Sales Credit Allocation
This chapter covers the following topics:
- Overview of Sales Credit Allocation
- Credit Rules Setup
- Defining, Editing, and Deleting Credit Rules
- Creating Credit Rules
- Editing Credit Rules
- Deleting Credit Rules
- Synchronize the Credit Rules
- Simple and Advanced Rule Searches
- Simple Rule Search
- Advanced Rule Search
- Transferring Transactions to the Sales Credit Allocation Rules Engine
- Processing Transactions in the Sales Credit Allocation Rules Engine
- Using Workflow to Check and Update the Revenue Allocation Percentage
Overview of Sales Credit Allocation
Oracle Incentive Compensation calculates and pays variable compensation to resources using rule-based compensation plans. However, other considerations can make the proper allocation of sales credit a much more complicated matter. Sales Credit Allocation in Oracle Incentive Compensation is an optional method of splitting the sales credit if splits are based upon the role. Territory Manager can be integrated into the Oracle Incentive Compensation collection process to create the credit assignments. See the Oracle Territory Manager Implementation Guide and Oracle Territory Manager User Guide for more details.
Sales Credit Allocation addresses these considerations:
-
At what point in the business process should credit receivers be identified?
-
What criteria should be used to determine a credit receiver?
-
Can these criteria change over the duration of the activity?
-
How is credit allocated?
-
Can credit be based on the specific contribution of the resource to the activity?
Sales Credit Allocation automates the credit allocation process by systematically applying a set of consistent rules. This minimizes errors, thereby reducing the time that Compensation Analysts must spend reconciling them.
Because the sales process varies from company to company, Sales Credit Allocation is flexible enough to cover many different scenarios. The Sales Credit hierarchy can be set up to represent any type of organizational structure. Any attribute or combination of attributes found on the collected transaction can be used to identify how the transaction should be allocated (split).
Using the common component, Oracle Territory Manager, credit rules can be based on different types of territories. Territories are assigned to maximize sales force productivity. Territories can be set up according to:
-
Geography: For example, state, county, or postal code.
-
Customer: Useful when customer relationships are especially important. For example, Acme Computers (one large customer), 25 dealerships (many small customers).
-
Product: Useful when strong product knowledge is crucial, for example, in complex industrial machinery.
-
Multiple criteria: Combines two or more of the above three territory types. Example: the California (geography) offices of Acme Computer (customer).
-
Custom qualifier: Create a custom attribute to be used in identifying a territory assignment.
A territory can have a single dedicated resource assigned to it, or it may have many resources assigned. In other situations, a single resource may be responsible for a single territory or multiple territories. When multiple sales resources are involved, the Territory Assignment engine can be used to determine who receives credit during collection for each transaction, creating multiple lines for the resources identified by the rules. Oracle Incentive Compensation Sales Credit Allocation rules can then be used to determine how much credit each resource receives. Optionally, the split percent can be added to the assignment in Territory Manager, but this involves some customization to the collection process.
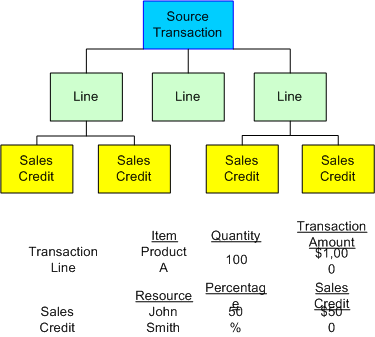
The Sales Credit Allocation engine generates percentages based on the credit rules that you create and based upon the information found on the source data collected into Oracle Incentive Compensation. The Sales Credit Allocation engine does not change the transaction lines themselves or create additional lines for new resources, so the quantity and transaction amounts appear unchanged even if the resource receives less than 100 percent of the sales credit.
Sales Credit Allocation Hierarchy
The sales credit allocation process is divided into two main areas:
-
Credit Rules Setup
-
Credit Rules Engine Transaction Processing
Credit Rules Setup
To set up sales credit allocation, you first must create a hierarchy of rules that defines how much credit each resource should receive.
The seeded transaction sources for sales credit allocation are Oracle Incentive Compensation and Oracle Quoting. You can also set up a custom user defined source.
Credit rules are defined by using credit rule attributes, which you set up for each transaction source. You can assign a user-defined name to each attribute. These attributes include:
-
Source Transaction Column Name
-
User Defined Column Name
-
Data Type
-
Value Set
-
Transaction Source
Credit rules evaluate inputs using attributes found on the transaction to determine if credit should be split between credit receivers. Credit rules also specify the allocation percentage by revenue type (Revenue, Non Revenue) for each role. Each resource that shares a role receives either the allocation percentage or a proportional share of the allocation percentage, depending on how the allocation percentages are defined.
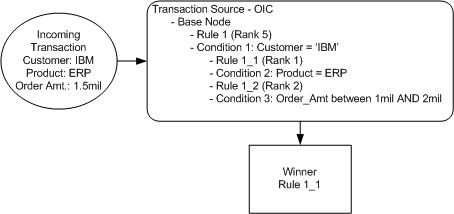
You must assign a numeric rank to credit rules. If a transaction matches more than one rule during processing, the application applies the rule with the lowest rank. If multiple rules with the same rank apply to the transaction, the application uses the first one it finds. Ranking does not have to be unique for each credit rule.
A credit rule hierarchy maintains and links rules in a logical manner. A child credit rule automatically inherits the conditions of the parent rule.
A credit rule consists of the following:
-
Name (of rule)
-
Description
-
Date Effectivity
-
Rank
-
Parent Rule
-
Transaction Source
Credit rule conditions determine whether a credit rule can be applied to a set of transactions. A credit rule can have one or more conditions. Credit rule conditions are made up of the following:
-
Attribute
-
Source Transaction Column Name
-
User Defined Column Name
-
Data Type
-
Value Set
-
Transaction Source
-
-
Operator
-
Value(s)
Allocation percentages indicate how much revenue credit or non revenue credit each resource associated with a role receives. You can assign one or more allocation percentages to each credit rule. Revenue percentages are split evenly among the resources that have the same role. Non revenue percentages can be split evenly or all resources can receive the same percentage. The application requires that revenue allocation add up to 100 percent. You can create, update, or delete allocation percentages, and make them date-effective.
Allocation percentages have the following definition:
-
Sales Role
-
Revenue Credit Percent
-
Non Revenue Credit Percent (optional)
-
Non Revenue Credit Split (check box)
-
Effective Date
Notes
-
The data type of the credit rule attribute must match the data type of the transaction attribute column value or rules engine processing will fail. For example, if the data type in the rule attribute is Numeric, the credit rule condition is Between 100,000 and 200,000, and the transaction attribute value is ABC, the rules engine will reject the transaction, because ABC is not numeric data.
-
The rules engine processes transactions in bulk, so the log does not list the specific transactions that caused the failure.
Defining, Editing, and Deleting Credit Rules
To define, edit, or delete Credit Rules, perform the following procedures. A bubble train at the top of the page shows where you are in the definition and editing processes.
A rule must have at least one condition specified on the Assign Conditions page and one date range specified on the Assign Allocation Percentage page.
When you create rules, you can selectively use the Cancel, Back, and Next buttons to navigate from one page to another. Use the Next button to proceed through the normal rule creation and editing processes. Use the Back button to return to the previous page without changing any data. Use the Cancel button to return to the summary page without changing any data.
Warning: When creating, editing, or deleting a rule, and after you have made changes to the data, do not use the Back and Forward browser buttons to navigate to the rule summary or search pages. This can cause stale data errors. Instead, use either the Cancel button or the View Full Hierarchy button to return to the Credit Allocation Rules search and summary pages. When switching between a simple and advanced rule search, always use either the Simple Search or Advanced Search navigation the buttons provided. Do not use the Back and Forward browser buttons.
Creating Credit Rules
This is the procedure for creating new credit rules.
Navigation
Plan Administrator > Maintain Credit Allocation Rule Sets
Prerequisites
- The transaction source must be seeded or previously defined in the CN_LOOKUPS table.
Steps
-
On the Credit Allocation Rules page, click View Full Hierarchy to expose the hierarchy.
-
click Select next to the hierarchy node under which you want to add a rule. Example: Oracle Quoting.
-
Click Create Child.
If you do not perform step 2, when you click Create Child you will receive an error message and be unable to continue.
-
Enter From and To dates.
If the rule is the child of a parent rule that has an end date, then an end date is required.
-
Enter a name for the new rule.
A rule name must be unique across a transaction source and also cannot be the same as a transaction source name.
-
Enter a rank.
The lower the rank number, the higher priority the rule. So, rank 1 is highest priority. See Restrictions.
-
If you want to change the parent of a rule, select one from the list of values.
-
Click Next.
-
Click the search icon to select credit rule attributes.
-
Select credit rule attribute operators.
Only if Between is selected can you enter both a Value From and a Value To.
-
Enter a value in the Value From field and click Next.
-
Set up an allocation percentage date range.
Note: If the rule has an end date, then the end date of the allocation is required.
You can define allocation percentages for more than one date range. See Restrictions. Note: Date ranges cannot overlap.
-
Click Apply.
You can use the new row if you are setting up multiple date ranges. Enter information for the second period of date effectiveness.
-
Select a sales role from the list of values.
Note: Use a Sales type role with Oracle Quoting, which calls the Oracle Incentive Compensation API to create the split. Use a Sales Compensation type role for Oracle Incentive Compensation Transactions.
You can assign multiple roles.
All resources that are assigned the sales role receive sales credit.
You cannot assign the same role more than once in a single date period.
You can assign a role non revenue credit only, without assigning revenue credit.
-
If you want all resources that share the sales role to receive revenue credit, enter a revenue credit percentage.
Revenue credit percentages must equal 100%.
-
If you want all resources that share the sales role to receive non revenue credit, enter a non revenue credit percent.
You can enter a role to receive only non revenue credit.
Non revenue credit does not need to add up to 100%.
-
If you entered a non revenue credit percent, you can check the Non Revenue Credit Split box to split the non revenue percent evenly between all resources that share the sales role.
If you want all resources that share the sales role to receive the full amount of the non revenue credit, leave the box unchecked.
-
If you made changes in the Revenue Credit Percent or Non Revenue Percent columns, click Update to refresh the total amount.
-
If you are defining allocation percentages for more than one date range for the role, repeat the steps to set up the second date range, assign it to the sales role, and indicate sales credit percentages.
-
Click Next.
-
Carefully review the information. If it is correct and complete, click Finish.
Changes made to a rule on the previous three pages are saved. The Rules Summary page appears, with a confirmation message, and the new rule appears in its place in the rule hierarchy. You can select the new rule and view the four pages that you used to create the rule.
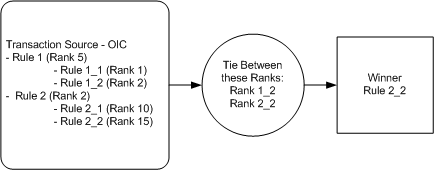
Rank is relative within a hierarchy. If two rules have the same rank but one has a parent with a higher rank, then the rule with the higher ranking parent takes priority. The examples below explain how ranking works.
If a single transaction matches more than one Credit Rule, the Credit Rule with the highest rank (lowest number) is the winning Credit Rule that is applied to the transaction.
If a single transaction matches more than one Credit Rule, and one or more Credit Rules have the same highest Rank, then the first Credit Rule with the highest Rank is the winning Credit Rule that is applied to the transaction. The order of matching Credit Rules with highest Rank is undefined (depends on result set's random order).
In the Credit Rule hierarchy, when child credit rules are inheriting the parent rule conditions, they also inherit the Rank. That means while evaluating a Credit Rule, its parent rule rank is also considered. In the following figure, Rule 2_2 is selected because its parent rule rank is lower then other rule's parent rank.
Editing Credit Rules
You can edit rules that you have already created. The main difference between editing and creating rules is that you use the Update Credit Allocation Rule page instead of the Create Credit Allocation Rule page at the beginning of the process. This page contains the same fields as the Create Credit Allocation Rule page, but they are filled in with data. Instead of clicking Create, you click Update to open the page for edits.
When you are editing rules, unless you know exactly in which node the rule you want exists, you can use the Simple Search and Advanced Search to find it. See Simple and Advanced Rule Searches for steps to this procedure.
You can change the name, description, rank and the start and end dates of a rule. You can also change the conditions of a rule, including the Credit Rule Attribute, Operator, and Value columns.
Navigation
Plan Administrator > Maintain Credit Allocation Rule Sets
Notes
-
If editing credit rules to take effect in a subsequent month, it is a better practice to end date the current rule or criteria and create or update the rules with a new effective date. This way you have a history to use for auditing purposes.
Deleting Credit Rules
You can delete rules if you no longer want them to be used in the Credit Rules Hierarchy. Again, if the rule has been used to calculate commission at some time, it is a recommended best practice to end-date the rule instead of deleting for auditing purposes. You can delete a rule in three places:
-
The Credit Allocation Rules hierarchy page
-
The Simple Search Results page
-
The Advanced Search Results page
The deletion process on each page is the same.
Navigation
Plan Administrator > Maintain Credit Allocation Rule Sets
Prerequisites
- The credit rule has already been created.
Steps
-
To delete a rule on the Credit Allocation Rules page, skip to step 4.
If you need to open a hierarchy node to find the rule, click the node containing a plus sign to drill down to greater detail.
-
To delete a rule from the Simple Search Results page, enter search parameters at the top of the Credit Allocation Rules page and click Go. To delete the rule, continue from step 4.
-
To delete a rule from the Advanced Search Results page:
-
Click the Advanced Search button on the Credit Allocation Rules page.
-
On the Advanced Search page, select parameters and values.
-
Click Search.
-
To delete the rule, continue from step 4.
-
-
Click Select next to the rule that you want to delete and click Delete.
-
Click Apply to confirm the deletion or click Cancel to cancel the deletion and return to the previous page.
Depending on the type of rule to be deleted (leaf-node rule or parent rule), the dialog page contains a radio button selection. The application provides two types of parent rule deletion--cascading and noncascading. In a cascading deletion, the parent rule and all of its child rules are deleted. In a noncascading deletion, only the parent rule is deleted, and its child rules are promoted to the level of the deleted parent rule.
Synchronize the Credit Rules
Any time you make changes to one or more rules, you must synchronize the rules in the Credit Rule hierarchy. This procedure ensures that when transactions are sent to the Credit Rules Engine they are processed based on the most recent rule conditions. For example, changes to the rank of a rule, or the allocation percentage of a rule must be up to date to deliver the desired results.
The synchronization process has five steps, which enable you to choose when the request runs, what it looks like, and whom should be notified. A request ID is supplied for tracking purposes.
The Transaction Source must be mapped and the Credit Rule hierarchy must be created.
Navigation
Plan Administrator > Synchronize Credit Allocation Rule Sets
Notes
You can synchronize credit allocation rule sets directly from the Credit Allocation Rules Summary page by clicking the Synchronize button.
Simple and Advanced Rule Searches
On Sales Credit Allocation rule creation summary pages, you can perform a simple or advanced search to find and display rules. A simple search can be performed directly on the Sales Credit Allocation main page. The advanced search enables a more detailed search process. Both searches are described below.
Simple Rule Search
If the rule you need is not displayed on the Sales Credit Allocation rules summary page, you can use the simple search at the top of the page to display rules by rule name, sales role, or effective date. In addition, you can access the Simple Search page from the Advanced Search page by clicking the Simple Search button.
Navigation
Plan Administrator > Maintain Credit Allocation Rule Sets
Notes
-
If you need to use the Advanced Search, click the Advanced Search button.
-
After performing a simple search, you can return to the Credit Allocation Rules summary page by clicking View Full Hierarchy.
Advanced Rule Search
If a simple search is not sufficient, use the Advanced Search page to search for rules by any of six parameters.
You can set up a wide search to look for rules that match or are like any specified parameter or create a narrow search that looks for rules that match or are like all specified parameters. The search results are displayed at the bottom of the page.
If your search results are not what you need, you can change the parameters and rerun the search. Or, you can return to the Simple Search page by clicking the Simple Search button.
Navigation
Plan Administrator > Maintain Credit Allocation Rule Sets > Advanced Search
Notes
-
Select a radio button to determine whether the results of the rule search will be filtered based on meeting all conditions or any conditions. The default is All.
-
For each of the parameters you can select filters.
-
If the table of search results is long, use the Next and Previous buttons to move through the list.
-
If necessary, you can change the parameters and rerun the search. Enter the new parameter information or change the existing parameter and click Search.
-
To use a simple search, click Simple Search.
-
To return to the Credit Allocation Rules summary page, click View Full Hierarchy.
Transferring Transactions to the Sales Credit Allocation Rules Engine
The Credit Allocation Engine determines which credit rules are applied to a transaction and provides the names of eligible credit receivers and the credit rule percentages for those credit receivers based on their roles.
For each transaction, the rules are evaluated to find criteria that match the transactions. Among matching rules, the rules with the highest rank or highest in the hierarchy (lowest number) take highest precedence for evaluation. If multiple rules apply with the same rank, then the rule found first by the application is selected.
Sales Credit Allocation provides a common interface for all calling modules. After the rules engine processes the input transactions and finds the matching rules and percentages, the role and percentage information is loaded into an output interface table, which then can be used by the calling module for further processing.
Loading transactions into the Sales Credit Allocation engine is performed separately from the processing of the transactions. That way, you can load transactions several separate times and then perform the processing later. The credited transactions in Oracle Incentive Compensation cannot be viewed in the transaction maintenance page however, until both processes have been run. The Plan Administrator creates and manages the rules, but the Compensation Manager performs the loading and processing of the transactions.
A filter is provided for processing transactions by date range. The rules engine processes only transactions with a process date within the given date range.
The Transaction Source must be mapped. The Sales Credit Rule hierarchy must be created.
Navigation
Compensation Manager > Allocation Transfer > Submit Request
Notes
-
Check the Rerun previous results box if you want to rerun the previous set of transactions.
-
After you set up and process the request, you can click View Log on the to see the Process Log.
-
Click the Monitor link to see if the request has completed.
-
After the transfer is completed, the Compensation Manager can go to Allocation Process to process the transactions in the Sales Credit Allocation rules engine. Or, you can wait until more transactions have been transferred before starting the allocation process.
-
To view the request status of any previously submitted, click View Request Status.
-
Transactions are loaded into fixed format input interface tables. The CN_SCA_HEADERS_INTERFACE_ALL table holds the transaction data and CN_SCA_LINES_INTERFACE_ALL holds the corresponding resources and their roles.
Processing Transactions in the Sales Credit Allocation Rules Engine
Transactions are processed in either Batch mode or Online mode. Use Batch mode for processing large volumes of transactions. Online mode is best if you want to create a manual transaction and need to find resources and their corresponding allocation percentages in real time.
The two modes use different process flows. To run the Allocation Process step you must schedule a request a concurrent request using the Allocation Process link. The job can be submitted to run as soon as possible or can be scheduled to run at a later time. For online processing, you must call a PL/SQL API.
Sales Credit Rules are specific to each transaction source. The rules engine checks the transaction source for each input transaction.
The following Notes describe the Batch mode of processing transactions in the Sales Credit Allocation rules engine.
At least one transaction, per unique ID, must have a revenue type of REVENUE (meaning that there is revenue credit) in order for Sales Credit Allocation to successfully allocate credit.
Navigation
Compensation Manager > Allocation Process > Submit Request
Notes
-
Select the date range through Allocation Process link, then name the job, select the Operating Unit and walk through the regular request pages.
-
Seeded transaction sources are Oracle Incentive Compensation and Oracle Quoting. You can also select any previously defined custom source.
-
You can click Monitor to see the Process Log.
-
Click Refresh Data periodically until the phase is displayed as Completed.
-
You can view the status of previously requested credit allocation requests.
-
The Sales Credit Allocation engine generates percentages based on the credit rules that you create. In Oracle Incentive Compensation, these percentages are then applied only to sales credit amounts. The percentages are not applied to order line attributes, such as quantity. However, the generated percentages could be used in a different application for other purposes, such as in an expression applied against quantity.
-
Sometimes, the generated percentages may not appear to add up to exactly 100 percent. This is because data that is displayed in the application is rounded to the precision of the currency and does not display the entire precision. However, data in the database is stored in the full precision and does add up to 100 percent. This is the behavior of several number fields in the application and is not specific to Sales Credit Allocation.
-
In the case of multiple transactions with identical invoice/order numbers, resource name, and line number, the transaction amounts are aggregated into a single sales credit allocation transaction. Zero amount transactions are created for the other source transactions. To avoid this situation, be sure that line numbers are unique for transactions with the same invoice/order number and resource name.
-
You must set up the background workflow process to move the processed credits back into the API table.
Using Workflow to Check and Update the Revenue Allocation Percentage
During credit allocation processing, the credit rules engine checks whether the total output revenue allocation percentage is equal to 100%. If the total revenue allocation percentage is not equal to 100%, then the status of the transaction is updated to REV NOT 100.
These transactions are processed by Workflow based on a system profile value. You can set how you want to handle transactions that are not able to be processed normally.
There are three options provided with the Sales Credit Allocation module.
-
Even Distribution: The remaining revenue percentage is distributed evenly among the existing sales roles.
-
Weighted Average: The remaining revenue percentage is distributed based on the weighted average.
-
Custom: You can add custom code if none of the seeded choices suits your business requirements. You can use the Custom option to set up for the Workflow process to not process the transaction.
The option is set in the system profile OIC: Allow split % less than 100%. If you do not set the value at the application level, it defaults to the site level. If no selection is made, the Workflow process fails.
For example, the allocation percentages for a transaction are 60% to Role 1, 20% to Role 2, and 20% to Role 3. However, during transaction processing, only two roles are associated with the credit rule. What is to become of the remaining 20%?
Using Even Distribution, each of the two roles receives 10% credit, or half of the remaining 20% credit. Using the Weighted Average, The first role gets 15% and the second receives 5% of the sales credit, because 60% represents three times the 20% of the second role. Each of the resources assigned to the roles that resulted in revenue output receives additional credit.