Managing Yard Operations
This chapter covers the following topics:
- Performing Yard Check-Ins
- Managing Equipment Details
- Performing Yard Check-Outs
- Viewing and Scheduling Dock Appointments
- Using the Yard Workbench to Perform Yard Tasks
- Using Graphical Workbench
- Performing Yard Moves
- Viewing Material with the Material Workbench (Inbound and Outbound Operations)
Performing Yard Check-Ins
A yard check-in refers to the activity of registering a trailer or container as it enters the yard of a warehouse. Typically, a security guard or personnel at the gate performs this action by registering the trailer, powering unit, or container when it enters the yard.
Check-ins can occur for both inbound and outbound shipments with or without appointments: a loaded trailer can check in to unload the material, or an empty trailer may check in to pick up material. During the yard check-in process, you can capture additional details such as driver information, reference documents, and related information.
After a trailer checks in, it needs to be moved to a parking place or to a dock door for unloading or loading material. A trailer can be moved within the yard by either creating a yard move order or through a user-initiated trailer transfer. Yard move order will be a transfer transaction for the equipment instance (serial number). Yard manager can query and manage the yard tasks using the Yard Workbench (Move Details tab).
Additional Considerations
-
The system automatically generates a cost group per unique serial number using the account definitions at the yard organization level. This cost group tracks the liability of the yard at a given point of time.
-
For tandem units: To check in tandem units (such as a power unit and two trailers), you need to perform three check-ins: one for the power unit, and two for the trailers. These three transactions can be entered (on separate lines) on the Check-In window, and submitted as a set.
Note: Checking in power units is optional. Some yards may choose not to track power units that are the yard for short periods of time (to pick up or drop off trailers).
-
If the seal code is not intact, you can raise an exception to alert the yard manager. Optionally, you can also unseal and perform an inspection of the material in the trailer
-
If no appointment exists or the vehicle arrives earlier than scheduled, you can still check-in to a holding yard area/location and put a hold status on the trailer. If the trailer is on hold, you can re-query the trailer ID to change the status and move it to an active yard area/location.
-
If one or more equipments is checked into the same dock door, system will check-in the first equipment to the dock door and the remaining will go the regular yard storage based on picking order of the parking spots.
Caution: Although Oracle Yard Management uses Oracle Inventory transactions for check-in, check-out and yard moves, Oracle does not support using Inventory windows or open interfaces to manipulate yard management data. Yard transactions should be performed only from the desktop and mobile windows that are part of the Oracle Yard Management application.
To perform yard check-ins
A check-in transaction can be completed for any equipment type. For example, a check-in can be performed for a loaded trailer attached to an inbound shipment, or an empty trailer required for an outbound shipment.
-
Navigate to the Check-In window.
-
Select the yard from the Yard drop-down list, and click Go.
-
Complete your yard check-in entries as required.
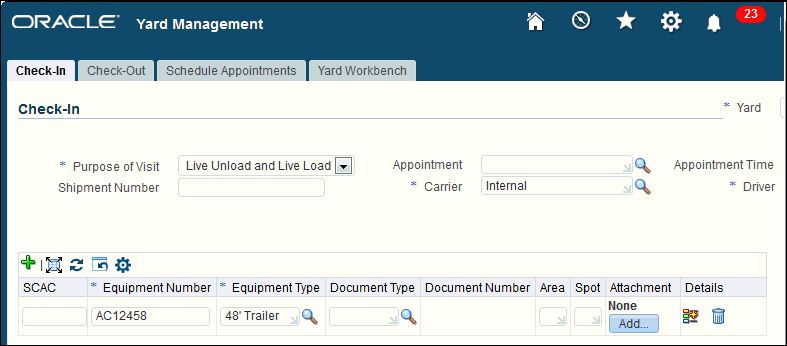
Notes
-
Purpose of Visit: Select the reason for the yard visit:
Live Load: For load operations such as an empty trailer entering the yard to pick up materials.
Live Unload: For unloading operations such as a full trailer entering the yard to deliver materials.
Live Unload and Live Load: For live load/unload operations such as a full trailer arriving to be unloaded before being loaded again.
Other: For other miscellaneous reasons.
-
Appointment: If applicable, select the scheduled appointment date for the check-in.
-
Appointment Time: Shows the start time of the appointment selected in the previous field. This is a read-only field and entering an appointment time in this field has no effect.
-
Driver: Select the driver who is checking-in the equipment. If the driver name does not exist, then click the Create Driver icon to add information about the driver.
-
SCAC Code: Enter the standard carrier alpha code (SCAC) that identifies the carrier. Although this field is optional, it is recommended that you enter this value to distinguish between equipment from different carriers that may randomly have the same equipment number.
-
Equipment Number: Enter the serial number of the equipment instance to be checked (usually, the asset ID or some visible identifying number assigned by the carrier or owner of the equipment). Enter this information on the desktop UI or mobile application.
Note: The number you enter is different from the internal serial number that Oracle uses to track each unique piece of equipment. The combination of SCAC+Equipment Number is considered unique. After a combination of the SCAC+Equipment Number is checked into any yard, it cannot be checked in again. The first time a unique combination of SCAC+Equipment number checks into a yard, Oracle Yard Management assigns a unique serial number (not displayed to the user). After that equipment checks out of the yard, if it checks in again at a later date (into the same yard, or a different yard), then the previously generated internal serial number is reused.
-
Equipment Type: Select the type of equipment to be checked in such as a trailer or container.
-
Document Type: Select the document type that accompanies the check-in transaction based on the shipment type: for example, a related document type could be an ASN, Purchase Order, Intransit Shipment, or RMA.
-
Document Number: Enter the number that corresponds to the selected document.
-
Area/Spot: Optionally, select the area where the truck/container is be unloaded or loaded for shipment and specific spot within the yard area.
-
Add Attachment: Click this button to attach documents at the time of check-in.
-
-
Click Check-in to complete the check-in process or click the Details icon to add additional information about the equipment and load.
Add equipment details about the equipment and load by clicking the Details icon. For more information, see Entering Equipment Details.
When a trailer checks in, it needs to be moved to a parking place or to a dock door for unloading or loading of material. A trailer can be moved within the yard by either creating a Yard Move Order or through a user initiated trailer transfer. Yard move order will be a transfer transaction for the equipment instance (serial number). Existing inventory transaction type of “Move Order Transfer” will be used for yard move transactions. Yard manager can query and manage the yard tasks using Yard Workbench (Move Details tab).
Managing Equipment Details
When performing a check-in, you can add additional information about the equipment and load such as the equipment contents, seals, and other equipment details. For existing equipment check-ins, you can manage equipment details using the Yard Workbench. For more information, see To manage equipment for existing check-ins.
To enter equipment details for new check-ins
On initial check-in, you can enter details information about the equipment contents, equipment seals, and equipment details. For existing equipment, you can use the Yard Workbench to manage the following equipment information:
Equipment Contents
-
Document Type and Number: Select the document type and the document number for the check-in transaction. A related inbound document type could be based on an ASN, purchase order, trip, or delivery.
Equipment Seals
-
Seal Code: Enter the seal code listed on the seal. A supplier/carrier typically applies seals to secure their loaded trailers, containers, or similar equipment against tampering or theft.
-
(Seal) Status: After you enter the seal code, select the status:
Sealed
Unsealed
Damaged: Select this option if you discover that the seal is damaged.
Equipment Details
-
Load Type: Identifies the type of material being loaded: Perishable, Dry, and Hazardous.
-
Load Status: Select the status of the load: Load Initiated, Unloaded Initiated, Full, or Empty.
-
Condition: Select the condition of the load: Good, Damaged, Leaking, Strong Odor.
-
Owner Type: Enter the owner of the equipment: Carrier Owned, Leased, Private, or Other.
-
Detention Limit/Detention Limit UOM: Identifies the detention limit UOM by unit of measure, UOM code, or class.
Note: Detention is defined as "The carrier charges and fees applied when rail freight cars and ships are retained beyond a specified loading or unloading time." The detention limit for Oracle Yard Management is "the time allowed for the container before detention charge starts accruing."
To manage equipment for existing check-ins
For existing check-ins, use the Yard Workbench to query the equipment to view or make changes to the equipment details.
-
Navigate to the Yard Workbench window, and do a search to find the desired equipment.
-
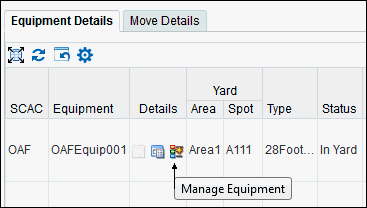
Click the Manage Equipment icon to display information about the equipment contents, seals, and details.
-
On the Manage Equipment window, review the equipment details, and if required, make any changes.
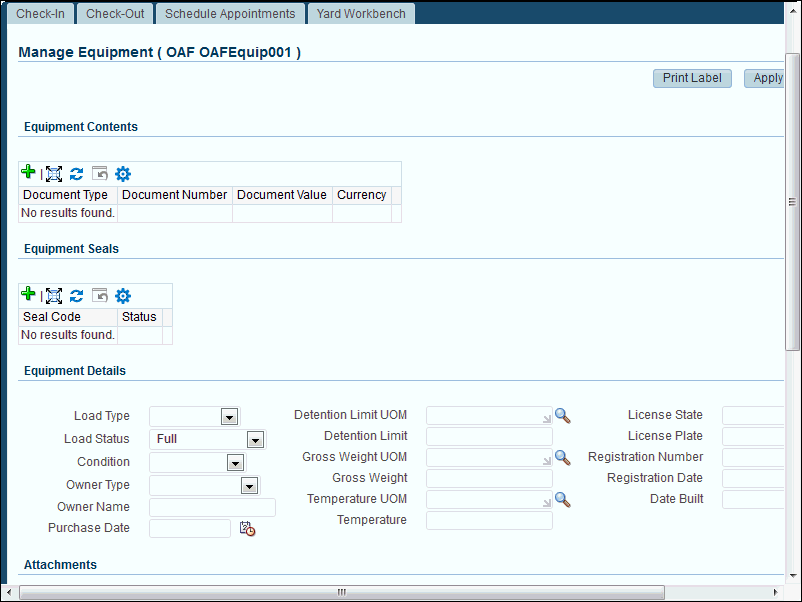
Notes
-
Add Attachment: Click this button to add any documents like carrier manifest, packing slip, bill of lading (BOL), master BOL and so on.
-
Print Label: Click to print equipment labels to provide information like equipment status or contents that can be used for additional reporting. For more information, see Labels for Yards.
-
Performing Yard Check-Outs
A yard check-out refers to discharging a trailer or container that exits the yard of a warehouse. During a yard check-out transaction, an issue transaction is performed for the internal serial number, not the (externally visible) asset ID of the trailer or powering unit exiting the yard. The equipment instance can be loaded or empty; however, the status of the delivery lines associated with a loaded trailer must be In Yard or Interfaced status before they can be checked out.
-
Perform yard check-outs from the desktop UI.
-
Sealing of outbound trailers is optional; check-outs can be performed even if a seal code is not entered in the system.
To perform a yard check-out
-
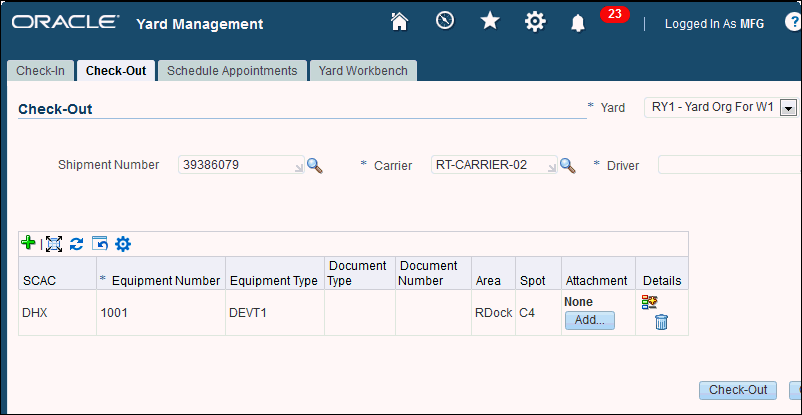
Navigate to the Check-Out page.
-
Complete your yard check-out entries as required.
Notes
-
Shipment Number: A (non-validated) numeric or alphanumeric identifier used for grouping one or more trailers that may have checked in together to pick up (or drop off) a shipment.
Important: When you select a shipment number, the remaining fields in the Check-Out window are automatically populated with information associated that shipment number (such as the SCAC, Equipment Number, Document Type and Number, Area and so on).
-
Driver: Select the driver who is checking-out the equipment. If the driver name does not exist, then click the Create Driver icon to add information about the driver.
-
SCAC: Enter the standard carrier alpha code (SCAC) that identifies the carrier.
-
Equipment Number: Enter the equipment number of the equipment to be checked out such as the trailer number.
-
Equipment Type: Select the type of equipment to be checked out such as a trailer or container.
-
Document Type and Number: Select the document type and number that accompanies the check-out transaction. For example, a related outbound document type could be based on a trip or delivery.
-
Area/Spot: Optionally, select the area and spot in the yard from where the truck/container has checked out.
-
Attachment Add: Click the Add button to attach documents at the time of check-out.
-
-
Click the Details icon to view the following details about the equipment being checked out (this information is view-only):
-
Equipment contents (such as related documents).
-
Equipment seals.
-
Equipment details (such as load status, detention limit UOM/detention limit, and other information).
-
Viewing and Scheduling Dock Appointments
An appointment is a single time slot with start and end times that can be scheduled for a shipment or receipt at the dock doors. Users can collaborate with carriers and shippers using the dock scheduling workbench, Dock Scheduling in Oracle Inventory Management/Oracle Warehouse Management, or using Oracle Transportation Management.
Prerequisites
- Calendars must be set up for your organization.
To view/schedule a dock appointment
-
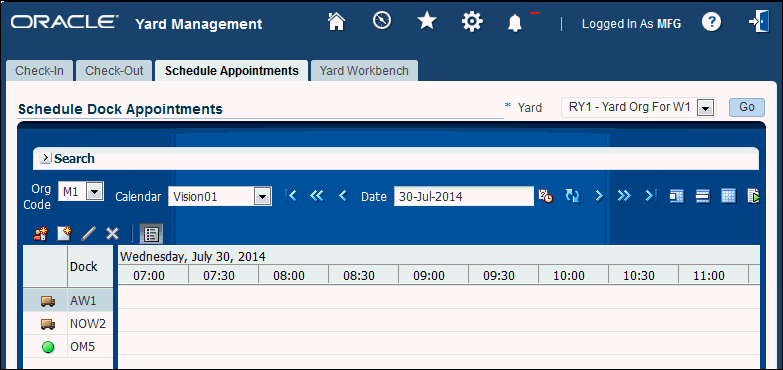
Navigate to the Schedule Dock Appointments window.
-
In the Dock column, select the dock where the appointment is required. A Truck icon next to dock shows that the dock is not empty while a green circle icon indicates that the dock is empty.
Important: The icons may appear even if there is no dock appointment; for example, the trailer may have been moved to the dock door for unscheduled loading or unloading.

-
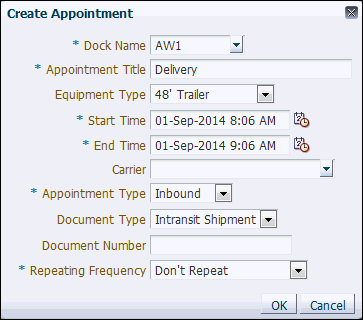
Click the Create Task icon to display the Create Appointment dialog box where you can enter the appointment details.
Notes
-
Dock Name: The dock selected in the previous step defaults. If desired, select a different dock from the Dock Name drop-down list .
-
Repeating Frequency: Select the start and end times then select the frequency of the repeating appointment such as every day, every weekday, or every week.
-
Appointment Type: Select whether the appointment is for inbound, outbound, or other.
-
-
Click OK.
The appointment appears as a colored bar in the Dock Appointments window that displays the following information: time, duration, and the status of the appointment. The color indicates the status of the appointment:

Appointment Status Status (Color) Description Exception (Red) One of the following exceptions has occurred: -
Incorrect Equipment at Dock Door.
-
Equipment not in Yard.
-
Equipment not at Dock Door.
-
Equipment at a Different Dock Door.
-
No Trailer Activity.
-
Appointment Ended but Equipment still at Dock Door.
Active (Yellow) The yard check-in transaction is complete and the appointment is assigned to the trailer checking in. Completed (Blue) The trailer is either loaded or unloaded and is moved from the dock door. Pending (Green) The appointment is first created. -
To edit an appointment
In the Schedule Dock Appointments window, double-click an existing appointment to edit it. In some cases (such as appointments in Completed status), you can only view but not change the appointment.
To update the dock appointment status for a yard
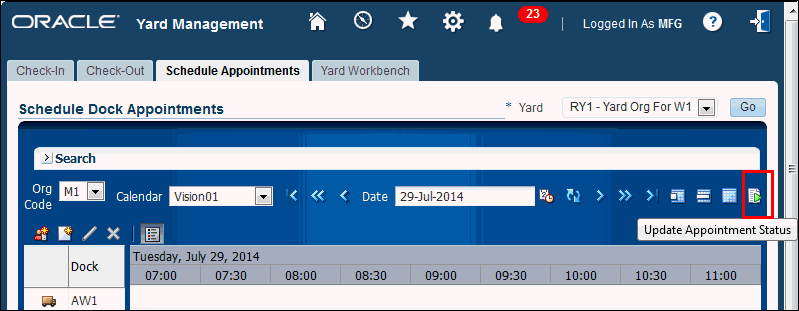
Run the concurrent program Update Dock Appointment Status (either manually or scheduled) to update the appointment status for a yard. Alternatively, on the Schedule Appointments tab of the Yard Workbench, click the Update Appointment Status icon to run this concurrent program.
Using the Yard Workbench to Perform Yard Tasks
The Yard Workbench provides a centralized UI for viewing and managing the yard areas, parking spots, and equipment instances (such as a container, power unit, or trailer) including their status and contents in the yard. For example, you could view the equipment in a particular yard, or move a trailer from one area of the yard to another.
Note: Oracle Inventory users can also use the Material Workbench window to view material sitting in the yard by selecting the Inbound option.
Use the Yard Workbench to perform the following tasks:
-
View move/picking slips for manual moves.
-
View equipment details and content including current and historical information for equipment.
-
View equipment transactions.
-
Generate move orders and assign users to pending moves.
-
View or cancel pending moves.
-
View check-in and check-out dates and times, appointment dates and times, and detention information.
To view equipment details (Equipment Details tab)
-
Navigate to the Yard Workbench.
-
Select the yard from the Yard drop-down list, and click Go.
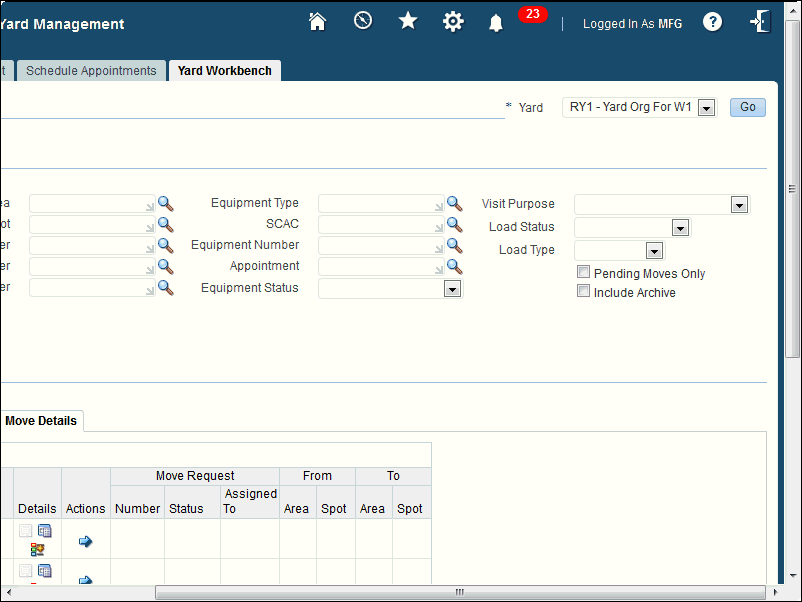
In the Search Equipment region, enter your search criteria such as the area, spot, carrier, or equipment type.
Important: To view all equipment for the selected yard, leave the fields blank in the Search Equipment region and click Go.
Search Criteria
-
Pending Moves Only check box: Restrict your search to only pending moves.
-
Include Archive check box: View the following historical data: completed moves, equipment that has been checked out, details of that equipment (seal codes, contents), and documents related to the contents of the equipment.
-
-
Click Go to display the search results. The Equipment Details tab shows equipment details such as the location in the yard, the related appointment, carrier, driver, and purpose of the check-in or check-out.
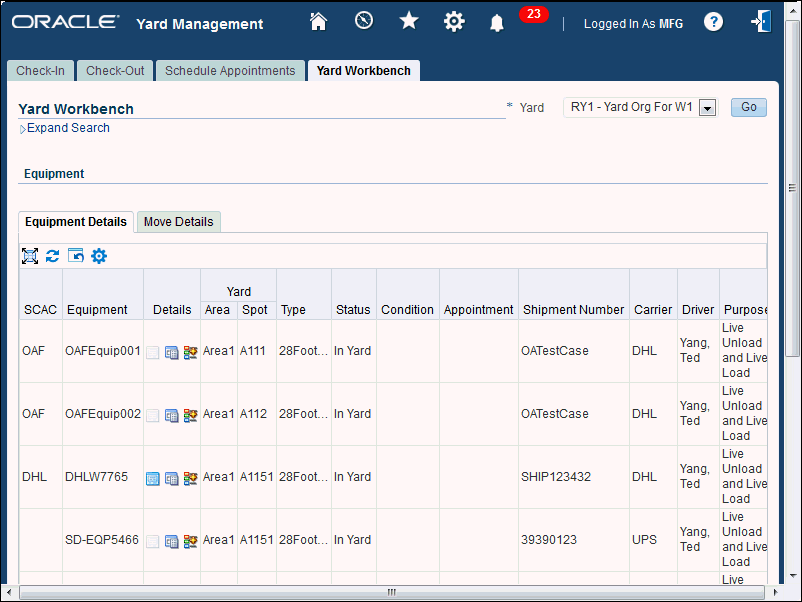
-
Enter the following equipment details.
Notes (Equipment Details tab)
-
SCAC: Displays the standard carrier alpha code (SCAC) that identifies the carrier.
-
Equipment: Displays the equipment number of the equipment instance that is checked in or out.
-
Details: Click an icon in the Details column to perform the corresponding action:
-
Equipment Contents: Displays details about the equipment contents such as the equipment status, document type, and item details. Select the Current Contents check box to view the existing contents of the equipment instance.
-
Transaction Details: Displays transaction details such as move orders or yard check-ins for the equipment, and the user who performed the transaction.
-
Manage Equipment: Click this icon to manage equipment. For more information, see Managing Equipment Details.
-
-
Yard Area/Spot: Displays the area where the truck/container is be unloaded or loaded for shipment and the specific spot within the yard area.
-
Type: Displays the type of equipment such as a trailer or container that is checked in or out.
-
Appointment: If applicable, displays the scheduled appointment for the unload/load operation. To view additional details, click the appointment link.
-
Driver: Displays the driver responsible for checking-in/checking-out the equipment.
-
Purpose: Displays the reason for the yard visit:
Live Load: For load operations such as an empty trailer entering the yard to pick up materials.
Live Unload: For unloading operations such as a full trailer entering the yard to deliver materials.
Live Unload and Live Load: For live load/unload operations such as a full trailer arriving to be unloaded before being loaded again.
Other: For other miscellaneous reasons.
-
Detention Limit Value/UOM: Displays any detention limits and the corresponding UOM for the equipment instance.
-
To view/move equipment (Move Details tab)
-
Click the Move Details tab to view details about equipment and current move requests.
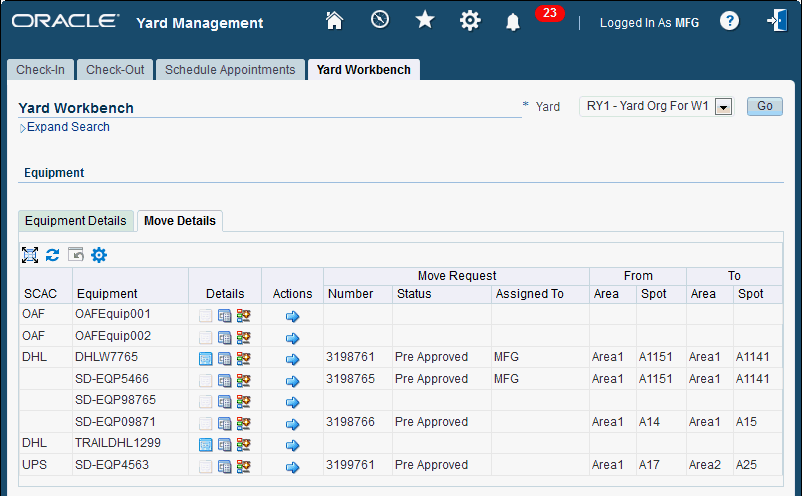
-
In the Actions column, click the Move Equipment icon to create a move request for the equipment instance.
Additional Information: If the Number field is blank for the equipment, then you can create a new move request.
-
Enter the move criteria.
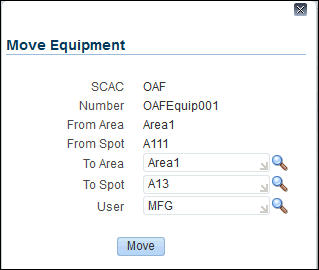
-
To Area: Enter the destination area where the equipment is to be moved
-
To Spot: Enter the destination spot within the area where the equipment is to be moved.
-
User: Enter the name of the user assigned to perform the move equipment request.
-
-
After you have completed your entries, click the Move button to create a move equipment request. The equipment is moved only when the equipment move request transfer is transacted on the mobile application.
To cancel, reassign, or print pick slip for a move equipment request
You can reassign a pending move equipment request, cancel a move equipment request, or print a pick slip from the Yard Workbench.
Note: Available for equipment already assigned a move request number in the Number column.
-
Click the Move Equipment icon for the equipment.
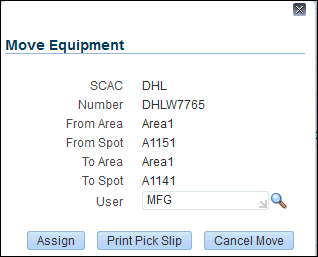
-
Click the button that corresponds to the desired action:
-
Assign: Reassign the move equipment transfer to a different user (search for the new user and then click Assign).
-
Print Pick Slip: Print a pick slip for the move equipment transfer.
-
Cancel Move: Cancel the move equipment transfer assigned to the current user.
-
Using Graphical Workbench
The graphical workbench is a pictorial representation of the yard workbench. It lets you view a yard and its contents by drawing organizations, parking areas, and parking spots on a map. You can associate or disassociate warehouses, parking areas, and parking spots with this drawing. You can also copy a drawing to save time.
Important: You must define the yard organizations, parking areas, and parking spots in the setup UI to use them in the graphical workbench.
To use the graphical workbench
-
Navigate to Yard Manager, Yard Operations, and then Graphical Workbench.
The Graphical Yard Workbench page is displayed.
-
Select a Yard and click Go.
-
Click Unfreeze.
-
Click Draw and select the option you want to draw.
-
Use the cursor to mark the organization, area, or spot on the map.
-
Select what you have drawn and associate or disassociate it with a warehouse, area, or spot by clicking the Action column in the right panel of the page.
-
Select Equipment or Spot, click Details, select Equipment or Appointment to view the equipment or appointment details.
-
Click the View button and select one of the following: Equipment Load Status, Equipment Load Type, Equipment Condition, Equipment Detention, and Equipment Late for Appointments.
-
Click Apply to save the information you have selected.
Performing Yard Moves
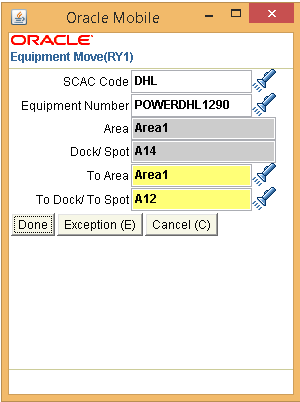
When a trailer checks in, it needs to be moved to a parking place or to a dock door for unloading or loading material. A trailer can be moved within the yard by either creating a yard move request on the Yard Workbench or from a user-initiated trailer transfer. A yard jockey that is logged into the mobile device can transact current and pending tasks but not the tasks assigned to other users.
To perform an equipment move
-
Navigate to the Equipment Move mobile page.
Additional Information: You can use the Yard Workbench to initiate moves. For more information, see Using the Yard Workbench. You can also use the Query/Update Equipment mobile page to manually update the location of the equipment.
-
Enter the move criteria.
-
To Area: Enter the destination area where the equipment is to be moved
-
To Dock/To Spot: Enter the destination dock and spot location where the equipment is to be moved.
-
-
Optionally, click Exception to display the Audit Page where you can select an exception for the move.
Note: The list of yard exceptions can be viewed using the lookup INV_REASON_TYPES.
-
Click Done when you have completed your entries.
Viewing Material with the Material Workbench (Inbound and Outbound Operations)
The Material Workbench enables you to view material in receiving, on-hand quantities, intransit material, and if Oracle Yard Management is licensed and installed, material and equipment in the yard.
To view material using the Material Workbench (Oracle Inventory)
-
Navigate to the Query Material window.
-
Enter the search criteria.
Note: You can clear the search organization to view item quantity across organizations (you must enter either an organization or an item). You can view only material in organizations to which you have access.
-
Select Inbound as the search option on the Query Material window, enter your search criteria, then click Find.
Note: Yard related information is available only to organizations with an associated yard organization.
The Material Workbench displays the search results including the yard-specific elements like equipment number and SCAC code.