Extending Oracle HRMS
Extend Oracle HRMS Overview
This section describes how you can extend Oracle HRMS to better meet your enterprise's needs.
There are many ways you can configure Oracle HRMS to meet the needs of your business processes:
-
Linking windows together in a task flow to streamline data entry and processing
-
Designing your own windows to create user or task-specific windows
-
Restricting data access on windows to provide security and confidentiality
You can configure Oracle HRMS using one or any combination of these.
Before configuring any part of Oracle HRMS, it is advisable to plan ahead and decide which parts of the system you want to configure. For example, if you know that your users typically perform a task in a certain way, you can design windows to help them enter information more efficiently. You can also link windows together to help users move from one window to the next. If necessary, you can also restrict what information appears in lists of values and restrict access to certain types of information.
Key Concepts
This section describes some of the tools available to configure Oracle HRMS for your enterprise.
Alerts
Alerts enable you to inform, remind, and confirm information on your personal information, your direct reports, and your workforce. The alert triggers an email notification of an impending action, task, or change to information. For example, you can set up an alert to remind you when a new hire is due to start work.
See: Oracle HRMS Predefined Alerts
Flexfields
You can add data fields called flexfields to windows to hold any additional information you require. You can add:
-
Key flexfields to configure some of the most important parts of the system, including the names of jobs, positions and grades, details of payroll cost allocation, and analysis information for employees and other people.
-
Descriptive flexfields to add fields to windows to record additional information.
-
Extra Information Types to set up multiple categories of information for the most important entities in Oracle HRMS. For example, you might use EITs to add details to assignment records in special circumstances, such as information about a leave of absence or extra information about a temporary assignment to a project.
Protected Flexfields are predefined and protected flexfields supplied with Oracle HRMS. There are two key protected flexfields and three descriptive protected flexfields. Your localization team defines these flexfields to meet the specific legislative and reporting needs of your country.
User-Defined Tables
You can set up user tables to provide matrixes of valid values that vary, such as age, or job, or number of years service. You can access these values from formulas, or your own forms or reports. The GET_TABLE_VALUE function is supplied for use in your formulas. Certain legislations include predefined user tables, for example, to hold values for payroll calculations.
Lookups
Lookups provide lists of valid values on certain fields throughout the system. For many lookups you can add your own values and change the predefined values. Lookups not only ensure that all users use the same terminology, but also speed up data entry.
CUSTOM Library Events
You can use CUSTOM Library Events to configure the logic that is executed at defined points within a window. Generic events are available to all Oracle Applications and Product Specific Events are also available to help you to apply business rules specific to Oracle HRMS.
APIs (called Application Programmatic Interfaces)
Oracle HRMS provides a set of PL/SQL packaged procedures and functions that together provide an open interface to the database.
Task Flows
You often need to use more than one window to complete many tasks. Oracle HRMS enables you to link these windows together using a task flow. Users can choose a button to bring up each window in turn without returning to the menu. For example, to hire an employee, you typically go from the People window, to the Address window, to the Special Information window, to the Assignment window, and so on. Task flows speed up processes and reduce data entry errors.
See: Task Flow
Restricting Information
You can restrict the data available on certain windows. For example, you could restrict the information on a People Management template to applicants only or employees only.
Restricting the type of information available on a window is useful as a security measure. For example, you can create versions of Compensation windows to show only compensation types available to the logged-in user.
You can restrict information on People Management templates using the People Management Configurator. See: People Management Configurator
You can restrict data using a wider range of criteria on the People Management form and a number of other forms using CustomForm.
See: Windows You Can Configure Using CustomForm
Configuration Template Forms
You can design forms to help users to perform their tasks quickly and efficiently. Predefined templates can serve as guidelines to design forms for the core People Management processes in your enterprise.
A template form can consist of up to three separate windows:
-
A Find window to enable queries to be performed
-
A Summary window to display people and assignment information
-
A Maintenance window to enable the entry and update of information
You can design the new windows to complete a whole process such as hiring an applicant. For example, users can use the Maintenance window to enter and maintain an applicant's details and the Find window to find groups of applicants to work with. You add the new template forms to the menu so that users can access them from the navigator in the same way as all the other windows.
See: People Management Templates
You configure the predefined templates to create your own windows using the People Management Configurator tool.
See: People Management Configurator
Currencies
You need to define the formats for displaying currency amounts. If required, you can use multiple currencies for entering information about employee compensation and benefits and you can also record your payment methods to employees in different currencies. You must enable at least one currency as the default currency for all information related to money in your system. This default is known as the Base Currency for your Business Group.
Extend Oracle HRMS
You can extend Oracle HRMS to meet the needs of your enterprise.
You can configure Oracle HRMS by designing windows to match your specific business processes. Configuring windows enables your users to perform their tasks more efficiently.
How can you hold additional information?
You can add data fields to windows to hold any additional information you require. Flexfields are flexible fields that enable you to do this.
Then, when you click in a flexfield you have set up, a window opens, displaying segments into which you can enter data.
You can also set up your own tables to hold data such as wage codes, shift differentials, or the amounts of certain deductions
How can you ensure the same terminology is used and speed up data entry?
Oracle provides lists of values called lookups for certain items of information. Lookups ensure that all users use the same terminology, making it easier to inquire and report on information. Lookups also speed up data entry because you can enter just enough to identify the value, and the system completes the entry.
Can you configure windows to match the business needs of your enterprise?
Yes. For the core employee management information you can use the People Management Configurator tool to design your own windows to match the tasks performed in your enterprise. A set of predefined templates are provided as examples of how you can design new windows.
How is security affected by configuring windows?
Any windows that you configure behave in the same way as existing windows. Security is set by the user's security profile option and responsibility. However, you can configure the Find results window to enable users to see information for people outside of their security profile. They cannot change this information.
In addition, you can create windows that:
-
Restrict the list of values on certain fields or limit access to certain types of information
-
Use workflow so that any data changes must be approved before the changes are applied to the database. This applies to the windows that are based on templates.
Can you restrict the amount of data that users have to enter?
Yes. If you design windows using the templates, they offer greater flexibility for defaulting values in fields. You can also hide fields where you require no input from users, and you can restrict the list of values on other fields that are displayed in the windows.
What happens to the online help when you design new windows?
Online help is provided for the windows that have been created using the predefined templates. If you make changes to the windows or create new windows, you can edit the online help to make it match the new way of performing the tasks.
Can you define the formats for currency?
Yes. You can define the formats for displaying currency amounts.
Flexfields
Flexfields
Flexfields are flexible fields that enable you to configure and extend Oracle Applications by adding fields to windows. There are two types of flexfield:
-
Key flexfields enable you to define additional information you want to record in existing fields.
-
Descriptive flexfields enable you to add fields to windows to record additional information.
Extra Information Types (EITs) are a type of descriptive flexfield that enable you to set up unlimited amounts of extra information for eight of the most important entities in Oracle HRMS.
You can set up each flexfield to contain a number of segments, which act like separate fields.
When a user clicks in a flexfield you have set up, a window opens, displaying the segments that you have defined. For each segment, you can define:
-
Its prompt
-
The type of data it can contain
-
The values a user can enter
You can provide a list or range of valid values. You also control the size and display characteristics of each segment and the sequence in which the segments appear.
User Definable Key Flexfields
In Oracle HRMS there are eight user definable key flexfields:
-
Job
-
Position
-
Grade
-
Competence
-
People Group
-
Personal Analysis
-
Cost Allocation
-
Collective Agreement Grades
The Personal Analysis and Collective Agreement Grades key flexfields can have an unlimited number of structures. All other flexfields can have only one structure each.
You can define up to 30 segments for each structure in all key flexfields except for the Collective Agreement Grades key flexfield. This can have up to 20 segments for each structure.
How Oracle HRMS Uses Key Flexfields
Oracle HRMS uses key flexfields in a number of distinct ways:
Unique Identifiers
The Job, Position, Grade Name, and Competence flexfields enable you to create a unique name, which is a combination of separate components or segments. You can use these flexfields when you are defining the work structures and competencies that exist in your enterprise.
Tip: When you are defining your requirements for these key flexfields you should consider the following points:
-
The task of defining the segment combinations is normally restricted to one or two users only. Therefore, you may not need to use value sets, or cross validation rule options to control the values that can be entered.
-
The names that users see are made up of a combination of segment values. The segment values are displayed, not the meanings.
-
Avoid segments containing information that may change regularly. There is no history of changes to the combinations you create. For example, do not define minimum and maximum values for grades as segments of the Grade flexfield.
-
Analysis Information
The People Group and Personal Analysis flexfields enable you to add key information to records of employee assignments and people. You can use the individual segments of these flexfields to identify or report on specific groups of people.
Payroll Costing
The Cost Allocation key flexfield is used to collect and to accumulate costs associated with running a payroll.
Collective Agreement Grade Structures
The Collective Agreement Grades key flexfield enables you to create an unlimited number of grade structures. You use the individual segments of each grade structure to record the grade factors that are defined within a collective agreement.
Once the grade structure is recorded you can link it to a collective agreement and enter the required factor values for each reference grade in the Agreement Grades window.
What You Must Set Up
The key flexfields are central to Oracle HRMS, therefore you must create certain definitions before you can set up your business group.
Position and Grade Key Flexfields
-
You can only define one structure per business group for each of these flexfields.
-
Use of these flexfields is optional, but almost all Oracle HRMS installations use the Grade flexfield. Positions are used most often in large, highly structured enterprises, such as those in the areas of government, education, and health care.
-
You must define a structure name for these two flexfields before you can define a business group.
-
You associate these structures with a business group in the Business Group Information window, which opens from the Organization window.
-
It is essential to run the Create Key Flexfield DB Items process whenever you create or change the Grade or Position key flexfield definitions. See: Creating Key Flexfield Database Items
Job Key Flexfields
-
Use of this flexfield is optional.
-
You must define at least one structure name for the job key flexfield before you can define a business group.
-
You associate this structure with a business group in the Business Group Information window, which opens from the Organization window. This defines the key flexfield that is used for the Default HR Job Group.
-
You can create a number of different structures for the job key flexfield and then associate them with user defined job groups.
-
It is essential to run the Create Key Flexfield DB Items process whenever you create or change the Job key flexfield definitions. See: Creating Key Flexfield Database Items
Competence Key Flexfield
-
You must define a structure name for this flexfield before you can define a business group.
-
You can only define one structure per business group for this flexfield.
-
You associate this structure with a business group in the Business Group Information window, which opens from the Organization window. This defines the key flexfield that is used when creating competencies specific to the business group.
-
You can create an additional key flexfield that can be used to create global competencies that are available across all business groups. You can, however, use the same key flexfield you have defined for the business group if you want. You define this key flexfield in the HR: Global Competence Flex Structure profile option.
-
You must specify one of the segments as the Default Attribute using the flexfield qualifier. You must also attach the Others flexfield qualifier to all other segments in the structure.
People Group Key Flexfield
-
You can only define one structure per business group for this flexfield.
-
You do not create separate combinations of segments for the People Group flexfield. You enter values for each employee as part of the employee assignment.
-
You must define a structure name for this flexfield before you can define a business group.
-
You must define at least one segment for the People Group flexfield in order to be able to use the Assignment window.
-
It is essential to run the Create Key Flexfield DB Items process whenever you create or change the People Group key flexfield definition. See: Creating Key Flexfield Database Items
Personal Analysis Key Flexfield
-
You can create any number of structures per business group for this flexfield. Each one represents a Special Information Type.
-
You do not need to define any structures for the Personal Analysis flexfield before you can use Oracle HRMS.
-
You link each structure to a business group in the Special Information Types window while you are logged on to that business group.
-
You can configure windows to restrict access to specific Information Types, such as medical or disciplinary information.
Cost Allocation Key Flexfield
-
You can only define one structure per business group for this flexfield.
-
You can control the levels at which users can enter cost information by using the flexfield qualifiers.
-
You must define a structure name for this flexfield before you can define a business group.
-
A number of windows in Oracle HRMS check for the existence of a valid flexfield structure for Cost Allocation. You must define at least one segment for your Cost Allocation flexfield.
Collective Agreement Grades (CAGR) Key Flexfield
-
You can create any number of structures for this flexfield.
Important: If you are using the Italian legislation, do not create new structures for this flexfield. You must use the predefined structure, IT_CAGR, and you must not make changes to it. Otherwise, you may be unable to enter collective agreement grades for your assignments.
-
You can define up to 20 segments within each structure. Each segment refers to a grade factor that is available as part of the grade structure.
-
You must check the Allow Dynamic Inserts check box when defining the structure of this flexfield.
-
You do not need to define any structures for the Collective Agreement Grades flexfield before you can use Oracle HRMS.
-
You link each structure to a collective agreement in the Agreement Grades window. The reference grades entered in this window are recorded against this combination.
-
You can enter values for each of the defined grade factors as part of each reference grade in the Agreement Grades window.
Flexfields: Open Key Window Profile Option
The way in which key flexfield windows open is controlled by the Flexfields:Open Key Window profile option. If this option is set to Yes, the flexfield window automatically pops open when the user navigates to the field. If it is set to No, users can open the flexfield by choosing Edit Field from the Edit menu or pressing CTRL+L. The default is Yes.
User Definable Descriptive Flexfields
The predefined fields in Oracle HRMS windows are designed to meet your core information requirements. However, like all enterprises, you may have special requirements that are best met by fields that you design yourself. Oracle HRMS provides a flexible mechanism called descriptive flexfields to enable you to add fields to windows.
All window blocks in which you can enter information contain a user definable descriptive flexfield. You decide in which blocks you want to record additional information. Each user definable descriptive flexfield has 20 segments that you can define. After you define a descriptive flexfield, Oracle HRMS treats the segments as part of the window.
The following figure illustrates the distinctive appearance of descriptive flexfields. When users click in a flexfield that you have set up, or choose Edit Field from the Edit menu, a window opens, displaying up to 20 segments that you have defined.
![]()
The way in which descriptive flexfield windows open is controlled by the Flexfields:Open Descr Window profile option. If this option is set to Yes, the flexfield window automatically pops open when the user navigates to the field. If it is set to No, users can open the flexfield by choosing Edit Field from the Edit menu or pressing CTRL+L. The default is Yes.
Segments
For each segment, you can define:
-
Its prompt
-
The type of data it can contain
-
The values a user can enter
You can provide a list or range of valid values. You also control the size and display characteristics of each segment and the order in which the segments appear.
Types of Descriptive Flexfield Segments
You can define two types of descriptive flexfield segments:
-
Global segments, which always appear in the window.
-
Context-sensitive segments, that appear only when a defined context exists. You can prompt the user to provide the context, or you can provide the context automatically from a reference field in the same block.
For example, a segment holding information about an employee's disability might appear only when the Disabled field is checked.
Important: Some descriptive flexfields appear in more than one window. For example, the Additional Evaluation Details flexfield appears in the Job Evaluation window and the Position Evaluation window.
Check all of the windows that use a descriptive flexfield before you define any of the segments. This is especially important if you intend to make the flexfield context sensitive to another field. You must ensure that the reference field is present in all of the windows that use the flexfield.
See: Descriptive Flexfield List for a full list of user definable descriptive flexfields in Oracle HRMS.
Descriptive Flexfield List
The following table lists all the user definable descriptive flexfields in Oracle HRMS.
| Descriptive Flexfield Title | Window Title | Database Items |
|---|---|---|
| Additional Absence Details | Absence Detail, View Absence History |
ABSENCES_<SEGMENT_NAME> |
| Additional Absence Type Details | Absence Attendance Type | ABSENCE_TYPES_<SEGMENT_NAME> |
| Additional Address Details | Address, Applicant Entry Contact |
PERSON_ADDRESSES_<SEGMENT_NAME> |
| Additional Application Details | Applicant Entry, Application, Terminate Applicant |
APPLICATIONS_<SEGMENT_NAME> |
| Additional Appraisal Details | ||
| Additional Appraisal Template Details | ||
| Additional Assessment Group Details | ||
| Additional Assessment Type Details | ||
| Additional Assessment Details | Medical Assessment | |
| Additional Assignment Details | Applicant Entry, Application, Assignment, Assignment History |
ASSIGNMENTS_<SEGMENT_NAME> |
| Additional Assignment Status Details | Secondary Statuses | |
| Additional Balance Type Details | Balance (Oracle Payroll only) | |
| Additional Benefit Contribution Details | Benefit Contributions (US only) | |
| Additional Booking Details | Applicant Interview, Book Events, Employee Review, Event Bookings |
|
| Additional Budget Details | Budget | |
| Additional Budget Values Details | ||
| Additional Budget Version Details | Budget | |
| Additional Calendar Information | Budgetary Calendar (Oracle Payroll) | |
| Additional Candidate Information | Election | |
| Additional Career Path Details | Career Path Names | |
| Additional Checklist Item Details | ||
| Additional COBRA Benefit Details | COBRA Benefits (US only) | |
| Additional COBRA Coverage Details | COBRA Coverage (US only) | |
| Additional COBRA Payment Details | COBRA Payment (US only) | |
| Additional COBRA Status Details | COBRA Status (US only) | |
| Additional Collective Agreement Details | Collective Agreements | |
| Additional Coll. Agreed Grades Details | Agreement Grades | |
| Additional Competence Details | ||
| Additional Competence Element Details | ||
| Additional Constituency Details | Election | |
| Additional Contact Relationship Details | Contact | CONTACTS_<SEGMENT_NAME> |
| Additional Contract Details | Contract | |
| Additional Delivery Method Details | ||
| Additional Deployment Factor Details | Work Choices, and Position Transaction (Work Choices tabbed region) | |
| Additional Disability Information | Disabilities | |
| Additional Election Details | Election | |
| Additional Element Entry Information | Adjust Balance (Oracle Payroll only), Element Entries, View Element Entry History for Employee |
|
| Additional Element Link Information | Element Link (Oracle Payroll) | |
| Additional Element Type Details | Element (Oracle Payroll) | |
| Additional Establishment Att Details | ||
| Additional Establishment Details | ||
| Additional Evaluation Details | Job, Position |
|
| Additional Event Details | Applicant Interview, Employee Review, Event Bookings |
EVENTS_<SEGMENT_NAME> |
| Additional Grade Details | Grade | GRADES_<SEGMENT_NAME> |
| Additional Hierarchy Details | Generic Hierarchy | |
| Additional Incident Details | Work Incident | |
| Additional Job Details | Job | JOBS_<SEGMENT_NAME> |
| Additional Letter Details | Letter | |
| Additional Location Details | Location | |
| Additional Node Details | Generic Hierarchy | |
| Additional Objectives Details | ||
| Additional Organization Information | Organization | |
| Additional Organization Payment Method Details | Organizational Payment Method (Oracle Payroll) | |
| Additional Organization Structure Details | Organization Hierarchy | |
| Additional Organization Unit Details | Organization | ORGANIZATION_<SEGMENT_NAME> |
| Additional Participants Details | ||
| Additional Pay Scale Information | Pay Scale | |
| Additional Pay Rate Details | Grade Rate, Scale Rate |
|
| Additional Payroll Action Details (Oracle Payroll) | ||
| Additional Payroll Details | Payroll | PAYROLLS_<SEGMENT_NAME> |
| Additional Performance Ratings Details | ||
| Additional Period Information | Budgetary Calendar, Period Dates (Payroll form) |
|
| Additional Period of Placement Details | End Placement | |
| Additional Period Type Information | Period Types | |
| Additional Person Analysis Details | Special Information, List People By Special Information |
|
| Additional Personal Details | Applicant Entry, Contact, People, People Folder |
PEOPLE_<SEGMENT_NAME> |
| Additional PPM Details | Personal Payment Method | |
| Add'l Person Type Usage Details | Person Type Usage | |
| Additional Position Details | Position, Find Positions (Mass Move form) |
POSITION_<SEGMENT_NAME> |
| Additional Position Structure Details | Position Hierarchy | |
| Additional Previous Employer Details | Previous Employment | |
| Additional Previous Job Details | Previous Employment | |
| Additional Previous Job Usage Details | Previous Job | |
| Additional Qualification Details | ||
| Additional Qualification Types | ||
| Additional Rating Level Details | ||
| Additional Rating Scale Details | ||
| Additional Recruitment Activity Details | Recruitment Activity | RECRUITMENT_ACTIVITIES_<SEGMENT_NAME> |
| Additional Requirement Details | Job, Position |
|
| Additional Requisition Details | Requisition and Vacancy | |
| Additional Role Details | Supplementary Roles | |
| Additional Salary Administration Details | Salary Administration | |
| Additional Salary Basis Details | Salary Basis | |
| Additional Standard Holiday Absence Details | ||
| Additional Subjects Taken Details | ||
| Add'l Succession Planning Det. | Succession Planning page | |
| Additional Telephone Number Details | Phone Numbers | |
| Additional Template Details | People Management Configurator (Template Object) | |
| Additional Vacancy Details | Requisition and Vacancy | |
| Additional Valid Grade Details | Job, Position |
|
| Additional Version Details | Generic Hierarchy | |
| Additional Year Information | Budgetary Calendar | |
| Assignment Extra Information | Extra Assignment Information | |
| Extra Job Info Details | Extra Job Information | |
| Extra Location Info Details | Extra Location Information | |
| Extra Person Info Details | Extra Person Information | |
| Extra Position Info Details | ||
| Extra Previous Job Details | Previous Employment | |
| Further Candidate Information | Election | |
| Further Election Information | Election | |
| Proposal Component Addl Info | ||
| Review Addl Information | ||
| Salary Survey Additional Information | ||
| Survey Line Addnl Information | ||
| Survey Mapping Add Info |
Descriptive Flexfields and Address Styles
Oracle HRMS supplies two predefined descriptive flexfields to hold address information in different styles for different countries. These are:
-
the Personal Address Information descriptive flexfield: This holds the address information of your employee or applicant.
-
the Location Address descriptive flexfield: This holds the address information of your locations.
Oracle HRMS holds the addresses of people and locations separately to enable you to record different information for tax reporting.
You can use these descriptive flexfields to add new address styles or to change the styles included in Oracle HRMS.
Important: If you change the predefined styles, your changes are overwritten when you upgrade Oracle HRMS. If you add new styles, your changes may be overwritten if new startup data contains address styles for these countries.
Address Styles
Address styles vary between countries, so Oracle HRMS provides descriptive flexfields that use context-sensitive segments to hold each line of an address. The Address Styles Flexfields table below details the title of the flexfield, its location and where it is used.
Address Style Flexfields in Oracle HRMS
| Title | Table Name | Window Title |
|---|---|---|
| Personal Address Information | PER_ADDRESSES | Address, Applicant Entry |
| Location Address | HR_LOCATIONS | Location, Organization |
The available address styles are defined as the contexts for these flexfields. There are two types of address style:
-
International
-
Local
Address styles are provided as startup data in these flexfields. If you require additional address styles, you need to define a new context and segments.
International Address Style
This style provides basic validation of address data. Oracle HRMS provides international address styles for many countries. This style can be used for both location and personal addresses. International address styles are named territory_code_GLB. For example, the Australian international address style is AU_GLB.
Territory codes can be found in the FND_TERRITORIES table.
If no international address style is available for your country, you can use the generic style (GENERIC) to enter your address information. This generic structure provides no validation.
Local Address Style
This style provides full validation of address data and is set up by a localization team. Where a local address style exists, it can usually be used for both location and personal addresses. Local address styles are named territory_code. For example, the Australian local address style is AU.
Where a local address style exists and the Business Group uses the legislation code for that country, the local address style is displayed as the default in the appropriate address entry window. Where no local address exists, the international style is the default.
US and Canadian users: the local address style for the US or Canada is only available when you have Vertex geocodes data installed.
Developer Flexfields
Oracle HRMS supplies developer key flexfields and developer descriptive flexfields. Your localization team has defined these flexfields, as required, to meet the specific legislative and reporting needs of your country.
The protected developer key flexfields are the Soft Coded Legislation key flexfield and the Bank Details key flexfield.
Of the developer descriptive flexfields, all except six are protected and cannot be amended. The remaining six have Extra Information Types that you can use to configure your application.
See: Extra Information Types (EITs)
The following table lists the developer descriptive flexfields, including EITs.
Developer Descriptive Flexfields in Oracle HRMS
| Title | Table Name | Window Title |
|---|---|---|
| Extra Job Information (EIT) | ||
| Extra Location Information (EIT) | ||
| Extra Person Information (EIT) | ||
| Extra Position Information (EIT) | ||
| Extra Previous Job Information | PER_PREVIOUS_JOB_EXTRA_INFO | Previous Employment |
| Further Absence Information (Additional Absence Detail Information) | PER_ABSENCE_ATTENDANCES | Absence Detail |
| Further Assignment Information (EIT) | ||
| Further Budget Values Details | ||
| Further Candidate Information | PER_ELECTION_CANDIDATES | Election |
| Further Canvas Properties | HR_CANVAS_PROPERTIES_B | People Management Configurator (Canvas Object) |
| Further Collective Agreement Information | PER_COLLECTIVE_AGREEMENTS | Collective Agreements |
| Further Competence Element Information | PER_COMPETENCE_ELEMENTS | |
| Further Competence Element Outcomes Information | PER_COMP_ELEMENT_OUTCOMES | |
| Further Competence Information | PER_COMPETENCES | Competencies |
| Further Competence Outcomes Information | PER_COMPETENCE_OUTCOMES | |
| Further Contact Relationship Information | PER_CONTACT_RELATIONSHIPS | Contacts |
| Further Contract Information (Datetracked) | PER_CONTRACTS_F | Contracts |
| Further Contribution History Information | ||
| Further Disability Information (Datetracked) | PER_DISABILITIES_F | Disabilities |
| Further Election Information | PER_ELECTIONS | Election |
| Further Element Information (Datetracked) | PAY_ELEMENT_TYPES_F | Element |
| Further Element Entry Information (Datetracked) | PAY_ELEMENT_ENTRIES_F | Element Entry |
| Further Establishment Information | PER_ESTABLISHMENTS | Schools/Colleges |
| Further Form Properties | HR_FORM_PROPERTIES | People Management Configurator (Form Object) |
| Further Item Properties | HR_ITEM_PROPERTIES | People Management Configurator (Item Object) |
| Further Job Information | PER_JOBS | Job |
| Further Medical Assessment Information | PER_MEDICAL_ASSESSMENTS | Medical Assessment |
| Further Payment Method Information (Datetracked) | PAY_ORG_PAYMENT_METHODS_F | Organizational Payment Method |
| Further Payroll Information (Datetracked) | PAY_ALL_PAYROLLS_F | Payroll |
| Further Period Details | PER_TIME_PERIODS | Payroll Periods |
| Further Period of Service Information (Add'l Periods of Service Information) | PER_PERIOD_OF_SERVICE | Terminate |
| Further Person Information (Datetracked) | PER_PEOPLE_F | People, Applicant Entry |
| Further Previous Employer Information | PER_PREVIOUS_EMPLOYERS | Previous Employment |
| Further Previous Job Information | PER_PREVIOUS_EMPLOYERS | Previous Employment |
| Further Previous Job Usage Information | PER_PREVIOUS_JOB_USAGES | Previous Job |
| Further Qualification Information | PER_QUALIFICATIONS | Qualifications |
| Further Role Information | PER_ROLES | Supplementary Roles |
| Further Subject Information | PER_SUBJECTS_TAKEN | Qualifications |
| Further Tab Page Properties | HR_TAB_PAGE_PROPERTIES_B | People Management Configurator (Tab Page Object) |
| Further Template Properties | People Management Configurator | |
| Further Window Properties | HR_WINDOW_PROPERTIES_B | People Management Configurator (Window Object) |
| Further Work Incident Information | PER_WORK_INCIDENTS | Work Incidents |
| Org Developer DF | ||
| State Tax Limit Rate Information | ||
| Statutory Transaction Information | ||
| Tax Signup Developer DF |
Your localization team determines which of these flexfields are required for your legislation, and what segments they should contain. The legislation of your business group determines which developer descriptive flexfields are displayed. This means that if your enterprise uses multiple business groups that have different legislations, different developer descriptive flexfields are displayed for business groups of each legislation.
Caution: Do not attempt to alter the definitions of the protected flexfields. These definitions are a fundamental part of Oracle HRMS. Any change to them may lead to errors in the operating of the system.
It is possible that Oracle HRMS will use other segments of these flexfields in the future. Therefore, do not add segments to any protected flexfield, as this may affect your ability to upgrade your system in the future.
Soft Coded Legislation Key Flexfield
This key flexfield holds legislation-specific information. The legislation of your business group determines the flexfield structure that you see.
Each localization team defines a flexfield structure, if required, which enables you to enter information specific to your legislation at the employee or contingent worker assignment level.
Bank Details Key Flexfield
This flexfield holds legislation-specific bank account information. The legislation of your business group determines the flexfield structure that you see. Each localization team defines a flexfield structure that allows you to record the bank account information relevant to your legislation. You enter this information in the Organizational Payment Method window and Personal Payment Method window.
Creating Key Flexfield Database Items
The Create Key Flexfield DB Items process turns data in key flexfields into database items that Oracle FastFormula can access. It is essential to run this process whenever you create or change the Grade, Job, Position, or People Group key flexfield definitions.
Submit the process from the Submit Requests window.
To create key flexfield database items
-
Run the Create Key Flexfield DB Items process.
Run this process whenever you create or change these key flexfield definitions.
See: Running Reports and Programs, Oracle Applications User's Guide
Creating Descriptive Flexfield Database Items
You can use descriptive flexfield segments in QuickPaint reports and formulas if there are database items for these segments.
See Descriptive Flexfield List for a list of flexfields for which you can create database items.
Submit the process from the Submit Requests window.
To create descriptive flexfield database items
-
Run the Create Descriptive Flexfield DB Items process.
Run this process whenever you create or change these descriptive flexfield definitions.
See: Running Reports and Programs, Oracle Applications User's Guide
Note: The process can only create database items for global segments. It does not create database items for context-sensitive segments.
Changing Default National Address Styles
National address styles, both international and local, are held and configured in the Personal Address Information and the Location Address descriptive flexfields. You can configure these styles using the Descriptive Flexfield Segments window.
You cannot construct any flexfield segment value sets with:
-
Profile options, $PROFILE$
-
Previous segment values, $FLEX$
-
Block.field references
-
Security rules
Note: You must ensure the Personal_Address or Location_Address protected flag is off.
To change the address style for any country, redefine those segments you do not want to use. Then define new segments to record your own information.
To alter an existing address style
-
Enter Oracle Human Resources in the application field.
-
Enter Personal Address Information or Location Address in the title field as appropriate.
-
Run the query.
-
Uncheck the Freeze Flexfield Definition check box.
Note: Read the warning.
-
Select the address style for your country.
Note: Both international and local address styles are included in the list of context field values.
-
Click the segments button.
This opens a new window with the segment and value set information for the selected address style.
-
Update the segments.
Note: You must make the Country segment mandatory. Do not change the validation on any segment as this may invalidate existing data.
-
Save your work, and open the Descriptive Flexfield Segments window. Make sure any new segments are enabled, and displayed.
-
Check the Freeze Flexfield Definition check box.
-
Choose the Compile button.
When compilation is complete, exit your current login session, then log in again to see your updated styles.
To add an address style
-
Enter Oracle Human Resources in the application field.
-
Enter Personal Address Information or Location Address in the title field as appropriate.
-
Run the query.
-
Uncheck the Freeze Flexfield Definition check box.
Note: Read the warning.
-
Choose New from the File menu.
-
Enter the country code in the code and name fields.
Note: Ensure that the length of the country code in the Code field is not more than seven characters. Otherwise, Oracle HRMS displays an error when you try to select the address style and save the location.
-
Enter a description and select the Segments button.
-
Define the segments.
Note: You can only use the columns provided by Oracle HR for your segments.
-
Save your work.
Note: Make sure any new segments are enabled. You can choose whether segments are displayed or not.
-
Check the Freeze Flexfield Definition check box.
-
Choose the Compile button.
When compilation is complete, exit your current login session. Then log in again to see your updated styles.
Extra Information Types
Extra Information Types (EITs)
Extra Information Types are defined using descriptive flexfields. You can set up any number of different EITs for:
-
Location
-
Job
-
Position
-
Person
-
Assignment
-
Organization
-
Element types
-
Previous Job
-
Contacts
-
Role
Note: EITs for Organization are different because you can define which organization classification the EIT is available for.
For each EIT you can define up to 30 fully validated segments of information (or 20 for organizations).
Note: Oracle HRMS provides some predefined EITs. You may add your own information types, but you must not change the definitions of the delivered EITs.
For information about predefined EITs for positions, see: Position Extra Information Types, Oracle HRMS Enterprise and Workforce Management Guide
Unlike the usual descriptive flexfields, EITs are child entities with separate tables to hold the information you enter. This means that you can have multiple instances of an EIT for each main record. When you define the EIT, you can specify whether you want to allow multiple instances. With the exception of organizations, EIT data is viewed and entered in a separate window which you can task flow.
The windows for all the EITs have the common look and feel of all the descriptive flexfield windows. This means that you can use your new EITs as soon as you save your definitions. Since flexfield definitions are preserved through upgrades, EITs do not require expensive recoding of configured forms with each new release.
Key Flexfield Combinations
EITs are very similar to Special Information Types (SITs). For analyzing people's attributes and job requirements, Oracle enables you to choose whether to set up extra or special information types, or both. Both types of information use flexfields to define the structure and validation of their segments.
However, SITs are stored in a key flexfield combination table where the combination of segments must be unique - a feature of all key flexfields. EITs are stored in a descriptive flexfield table where the combination of segment values do not need to form a unique key.
This means that EITs have performance advantages in large scale, or global implementations where you may want to transfer large volumes of information between separate installations.
Dates and EITs
EITs are not datetracked. Even if the parent entity, for example People, is datetracked, the extra information is not. However, if you want to track changes to specific EITs you can define date segments for Start and End Dates and use multiple rows of the EIT to track changes.
EITs and Security
Both special and extra information types use CustomForm and task flow security to restrict access to information. This means that you can restrict access to the information types as part of a specific user process. For example, in a "Transfer to the UK" process you might want to enter additional UK specific information. You could design your user process to include a "UK Info" window as part of the task flow and restrict the window to display only the UK information type.
To provide extra security for EITs, you must associate each EIT with the responsibilities that should have access to the information. For example. you might record details of an extended leave of absence in an EIT for an assignment and provide access only to managers who need to know.
Restricting Access to Extra Information
You can restrict access to EITs using a combination of the following:
-
Menus and task flows : Without the EIT window a user cannot see or change any extra information for the entity.
-
CustomForm and task flows: This restricts EITs to specific user processes.
For example, at the person level you might define EITs to hold medical details, security information and information required for working in other countries. In this situation you might want to create two task flows, the first with a button for entering only medical details and the second with a button for entering the other types of extra information
-
Responsibility level security: For each responsibility, you must select the EITs to be viewed. CustomForm and task flow restrictions provide additional security. You might specify that a responsibility can access an EIT, but users of this responsibility will not be able to view the extra information unless they have access to a window that displays it.
Note: This security does not apply to extra information on organizations.
Example Script for Registering Extra Information Types (EITs)
If you have created new organization EITs, you must create a SQL script to insert a row for each EIT into the relevant information type table. This is known as registering your information type. When you create your script, you can use the sample script provided as a guide.
Note: If you have created non-organization EITs, you use the concurrent process Register Extra Information Types (EITs) instead.
See: Register Extra Information Types (EITs)
Example Script to Register EITs
WHENEVER SQLERROR EXIT FAILURE ROLLBACK
REM /* $Header: example.sql $ */
REM =============================================
REM SQL Script File Name : example.sql
REM Description : This sql script inserts information
REM 1) HR_ORG_INFORMATION_TYPES
REM 2) HR_ORG_INFO_TYPES_BY_CLASS
REM =========================================
WHERE not exists (SELECT 1
--1) Insert into HR_ORG_INFORMATION_TYPES:---
-- Note different parameter value for single and multi-row
-- Note different parameters for this EIT
INSERT INTO HR_ORG_INFORMATION_TYPES
(ORG_INFORMATION_TYPE
,DESCRIPTION
,DESTINATION
,DISPLAYED_ORG_INFORMATION_TYPE
,FND_APPLICATION_ID
,LEGISLATION_CODE
,NAVIGATION_METHOD
)
SELECT
'<Organization EIT Name>'
,'<Description>'
,NULL
,'<Display value on the Organization form>'
,NULL
,'<legislation code US/GB/etc>'
,'<GM for multi-row - GS for single>'
FROM sys.dual
WHERE not exists (SELECT 1
FROM HR_ORG_INFORMATION_TYPES
WHERE ORG_INFORMATION_TYPE = '<Organization EIT Name>');
INSERT INTO HR_ORG_INFO_TYPES_BY_CLASS
(ORG_CLASSIFICATION
,ORG_INFORMATION_TYPE
,MANDATORY FLAG)
SELECT
'<Check lookup value for classification HR_BG for Business Group>'
, '<Organization EIT Name>'
,'N'
FROM sys.dual
WHERE not exists (SELECT 1
FROM HR_ORG_INFO_TYPES_BY_CLASS
WHERE ORG_INFORMATION_TYPE = '<Organization EIT Name>'
and
ORG_CLASSIFICATION = '< HR_BG for Business Group>');
/
COMMIT;
EXIT;
Setting Up Extra Information Types (Excluding Organization EITs)
The following steps explain how to set up Extra Information Types (EITs) to use in Oracle HRMS.
Note: EITs for organizations are set up differently. See: Setting Up Extra Information Types for an Organization Classification
-
In the Descriptive Flexfield Segments window, select the relevant descriptive flexfield by title (for example, Extra Job Information). The descriptive flexfields available are:
-
Extra Location Information (30 Segments)
-
Extra Job Information (30 Segments)
-
Extra Position Information (30 Segments)
-
Extra Person Information (30 Segments)
-
Extra Element Information (30 Segments)
-
Further Assignment Information (30 Segments)
-
Previous Extra Job Information (30 Segments)
-
Contact Extra Information (30 Segments)
-
-
Unprotect the relevant extra information type using the Register Descriptive Flexfield window. You must do this before you can query the flexfield in the Descriptive Flexfield window.
-
Create a new record in the Context Field Values region of the Descriptive Flexfield window and enter the name of your new Information Type in the Code field. As these are context-sensitive descriptive flexfields, enter INFORMATION_TYPE in the Reference Field.
-
Enter the segment values and compile in the same way as a standard descriptive flexfield.
See: Defining Descriptive Flexfield Structures, Oracle Applications Flexfields Guide
Important: There are some predefined EITs in Oracle HRMS. These definitions are a fundamental part of your Oracle HRMS installation and any change to them may lead to errors in the operation of the system. Do not attempt to alter the definitions of these developer flexfields or to add other segments to them. It is possible that Oracle will use other segments of these flexfields in the future. Any changes you make may affect your ability to upgrade your system in the future.
For US Federal users: Do not prefix EIT definitions with GHR_US. This prefix is reserved for the predelivered US Federal definitions.
-
Reset the protection in the Register Descriptive Flexfield window so the flexfield remains a protected descriptive flexfield.
-
Run the Register Extra Information Types (EITs) concurrent program to insert a row for each EIT into the relevant Information Type table. The following table lists the tables for each EIT.
Extra Information Type Tables
EIT Table Location HR_LOCATION_INFO_TYPES Job PER_JOB_INFO_TYPES Position PER_POSITION_INFO_TYPES Person PER_PEOPLE_INFO_TYPES Assignment PER_ASSIGNMENT_INFO_TYPES Previous Job PER_PREV_JOB_INFO_TYPES Contact PER_CONTACT_INFO_TYPES Important: Oracle applications use a standard 2- or 3-character product prefix followed by an underscore to name the predefined EITs. To avoid current and future naming conflicts, you should adopt a different naming convention for your Extra Information Types; for example CUSTOM_EXPAT_TAXABILITY.
-
Use the Information Types Security window to set up responsibility level access to EITs.
See: Setting Up Extra Information Types Against a Responsibility
Your EIT will now be available anyone using the specified responsibilities. If you want to set up further security using CustomForm and task flow, continue with the next step.
-
Use the Form Customization window to restrict access to specific EITs within the appropriate windows.
-
Use the Define Task Flow Nodes window to define new nodes for any CustomForm restrictions you have set up.
-
Use the Define Task Flow window, or use Oracle Workflow, to define and change task flows to include any new nodes you have set up.
Setting Up Extra Information Types for an Organization Classification
To add Extra Information Types (EITs) to an organization classification
-
Define a new organization classification. You do not need to do this if you are setting up an EIT for a classification that already exists.
Note: To define a new classification, enter a new value for the Lookup type ORG_CLASS in the Lookup Values window.
-
Define the new EIT. See: Entering Table Values
-
Unprotect the Org Developer DF using the Register Descriptive Flexfield window. You must do this before you can query the flexfield on the Descriptive Flexfield window
-
Add the new structure for the EIT to the Org Developer DF descriptive flexfield using the Descriptive Flexfield Segments window. The structure must have as its context the name of the extra information type, and as this is a context sensitive descriptive flexfield you must enter C_ORG_INFORMATION_CONTEXT in the Reference Field. Compile in the same way as a standard descriptive flexfield.
-
Reset the protection, so the flexfield remains a protected descriptive flexfield.
-
-
You need to enter rows into the following tables:
-
HR_ORG_INFORMATION_TYPES
-
HR_ORG_INFORMATION_TYPES_TL
Oracle recommends that you write a script to carry out the HR_ORG_INFORMATION_TYPES_PKG.INSERT_ROW procedure to create the rows in the base table and translation table. The procedure uses the following parameters:
Parameter Column name Description X_ORG_INFORMATION_TYPE ORG_INFORMATION Name of the type (same as DDF context). X_DESCRIPTION DESCRIPTION Description of the extra information type. X_DISPLAYED_ORG_INFORMATION_TP DISPLAYED_ORG_INFORMATION_TYPE The Name of the Extra Information Type displayed in the Organization window. X_NAVIGATION_METHOD NAVIGATION_METHOD "GS" for single row, a user can only enter one extra information row for each organization. Alternatively, "GM" for multi row, a user can enter more than one row for each organization. X_LEGISLATION_CODE LEGISLATION_CODE Optionally, you can enter a legislation code to restrict to which business groups the EIT is available. If you do not enter a legislation code it will be valid for all business groups. X_DESTINATION DESTINATION This is set to Null. X_FND_APPLICATION_ID FND_APPLICATION_ID ID of application. X_CREATION_DATE CREATION_DATE Creation date. X_CREATED_BY CREATED_BY Created by (user ID). X_LAST_UPDATE_DATE LAST_UPDATE_DATE Date of last update. X_LAST_UPDATED_BY LAST_UPDATED_BY User ID of last person to update table. X_LAST_UPDATE_LOGIN LAST_UPDATE_LOGIN ID for the login session -
-
Specify for which organization classifications this EIT should be available.
To do this, enter a row into HR_ORG_INFO_TYPES_BY_CLASS as shown in the following table:
Column name Description ORG_CLASSIFICATION ORG_CLASS lookup code ORG_INFORMATION_TYPE Org extra information type MANDATORY_FLAG Y (for Yes) or N (for No)
Setting Up Extra Information Types For a Responsibility
Before a user can access an Extra Information Type (EIT), you must attach the EIT to the user's responsibility. If you do not link your information types to a responsibility, users cannot access your information types.
Note: You can select EITs for any legislation to add to a responsibility in this window. Users of the Oracle HRMS professional user interface are restricted to seeing the information types for the legislation of the business group to which they have access. Self-service users are restricted to seeing information types for the legislation of the record they are working with.
Use the Information Type Security window to link EITs to a responsibility.
Note: If you have created new document types for the Documents of Record function, you also use the Information Type Security window to link these document types to a responsibility.
See: Creating Document Categories, Subcategories, and Types
To set up EITs for a responsibility
-
Select the name of the responsibility to which to attach the EIT.
Note: The responsibilities displayed belong to the same application as the responsibility that you have used to display the Information Type Security window, for example, Human Resources. If you want to link an EIT to a responsibility from another application, for example, Advanced Benefits, you must access the Information Type Security window from an Advanced Benefits responsibility. If necessary, add the Information Types Security function to your responsibility.
Oracle HRMS displays a list of EITs already associated with the responsibility you have chosen.
-
Enter or select the new EIT you want to link to the responsibility.
-
Save your work.
To copy EITs between responsibilities
-
Query the responsibility from which you want to copy.
-
Select the Copy Responsibility button
-
Enter the responsibility to which you want to copy.
This responsibility is then displayed with the new EITs.
-
Save your work.
Entering Extra Information
You enter extra information in one or more windows available from the main window (such as the Job window). Your system administrator may have created configured versions of the extra information windows so that you can use each version for one information type only.
Your implementation team may have defined one or more types of extra information for you to record for:
-
Locations
-
Jobs
-
Positions
-
People
-
Assignments
-
Organization
-
Element types
-
Previous Job
-
Contacts
To enter extra information
-
Enter the type of extra information, for example Job Category.
Note: To access extra information in the Organization window select the Others button in the Organization Classifications region.
-
Click in the Details field to display the extra information fields you can enter.
-
Enter your extra information.
-
Save your work.
Running the Register Extra Information Types (EITs) Process
Use this process to register any new Extra Information Types (EITs) (excluding Organization EITs).
You run this process from the Submit Requests window.
To run the Register Extra Information Types (EITs) process
-
In the Name field, select Register Extra Information Types (EITs).
The Parameters window opens.
-
In the Table Name field, select the table in which the EIT will be registered.
-
In the Information Type field, select the extra information type created in the Descriptive Flexfield Segments window. The value in the Table Name field determines which information types are available.
-
In the Multiple Rows field, specify whether multiple occurrences of the same infotype can exist.
-
In the Legislation Code field, select the legislation code for the information type. The default value is the legislation code of the current business group.
Note: If the information type is global, the legislation code value should be Null.
-
Optionally, enter a description for information type.
-
Choose the Submit button.
User-Defined Tables
User-Defined Tables
You may need to set up your own tables in your Oracle HRMS system to hold data such as wage codes, shift differentials, or the amounts of certain deductions. You can set up all the tables you require using the Table Structure window. Using Oracle FastFormula, you can write simple formulas for validating entries made in table columns.
The Oracle HRMS user-defined tables are different from the database tables of the Oracle Relational Database Management System. When you set up a user table, you define the rows as well as the columns, like a matrix. For example, you could set up a table showing bonus amounts (the column) against years of service (the rows).
Important: Do not use the Table Structure window to set up tables holding information on medical, dental, or vision benefit plans (benefits with the benefits classification Medical, Dental, or Vision).
The Oracle HRMS database includes a special table, the Benefits Table, already set up to hold information on benefit plans with coverage levels, and the employee and employer contributions at each level. To enter information into this table you use the Benefit Contributions window.
See: Establishing Plan Coverage and Default Contributions (Basic Benefits), Oracle HRMS Compensation and Benefits Management Guide
See: Setting Up Basic Benefits, Oracle HRMS Compensation and Benefits Management Guide
Entering and Accessing Table Values
Use the Table Values window to enter values in tables. Table entries and rows are both datetracked, so you can delete existing entries or rows and add new ones, as of an effective date.
Oracle HRMS provides the GET_TABLE_VALUE function to access table values. You can write formulas that include calls to this function, perhaps for QuickPaint inquiries. For example, IT personnel can write PL/SQL statements that call this function, to include in the code for a form or report process.
Row Types for Payroll Tables
Tables set up to hold deduction amounts are payroll tables. You need a payroll table when the amount of a deduction varies in accordance with a factor such as employee age, pay, or job class.
To initiate a deduction with the amount rule Payroll Table, you must establish a row type. The formula for the deduction uses the row type to help determine which row of the table to go to for each employee's deduction amount. Your startup data includes three predefined row types: Age Range, Salary Range and Job Class. You can set up any additional types you require.
Predefined User Tables
Oracle HRMS supplies the following tables, already defined using the Table Structure window:
Canada Tables
COMPANY WORK SCHEDULES Table
This table has several commonly-used work schedules already entered in it, and you can add more. A work schedule shows the hours employees normally work each day from Monday through Sunday.
Employees with the schedule 10-10-10-10-0-0-0 work 10 hours each day Monday through Thursday, and have Friday, Saturday and Sunday off.
Each column in this table holds a separate schedule, with each row holding the hours worked each day of the week for the schedule. For convenience, each column header names the schedule held in the column.
The header for the column holding the first schedule is 1 Schedule: 8-8-8-8-8-0-0.
SHIFT DIFFERENTIALS Table
This table has no data already in it, but is ready for your data entry. Its rows hold the shift designators Day, Eve, Night and Split, representing the normal shifts employees work, and its columns have the same headings, for entry of differentials. You can add to or change the shift designators as necessary.
To look at examples of differentials entries, suppose day shift employees receive one and one-half times their regular pay when temporarily working the evening shift, twice their regular pay for the night shift, and three times their regular pay for the split shift. You enter 1.5, 2.0 and 3.0 as the differentials for day shift workers.
| Time Period | D | E | N | S |
|---|---|---|---|---|
| Day | -- | 1.5 | 2.0 | 3.0 |
WAGE RATES Table
This table has no data in it when you receive your system, but is ready for your data entry. Its rows hold rate codes, and its single column holds the rate matching each code. This example holds codes for rates associated with the operation of different types of equipment:
| Rate Code | Rate |
|---|---|
| FL (forklift) | 6.80 |
| A3 (crane A3) | 8.20 |
| A7 (crane A7) | 9.00 |
Maximum Assessable Earnings
Wages defined as subject to the workers compensation premium are referred to as assessable wages. Each year, the workers' compensation board for each province and territory defines the maximum amount of employee wages that are deemed to be assessable. Use this table to enter the maximum assessable amount for each province or territory.
Manitoba HAPSET Rate
In Manitoba, health and post secondary premiums are paid by the employer. These premiums are calculated as a percentage of wages subject to PMED, as defined in taxability rules. The percentage rate used by the employer may be a flat percent, or vary based on the total amount of wages paid to all employees in the province. It may also involve an exemption. Use this table to enter the rate at which the premiums are calculated for each threshold of earnings. The thresholds are provided in a list of values. You must enter the associated rate for each threshold, including a rate of zero for any exempt earnings.
Newfoundland/Labrador HAPSET Rate
In Newfoundland, health and post secondary premiums are paid by the employer. These premiums are calculated as a percentage of wages subject to PMED as defined in taxability rules. Use this table to enter the rate at which the premiums are calculated. The thresholds are provided in a list of values. You must enter the associated rate for each threshold, including a rate of zero for any exempt earnings.
Quebec Health Services Fund Tax Rate
In Quebec, health premiums are paid by the employer. These premiums are calculated as a percentage of wages subject to PMED as defined in taxability rules. The percentage paid by the employer may vary based on the total amount of wages paid to all employees in the province. Use this table to enter the rate at which the premiums are to be calculated.
Ontario EHT Rate
In Ontario, health premiums are paid by the employer. These premiums are calculated as a percentage of wages subject to PMED as defined in taxability rules. The percentage paid by the employer may vary based on the total amount of wages paid to all employees in the province. Use this table to enter the rate at which the premiums are calculated for each threshold of earnings. The thresholds are provided in a list of values. You must enter the associated rate for each threshold, including a rate of zero for any exempt earnings.
Default Vacation Bank
The Vacation Bank table holds the values that reflect a length of service band and the associated percentage at which the person would accumulate the vacation amount they are owed by an employer. For example, some provinces legislate that the minimum a person can accrue is 4% of their vacationable wages (as defined in the taxability rules for the province). Depending on the province, this may increase to 6% after a number of years of service. You must define each of these 'length of service' bands in the vacation bank table in order for employees to accrue the correct amount. The Default Vacation Bank table holds a value of 4% for all lengths of service. If you have different rules, you can create a new user table to hold the applicable values.
Denmark Tables
Earned Notice Period Table
The table DK_EARNED_NOTICE_PERIOD maps the length of service against the earned notice period. For example, an employee whose length of service is six months has an earned notice period of one month. Oracle HRMS references this table to retrieve the appropriate earned notice period value for an employee assignment.
Company Mileage Rates Table
The table DK_COMPANY_MILEAGE_RATES enables you to use your own mileage rates, if they are different from the official rates. You can record the mileage rate against the mileage range.
Finland Tables
Regional Membership Table
The table FI_REGIONAL_MEMBERSHIP maps the place of residence and territory code with any of the three regional memberships, Nordic, EU, and non-EU. Oracle HRMS references this table for income tax calculation and other statutory deductions.
Employee Pension Insurance Table
The table FI_EMPLOYEE_PENSION_PCT maps the percentage deduction of the employee pension insurance to the employee's age. Oracle HRMS references this table for calculating the pension insurance deduction accurately.
Employer Unemployment Insurance Table
The table FI_EMPLOYER_UNEMP_INS_PCT maps the percentage of employer unemployment insurance against the employer's yearly income. Oracle HRMS references this table for deducting the employer's contribution towards unemployment insurance.
Court Order Table
The table FI_COURT_ORDER_USER_TAB maps the monthly, fortnightly, weekly, and daily protected portions of an employee's income against the number of dependents an employee has. Oracle HRMS references this table for deducting the court order amount from the employee's income after excluding the protected portion.
Car Benefit Rates for Age Group A Table
The table FI_CAR_BENEFIT_RATES_GROUP_A contains the applicable benefit rates for cars that belong to the mobilization period between the years 2002 and 2004 (age group A). Oracle HRMS references this table to calculate the taxable value of the car benefit for cars in this age group.
Car Benefit Rates for Age Group B Table
The table FI_CAR_BENEFIT_RATES_GROUP_B contains the applicable benefit rates for cars that belong to the mobilization period between the years 1992 and 2001 (age group B). Oracle HRMS references this table to calculate the taxable value of the car benefit for cars in this age group.
Car Benefit Rates for Age Group C (Full Benefit) Table
The table FI_CAR_BENEFIT_RATES_GROUP_C_FULL contains the applicable benefit rates for cars that belong to the mobilization period prior to the year 1992 (age group C). Oracle HRMS references this table to calculate the value of the car benefit for cars in this age group.
Car Benefit Rates for Age Group C (Taxable Benefit) Table
The table FI_CAR_BENEFIT_RATES_GROUP_C_TAX contains the applicable benefit rates for cars that belong to the mobilization period prior to the year 1992 (age group C). Oracle HRMS references this table to calculate the taxable value of the car benefit for cars in this age group.
Tax Days Table
The table FI_TAX_DAY_MAPPING maps the number of tax days against the different payroll frequencies. Oracle HRMS references this table to retrieve the standard number of tax days applicable for a payroll period.
Postal Code Table
The table FI_POSTAL_CODE maps the postal codes to the corresponding Finnish and Swedish post office names. Oracle HRMS references this table to display the correct post office information.
France Tables
Validation Table
The table PQH_FR_VALIDATIONS keeps the details regarding the validations available for a person. The Services Validation Process references this table when validating the previous services of the employee.
Validation Events Table
The table PQH_FR_VALIDATION_EVENTS keeps the details regarding the events for a particular validation. The Services Validation Process references this table to know the events history of the validation process.
Validation Periods Table
The table PQH_FR_VALIDATION_PERIODS keeps the period details for a particular validation of an individual. The Services Validation Process references this table while calculating the period of service.
Role Information Types Table
The table PQH_ROLE_INFO_TYPES keeps the details regarding the committee information types and is used for information purposes.
Role Extra Information Table
The table PQH_ROLE_EXTRA_INFO keeps the details regarding the extra information recorded against the role information types. These details are used for information purposes.
Termination
The termination reasons table FR_TERM_REASON_ADS_STATUS_CODE includes the reasons for the termination. Oracle HRMS references this information for generating the absence report.
Absence
The table FR_ABS_CATG_ADS_STATUS _CODE contains the information on the status of absence.
The table FR_ABS_CATG_ADS_ABS_CODE includes the information on absence categories provided by Oracle HRMS.
Oracle HRMS references these tables for the absence report.
Statutory information for maternity, paternity, and adoption leave duration is maintained in the seeded user defined table FR_MAP_DURATION.
Work Incident
The table FR_WORK_INC_ADS_ABS_CODE keeps the information on the type of work incident. Oracle HRMS references this table.
Legal Guaranteed Income
The table FR_LEGI_RATE_BANDS contains the information on the seniority of the person as of the parent absence date, the percentage rates and days to be paid at each of the rates. Oracle Payroll references this table while processing sick pay.
The table FR_LEGI_WAITING_DAYS provides information on the number of waiting days for the processing of legal guaranteed income. Oracle Payroll references this table.
IJSS
The table FR_IJSS_NON_OCCUP_RATES_MAX keeps the information on the social security benefit rates for non-occupational sicknesses.
The table FR_IJSS_OCCUP_RATES_MAX keeps the information on the social security benefit rates for occupational sicknesses and social security ceiling.
Oracle Payroll references these tables while processing sick pay.
Note: There are further predefined tables supplied with Oracle HRMS for France that are used in certain statutory reports.
See: User Defined Tables, Oracle HRMS Enterprise and Workforce Management Guide
See: User Defined Tables Used by the Bilan Social, Oracle HRMS Enterprise and Workforce Management Guide
Hong Kong Tables
When the Mandatory Provident Fund (MPF) Board makes changes to the limits for a particular contribution, Oracle Payroll provides legislative updates that include the new limit information.
MPF Limits Table
The MPF limits table, MPF_RI_LIMITS, contains the MPF upper and lower limits for each valid time period.
Oracle Payroll references this table when processing MPF contributions.
Hungary Tables
Company Work Patterns
The table PQP_COMPANY_WORK_PATTERNS has several commonly-used work schedules already entered in it, and you can add more. A work schedule shows the hours employees normally work each day from Monday through Sunday.
Employees with the schedule 10-10-10-10-0-0-0 work 10 hours each day Monday through Thursday, and have Friday, Saturday and Sunday off.
Each column in this table holds a separate schedule, with each row holding the hours worked each day of the week for the schedule. For convenience, each column header names the schedule held in the column.
The header for the column holding the first schedule is 1 Schedule: 8-8-8-8-8-0-0.
Ireland Tables
EHECS Assignment Categories Table
The EHECS Report uses predefined assignment categories for reporting purposes. The report categorizes these assignments and the EHECS_ASG_CATG_TAB table maps the assignment categories, defined in the EMP_CATG lookup to the employment types. If you define your own assignment categories, then you must map these categories to the employment types using this table.
EHECS Occupation Categories Table
The EHECS Report uses predefined occupation categories for reporting purposes. The report categorizes these occupations and the EHECS_CATG_TAB table maps the occupation categories, defined in the EMPLOYEE_CATG lookup to the occupations. If you define your own employee categories, you must map them to the occupations using this table.
The occupation categories defined in the lookup are:
-
11 Legislators and senior officials
-
12 Corporate managers
-
13 General managers
-
21 Physical, mathematical, and engineering science professionals
-
22 Life science and health professionals
-
23 Teaching professionals
-
24 Other professionals
-
31 Physical and engineering science associate professionals
-
32 Life science and health associate professionals
-
33 Teaching associate professionals
-
34 Other associate professionals
-
41 Office clerks
-
42 Customer services clerks
-
51 Personal and protective services workers
-
52 Models, salespersons, and demonstrators
-
61 Market-oriented skilled agricultural and fishery workers
-
62 Subsistence agricultural and fishery workers
-
71 Extraction and building trade workers
-
72 Metal, machinery and related trades workers
-
73 Precision, handicraft, printing and related trades workers
-
74 Other craft and related trades workers
-
81 Stationary-plant and related operators
-
82 Machine operators and assemblers
-
83 Drivers and mobile-plant operators
-
91 Sales and services elementary occupations
-
92 Agricultural, fishery and related labourers
-
93 Labourers in mining, construction, manufacturing and transport
The EHECS report categorizes the above occupations as follows:
-
Occupations 11, 12, 13, 21, 22, 23, 24, 31, 32, 33, 34: Managers, Professionals, and Associate Professionals
-
Occupations 41, 42, 51, 52: Clerical, Sales and Service Workers
-
Occupations 61, 62, 71, 72, 73, 74, 81, 82 83, 91, 92, 93: Production, Transport Workers, Craft & Tradespersons, and Other Manual Workers
PRSI Tables
The PRSI formula uses the following predefined tables with community flag to calculate which PRSI employee or employer deduction to use in a payroll. Community is a scheme run by the Irish Government to encourage employers to employ people for work. They are allowed certain number of people in their workforce, and in return the employer receives a reduced PRSI rate.
-
IE Class A Community Employee Monthly
-
IE Class A Community Employer Monthly
-
IE Class A Community Employee Weekly
-
IE Class A Community Employer Weekly
The PRSI formula uses the following predefined tables to calculate which PRSI employee or employer deduction to use in a payroll:
-
IE Class A, B, C, D, H, J, K and S Employee Monthly
-
IE Class A, B, C, D, H, J, K and S Employer Monthly
-
IE Class A, B, C, D, H, J, K and S Employee Weekly
-
IE Class A, B, C, D, H, J, K and S Employer Weekly
IE PRSA Certificates Rates
The Pension Deduction formula uses this table to calculate Personal Retirement Savings Account (PRSA) contributions. The table holds the age-related limit for tax exempted PRSA contribution that is a percentage of the employee's net relevant earnings.
IE BIK Annualized Mileage
The BIK Company Vehicle formula uses this table to calculate the mileage percentage for the period being processed. The column holds the annualized mileage percentage and the rows hold the lower and upper limits of mileage.
Company Work Patterns
This table provides several commonly-used work schedules, and you can add more. A work schedule shows the hours employees normally work each day from Monday through Sunday. Employees with the schedule 10-10-10-10-0-0-0 work 10 hours each day Monday through Thursday, and have Friday, Saturday and Sunday off. Each column in this table holds a separate schedule, with each row holding the hours worked each day of the week for the schedule. For convenience, each column header names the schedule held in the column. The header for the column holding the first schedule is 1 Schedule: 8-8-8-8-8-0-0.
Mexico Tables
COMPANY WORK SCHEDULES Table
This table provides several commonly-used work schedules, and you can add more. A work schedule shows the hours employees normally work each day from Monday through Sunday.
Employees with the schedule 10-10-10-10-0-0-0 work 10 hours each day Monday through Thursday, and have Friday, Saturday and Sunday off.
Each column in this table holds a separate schedule, with each row holding the hours worked each day of the week for the schedule. For convenience, each column header names the schedule held in the column.
The header for the column holding the first schedule is 1 Schedule: 8-8-8-8-8-0-0.
Contract Table
The PQP_CONTRACT_TYPES table is used for IDW calculation and is a part of the historic rates infrastructure. Rows are created automatically as a part of the IDW calculation. Users would not normally see these.
ISR Credit to Salary Tables
The following tables store ISR credit-to-salary information for tax calculation:
-
ISR Credit to Salary_Week
-
ISR Credit to Salary_Month
ISR Rates Tables
The following tables store ISR tax rate information for tax calculation:
-
ISR Rates_Week
-
ISR Rates_Month
-
ISR Rates_Annual
ISR Subsidy Tables
The following tables store ISR tax subsidy rate information for tax calculation:
-
ISR Subsidy_Week
-
ISR Subsidy_Month
-
ISR Subsidy_Annual
PTU Factors
This table stores the details that are required for the Employee Participation in Profits (PTU) calculation. See Legal Employer: PTU Factors, Oracle HRMS Enterprise and Workforce Management Guide (Mexico) for information about the table columns.
Tax Subsidy Percentage Table
This table has no data already in it but is ready for your data entry. It provides the means to record and track your yearly tax subsidy percentage.
Work Risk Insurance Percentage Table
This table has no data already in it but is ready for your data entry. It provides the means to record and track your yearly work risk insurance percentage.
Russia Tables
Flexfield Segment Mappings Table
The RU_FLEXFIELD_SEGMENT_MAPPINGS table maps the value of a key flexfield segment to the respective segment number. This table stores information about the Grade Code segment of the Grade Key Flexfield, and the Foreign Language Code and Foreign Language Name segments of the Competence Key Flexfield.
Oracle HRMS references this table to define the grade of an employee. It also uses the table to define the code and name of the foreign language in which an employee is competent.
Singapore Tables
When the CPF Board makes changes to the rates for a particular contribution, Oracle Payroll for Singapore provides legislative updates that include the new rate information.
CPF Rates
The CPF rates tables, CPF_SCHEDULE_A to CPF_SCHEDULE_N, include the CPF rates that are payable for each employee, depending on the employee type, salary range, and age range.
Oracle Payroll references this table when processing involuntary CPF deductions.
FWL Rates
The FWL_RATES table holds the rates that are used to calculate an employer's Foreign Workers Levy (FWL) liability. The table includes the codes that determine the type of work performed by the employee, both skilled and unskilled, and the rate payable for that type of employee, depending on whether they worked for the entire month or just part of it.
Oracle Payroll references this table when processing FWL Employer Liability deductions.
Community Fund Rates
The following rate tables provide the monthly contribution rate for each community fund, depending on the employee's salary:
-
SG_COMM_FUND_CDAC
-
SG_COMM_FUND_ECF
-
SG_COMM_FUND_MBMF
-
SG_COMM_FUND_SINDA
Oracle Payroll references this table when processing involuntary Community Fund deductions.
Exchange Rate Types
The EXCHANGE_RATE_TYPES table includes conversion rate type information. Oracle Financials references this table.
Spain Tables
Company Work Patterns
The table PQP_COMPANY_WORK_PATTERNS has several commonly-used work schedules already entered in it, and you can add more. A work schedule shows the hours employees normally work each day from Monday through Sunday.
Employees with the schedule 10-10-10-10-0-0-0 work 10 hours each day Monday through Thursday, and have Friday, Saturday and Sunday off.
Each column in this table holds a separate schedule, with each row holding the hours worked each day of the week for the schedule. For convenience, each column header names the schedule held in the column.
The header for the column holding the first schedule is 1 Schedule: 8-8-8-8-8-0-0.
Contract Key Relation Table
The ES_CONTRACT_KEY_RELATION table maps the relationship between the contract key, status, type, subtype, and start reason. Oracle HRMS references this table for social security information.
UAE Tables
City Validation Table
The UAE_CITY_VALIDATION table stores the list of cities that are valid for a particular Emirate.
Area Validation Table
The UAE_AREA_VALIDATION table holds the list of areas that are valid for a particular city.
Marital Status Table
The UAE_MARITAL STATUS table stores values used to map the codes required by Dubai Naturalization and Residency Department (DNRD) to the codes in the core lookup.
US Tables
COMPANY WORK SCHEDULES Table
This table has several commonly-used work schedules already entered in it, and you can add more. A work schedule shows the hours employees normally work each day from Monday through Sunday.
Employees with the schedule 10-10-10-10-0-0-0 work 10 hours each day Monday through Thursday, and have Friday, Saturday and Sunday off.
Each column in this table holds a separate schedule, with each row holding the hours worked each day of the week for the schedule. For convenience, each column header names the schedule held in the column.
The header for the column holding the first schedule is 1 Schedule: 8-8-8-8-8-0-0.
GTL PREMIUMS Table
For use in Oracle Payroll, this table holds the cost of Group Term Life insurance premiums per $1,000 of coverage by age range, as maintained in the IRS Uniform Premiums table. The table rows hold age ranges, and its single column holds the premium for each $1,000 of coverage for each age range.
Oracle provides you with updates to the GTL Premiums table, which your system administrator applies.
The predefined imputed earnings GTL Imputed Income references this table in its processing.
SHIFT DIFFERENTIALS Table
This table has no data already in it, but is ready for your data entry. Its rows hold the shift designators Day, Eve, Night and Split, representing the normal shifts employees work, and its columns have the same headings, for entry of differentials. You can add to or change the shift designators as necessary.
To look at examples of differentials entries, suppose day shift employees receive one and one-half times their regular pay when temporarily working the evening shift, twice their regular pay for the night shift, and three times their regular pay for the split shift. You enter 1.5, 2.0 and 3.0 as the differentials for day shift workers.
| Time Period | D | E | N | S |
|---|---|---|---|---|
| Day | -- | 1.5 | 2.0 | 3.0 |
The predefined earnings types Regular Wages and Shift Pay reference this table in their processing in Oracle Payroll.
WAGE RATES Table
This table has no data in it when you receive your system, but is ready for your data entry. Its rows hold rate codes, and its single column holds the rate matching each code. This example holds codes for rates associated with the operation of different types of equipment:
| Rate Code | Rate |
|---|---|
| FL (forklift) | 6.80 |
| A3 (crane A3) | 8.20 |
| A7 (crane A7) | 9.00 |
Oracle Payroll's predefined earnings types Regular Wages, Overtime, and Shift Pay reference this table in their processing.
Setting Up User Tables, Columns and Rows
You set up user tables in the Table Structure window.
To set up the structure of a table
-
Set your effective date to the date from which you want the table's row labels to take effect.
-
Enter the table name.
-
For the table's match type, select Match or Range. Select Match if each row is for one item, such as one job or one code. Select Range if each row is for a range of numeric values, such as an age range or a pay range.
-
If the match type is Match, select Date, Number or Text as the Key Units of Measure, depending on whether entries in the rows are dates, numbers, or alphanumeric text.
If the table's match type is Range, the Key Units of Measure automatically becomes Number.
-
Enter the row label as the Row Title.
For example, if the table rows refer to rate codes, an appropriate row title would be Rate Code. If the rows refer to age ranges, you might use the title Age Range.
-
Save your work, and choose the Columns button to go to the Columns window.
Column Setup
-
Enter labels for the table columns in the Name field.
Note: To add a new column to a table that already exists, place the cursor on the name of the column after which you want to enter the new column name, and choose Insert Record from the Edit menu to obtain a clear field.
-
If you are using formula validation for a column's entries, select the name of the validation formula for the column.
-
Save your work and close the window.
Row Setup
-
In the Table Structure window, choose the Rows button to go to the Rows window.
-
If the match type of the table is Match, enter the label for each table row in the fields under the heading Exact.
If the match type of the table is Range, enter numbers representing the lower and upper boundary of each row's range.
-
In the Sequence fields, you can optionally enter a number for each row label to determine the order in which it appears on a list in the Table Values window. Logical sequencing of row labels helps users enter table values rapidly and accurately.
-
When you are finished, save your work and close the window. Your table is now set up and ready to receive entries into its columns.
Entering Table Values
If you have set up user-defined tables, you can enter and maintain values in the Table Values window.
You can access table values from any formula used for input-value validation, payroll calculation or definition of skip-rules, assignment sets or QuickPaint reports. You can access this information using the GET_TABLE_VALUE function.
Note: The system administrator can create configured versions of the Table Values window so that you use each version for one user table only.
To enter values into table columns
-
Set your effective date to the date from which you want the entries to take effect.
-
Query the table name.
-
With the cursor in the Column Name field, use the up and down arrows to locate the name of the column in which you want to make entries.
-
In the Values region, select each row for which you want to make an entry. You select rows in the Exact field or the Lower Bound field, depending on the match type of the table.
-
For each row, make the appropriate entry in the Value field. For numeric values, you must use '.' (dot) as the decimal separator to ensure the use of accurate table values in payroll calculations.
-
Save your work.
Lookups
Lookups
Lookups provide lists of valid values for certain items of information. This has two key advantages:
-
It ensures that all users use the same terminology, which makes it easier to inquire and report on the information.
-
It speeds up data entry because you can enter just enough to identify the value, and the system completes the entry.
In Oracle HRMS, a list of values is called a lookup type. Each value comprises a code, a meaning, and sometimes, a legislative tag. For example:
| Lookup Type | Code | Meaning | Tag |
|---|---|---|---|
| MAR_STATUS | M | Married | |
| S | Single | ||
| R | Registered Partner | +NL | |
| DP | Domestic Partner | -FR, AU |
The codes are used internally; users do not see them. There is a maximum of 250 lookups for each lookup type.
Your localization team uses the Tag column to define the lookup codes that are used by each localization. In this example, the Married and Single codes are visible to all legislations. The Registered Partner code is visible to the Dutch legislation only. The code for Domestic Partner, however, is visible to all legislations except France and Australia.
Predefined Lookup Types
A number of lookup types are included in Oracle HRMS. Some contain codes as startup data. You can never delete these codes, but you can change their meaning. For some lookup types, you can also disable the codes that are supplied. Your ability to disable codes and add new codes is determined by the access level of the lookup type:
-
User - You can add codes and you can disable supplied codes.
-
Extensible - You can add new codes, but you cannot disable supplied codes because the system uses them.
-
System - You can neither add codes nor disable supplied codes. You can only change the meaning or description of supplied codes.
See User and Extensible Lookups for a list of the predefined lookup types with an access level of User or Extensible.
You can also create your own lookup types in the lookup type window. These all have an access level of User.
Global and Local Lookup Types
If you are using Security Groups Enabled security, lookup types may be either global or local:
-
Global lookup types are available to all business groups
-
Local lookup types are only available to the business group/security group in which they are created.
Local lookups can be implemented in either of the following ways:
-
You can create an override. This means that you retain the global name for the lookup type, but supply local values appropriate for your business group. The extent to which you can do this is determined by the access level for the lookup type.
-
You can create an entirely new lookup type with lookup values that are only applicable to your local business group.
When you connect to any business group you will therefore have access to each of the following:
-
The global lookup types and values
-
Local overrides to the global lookup values
-
Local lookup types and values
User and Extensible Lookups
The following table shows the field and legislation for user and extensible lookups.
| Field | Lookup | Legislation |
|---|---|---|
| Category (absence) | ABSENCE_CATEGORY | All |
| Reason (for absence) | ABSENCE_REASON | All |
| Account Type (for bank details) | ACC_TYPE | All |
| Categories (for activities, programs, packages) | ACTIVITY_CATEGORY | All |
| Successful attendance (for activity based events) | ACTIVITY_SUCCESS_CRITERIA | All |
| User Status (for an activity) | ACTIVITY_USER_STATUS | All |
| Address Type | ADDRESS_TYPE | All |
| AK Web Region Codes | AK_WEB_REGION_CODES | All |
| Reason (for application assignment status) | APL_ASSIGN_REASON | All |
| Type (event type for applicant) | APL_EVENT_TYPE | All |
| Type (interview type for applicant) | APL_INTERVIEW_TYPE | All |
| Reason (for secondary assignment status) | APL_SEC_ASSIGN_REASON | All |
| Appraisal and Assessment Status (appraisal and assessment on SSHR) | APPRAISAL_ASSESSMENT_STATUS | All |
| Types of appraisal processed by appraisal functionality | APPRAISAL_SYSTEM_TYPE | All |
| Appraisal and Assessment Type (appraisal and assessment on SSHR) | APPRAISAL_TYPE | All |
| AT_PROVINCE | All | |
| Activity (for work incident) | AT_WORK_FLAG | All |
| Australian Tax Office Codes | AU_ATO_OFF | Australia |
| Australian Direct Entry Indicator | AU_DE_IND | Australia |
| Australian Direct Entry Transaction Code | AU_DE_TRN_CDE | Australia |
| State (Australian addresses) | AU_STATE | All |
| Years until eligible for long service leave on termination | AU_TERM_LSL_ELIGIBILITY_YEARS | Australia |
| Balance Type Category | BACKFEED_BT_CATEGORY | All |
| Check Type Category | BACKFEED_PD_CHECK_TYPE | All |
| Bank account name | BANK_ACCOUNT_NAME | All |
| Bank account number | BANK_ACCOUNT_NUMBER | All |
| Bank account type | BANK_ACCOUNT_TYPE | All |
| Bank branch | BANK_BRANCH | All |
| Bank name | BANK_NAME | All |
| Bargaining Unit (for assignment) | BARGAINING_UNIT_CODE | All |
| Bank name | BE_BANK | Belgium |
| City (Belgian addresses) | BE_CITY | Belgium |
| Contract Category | BE_CONTRACT_CATEGORY | Belgium |
| Disciplinary Action | BE_DISCIPLINARY_ACTION | Belgium |
| Disciplinary Body | BE_DISCIPLINARY_BODY | Belgium |
| Employee Coding | BE_EMPLOYEE_CODING | Belgium |
| Employee Type | BE_EMPLOYEE_TYPE | Belgium |
| Ending Reason | BE_ENDING_REASON | Belgium |
| Misdemeanour Type | BE_MISDEMEANOUR_TYPE | Belgium |
| Organization Language | BE_ORGANIZATION_LANGUAGE | Belgium |
| Reduced Charges Category | BE_REDUCED_CHARGES_CATEGORY | Belgium |
| RSZ Category | BE_RSZ_CATEGORY | Belgium |
| Starting Reason | BE_STARTING_REASON | Belgium |
| Yes/No | BE_YES_NO | Belgium |
| Bank Identifier Code | HR_BE_BIC_CODES | Belgium |
| Action Type | BEN_ACTN_TYP | All |
| Activity Type | BEN_ACTY_TYP | All |
| Benefits Balance Usage | BEN_BNFTS_BAL_USG | All |
| Certification Type | BEN_BNF_CTFN_TYP | All |
| BEN_CMP_ENRT_ACTN_TYP | All | |
| Compensation Category | BEN_COMP_TYP | All |
| Type | BEN_CRT_ORDR_TYP | All |
| Delivery Medium | BEN_DLVRY_MED | All |
| Delivery Method | BEN_DLVRY_MTHD | All |
| BEN_DLVRY_SCHED_INFO | All | |
| Dependent Coverage Certification Type | BEN_DPNT_CVG_CTFN_TYP | All |
| Enrollment Certification Type | BEN_ENRT_CTFN_TYP | All |
| Life Event Occurred Date Code | BEN_EVAL_DET | All |
| Change Event | BEN_EXT_CHG_EVT | All |
| Format Mask | BEN_EXT_FRMT_MASK | All |
| Operator | BEN_EXT_OPER | All |
| Run Status | BEN_EXT_STAT | All |
| Condition (Optional) Where | BEN_EXT_TTL_COND_OPER | All |
| Field | BEN_FIELD | All |
| BEN_FILE_CTL_TTL_TYP | All | |
| BEN_FILE_DTA_TYP | All | |
| Type | BEN_FILE_RCRD_TYP | All |
| BEN_FILE_TYP | All | |
| BEN_FILE_UPDT_TYP | All | |
| BEN_FL_TM_PT_TM | All | |
| Type | BEN_GD_R_SVC_TYP | All |
| BEN_GNDR | All | |
| Health Service | BEN_HLTH_CARE_SVC_TYP | All |
| BEN_INFO_SRC | All | |
| BEN_INTRFC_TYP | All | |
| BEN_MED_CNTNT_TYP | All | |
| BEN_MED_FMT_TYP | All | |
| Non-Monetary UOM | BEN_NNMNTRY_UOM | All |
| Option Type | BEN_OPT_TYP | All |
| Organization Roles | BEN_ORG_ROLE_TYP | All |
| Reason | BEN_OVRID_RSN | All |
| Designation code | BEN_PCP_DSGN | All |
| Program Group | BEN_PGM_GRP | All |
| Program Type | BEN_PGM_TYP | All |
| BEN_PIN_PRPS | All | |
| Product | BEN_PRDCT | All |
| Type | BEN_PRMRY_CARE_PRVDR_TYP | All |
| Primary Funding Method | BEN_PRMRY_FNDG_MTHD | All |
| BEN_PRTN_CTFN_TYP | All | |
| Payment Schedule | BEN_PYMT_SCHED | All |
| QDRO Payment Distribution | BEN_QDRO_DSTR_MTHD | All |
| Administrative Code | BEN_REGN_ADMIN | All |
| Regulatory Plan Type | BEN_REGY_PL_TYP | All |
| Regulatory Purpose | BEN_REGY_PRPS | All |
| Type | BEN_REIMBMT_CTFN_TYP | All |
| BEN_RESND_RSN | All | |
| BEN_RMBT_CTFN_TYP | All | |
| Purpose | BEN_RPTG_PRPS | All |
| Waive Coverage Reason | BEN_WV_CVG_RSN | All |
| Waive Participation Certification Type | BEN_WV_PRTN_CTFN_TYP | All |
| Waiving Participation Reason | BEN_WV_PRTN_RSN | All |
| Blood Type | BLOOD_TYPE | All |
| Source of student | BOOKING_SOURCE | All |
| Measurement Type (for budget) | BUDGET_MEASUREMENT_TYPE | All |
| Cash Analysis (for a cash payment) | CASH_ANALYSIS | All |
| Census Metropolitan Area (Canada) | CA_CMA | Canada |
| Canadian Payment Association Codes | CA_DD_CPA_CODES | Canada |
| Element categories | CA_EMPLOYER_LIABILITIES | Canada |
| Select Form to be printed (Canada) | CA_FORM_NAME | Canada |
| Element categories | CA_INVOLUNTARY_DEDUCTIONS | Canada |
| Element categories | CA_PAYMENT | Canada |
| Province (Canadian addresses) | CA_PROVINCE | All |
| Element categories | CA_REGULAR_EARNINGS | Canada |
| Element categories | CA_SUPPLEMENTAL_EARNINGS | Canada |
| Element categories | CA_TAXABLE_BENEFITS | Canada |
| Element categories | CA_VOLUNTARY_DEDUCTIONS | Canada |
| Method | CERTIFICATION_METHOD | All |
| List of Swiss Cantons | CH_CANTON | All |
| CHECKBOX | All | |
| Checklist categories
Note: Applicable to Release 12 only |
CHECKLIST_CATEGORIES | All |
| Check item (on a checklist) | CHECKLIST_ITEM | All |
| Status (of an item on a checklist) | CHECKLIST_STATUS | All |
| User friendly names for cheque/check-ordering SQL statement | CHEQUE_PROCEDURE | All |
| User friendly names for cheque/check-writing SRW2 reports. | CHEQUE_REPORT | All |
| Company Age (for salary surveys mappings) | COMPANY_AGE | All |
| Company Size (for salary surveys) | COMPANY_SIZE | All |
| Primary Evaluation Method | COMPETENCE_EVAL_TYPE | All |
| Consultation Type | CONSULTATION_TYPE | All |
| Consultation Result | CONSULTATION_RESULT | All |
| Competence Type | COMPETENCE_TYPE | All |
| Type (relationship of one person to another) | CONTACT | All |
| Contract End Reason | CONTRACT_END_REASON | All |
| Contract Start Reason | CONTRACT_START_REASON | All |
| Contract Status | CONTRACT_STATUS | All |
| Contract Status Reason | CONTRACT_STATUS_REASON | All |
| Contract Types | CONTRACT_TYPE | All |
| Contract Types (Belgium) | CONTRACT_TYPE_BE | Belgium |
| Type (of MIX batch control total) | CONTROL_TYPE | All |
| Assignment Category | CWK_ASG_CATEGORY | All |
| Reason (for contingent worker assignment) | CWK_ASSIGN_REASON | All |
| Reason (for contingent worker secondary assignment status) | CWK_SEC_ASSIGN_REASON | All |
| Reason a student failed to successfully complete an event. | DELEGATE_FAILURE_REASON | All |
| User defined Type to categorize development events. | DEV_EVENT_TYPE | All |
| Bank Code | DE_BANK_CODE | Germany |
| Course Type (for qualifications) | DE_COURSE_TYPE | Germany |
| Establishment Type (for qualifications) | DE_ESTABLISHMENT_TYPE | Germany |
| Hereditary Title | DE_HEREDITARY_TITLE | Germany |
| Work Incident Status | DE_INCIDENT_STATUS | Germany |
| License Type (degree type) | DE_LICENSE_TYPE | Germany |
| Organization Link Type | DE_LINK_TYPE | Germany |
| Name Prefix | DE_PREFIX | Germany |
| Professional Title | DE_PROF_TITLE | Germany |
| Bank Identifier Code | HR_DE_BIC_CODES | Germany |
| DE_REGION | All | |
| Category (of disability) | DISABILITY_CATEGORY
Note: For Polish users only: This lookup contains relevant Polish codes. Therefore, you must not add further codes for disability categories to this lookup. |
All |
| Reason (for disability) | DISABILITY_REASON | All |
| Status (of disability) | DISABILITY_STATUS | All |
| Disease Type | DISEASE_TYPE | All |
| Document Category | DOCUMENT_CATEGORY | All |
| Document Status (contract) | DOCUMENT_STATUS | All |
| Reason (for element entry) | ELE_ENTRY_REASON | All |
| Reason (for employee assignment) | EMP_ASSIGN_REASON | All |
| Employment Category | EMP_CAT | All |
| Type (of employee event) | EMP_EVENT_TYPE | All |
| Type (of interview for employee) | EMP_INTERVIEW_TYPE | All |
| Reason (for secondary assignment status) | EMP_SEC_ASSIGN_REASON | All |
| Employee Category | EMPLOYEE_CATG | Ireland |
| Bank Identifier Code | HR_IE_BIC_CODES | Ireland |
| Employee Category | EMPLOYEE_CATG | Mexico |
| Reason (for change in enrollment status) | ENROLLMENT_STATUS_REASON | All |
| Province | ES_PROVINCE | Spain |
| Bank Identifier Code | HR_ES_BIC_CODES | Spain |
| Ethnic Origin | ETH_TYPE | All |
| System (job or position evaluation system) | EVAL_SYSTEM | All |
| Measurement In (type for EVAL SYSTEM) | EVAL_SYSTEM_MEAS | All |
| User defined status for an event | EVENT_USER_STATUS | All |
| Type (of work pattern exception) | EXCEPTION_CATEGORY | All |
| Type (of finance line) | FINANCE_LINE_TYPE | All |
| Type (of formula) | FORMULA_TYPE | All |
| Bank Details | HR_DK_BANK_REGISTRATION | Denmark |
| Condition of Employment | DK_EMP_CATEGORY | Denmark |
| Employee Group | DK_EMP_GROUP | Denmark |
| Employee Type | DK_EMP_TYPE | Denmark |
| School Type | DK_ESTB_TYPE | Denmark |
| Labels (for Denmark) | DK_FORM_LABELS | Denmark |
| Employee Category | DK_EMP_CATEGORY | Denmark |
| Postal Code/Town | DK_POSTCODE_TOWN | Denmark |
| Union Membership | DK_UNION_MEMBERSHIP | Denmark |
| Court Order Name | DK_COURT_ORDER_NAME | Denmark |
| Benefits Given | DK_BENEFIT | Denmark |
| Postal Code | DK_POSTAL_CODE | Denmark |
| Bank Identifier Code | HR_DK_BIC_CODES | Denmark |
| Community Price Category | FI_COM_PRICE_CAT | Finland |
| Insurance Occupational Group | FI_INS_OCC_GRP | Finland |
| Electronic Report Method | FI_REPORTING_METHOD | Finland |
| Union Occupational Group | FI_EMPR_OCC_GRP | Finland |
| Pension Type | FI_PENSION_TYPES | Finland |
| Postal Code | FI_POSTAL_CODE | Finland |
| Bank Identifier Code | HR_FI_BIC_CODES | Finland |
| Activity Type | FR_ACTIVITY_TYPE | France |
| Address Suffix | FR_ADDRESS_SUFFIX | France |
| AGIRC/ARRCO | FR_AGIRC_ARRCO | France |
| Bank | FR_BANK | France |
| Contract Category | FR_CONTRACT_CATEGORY | France |
| Disability/COTOREP Code | FR_COTOREP_CODE | France |
| DADS Type | FR_DADS_TYPE | France |
| Department | FR_DEPARTMENT | France |
| Disciplinary Actions | FR_DISCIPLINARY_ACTION | France |
| Education Status | FR_EDUCATION_STATUS | France |
| Employee Category | FR_EMPLOYEE_CATEGORY | France |
| Employee Status | FR_EMPLOYEE_STATUS | France |
| Employer Type | FR_EMPLOYER_TYPE | France |
| Employment Type | FR_EMPLOYMENT_TYPE | France |
| Ending Reason | FR_ENDING_REASON | France |
| Guaranteed ID | FR_GI_TYPES | France |
| Hiring Reason | FR_PQH_NONTIT_HIRE_REASON | France |
| Class of Illness | FR_ILLNESS_CLASS | France |
| Type of Illness | FR_ILLNESS_TYPE | France |
| Invalidity Category | FR_INVALIDITY_CLASS | France |
| Qualification Level | FR_LEVEL_OF_WORKER | France |
| Mandate Type | FR_MANDATE_TYPE | France |
| Type of Medical Examination | FR_MEDICAL_EXAMINATION_TYPE | France |
| Result of Medical Examination | FR_MEDICAL_RESULT | France |
| Military Service Status | FR_MILITARY_SERVICE_STATUS | France |
| Military Service Types | FR_MILITARY_SERVICE_TYPE | France |
| Misdemeanor Type | FR_MISDEMEANOUR_TYPE | France |
| NAF/APE Code | FR_NAF_CODE | France |
| PCS Code | FR_PCS_CODE | France |
| Pension Code | FR_PENSION_CODE | France |
| Reason (in Person EIT-French Public Sector additional Seniority Details) | FR_PQH_ADDL_REASON | France |
| Activity (in Person EIT-French Public Sector Soldier Details) | FR_PQH_ARMY_ACTIVITY | France |
| Army Body (in Person EIT-French Public Sector Soldier Details) | FR_PQH_ARMY_BODY | France |
| Hierarchy (in Person EIT-French Public Sector Soldier Details) | FR_PQH_ARMY_HIERARCHY | France |
| Rank (in Person EIT-French Public Sector Soldier Details) | FR_PQH_ARMY_RANK | France |
| Bonification Type (in Person EIT-French Public Sector Bonification Details) | FR_PQH_BONIFICATION_TYPE | France |
| Level | FR_PQH_COMMITTEE_LEVEL | France |
| Type (Members) | FR_PQH_COMMITTEE_MEMBER_TYPE | France |
| Mention (in Qualification Type DDF) | FR_PQH_DIPLOMA_MENTION | France |
| Optional (in Qualification Type DDF) | FR_PQH_DIPLOMA_OPTION | France |
| Specialty (in Qualification Type DDF) | FR_PQH_DIPLOMA_SPECIALITY | France |
| Sub-Specialty (in Qualification Type DDF) | FR_PQH_DIPLOMA_SUB_SPECIALITY | France |
| Relationship Type | FR_PQH_EXT_ORG_TYPE | France |
| Category (in Corps) | FR_PQH_GRADE_CATEGORY | France |
| Badge Name (in Ministry Awards SIT) | FR_PQH_MINISTRY_BADGE_NAME | France |
| Level (in Ministry Awards SIT) | FR_PQH_MINISTRY_LEVEL | France |
| Medal Name (in Ministry Awards SIT) | FR_PQH_MINISTRY_MEDAL_NAME | France |
| Order Name (in Ministry Awards SIT) | FR_PQH_MINISTRY_ORDER_NAME | France |
| Activity (in Organization EIT) | FR_PQH_ORG_ACTIVITY | France |
| Physical Share (in Assignment: Statutory Information) | FR_PQH_PHYSICAL_SHARE | France |
| Type of Service (in Person EIT-French Public Sector Soldier Details) | FR_PQH_TYPE_OF_ARMY_SERVICE | France |
| Event | FR_PQH_VALIDATION_EVENT | France |
| Previous Employer COTOREP Type | FR_PREVIOUS_COTOREP | France |
| Department | FR_REGION | France |
| Representative Type | FR_REPRESENTATIVE_TYPE | France |
| Starting Reason | FR_STARTING_REASON | France |
| Types of French Training | FR_TRAINING_TYPE | France |
| Type of Worker | FR_TYPE_OF_WORKER | France |
| URSSAF Code | FR_URSSAF_CODE | France |
| Visa Status | FR_VISA_STATUS | France |
| Visa Type | FR_VISA_TYPE | France |
| Work Accident Code | FR_WORK_ACCIDENT_CODE | France |
| Work Accident Result | FR_WORK_ACCIDENT_RESULT | France |
| Type of Work Accident | FR_WORK_ACCIDENT_TYPE | France |
| Work Pattern | FR_WORK_PATTERN | France |
| Medical Service | FR_WORK_MEDICAL_SERVICE | France |
| Situation Sub Type | FR_PQH_STAT_SIT_SUB_TYPE | France |
| Situation Reason | FR_PQH_STAT_SIT_REASON | France |
| Type of Request | FR_PQH_STAT_SIT_RQST_TYPE | France |
| Label names for the BIAF report template | BIAF_LOOKUP_CODE | France |
| Label names for the DIF Statement report template | DIF_STMT_LOOKUP_CODE | France |
| Bank Identifier Code | HR_FR_BIC_CODES | France |
| Representative Body's method of funding | FUNDING_METHOD | All |
| Authority (for PAYE details) | GB_AUTHORITY | GB |
| Bank Name | GB_BANKS | GB |
| Certificate (for element NI) | GB_CERTIFICATE | GB |
| Cheque/Check Style | GB_CHEQUE_REPORT | GB |
| County (UK addresses) | GB_COUNTY | GB |
| Pay day type | GB_PAY_DAY_TYPE | GB |
| Pension | GB_PENSION | GB |
| Allows users to to define valid SCON number for NI SCON input | GB_SCON | GB |
| Sequence (for the BACS process) | GB_SORT_SEQUENCE | GB |
| PQP_GB_ADDITIONAL_PAY_TYPE | GB | |
| PQP_GB_SWF_CNTRCT_AGRMNT_TYPES | GB | |
| PQP_GB_SWF_ABSENCE_CATEGORY | GB | |
| PQP_GB_SWF_DESTINATION_CODES | GB | |
| PQP_GB_SWF_ORIGIN_CODES | GB | |
| PQP_GB_DCSF_PAY_SCALE | GB | |
| PQP_GB_SWF_POSTS | GB | |
| PQP_GB_REGIONAL_SPINE_CODE | GB | |
| PQP_GB_SWF_ROLES | GB | |
| PQP_GB_DCSF_SPINE_POINTS | GB | |
| PQP_GB_SWF_SUBJECT_CODES | GB | |
| PQP_GB_SWF_QTS_ROUTES | GB | |
| PQP_GB_SWF_QUALIFICATION_CODES | GB | |
| PQP_GB_STAFF_CATEGORY | GB | |
| UK_ETHNIC_CODES | GB | |
| Names of Item Types for HR Summary Process | GSP_ITEM_TYPE | All |
| Names of Key Types for HR Summary Process | GSP_KEY_TYPE | All |
| Names of Restriction Types for HR Summary Process | GSP_RESTRICTION_TYPE | All |
| Hazard | HAZARD_TYPE | All |
| Area (Hong Kong addresses) | HK_AREA_CODES | Hong Kong |
| Rental/Passage Deduction Level | HK_DEDUCTION_LEVEL | Hong Kong |
| Leaving Reasons | HK_DEPARTURE_REASONS | Hong Kong |
| IR56B Origin | HK_IR56B_ORIGIN | Hong Kong |
| IR56 Box Descriptions | HK_IR56_BOX_DESC | Hong Kong |
| MPF Voluntary Processing Rules | HK_MPF_PROC_RULE | Hong Kong |
| MPF Wage Base | HK_MPF_WAGE_BASE | Hong Kong |
| Nature of Quarters | HK_NATURE_OF_QUARTERS | Hong Kong |
| Overseas Payment Amount Known | HK_OVERSEAS_PAYMENT | Hong Kong |
| Returning to Hong Kong | HK_RETURN_TO_HK | Hong Kong |
| Tax Reporting Year | HK_TAX_YEAR | Hong Kong |
| Document Category | HR_ADI_DOCUMENT_TYPE | All |
| Date Posted | HR_APPLICATION_DATE | All |
| Reason for Deployment | HR_DEPLOYMENT_REASONS | All |
| Hire Date | HR_HIRE_DATE | All |
| Banks in Ireland | HR_IE_BANK | Ireland |
| Date Posted | HR_JOB_POSTED_DATE | All |
| HR Metalink Application | HR_METALINK_APPLICATION | All |
| Academic Title | HR_NL_ACADEMIC_TITLE | NL |
| Dutch Bank Details | HR_NL_BANK | NL |
| Dutch Cities | HR_NL_CITY | NL |
| Correspondence Language | HR_CORR_LANGUAGE | NL |
| Dutch HR WAO Disability | HR_NL_DI_WAO | NL |
| Full Name Format | HR_NL_FULL_NAME_FORMAT | NL |
| Identification Certificate | HR_NL_ID_CERTIFICATE | NL |
| Job Level | HR_NL_JOB_LEVEL | NL |
| Nationality | HR_NL_NATIONALITY | NL |
| Province | HR_NL_PROVINCE | NL |
| Dutch Regions | HR_NL_REGIONS | NL |
| Royal Title | HR_NL_ROTAL_TITLE | NL |
| End Reasons for Social Health Insurance Report | HR_NL_SHI_END | NL |
| Special Title | HR_NL_SPECIAL_TITLE | NL |
| Field Labels | HR_FORM_LABELS | NL |
| Bank Identifier Code | HR_NL_BIC_CODES | NL |
| Group | HR_WPM_GROUP | All |
| Unit of Measure | HR_WPM_MEASURE_UOM | All |
| Priority | HR_WPM_PRIORITY | All |
| Weighting | HR_WPM_WEIGHTING | All |
| Sector | NL_SECTOR | NL |
| Batch process used by OTM | HXT_BATCH_STATUS | All |
| Days of the week | HXT_DAY_OF_WEEK | All |
| Process modes used by OTM | HXT_PROCESS_MODE | All |
| Benefit Type | IE_BENEFIT_TYPE | Ireland |
| Benefit Type | IE_BIK_ASSET_TYPE | Ireland |
| Benefit Type | IE_BIK_REPORTABLE_ITEM | Ireland |
| Calculation Option | IE_CALC_OPTION | Ireland |
| Cheque List Report Sort Option | IE_CHEQLIST_SORT | Ireland |
| Cheque Report | IE_CHEQUE_REPORT | Ireland |
| Colleges (Irish colleges) | IE_COLLEGES | Ireland |
| County (Irish addresses) | IE_COUNTY | Ireland |
| Text to be displayed on Irish specific field prompts | IE_FORM_LABELS | Ireland |
| Basis of Tax Assessment | IE_PAYE_ASSESS_BASIS | Ireland |
| Information Source | IE_PAYE_INFO_SOURCE | Ireland |
| Tax Basis | IE_PAYE_TAX_BASIS | Ireland |
| Postal Code | IE_POSTAL_CODE | Ireland |
| Contribution Class | IE_PRSI_CONT_CLASS | Ireland |
| Overridden Subclass | IE_PRSI_CONT_SUBCLASS | Ireland |
| Mode | IE_P35_SRS_MODE | Ireland |
| Qualification Type | IE_QUAL_TYPES | Ireland |
| Incident Type | INCIDENT_TYPE | All |
| Industry (for salary survey) | INDUSTRY | All |
| Injury | INJURY_TYPE | All |
| Financial years and CII data | IN_CII_YEARS | India |
| Bank Name | IT_BANK | Italy |
| City (Italian addresses) | IT_CITY | Italy |
| Collective Agreement | IT_COLLECTIVE AGREEMENTS | Italy |
| Contract Type | IT_CONTRACT_TYPE | Italy |
| Text to be displayed on Italian specific field prompts | IT_FORM_LABELS | Italy |
| Employment Category | IT_EMP_CAT | Italy |
| Province (Italian addresses) | IT_PROVINCE | All |
| Trade Unions | IT_TRADE_UNIONS | Italy |
| Unemployment Insurance Codes | IT_UNEMPLOYMENT_INSURANCE_CODE | Italy |
| Unemployment Insurance Sub Codes | IT_UNEMPLOYMENT_INS_SUB_CODE | Italy |
| Extra Job Information | JOB_CATEGORY | All |
| Categories of Jobs | JOB_CATEGORIES | All |
| Representative Body's Jurisdiction | JURISDICTION | All |
| Reason (for leaving) | LEAV_REAS | All |
| LOCAL_BAL_FORM_NAME | All | |
| Marital Status | MAR_STATUS | All |
| Marital Status (Belgium) | MAR_STATUS_BE | Belgium |
| Government Employment Sector | MX_HR_EMP_CAT | Mexico |
| MX_SOCIAL_SECURITY_SALARY_TYPE | Social Security Salary Type | Mexico |
| MX_STATE | All | |
| MY_STATE | All | |
| North American Industry Code for Canada | NAIC | All |
| Nationality | NATIONALITY | All |
| NI Unique Error or Warning | NI_UNIQUE_ERROR_WARNING | All |
| NL_REGION | All | |
| Reason | NPW_TERMINATION_REASONS | All |
| Region (New Zealand addresses) | NZ_COUNTIES | All |
| District of Origin | NZ_DISTRICT_OF_ORIGIN | New Zealand |
| Ethnic Origin | NZ_ETHNIC_ORIGIN | New Zealand |
| Tribal Group | NZ_TRIBAL_GROUP | New Zealand |
| Organization Type | ORG_TYPE | All |
| Class Begins | OTA_ENROLL_CLASS_DATE | All |
| Use to which a work pattern is or may be put | PATTERN_PURPOSE | All |
| Type of checksum used for deductions batches | PAY_PDT_DED_CKSUM | All |
| Type of checksum used for earnings deductions batches | PAY_PDT_EARN_CKSUM | All |
| Type of checksum used for time entry batches | PAY_PDT_TIME_CKSUM | All |
| Category | PER_CATEGORIES | All |
| Communication delivery method, Report Method | PER_CM_MTHD | All |
| Cluster | PER_COMPETENCE_CLUSTER | All |
| FTE Capacity | PER_FTE_CAPACITY | All |
| Minimum Service | PER_LENGTHS_OF_SERVICE | All |
| Format Type | PER_NAME_FORMATS | All |
| Credit Type | PER_QUAL_FWK_CREDIT_TYPE | All |
| Field | PER_QUAL_FWK_FIELD | All |
| Level | PER_QUAL_FWK_LEVEL | All |
| Level Type | PER_QUAL_FWK_LEVEL_TYPE | All |
| Provider | PER_QUAL_FWK_PROVIDER | All |
| QA Organization | PER_QUAL_FWK_QA_ORG | All |
| Qualification Type | PER_QUAL_FWK_QUAL_TYPE | All |
| Sub-Field | PER_QUAL_FWK_SUB_FIELD | All |
| Unit Standard Type | PER_QUAL_FWK_UNIT_STD_TYPE | All |
| Relocation | PER_RELOCATION_PREFERENCES | All |
| Status | PER_SUBJECT_STATUSES | All |
| Subject | PER_SUBJECTS | All |
| Work Duration | PER_TIME_SCALES | All |
| Tuition Method | PER_TUITION_METHODS | All |
| Address Type | ADDRESS_TYPE | Norway |
| Confederation Code | NO_CONFEDERATION_CODES | Norway |
| Labels (for Norway) | NO_FORMS_LABEL | Norway |
| Marital Status | MAR_STATUS | Norway |
| Nationality | NATIONALITY | Norway |
| Legal Employer | NO_LEGAL_EMP_SI_STATUS | Norway |
| Organization Class | ORG_CLASS | All |
| Contact Type | ORG_CONTACT_TYPES | Norway |
| SSB Position Code | HR_NO_POSITION_CODES | Norway |
| School Type | NO_ESTB_TYPES | Norway |
| Tax Municipality | NO_TAX_MUNICIPALITY | Norway |
| Tax Table Numbers | NO_TAX_TABLE_NO | Norway |
| Title | TITLE | Norway |
| Bank Identifier Code | HR_NO_BIC_CODES | Norway |
| US Country Code | PER_US_COUNTRY_CODE | USA |
| I9 Status | PER_US_I9_STATE | USA |
| US Income Types | PER_US_INCOME_TYPES | USA |
| US Process Type | PER_US_PROCESS_TYPE | USA |
| US Residency Status | PER_US_RES_STATUS | USA |
| US Visa Categories | PER_US_VISA_CATEGORIES | USA |
| US Visa Types | PER_US_VISA_TYPES | USA |
| US Visit Code | PER_US_VISIT_CODE | USA |
| Work Hours | PER_WORK_HOURS | All |
| Work Schedule | PER_WORK_SCHEDULE | All |
| Rating | PERFORMANCE_RATING | All |
| Type | PHONE_TYPE | All |
| Reason (for grade step placement) | PLACEMENT_REASON | All |
| Position Family | POSITION_FAMILY | All |
| Status (of reserved position) | POSITION_RESERVED_STATUS | All |
| Status (of position) | POSITION_STATUS | All |
| Academic Rank | PQH_ACADEMIC_RANK | USA |
| Document Type (in Corps: Document Details) | PQH_CORPS_DOC_TYPE | FR |
| Type of Exam (in Corps: Entrance Exams) | PQH_CORPS_EXAM_TYPE | FR |
| Filere (in Position and Corps HGRID) | PQH_CORPS_FILERES | FR |
| Way of Joining Corps (in Corps: Other Details) | PQH_CORPS_WAYS | FR |
| Requirements (in Corps: Other Details) | PQH_CORPS_WAYS_CRITERIA | FR |
| Value of SSHR Transaction Attribute (in Document Management) | PQH_CURRENT_PROPOSED | All |
| PQH_PA_HGRID_NODE_IMAGE | All | |
| PQH_PA_HGRID_ROLLOVER_TEXT | All | |
| Tenure Status | PQH_TENURE_STATUS | USA |
| Element Extra Information (rate type name) | PQP_RATE_TYPE | UK |
| Subtype (for previous employer) | PREV_EMP_SUBTYPE | All |
| Type (for previous employer) | PREV_EMP_TYPE | All |
| Student Enrollments Priority | PRIORITY_LEVEL | All |
| Type (of Professional Credits) | PROFESSIONAL_CREDIT_TYPE | All |
| Source of Proficiency Rating | PROFICIENCY_SOURCE | All |
| A label given to group events within a program | PROGRAM_MEMBERSHIP_GROUP | All |
| Reason (for salary proposal) | PROPOSAL_REASON | All |
| Units (qualifying units for probation period) | QUALIFYING_UNITS | All |
| Basis | RATE_BASIS | All |
| Type (of recruitment activity, also used in application source) | REC_TYPE | All |
| Report Method | REPORT_METHOD | All |
| RECON_STATUS | All | |
| Type (of resource) | RESOURCE_TYPE | All |
| Reason (a resource is used by an activity) | RESOURCE_USAGE_REASON | All |
| Account Type | SG_ACCOUNT_TYPE | Singapore |
| Bank Code | SG_BANK_CODE | Singapore |
| Employer IRAS Category | SG_EMPLOYER_IRAS_CATEGORY | Singapore |
| Permit Category | SG_PERMIT_CATEGORY | Singapore |
| Race | SG_RACE | Singapore |
| Religion | SG_RELIGION | Singapore |
| Survey Age (for salary surveys) | SURVEY_AGE | All |
| Survey Company (for salary surveys) | SURVEY_COMPANY | All |
| Job Name (for salary surveys) | SURVEY_JOB_NAME | All |
| Region (for salary surveys) | SURVEY_REGION | All |
| Seniority (for salary surveys) | SURVEY_SENIORITY | All |
| Reason (for terminating application) | TERM_APL_REASON | All |
| Prefix | TITLE | All |
| Uses Tobacco (for benefits) | TOBACCO_USER | All |
| Role (of trainer in event) | TRAINER_PARTICIPATION | All |
| Center (where event takes place) | TRAINING_CENTRE | All |
| Type (of unit for event pricing) | TRAINING_UNIT | All |
| Accrual Start | US_ACCRUAL_START_TYPE | All |
| Status of request for accommodation | US_ADA_STATUSES | All |
| Coverage Level (for medical, dental and vision benefit plans) | US_BENEFIT_COVERAGE | All |
| Status (of continued coverage) | US_COBRA_STATUS | All |
| Reason (for COBRA Termination) | US_COBRA_TERM_REASON | All |
| Category (within Earnings classification) | US_EARNINGS | All |
| Category (within Imputed Earnings classification) | US_IMPUTED_EARNINGS | All |
| Category (within Information classification) | US_INFORMATION | All |
| Category (within Involuntary Deductions classification) | US_INVOLUNTARY_DEDUCTIONS | All |
| Job Groups | US_JOB_GROUPS | All |
| Filing Status for local income tax | US_LIT_FILING_STATUS | All |
| Exemption Reason (for excluding employee from New Hire report) | US_NEW_HIRE_EXCEPTIONS | All |
| Category (within Nonpayroll Payments classification) | US_PAYMENT | All |
| Category (of accrual plan) | US_PTO_ACCRUAL | All |
| Filing Status for state income tax | US_SIT_FILING_STATUS | All |
| State (US addresses) | US_STATE | All |
| Category (within Supplemental Earnings classification) | US_SUPPLEMENTAL_EARNINGS | All |
| Row Type (for Payroll Tables) | US_TABLE_ROW_TYPES | All |
| List of different instances of US Payroll Tax Balance reports | US_TAX_REPORT | All |
| Category (within Voluntary Deductions classification) | US_VOLUNTARY_DEDUCTIONS | All |
| Position of WC surcharge (after experience modifications and after premium discount) | US_WC_SURCHARGE_POSITION | All |
| Category (of a vacancy, for use in HR Direct Access) | VACANCY_CATEGORY | All |
| Status (of a vacancy) | VACANCY_STATUS | All |
| Type of Reporting Organization | VETS_ORG_TYPE | All |
| User friendly names for cheque writing SRW2 reports | W2_BOX-14_USER_DEFINED | All |
| Name (of global used in workflow) | WF_GLOBAL | All |
| Availability Schedule | WORK_SCHEDULE | All |
| Aggregate Third Party Cheque Types | ZA_AGG_3RD_CHEQUE_REPORT | S Africa |
| Cheque Reports | ZA_CHEQUE_REPORT | S Africa |
| Credit Transfer Cheque Reports | ZA_CT_CHEQUE_REPORT | S Africa |
| Employment Equity Occupational Categories | ZA_EMP_EQ_OCCUPATIONAL_CAT | S Africa |
| Employment Equity Occupational Levels | ZA_EMP_EQ_OCCUPATIONAL_LEV | S Africa |
| Employment Equity Status | ZA_EMP_EQUITY_STATUS | S Africa |
| Language Preference | ZA_LANG_PREF | S Africa |
| NQF Activity Names | ZA_NQF_ACTIVITY_NAMES | S Africa |
| NQF Chamber Names | ZA_NQF_CHAMBER_NAMES | S Africa |
| Race | ZA_RACE | S Africa |
| Religion | ZA_RELIGION | S Africa |
| RSC Regions | ZA_RSC_REGIONS | S Africa |
| Sort Order for Tax Certificates | ZA_TAXCERT_SORT | S Africa |
| Country of Passport Issue | ZA_COUNTRY_OF_PASSPORT_ISSUE | S Africa |
| Employer Trade Classification | ZA_EMPLOYER_TRADE_CLASS | S Africa |
| Tax Area | CN_TAX_AREA | China |
| Social Insurance/PHF Contribution Area | CN_SIC_AREA | China |
| Notice Duration Unit | CN_DURATION_UNIT | China |
| Province/City/SAR (Personal Address Information and Location Address windows) | CN_PROVINCE | China |
| Hukou Location | CN_HUKOU_LOCN | China |
| Hukou Type | CN_HUKOU_TYPE | China |
| Health Status | CN_HEALTH_STATUS | China |
| Race/Ethnic Origin | CN_RACE | China |
| Highest Education Level | CN_HIGH_EDU_LEVEL | China |
| Enterprise Category | CN_ENTRP_CATEGORY | China |
| Archive Format | CN_FILE_ARCHIVE | China |
| Last Level | CN_MILITARY_LEVEL | China |
| Last Rank | CN_MILITARY_RANK | China |
| Type of Exception | CN_PARTY_EXCEPTION | China |
| Party Status | CN_PARTY_STATUS | China |
| Party Type | CN_PARTY_TYPE | China |
| Type | CN_RDP_TYPE | China |
| Technical Title | CN_TECH_TITLE | China |
| Way to obtain Title | CN_TECH_WAY | China |
| Religion | GCC_RELIGION | For all GCC countries. Saudi Arabia, Kuwait |
| Employment Status | SA_EMPLOYMENT_STATUS | Saudi Arabia |
| City | SA_CITY | Saudi Arabia |
| Bank | SA_BANKS | Saudi Arabia |
| Bank | HU_BANKS | Hungary |
| County | HU_COUNTY | Hungary |
| Location Types | HU_LOCATION_TYPES | Hungary |
| Nationality | HU_NATIONALITY | Hungary |
| Form Labels | HU_FORM_LABELS | Hungary |
| Company Formation | HU_COMPANY_FORMATION | Hungary |
| Pension Provider | HU_PENSION_PROVIDERS | Hungary |
| Job Classification | HU_JOB_CLASSIFICATION | Hungary |
| Joining Reason | HU_JOINING_REASON | Hungary |
| Military Rank | HU_MILITARY_RANK | Hungary |
| Civil Defense Organization | HU_CIVIL_DEFENCE_ORG | Hungary |
| Civil Local Department | HU_CIVIL_LOCAL_DEPT | Hungary |
| Civil Local Sub Department | HU_CIVIL_LOCAL_SUB_DEPT | Hungary |
| Civil Group | HU_CIVIL_GROUP | Hungary |
| Civil Sub Group | HU_CIVIL_SUB_GROUP | Hungary |
| Bank Identifier Code | HR_HU_BIC_CODES | Hungary |
| Banks | ES_BANKS | Spain |
| Company Types | ES_COMPANY_TYPES | Spain |
| Province | ES_PROVINCE | Spain |
| Province codes | ES_PROVINCE_CODES | Spain |
| Form Labels | ES_FORM_LABELS | Spain |
| Identifier Type | ES_IDENTIFIER_TYPE | Spain |
| Epigraphs | ES_EPIGRAPHS | Spain |
| Contract Subtype | ES_CONTRACT_SUBTYPE | Spain |
| Contract Replacement Reason | ES_CONTRACT_REPLACEMENT_REASON | Spain |
| Worker Status | ES_WORKER_STATUS | Spain |
| Unemployment Status | ES_UNEMPLOYMENT_STATUS | Spain |
| Special Relationship Type | ES_SPECIAL_RELATIONSHIP_TYPE | Spain |
| Contract Start Reason | ES_CONTRACT_START_REASON_UDT | Spain |
| Payment Key | ES_PAYMENT_KEY | Spain |
| Sub Payment Key (for Payment Key B) | ES_SUB_PAYMENT_KEY_B | Spain |
| Sub Payment Key (for Payment Key F) | ES_SUB_PAYMENT_KEY_F | Spain |
| Sub Payment Key (for Payment Key G) | ES_SUB_PAYMENT_KEY_G | Spain |
| Sub Payment Key (for Payment Key H) | ES_SUB_PAYMENT_KEY_H | Spain |
| Sub Payment Key (for Payment Key L) | ES_SUB_PAYMENT_KEY_L | Spain |
| Contract Subtype | ES_CONTRACT_SUB_TYPE_UDT | Spain |
| State/UT | IN_STATES | India |
| Pin Code | IN_PIN_CODES | India |
| Bank Name | IN_BANK | India |
| Branch Name | IN_BANK_BRANCH | India |
| Account Type | IN_ACCOUNT_TYPE | India |
| Contribution Period | IN_ESI_CONTRIB_PERIOD | India |
| Currency Period | IN_FINANCIAL_YEAR | India |
| Remittance Month | IN_CALENDAR_MONTH | India |
| Nature of Injury | IN_INJURY | India |
| Disablement Level | IN_DISABLEMENT_LEVEL | India |
| Type (Extra Contact Information) | IN_NOMINATION_TYPES | India |
| Residential Status | IN_RESIDENTIAL_STATUS | India |
| Religion | IN_RELIGION | India |
| Community | IN_COMMUNITY | India |
| Employer Classification | IN_ER_CLASS | India |
| Trust Classification | IN_PF_CLASSIFICATION | India |
| Office Type | IN_OFFICE_TYPES | India |
| Industry Classification | IN_IND_CLASS | India |
| Joy Type | IN_JOB_TYPE | India |
| TDS Type on Bonus | IN_BONUS_TDS_TYPE | India |
| Reason for ESI Exemption | IN_ESI_EXEMPTION | India |
| Gratuity forfeiture reason | IN_GRATUITY_FORFEITURE_REASON | India |
| Leaving reason | LEAV_REAS | India |
| Allowance Categories for India | IN_ALLOWANCE_CATEGORY | India |
| Declaration Types | IN_TAX_DECLARATION_TYPES | India |
| City Types | IN_CITY_TYPE | India |
| Declaration Status | IN_DECLARATION_STATUS | India |
| Approval Status | IN_APPROVAL_STATUS | India |
| Declaration Types | IN_INPUT_NAMES | India |
| Professional Tax Frequencies | IN_PT_FREQUENCIES | India |
| Employee Type | IN_EMPLOYEE_TYPE | India |
| Check Styles | IN_CHEQUE_REPORT | India |
| Other Termination Types | IN_OTHER_TERMINATIONS | India |
| Period | IN_PT_FORM3_QUARTERS | India |
| Frequency | IN_PT_FORM3_FREQUENCY | India |
| Year | IN_PT_FORM3_YEAR | India |
| LWF Adjustment Reason | IN_LWF_ADJUST_REASONS | India |
| LWF Exemption Reason | IN_LWF_EXEMPTION | India |
| Cheque/DD Drawn Bank Name | IN_PF_BANK | India |
| Cheque/DD Deposited Base Branch | IN_PF_BASE_BANK | India |
| Governorate | KW_GOVERNORATE | Kuwait |
| Employment Status | KW_EMPLOYMENT_STATUS | Kuwait |
| Banks | KW_BANKS | Kuwait |
| Company Types | KW_COMPANY_TYPE | Kuwait |
| Street Type | PL_STREET_TYPE | Poland |
| Province | PL_PROVINCE | Poland |
| District | PL_DISTRICT | Poland |
| Community | PL_COMMUNITY | Poland |
| Bank Branch | PL_BANK_BRANCH_NAME | Poland |
| Bank Name | PL_BANK_NAME | Poland |
| Period of Submission | PL_PLATNIK_TERM | Poland |
| Application to NIRDP | HR_PL_NIRDP_APPLICATION | Poland |
| Legal Base of Activity | PL_LEGAL_BASE_ACTIVITY | Poland |
| Type of Property | PL_TYPE_OF_PROPERTY | Poland |
| Type of Service | PL_TYPE_OF_SERVICE | Poland |
| Employee Social Security Meaning | PL_EMP_SOCIAL_SECURITY_MEANING | Poland |
| Expense Type | PL_TYPE_OF_VEHICLE_EXPENSE | Poland |
| Paid By | PL_TYPE_OF_VEHICLE_PAYEE | Poland |
| Payment Mode | PL_TYPE_OF_VEHICLE_PAY_MODE | Poland |
| Bank Identifier Code | HR_PL_BIC_CODES | Poland |
| Bank Code | HR_KW_BANK_CODES | Kuwait |
| Loan Type | KW_LOAN_TYPE | Kuwait |
| Equipment Used | RU_EQUIPMENT | Russia |
| Alcoholic or Narcotic | RU_INTOXICATION | Russia |
| RU_MARITAL_STATUS | Russia | |
| Reserve Category | RU_RESERVE_CATEGORY | Russia |
| Rank | RU_MILITARY_RANK | Russia |
| Profile | RU_MILITARY_PROFILE | Russia |
| Service Readiness Category | RU_MILITARY_SERVICE_READINESS | Russia |
| Conscription Dismissal Mark | RU_QUITTING_MARK | Russia |
| No field name. Used internally to map codes in the PER_CATEGORIES lookup. | RU_EDUCATION_LEVELS | Russia |
| No field name. Used internally to map codes in the PER_CATEGORIES lookup. | RU_ENTERPRISE_EDUCATION | Russia |
| Course Name | RU_COURSE_NAMES | Russia |
| Type of Qualification Improvement | RU_QUAL_IMPROVEMENT_TYPES | Russia |
| Document Name | RU_DOCUMENT_NAMES | Russia |
| COMPETENCE_TYPE | Russia | |
| Type of Activity | RU_ACTIVITY_TYPE | Russia |
| Calculated Record of Service Reason (CSR) | RU_CALC_RECORD_SERVICE | Russia |
| Insurance Type | RU_INSURANCE_TYPE | Russia |
| Limited Term Reason | RU_LIMITED_CONTRACT_REASON | Russia |
| Long Service Reason (LSR) | RU_LONG_SERVICE | Russia |
| Special Working Conditions | RU_SPECIAL_WORK_CONDITIONS | Russia |
| Territory Conditions | RU_TERRITORY_CONDITIONS | Russia |
| Usage Schedule | RU_USAGE_SCHEDULE | Russia |
| Vehicle Category | RU_VEHICLE_CATEGORY | Russia |
| Place of Birth/OKATO Code | RU_OKATO | Russia |
| SUN Code | SE_SKILLS_LEVEL_CODE | Sweden |
| County Code | SE_COUNTY_CODES | Sweden |
| Municipality | SE_TAX_MUNICIPALITY | Sweden |
| Industry Code | SE_INDUSTRY_CODE | Sweden |
| Employment Category | SE_EMP_CATG | Sweden |
| Estimated Period of Absence | SE_EST_PER_ABS | Sweden |
| Central Reporting | SE_CENTRAL_REPORTING | Sweden |
| Bank Identifier Code | HR_SE_BIC_CODES | Sweden |
| Religion | AE_RELIGION | UAE |
| City | AE_CITY_CODES | UAE |
| Emirate | AE_EMIRATE | UAE |
| Area | AE_AREA_CODES | UAE |
| Language | AE_LANGUAGES | UAE |
Adding Lookup Types and Values
Lookups supply many of the list of values in Oracle HRMS and lookup values are the valid entries that appear in the list of values. They make choosing information quick and easy, and they ensure that users enter only valid data into Oracle HRMS.
Some Lookup Types have been predefined. You only need to define values for these types.
To create a new lookup type, add values to an existing lookup type, or prevent existing values from appearing in a lookup type, use the Application Utilities Lookups window.
Note: You must log out and log in again to see the effect of your changes.
Defining Lookup Types
You can create your own lookup types to provide lists of values, for example to validate element entries.
To define a new lookup type and lookup values
-
Choose the access level for the lookup type.
-
Enter the lookup type.
-
Enter the user name of the lookup. This is the name that users will see from within the application.
Note: For US Federal users: Do not prefix EIT definitions with GHR_US. This prefix is reserved for the predelivered US Federal definitions.
-
Select the application in which the lookup will be used.
-
Optionally, add a description of the lookup type.
-
If you want to add lookup values specific to the security group/business group linked to your current responsibility, un-check the Global Security Group check box. Existing lookup values are available to all business groups.
Important: The Global Security Group check box only displays if you are using Security Group Enabled Security with a non-default security group. If you use Standard HRMS security, or the default (Standard) security group in Security Group Enabled Security, all lookup types are global.
-
Enter the code, meaning and optionally a description for each value. Leave the Tag column blank.
If you do not enter a start date, the new lookup is valid immediately. If you do not enter an end date, the new lookup is valid indefinitely.
-
Save your work.
Defining Lookup Values
To add lookup values to an existing lookup type
-
Query the lookup type to which you want to add a value.
You cannot add values if the access level is System.
-
If you want to add lookup values specific to the security group/business group linked to your current responsibility, un-check the Global Security Group check box. Existing lookup values are available to all business groups.
Important: The Global Security Group check box only displays if you are using Security Group Enabled Security with a non-default security group. If you use Standard HRMS security, or the default (Standard) security group in Security Group Enabled Security, all lookup types are global.
-
Enter the code, meaning and optionally a description for each value. Leave the Tag column blank.
Caution: Do not change or remove any legislation codes that are shown in the Tag column for existing lookup values. This may have implications elsewhere in your HRMS system.
If you do not enter a start date, the new lookup is valid immediately. If you do not enter an end date, the new lookup is valid indefinitely.
-
Save your work.
Removing Lookup Values
You can only remove lookup values if they are set up for a specific security group. However, you can stop all lookups appearing in lists of values.
Note: You must be using Security Group Enabled security to categorize lookups by security groups. See: Categorizing Information By Security Groups
To remove a user defined lookup
In the Application Utilities Lookups window, do one of the following:
-
Enter an end date if you want to prevent users selecting this value after a certain date.
-
Disable the code by un-checking the Enabled check box if you want to prevent users selecting this value with immediate effect from the current date.
-
Change the meaning and description to create a replacement lookup.
If you add, disable, or change the meaning of a lookup, users must log out and log back in again for your changes to take effect.
To remove a lookup set up for a security group
-
In the Application Utilities Lookups window, select the lookup type which has lookups for a specific security group.
-
Check the Global Security Group check box.
This removes all lookups which have been set up for the security group linked to your current responsibility. Predefined lookups are not removed.
If you add, disable, or change the meaning of a lookup, users must log out and log back in again for your changes to take effect.
Document Categories and Types
Overview of Document Categories and Types
The Documents of Record functionality enables you to create and maintain documents, such as medical certificates, visas, and licenses, in Oracle HRMS. These documents belong to document categories (for example, visa information), subcategories (for example, work visa or business visa), and types (for example, US H1, US H2). The following table provides additional examples:
| Document Category | Document Subcategory | Document Type |
|---|---|---|
| Absence Information | Sickness | Doctor Certificate |
| Maternity | Hospital Certificate | |
| Personal Information | General | Birth Certificate |
| General | Driver's License | |
| Educational Information | Degree Certificate | Bachelor of Science |
| Degree Certificate | Master of Science |
Oracle provides some standard document types. However you can also create your own document categories, subcategories, and types to suit the particular requirements of your enterprise.
See: Creating Document Categories, Subcategories, and Types
See also: Documents of Record, Oracle SSHR Deploy Self-Service Capability Guide for information on using the Documents of Record function in SSHR.
Creating Document Categories, Subcategories, and Types
Although Oracle provides several document categories, subcategories, and types for use with the Documents of Record functionality, you may need to create new objects to match your specific business requirements. Use the following process to create these objects.
-
To create a new document category, use the Application Utilities Lookups window and the DOCUMENT_CATEGORY lookup type. Enter the name of the new document category in the lookup code region, for example, Professional Information.
-
To create a new document subcategory, use the User Types and Statuses window:
-
Query the DOCUMENT_CATEGORY lookup in the Name field.
-
Enter the document category, for example, Professional Information, in the System Type column.
-
Enter the required subcategories in the Code column, for example, Diploma, Certificate, Award.
-
-
To create new document types, run the Register Document Types (EITs) process.
-
When you have created your document types, you must associate them with a responsibility in the Information Types Security window (in the same way as you associate Extra Information Types with a responsibility).
See: Setting Up Extra Information Types for a Responsibility
For more information on document categories and types, see: Overview of Document Categories and Types
Running the Register Document Types (EITs) Process
Use this process to create new document types for the Documents of Record functionality.
See: Overview of Document Categories and Types
Run this process from the Submit Requests window.
To run the Register Document Types (EITs) process
-
In the Name field, select Register Document Types (EITs).
The Parameters window appears.
-
In the Document Type field, enter a unique name for the new document type.
Note: When the process runs, the application creates an internal name for the document type. The internal name is the same as the document type name and does not change, even if you subsequently change the document type name, for example, for translation. The internal name is used as the flexfield context.
-
In the Multiple Rows field, specify whether multiple occurrences of the same document type can exist. For example, for a birth certificate, the value would be No.
-
Select the country to which the document is applicable. You can leave the Country Code field blank to create a globally applicable document, for example, a passport document.
-
Enter the Category Code (mandatory) and Sub Category Code (optional).
-
Specify whether authorization is required for the new document type.
-
Click Submit.
User Types and Statuses
User Types and Statuses Window
The User Types and Statuses window enables you to extend certain delivered Oracle lookups to meet additional system requirements by creating user types and statuses for these lookups.
Note: If you wish to use user types or statuses, you must modify your program code to point to enable user types or statuses for the relevant fields. However, Oracle recommends that you only use the User Types and Statuses form as described in the examples below.
You can define user types for specific business groups if required. If you do not define specify a business group, your user types and statuses will be available in all business groups.
Using the User Types and Statuses Window
You would like to categorize the white collar workers in the organization according to their function. However, the delivered Employee Category lookup type contains only one value for white-collar worker. To further extend the possible values of this lookup, you can create the following additional user values for the WHITE_COLLAR lookup of the EMPLOYEE_CATG lookup type:
-
Office Clerk
-
Office Manager
-
Administration Staff
For more information on lookups in general, see: Lookups
Specific Applications of the User Types and Statuses Window
There are additional help topics available which illustrate specific uses of the User Types and Statuses window:
-
To create position hiring statuses. Although several hiring statuses are delivered with Oracle HRMS, you can create multiple values for each system status if required.
For more information, see: Position Hiring Statuses, Oracle HRMS Enterprise and Workforce Management Guide
-
To create budget measurement types.
For more information, see: People Budgets and Costing Overview, Oracle HRMS Enterprise and Workforce Management Guide
-
To create new document subcategories.
For more information, see: Creating Document Categories, Subcategories, and Types
Some Oracle localizations also use the User Types and Statuses window. For example, Oracle HRMS for France uses the User Types and Statuses window to create additional information for contacts and collective agreements.
For more information on these applications, please see the following documentation:
-
Setting Up Dependent Child Contact Relationships, Oracle HRMS Workforce Sourcing, Deployment, and Talent Management Guide
-
Setting Up Collective Agreement Entitlement Items, Oracle HRMS Enterprise and Workforce Management Guide
Note: Please note that the above examples are specific to the French localization of Oracle HRMS and you should only use the User Types and Statuses window as described in the examples above.
Creating User Types and Statuses
You use the User Types and Statuses window to create user types and statuses for delivered standard lookups.
-
In the Name field, select the lookup type. For example, select the EMPLOYEE_CATG lookup.
-
If applicable, select a business group. If you do not specify a business group, the user type or status will be available globally.
-
In the System Type field, select the lookup value that you wish to extend. For example, select the White Collar system type.
-
Enter a description of the new user type or status. For example, enter Office Clerk as a description.
-
Enter a code for the new user type or status.
-
Enter Further Information as required. Depending on the lookup type or localization, you may have the option of entering additional data, such as marking a contract status for inclusion in reports, working hours, or hierarchy type.
-
Save your work.
You can enter additional values for each user type or status if required. For example, you may choose to create a further type or status for the White Collar lookup value such as Office Manager.
Alerts
Oracle HRMS Predefined Alerts
Use the Oracle HRMS Alerts to help you manage your enterprise and workforce more efficiently. Use the predefined alerts to inform, remind and confirm to you information on your personal details, your subordinate workforce and your organizations. For example, you could run HRMS Alert - New Hire Details Missing to ensure that you have all of the correct information for any newly hired employees.
See the Oracle Alert's User Guide for information on using and setting up the alerts.
The recipient of the alert is the person who meets the alert's requirements, usually a supervisor with a subordinate workforce. The recipient is sometimes required to perform an action based on the alert's email message, for example, if a piece of information is incorrect or missing and needs updating.
Configurable Options
Each of the HRMS alerts has been designed as a periodic alert with a set of predefined and configurable conditions. To view the configurable conditions and their descriptions, query the desired alert in the Alerts window. You can configure the conditions and determine how often you need the alerts run to suit your organizational needs. The alerts will check your database for these conditions according to the frequency you define.
See: Conditions of the HRMS Alerts
The table below describes each predefined alert with its specific business benefit, recommended frequency and any further information of when the alert sends an email notification to the recipient. An email will only be sent if the recipient meets the alert's requirements, the fixed and configurable conditions, and has a correctly formatted email address.
Warning: Oracle HRMS only supports the default select statement in the Alerts window if it is unchanged.
Period Conditions
For alerts that are based on events, for example a new hire or a termination, you can use the following configurable conditions to control whether your alerts report on a specific day or over a range of days:
-
PERIOD_EVT_IN_X_DAYS - setting this value configures alerts to detect events that occurred X days ago or will occur in X days time. For example, if you set this to 7 for an alert that detects events in the future, when the alert is run, it will look for events that will occur in 7 days time.
-
PERIOD_RERUN_EVENT_DAYS - setting this value configures alerts to detect events that occurred or will occur during a number of days before the value set in the PERIOD_EVT_IN_X_DAYS condition. For example, if PERIOD_EVT_IN_X_DAYS is set to 7, and PERIOD_RERUN_EVENT_DAYS is set to 3, then for an alert that detects events in the future, it will look for events that will occur between 4 and 7 days from the current date. For alerts that detect events that have already happened, the above settings would mean an alert looks for events that occurred between 7 and 10 days before the current date.
For a future event, a new hire that is due to start work, you can use the HRMS Alert - New Hires (not yet started) to find out how many new hires are about to start work and when. For example, if the current date is 01-AUG-2003, and you set the value in the PERIOD_EVT_IN_X_DAYS condition to 14, the alert will return a list of new hires that are due to start on the 15-AUG-2003. If you set the frequency of this alert to run daily, it will run everyday from the 15-AUG-2003 and will send an email notification if it finds any new hires.
If you want the alert to return a list of new hires before the 15-AUG-2003, for example you have set the alert to run as above and you need to find out if any new hires are due to start between the 07-AUG-2003 and the 15-AUG-2003, you can set the value in the PERIOD_RERUN_EVENT_DAYS condition to 8. The alert will run in the period between the value set in the PERIOD_EVT_IN_X_DAYS condition and the value set in the PERIOD_RERUN_EVENT_DAYS condition, therefore an email notification will be sent if the alert finds any new hires that are due to start between the 07-AUG-2003 and 15-AUG-2003.
For a past event, an employee who has recently started employment, you can use the HRMS Alert - New Hire Details Missing to find out if they have any important information missing from their records. For example, if the current date is 28-DEC-2002, and you set the value in the PERIOD_EVT_IN_X_DAYS condition to 10, the alert will return a list of newly hired employees with missing information that started work on the 18-DEC-2002. If you set the frequency of this alert to run daily, it will run everyday from the 18-DEC-2002 and will send an email notification if it finds any newly hired employees with missing details.
If you also want the alert to return a list of newly hired employees that started before the 18-DEC-2002, for example you need to find out if any new employees started between the 14-DEC-2002 and the 18-DEC-2002, you can set the value in the PERIOD_RERUN_EVENT_DAYS condition to 4. The alert will run in the period between the value set in the PERIOD_EVT_IN_X_DAYS condition and the value set in the PERIOD_RERUN_EVENT_DAYS condition, therefore an email notification will be sent if the alert finds any newly hired employees with information missing from their records between the 14-DEC-2002 and the 18-DEC-2002.
Predefined Alerts Table
| Alert Name and Description | Recommended Frequency | Business Benefits | Further Information |
|---|---|---|---|
| HRMS Alert - Active Direct Reports - this alert returns a list of subordinates and their assignment details. | Monthly | Use this alert to ensure that the information on your workforce is correct. | This alert sends an email only if it identifies active employees and contingent workers with current assignments. |
| HRMS Alert - Cost Center Listing by Manager - this alert returns a list of cost centers managed by the recipient and the recipient's subordinates. | Monthly | Use this alert to ensure that the list of cost centers that you and your subordinates manage is accurate. | This alert sends an email only if it identifies organizations that are currently classified as company cost centers to a current cost center manager, who is either an employee or contingent worker. |
| HRMS Alert - Ended Cost Center Listing by Manager - this alert returns a list of end-dated cost centers managed by the recipient and the recipient's subordinates. | Monthly | Use this alert to inform you of any cost centers that have been end-dated that you or your subordinates manage. You can then use this information to update your records. | This alert sends an email only if it identifies organizations that are classified as company cost centers, and that have been end-dated before the current date to a current cost center manager, who is either an employee or contingent worker. |
| HRMS Alert - New Hires (not yet started) - this alert returns a list of new members of the workforce that are due to start work. | Daily | Use this alert as a confirmation that new members of your workforce have been entered into the Oracle HRMS application, and as a reminder of their start date. | This alert sends an email only if it identifies employees or contingent workers who are due to start between the current date, and the number of days ahead, which you indicate in the PERIOD_EVT_IN_X_DAYS condition and the number of days before that, which you indicate in the PERIOD_RERUN_EVENT_DAYS condition. |
| HRMS Alert - New Hire Details Missing - this alert returns a list of missing information for newly hired employees, such as salary basis and bank details. | Daily | Use this alert to inform you of any important information that is missing from a newly hired employee's record, and to ensure that the information is updated. | This alert sends an email only if it identifies current employee or contingent worker assignments that started between the current date, and the number of days previous, which you indicate in the PERIOD_EVT_IN_X_DAYS condition, and the number of days before that, which you indicate in the PERIOD_RERUN_EVENT_DAYS condition. |
| HRMS Alert - Ending Probationary Period - this alert returns a list of the recipient's subordinates that are near the end of a review or probation period. | Daily | Use this alert to remind you when a member of your workforce is nearing the end of an employment review or probation period. | This alert sends an email only if it identifies current employee assignments that have probation periods that are due to end between the current date, and the number of days ahead, which you indicate in the PERIOD_EVT_IN_X_DAYS condition, and the number of days before that, which you indicate in the PERIOD_RERUN_EVENT_DAYS condition. |
| HRMS Alert - Performance Appraisal Due - this alert returns a list of the recipient's subordinates that require appraisals. | Daily | Use this alert to remind you when a member of your workforce is due an appraisal. | This alert sends an email only if it identifies active employees that have an appraisal due between the current date, and the number of days ahead, which you indicate in the PERIOD_EVT_IN_X_DAYS condition, and the number of days before that, which you indicate in the PERIOD_RERUN_EVENT_DAYS condition. The alert will not be sent if an appraisal of the same appraisal type has already occurred. |
| HRMS Alert - Performance Appraisal Passed Due - this alert returns a list of the recipient's subordinates that have appraisals outstanding. | Daily | Use this alert to remind you when a member of your workforce is overdue an appraisal. | This alert sends an email only if it identifies active employees that were due an appraisal from the current date, and the number of days previous, which you indicate in the PERIOD_EVT_IN_X_DAYS condition and the number of days before that, which you indicate in the PERIOD_RERUN_EVENT_DAYS condition. The alert will not be sent if an appraisal of the same appraisal type has already occurred. |
| HRMS Alert - Overlapping Position Incumbency - this alert returns a list of the recipient's subordinates that are in positions where there is an unacceptable position incumbency overlap due to occur. | Daily | Use this alert to warn you when members of your workforce are in positions where there is an unacceptable position incumbency due to occur. You can then use this information to correct or update your records. | This alert sends an email only if it identifies employee assignments that occupy the same position, that has a maximum headcount of one and the maximum overlap duration (for that position) is due to end between the current date, and the number of days ahead, which you indicate in the PERIOD_EVT_IN_X_DAYS condition and the number of days before that, which you indicate in the PERIOD_RERUN_EVENT_DAYS condition. The alert will not include a position if it has two or more assignments assigned to it. |
| HRMS Alert - People Terminating in the Next Week - this alert returns a list of the recipient's terminating workforce one week before they leave. | Daily | Use this alert to remind you to perform any termination procedures and collect any company assets. | This alert sends an email only if it identifies an employee's or contingent worker's period of service or placement is due to end between the current date, and the number of days ahead, which you indicate in the PERIOD_EVT_IN_X_DAYS condition, and the number of days before that, which you indicate in the PERIOD_RERUN_EVENT_DAYS condition. |
| HRMS Alert - People Returning from Leave of Absence - this alert returns a list of subordinates to the supervisor who are due to return from a suspended assignment. | Daily | Use this alert to inform you of your subordinate's return date. | This alert sends an email if it identifies active employee assignments that have a current status of Suspended and a future dated assignment change between the current date, and the number of days ahead, which you indicate in the PERIOD_EVT_IN_X_DAYS condition, and the number of days before that, which you indicate in the PERIOD_RERUN_EVENT_DAYS condition with an assignment status of active. |
| HRMS Alert - Open Vacancies Listing - this alert returns a list of outstanding vacancies that are assigned to the recipient. | None | Use this alert to provide you with a list of outstanding vacancies that are assigned to you and require an action. | This alert sends an email only if it identifies active vacancies. |
| HRMS Alert - Personal Details Review - this alert returns details of the recipient's important personal information. | Bi-annually | Use this alert to review your important personal information to ensure it is correct. | This alert sends an email if it identifies active employee and contingent worker primary assignments. |
| HRMS Alert - People Without a Supervisor - this alert returns a list (to a nominated user) of all current employees and contingent workers that do not have a supervisor. | Monthly | Use this alert to ensure that all workers are assigned to a supervisor. | This alert sends an email only if it identifies active assignments without a direct or valid supervisor. |
| HRMS Alert - Payroll Run Completed - this alert returns a confirmation (to a nominated user) of the latest successful payroll run | Daily | Use this alert to confirm a successful payroll run. | This alert sends an email only if it identifies payroll actions that have a status of complete between the current date, and the number of days previous, which you indicate in the PERIOD_EVT_IN_X_DAYS condition, and the number of days before that, which you indicate in the PERIOD_RERUN_EVENT_DAYS condition. |
| HRMS Alert - People Without Email Addresses - this alert returns a list of the recipient's subordinates that do not have an email address. | Monthly | Use this alert to inform you of any subordinates that do not have a valid email address. Use this information to update your records. | This alert sends an email only if it identifies active employee and contingent worker primary assignments that do not have an email address or have an incorrectly formatted email address. |
| HRMS Alert - Training Attendance Reminder - this alert returns a list of training events that the recipient or their subordinates are due to attend or have attended. | Daily | Use this alert to remind you of any training events that you or your subordinates are due to attend or to inform you of any training events that you or your subordinates have attended. | This alert sends an email only if it identifies active employee or contingent worker delegate assignments that are due to attend a training event or have previously attended a training event between the days you indicate in the PERIOD_EVT_IN_X_DAYS condition, and the number of days before that, which you indicate in the PERIOD_RERUN_EVENT_DAYS condition. A training event will only be included if it is not a development event and if it has not been cancelled. |
| HRMS Alert - Workers Competencies Expiring - this alert returns a list of competencies that the recipient and their subordinates have that are due to expire. | Daily | Use this alert to remind you of any competencies that you or your subordinates have that are due to expire. | This alert sends an email only if it identifies active employees or contingent workers that have competencies that are due to expire between the current date, and the number of days ahead, which you indicate in the PERIOD_EVT_IN_X_DAYS condition, and the number of days before that, which you indicate in the PERIOD_RERUN_EVENT_DAYS condition. An email will not be sent if the competence is due to restart the day after it expires. |
Using the Alerts
For information on using the alerts see the Oracle Alert's User Guide.
For an example of how to use a HRMS alert, see: Example of Setting up a HRMS Alert.
For information on the configurable conditions for the alerts, see: Conditions of the HRMS Alerts.
Conditions of the HRMS Alerts
The conditions of the alerts enable you to control the content of the alert and who receives them. Each alert provides you with a number of configurable options that you can configure to provide email notifications to best suit your organizational needs. For example, if you want to send the HRMS Alert - Training Attendance Reminder to the supervisor of an employee that is due to attend a training course, you can set the value of the SEND_TO_ASG_SPVSR condition to Y. When the alert is run, an email notification is sent to the supervisor regarding the training event.
The table below describes each condition and its default value.
The HRMS Alerts Conditions Table
| Condition | Default Values | Description |
|---|---|---|
| ALERT_BANK_DETAILS | Y | If set to Y an alert will be raised when bank details have not been set for a new hire. |
| ALERT_GRADE_PLACEMENT_MISSING | N | If set to Y an alert will be raised when grade placements have not been set for a new hire. |
| ALERT_PAY_METHOD_MISSING | Y | If set to Y an alert will be raised when the pay method has not been set for a new hire. |
| ALERT_PAYROLL_MISSING | Y | If set to Y an alert will be raised when the payroll has not been set for a new hire. |
| ALERT_SALARY_BASIS_MISSING | Y | If set to Y an alert will be raised when the salary basis has not been set for a new hire. |
| ALERT_SALARY_MISSING | Y | If set to Y an alert will be raised if the salary information is missing for a new hire. |
| ALERT_SUPERVISOR_MISSING | N | If set to Y an alert will be raised when a new hire does not have a supervisor. |
| DISPLAY_SALARY_AMOUNT | N | If set to Y the actual salary amount displays on the alert. |
| EXCLUDE_CEO | Blank | If set to an employee number, that employee will be excluded from the alert, if blank then all employees will be considered within the scope of the alert. |
| INCLUDE_ALL_NEW_STARTS | N | If set to Y an alert will be raised for all new hires regardless of whether they have missing details or not. |
| INCLUDE_BUSINESS_GROUP | Blank | Restricts the alert to a named business group. If not set, all business groups will display. |
| INCLUDE_CONT_FLAG | N | Includes contingent workers within the scope of the alert. |
| INCLUDE_EMP_FLAG | Y | Includes employees in the scope of the alert. |
| INCLUDE_ORGANIZATION | Blank | Restricts the alert to a named organization. If not set, all organizations will display. |
| INCLUDE_SECONDARY_ASG | N | If set to Y an alert will include information for a secondary assignment. |
| PERIOD_EVT_IN_X_DAYS | 7 | Set the alert to X number of days before or after an event. |
| PERIOD_RERUN_EVENT_DAYS | 0 | Allows a rerun of the alert and provides an additional configuration option to run the alert for a period of time rather than a single day. |
| *SEND_TO_ASG_PSN | Y | Send alert to the person (with an assignment) who is the subject of the alert. |
| *SEND_TO_ASG_SPVSR | Y | Send alert to the supervisor of the person (with an assignment) who is the subject of the alert. |
| *SEND_TO_NAMED_USER | N | Send a copy of the alert to the specified email address. |
| *SEND_TO_PASG_SPVSR | N | Send alert to the primary assignment supervisor of the person who is the subject of the alert. |
| *SEND_TO_PSN | Y | Send alert to the person who is the subject of the alert. |
| *SEND_TO_SUP_PSN | N | Send alert to the supervisor of the person who is the subject of the alert. |
Warning: If you set more than one of the *Send_To condition values to Y, the recipient of the alert may receive duplicate information in the alert notification.
Example of Setting up a HRMS Alert
This topic is an example of the steps you perform to set up the HRMS Alert - Cost Center Listing by Manager.
To set up the HRMS Alert - Cost Center Listing by Manager
-
Query the HRMS Alert - Cost Center Listing by Manager in the Alerts window.
-
Choose Tools in the menu, and select the Transfer Alert option to copy the alert.
See: Transferring Alert Definitions in the Oracle Alert's User Guide for more information on copying an alert.
-
Ensure you rename the alert and choose the same database in the Destination Alert region of the Transfer Alert Definition window.
Note: It is important to rename your alerts and to save them to the same database. This ensures that any changes you make to the alert are specific to your alert and not the predefined alert.
-
Choose the Transfer button, close the Transfer Alert Definitions window and query your copied alert.
-
Check the Enabled button to enable your alert.
You can check your periodic alerts regardless of the frequency you define. See: Checking a Periodic Alert in the Oracle Alert's User Guide for information on checking your periodic alerts and their enabled action sets.
-
Set the frequency to On Day of the Month and enter 1 as the day number for the alert to run on the first day of every month.
See: Creating a Periodic Alert in the Oracle Alert's User Guide for more information on setting up the frequency.
-
Choose the Action Details button to set up the conditions of the alert. The conditions you set up here specify the scope of the alert.
See: Specifying the Alert Details in the Oracle Alert's User Guide for more information.
-
Enter the business group name in the Value field for the INCLUDE_BUSINESS_GROUP optional condition for which you want the alert to run.
Warning: You must enter a valid value for the alert to run successfully. For example, if you enter an invalid business group name, the alert will not find any information and an email notification will not be sent.
-
Change the INCLUDE_CONT_FLAG condition to Y in the Value field to include contingent workers in the scope of the alert.
Warning: The Value field is case sensitive, you must ensure that you enter the value as uppercase.
-
Leave the INCLUDE_ORGANIZATION condition blank in the Value field, as this example wants the alert to include all organizations within the business group in the scope of the alert.
Note: You can restrict this condition to a specific organization if you enter an organization name.
-
Leave all other conditions with their default values.
As an additional verification step, you can set the conditions up in the Alert Details window with the same values as in the Action Details window, to test your alert to find out if it returns the number of rows you expect. You use the Run button to test and verify your alert.
See: Creating a Periodic Alert in the Oracle Alert's User Guide for more information on verifying your alerts.
This alert now runs on the first day of every month, and sends an email notification to employees and contingent workers if it identifies them as current company cost center managers within the specified business group.
Custom Library Events and APIs
CUSTOM Library Events
Generic Events
An event is a point within the processing of a form at which you can call custom code from the CUSTOM library. For example, you can use the event WHEN-FORM-NAVIGATE to code a sequence of logic that occurs after any existing logic for the form, block or item. WHEN-FORM-NAVIGATE is an example of a generic event available to all the windows in Oracle Applications. For a complete list of generic events see: Events Passed to the CUSTOM Library, Oracle Applications Developer's Guide.
Product-Specific Events
In addition to generic events, Oracle HRMS provides a range of product-specific events that you can use to make CUSTOM library calls to support your business rules. The product-specific events for HRMS are available for most HRMS windows. The following table details the purpose of each event and shows when the events occur.
| Event Name | Purpose | When Occurs |
|---|---|---|
| WHEN-CREATE-RECORD | Enables you to specify values that will appear by default when you create a new record. | After the form has processed. |
| POST-QUERY | Enables you to add additional derivation or validation on completion of a query. | After the form has processed. |
| KEY-DELREC | Enables you to add an extra level of validation before users are allowed to delete a record from the database. | Immediately before the user is asked to confirm the deletion of the record. |
| PRE-UPDATE, PRE-INSERT and PRE-DELETE | Enables you to add additional validation before the update, insert or delete action is performed. | After any data validation. Before DateTrack manupulation if the block contains DateTrack features. |
| POST-INSERT, POST-UPDATE and POST-DELETE | Enables you to add additional insert, update, or delete actions to user tables. We do not recommend using these events for validation. |
After the form has processed. |
| POST-FORMS-COMMIT | Enables you to specify an action to occur as the last action in a sequence of commit actions. | After the form has processed. |
| WHEN-BUTTON-PRESSED | Enables you to perform custom validation before a button action is performed. | After any data validation. Before any action (for example, display new window) has been performed. |
| DT_CALL_HISTORY | Enables you to change which database view is used by DateTrack History. | After the user has requested to use DateTrack History and the form has derived the standard details. Before the DateTrack History window is visible. |
| DT_SELECT_MODE | Enables you to restrict the DateTrack modes that a user can select. | After the form has derived which DateTrack modes are available but before the mode selection window is visible. |
| NAVIGATE | Enables you to supplement the validation that takes place when the user selects a task flow navigation option. The following field values are set for the duration of this event: CTL_GLOBALS.DESTINATION_FORM CTL_GLOBALS.DESTINATION_BLOCK |
After the user selects a task flow navigation option but before the new window opens. |
Publicly Callable Business Process APIs in Oracle HRMS
Application Programmatic Interfaces (APIs) are a logical grouping of all external process routines. The Oracle HRMS API strategy delivers a set of PL/SQL packages procedures and functions that provide an open interface to the database.
Oracle Integration Repository, an integral part of Oracle E-Business Suite, is a compilation of information about the numerous interface endpoints exposed by Oracle applications. The full list of public APIs and the purpose of each API is available in the integration repository. See: Oracle Integration Repository Overview, Oracle Integration Repository User Guide
For information on how to access and use Oracle Integration Repository, see: Accessing Oracle Integration Repository, Oracle Integration Repository User Guide
For information on how to call APIs, see the technical essay APIs in Oracle HRMS, Oracle HRMS Implementation Guide
APIs Available for HR Foundation Users
Application Programmatic Interfaces (APIs) are a logical grouping of all external process routines. The Oracle HRMS API strategy delivers a set of PL/SQL packages procedures and functions that provide an open interface to the database.
Oracle® Integration Repository, an integral part of Oracle E-Business Suite, is a compilation of information about the numerous interface endpoints exposed by Oracle applications. The full list of public APIs and the purpose of each API is available in the integration repository. See: Oracle Integration Repository Overview, Oracle Integration Repository User Guide . For information on how to access and use Oracle Integration Repository, see: Accessing Oracle Integration Repository, Oracle Integration Repository User Guide
For information on how to call APIs, see the technical essay APIs in Oracle HRMS, Oracle HRMS Implementation Guide
This topic lists APIs supported for HR Foundation. HR Foundation users can only use restricted parameters in some APIs. See:APIs to Which Restrictions Apply for HR Foundation
List of APIs Supported for HR Foundation
The following table shows the APIs delivered with Oracle HR Foundation.
Important: Legislation WW = All Legislations
| API Name | Technical Name | File Name | Business Process | Description | User Hooks | Legislation | Data Pump |
|---|---|---|---|---|---|---|---|
| HR Competence Element API | HR_COMPETENCE_ELEMENT_API | pecelapi.pkh | create_competence_element | Creates a competence element | Yes | WW | Yes |
| update_competence_element | Updates competence element details | Yes | WW | No | |||
| delete_competence_element | Deletes a competence element | Yes | WW | No | |||
| update_personal_comp_element | Updates a personal competence element | Yes | WW | No | |||
| HR Competences API | HR_COMPETENCES_API | pecpnapi.pkh | create_competence | Creates a competence | Yes | WW | Yes |
| update_competence | Updates a competence | Yes | WW | Yes | |||
| delete_competence | Deletes a competence | Yes | WW | No | |||
| HR Employee API | HR_EMPLOYEE_API | peempapi.pkh | create_employee | Creates a new employee | Yes | WW | Yes |
| re_hire_ex_employee | Hires an ex-employee as an employee | Yes | WW | Yes | |||
| HR Location API | HR_LOCATION_API | hrlocapi.pkh | create_location | Creates locations | Yes | WW | Yes |
| update_location | Updates the details of a location | Yes | WW | Yes | |||
| delete_location | Deletes a location | Yes | WW | No | |||
| HR Organization API | HR_ORGANIZATION_API | hrorgapi.pkh | create_organization | Creates a new organization within the scope of an existing business group | Yes | WW | Yes |
| update_organization | Updates an existing organization | Yes | WW | Yes | |||
| delete_organization | Deletes an organization | Yes | WW | No | |||
| create_org_classification | Creates an organization classification for an existing organization | Yes | WW | Yes | |||
| enable_org_classification | Enables the classification of an organization | Yes | WW | No | |||
| disable_org_classification | Disables the classification of an organization | Yes | WW | No | |||
| create_org_information | Creates organization information | Yes | WW | Yes | |||
| create_org_manager | Creates cost center manager information | Yes | WW | No | |||
| update_org_information | Updates an information type of an organization | Yes | WW | No | |||
| update_org_manager | Updates an organization manager relationship | Yes | WW | No | |||
| delete_org_manager | Deletes an organization manager relationship | Yes | WW | No | |||
| create_business_group | Creates a business group | Yes | WW | Yes | |||
| create_operating_unit | Creates a new operating unit within an existing business group | Yes | WW | No | |||
| update_operating_unit | Updates a new operating unit starting with an existing business group | Yes | WW | No | |||
| create_legal_entity | Creates an organization with a classification of legal entity | Yes | WW | No | |||
| create_bgr_classif | Creates a new classification for an existing business group, namely operating unit and legal entity accounting | Yes | WW | No | |||
| create_legal_entity_classif | Creates a legal entity classification for an existing organization and populates information type data | Yes | WW | No | |||
| create_oper_unit_classif | Creates an operating unit classification for an existing organization | Yes | WW | No | |||
| trans_org_name | Translates an organization name | Yes | WW | No | |||
| HR Person Address API | HR_PERSON_ADDRESS_API | peaddapi.pkh | create_person_address | Creates a new address for a given person | Yes | WW | Yes |
| update_person_address | Updates a particular address for a given person | Yes | WW | Yes | |||
| create_job_group | Creates a job group | Yes | WW | Yes | |||
| update_job_group | Updates a job group | Yes | WW | Yes | |||
| delete_job_group | Deletes a job group | Yes | WW | No | |||
| HR Job API | HR_JOB_API | pejobapi.pkh | create_job | Creates a job in the specified business group | Yes | WW | Yes |
| HR Phone API | HR_PHONE_API | pephnapi.pkh | create_phone | Creates a phone record | Yes | WW | Yes |
| update_phone | Updates the phone record for a person | Yes | WW | Yes | |||
| delete_phone | Deletes a phone record | Yes | WW | No | |||
| HR Position API | HR_POSITION_API | peposapi.pkh | create_position | Creates a position that is a specific occurrence of a job within an organization | Yes | WW | Yes |
| update_position | Updates a position | Yes | WW | Yes | |||
| delete_position | Deletes a position | Yes | WW | Yes | |||
| HR Person API | HR_PERSON_API | peperapi.pkh | update_person | Updates person information | Yes | WW | Yes |
| HR Assignment API | HR_ASSIGNMENT_API | peasgapi.pkh | update_emp_asg | Updates employee assignment details that do not affect entitlement to element entries | Yes | WW | Yes |
| update_emp_asg_criteria | Updates attributes of an employee assignment that affects the entitlement criteria for any element entry | Yes | WW | Yes | |||
| update_cwk_asg | Updates a contingent worker assignment | Yes | WW | No | |||
| update_cwk_asg_criteria | Updates attributes of a contingent worker assignment that may affect the entitlement to element entries | Yes | WW | No | |||
| HR Ex-Employee API | HR_EX_EMPLOYEE_API | peexeapi.pkh | actual_termination_emp | Terminates an employee | Yes | WW | Yes |
| final_process_emp | Set the final process date for a terminated employee | Yes | WW | Yes | |||
| HR Grade API | HR_GRADE_API | pegrdapi.pkh | create_grade | Creates a grade | Yes | WW | Yes |
| update_grade | Updates a grade | Yes | WW | No | |||
| delete_grade | Deletes a grade | Yes | WW | Yes | |||
| HR Contingent Worker API | HR_CONTINGENT_WORKER_API | pecwkapi.pkh | create_cwk | Creates a new contingent worker | Yes | WW | No |
| convert_to_cwk | Converts an existing person to a contingent worker | Yes | WW | No | |||
| terminate_placement | Terminates a contingent worker | Yes | WW | No | |||
| reverse_terminate_placement | Reverses a contingent worker termination | Yes | WW | No | |||
| HR Rating Scales API | HR_RATING_SCALES_API | perscapi.pkh | create_rating_scale | Creates a rating scale | Yes | WW | Yes |
| update_rating_scale | Updates a rating scale | Yes | WW | Yes | |||
| delete_rating_scale | Deletes a rating scale | Yes | WW | No | |||
| HR Rating Levels API | HR_RATING_LEVELS_API | pertlapi.pkh | create_rating_level | Creates a rating level | Yes | WW | Yes |
| update_rating_level | Updates a rating level | Yes | WW | Yes | |||
| delete_rating_level | Deletes a rating level | Yes | WW | No | |||
| HR Qualification Type API | HR_QUALIFICATION_TYPE_API | peeqtapi.pkh | create_qualification_type | Creates a qualification type | Yes | WW | Yes |
| update_qualification_type | Updates a qualification type | Yes | WW | Yes | |||
| delete_qualification_type | Deletes a qualification type | Yes | WW | No | |||
| HR Change Start Date API | HR_CHANGE_START_DATE_API | pehirapi.pkh | update_start_date | Changes the start date of an employee or contingent worker | Yes | WW | No |
| HR Hierarchy Element API | HR_HIERARCHY_ELEMENT_API | peoseapi.pkh | create_hierarchy_element | Creates an organization hierarchy element record | Yes | WW | Yes |
| update_hierarchy_element | Updates an organization hierarchy element record | Yes | WW | No | |||
| delete_hierarchy_element | Deletes an organization hierarchy element | Yes | WW | No | |||
| HR Position Hierarchy Element API | HR_POS_HIERARCHY_ELE_API | pepseapi.pkh | create_pos_hierarchy_ele | Creates position hierarchy elements | Yes | WW | No |
| update_pos_hierarchy_ele | Updates a parent to a new child or a child to a new parent | Yes | WW | No | |||
| delete_pos_hierarchy_ele | Deletes a position hierarchy element | Yes | WW | No | |||
| HR Competence Outcome API | HR_COMPETENCE_OUTCOME_API | pecpoapi.pkh | create_outcome | Creates a competence outcome | Yes | WW | Yes |
| update_outcome | Updates a competence outcome | Yes | WW | Yes | |||
| delete_outcome | Deletes a competence outcome | Yes | WW | No |
APIs to Which Restrictions Apply for HR Foundation
The following table includes APIs with a list of restricted parameters that you can use for each API. For APIs that are not part of this restricted list, you use all parameters.
| API Name | Technical Name | File Name | Business Process | Special Instructions | Parameters |
|---|---|---|---|---|---|
| HR Employee API | HR_EMPLOYEE_API | peempapi.pkh | create_employee | None | P_VALIDATE P_HIRE_DATE P_BUSINESS_GROUP_ID P_LAST_NAME P_PREVIOUS_LAST_NAME P_MAILSTOP P_OFFICE_NUMBER P_INTERNAL_LOCATION P_CORRESPONDENCE_LANGUAGE P_KNOWN_AS P_SEX P_DATE_OF_BIRTH P_EMAIL_ADDRESS P_EMPLOYEE_NUMBER P_EXPENSE_CHECK_SEND_TO_ADDRESS P_FIRST_NAME P_MIDDLE_NAMES P_NATIONAL_IDENTIFIER P_TITLE P_ATTRIBUTE_CATEGORY P_ATTRIBUTE1-30 P_BACKGROUND_CHECK_STATUS P_BACKGROUND_DATE_CHECK P_BLOOD_TYPE P_HONORS P_LAST_MEDICAL_TEST_BY P_LAST_MEDICAL_TEST_DATE P_PERSON_TYPE_ID P_ON_MILITARY_SERVICE P_PRE_NAME_ADJUNCT P_RESUME_EXISTS P_RESUME_LAST_UPDATED P_SECOND_PASSPORT_EXISTS P_DATE_EMPLOYEE_DATA_VERIFIED P_NATIONALITY P_REGISTERED_DISABLED_FLAG P_STUDENT_STATUS P_WORK_SCHEDULE P_SUFFIX P_TOWN_OF_BIRTH P_REGION_OF_BIRTH P_COUNTRY_OF_BIRTH P_MARITAL_STATUS P_USES_TOBACCO_FLAG P_DPDNT_ADOPTION_DATE P_DPDNT_VLNTRY_SVCE_FLAG P_ORIGINAL_DATE_OF_HIRE |
| re_hire_ex_employee | None | P_VALIDATE P_HIRE_DATE P_PERSON_ID P_OBJECT_VERSION_NUMBER P_REHIRE_REASON P_PERSON_TYPE_ID | |||
| HR Contingent Worker API | HR_CONTINGENT_WORKER_API | pecwkapi.pkh | create_cwk | None | P_VALIDATE P_BUSINESS_GROUP_ID P_LAST_NAME P_EMAIL_ADDRESS P_NPW_NUMBER P_FIRST_NAME P_MIDDLE_NAMES P_PREVIOUS_LAST_NAME P_MAILSTOP P_TITLE P_KNOWN_AS P_START_DATE P_SEX P_DATE_OF_BIRTH P_NATIONAL_IDENTIFIER P_OFFICE_NUMBER P_INTERNAL_LOCATION P_CORRESPONDENCE_LANGUAGE P_ATTRIBUTE_CATEGORY P_ATTRIBUTE1-30 P_PERSON_TYPE_ID P_BACKGROUND_CHECK_STATUS P_BACKGROUND_DATE_CHECK P_BLOOD_TYPE P_COUNTRY_OF_BIRTH P_DPDNT_VLNTRY_SVCE_FLAG P_HONORS P_LAST_MEDICAL_TEST_DATE P_MARITAL_STATUS P_NATIONALITY P_ON_MILITARY_SERVICE P_PRE_NAME_ADJUNCT P_REGION_OF_BIRTH P_REGISTERED_DISABLED_FLAG P_RESUME_EXISTS P_RESUME_LAST_UPDATED P_TOWN_OF_BIRTH P_USES_TOBACCO_FLAG P_WORK_SCHEDULE P_SECOND_PASSPORT_EXISTS P_STUDENT_STATUS P_SUFFIX P_DPDNT_ADOPTION_DATE P_LAST_MEDICAL_TEST_BY P_EXP_CHECK_SEND_TO_ADDRESS P_DATE_EMPLOYEE_DATA_VERIFIED P_HOLD_APPLICANT_DATE_UNTIL P_ORIGINAL_DATE_OF_HIRE |
| convert_to_cwk | The parameter P_EFFECTIVE_DATE must be set to the system date. The parameter P_DATETRACK_UPDATE_MODE must be set to CORRECTION. |
P_VALIDATE P_EFFECTIVE_DATE P_PERSON_ID P_OBJECT_VERSION_NUMBER P_NPW_NUMBER P_PERSON_TYPE_ID P_DATETRACK_UPDATE_MODE | |||
| terminate_placement | The parameter P_EFFECTIVE_DATE must be set to the system date. The parameters P_FINAL_PROCESS_DATE and P_LAST_STANDARD_DATE must be set to the same date as the parameter P_ACTUAL_TERMINATION_DATE. |
P_EFFECTIVE_DATE P_VALIDATE P_FINAL_PROCESS_DATE P_LAST_STANDARD_PROCESS_DATE P_PERSON_ID P_DATE_START P_OBJECT_VERSION_NUMBER P_ACTUAL_TERMINATION_DATE P_PERSON_TYPE_ID P_ASSIGNMENT_STATUS_TYPE_ID P_TERMINATION_REASON P_ATTRIBUTE_CATEGORY P_ATTRIBUTE_1-30 | |||
| reverse_terminate_placement | None | P_VALIDATE P_PERSON_ID P_ACTUAL_TERMINATION_DATE P_CLEAR_DETAILS | |||
| HR Person API | HR_PERSON_API | peperapi.pkh | update_person | The parameter P_EFFECTIVE_DATEmust be set to the system date. The parameter P_DATETRACK_UPDATE_MODE must be set to CORRECTION. |
P_EFFECTIVE_DATE P_DATETRACK_UPDATE_MODE P_VALIDATE P_HIRE_DATE P_BUSINESS_GROUP_ID P_LAST_NAME P_SEX P_DATE_OF_BIRTH P_EMAIL_ADDRESS P_EMPLOYEE_NUMBER P_NPW_NUMBER P_EXPENSE_CHECK_SEND_TO_ADDRESS P_TITLE P_FIRST_NAME P_MIDDLE_NAMES P_NATIONAL_IDENTIFIER P_PREVIOUS_LAST_NAME P_KNOWN_AS P_MAILSTOP P_OFFICE_NUMBER P_INTERNAL_LOCATION P_CORRESPONDENCE_LANGUAGE P_ATTRIBUTE_CATEGORY P_ATTRIBUTE1-30 P_OBJECT_VERSION_NUMBER P_PERSON_ID P_PERSON_TYPE_ID P_DATE_EMPLOYEE_DATA_VERIFIED P_MARITAL_STATUS P_NATIONALITY P_REGISTERED_DISABLED_FLAG P_BACKGROUND_CHECK_STATUS P_BACKGROUND_DATE_CHECK P_BLOOD_TYPE P_HOLD_APPLICANT_DATE_UNTIL P_HONORS P_LAST_MEDICAL_TEST_BY P_LAST_MEDICAL_TEST_DATE P_ON_MILITARY_SERVICE P_PRE_NAME_ADJUNCT P_RESUME_EXISTS P_RESUME_LAST_UPDATED P_SECOND_PASSPORT_EXISTS P_STUDENT_STATUS P_WORK_SCHEDULE P_SUFFIX P_USES_TOBACCO_FLAG P_DPDNT_ADOPTION_DATE P_DPDNT_VLNTRY_SVCE_FLAG P_ORIGINAL_DATE_OF_HIRE P_ADJUSTED_SVC_DATE P_TOWN_OF_BIRTH P_REGION_OF_BIRTH P_COUNTRY_OF_BIRTH |
| HR Ex-Employee API | HR_EX_EMPLOYEE_API | peexeapi.pkh | actual_termination_emp | The parameter P_EFFECTIVE_DATE must be set to the system date. The parameter P_LAST_STANDARD_DATE must be set to the same date as the parameter P_ACTUAL_TERMINATION_DATE. |
P_VALIDATE P_PERIOD_OF_SERVICE_ID P_OBJECT_VERSION_NUMBER P_ACTUAL_TERMINATION_DATE P_EFFECTIVE_DATE P_LAST_STANDARD_PROCESS_DATE P_PERSON_TYPE_ID P_ASSIGNMENT_STATUS_TYPE_ID P_LEAVING_REASON |
| final_process_emp | The parameter P_FINAL_PROCESS_DATE must be set to the same date as was set for the parameter P_ACTUAL_TERMINATION_DATE in the ACTUAL_TERMINATION_EMP API. | P_FINAL_PROCESS_DATE P_VALIDATE P_PERIOD_OF_SERVICE_ID P_OBJECT_VERSION_NUMBER | |||
| HR Assignment API | HR_ASSIGNMENT_API | peasgapi.pkh | update_emp_asg | The parameter P_EFFECTIVE_DATE must be set to the system date. The parameter P_DATETRACK_UPDATE_MODE must be set to CORRECTION. When you perform a correction to an employee's supervisor, the new supervisor must exist for the entire duration of the employee's assignment. If you want to assign a supervisor who does not exist for the entire duration of the assignment, then you can use the People window. |
P_EFFECTIVE_DATE P_DATETRACK_UPDATE_MODE P_VALIDATE P_ASSIGNMENT_ID P_SUPERVISOR_ID P_OBJECT_VERSION_NUMBER P_ASSIGNMENT_NUMBER P_DEFAULT_CODE_COMB_ID P_SET_OF_BOOKS_ID P_ASS_ATTRIBUTE_CATEGORY P_ASS_ATTRIBUTE1-30 P_CHANGE_REASON P_FREQUENCY P_MANAGER_FLAG P_NORMAL_HOURS P_PERF_REVIEW_PERIOD P_PERF_REVIEW_PERIOD_FREQUENCY P_PROBATION_PERIOD P_PROBATION_UNIT P_PROJECTED_ASSIGNMENT_END P_SAL_REVIEW_PERIOD P_SAL_REVIEW_PERIOD_FREQUENCY P_TIME_NORMAL_FINISH P_TIME_NORMAL_START P_BARGAINING_UNIT_CODE P_LABOUR_UNION_MEMBER_FLAG P_HOURLY_SALARIED_CODE P_NOTICE_PERIOD P_NOTICE_PERIOD_UOM P_EMPLOYEE_CATEGORY P_WORK_AT_HOME P_JOB_POST_SOURCE_NAME P_SUPERVISOR_ASSIGNMENT_ID P_DATE_PROBATION_END P_INTERNAL_ADDRESS_LINE P_SOURCE_TYPE P_ESTABLISHMENT_ID P_CONCAT_SEGMENTS P_ASSIGNMENT_STATUS_TYPE_ID P_CONTRACT_ID |
| update_emp_asg_criteria | The parameter P_EFFECTIVE_DATE must be set to the system date. The parameter P_DATETRACK_UPDATE_MODE must be set to CORRECTION. |
P_EFFECTIVE_DATE P_DATETRACK_UPDATE_MODE P_VALIDATE P_ASSIGNMENT_ID P_OBJECT_VERSION_NUMBER P_POSITION_ID P_JOB_ID P_ORGANIZATION_ID P_LOCATION_ID P_GRADE_ID P_SEGMENT1-30 P_SUPERVISOR_ASSIGNMENT_ID P_EMPLOYMENT_CATEGORY P_ESTABLISHMENT_ID P_CONCAT_SEGMENTS P_CONTRACT_ID | |||
| update_cwk_asg | The parameter P_EFFECTIVE_DATE must be set to the system date. The parameter P_DATETRACK_UPDATE_MODE must be set to CORRECTION. |
P_EFFECTIVE_DATE P_DATETRACK_UPDATE_MODE P_VALIDATE P_ASSIGNMENT_ID P_OBJECT_VERSION_NUMBER P_ASSIGNMENT_NUMBER P_SUPERVISOR_ID P_TITLE P_SET_OF_BOOKS_ID P_VENDOR_ID P_VENDOR_EMPLOYEE_NUMBER P_MANAGER_FLAG P_EMPLOYMENT_CATEGORY P_ASS_ATTRIBUTE_CATEGORY P_ASS_ATTRIBUTE1-30 P_CHANGE_REASON P_ESTABLISHMENT_ID P_PROJECT_TITLE P_FREQUENCY P_INTERNAL_ADDRESS_LINE P_LABOUR_UNION_MEMBER_FLAG P_NORMAL_HOURS P_PROJECTED_ASSIGNMENT_END P_ASSIGNMENT_STATUS_TYPE_ID P_CONCAT_SEGMENTS P_SUPERVISOR_ASSIGNMENT_ID P_SOURCE_TYPE P_TIME_NORMAL_FINISH P_TIME_NORMAL_START P_ASSIGNMENT_CATEGORY P_SCL_SEGMENT1-30 | |||
| HR Position API | HR_POSITION_API | peposapi.pkh | create_position | This API can use all HR Foundation parameters for (HR foundation version). | |
| HR Competence Element | HR_COMPETENCE_ELEMENT_API | pecelapi.pkh | create_competence_element | The parameter P_EFFECTIVE_DATE must be set to the system date. The parameter P_TYPE must be set to PERSONAL. |
P_EFFECTIVE_DATE P_TYPE P_VALIDATE P_BUSINESS_GROUP P_COMPETENCE_ID P_PROFICIENCY_LEVEL P_RATING_LEVEL P_PERSON_ID P_EFFECTIVE_DATE_FROM P_EFFECTIVE_DATE_TO P_SOURCE_OF_PROFICIENCY_LEVEL P_CERTIFICATION_DATE P_CERTIFICATION_METHOD P_NEXT_CERTIFICATION_DATE P_COMMENTS P_ATTRIBUTE_CATEGORY P_ATTRIBUTE1 – 20 P_PARTY_ID |
| update_competence_element | The parameter P_EFFECTIVE_DATE must be set to the system date. | P_EFFECTIVE_DATE P_COMPETENCE_ELEMENT_ID P_OBJECT_VERSION_NUMBER P_VALIDATE P_PROFICIENCY_LEVEL P_RATING_LEVEL P_EFFECTIVE_DATE_FROM P_EFFECTIVE_DATE_TO P_SOURCE_OF_PROFICIENCY_ LEVEL P_CERTIFICATION_DATE P_CERTIFICATION_METHOD P_NEXT_CERTIFICATION_DATE P_COMMENTS P_ATTRIBUTE_CATEGORY P_ATTRIBUTE1 – 20 P_PARTY_ID | |||
| delete_competence_element | None | P_COMPETENCE_ELEMENT_ID P_OBJECT_VERSION_NUMBER P_VALIDATE | |||
| update_personal_comp_element | The parameter P_EFFECTIVE_DATE must be set to the system date. This API automatically maintains a historical record of the old competence profile entry if the effective date and the proficiency level have changed. The old competence profile entry is end dated and a new competence profile record is created. | P_EFFECTIVE_DATE P_COMPETENCE_ELEMENT_ID P_OBJECT_VERSION_NUMBER P_VALIDATE P_PROFICIENCY_LEVEL P_EFFECTIVE_DATE_FROM P_EFFECTIVE_DATE_TO P_SOURCE_OF_PROFICIENCY_LEVEL P_CERTIFICATION_DATE P_CERTIFICATION_METHOD P_NEXT_CERTIFICATION_DATE P_COMMENTS P_ATTRIBUTE_CATEGORY P_ATTRIBUTE1 - 20 |
Subscribing to Business Events
Subscribing to Business Events to Synchronize Email Address
You can update a person's email address using the Email Address field in the People window, Office Details tab. If the person is an Oracle application user, then you can ensure that this changed email address is replicated in the E-Mail field of the user's record in the Users window. To synchronize the email address, you must subscribe to business events.
To subscribe to business events to synchronize email address
-
Navigate to the Business Events page using the Workflow Administrator Web Applications responsibility.
-
In the Events page, search for the oracle.apps.per.api.person.update_person_mail event (display name is Update Person Mailer).
-
Click Update. The Update Event page appears.
-
Select Enabled in the Status field and click Apply.
-
In the Events page, search for the oracle.apps.per.api.person.update_person_mail event.
-
Click Subscribe. The Subscriptions page appears.
-
Click Update for the function per_upd_mail_notf.propagate_email_callbackable. The Update Event Subscriptions page appears.
-
Scroll down to the Execution Condition region.
-
Select Enabled in the Status field.
-
Click Next and then Apply.
Subscribing to Business Events to Send Emails
You can subscribe to business events to send email notifications when personal information and address details are updated in Oracle Human Resources (Oracle HR) and Oracle Self-Service Human Resources (Oracle SSHR).
FYI emails are sent with the changed details when the following fields are updated in Oracle HR and Oracle SSHR.
| Window Name | Fields |
|---|---|
| People | Last, First, Title, Known as, Gender, Social Security or National Identifier, Birth Date, Status, Nationality, Blood Type, Disability Information, Honors, Preferred Name, Previous Last Name |
| Address | Address, City, State, Zip Code, county, Telephone, Type |
| Phone Numbers | Home Secondary, Home Fax, Pager, Work |
Note that email is sent to the email address recorded in the Email field in the Office Details tab.
| Page Name | Fields |
|---|---|
| Basic Details: Update Information | First Name, Last Name, Title, Preferred Name, Previous Last Name, Social Security or National Identifier, Date of Birth, Gender, Marital Status, Nationality, Blood Type |
| Phone Numbers: Enter and Maintain | Home Secondary, Home Fax, Pager, Work |
| Main Address: Enter New Address | Address lines, Country, City, State, Zip Code, County |
| Other Address: Enter New Address | Address lines, Country, City, State, Zip Code, County |
Note that email is sent to the email address recorded in the Organization Email Address field in the Other region.
To subscribe to business events
-
Navigate to the Business Events page using the Workflow Administrator Web Applications responsibility.
-
In the Events page, search for the oracle.apps.per.api.person.update_person_mail event (display name is Update Person Mailer).
-
Click Update. The Update Event page appears.
-
Select Enabled in the Status field and click Apply.
-
In the Events page, search for the oracle.apps.per.api.person.update_person_mail event.
-
Click Subscribe. The Subscriptions page appears.
-
For the HRUPMAIL/UPDMAILNOTF workflow, click Update. The Update Event Subscriptions page appears.
-
Scroll down to the Execution Condition region.
-
Select Enabled in the Status field.
-
Click Next and then Apply.
Info Online Links to Information Provider Websites
Info Online Links to Information Provider Web Sites
Info Online is a generic framework to integrate Oracle Applications with partner applications. Info Online enables users to access information from third-party providers and integrations. Once the links have been enabled, users can access an information provider web site directly from a button or link on an Oracle HRMS window or self-service web page. Depending on the level of configuration available, the link can lead directly to a page relevant to the window or even the record on which the user is working.
For example, someone entering tax information might access a web site providing up-to-date information on tax regulations, or an administrator looking at benefit details for an employee could open a web page providing documentation for that employee's benefit plan.
Note: Info Online was previously known as the Knowledge Integrator.
See: Accessing Information Provider Web Sites
See: Integration between Oracle HRMS Products and Information Providers
Accessing Information Provider Web Sites
Oracle HRMS supports two versions of Info Online. The HR: KI Framework Version profile option value identifies the Info Online version.
Info Online Version 1
If the system administrator sets the profile to Version 1, users can access:
-
RIA (Research Institute of America) through the user interface for some payroll forms
-
Authoria, a provider of health insurance and compensation information, through links on some Benefits self-service web pages
-
My Oracle Support, Oracle's support web site, through the Info Online button from the user interface
Info Online Version 2
If the system administrator sets the profile to Version 2, users can access:
-
My Oracle Support and iLearning on self-service web pages in which the content container has been included
-
Transcentive through the menu link from the professional user interface and self-services pages, after completing the setup steps.
-
Enwisen through Oracle HRMS products after completing the setup steps
-
Any other information provider with whom your enterprise has an agreement.
Accessing Information Providers from Oracle HRMS Interface
Info Online Button on Oracle HRMS Windows
Once the system administrator enables the links between Oracle HRMS and the information provider pages, users access information provider web sites from the user interface by clicking the Info Online button on the Oracle HRMS toolbar, or by selecting Tools > Info Online from the menu (Shift+Control+F7). This button is enabled in windows for which information provider links have been configured and enabled.
Note: Shift+Control+F7 is the key sequence currently mapped to Function 7. Choose Help -> Keyboard on the menu to determine the actual key combination. The Oracle Forms Deployment Guide explains how to change this key assignment in the Oracle Terminal resource file fmrweb.res.
Clicking the Info Online button first opens a list of values, displaying a list of links to any information provider web sites that are enabled for the current window. When the user selects a value from the list, a browser window opens at the appropriate page.
If the user chooses the Info Online button from a window for which no links to information provider web sites are enabled, no list of values appears.
Users can control the behavior of the Info Online button using the Open in New Window option on the Tools menu. When this option is checked, each new search opens in a new browser window. This option allows users to compare results from different queries side by side, but the windows remain open until the user specifically closes them. When this option is unchecked, the page appears in the last browser window opened.
Info Online Content Container on the Oracle HRMS Products' Pages
Users access information provider web sites from the self-service web pages either through links on Benefits pages or through the Info Online content container. The list of applicable topics and providers appear alphabetically in the content container. See: Info Online Content Container
Integration between Oracle HRMS Products and Information Providers
Information Providers
Integration is available between Oracle HRMS and the following information providers:
My Oracle Support
My Oracle Support web site provides access to the latest product information, discussion forums, bug fixes, and patch information for Oracle HRMS, as well as enabling users to contact Oracle Support. Integration is available for all Oracle HRMS windows in the user interface in KI Framework Version 1 and for self-service web pages which include the content container in KI Framework Version 2. This integration is available for all legislations.
See My Oracle Support Note 229585.1 for details of how to set up links from Oracle HRMS to My Oracle Support pages.
Authoria HR
Integration is available between a number of Oracle Advanced Benefits windows and self-service pages and the third-party product Authoria HR in KI Framework Version 1. This integration is available for UK and US legislations. See: Links to Authoria HR
Also see My Oracle Support Note 215637.1 for details of how to set up links from Oracle HRMS to Authoria HR pages.
RIA PCP on Checkpoint
Integration is available between Oracle HRMS US tax windows and third-party information provider RIA's Payroll Compliance Pro on Checkpoint in KI Framework Version 1. This integration is available for US legislations.
See My Oracle Support Note 148468.1 for further details of how to set up links from Oracle HRMS to RIA PCP on Checkpoint.
Transcentive
Integration is available between Oracle HRMS windows and Transcentive, a third-party compensation management solutions provider, in KI Framework Version 2. This integration is available for all legislations.
See My Oracle Support Note 294453.1 for further details of how to set up links from Oracle HRMS to Transcentive.
iLearning
Oracle iLearning is an enterprise learning management system that prescribes, delivers and tracks learning, and monitors and manages the learning process. Integration is available between the Rapid Implementation Workbench web pages and Oracle iLearning in KI Framework Version 2.
See My Oracle Support Note 294453.1 for further details of how to set up links from the Rapid Implementation Workbench web pages to Oracle iLearning.
Enwisen
Integration is available between Oracle HRMS products and Enwisen, a third-party information provider.
See: Info Online Links to Enwisen from Oracle iRecruitment Pages
See: Info Online Links to Enwisen from Oracle Performance Management Pages
See: Info Online Links to Enwisen from Oracle SSHR Pages
See: Info Online Links to Enwisen from Oracle Time and Labor Pages
See: Configuring Links between HRMS Products and Enwisen
See: Oracle technical brief Integrating Oracle Applications with Partner Applications on Oracle My Oracle Support Note 294453.1 for further details of how to set up links from Oracle HRMS to Enwisen.
Info Online Content Container
The Info Online content container is an ancillary region that appears on self-service web pages. Topics and providers appear as an alphabetical list of links in the content container.
On clicking a topic, the list of providers who provide content for the topic appears in a new web page. If only one provider exists for the selected topic, the single provider's page opens immediately.
Users can also select a provider from the list in the content container, and view a list of topics offered by that provider.
The More link appears when the number of topics or providers exceeds a predefined limit. The limit of topics or providers is set in the HR: KI Maximum Topics and Integrations profile. If no limit is set, the More link appears when the number of topics or providers exceeds 3. On clicking the More link from the topics or providers region, the complete set of topics or providers appears in a new page.
Configuring Links between Oracle HRMS Products and Information Providers
You can configure links between Oracle HRMS products and information providers to enable users to access content on information provider web sites.
Note: The information that your workforce can access on the information provider web site depends on the agreement with the information provider.
To configure links between Oracle HRMS products and information providers
-
Setting Profiles Options
Set the following profile options to set up links between Oracle HRMS and any information provider web sites:
-
HR: KI Framework Version
-
HR: Extension Agent Enabled
-
HR: Extension Agent Client Timeout
Setting the following additional profile options is optional if you are setting up links between Oracle HRMS and any information provider web sites:
-
HR: Extension Agent
-
HR: Info Online: Open in New Window
-
HR: Info Online: Toolbar Icon
-
HR: KI Maximum Topics and Integrations
-
HR: Servlet Timeout
-
HR: KI Providers Enabled
-
HR: KI Topics Enabled
-
HR: KI User Options Enabled
Additional required and optional profile options exist for individual information providers. See: User Profiles
-
-
Configure links to information providers
After you configure Info Online, you can access configured partners in self service pages through the Info Online content container and in forms through the Info Online icon. You can also access configured partners as a menu link.
For more information on configuring links to information providers, see: Oracle technical brief Integrating Oracle Applications with Partner Applications on My Oracle Support Note 294453.1
-
Display the Info Online content container, if hidden by default
The links to information providers are available in the Info Online content container on the Oracle HRMS products' pages. If the content container is hidden by default, then use the Personalization Framework functionality to display the content container on the appropriate applications pages.
Info Online Links to Authoria HR
Info Online Links to Authoria HR
Authoria HR uses a common knowledge repository to manage and communicate HR and benefits information. You can configure context-sensitive access between Oracle HRMS and Authoria HR. End users can follow links from the user interface windows and self-service pages to display Authoria HR documentation directly related to the record they are working with.
This feature is available for US and UK legislations.
Note: Info Online was previously known as the Knowledge Integrator.
Links from Oracle Windows and Self-Service Pages
Integration with Authoria HR is enabled for the following Oracle Standard and Advanced Benefits windows:
-
View Enrollment Results window (BENDSPER)
-
View Participation Information window (BENDISPL)
-
Flex Program window (BENEFXEB)
-
Non-Flex Program window (BENENFEB)
-
Savings Plan window (BENESPEB)
-
Miscellaneous Plan window (BENEMSEB)
-
Person Life Events window (BENDSPLE)
Integration is also enabled for the following self-service pages:
-
Benefits Enrollment Overview page (BEN_ENRL_OVERVIEW_PAGE)
-
Current Benefits page (BEN_CURR_OVW_PAGE)
-
Confirmation page (BEN_ENRL_CONF_PAGE)
-
Benefits Selection page (BEN_ENRT_SELECTION_PAGE)
Accessing Authoria HR
Access to Authoria HR is available in user interface windows from the Info Online button on the toolbar or the Info Online option on the Tools menu (Shift+Control+F7).
When a user chooses the Info Online button in one of the windows in which the feature is enabled, a list of values appears, listing the pages in the Authoria HR system applicable to the current context. If other Information Provider links have been enabled, these are also displayed. When the user selects an Authoria link from the list of values, a browser window opens at the appropriate Authoria HR page.
Users can control the behavior of the Info Online button using the Open in New Window option on the Tools menu. When this option is checked, each new search opens in a new browser window. This allows users to compare results from different queries side by side, but they must close each window when finished. When this option is unchecked, the the last browser window that was opened is used to display the Authoria HR page.
From the self-service interface, access to Authoria HR is via hypertext links in the Oracle Standard and Advanced Benefits pages. The links appear only when there is a mapping between the page and a page in the Authoria HR system. When a user clicks on a link, a new browser window opens and displays the page from the Authoria HR system applicable to the current context.
See: Configuring Links Between Oracle HRMS and Authoria HR
Example SQL Script to Populate Mapping Table
This example script configures links between Oracle benefit plans and programs and Authoria HR pages. See Configuring Mappings Between Oracle and Authoria HR for information on how to configure this script for your own use.
The script assumes that there are no mappings stored in the table to begin with. The mappings are business group-specific. Each plan/program combination results in two mappings, one for open enrollment and the other for non-open enrollment. The open enrollment mapping is typically to a common open enrollment page.
The script shows the following four mappings:
-
A plan named 'ACME Dental NonFlex' exists in the program 'ACME Program NonFlex'. This is mapped to the Authoria page 'AnnEnroll' during open enrollment, and at other times to the page 'Dental'. This results in the procedure call for non-open enrollment:
create_page_map('ACME Dental NonFlex','ACME Program NonFlex', 'N','Dental',l_business_group_id); -
and for open enrollment:
create_page_map('ACME Dental NonFlex','ACME Program NonFlex', 'Y','AnnEnroll',l_business_group_id); -
A plan 'Saving Plan', that is not in a program, is mapped to the Authoria page 'AnnEnroll' during open enrollment, and at other times to the page 'Sav'. This results in the procedure call for non-open enrollment:
create_page_map('Saving Plan',NULL, 'N','Sav',l_business_group_id); -
and for open enrollment:
create_page_map('Saving Plan',NULL,
               'Y','AnnEnroll',l_business_group_id);
Example Script
REM +===============================================+
REM SQL Script File Name : create_page_map.sql
REM Description: Seed Authoria page mappings via APIs
REM +===============================================+
declare
l_business_group_id number;
procedure create_page_map
 (p_plan_name                     in     varchar2
 ,p_program_name                  in     varchar2
  ,p_open_enrollment_flag          in     varchar2
 ,p_target_page                   in     varchar2
  ,p_business_group_id             in     number
 ) is
--
l_authoria_mapping_id number;
l_object_version_number number;
l_plip_id number := null;
l_pl_id number;
l_pgm_id number := null;
-- value -924926578 represents a number unlikely to
-- exist in the database
cursor csr_exists is
  select authoria_mapping_id,
         object_version_number
  from  hr_authoria_mappings
  where pl_id            = l_pl_id
    and nvl(plip_id,-924926578) = nvl(l_plip_id,-924926578)
    and open_enrollment_flag = p_open_enrollment_flag;
begin
-- get pl_id
select pl_id
into l_pl_id
from ben_pl_f
where sysdate between effective_start_date
                and effective_end_date
and name = p_plan_name
and business_group_id = p_business_group_id;
if (p_program_name is not null) then
  -- get pgm_id
  select pgm_id
  into l_pgm_id
  from ben_pgm_f
 where sysdate between effective_start_date
                    and effective_end_date
    and name = p_program_name
    and business_group_id = p_business_group_id;
 select plip_id
  -- get plip_id
  into l_plip_id
 from ben_plip_f
 where sysdate between effective_start_date
                    and effective_end_date
    and pl_id = l_pl_id
    and pgm_id = l_pgm_id
   and business_group_id = p_business_group_id;
end if;
-- see if there is an existing record
open csr_exists;
fetch csr_exists into l_authoria_mapping_id
                     ,l_object_version_number;
if csr_exists%found then
 -- do update
 HR_AUTHORIA_MAPPING_API.update_authoria_mapping
    (
    p_authoria_mapping_id           => l_authoria_mapping_id
    ,p_pl_id                         => l_pl_id
    ,p_plip_id                       => l_plip_id
   ,p_open_enrollment_flag          => p_open_enrollment_flag
    ,p_target_page                   => p_target_page
   ,p_object_version_number         => l_object_version_number
    );
else
 -- do insert
  HR_AUTHORIA_MAPPING_API.create_authoria_mapping
    (
    p_pl_id                         => l_pl_id
   ,p_plip_id                       => l_plip_id
   ,p_open_enrollment_flag          => p_open_enrollment_flag
   ,p_target_page                   => p_target_page
   ,p_authoria_mapping_id           => l_authoria_mapping_id
   ,p_object_version_number         => l_object_version_number
end if;
    );
close csr_exists;
end;
--
BEGIN
--
select business_group_id
into l_business_group_id
from per_business_groups
where name = 'SC Benefits';
create_page_map('ACME Dental NonFlex','ACME Program NonFlex',
               'N','Dental',l_business_group_id);
create_page_map('ACME Dental NonFlex','ACME Program NonFlex',
                'Y','AnnEnroll',l_business_group_id);
create_page_map('Saving Plan',NULL,
               'N','Sav',l_business_group_id);
create_page_map('Saving Plan',NULL,
               'Y','AnnEnroll',l_business_group_id);
--
END;
/
COMMIT;
EXIT;
Configuring Links Between Oracle Standard and Advanced Benefits and Authoria HR
You can configure links between Oracle Standard and Advanced Benefits windows and self-service pages and Authoria HR. See: Info Online Links to Authoria HR
To Configure Links Between Oracle Standard and Advanced Benefits and Authoria HR
-
You must first install the required versions of Oracle HRMS and Authoria HR. For further details on installation and implementation, see My Oracle Support (formerly MetaLink) Note 215637.1.
-
Ensure that the following profile options are set:
-
HR: Extension Agent Enabled
-
HR: Authoria Integration Enabled
-
HR: Authoria US URL and/or HR: Authoria UK URL
-
-
Check the following optional profile options to see whether you should set them for your system:
-
HR: Extension Agent
-
HR: Info Online: Open in New Window
-
HR: Info Online: Toolbar Icon
For further details of profile options, see: User Profiles
-
-
Set up your Oracle benefit plans and programs.
-
Set up your Authoria HR benefit plans. For further details, see your Authoria HR documentation.
Configuring Mappings between Oracle and Authoria HR
Before users can access Authoria HR pages from Oracle HRMS windows or self-service web pages, you must configure the mappings between your Oracle HRMS benefits and the pages you have set up in Authoria HR.
To Configure Mappings
-
Identify the pages in Authoria HR that you want to link to each of your Oracle benefit plans and programs.
-
Edit the following select statement in the example SQL script to include the appropriate business group by replacing "SC Benefits" with the required business group name:
select business_group_id
into l_business_group_id
from per_business_groups
where name = 'SC Benefits';
-
For each mapping, add a create_page_map procedure, replacing the example create_page_map procedure lines. Add a separate line for each mapping.
The create_page_map procedure takes the following arguments:
Mapping Arguments
Procedure Description p_plan_name the name of the benefits plan p_program_name the name of the benefits program (null if the plan is not in a program) p_open_enrollment_flag indicates whether the page mapped to is for open enrollment. Allowed values are Y or N. p_target_page the name of the target page in the Authoria application p_business_group_id the business group id, as determined using the select statement -
Run the SQL script.
The script calls the HR_AUTHORIA_MAPPING API, which saves the mappings in the Oracle database table HR_AUTHORIA_MAPPINGS.
Info Online Links to Enwisen
Info Online Links to Enwisen from Oracle iRecruitment Pages
You can configure access between Oracle iRecruitment and Enwisen, a third-party information provider to enable end users to access company specific information or any other relevant information hosted on the Enwisen web site. The Info Online content container on the self-service pages displays hypertext links to information providers.
The Info Online content container that is available on the iRecruitment Manager and Recruiter Home page, is hidden by default. This content container includes the iRecruitment Process link (default link) to access, for example, information on company's recruitment policies.
To enable users to access Enwisen, complete the following steps. Using the Personalization Framework function:
-
Display the Info Online content container.
-
Display the default iRecruitment Process link or configure links to Enwisen according to your agreement with Enwisen.
See: Configuring Links between HRMS Products and Enwisen
Info Online Links to Enwisen from Oracle Performance Management Pages
You can configure access between Oracle Performance Management and Enwisen, a third-party information provider to enable end users to access company specific information or any other relevant information hosted on the Enwisen web site. The Info Online content container on the self-service pages displays hypertext links to information providers.
The Performance Management page available from the Manager Self-Service and Employee Self-Service responsibilities contains the Info Online content container, which is hidden by default. This content container includes the Handbook link (default link) to access, for example, your company's information on performance appraisals.
To enable users to access Enwisen, complete the following steps. Using the Personalization Framework function:
-
Display the Info Online content container.
-
Display the default Handbook link or configure links to Enwisen according to your agreement with Enwisen.
See: Configuring Links between HRMS Products and Enwisen
Info Online Links to Enwisen from Oracle Self-Service Human Resources (SSHR) Pages
You can configure access between Oracle Self-Service HR (Oracle SSHR) and Enwisen, a third-party information provider to enable end users to access company specific information or any other relevant information hosted on the Enwisen web site. The Info Online content container on the self-service pages displays hypertext links to information providers.
Accessing Enwisen from the Personal Information Page
The Personal Information page available from the Employee Self-Service responsibility contains the Info Online content container, which is hidden by default. This content container displays the Handbook link (default link) to access, for example, company policies on the Enwisen web site.
To enable users to access Enwisen, complete the following steps. Using the Personalization Framework function:
-
Display the Info Online content container.
-
Display the default Handbook link or configure links to Enwisen according to your agreement with Enwisen.
Accessing Enwisen from the Absence Management Page
The Absence Management page available from the Manager and Employee Self-Service responsibilities contains the Info Online content container, which is hidden by default. This content container displays the Time Off Policy link (default link) to access, for example, company's absence policies on the Enwisen web site.
To enable users to access Enwisen, complete the following steps. Using the Personalization Framework function:
-
Display the Info Online content container.
-
Display the default Time Off Policy link or configure links to Enwisen according to your agreement with Enwisen.
See: Configuring Links between HRMS Products and Enwisen
Info Online Links to Enwisen from Oracle Time and Labor Pages
You can configure access between Oracle Time and Labor and Enwisen, a third-party information provider to enable end users to access company specific information or any other relevant information hosted on the Enwisen web site. The Info Online content container on the self-service pages displays hypertext links to information providers.
The Recent Timecard function on the Timecard Activities page available from the OTL Employee Self-Service responsibility contains the Info Online content container, which is hidden by default. This content container includes the Handbook link (default link) to access, for example, your company's information on timecards.
To enable users to access Enwisen, complete the following steps. Using the Personalization Framework function:
-
Display the Info Online content container.
-
Display the default Handbook link or configure links to Enwisen according to your agreement with Enwisen.
See: Configuring Links between HRMS Products and Enwisen
Configuring Links between HRMS Products and Enwisen
If your enterprise has an agreement with Enwisen, a third-party information provider to enable your workforce access company specific information or any other relevant information hosted on the Enwisen web site, then you can configure links to Enwisen.
Note: The company information that your workforce can access on Enwisen depends on your agreement with Enwisen.
See: Info Online Links to Enwisen from Oracle iRecruitment Pages
See: Info Online Links to Enwisen from Oracle Performance Management Pages
See: Info Online Links to Enwisen from Oracle SSHR Pages
See: Info Online Links to Enwisen from Oracle Time and Labor Pages
To configure links between HRMS products and Enwisen
The following section lists the basic implementation steps that are required to configure links between Oracle HRMS products and Enwisen.
-
Set the HR: Extension Agent profile option to enable the Info Online functionality.
See: User Profiles
-
Set the HR: Enwisen Login URL profile option.
See: User Profiles
-
Enable the Info Online content container and Topics region by setting an applicable value for the HR: KI Topics Enabled profile option.
See: User Profiles
-
Use the Personalization Framework function to display the Info Online content container on the product pages that support Enwisen integration. The content container is hidden by default on the following pages:
-
iRecruitment
Manager and Recruiter Home page
-
Oracle Self-Service HR
Absence Management page (Manager Self-Service and Employee Self-Service responsibilities)
Personal Information page (Employee Self-Service responsibility)
-
Oracle Performance Management
Performance Management page (Manager Self-Service and Employee Self-Service responsibilities)
-
Oracle Time and Labor
Recent Time Cards page
-
-
Enter the login and authentication details that you receive from Enwisen for Enwisen:Provider integration option on the Integration Options page.
To provide the details:
-
Log on to the Info Online Administrator responsibility.
-
Click the Info Online Options link.
-
Search for the Enwisen:Provider integration option on the Integration Options page.
-
In the Option Name region, set the Enabled and User Visible options to Yes.
Mandatory Details
Provide the following mandatory information:
-
Enwisen Subscriber Name
-
Enwisen TPPassword
-
Enwisen TPUserID
Enwisen Secret Key
In the Enwisen Secret Key field enter the Enwisen authentication key.
-
Additional Implementation Steps
After you implement the basic steps, you can carry out the following steps to define user specific additional security to access Enwisen. For example, depending on your business requirements, you can:
-
Restrict access to information on Enwisen based on criteria such as jobs, positions, or departments. Additionally, you can restrict information to different users such as employees, line managers, and HR personnel.
-
Enable specific users to view data across geographical areas. For example, if your enterprise has a global presence, then the Vice President of the HR team may require access to recruitment policies across geographic locations. You can define security options to enable the vice president to access the required information.
To define additional security when accessing Enwisen:
-
Enwisen requires users to log in to access the provider's site for information. To define additional security depending on your business requirements, you must create a Java class that implements Oracle's predefined Java interface: oracle.apps.per.ki.kiserver.KIDataFetcher. The Java class contains the method to retrieve login values when end users access Enwisen from Oracle HRMS product pages.
For technical details of creating a Java class, see: Oracle technical brief, Integrating Oracle Applications with Partner Applications on My Oracle Support Note 294453.1
-
Provide the Java class value in the HR: Class Name to Fetch KI Data profile option to enable users to launch Enwisen from Oracle HRMS product pages that support Enwisen integration.
See: User Profiles
Link Windows (Task Flow)
Task Flow
You can link windows used to complete tasks in a task flow. Then, you can choose a button to bring up each window in turn without returning to the menu.
The first window in the task flow defines the context of the subsequent windows. For example, if the task flow begins with the People window, all subsequent information is entered for the person you enter or query in the People window.
You can include configured windows in task flows. For example, you might create a version of the People window that handles applicants only. You could then use this window in a recruitment task flow. Or you might configure a People Management template and add task flow buttons to provide access to other windows.
Using Forms or Workflow
There are two methods you can use to create and maintain your task flows:
You can model your task flows using Oracle Workflow (version 2.0.3.8.1 or higher) then generate a task flow. This method of creating task flows has the advantage of using a diagrammer to help you design the sequence of windows.
Caution: Do not use apostrophes or "%" symbols in task flow names or task flow node names.
Sequential or Branched Structure
Task flows can follow a sequential or a branched structure, as shown in the following two figures. You can choose how many navigation options users have from each window in the task flow. You can also choose the labels that appear on the navigation buttons, and you can define access keys.
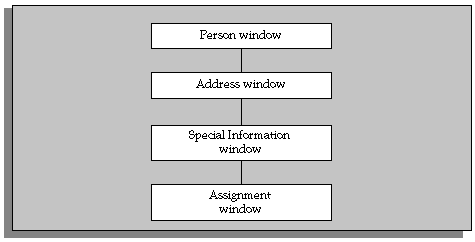
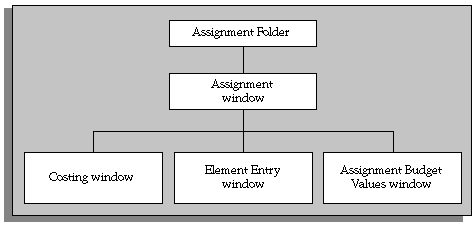
Predefined Task Flows
Oracle HRMS supplies several predefined task flows that include all the windows that you can use in task flows. They are designed as a simple structure to use during implementation, not as a recommended structure for users.
Predefined task flows are translated into your base language when you install Oracle HRMS. However, if you install an additional language, you need to create new versions of your task flows in that language. You can then link these to the correct menu for the language.
When you install a new version of Oracle HRMS, any changes you have made to the standard task flows supplied by Oracle are removed.
Important: If you have made any changes to standard task flows, you will need to recreate them in each new version of the software. It is therefore recommended that if you wish to make changes to task flows, you do so by copying a standard task flow and making changes to the copy.
Transferring Task Flows Between Databases
You can transfer a task flow you have created using Forms or Workflow from one database to another; for example, to add new task flows you have created in a test database into your production database. You do this by saving the task flow from the first database to a file, then importing the file to the second database. See Transferring Task Flows.
Legislation-specific Task Flows
When installing Oracle HRMS, you can install only global task flows and task flows specific to the legislation you have installed.
Note: This does not include US- and UK-specific task flows, which are installed with all legislations.
When defining a new task flow, you must specify that the task flow is global or that it is specific to a legislation you have installed.
Note: Task flows created by converting from Oracle Workflow are always global.
When downloading task flows, you can download only global task flows and task flows specific to the legislation(s) you have installed.
See Transferring Task Flows Between Databases
Task Flow Windows
You can create your own task flows by referencing the windows or Oracle Application Framework (OAF) pages listed in the table below, or configured versions of them. Some of these windows require the context of an assignment. This means that one of the following windows must appear above them in the task flow:
-
Assignment window
-
Assignments Folder window
-
Application window (for applicant assignments)
-
a People Management template window that identifies assignments
All task flows must begin with one of the following windows:
-
A Maintenance window created from a People Management template
-
People and Assignment (PERWSHRG)
-
People (PERWSEPI)
-
People Folder (PERWSFPE)
-
Assignments Folder (PERWSFAS)
-
Assignment (PERWSEMA)
-
Job (PERWSDJT)
-
Position (HRWSPSF)
-
Position (non HRMS users) (PERWSDPO)
-
Location (PERWSLOC)
-
Collective Agreements (PERWSDCA)
-
Tax Balance (PAYUSTBA)
Note: If you are not using People Management templates, use the combined People and Assignment form (PERWSHRG), rather than the separate forms (PERWSEPI and PERWSEMA), to allow the Assignment window to open more quickly from the People window. We recommend that you use the combined form in any task flow that requires both windows. The predefined task flows use the combined form.
Windows or Oracle Application Framework (OAF) Pages You Can Use in Task Flows
| Window or OAF Page | Context Required |
|---|---|
| Absence Detail | Person (employee) |
| Address | Person |
| Adjust Balances (Oracle Payroll) | Assignment (employee) |
| Agreement and Grade Results | Assignment (employee) |
| Allocated Checklists | Person (employee, applicant, or contingent worker) / Assignment |
| Applicant Interview | Assignment (applicant) |
| Application | Person (applicant) |
| Assignment | Person (employee) |
| Assignment Budget Values | Assignment |
| Assignments Folder | None |
| Assignment Rates | Assignment (contingent worker) |
| Belgian Tax Information (Belgian legislation only) | Assignment (employee) |
| Beneficiaries (US legislation only) | Element entry |
| Book Events | Person (employee or applicant) |
| COBRA (US legislation only) | Assignment (employee) |
| Communication Delivery Methods | Person |
| Competence Profile | Person |
| Contact | Person |
| Contract | Person |
| Costing | Assignment (employee) |
| Covered Dependents (US legislation only) | Element entry |
| Disability (global and selected legislations) | Person |
| Documents of Record | Person |
| Element Entries | Assignment (employee) |
| Employee Review | Assignment (employee) |
| Employee Tax Rules (US Oracle Payroll) | Assignment (employee) |
| Employment Declaration (Australian legislation only) | Assignment (employee) |
| End Placement | Person (contingent worker) |
| External/Manual Payments (Oracle Payroll) | Assignment (employee) |
| Extra Assignment Information | Assignment (employee or applicant) |
| Extra Job Information | Job |
| Extra Location Information | Location |
| Extra Person Information | Person (employee or applicant) |
| Extra Position Information | Position |
| Grade Step Placement | Assignment (employee) |
| Medical Assessment (global and selected legislations) | Person |
| P45 (UK Oracle Payroll) | Assignment (employee) |
| People Folder | None |
| People | None |
| People Management template Maintenance window | None |
| Performance | Assignment (employee) |
| Person Type Usage | Person |
| Personal Payment Method | Assignment (employee) |
| Phone Numbers | Person |
| Picture (OAF page)
Note: When you define the task flow node, the node must point to the Picture OAF page or to the predefined PERWSIMG function from which users can navigate to the Picture OAF page. |
Person |
| Position | None |
| Position Occupancy | Position |
| Previous Employment | Person |
| Qualifications | Person |
| QuickPay (Oracle Payroll) | Assignment (employee) |
| Reverse Payroll Run (Oracle Payroll) | Assignment (employee) |
| Salary Administration | Assignment (employee) |
| Salary History | Assignment (employee) |
| Schools and Colleges (Establishment Attendances) | Person |
| Secondary Statuses | Assignment |
| SOE Report (UK Oracle Payroll) | Assignment (employee) |
| Special Information | Person |
| Statement of Earnings (Australian and New Zealand legislations) | Assignment (employee) |
| Statutory Details (UK Oracle Payroll) | Assignment (employee) |
| Supplementary Roles | Person |
| Terminate | Person (employee) |
| Terminate Applicant | Person (applicant) |
| View Element Entry History | Assignment (employee) |
| View Employee Accruals (US legislation only) | Assignment (employee) |
| View Employee Benefits (US legislation only) | Assignment (employee) |
| View Employee Earnings & Deduction Balances (US Oracle Payroll) | Assignment (employee) |
| View Employee Tax Balances (US Oracle Payroll) | Assignment (employee) |
| View SOE (US Oracle Payroll) | Assignment (employee) |
| Work Choices (Job or Position) | Job or Position |
| Work Choices (Person) | Person |
| Work Incident (global and selected legislations) | Person |
Including the Assignment Window
When users move down a task flow from the combined People and Assignment form, the Assignment window remains visible in the background. They can return to the Assignment window by closing their current window. Therefore you should not define a button to call the Assignment window.
However, if you are defining a task flow to the Assignment window from any window except the People window, you should use the Assignment form (PERWSEMA). In this case you can add an Assignment button to any forms below the Assignment window in the task flow. This enables users to return to the Assignment window without going back to the top window.
Task Flow (Oracle Workflow)
As an alternative to using forms to set up and maintain task flows, you can model your task flows using Oracle Workflow (version 2.0.3.8.1 or higher) then generate a task flow. This method of creating task flows has the advantage of using a diagrammer to help you design the sequence of windows.
Note: When you create a task flow using Oracle Workflow, you must continue to maintain it using Oracle Workflow. You cannot edit a generated task flow using the Define Task Flow form.
Oracle HRMS supplies the HR Task Flow item type and a function activity for every window that can be task flowed. You model these into a workflow process for each task flow. By setting activity attributes, you create button labels and the position of buttons on each window.
Key Rules
There are two key rules in defining task flows:
-
Only certain windows are valid first windows (or top nodes) in a task flow. To check which windows are valid first windows, check the lookup types using Oracle Workflow Designer.
When you create a workflow process to model your task flow, your Start activity must connect to the Top Node Selector activity. This activity ensures that your first window is valid.
-
Each window in a task flow can only be connected to a window that supplies the correct context.
For example, the Position Occupancy window requires the context of a position, while the Qualifications window requires the context of a person. Each workflow activity supplied for a window has its Result Type set to a lookup type that defines the context that must be passed to it. For example, the F4 Enter Address window has the Result Type set to Person Context Windows. This means it must be given the context of a person.
Task flows are associated with one of the following contexts:
-
Assignment
-
Element Entry
-
Job
-
Location
-
Request for Personnel Action (US Federal HR)
-
People
-
Position Description (US Federal HR)
-
Position
-
Top node HRMS windows
-
Creating Task Flows Using Forms
Complete the following steps to create task flows using forms:
-
You can also complete these optional steps, if required:
Defining Task Flow Nodes
Each form in a task flow is a node. There are predefined nodes for every form that you can include in a task flow. However, if you create a configured version of one of these forms, you must create a node for the configured version before you can include it in a task flow.
Tip: If you want to use a configured form as the first node in a task flow you should define this as a new node.
You could add both the task flow and the configured form as arguments to a single menu function but this may be more difficult to maintain.
You create nodes in the Define Task Flow Nodes window.
To create a task flow node
-
Enter a name for the node. You select this name when you create a task flow containing the node. It is not visible to users.
Caution: Do not use apostrophes or "%" symbols in the node name.
-
Select the name of the form that you configured. Leave the Block field blank.
-
Select the name of the configured version of the form that you created.
-
Save the new node.
Defining Task Flows
You define task flows in the Define Task Flow window. If there is a similar existing task flow, you can copy it to form the basis of your new flow.
Tip: When defining the navigation buttons in your task flows:
-
Do not define long sequences where you cannot go back to the previous step
-
Use the same button names for the same nodes
-
Use different button names for configured nodes
Before you can include the task flow in a menu, you must define a new menu function for the first form in the task flow with the following argument in the Parameters field:
WORKFLOW_NAME = "task flow name"
To define a new task flow
-
Enter a name for the task flow and save it.
Caution: Do not use apostrophes or "%" symbols in task flow names.
Note: Do not choose the Convert button. This is provided only for converting task flows you created in Oracle Workflow. See: Creating Task Flows Using Workflow
-
Select a legislation for the task flow from the list of values, or leave the legislation field blank to create a global task flow.
-
In the Node block, select the name of the node that you want to be the first form in the task flow.
-
For this node, select the Top Node check box.
-
Create a new record in the Node block and select another node. You must create all the nodes for the task flow before you can begin entering the navigation paths between them.
-
In the Navigation Options region, for each node, select the other nodes to which you can navigate.
-
Enter a sequence number to determine the order in which the navigation options appear as buttons (from left to right) along the base of the window or as options in a navigation list.
-
Select the Button check box for the navigation options that should appear as buttons. There is a limit on the number of buttons that can appear on each form. This number varies from form to form.
The other options are displayed in a navigation list when the user chooses a button labelled Others. Or, if there is only one other option, this form displays when the user chooses a button labelled Next.
-
There is a default label that appears on buttons or in the navigation list for every form. You can override this with your own label.
If the label in the Define Task Flow window appears blue, this is the default value. It is a dynamic default: if the seeded value changes (for example, as the result of an upgrade), the label will be updated automatically in all task flows where it has not been overridden.
If the label appears black, the default value has been overridden. To re-inherit the default label, clear the field.
-
To define an access key (or keyboard shortcut) for a navigation option, precede the appropriate letter in the label with an ampersand (&). For example, to use ALT+P (in the Microsoft Windows environment) as the access key for the Picture page, enter the label &Picture.
Note: Do not use the following letters, as they are used on the Oracle Applications menu: A, E, F, G, H, Q, S, W.
There is no validation to prevent the same letter being used more than once for a group of buttons.
-
Save the task flow.
Copying an Existing Task Flow
-
Query the existing flow and choose the Copy To button.
-
Enter the name of the new task flow and choose OK.
-
Query your new task flow and edit it as required.
Adding a New Window to an Existing Task Flow
You can use the Define Task Flow window to add a new window, using its node name, to an existing task flow. If you have already used the window in the task flow you only have to amend the navigation, see: Amending the Navigation of a Task Flow
Note: If you have created a task flow using Oracle Workflow, you must continue to maintain it using Oracle Workflow. You cannot edit a generated task flow using the Define Task Flow window.
To add a new window to an existing task flow
-
Query the task flow you want to amend in the Name field.
-
In the Node block, enter the window's node name.
-
Save your changes.
You must now include the node in the navigation path for the task flow.
-
Select the existing node you want the new node to be accessed from in the Node block.
-
Enter the new node`s details in the Navigation Options region and edit the existing navigation path as required. For information about how to set up the Navigation Options region refer to steps 5 to 9 in "To define a new task flow".
Amending the Navigation of a Task Flow
Use the Define Task Flow window to amend the navigation of a task flow.
To amend the navigation of a task flow
-
Query the task flow for which you want to amend the navigation in the Name field.
-
Select the node name in the Node block.
-
Edit the existing navigation path in the Navigation Options region, as required. For information on the Navigation Options refer to steps 5 to 9 in To define a new task flow.
Generating a Task Flow From Oracle Workflow
After modeling a task flow in Oracle Workflow and saving it to the database, you must generate task flow definitions.
Use the Define Task Flow window from the HRMS application.
To generate a task flow from Oracle Workflow
-
Query the task flow(s) you have created and choose the Convert button.
-
Choose OK to convert the task flows from Oracle Workflow.
Oracle HRMS indicates how many task flows have been successfully converted. If any task flows have not been converted, these are identified and are not saved to the database. You must correct the errors then verify, save and regenerate the task flows again.
Note: Having modeled a task flow in Oracle Workflow, you cannot edit it using the Define Task Flow window. You must make any edits using Oracle Workflow, save it and then regenerate the task flow definitions.
Creating Task Flows Using Workflow
Complete the following steps to create task flows using Oracle Workflow:
-
Combined People and Assignment Form Only
If you are creating task flows using the combined People and Assignment form, you have an additional step to perform:
-
Identify Windows or Blocks to Display
Configured Versions of Forms Only
If you have created a configured version of a form, you have an additional step to perform:
-
Identify Configured Forms to Include in the Task Flow
All Forms
Creating a Top Level Process
You must define a top level process for each task flow. The top level process can contain sub processes, but not any other top level processes.
A top level process must have a Top Node Selector activity. This ensures that the first window in a task flow is a valid top node window. All windows that can be a top node are defined within the Top Node HRMS Context Windows lookup type.
The Top Node Selector must have two transitions. The first transition must go to the Top Node activity and its value must be the window activity name. The second transition must be <Default> and go to the end activity.
You use the Process Diagrammers within Oracle Workflow to create your task flows. You do this by adding and connecting the windows you want to appear.
To create a top level process
-
Enter a unique internal and display name for the new process for the HR Task flow item type.
Tip: Use a naming convention for Internal and Display names. For example, a good internal name might be POSITION_DETAILS_TL with a Display name of Position Details (Top Level).
-
Define the process as runnable.
-
Open the Process Diagrammer window and add one Start activity and at least one End activity.
-
Add a Top Node Selector activity. The Start activity must connect to the Top Node Selector activity.
-
Connect the Top Node Selector to the End activity with a <Default> transition result value.
-
Add the Top Node window.
-
Connect the Top Node Selector to the Top Node window, specifying the name of this window activity as the transition result value.
-
Connect the Top Node window to the End Activity with a <Default> transition result value.
-
Add other windows to the process, noting the following rules:
-
A window can only connect to another window where the result type is the same (such as, both Person Context windows).
-
The transition result value must be the name of the window activity you are connecting to (for example, F4 Enter Assignment).
-
Each window can only connect once to any other window.
-
Each window must be connected to the Top Node window with a <Default> transition result value.
-
You can connect a window back to its parent using the <Parent> transition result value, rather than the name of the parent window.
-
Creating Sub Processes
You can group a logical set of task flow windows into a sub process, which can then be used by several top level processes. This simplifies process modelling. Each sub process can contain other sub processes. There are two rules to note regarding sub processes:
-
A sub process cannot be defined as runnable.
-
When you use a sub process in another process, you must connect the sub process to the Top Node window.
To create sub processes
-
Enter a unique internal and display name for the new process for the HR Task flow item type.
Tip: Use a naming convention for Internal and Display names. For example, a good Internal name might be ASSIGNMENT_DETAILS_SL with a Display name of Assignment Details (Sub Level)
-
Define the process as NOT runnable.
-
Specify a user defined result set as a Process Result Type if the sub process requires more than one result value.
-
Open the Process Diagrammer window and add one Start activity and at least one End activity
Because a process can have more than one result value, many End activities may be required. At least one End activity is required to indicate that the process must connect back to the Top Level node window.
-
Connect the Start activity to another window.
Note: The Start activity can connect to one window only.
-
Add other windows to the process, noting the following rules:
-
A window can only connect to another window where the result type is the same (such as, both Person Context windows).
-
The transition result value must be the name of the window activity you are connecting to (for example, F4 Enter Assignment).
-
Each window can only connect once to any other window.
-
Each window must connect to an End Activity with a <Default> transition result value.
-
You can connect a window back to its parent using the <Parent> transition result value, rather than the name of the parent window.
-
Creating Button Labels
You can enter the label you want to appear on the task flowed forms, for example, Photo (for the Picture page). Each task flow window activity has an attribute called Button Label. Use this attribute to override the default button label for a window and to define an access key (or keyboard shortcut).
To create button labels
-
Display the process in the Oracle Workflow Process Diagrammer.
-
Select the activity by choosing Edit - Properties. (You can also double click on Edit - Properties to select it).
-
Select the Attribute Values tab frame.
-
Enter the label you want to appear on the forms.
Precede the appropriate letter in the label with an ampersand (&) to define an access key. For example, to use ALT+P (in the Microsoft Windows environment) as the access key for the Picture page, you could enter the label &Photo.
Positioning Button Display
You can position the display order of buttons on the form. For example, you might want the first button to display the Picture page.
The number of task flow navigation buttons that can be displayed on a window varies from window to window. If there are too many navigation options for them all to appear as buttons, the last button on the window is called Other and it displays a list of values containing the other navigation options.
You determine the navigation options available from a window by defining transitions to other windows in the Process Diagrammer. Now you can use the activity attributes Display Button 1..4 to specify which navigation options should display as buttons and the order in which they should appear.
To position buttons
-
Display the process in the Oracle Workflow Process Diagrammer.
-
Select the activity by choosing Edit - Properties. (You can also double click on Edit - Properties to select it).
-
Select the Attribute Values tab frame.
-
Enter the name of the window you want to display on the button for the Display Button 1 attribute.
For example, if you want the first button to display the Picture page, enter F4 Enter Picture. If the window is the parent window then you can specify the <Parent> special connection value.
-
Repeat step 4 for the attributes Display Button 2 .. 4. If you do not want a button to appear on the window, enter the value <Null>.
For example, if you only want three buttons to be displayed, enter <Null> as the value for Display Button 4.
Identifying Windows or Blocks to Display
For most task flow forms, you must display the first block of the form on entry. However, when you use the Combined People and Assignment form in a task flow, you must specify whether to display the People window (or block) or the Assignment window on entry.
To identify windows or blocks to display
-
Display the process in the Oracle Workflow Process Diagrammer,
-
Select the window activity by choosing Edit - Properties. (You can also double click on Edit - Properties to select it).
-
Select the Attribute Values tab frame.
-
Enter the name of the block you want to display on entry for the Block Name attribute.
Identifying Configured Forms to Include in the Task Flow
If you have created a configured version of a window, you can use it in a task flow.
To identify configured forms to include in the task flow
-
Display the process in the Oracle Workflow Process Diagrammer.
-
Select the window activity by choosing Edit - Properties. (You can also double click on Edit - Properties to select it).
-
Select the Attribute Values tab frame.
-
Enter the name of your Form Customization for the Customization attribute.
Verifying and Saving the Workflow
When you have completed the task flow definition within Oracle Workflow, use the Workflow Verify function to check that your workflow conforms to Oracle Workflow modeling rules.
When you have successfully verified the Workflow, save it to the HRMS database.
To verify and save the Workflow
-
Choose File - Verify.
Note: This process does not check that you have created a valid task flow. This check is done when you generate the task flow.
-
Choose File - Save.
Transferring Task Flows Between Databases
You can transfer a task flow you have created in one database (using either Forms or Workflow) into another database; for example, to add a task flow created in a test database to a live database. You do this by exporting the task flow information from the first database to a flat file which you can then import to the second database.
You do this using the Submit Request window.
Important: Before transferring task flows into a database, you must ensure that all windows used by the task flow are present in the database. This includes any versions of windows that you have configured using CustomForm or the People Management Configurator.
To export a task flow to a file
-
Log in to the source database.
-
In the Submit Request window, choose Download HRMS Taskflows from the list of values in the Name field.
-
Enter a name for the file in which to save the task flow in the Data File parameter field. The recommended file extension is .ldt.
Tip: To avoid having to move the file before importing it to the target database, include the full file path of a location that is accessible to both the source and target databases.
-
To download a single task flow, select the task flow name from the list of values (you can download all task flows for a legislation, or all global task flows, by leaving the task flow field blank).
-
To download task flows for a particular legislation, select the legislation from the list of values. To download global task flows, leave the legislation field blank.
-
Choose OK, then choose Submit, to save the task flow to a flat file.
To import a task flow from a file
-
Log in to the target database.
-
In the Submit Request window, choose Upload HRMS Taskflows from the list of values in the Name field.
-
Enter the name of the file containing the task flow in the Data File parameter field.
-
Choose OK, then choose Submit, to import the task flow to the database.
-
You can now use the task flow in the same way as in your original database.
Configure Windows Using the People Management Configurator
People Management Configurator
You can use the People Management Configurator tool (formerly called Forms Configurator) to design windows that closely meet the business processes of your enterprise. For example, you can design windows to contain the essential information you need to hire a new person. This saves time, reduces errors, and makes data entry and maintenance easier.
Predefined templates are provided with Oracle HRMS. These are examples of windows that have been designed with specific processes in mind. The predefined People Management templates have been created using the People Management window. The example templates use selected items from this window. However, you can select any item from the People Management window when you create your own windows.
See People Management Templates.
Why Use a Predefined Template?
You can create new windows without using a predefined template but we recommend that you use one as a guide for the following reasons:
-
The templates have been carefully designed to represent typical business processes and show a good implementation of window design.
-
It makes it easier to upgrade to new predefined templates when they become available. When you upgrade a predefined template the system makes the necessary core updates but leaves any changes you have made to the template in place.
What Can I Change On a Template?
When you design a new window using a template, you can:
-
Choose which component windows (Summary, Find, Maintenance) of the main window to display, and where they are positioned.
-
Choose which window displays first when a user chooses the main window from the navigator.
-
Select which tabs, fields, and buttons you want displayed on each window.
-
Choose to maintain worker information across business groups.
-
Choose where fields are positioned, on which tabs they appear, and the field tabbing order.
-
Choose to default values in fields.
-
Use formulas to supply additional details about a field or button to be displayed when a user right-clicks on the item.
-
Set up context-sensitive fields such as address styles so that the appropriate fields are displayed depending on a value chosen.
-
Enable display of DateTrack History on datetracked fields.
-
Define data restrictions such as Employees only, Applicants only or Contingent Workers only.
-
Set up checklists for users to record the progress of actions. You can add values to the predefined lookups: CHECKLIST_ITEM and CHECKLIST_STATUS.
-
Create notification messages for users to send workflow notifications to other people. Some messages are predefined.
Note: The online help reflects the predefined templates. If you configure the forms, you might need to edit the help to reflect the changes you make.
Additional Configuration Options For People Management Templates
A number of user extensible custom fields have been added to the People Management templates which enable you to maintain any data that you cannot currently maintain using the templates (either Oracle E-Business Suite data items or 3rd party/custom data items that are stored within the database). These fields only apply to the People Management window (PERWSQHM form) and are only available on the Maintain block/window (not the summary or Find window).
You can add these custom fields to the People Management Configurator template via the Forms Configurator option. There are a number of different types of fields to accommodate different functional requirements. These fields are:
-
Character
-
Number
-
Date
-
Check Box
-
List of Values
-
List Item
These additional fields are referred to as items and they can be placed on to the template using the People Management Configurator (see Fields on the People Management Window for further information).
When you have added the required custom items to the template, it is necessary to use the Custom Library to write the required business rule code and logic for the retrieval, update and validation of each custom item.
For further information, refer to My Oracle Support Knowledge Document 242261.1, Further Configuration Options For People Management Templates.
Setting Up Task Flows To Other Windows
You can add task flow buttons to access other windows from the Maintenance window of your configured window. Create the task flow using Oracle Workflow or the Task Flow windows, then view the window with the buttons in the People Management Configurator.
If you want to reposition or resize the buttons on the window, you need to add the button items to your template using the People Management Configurator, place them in the appropriate positions, set their size, and enter labels for them.
People Management Configurator User Interface
The People Management Configurator tool contains a graphical navigation tree and a set of properties. The navigation tree has been set up in a logical order so that if you follow the tree down from the top, that is the order in which you should complete your tasks. Expand the template name to see the information associated with the template.
You can see what your windows look like on the screen as you make edits to them. You can also preview the windows in your template to test out the fields and tabbing and see how they will appear to the user.
People Management Templates
The predefined People Management templates have been designed to help you create windows that match your business processes. These templates were created from the People Management window using the People Management Configurator. The predefined template windows are available on the Navigator; you can use these without making changes. Alternatively, you can make copies of the predefined templates and modify them to create your own windows, or you can create entirely new templates.
For details of the predefined templates, see Predefined People Management Templates
What Information Is Included In the Templates?
The predefined templates have been designed for generic business processes, such as hiring a person or creating a new applicant. For example, when you go through the hiring process, you typically have to open lots of windows to complete the task. With a template window, all the data can be put together and grouped into logical sections using the tabbed regions.
When an applicant is hired, assignment information from the application is automatically entered on the employee assignment.
Designing Your Own Templates
The People Management window contains all the personal and assignment information, such as LAST_NAME and VACANCY. You use the templates to control what the user can see by only including what you need.
See Fields on the People Management Window for a complete list of all the fields available for you to use when creating People Management templates.
How Many Windows and Tabs Can I Design?
A template can consist of a Find window, Summary window, and Maintenance window. You can modify each of these windows to suit your requirements. You can design as many templates as you require, targeted at different tasks or user groups. For example, for users who only need to review information, you design a template that provides a Summary window. For users who need to update information, you can provide a Maintenance window too.
When you have created a new template, you add it to the Navigator so that your users can access the new windows. For each template, you can set up which window is displayed first. For example, you can specify that choosing People Maintenance from the Navigator displays the Find window first to enable users to find a person. Then they can navigate to the Maintenance window by choosing the Show Details button.
The Find window can contain up to six tabs. One tab has been defined as the Advanced tab but you can use this for another purpose if you want.
The Summary window can contain up to ten tabs. One tab has been defined as the Checklist tab but you can use this for another purpose if you want.
The Maintenance window can contain up to ten tabs, including the Extra Information Types, and Special Information Types tabs. One tab has been defined as the Checklist tab but you can use this for another purpose if you want.
Using Templates to Design Process Based Windows
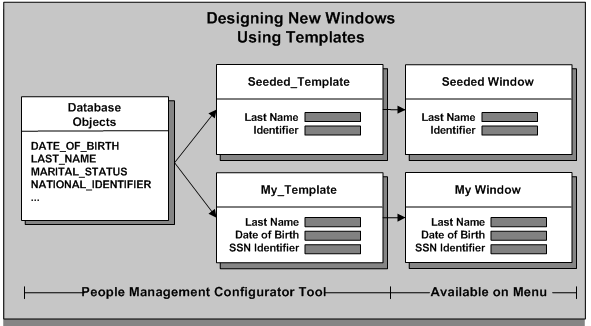
How Do I Control What Users Can Do With a Template?
Some restrictions are made using the People Management Configurator tool, and others using CustomForm. For example, you use the People Management Configurator to determine the fields, buttons, tabs, and windows available. You can also restrict a template to the Employee, Applicant or Contingent Worker system person types using the People Management Configurator.
You can use CustomForm to:
-
Specify the user person types, special information types, and extra information types that users can view or enter
-
Specify the actions that users can perform, and the notifications they can send
-
Remove fields from the list available for searching on the Advanced Find tab
-
Restrict the types of person record users can create using the template: new applicants, employees, contingent workers, applications, employee assignments, or contingent worker assignments.
Important: You must be careful to create consistent restrictions. For example, it would not be consistent to restrict a template to Applicants Only using the People Management Configurator, then add a CustomForm restriction that only allows users to enter new employees or employee assignments.
Benefits of Using Template Windows
Templates provide the following advantages for your users:
-
They can find information using the basic and advanced queries on the configurable Find window. You specify which fields appear in this window and in what order.
-
They can save result sets to folders for repeated use in future work sessions.
-
They can work more quickly if you use the templates to:
-
Hide information they do not need
-
Provide defaults where possible
-
Position fields in logical groups and on tabbed regions
-
-
They can use the checklists to track the status of actions that you have defined as relevant to the template.
Using templates is only one part of making Oracle HRMS specific to your enterprise. You can also sequence windows together in task flows. You can define a Maintenance window to be the top window and provide buttons for navigating directly to other windows while the Maintenance window remains in the background.
People and Assignments in the Data Organizer
The Summary window of the people management templates includes the Data Organizer, which helps you find and organize information about people and assignments.
The Data Organizer can display people organized alphabetically by name, organization, or job. When you expand a person's node in the Data Organizer, you see a list of their employee, applicant, and contingent worker assignments. Assignments do not have names, so you can choose what information appears in this list to help users identify the assignment they want to work with.
By default, assignments are identified as <job>.<organization>, such as Senior Manager.Engineering. However, you can choose any other database items to display in the Data Organizer. The same information appears in the Assignment field that you can display on the Maintenance window.
If you want to override the default, write a formula to return the text to be displayed. See: Writing Formulas for Templates, Oracle HRMS FastFormula User Guide
Defaulting Values in Template Fields
The templates enable you to default values in as many fields as you want. You can make data entry easier for users by defaulting items that frequently take the same value. Where the value is constant, you might set a default and then hide the field from users.
When an applicant is hired, assignment information from the application is automatically entered on the employee assignment.
Defaults from Other Windows
When you set up information for your implementation in Oracle HRMS windows, you can specify that values in some fields are automatically defaulted by the system when the user selects a value in another field. For example, you can set up default information for business groups in the Organization window, so that selecting a business group populates the fields for Location, Working Hours, Frequency, Start Time, and End Time. You can also specify default information in many fields for a position or vacancy in the Positions window and the Requisition and Vacancy window.
If you set defaults for these fields using People Management Configurator, they will be overridden by the automatic defaults set up in these windows.
Defaults in Dependent Fields
Some fields are dependent on other fields, so that when the user enters a value in the main field, they must always enter a value in the dependent field. For example, if the user enters a value for Notice Period, they must enter or select a value for Notice Period Units.
You cannot set default values in the dependent fields.
Information on the fields that are dependent on other fields is included in the list of Fields on the People Management Window
Predefined People Management Templates
Oracle supplies a number of predefined People Management templates. We recommend that you base any new window design on one of these templates.
Note: You can create an entirely new template but there are many issues to be aware of such as upgrading and setting up context-sensitive address styles. Instead, we recommend that you copy a predefined template for your localization and make any changes to that.
Templates are provided for specific localizations. There are also generic templates for you to use if none of the predefined localization-specific templates meet your requirements.
Hiring Applicants Template
This template enables you to create windows for entering an applicant, tracking the applicant up to the point of hire, and hiring the applicant. You can use the Hiring Applicants window for the complete hiring process. You can access both employees and applicants in this template. This enables you to hire applicants and to process internal applicants.
Enter Employees Template
This template enables you to create a Maintenance window for quickly entering details of employees, and their primary assignment. It is restricted to employees only. This window is designed for users who have lots of employees to enter who do not need any applicant history, for example, a one day casual hire.
You can enter basic personal details such as name, date of birth and address as well as assignment details such as job, grade, and salary. The Notify button enables you to send notifications about actions to other people.
Maintain Employees Template
Use this template to create windows for entering or maintaining full employee details. It is restricted to employees only. This is very similar to the tasks you would perform using the People window and associated windows.
Enter Contingent Workers Template
This template enables you to create a Maintenance window for quickly entering contingent worker details and their primary assignment. It is restricted to contingent workers only. This window is designed for users who have lots of contingent workers to enter.
You can enter basic personal details such as name, date of birth and address as well as assignment details such as job, supplier, and worker number. The Notify button enables you to send notifications about actions to other people.
Maintain Contingent Workers Template
Use this template to create windows for entering or maintaining contingent worker details. It is restricted to contingent workers only. This is very similar to the tasks you would perform using the People window and associated windows.
Visa Administration Template
This template enables you to create windows for entering information about foreign workers. You can record details about an employee's addresses, contacts and visa details.
HR Foundation Template
The HR Foundation template enables you enter and maintain contingent workers using the HR Foundation responsibility. The HR Foundation template is restricted to contingent workers only and is used for tasks very similar those tasks you would perform using the entering and maintaining contingent workers templates.
Find Window Configuration
There are two parts to a Find window, and you can choose the fields that appear on each:
-
Find tabs where users enter their search criteria
-
Find Folder where the results of the search are summarized in a one-row-per-record format
Find Folder
In the Find Folder, include fields that will enable users to uniquely identify the records they need. Typically these fields are Full Name, Employee or Applicant Number, National Identifier (such as Social Security Number) and Date of Birth.
Find Tab
Put the fields in which you expect users to search most frequently on the Details Find tab (the tab to display first). To provide fast search results, we recommend that some of the following fields are available for searching:
-
Last Name
-
Employee Number
-
Applicant Number
-
National Identifier
-
Full Name
Fields that have lists of values also provide good search performance.
The predefined templates include the Effective Date field on the Details tab. You can use this field to change your effective date without using the calendar icon from the toolbar. The effective date determines the lists of values available on fields in the Find window and which records will be returned. If you are going to include this field on the Find window, it is best to place it at the top of the window. This encourages users to set their effective date first, and then select from the appropriate lists of values in the other Find fields. You can include up to six Find tabs.
Advanced Find Tab
You can provide an Advanced Find tab (as one of the six Find tabs) for more complex searches, such as matching ranges of values. To construct an advanced tab you need to include the following fields, where n = 1 to 5:
-
Field n Name
This field enables you to select a field on which to perform an advanced search.
-
Field n Condition Code
This field defines the operator for the search, for example, not equal to, less than, greater than.
-
Field n Value
This field is the value you want to search on.
For example, you could set up the following query, find me all people whose hire date (field name) is less than (condition code) 1-Jan-1999 (value).
You can restrict the fields that users can select in the Field n Name fields using CustomForm. You can therefore remove the ability to search on sensitive or confidential fields.
Security Check Box on Find Window
There is a Security check box on the Find window that defines which people are included in a user's search. To find people from outside your Security profile, you must ensure that the Security check box is enabled and is unchecked. However, they will not be able to view full information for people outside their security profile, and they will not be able to update these records.
If you leave this box unchecked, you must be careful that no confidential information is included in the Results of the Find. We recommend that you always check this check box.
If you do not want users to be able to change the security profile set for the template then you should set the Security check box to the required setting and then hide it, thus preventing users from updating it.
Although the Security check box defines which people are included in a search, it does not define what can be saved from the Find window into the Data Organizer, as this is controlled by the user's security profile. This means that if you have the check box unchecked, your user may find that they cannot save some data that is returned in a query into a folder as it is outside their security access. The Data Organizer is also limited depending on the person type restrictions set up at template level.
If you delete the check box from the search criteria, the results will only display those people from within your Security profile.
The Business Group Field on the Find Window
If you want to use the Business Group field to query and update worker information across business groups, then you must associate a global security profile to your responsibility. If you do not use a global security profile, then you can view the business group of the worker you searched for, but you cannot use the Business Group field in the Find window to search for workers.
SITs, EITs and Other Flexfields in Templates
Maintenance windows in your people management templates can include tabs for entering Special Information Types (SITs) and person and assignment Extra Information Types (EITs).
These tabs must contain a drop down list to enable the user to select the appropriate SIT or EIT to enter. This poplist controls the segments of the flexfield that display. In the People Management Configurator, you select the item Special Information Type List (Special Information), or Extra Information Type List (Extra Info), to enable this poplist.
You select which segments of the flexfield are displayed. Each segment is displayed as a folder form column. At run time, the window displays the appropriate columns with no gaps where segments are not displayed.
Note: You can control which SITs or EITs a user can select in the template by creating a CustomForm restriction that you associate with the template when you add it to a menu.
Segments Using Value Sets
Each segment item for a flexfield has two entries, one called meaning and one called value. The value item is always required as this is where the user would enter or select the information. The meaning item is only used where the user selects a value from a value set. If the value set uses a short meaning and a longer description, you can include the meaning item to display this longer description when the user selects a value.
For example, you may have a segment in a flexfield that records a country of residence. In the value field the user may select a country short code, USA, and in the meaning field the longer description, United States of America, would be displayed.
How Segment Properties Are Derived From Template and Flexfield Definitions
When a user selects an SIT or an EIT type from the list, the item properties for each segment depend on the settings defined for the template and the flexfield:
-
Case Restriction, Default Value, Prompt Text, Width
If these properties are set in the template, these values are used. If not, the values set for the flexfield are used.
-
Enabled, Insert Allowed, Update Allowed, Visible
If the value for these properties is set to Yes on the flexfield, and is set to Yes or blank on the template, then these properties are set to Yes. Otherwise these properties are set to No.
-
Required
This property is set to Yes if it is set to Yes on either the template or the flexfield. Otherwise it is set to No.
Some of the properties rely on other properties being set to appropriate values for them to take effect. For example, if the Required, Insert Allowed, or Update Allowed value are set to Yes, this will only take effect if the item is enabled and visible.
Note: These rules apply to all flexfields, not just SITs and EITs.
Positioning Columns in the SIT Folder
We recommend that you place the items Date from (Special info) and Date to (Special info) first in the folder. Then place all of the Special Information Segment n Value items (where n is 1 to 30) onto the tab in consecutive order.
As it is a folder form, you must also include the record indicator for the multi row block. This item is called Current Record Indicator (special info). Make its width 0.1", and make it appear just before the first Date field.
Positioning Columns in the EIT Folder
We recommend that you place all Extra Information segments onto the tab in consecutive order. Assignment EITs are called Assignment Extra Information n Value items (where n is 1 to 30), and person EITs are called Person Extra Information n Value items (where n is 1 to 30).
The actual positioning of the EIT segments on the tab is not important as when the window is accessed by a user the first populated EIT segment is displayed flush against the current record indicator and all others are lined up against it.
As with the SIT folder, you must include the record indicator for the multi row block. This item is called Current record indicator (Extra info). Make its width 0.1", and make it appear just before the first EIT segment field.
Other Flexfields
You can include user-defined descriptive flexfields (DFs) and developer descriptive flexfields (DDFs) in both the Summary and Maintenance template windows. You can include individual flexfield segments directly in the template window in the same way that you would add normal fields (segment properties are the same as those described for EITs and SITs); alternatively you can include the whole flexfield in a flexfield popup window, by selecting the Flexfield Name Popup item. If you want to include multiple flexfields in your templates, you can include segments from some directly within the template, and add flexfield popup windows for others; however, you cannot include flexfield segments and a popup window for the same flexfield structure.
We recommend that you do not add too many flexfield segments directly to the template as this will impact performance. It is better to include whole flexfields as popup flexfield windows.
Context-Sensitive Fields In Templates
You can set up fields that are context-sensitive in your templates using the People Management Configurator tool. For example, you might want to display the Employee Number field when the selected person is an employee, and the Applicant Number field for an applicant.
You can also use this feature to display the appropriate segments of a flexfield. For example, you set the context to display the appropriate structure of the Personal Analysis Key Flexfield for the selected Special Information Type. You do not have to display the full structure defined in the flexfield. You can hide segments to save space on the template, or for security reasons.
You set up each context as a 'child' item under the main item in the People Management Configurator navigator. For example, if you want Post Code to display in three address style contexts, you define three context items under the Post Code item If you hide the 'parent' items, there will be a blank area of the window when it opens. This area is populated by the context sensitive fields (such as address lines) when the user selects the appropriate context (such as an address style). The fields that are displayed, their position, size, defaults, and all other properties can vary with the context.
If one context is more common that the others, you can set that context as the default in the field where the context is chosen. Then there is no blank area when the window opens, because it contains the fields appropriate to this default context. For example, you might set your local address style as the default so that the appropriate address lines for local addresses are displayed by default.
Online Help Targets for Templates
When you are defining your template you can add your own help target to display a particular help topic in the online help. This will override the default context-sensitive help call of the form.window name.
If you enter a help target for the template this will override the form section of the default help target. The window name will still be appended to this target depending on from which window the user accesses help.
Note: If you define a new help target for your template none of the supplied online help for the template will work. You will have to update your help files to include your new help target.
The window names that can make up the People Management templates are:
-
SUMMARY_WINDOW
-
FIND_WINDOW
-
MAINTAIN_WINDOW
-
ACTION_WINDOW
-
CREATE_WINDOW
-
NOTIFY_WINDOW
For example, the default target that is generated when a user calls help from the Summary window of the Hiring Applicants template is PERWSQHM.SUMMARY_WINDOW. If you have defined a help target of "HIREAPP" for the Hire Applicants template, then when a user calls help from the Summary window the target that is generated is HIREAPP.SUMMARY_WINDOW.
Notification Messages Issued From Template Window
When users choose the Notify button on a template window, they can select a message and a person or role to send it to.
Predefined Messages
The following table shows predefined notification messages. You can create additional messages using Oracle Workflow or delete any that are not relevant to your enterprise.
| Display Name | Internal Name |
|---|---|
| Change of employment for supervisor | SUPERVISOR_JOB_CHANGE |
| Change of Supervisor | CHANGE_SUPERVISOR |
| Employee Transfer | EMPLOYEE_TRANSFER |
| Employee Transfer - Notify Payroll | PAYROLL_INT_HIRE |
| New Contingent Worker Notification | NEW_CWK |
| New Hire Notification | NEW_STARTER |
| New Hire Notification (US) | US_NEW_STARTER |
| Notify Payroll with New Hire Details | PAYROLL_NEW_STARTER |
| Probation Period is close to expiry | PROBATION_PERIOD_EXP |
| Relocation Notification | RELOCATION_NOTIFICATION |
| Request Security Card | SECURITY |
| Employee Transfer (US) | US_EMPLOYEE_TRANSFER |
| Notify Payroll with New Hire Details (US) | US_PAYROLL_NEW_STARTER |
| Employee Transfer - Notify Payroll (US) | US_PAYROLL_INT_HIRE |
| Relocation Notification (US) | US_RELOCATION_NOTIFICATION |
| Visa Expiry Notification to Supervisor | GLB_SUP_VISA_EXP_WARN |
| Visa Expiry Notification to Employee | GLB_EMP_VISA_EXP_WARN |
| Visa Expiry Notification to Employee (US) | US_EMP_VISA_EXP_WARN |
| Visa Expiry Notification to Supervisor (US) | US_SUP_VISA_EXP_WARN |
Message Tokens
Notification messages can include the following tokens:
-
HIRE_DATE
-
FULL_NAME
-
PER_EFFECTIVE_START_DATE (Person Effective Start Date)
-
TITLE
-
FIRST_NAME
-
LAST_NAME
-
EMPLOYEE_NUMBER
-
APPLICANT_NUMBER
-
NATIONAL_IDENTIFIER
-
ORGANIZATION
-
GRADE
-
JOB
-
POSITION
-
PAYROLL
-
VACANCY
-
SUPERVISOR
-
ASG_EFFECTIVE_START_DATE (Assignment Effective Start Date)
-
LOCATION
-
SALARY
-
SALARY_CURRENCY
-
PAY_BASIS
-
DATE_PROBATION_END
-
NPW_NUMBER (Contingent Worker Number)
-
START_DATE (Contingent Worker's Start Date)
-
SUPPLIER_NAME
-
SUPPLIER_REFERENCE
-
FF1 - FF5
Creating Additional Tokens
If your messages require additional tokens, you can create a formula that returns up to five outputs that you can use as tokens (FF1 - FF5) in your message text. You create the formula using Oracle FastFormula.
See: Writing Formulas for Templates, Oracle HRMS FastFormula User Guide.
People Management Configurator Options
This section describes the configuration options you can use when designing your template. The options are shown in the order that they appear on the People Management Configurator tool.
Template Properties
Template Code
Displays the internal name for the template. This code in combination with the Legislation uniquely identifies the template. You use this name when adding the window to the user's menu.
Template Name
Specifies the descriptive name of the template.
Enabled
A template can be enabled or disabled. You can only choose the Run Template option from the Tools menu for a template that is enabled and linked to a menu. Disable a template when it is no longer in use.
Legislation
Specifies the legislation of the template. Leave the legislation option blank to create a generic template. The system automatically displays the appropriate legislative version of a template for a user, or the generic version if there is no legislative version that matches the legislation of the user's Business Group.
Description
You can provide a longer description of the template.
Help Target
You can add your own help target to display a particular help topic. This overrides the default context-sensitive help call of the form.window name.
Note: The target you enter here has the name of the window from which you have called help appended to it to form the complete target. For example, if you have defined a help target called HIREPER for your template and you call help from the Summary window, then the help target generated is HIREPER.SUMMARY_WINDOW.
Online Help Targets for Templates
Further Information
Use this Further Template Properties flexfield to enter additional configuration information for the template. For example, for the People Management templates this flexfield enables you to specify which window is displayed first and which person types are allowed.
[ ]
Additional Template Details descriptive flexfield. You can configure this to include additional information.
Window Properties
Window Name
Specifies the name of the selected window. There are three windows available: Summary, Find, and Maintenance
Title
Specifies the title of the window. This name is displayed at the top left of the window.
Height
Sets the height of the window in inches.
Width
Sets the width of the window in inches.
X Position and Y Position
Sets the position of the window using co-ordinates. X sets the horizontal position and y sets the vertical position. Alternatively, you can use the arrow keys to move the window around.
Further Information
Further Window Properties Developer Descriptive flexfield.
Canvas Properties
Canvas Name
Specifies the name of the selected canvas. This is the region of the window where fields and other items appear The canvases available depend on the window you are creating:
-
Background Canvases
The Maintain, Summary, and Find canvases fill in the background of the window. You cannot amend the properties of these canvases.
-
Tab Canvases
The Maintain Tabs, Summary Tabs, and Find Tabs canvases define the area of the window in which you can define tabs.
-
Find Results Canvas
The Find Results canvas defines the area of the window in which you can define the Find Results region.
Visible
Set this to Yes if you want the canvas to be displayed to the user.
Height
Sets the height of the canvas in inches.
Width
Sets the width of the canvas in inches.
X Position and Y Position
Sets the position of the canvas using co-ordinates. X sets the horizontal position and y sets the vertical position. Alternatively, you can use the arrow keys to move the canvas around.
Further Information
Developer Descriptive flexfield.
Tab Page Properties
Tab Page Name
Displays the name of the tab. The tabs available to you depend on the window you are editing:
-
Find - The find window has six tabs you can set up for any use.
-
Maintain - The Maintain window has ten tabs available. Three tabs have been set up to be used specifically for Extra Information Types (EIT), Special Information Types (SIT), and the checklist.
-
Summary - The Summary window has ten tabs available. One tab has been set up to be used specifically for the checklist.
Visible
Set this to Yes if you want the tab to be displayed to the user.
Label
The label appears on the tab and describes the content of the tab.
You can define an access key (or keyboard shortcut) by preceding the appropriate letter in the label with an ampersand (&). For example, to use ALT+P (in the Microsoft Windows environment) as the access key for the Personal Details tab, enter the label &Personal Details.
Do not use the letters A, E, F, G, H, Q, S, or W, as they are used on the Oracle Applications menu. There is no validation to prevent the same letter being used more than once in the same window.
Navigation Direction
Sets the tabbing order for the items in the tab. This can be left to right, or top to bottom.
Further Information
Developer Descriptive flexfield.
Item Properties
Item Name
The item name is the name of the data item or field, such as LAST_NAME, you have currently selected in the People Management Configurator Items branch. Items also include buttons, such as the Actions or Notify button, and flexfield popup windows. If you are working with a predefined template, only the fields used in that template are displayed on the People Management Configurator Items branch. You can add other fields to your template from the window.
See: Adding and Removing Fields on a Template.
Window Name
Displays the window name on which the field is used. You cannot change this property. Each field has an associated window. There are three windows available: Summary, Find, and Maintenance
Tab Page Name
Displays the name of the tab or tabs in the window on which the field is positioned. You can choose a tab by clicking the button next to this field to see the available tab pages you can use.
Visible
Set this to Yes if you want the field to be displayed to the user. If it is set to No, the user cannot see the field but the field and its value are still in use. For example, the Secure check box on the Find window is not visible but the box has been checked. The user cannot see the check box on the window but the security restriction still applies.
Height
Sets the height of the field in inches.
Width
Sets the width of the field in inches.
X Position and Y Position
Sets the position of the field using co-ordinates. X sets the horizontal position and y sets the vertical position. Alternatively, you can use the arrow keys to move the field around.
Enabled
Specifies whether the user can put their cursor into this field. If it is set to No, the user can see the field but cannot do anything to it.
Required
Set this to Yes if you want to make the field mandatory.
Query Allowed
Specifies whether the user can run a query in this field.
Note: This property is ignored in the People Management templates. You can only run queries using the Find window.
Insert Allowed
Specifies whether the user can insert new data in this field. If this is set to No for a field or button then it appears greyed out in the window.
Note: If you set this option to No for a check box then the check box still appears in white on the window. To grey out a check box you must set the Enabled option to No.
Update Allowed
Specifies whether the user can enter information in the field and save it to the database. If this is set to No, the user can enter information but cannot save it.
Note: All fields included on a Summary window are greyed out, irrespective of the settings in the Insert Allowed and Update Allowed fields.
Prompt Text
Defines what text is displayed with the field. It also defines the text displayed for a group of check boxes. You enter text labels for individual check boxes using the Label property (see below).
Prompt Display Style
Specifies where a prompt is displayed for multi-row columns. "First Record" displays a prompt next to the first row. "All Records" displays a prompt next to each row. "Hidden" hides all prompts.
Prompt Text Alignment
Specifies the alignment of the prompt text as Center, Left, Right, End, or Start within the prompt box. Generally has no visible effect.
Prompt Edge
Specifies which edge of the field the prompt is attached to, either Start, End, Top, or Bottom.
Prompt Edge Alignment
Specifies how the prompt is aligned along the selected field edge, either Start, End or Center.
Prompt Edge Offset
Specifies the distance between the field and its prompt, measured in inches.
Prompt Alignment Offset
Use this property to adjust the prompt edge alignment. For example, if the Prompt Edge is Top, the Prompt Edge Alignment is Center and the Prompt Alignment Offset is 0.1, the prompt is centered 0.1 inches from the center of the top edge of the field.
Label
This only applies to buttons or check box items. The label describes the button or individual check box.
You can define an access key (or keyboard shortcut) by preceding the appropriate letter in the label with an ampersand (&). For example, to use ALT+P (in the Microsoft Windows environment) as the access key for the Picture page, enter the label &Picture.
Do not use the letters A, E, F, G, H, Q, S, or W, as they are used on the Oracle Applications menu. There is no validation to prevent the same letter being used more than once in the same window.
Tooltip Text
You can enter text here that displays when the user has the mouse pointer over the field. Use this to provide additional quick help.
Previous Item
Specifies which field is tabbed to next if you tab backwards. This overrides the default tabbing order.
Next Item
Specifies which field is tabbed to next. This overrides the default tabbing order.
Default Value
You can set the default value for the field here. Setting defaults can help save time, provide better control, and reduce errors for the user.
Format Mask
You can apply a format style to number and date type fields so that the format is correct for your users.
Validation Formula
You can set up additional validation using formulas. For example, if you need to validate that an entry has been entered correctly, you can create a validation formula to check the format. Up to five inputs can be passed to the formula but only one message can be returned.
See: Writing Formulas for Templates, Oracle HRMS FastFormula User Guide
Validation Formula Parameters 1-5
Enter the parameters you want to pass to the formula specified in the Validation Formula field.
Information Formula
You can set up additional information for fields using a formula. For example, on the Job field, the user can right click and choose More Information to see related information such as supervisor. Up to five inputs can be passed to the formula but only three outputs can be returned.
See: Writing Formulas for Templates, Oracle HRMS FastFormula User Guide
Information Prompt
Specifies the prompt displayed on the right mouse menu which the user selects to view the information you have defined in the Information Formula.
Information Formula Parameters (1-5)
Enter the parameters you want to pass to the formula specified in the Information Formula field.
Alignment
Defines the alignment of text within the item (left, center, or right).
Case Restriction
Defines what case the text is defaulted to. For example, you can set it to upper case so that all the text entered in the field is upper case.
Bevel
Specifies the appearance of the field border, either RAISED, LOWERED, INSET, OUTSET, or NONE.
Further Information
Opens the Further Item Properties developer descriptive flexfield, where you can enter additional configuration options. For example, for the People Management templates, you can select whether DateTrack History is enabled for datetracked fields.
Fields on the People Management Window
The following table lists all the available fields on the People Management window. Not all of these fields are available on the predefined People Management templates. You can choose which of these fields are displayed on your users' windows by making your own copies of the People Management templates and adding or removing fields.
See Adding and Removing Fields on a Template
| Item Title | Windows | Additional Information |
|---|---|---|
| Accounting KeyFlex Popup | Maintain | Popup window containing all segments for the Default Expense Account key flexfield |
| Action | Maintain Summary |
Button. If you are updating a worker record that is outside your current business group, then you can perform all actions on that worker record, except the following:
|
| Address Attribute 1-20 | Maintain Summary |
Segments from the Additional Address Details descriptive flexfield |
| Address Attribute Category | Maintain Summary |
Context for the Additional Address Details descriptive flexfield |
| Address Attributes Popup | Maintain Summary |
Popup window containing all segments for the Additional Address Details descriptive flexfield |
| Address Date From | Maintain Summary |
Field |
| Address Date To | Maintain Summary |
Field |
| Address Information 13-20 | Maintain Summary |
Segments from the Address developer flexfields that may have been defined by localization teams |
| Address Information Popup | Maintain Summary |
Popup window containing all segments for the Address developer flexfields |
| Address Line 1-3 | Maintain Summary |
Field |
| Address Type | Maintain Summary |
Field |
| Adjusted Service Date | Maintain Summary |
Field |
| Age | Maintain Summary |
Field |
| Agreed Working Hours | Find Results Maintain |
Field. This is available on the Employment Information tab. Norwegian users only. |
| Alternate First Name | Maintain | Filed avaiable in the Employment Details tabbed region. This field is available to Kuwaiti users only. |
| Alternate Family Name | Maintain | Field Available in the Additional Name Details tabbed region. This field is available to Kuwaiti users only. |
| Annuities | Maintain | Field Available in the GOSI Details tabbed region. This field is available to Saudi users only |
| Annuities Join Date | Maintain | Field Available in the GOSI Details tabbed region. This field is available to Saudi users only |
| Applicant Number | Find Results Find Maintain Summary |
Field |
| Application Attribute 1-20 | Maintain Summary |
Segments from the Additional Application Details descriptive flexfield |
| Application Attribute Category | Maintain Summary |
Context for the Additional Application Details descriptive flexfield |
| Application Attributes Popup | Maintain Summary |
Popup window containing all segments for the Additional Application Details descriptive flexfield |
| Application Date End | Summary | Field |
| Application Date Received | Maintain Summary |
Field |
| Approved | Maintain Summary |
Field |
| Assignment Attribute 1-30 | Maintain Summary |
Segments from the Additional Assignment Details descriptive flexfield |
| Assignment Attribute Category | Maintain Summary |
Context for the Additional Assignment Details descriptive flexfield |
| Assignment Attributes Popup | Maintain Summary |
Popup window containing all segments for the Additional Assignment Details descriptive flexfield |
| Assignment Category | Find Results Find Maintain Summary |
Employment or Assignment Category |
| Assignment Effective End Date | Find Results Maintain Summary |
Field |
| Assignment Effective Start Date | Find Results Maintain Summary |
Field |
| Assignment Extra Information 1-30 | Maintain | Assignment extra information types |
| Assignment Extra Information Category | Maintain | Context for the Assignment extra information types |
| Assignment List | Maintain | Drop-down list displaying person's assignments |
| Assignment Number | Find Results Maintain Summary |
Field |
| Assignment Rate | Maintain | Assignment rate for contingent workers |
| Assignment Rate Basis | Maintain | Assignment rate basis for contingent workers |
| Assignment Rate Currency | Maintain | Assignment rate currency for contingent workers |
| Assignment Rate Value | Maintain | Assignment rate monetary value for contingent workers |
| Assignment Sequence | Find Results Maintain Summary |
Field |
| Assignment Status Type | Find Results Find Maintain Summary |
Field |
| Assignment Title | Summary | Field |
| Assignment Type | Find Results Maintain Summary |
Field |
| Available For Transfer | Maintain Summary |
Field |
| Background Check Date | Maintain | Field |
| Background Check Status | Find Results Maintain Summary |
Field |
| Background Date Check | Find Results Summary |
Field |
| Bargaining Unit Code | Find Results Find Maintain Summary |
Field |
| Benefit Group | Find Results Find Maintain Summary |
Field |
| Benefit Medical Plan Number | Maintain | Field |
| Birth Name | Maintain | Field. Hungarian users only |
| Billing Title | Maintain | Field |
| Blood Type | Find Results Maintain Summary |
Field |
| Business Group | Find Summary Maintain |
Field. If you want to use the Business Group field to query and update worker information across business groups, you must associate a global security profile to your responsibility. If you do not use a global security profile, you can view the business group of the worker you searched for, but you cannot use the Business Group field to search for workers. |
| Button 1-5 | Maintain | Task flow buttons |
| Cancel | Find | Button |
| Change Date | Maintain Summary |
Assignment change date |
| Change Reason | Find Results Maintain Summary |
Assignment change reason |
| Checklist 1-10 Date Done | Maintain Summary |
Field |
| Checklist 1-10 Date Due | Maintain Summary |
Field |
| Checklist 1-10 Item Code | Maintain Summary |
Field |
| Checklist 1-10 Notes | Maintain Summary |
Field |
| Checklist 1-10 Status | Maintain Summary |
Field |
| Citizen Identification Number | Maintain | Field. Chinese Users only. |
| Civil Identity Number | Maintain | Field This field is available to Saudi users only |
| Civil Identifier | Maintain | Field Available in the Employee Details tabbed region. This field is available to Kuwaiti users only. |
| Civil Status | Find Results Maintain |
Field. Finnish users only. |
| Clear | Find | Button |
| Collective Agreement | Maintain Summary |
Field |
| Collectively Agreed Grades Id Flex Num | Maintain Summary |
Field |
| Collectively Agreed Grades Name | Maintain Summary |
Field |
| Command Color | Maintain | Field. This is available on the Military tab. Hungarian users only |
| Command Type | Maintain | Field. This is available on the Military tab. Hungarian users only |
| Command Number | Maintain | Field. This is available on the Military tab. Hungarian users only |
| Community Price Category | Find Results Maintain |
Field. This is available on the Employment Information tab. Finnish users only. |
| Condition of Employment | Find Results Maintain |
Field. This is available on the Employment Information tab. Norwegian and Danish users only. |
| Contingent Worker Number | Find Results Find Maintain Summary |
Field |
| Contribution Group | Maintain | Field. Spanish users only. |
| Contract | Find Results Maintain Summary |
Field |
| Coordinated Benefits Medical Plan Number | Find Results Summary |
Field |
| Coordinated Benefits No Coverage | Find Results Summary |
Field |
| Correspondence Language | Find Results Maintain Summary |
Field |
| Country | Maintain Summary |
Field |
| Country 1-3 | Maintain Summary |
Field |
| Country of Birth | Maintain Summary |
Field |
| CPR Number | Find Results Maintain |
Field. Danish users only. |
| Currency Code | Maintain Summary |
Field |
| Current Employer | Maintain Summary |
Field |
| Current Record Indicator | Find Results Maintain |
This indicator must be included in any multi-block records. It shows the currently selected record. There are separate versions of this item on the Maintain window for special information types and extra information types. |
| Custom Date Text Item 1-10 | Maintain | These fields do not correspond to the database column. They are used in a custom library solution. Please refer to the Additional Configuration Options For People Management for more details. |
| Custom Number Item 1-10 | Maintain | These fields do not correspond to the database column. They are used in a custom library solution. Please refer to the Additional Configuration Options For People Management for more details |
| Custom Character Text Item 1-10 | Maintain | These fields do not correspond to the database column. They are used in a custom library solution. Please refer to the Additional Configuration Options For People Management for more details |
| Custom Checkbox Item 1-3 | Maintain | These fields do not correspond to the database column. They are used in a custom library solution. Please refer to the Additional Configuration Options For People Management for more details |
| Custom List Item 1-3 | Maintain | These fields do not correspond to the database column. They are used in a custom library solution. Please refer to the Additional Configuration Options For People Management for more details |
| Custom Item with List of Values 1-5 | Maintain | These fields do not correspond to the database column. They are used in a custom library solution. Please refer to the Additional Configuration Options For People Management for more details |
| Date Employee Data Verified | Find Results Maintain Summary |
Field |
| Date From | Maintain | Special information |
| Date Notice Received | Find Results Maintain |
Field. This is available on the Employment Information tab. Norwegian users only. |
| Date Of Birth | Find Results Find Maintain Summary |
Field |
| Date Of Death | Find Results Maintain Summary |
Field |
| Date Of Receipt Of Death Certificate | Maintain | Field |
| Date Probation End | Find Results Maintain Summary |
Field |
| Date To | Maintain | Special information |
| Datetrack Correction | Maintain | Datetrack radio button |
| Datetrack Update | Maintain | Datetrack radio button |
| Default Code Combination Identifier | Find Results | Internal identifier for the assignment's default expense account |
| Dependant Adoption Date | Find Results Maintain Summary |
Field |
| Dependant Voluntary Service | Find Results Maintain Summary |
Field |
| Deployment Factor Attribute 1-20 | MaintainSummary | Segments from the Additional Deployment Factor Details descriptive flexfield (Work Choices) |
| Deployment Factor Attribute Category | Maintain Summary |
Context for the Additional Deployment Factor Details descriptive flexfield (Work Choices) |
| Deployment Factors Attributes Popup | Maintain Summary |
Popup window containing all segments for the Additional Deployment Factor Details descriptive flexfield (Work Choices) |
| Description of Expense Account | Maintain | Description associated with Accounting KeyFlex popup window |
| Dpf Fte Capacity | Maintain Summary |
Deployment factor FTE capacity |
| Dpf Work Duration | Maintain Summary |
Deployment factor work duration |
| Dpf Work Hours | Maintain Summary |
Deployment factor work hours |
| Dpf Work Schedule | Maintain Summary |
Deployment factor work schedule |
| Duplicate Check | Maintain Maintain Tabs |
Button. This can be placed on the main window or the tabs in the Maintain window. If you include this button you must ensure that you have set up a Find window in your template. |
| E-Post Address | Find Results Maintain |
Field. This is available on the Further Details tab. Finnish users only. |
| Earliest Available Date | Maintain Summary |
Field |
| Education Establishment 1-4 Attended End Date | Summary | Schools information |
| Education Establishment 1-4 Attended Start Date | Summary | Schools information |
| Education Establishment 1-4 Full Time | Summary | Schools information |
| Education Establishment 1-4 Name | Summary | Schools information |
| Effective Date | Find Maintain |
There are separate versions of this element for the Find window and the timeline on the Maintain window |
| Email Address | Find Results Find Maintain Summary |
Field |
| Employee Category | Maintain Summary |
Field |
| Employee Group | Find Results Maintain |
Field. This is available on the Employment Information tab. Danish users only. |
| Employer | Maintain | Field Available in the GOSI tabbed region This field is available to Saudi users only |
| Employee Number | Find Results Find Maintain Summary |
Field |
| Employee Status | Find Results Maintain |
Field. This is available on the Employment Information tab. Finnish users only. |
| Employment Type | Find Results Maintain |
Field. This is available on the Employment Information tab. Finnish users only. |
| Establishment | Find Maintain Summary |
Field |
| Expatriate | Maintain | Field. Chinese Users only. |
| Expense Check Send Address | Find Results Maintain Summary |
Field |
| Extra Information Type List | Maintain | Displays a drop-down list of extra information types. |
| Family Name | Maintain | Field Available in the Alternate Names and in the Employee Details tabbed region This field is available to Saudi and Kuwaiti users only |
| Family/Last | Maintain | Field. Chinese users only. |
| Father Name | Maintain | Field Available in the Alternate Names and in the Employee Details tabbed region This field is available to Saudi and Kuwaiti users only |
| Father's Alternate Name | Maintain | Field Available in the Additional Name Details tabbed region. This field is available to Kuwaiti users only. |
| Field | Find Results Maintain |
Field. This is available on the Further Details tab. Finnish users only. |
| Field 1-5 Condition Code | Find | Advanced search items |
| Field 1-5 Name | Find | Advanced search items |
| Field 1-5 Value | Find | Advanced search items |
| Find | Find | Button |
| First Name | Find Results Find Maintain Summary |
Field |
| Frequency | Find Results Maintain Summary |
Dependent field. Used with Normal Hours. |
| Full Name | Find Results Find Maintain Summary |
Field |
| Full Name Title | Summary | Field |
| Full / Part Time | Find Results Maintain |
Field. This is available on the Employment Information tab. Norwegian users only. |
| Full Time Equivalent Capacity | Find Results Maintain Summary |
Field |
| Gender | Find Results Find Maintain Summary |
Field |
| Given/First | Maintain | Field. Chinese Users only. |
| Go | Maintain | Button used on timeline to show details as of the effective date entered |
| GOSI Number | Maintain | Field Available in the GOSI Details region tabbed region This field is available to Saudi users only |
| Grade Ladder | Find Results Find Maintain Summary |
Field |
| Grade | Find Results Find Maintain Summary |
Field |
| Grade Point Average | Find Results Maintain |
Field. This is available on the Further Details tab. Norwegian users only. |
| Grandfather Name | Maintain | Field Available in the Alternate Names and Employee Details tabbed region This field is available to Saudi and Kuwaiti users only |
| Grandfather's Alternate Name | Maintain | Field Available in the Additional Name Details tabbed region. This field is available to Kuwaiti users only. |
| Governorate | Maintain | Field Available in the Employee Details tabbed region. This field is available to Kuwaiti users only. |
| Group | Maintain | Field. This is available on the Civil tab. Hungarian users only. |
| Hazards | Maintain | Field Available in the GOSI Details tabbed region. Available in the GOSI Details tabbed region This field is available to Saudi users only |
| Hazards Join Date | Maintain | Field Available in the GOSI Details tabbed region This field is available to Saudi users only |
| Hire Date | Maintain Summary |
Start Date for Employee |
| Hukou Location | Maintain | Field. Chinese Users only. |
| Hukou Type | Maintain | Field. Chinese Users only. |
| Hold Applicant Date Until | Find Results Maintain Summary |
Field |
| Honors | Find Results Maintain Summary |
Field |
| Hourly Salaried | Find Results Maintain Summary |
Field |
| Identifier Type | Maintain | Field. Spanish users only. |
| Identifier Value | Maintain | Field. Spanish users only. |
| Insurance Occupational Group | Find Results Maintain |
Field. This is available on the Employment Information tab. Finnish users only. |
| Internal Address Line | Find Results Maintain Summary |
Field |
| Internal Location | Find Results Maintain Summary |
Field |
| Job | Find Results Find Maintain Summary |
Field |
| Job Status | Find Results Maintain |
Field. This is available on the Employment Information tab. Norwegian users only. |
| Jubilee Status | Find Results Maintain |
Field. This is available on the Further Information tab. Danish users only. |
| Known As | Find Results Maintain Summary |
Field |
| Labour Union Member | Find Results Maintain Summary |
Field |
| Last Medical Test By | Find Results Maintain Summary |
Field |
| Last Medical Test Date | Find Results Maintain Summary |
Field |
| Last Name | Find Results Find Maintain Summary |
Field |
| 1st Last Name | Maintain | Field. Spanish users only. |
| 2nd Last Name | Maintain | Field. Spanish users only. |
| Level | Find Results Maintain |
Field. This is available on the Further Details tab. Finnish users only. |
| Load Picture | Maintain | Button that enables you to load a digitized picture of the person |
| Local Department | Maintain | Field. This is available on the Civil tab. Hungarian users only. |
| Local Sub Department | Maintain | Field. This is available on the Civil tab. Hungarian users only. |
| Local Unit | Find Results Maintain |
Field. This is available on the Employment Information tab. Norwegian and Finnish users only. |
| Location | Find Results Find Maintain Summary |
Field |
| Legal Employer | Maintain | Fields Available in the Employment Details tabbed region. This field is available to Kuwaiti users only. |
| Legal Entity | Find Results Maintain |
Field. This is available on the Employment Information tab. Danish users only. |
| Mailstop | Find Results Maintain Summary |
Field |
| Manager | Find Results Maintain Summary |
Field |
| Mandate Code | Maintain | Field. This is available on the Military tab. Hungarian users only. |
| Mandate Date | Maintain | Field. This is available on the Military tab. Hungarian users only. |
| Marital Status | Find Results Maintain Summary |
Field |
| Middle Names | Find Results Find Maintain Summary |
Field |
| Mother's Maiden Name | Maintain | Field. Hungarian users only |
| Multiple Components | Maintain | Field |
| National Identifier | Find Results Find Maintain Summary |
Field |
| NI Number | Find Results Maintain |
Field. Norwegian users only. |
| NIF Number | Maintain | Field. Spanish users only |
| Nationality | Find Results Find Maintain Summary |
Field |
| No Benefit Coverage | Maintain | Field |
| Normal Hours | Find Results Maintain Summary |
Field |
| Notice Period Length | Maintain Summary |
Field |
| Notice Period Units | Maintain Summary |
Dependent field. Used with Notice Period Length. |
| Notify | Maintain Summary |
Field |
| Number of Credits | Find Results Maintain |
Field. This is available on the Further Details tab. Norwegian users only. |
| NUS-2000 Code | Find Results Maintain |
Field. This is available on the Further Details tab. Norwegian users only. |
| Office Number | Find Results Maintain Summary |
Field |
| On Military Service | Find Results Maintain Summary |
Field |
| Only Current Location | Maintain Summary |
Field |
| Organization | Find Results Find Maintain Summary |
Field |
| Organization | Maintain | Field. This is available on the Civil tab. Hungarian users only |
| Original Date Of Hire | Maintain Summary |
Field |
| Pay Basis | Find Results Maintain Summary |
Salary frequency |
| Pay Proposal Attribute 1-20 | Maintain Summary |
Segments from the Additional Salary Administration Details descriptive flexfield |
| Pay Proposal Attribute Category | Maintain Summary |
Context for the Additional Salary Administration Details descriptive flexfield |
| Pay Proposal Attributes Popup | Maintain Summary |
Popup window containing all segments for the Additional Salary Administration Details descriptive flexfield |
| Payroll | Find Results Find Maintain Summary |
Field |
| Payroll Period | Find Results Maintain |
Field. This is available on the Employment Information tab. Norwegian users only. |
| Pension Provider | Find Results Maintain |
Field. This is available on the Employment Information tab. Danish users only. |
| People Group | Find | Field |
| People Group KeyFlex Popup | Find Results Maintain Summary |
Popup window containing all segments for the People Group key flexfield |
| People Group Segment 1-30 | Find Results Maintain Summary |
Segments from the People Group key flexfield |
| Performance Review Period | Find Results Maintain Summary |
Field |
| Performance Review Period Frequency | Find Results Maintain Summary |
Dependent field. Used with Performance Review Period. |
| Person Attribute 1-30 | Maintain Summary |
Segments from the Additional Person Details descriptive flexfield |
| Person Attribute Category | Maintain Summary |
Context for the Additional Person Details descriptive flexfield |
| Person Attributes Popup | Maintain Summary |
Popup window containing all segments for the Additional Person Details descriptive flexfield |
| Person Effective End Date | Find Results Maintain Summary |
Field |
| Person Effective Start Date | Find Results Maintain Summary |
Field |
| Person Extra Information 1-30 | Maintain | Person extra information type |
| Person Extra Information Category | Maintain | Context for the Person extra information type |
| Person Information 1-30 | Find Results Maintain Summary |
Person developer descriptive flexfield. This will only contain records if they have been set up for your legislation. |
| Person Information Category | Find Results Maintain Summary |
Context for the Person developer descriptive flexfield. |
| Person Information Popup | Find Results Maintain Summary |
Popup window containing all segments for the Person developer descriptive flexfield. |
| Person Referred By | Find Results Maintain Summary |
Field |
| Person Type | Find Results Find Maintain Summary |
Field |
| Personal ID | Find Results Maintain |
Field. Finnish users only. |
| Personal Identity Number | Maintain | Field. This is available on the Employment tab. Hungarian users only |
| Personnel Group | Find Results Maintain |
Field. This is available on the Employment Information tab. Finnish users only. |
| Pensioner Registration Number | Maintain | Field. This is available on the Employment tab. Hungarian users only |
| Phone Home Date From | Maintain Summary |
Field |
| Phone Home Date To | Maintain Summary |
Field |
| Phone Home Fax Date From | Maintain Summary |
Field |
| Phone Home Fax Date To | Maintain Summary |
Field |
| Phone Home Fax Number | Maintain Summary |
Field |
| Phone Home Number | Maintain Summary |
Field |
| Phone Mobile Date From | Maintain Summary |
Field |
| Phone Mobile Date To | Maintain Summary |
Field |
| Phone Mobile Number | Maintain Summary |
Field |
| Phone Work Date From | Maintain Summary |
Field |
| Phone Work Date To | Maintain Summary |
Field |
| Phone Work Fax Date From | Maintain Summary |
Field |
| Phone Work Fax Date To | Maintain Summary |
Field |
| Phone Work Fax Number | Maintain Summary |
Field |
| Phone Work Number | Maintain Summary |
Field |
| Picture | Maintain Summary |
Field |
| Placement Start Date | Maintain Summary |
Start date for a contingent worker period of placement |
| Place of Birth | Maintain | Field. Hungarian users only. |
| Place of Residence | Find Results Maintain |
Field. This is available on the Further Details tab. Finnish users only. |
| Position | Find Results Find Maintain Summary |
Field |
| Position | Maintain | Field. This is available on the Civil tab. Hungarian users only |
| Postal Code | Maintain Summary |
Field |
| Pre Name Adjunct | Find Results Maintain Summary |
Field |
| Previous Last Name | Find Results Maintain Summary |
Field |
| Primary Address | Maintain | Field |
| Primary Assignment | Find Results Maintain Summary |
This check box should always be set to display only when included in a template. When a user wants to change a secondary assignment to a primary they must use the Make Primary Assignment action. |
| Probation Period | Find Results Maintain Summary |
Field |
| Probation Unit | Find Results Maintain Summary |
Dependent field. Used with Probation Period. |
| Professional Category | Maintain | Field. Spanish users only. |
| Projected Hire Date | Find Results Find Maintain Summary |
Field |
| Projected Placement End Date | Maintain Summary |
Projected end date for a contingent worker period of placement |
| Project Title | Find Results Find Maintain Summary |
Field |
| Proposed Salary | Maintain Summary |
Field |
| Qualification | Find Results Maintain |
Field. This is available on the Further Details tab. Norwegian and Finnish users only. |
| Rank | Maintain | Field. This is available on the Military tab. Hungarian users only |
| Reason Not Completed | Maintain | Field. This is available on the Military tab. Hungarian users only |
| Receipt Of Death Certificate Date | Find Results Summary |
Field |
| Recruiter | Find Results Maintain Summary |
Field |
| Recruitment Activity | Find Results Find Maintain Summary |
Field |
| Region 1-3 | Maintain Summary |
Address regions |
| Regional Membership | Find Results Maintain |
Field. This is available on the Further Details tab. Finnish users only. |
| Region of Birth | Maintain Summary |
Field |
| Registered Disabled | Find Results Find Maintain Summary |
Field |
| Rehire Reason | Maintain Summary |
Field |
| Rehire Recommendation | Find Results Maintain Summary |
Field |
| Religion | Maintain | Field This field is available to Saudi users only |
| Relocate Domestically | Maintain Summary |
Field |
| Relocate Internationally | Maintain Summary |
Field |
| Relocation Preference | Maintain Summary |
Field |
| Reported Assignment | Find Results Maintain |
Field. This is available on the Employment Information tab. Finnish users only. |
| Requisition | Find Results Find Maintain Summary |
Field |
| Resume Exists | Find Results Maintain Summary |
Field |
| Resume Last Updated | Find Results Maintain Summary |
Field |
| Retirement Age | Find Results Maintain |
Field. This is available on the Employment Information tab. Norwegian and Finnish users only. |
| Retirement Date | Find Results Maintain |
Field. This is available on the Employment Information tab. Norwegian and Finnish users only. |
| Retirement Inquiry Sent | Find Results Maintain |
Field. This is available on the Employment Information tab. Norwegian users only. |
| Salary Basis | Find Results Find Maintain Summary |
Field |
| Salary Change Reason | Maintain Summary |
Field |
| Salary Review Period | Find Results Maintain Summary |
Field |
| Salary Review Period Frequency | Find Results Maintain Summary |
Dependent field. Used with Salary Review Period. |
| Save As | Find | Button |
| Second Passport Exists | Find Results Maintain Summary |
Field |
| Secondary E-mail | Find Results Maintain |
Field. This is available on the Further Details tab. Finnish users only. |
| Secure | Find | Check box |
| Ledger | Maintain | Field |
| Section | Maintain | Field. This is available on the Employment tab. Spanish users only. |
| Show Details | Find Summary |
Button |
| Social Insurance/PHF Contribution Area | Maintain | Field. Chinese Users only. |
| Soft Coded KeyFlex Popup | Find Results Maintain Summary |
Popup window containing all segments for the soft coded legislation key flexfield. |
| Soft Coded Segment 1-30 | Find Results Maintain Summary |
The soft coded legislation key flexfield holds legislation specific information at the assignment level. The legislation of your Business Group determines which flexfield structure you see. |
| Social Security Code | Maintain | Field |
| Social Security Office | Find Results Maintain |
Field. This is available on the Further Details tab. Norwegian users only. |
| Source Organization | Find Results Maintain Summary |
Field |
| Social Security Start Date | Maintain | Field. Hungarian users only |
| Social Security End Date | Maintain | Field. Hungarian users only |
| Service Completed | Maintain | Field. This is available on the Military tab. Hungarian users only |
| Service Start Date | Maintain | Field. This is available on the Military tab. Hungarian users only |
| Service End Date | Maintain | Field. This is available on the Military tab. Hungarian users only |
| Shift Work | Find Results Maintain |
Field. This is available on the Employment Information tab. Norwegian users only. |
| Shift Work Type | Find Results Maintain |
Field. This is available on the Employment Information tab. Finnish users only. |
| Shift Work Type Days | Find Results Maintain |
Field. This is available on the Employment Information tab. Finnish users only. |
| Source Type | Find Results Maintain Summary |
Field |
| Social Security Number | Maintain | Fields available in the Employment Details tabbed region. This field is available to Kuwaiti users only. |
| Special Ceiling Point | Find Results Maintain Summary |
Dependent field. Used with Special Ceiling Step. |
| Special Ceiling Step | Find Results Maintain Summary |
Field |
| Special Information Segment 1-30 | Maintain | Field |
| Special Information Type List | Maintain | Displays a drop-down list of special information types. |
| Special Title | Maintain | Field |
| Speed Dial Number | Find Results Maintain |
Field. This is available on the Further Details tab. Finnish users only. |
| SSB Position Code | Find Results Maintain |
Field. This is available on the Employment Information tab. Norwegian users only. |
| Start Date | Find Results Find Maintain Summary |
Field |
| Student Status | Find Results Maintain Summary |
Field |
| Style | Maintain Summary |
Address style |
| Sub Group | ||
| Successful | Maintain Summary |
Flag indicating whether an application was successful |
| Suffix | Find Results Maintain Summary |
Field |
| Supervisor | Find Results Find Maintain Summary |
Field |
| Supplier ID For Assignment | Find Results Find Maintain Summary |
Supplier ID information for a contingent worker |
| Supplier ID For Worker | Find Results Find Maintain Summary |
Supplier ID information for a contingent worker |
| Supplier Name | Find Results Find Maintain Summary |
Supplier name for contingent worker |
| System Person Type | Find Results Maintain |
Field |
| System Status | Find Results Summary |
Field |
| Tax Area | Maintain | Field. Chinese Users only. |
| Tax Effective End Date | Maintain Summary |
Field |
| Tax Effective Start Date | Maintain Summary |
Field |
| Tax Field 1-150 | Maintain Summary |
Empty items to enable localization teams to configure legislation specific information, such as tax information. |
| Tax Identification Number | Maintain | Field. This is available on the Employment tab. Hungarian users only |
| Telephone Number 1-3 | Maintain Summary |
Field |
| Termination Reason | Maintain Summary |
Field |
| Time Normal Finish | Find Results Maintain Summary |
Field |
| Time Normal Start | Find Results Maintain Summary |
Field |
| Timeline Field | Maintain | Drop-down list that enables you to select what data is shown in the timeline |
| Timeline First | Maintain | Button |
| Timeline Last | Maintain | Button |
| Timeline Next | Maintain | Button |
| Timeline Previous | Maintain | Button |
| Title | Find Results Find Maintain Summary |
Field |
| Town of Birth | Maintain Summary |
Field |
| Town Or City | Maintain Summary |
Field |
| Travel Required | Maintain Summary |
Field |
| Unacceptable Country 1-3 | Maintain Summary |
Countries in which the person does not want to work |
| Under 18 Approved | Maintain | Field. Spanish users only |
| Union Membership | Find Results Maintain |
Field. This is available on the Employment Information tab. Danish users only. |
| Union Occupational Group | Field. This is available on the Employment Information tab. Finnish users only. | |
| Uses Tobacco | Find Results Maintain Summary |
Field |
| Vacancy | Find Results Find Maintain Summary |
Field |
| Visit Internationally | Maintain Summary |
Field |
| Work Center | Maintain | Field. Spanish users only |
| Work Any Country | Maintain Summary |
Field |
| Work Any Location | Maintain Summary |
Field |
| Work Schedule | Find Results Maintain Summary |
Field |
| Work Title | Find Results Maintain |
Field. This is available on the Employment Information tab. Norwegian users only. |
| Working Time Type | Find Results Maintain |
Field. This is available on the Employment Information tab. Finnish users only. |
Using the People Management Configurator
Use the People Management Configurator to create your own versions of the predefined People Management templates and design windows that match your business processes.
Note: You can also use CustomForm to configure certain windows, including the People Management template windows, by setting access restrictions.
See: Using CustomForm
To configure a template using the People Management Configurator:
-
Write any formulas you require for the template. You can write formulas to:
-
Change the name used to identify assignments.
-
Validate user entries in a field.
-
Provide more information on a field, which the user can access from the right mouse menu when they right-click on the field.
-
Create additional tokens for notification messages.
See: Writing Formulas for Templates, Oracle HRMS FastFormula User Guide.
-
-
Open and make a copy of a predefined template using the People Management Configurator, or import an existing template.
See: Opening and Copying a Template
See: Importing a Template
-
Modify the template to your requirements. You can perform as many of the following tasks as you require to complete your template.
See: Editing a Template
See: Adding and Removing Fields on a Template
See Adding Flexfields to a Template
See: Defining Checklists
See: Setting Defaults for Fields in Templates
See: Setting Up Context-Sensitive Fields in Templates
-
Review the predefined notifications and create any required new ones using Oracle Workflow.
-
If appropriate, use CustomForm to restrict the information that appears in the template window, and the actions that users can perform.
-
Create a form function for the new window, and add the window to a menu or task flow.
See: Adding a People Management Window to a Menu or Task Flow
-
Preview the form in the People Management Configurator to check properties such as field tabbing sequence and defaults. You can also check whether you are happy with the default position of task flow buttons. If not, you can reposition them in the People Management Configurator.
Opening and Copying a Template
You can use the predefined People Management templates as a basis for designing your own windows. You cannot edit the predefined templates directly, but you can make your own copy of any template and edit the copy. You can then always return to the original template if necessary.
Note: We also recommend that you set up templates in a test area. This avoids any security infringements when you run a template to view the windows you are designing. If the Security check box on the Find window is not selected, you can view summary information in the search results about all the people who meet your search criteria. This may include people outside your security profile.
To open and copy a template
-
In the Navigator, open the People Management Configurator.
-
In the Find Templates window, select the template you want to copy.
-
Choose the Copy button.
-
In the Copy Template window, enter the details for your new template in the Copy To section:
-
Enter a template code and, optionally, a legislation. These must form a unique combination, but you can create several legislative variations using one template code.
You use the template code when you add the template window to a menu.
-
Enter a descriptive name for the template
-
Choose Yes or No to enable or disable the template. While designing a window, you can choose No so that users cannot display the window.
-
-
Choose OK. In the Decision window that appears next, choose Yes.
The Designer (People Management) window is displayed along with a representation of how the template window will appear to the user.
To make changes to the template, see Editing a Template.
Editing a Template
You can edit a copy of a predefined template to design the layout and content of a People Management window. Use the People Management Configurator tool.
Note: You cannot edit the predefined templates directly. To make a copy of a predefined template to edit, see Opening and Copying a Template
To see a full list of the properties you can set for templates, windows, canvases, tab pages, and items, see: People Management Configurator Options.
To edit a template
-
In the Find Template window, select the template you want to edit and choose Edit.
The Designer window of the People Management Configurator tool is displayed, showing a navigation tree for the items on the template. When you select something in the navigator, its properties are shown in the bottom half of the window. A representation of each window in the template form as it will appear to the user is also displayed behind the Designer.
-
Review the template properties and edit as required. Click in the Further Information field (a predefined descriptive flexfield) if you want to:
-
Restrict the template to handling applicants, employees or contingent workers only.
-
Specify which windows (Summary, Maintenance and Find) are included in the template, and which one displays first.
-
-
Click the + symbol next to the template name (top node in the navigator) to expand the node and display Windows and Items.
-
Expand Windows to display details of the windows in the template.
-
Expand each window to display the canvases and tab pages it contains, then expand the canvases and tab pages to specify the properties of each.
For example, you can specify the title, size, and position of the Summary window. You can choose which tab pages appear on the Maintenance window and specify the label and navigational direction (top to bottom or left to right) in the tabs.
Note: If you make any changes to the properties of a window, canvas, tab, or item and do not want to save them, you can select Clear Record from the toolbar to reset the changes.
-
To set up a checklist tab, see Defining Checklists.
-
Expand Items to display all the fields and buttons that are used in the template. The window on which each item is displayed is shown in brackets.
-
Select an item to view and update its properties. For example, you can move a field or change its prompt.
-
To add fields that do not currently appear on the template, or remove fields from the template, see: Adding and Removing Fields on a Template.
-
Save your work.
Previewing Your New Window
-
Choose Run Template from the Tools menu to see how the window will appear to your users, and to test task flow and right mouse menus.
Important: Before you can preview your window, you must first enable the template and add the new window to a menu. We recommend that you preview your windows on a test database only, to avoid security infringements.
Adding and Removing Fields on a Template
For windows that have been designed using the People Management templates, you can choose to remove fields from the window if your users do not need them and you can add new fields if required.
For a full list of the fields, buttons and other items you can add to a template, see: Fields on the People Management Window.
Note: There is a distinction between removing a field from the template and removing a field from a window. If the field is on the template but hidden in the window, the field data is still active. Hidden fields, however, slow your performance so you should remove fields wherever possible. This procedure describes removing a field from the template so that its data is not used.
To add or remove a field from a template
-
Open the template using the People Management Configurator tool.
See: Editing a Template.
The template windows are displayed along with the People Management Configurator tool.
Adding a Field
-
To add a field or other item that is not already in the template, expand the Items node, then right-click on Items and choose New from the right mouse menu.
Tip: Add all your new fields in a consistent location, such as the top of the branch, to help you keep track of them. Choose Refresh from the right mouse menu when you want the system to place your new fields in their correct alphabetical position.
-
Click on the list of values icon in the Item Name field to open the Item Names Find window. Search for the field you want to add or enter % to see the complete list.
-
Select the field you want to add and choose OK.
Your new field appears under Items in the navigator.
-
Set the following properties:
-
Tab Page Name
-
Visible
-
Height and width of the field
-
Position - Either use the arrow buttons to move the field around or enter a new position in the X and Y Position fields. As you move a field, you can view how it will appear on the window by looking at the template window.
Note: If you make any changes to the properties of an item and do not want to save them, you can select Clear Record from the toolbar to reset the changes.
You can choose to set other properties for the field. Refer to People Management Configurator Options for a complete description of all the properties.
See also Adding Flexfields to a Template
Removing a Field
-
-
To remove a field or button from a template, right-click on the item in the navigator and choose Delete from the right mouse menu.
-
Save your work.
Adding Flexfields to a Template
You can add individual segments of a flexfield to a template you create using the People Management Configurator, or you can add a popup window containing all the segments in a flexfield. For reasons of performance, it is recommended that you use a popup window if you have a large number of segments that you want to add to the window.
Note: You cannot add both individual flexfield segments and a popup window for the same flexfield structure on the same window.
To add individual flexfield segments to a template
-
Open your template using the People Management Configurator.
See: Editing a Template.
-
Expand Items and locate the flexfield segment.
-
Add the value item for the flexfield segment.
-
If the user will be selecting the value for the segment from a value set, enter the meaning item so that the longer description is also displayed.
Note: It is your responsibility to ensure that you enter all flexfield segments required by your configuration. If you omit flexfields that you have defined as mandatory, the user will be unable to save records.
To add a popup flexfield window to a template
-
Open your template using the People Management Configurator.
See: Editing a Template.
-
Expand Items and locate the flexfield items.
-
If you have previously added individual segments of the flexfield to the template, you must first remove all of them. Right-click on each segment of the flexfield and choose Delete from the right mouse menu.
-
Add the Flexfield Name Popup item to the window. This adds a popup window containing all of the flexfield segments.
-
Save your work
Defining Checklists
A checklist is a list of user actions related to people management and recruitment, such as Check References" and Reimburse Expenses". Against each check item, users can record a status, date due, date achieved, and any notes. The checklists are for user reference only; they do not perform any actions.
Checklists can appear on tabs of template forms: on the Summary window, Maintenance window, or both. These tabs are configurable. You specify which check items are displayed, and which fields are available for entry. There is a limit of ten check items on a tab.
There is also a Checklist window, which you can include in task flows from other windows, such as the People page. The Checklist window is not configurable. On this window, users can select any checklist item that you have defined.
To define checklist items and statuses
-
Open the Application Utilities Lookups window.
-
Query the lookup CHECKLIST_ITEM.
-
Enter the code, meaning, and optionally a description for each checklist item you want to define.
-
Save your work.
-
Query the lookup CHECKLIST_STATUS.
-
Enter the code, meaning, and optionally a description for each checklist status you want to define.
-
Save your work.
To define a checklist
-
Open your template using the People Management Configurator.
See: Editing a Template.
-
Expand Windows, expand the window on which you want to place the checklist, expand the Tab Pages node, and select the Checklist tab.
-
Enter properties for the Checklist tab, including the tab label.
For a list of the properties you can change for a tab page, see People Management Configurator Options.
-
Expand Items and find Checklist 1 Item Code (Maintain) or Checklist 1 Item Code (Summary), depending which window is to include the checklist. If this item does not appear in the items list, you need to add it.
-
Enter properties for this item.
To provide a default check item in this field, enter the appropriate lookup meaning in the Default Value property. You must enter the meaning exactly as you typed it in the Application Utilities Lookups window. If you want to prevent users from selecting other check items in this field, set the Insert Allowed property to No.
-
Save your work.
-
To specify the fields that accompany this check item in the checklist, find the following items. If they do not appear under Items, you can add them. If they appear and you do not want them on your checklist, you can remove them.
-
Checklist 1 Status
-
Checklist 1 Date Due
-
Checklist 1 Date Done
-
Checklist 1 Notes
-
-
Repeat steps 4 to 7 to add up to ten checklist items to your template, using the items Checklist 2 Item Code through Checklist 10 Item Code.
Setting Defaults for Fields in Templates
The templates enable you to default values in many fields.
See Default Values in Template Fields
To set a default for a field
-
Open the template using the People Management Configurator tool.
See: Editing a Template.
-
In the People Management Configurator navigator, expand Items and select the field for which you want to set a default.
See: Fields on the People Management Window for a full list of all the available fields.
-
In the Properties section, enter a default value for the field in the Default Value field. There is no list of values available, so you must be careful to type the value exactly as it should appear.
You can also choose not to display the field on the window even though you have set a default value.
-
If you want to hide the field set the Visible Field to No.
-
Save your work.
Setting Up Context-Sensitive Fields In Templates
You can set up fields that are context-sensitive in your templates using the People Management Configurator tool. You can use the following contexts:
-
Person type - for example, to hide the Employee Number field when an applicant is selected.
-
Descriptive flexfield context - for example, to display address lines in the appropriate sequence for each address style
-
Key flexfield structure - for example, to display the appropriate structure of the Personal Analysis Key Flexfield for each Special Information Type.
Note: If a segment is not defined for a particular structure or context in the flexfield definition, it does not appear on the form even if you set it up for that context in the People Management Configurator.
To set up a context-sensitive field
-
Open your template using the People Management Configurator.
See: Editing a Template.
-
In the navigator, expand Items and find the field that you want to make context-sensitive.
-
Set the properties for the default field. You may want to hide the default field so that it only appears in the contexts that you define.
-
Expand the field, right click on Contexts, and choose New from the right mouse menu. You set up a 'child' context field for each context in which you want the field displayed.
-
In the Properties section, select a value in the Context Type field: Descriptive Flexfield, Key Flexfield, or QuickHire Person Type.
-
In the window that displays, enter the context in which this field should display and choose OK.
For a descriptive flexfield, select the Application, Title, and Context. For example, this could be Oracle Human Resources, Personal Address Details, and United Kingdom respectively. For a key flexfield, select the Application, Title, and Structure. For a QuickHire Person Type, select the person type.
-
Choose the tab you want the field displayed on for this context and set any other properties, such as position or tool tip text.
-
Repeat steps 4 to 7 for each context in which this field should display.
-
Save your work.
Setting Up DateTrack History on Fields in Templates
You can set up DateTrack History for datetracked and dated fields on a template. This has two effects:
-
Users can then right-click in the field and choose DateTrack History to see a history of changes that have been made to that field.
-
The field appears in the drop down list by the timeline bar. If you select the field in the drop down list, the timeline shows the dates of changes to this field.
To set up DateTrack History on a field
-
Open your template using the People Management Configurator.
See: Editing a Template.
-
Expand Items and find the field.
-
Select the flexfield [ ] at the bottom of the Properties section.
-
Enter Yes in the DateTrack History field.
-
Save your work.
Setting Up More Information on Fields in Templates
You can set up more information to be available to users on each of the fields you include in a template using Oracle FastFormula. The user can right-click in a field and choose a prompt that you specify. For example, you might want to enable the display of a supervisor's email address from the Supervisor field. From the Job field, you might show the normal working conditions for the job.
For examples of how you can set up more information see the Supervisor and Position fields in the predefined Hiring Applicants and Maintaining Employees templates.
To set up more information on a field
-
Open your template using the People Management Configurator.
See: Editing a Template.
-
Expand Items and select the field for which you want to set up more information.
-
Enter a formula name in the Information Formula field.
You create the formula using Oracle FastFormula.
See: Writing Formulas for Templates, Oracle HRMS FastFormula User Guide.
-
Enter a label explaining the information available in the Information Prompt field. This prompt is displayed in the right mouse menu when a user right-clicks on the field.
-
Enter up to five inputs for the formula in the Information Formula Parameter Fields.
-
Save your work.
Adding a People Management Template Window to a Menu or Task Flow
When you create your own version of a window using the People Management Configurator, you need to add your new window to a menu or task flow so that users can access it.
To create a function for a window
-
You must define a function to call the window. When you define the form function, use parameters to specify the template name, and, if necessary, the customization name and task flow name (separate the parameters by spaces). For example:
Function: PERWSQHM_CUSTOM_MAINTAIN_EMPS
Parameters: TEMPLATE_NAME="PER_MAINTAIN_EMPS" HR_CUSTOMIZATION="MedicalSIT" WORKFLOW_NAME="EMP_DEVELOPMENT"
For a description of the HRMS parameters you can use when you define functions, see: Using Parameters for HRMS Form Functions.
Adding a window to a menu:
-
You can add the function to any menu.
For more information about adding your configured window to a menu see: Menus Window, Oracle Applications System Administrator's Guide
Adding a window to a task flow:
-
You can create a new task flow for the window. People Management windows must always be the first window in the task flow.
See: Define Task Flows
Note: If you want to use a version of the People Management window that you have restricted using CustomForm in a task flow, you must first define a new task flow node and then define a menu function to call the task flow.
Importing a Template
You can import a template from another database provided that it is for the same legislation as your Business Group. For example, you should not import a UK template for a US Business Group.
You might want to import a template from a test database to your production environment. You can also use this procedure to make backups of templates.
This procedure involves downloading the template to a data file then uploading to your target database.
To import a template
-
Run the Forms Configurator - Download Template process. You do this in the Submit Requests window for a Super HRMS Manager responsibility.
-
In the Parameters window, enter a filename and full directory path for the data file. The template will be saved to this data file. You will use this data file to import the template later.
-
Select the name of the template you want to download and choose OK.
-
Go to the database where you want to upload and use the template.
-
Run the Forms Configurator - Upload Template process.
-
In the Parameters window, enter the name and path of the data file you created when you downloaded the template.
The template is now available for you to add to a menu or modify using the People Management Configurator.
Restrict Windows Using CustomForm
CustomForm
Many of the standard Oracle HRMS windows are multipurpose. For example, in the People window, you can enter or view details of employees, applicants, contingent workers, contacts, or other person types that you have defined. In the Element Entries window, you can make entries for all the elements you have defined.
You might prefer to have multiple versions of these windows, each version being used for just one purpose. This approach restricts the list of values on certain fields and therefore provides for faster data entry. It also enables you to limit access to certain types of information.
For example, you might create a version of the View Element Entry History for Employee window that does not display the earnings elements representing salary, bonus, and commission. Most users' menus would only give them access to this version of the window. For the small group of people authorized to view salary, bonus, and commission figures, your system administrator can define a menu function to allow access to the standard window.
You can do this using CustomForm.
Restricting Access to People Management Templates
When you create a people management template using the People Management Configurator (see People Management Configurator), you can specify whether the template handles employees, applicants, contingent workers or a combination of all three. This is a quick way to restrict your template windows by system person type. If you need to restrict the template windows by user person type, you can use CustomForm to create a restricted version of your template.
Important: Make sure that the criteria you enter in the Form Customization window do not conflict with any restrictions you put on the template using the People Management Configurator. For example, if you restrict the template to Applicants Only in the People Management Configurator then create a version that only handles the user person type Graduate Intake (a type of employee), users will not be able to find any people using the template.
You can also use CustomForm to restrict People Management templates in other ways. You can restrict the special information types, extra information types, actions, and notifications that are available from your templates. You can also control the fields available for searching and the new records (applicant, employee, contingent worker, assignment or application) that users can create using the templates.
Windows you can Restrict using CustomForm
You can use CustomForm to restrict the information available in the windows listed in the table below. We also identify the criteria you can use to restrict access to information.
| Window | Restrict By | Values |
|---|---|---|
| Adjust Balance: (Oracle Payroll form) | Element Set | User defined |
| Adjust Balance: (Oracle Payroll form) | Element Processing Type | Recurring, Nonrecurring |
| Assignment Folder | Person Type | User defined |
| Element Entries | Element Set | User defined |
| Element Entries | Element Processing Type | Recurring, Nonrecurring |
| Element Entries | Entry Type | Override |
| Event Bookings | Employee or Applicant | Employee, Applicant |
| Extra Assignment Information | Extra Information Type | User defined |
| Extra Element Information | Extra Information Type | User defined |
| Extra Job Information | Extra Information Type | User defined |
| Extra Location Information | Extra Information Type | User defined |
| Extra People Information | Extra Information Type | User defined |
| Extra Position Information | Extra Information Type | User defined |
| List Employees by Element | Element Set | User defined |
| List Employees by Element | Element Processing Type | Recurring, Nonrecurring |
| List People by Special Information | Employee or Applicant | Employee, Applicant |
| List People by Special Information | Special Information Type | User defined |
| List People by Special Information | Person Type | User defined |
| Organization | Organization Classification | List of Organization Classifications |
| Payroll and Assignment Processes: (Oracle Payroll form) | Action Type | List of Action Types (e.g. Run, Pre-payments, Reversal) |
| People Folder | Person Type | User defined |
| People (PERWSEPI), People and Assignment (PERWSHRG): (Enter Personal Information) | Person Action | User defined |
| People (PERWSEPI), People and Assignment (PERWSHRG): (Enter Personal Information) | Person Function | User defined |
| People (PERWSEPI), People and Assignment (PERWSHRG): (Enter Personal Information) | Person Type | User defined |
| People Management | Person Type | User defined |
| People Management | Special Information Type | User defined, and some may be predefined |
| People Management | People Extra Information Type | User defined, and some may be predefined |
| People Management | Assignment Extra Information Type | User defined, and some may be predefined |
| People Management | Actions | List of available actions such as Hire Applicant |
| People Management | Workflow Notifications | Notifications defined in workflow; some predefined, you can add others |
| People Management | New Objects | New Applicant, New Employee, New Application, New Assignment |
| Position Occupancy Folder | Employee or Applicant | Employee, Applicant |
| Run QuickPaint Report | QuickPaint Inquiry | User defined |
| Run QuickPaint Report | Person Type | User defined |
| Run QuickPaint Report | Assignments | Assignment Sets, Assignments |
| Special Information | Special Information Type | User defined |
| Table Values: (Define User Values) | Table Name | User defined |
| View Element Entry History for Employee | Element Set | User defined |
| View Element Entry History for Employee | Element Processing Type | Recurring, Nonrecurring |
Types of Data Restrictions
You can restrict the information that appears in a window by the following sorts of criteria:
-
Element processing type (recurring or nonrecurring)
-
Element set (user defined)
-
Person type (user defined)
-
Special information type (user defined)
-
Organization classification
-
Employee, applicant, or contingent worker
Note: If you choose to restrict access to your form by person type, you select the person type and then choose whether to include or exclude this person type.
-
QuickPaint report (user defined)
-
Extra Information Type (user defined)
-
Action for People Management
-
Workflow notification (user defined)
-
New objects that you can create using the People Management window
-
Fields you can search on using Advanced Find in the People Management window. The fields you select are excluded from the Advanced Find.
Important: When you use a standard window, all types of information are available. When you use a configured version, you can only see the types of information that were selected on the Form Customization window. However, there is one exception. When you restrict the People Management window by Advanced Find Item, you can search in the configured version of the window on all Find items except the ones you selected on the Form Customization window.
If you want to restrict the data by a user defined information type, you must create it first:
-
To restrict by element set, create the set in the Element and Distribution Set window.
See: Defining an Element or Distribution Set, Oracle HRMS Compensation and Benefits Management Guide
-
To restrict by QuickPaint Report, create the report in the Define QuickPaint Report window.
-
To restrict by Special Information Type, define your information type as an instance of the Personal Analysis key flexfield.
See: Setting Up Special Information, Oracle HRMS Workforce Sourcing, Deployment, and Talent Management Guide
-
To restrict by person types, define your user person types in the Person Types window.
See: Defining Person Types, Oracle HRMS Enterprise and Workforce Management Guide
-
To restrict by Extra Information Type, define your information type as an instance of the appropriate extra information flexfield.
See: Setting Up Extra Information Types (Excluding Organization EITs)
-
To restrict by workflow notification, create your notifications using Oracle Workflow.
Using the Include and Exclude Restrictions
With selected restriction types, you can choose to include or exclude specific types. This is currently only possible with the Person Type restriction. In this case, the system checks whether any of the person types assigned to a person match any of the person types included or excluded using the Person Type restriction.
The different scenarios are best illustrated using examples. In each case, the employee has the person types of Employee and Applicant.
| Included Person Type | Excluded Person Type |
|---|---|
| Employee |
Result: The employee is visible in the form. In this case, all persons with the person type of Employee are visible.
| Included Person Type | Excluded Person Type |
|---|---|
| Employee |
Result: The employee is not visible in the form. In this case, all persons with the person type of Employee are excluded and all other persons are visible.
| Included Person Type | Excluded Person Type |
|---|---|
| Employee | Applicant |
Result: The employee is not visible in the form. Even though the employee has the Person Type of Employee, which is included according to the restriction, the Excluded Person Type of Applicant takes priority over the Included Person Type and the employee is not visible in the form.
Note: It is not possible to include and exclude the same person type.
Using CustomForm
Use CustomForm to configure a certain set of windows by setting restrictions in them. For example, you can use CustomForm to restrict the elements that users can enter using the Element Entries window.
You can also use the People Management Configurator to modify predefined templates and create windows that match your business processes.
See: Using the People Management Configurator
To configure a window using CustomForm:
-
If you are restricting the information that appears in the configured window by a user defined entity (such as an element set, person type, special information type, or QuickPaint report), ensure that this entity is already defined.
-
Define a configured version of the window using the Form Customization window.
-
Add the new window to a menu or task flow.
Configuring a Window With CustomForm
You can define your own versions of templates and some standard windows in the Form Customization window.
See: List of Configurable Windows
Note: If you want to restrict access to query-only for a window, you do not need to create a separate version. Instead you create a new form function, setting the QUERY_ONLY parameter to YES.
See: Restricting Access to Query-only Mode
To define restrictions for a window
-
Select the name of the window in the Form to be customized field.
-
Enter the name of your new version in the Name field. This name is used when defining menus but it is not seen by users.
-
Select Enabled if you want the restrictions to come into effect. If you do not select this option, the configured version of the window behaves the same way as the standard version.
-
Enter the titles to appear in the new version of the window:
-
In the Standard Title field, enter the window title to be seen by users who can use the window for data entry and editing.
-
In the Query Title field, enter the window title to be seen by users who have view-only access to the window.
Note: If you are configuring a template, the titles entered for the template in the People Management Configurator window override those entered here.
-
-
Save your new version.
-
In the Restrictions block, select the Type and Value of the restrictions you want to define. The types and values available depend on the window you are configuring.
Note: If you are using the Person Type restriction, you can choose whether to include or exclude the selected person type using the available radio buttons. If you select any other type of restriction, the radio button is automatically set to Include.
Adding a Custom Window to a Menu or Task Flow
When you create a restricted version of a window using CustomForm, you need to add your new window to a menu or task flow so that users can access it.
Adding custom windows
-
If you want to add the custom window to a task flow, you must create a Task Flow Node for it.
-
If the window is called directly from the Navigator window, you must define a menu function to call the custom version of the window. You can add the function to any menu.
For a description of the HRMS parameters you can use when you define functions, see: Using Parameters for HRMS Form Functions.
Note: If you want to use a custom version of the People window, People Folder, or Assignment Folder to start a task flow, you should define a new task flow node and then define a menu function to call the task flow.
For more information about adding your custom window to a menu see: Menus Window, Oracle E-Business Suite Developer's Guide
Additional Configuration Options
Additional Configuration Options
There are some additional configuration options that your organization may need to set up, depending on the requirements of your system. These include:
-
Setting up International HRMS. See: What is International HRMS?
Setting Up Your Printers
To run reports in Oracle HRMS, you need to associate the following predefined print styles with your printer driver:
-
XX PS Portrait
-
XX PS Landscape
-
XX_Cheque
Note: XX represents your country code, such as ZA.
You do this using the Printer Types window.
See: Setting Up Your Printers, Oracle Applications Systems Administrator's Guide.
Examples of Printer Driver and Printer Types
Example postscript printer driver (HP LaserJet 4000)
| Driver Name: | A4PS |
| User Driver: | A4 POSTSCRIPT |
| SRW Driver: | A |
| Driver Method: | Command |
| Arguments: | lp -d$PROFILES$.PRINTER -n$PROFILES$.CONC_COPIES -t"$PROFILES$.TITLE" $PROFILES$.FILENAME |
Table 1-6 Example of the South African cheque printer driver (HP LaserJet 4000)
| Driver Name: | A4CHEQUE |
| User Driver: | A4 CHEQUE |
| SRW Driver: | HPA |
| Driver Method: | Select Command |
| Arguments: | lp -d$PROFILES$.PRINTER -n$PROFILES$.CONC_COPIES -t"$PROFILES$.TITLE" $PROFILES$.FILENAME |
| Initialization: | /eE/e(s0P/e&l0O/e&l8D/e&l26A/e&k2S/e(8U/e(s0p12h0s0b4099T/e&l25E |
| Reset: | /eE/000 |
Example Printer Type (HP LaserJet 4000)
| Style | Driver Name |
| PS Landscape | A4PS |
| PS Portrait | A4PS |
| Cheque | A4CHEQUE |
What is International HRMS?
International HRMS is a set of standard data categories that provide the foundation for a localized version of HRMS. You can use International HRMS to set up a localized version of HRMS, provided that your localization is not already supported.
You are not obliged to use International HRMS to set up localized data. If you prefer, you can set your own localization by following a series of manual steps. However, the advantages of using International HRMS to set up a localization are:
-
It is faster to install.
-
It is easier to install.
-
It is easier to support once you have installed it.
International HRMS is also updated regularly. For example, features such as the Costing of Payment process, Statement of Earnings, Enhanced RetroPay, and Cheque/Check Writer (Generic) are included in International HRMS. This means that when you use International HRMS to begin setting up a localization, you already have access to some of the latest features delivered in Oracle HRMS.
How Do You Use International HRMS to Create a Localization?
You apply hrglobal and then run the concurrent program International HRMS Setup. For further details of the exact sequence.
What is Included in International HRMS?
International HRMS includes all of the following data definitions:
-
Business rules
-
Element Classifications
-
Legislative rules
-
Balance Dimensions
-
Balances
-
Balance Categories
Legislation Rules
This legislation rules supplied with International HRMS include:
| Rule Type | Rule Mode | Comments |
|---|---|---|
| ACTION_CONTEXTS | Y | This rule is always enabled. It means that you always save the context information from a payroll run or other payroll action. This makes it easier to purge your unwanted data. |
| BAL_INIT_VALIDATION | N | This rule is always set to N to specify that balance initialization validation is not supported. You can override this default, but if you do, you will also need to write a procedure to enable balance initialization validation. |
| E | {Leg Code}_BANK_DETAILS | This holds the ID for the Bank key flexfield. |
| I | N | This rule determines whether assignments are time independent of each other. It is always set to N. This means that assignments are not independent of each other. They are always synchronized to preserve the integrity of person level balances when processing a payroll. |
| L | 01/01 | This rule holds the tax year start date. |
| PAYWSACT_SOE | N | This rule is set to exclude the display of the Statements of Earnings from the Assignments Process form. |
| PAYWSRQP_DS | Y | This rule is set to include the display of the Statements of Earnings from the QuickPay form. |
| RUN_TYPE_FLAG | Y | This rule is set on delivery to enable you to use the delivered run types. The RUN_TYPE_ENABLE legislative field information is also set to exclude the use of user-created run types. You can only use those run types that are delivered as standard, and you cannot subsequently add extra run types. |
| SOE | Y | This rule is set to include the display of Statement of Earnings from the Assignments Process form. |
| SUPPRESS_INSIG_INDIRECTS | Y | This rule is set to avoid the creation of null run result values. |
| RETROELEMENT_CHECK | Y | This rule determines that the field RetroPay Element appears in the Element window of the localized product. |
| RR_SPARSE | Y | This rule is to suppress the creation of indirect run results with zero or null values. |
| BAL_ADJ_LAT_BAL | Y | This legislation rule is set to prevent the deletion of latest balances as part of balance adjustments. |
| DC | {Currency Code of the localization} | This rule holds the currency code of the legislation. |
| MAGTAPE_FILE_SAVE | Y | This rule determines in magnetic tape files are to be saved in the internal tables. |
| ADVANCED_RETRO | Y | This rule enables Enhanced RetroPay mechanism. |
| PAYSLIP_MODE | XDO | This rule determines the Online Payslip architecture. (XDO or OAF). |
| REHIRE_BEFORE_FPD | Y | This rule is set to re-hire the employee before final process date. |
In addition, this legislation rule is delivered if you choose the Tax Unit option when you run the International HRMS Setup process:
| Rule Type | Rule Mode | Comments |
|---|---|---|
| S | {Leg Code}_BANK_DETAILS | This rule holds the ID for the SCL key flexfield |
| SDL | A | This rule establishes the SCL level. It is always assignment. |
| TAX_UNIT | Y | This rule is set to indicate that the Tax Unit is enabled. It is created as a mandatory segment in the SCL key flexfield. |
| SAVE_ASG_RUN_BAL | Y, N | This rule indicates whether to enable or disable the Run Balance at legislation level for assignment run balances. |
Element Classifications
These element classifications are supplied with International HRMS:
-
Information
-
Earnings
-
Absence
-
Supplemental Earnings
-
Taxable Benefits
-
Pre-tax Deductions
-
Tax Deductions
-
Direct Payment
-
Employer Charges
-
Involuntary Deductions
-
Voluntary Deductions
Balance Dimensions
The balance dimension available with International HRMS are:
| Payments |
| Assignment Run |
| Assignment Inception to Date |
| Assignment Processing Period to Date |
| Assignment Calendar Month to Date |
| Assignment Calendar Quarter to Date |
| Assignment Calendar Year to Date |
| Assignment Tax Quarter to Date |
| Assignment Tax Year to Date |
| Assignment Fiscal Quarter to Date |
| Assignment Fiscal Year to Date |
| Person Inception to Date |
| Person Processing Period to Date |
| Person Calendar Month to Date |
| Person Calendar Quarter to Date |
| Person Calendar Year to Date |
| Person Tax Quarter to Date |
| Person Tax Year to Date |
| Person Fiscal Quarter to Date |
| Person Fiscal Year to Date |
| Element Entry Inception to Date |
| Element Entry Processing Period to Date |
| Element Entry Calendar Month to Date |
| Element Entry Calendar Quarter to Date |
| Element Entry Calendar Year to Date |
When the tax unit segment is enabled the following set of Tax Unit dependent balance dimensions are enabled, allowing balance values to be retrieved for a given Legal Entity.
| Assignment Within Tax Unit Inception to Date |
| Assignment Within Tax Unit Processing Period to Date |
| Assignment Within Tax Unit Calendar Month to Date |
| Assignment Within Tax Unit Calendar Quarter to Date |
| Assignment Within Tax Unit Calendar Year to Date |
| Assignment Within Tax Unit Tax Quarter to Date |
| Assignment Within Tax Unit Tax Year to Date |
| Assignment Within Tax Unit Fiscal Quarter to Date |
| Assignment Within Tax Unit Fiscal Year to Date |
| Person Within Tax Unit Inception to Date |
| Person Within Tax Unit Processing Period to Date |
| Person Within Tax Unit Calendar Month to Date |
| Person Within Tax Unit Calendar Quarter to Date |
| Person Within Tax Unit Calendar Year to Date |
| Person Within Tax Unit Tax Quarter to Date |
| Person Within Tax Unit Tax Year to Date |
| Person Within Tax Unit Fiscal Quarter to Date |
| Person Within Tax Unit Fiscal Year to Date |
Balance Attributes
The balance attributes available with International HRMS are Online SOE Balance Attribute and Statutory Balance Attribute.
Balances
The balance available with International HRMS is Total Payments.
Balance Categories
The balance categories available with International HRMS are:
-
Information
-
Earnings
-
Absence
-
Supplemental Earnings
-
Taxable Benefits
-
Pre-Tax Deductions
-
Tax Deductions
-
Direct Payment
-
Employer Charges
-
Involuntary Deductions
-
Voluntary Deductions
Legislative Field Info
This table describes the seeded legislative field information available with International HRMS:
| Field Name | Validation Name | Validation Type | Target Location | Rule Type | Rule Mode |
|---|---|---|---|---|---|
| RUN_TYPE | ENABLE | ||||
| ET_USAGE | ENABLE | ||||
| RT_ORG_METHOD | ENABLE | ||||
| CONTEXT_VALUE | DISPLAY | BLOCK_PROPERTY | PAYWSACT | BALANCE_BREAKDOWN | |
| COSTING_TAB | DISPLAY | TAB_PAGE_PROPERTY | PAYWSDPM | DISPLAY | |
| EC_USAGE | ENABLE | Y | |||
| PRORATION_GROUP_NAME | DISPLAY | Y | |||
| TAX_PROCESSING_TYPE | DISPLAY | ITEM_PROPERTY | PAYWSRQP | RUN_TYPE_FLAG | Y |
| ARCH_BUTTON | DISPLAY | ITEM_PROPERTY | PAYWSRQP | Y | |
| RUN_RESULTS_BUTTON | ACTION_TYPE | <blank> | PAYWSVAV | LAUNCH_FORM | X |
| CHOOSE_PAYSLIP | ITEM_PROPERTY | DISPLAY | PAY_PAYSLIP | PAYSLIP_EMPLYR_ADDR | ORG |
Overview: Using International HRMS to Define a Localization
You apply International HRMS standard data by following this sequence:
-
Install HRMS.
-
Apply the latest patch to provide the standard set of data categories needed in every legislation.
-
Run hrglobal.
-
Apply the latest patch to provide a translated set of data for the particular legislation that you are installing.
-
Run the concurrent program International HRMS Setup.
See: Running the International HRMS Setup Process
When you install International HRMS, you can also use the following features that have been enabled for International HRMS:
Viewing Statement of Earnings
The Statement of Earnings is enabled for International HR/Payroll.
If the legislation rule PAYWSRQP_DS is set to Y, you can view the Statements of Earnings from the QuickPay window. If the legislation rule SOE is set to Y, you can view the Statements of Earnings from the Assignments Process window.
To view the statement of earnings, you must configure your system before you can view them.
See: Configuring the SOE Information
See: Viewing Statement of Earnings, Oracle HRMS Payroll Processing Management Guide
Costing of Payments
Costing Process is enabled for International HR/Payroll. You can run the Costing of Payments from the International Payroll request groups and enter any costing information using the Costing tab within the Payment Methods window.
See: Running the Costing of Payment Process, Oracle HRMS Enterprise and Workforce Management Guide
Cheque Writer (Generic)
The International Payroll request group (Global HRMS Reports & Process) includes the Cheque Writer (Generic) program. You can use the Cheque Writer (Generic) process to create assignment actions for each of the prepayments that have a payment type of Cheque and process these assignment actions and produces an XML file, and a PDF document containing cheques.
See: Running the Cheque Writer (Generic) Process, Oracle HRMS Payroll Processing Management Guide
Enhanced RetroPay
You can use Enhanced Retropay to retropay employees when you have installed International HRMS. .
See: Running the Retro-Notifications Report (Enhanced and Enhanced PDF), Oracle HRMS Payroll Processing and Management Guide
See: Running Enhanced RetroPay, Oracle HRMS Payroll Processing and Management Guide
Rehire Before Final Close
When you use International HRMS you can rehire employees before final close.
See: Rehire Before Final Close, Oracle HRMS Workforce Sourcing and Deployment Guide
Run Balances
When you use International HRMS, you can use the Run Balances to improve the performance of non-latest balances. By storing run balances, users can sum the contributing rows to return other dimensions - YTD and QTD balances.
View Cost Allocations
Users can use the View Cost Allocation page to view an assignments costing details before running the Costing process.
See: Previewing Cost Allocations, Oracle HRMS Enterprise and Workforce Management Guide
Quick Pay Archiver
Users can use the Quick Pay Archive for one assignment. Users can also use this process, if the Payroll Archiver (International Payroll) process has errored for some employees and to rerun the Archiver process only for those employees, thereby not requiring the need to roll back the entire process.
See: Running the Quick Pay , Oracle HRMS Payroll Processing Management Guide
Sparse Run Result Values
Users can use this feature to suppress the creation of run results with zero or null values.
Users must run the following generic upgrades for the localization created using International HRMS :
-
Sparse Matrix Null Result Values Upgrade: This process purges all the null run result values which are present in the system before enabling this feature.
-
Enable Sparse Matrix Null Result Values Functionality: This process enables the Sparse Matrix functionality for created legislation.
See :Running the Generic Upgrade Mechanism Process, Oracle HRMS Payroll Processing Management Guide
For more information, see: What is SPARSE Matrix and How does it Help to Minimise Size and Growth of Run Results and Run Result Values Tables note ID 368723.1 on My Oracle Support.
Prevent Loss of Latest Balances
All the latest balances get deleted when users make any balance adjustments. This affects the value of current latest balance. The prevention of loss of latest balances feature prevents the deletion of latest balances upon balance adjustments and adjusts the values accordingly.
To prevent the deletion of latest balances as part of balance adjustments, the legislation rule BAL_ADJ_LAT_BAL is set to Y for International HRMS. When a balance adjustment occurs, instead of deleting all related latest balances, the values are adjusted accordingly.
Payroll Dashboard
Users can use the payroll dashboard for viewing the payroll and assignment process information by providing them with payroll readiness, analysis and validation information for the entire payroll cycle. Users can monitor payroll and assignment processes as well as run, retry, or roll back payroll processes. Administrators can easily configure the payroll readiness, analysis and validation informatio n according to their requirements using both delivered as well as custom checks and rules.
See: Using Payroll Dashboard, Oracle HRMS Deploy Self Service Capability Guide
See: Using the Readiness Configuration, Oracle HRMS Deploy Self Service Capability Guide
See: Configuring Payroll Dashboard, Oracle HRMS Deploy Self Service Capability Guide
Cash Management Integration for EFT Payroll Payments
International HR and Payroll users can use the Cash Management Integration for EFT Payroll Payment functionality to reconcile payments.
For information on this integration, See: Cash Management and Oracle Payroll, Oracle Payroll Processing and Management Guide and Setting up Cash Management Integration for EFT Payroll Payments
Overview of Payroll Archiver Process (International Payroll)
You run the payslip archive process to extract and gather relevant information to appear on your employees' payslips. The archiver accesses the payslip information for the dates you select and copies the information across to storage archive tables, where it is picked up and converted into a format for printing and distributing to employees or for viewing online through the self service application.
Components of Archiver
The Payroll Archiver process archives the following components
-
Elements
-
Balances
-
Employee Details
-
Address Details
-
Employer Information
-
Accruals/Absences
-
Summary
Elements
The Payroll Archiver process archives the elements that are created either using the Element Description window or Element Design Wizard. You can decide whether you want to report YTD values along with current pay value or not. If you want to display YTD values, then you must ensure that all the elements have the primary balance setup complete and attach the Primary Balances in the Further Information field in the Element Description window.
You must record the Primary Balance and Hours Balance (if applicable) for the Earnings elements and Primary Balance for Deduction Elements only.
To report the YTD for elements using the Archive YTD for Elements in the Reporting Preferences window at the business group level.
Balances
A predefined balance attribute SOE Balance Attribute is used to display required balances in the SOE report and determines which balances need to be archived as part of Payroll Archiver run.
Additionally, the Balance Attribute - Statutory Balance Attribute is also available to enable users to choose the balances to archive.
For example, if you need to archive a balance in the Payroll Archiver process and display in SOE, then you must associate the balance with SOE Balance Attribute only. However, if you need to archive the balance in Payroll Archiver only and not display in the SOE, then you must associate the Balance Attribute Statutory Balance Attribute for this balance with the desired balance dimension.
If you want to archive the same balance with multiple dimensions, then you must associate multiple Balance Dimensions with the same Balance Attribute. The Payroll Archiver process archives the balance information based on the selected dimensions in Balance Attribute window.
Net Pay Distribution
The employee payment details recorded through pre-payment process are archived under the Information category Employee Net Pay Distribution.
Employee Details
The Payroll Archiver process archives the employee generic information under the Information category Employee Details. A new Information Category IP Additional Employee Details to archive additional Employee Information is available for archiving information.
Address Details
You record employee address details and archive these details under the information category Address Details.
Employer Information
You record Employer Information at Payroll Action level and archive all organizations and GREs (Tax Units) details belonging to the archived assignments in the given Payroll Archiver period. The Tax Unit (GRE) information is archived only when Tax Unit is enabled for the legislation. The name and address of the employer (Organization/GRE) legislation specific and archived under IP EMPLOYER DETAILS.
Accruals/Absences
Accruals and Absences details are archived under Information categories EMPLOYEE ACCRUALS and IP ABSENCES.
Summary
The Summary of the Earnings and Deductions along with the total net pay is recorded in the Information categories IP SUMMARY CURRENT and IP SUMMARY YTD. IP SUMMARY CURRENT holds the summary amounts of current payroll run. IP SUMMARY YTD holds the summary of the YTD amounts up to the current payroll run.
Balance Dimensions
As the Tax Year start date varies from localization to localization, the Tax Year to Date (TYTD) Balance Dimension is used to retrieve the YTD values of the Elements and Balances. The criteria to select Balance Dimension for YTD values also depend on the Tax Unit configuration. If the Tax Unit is enabled, then the Assignment Within Tax Unit Tax Year To Date (_ASG_TU_TYTD) dimension is used otherwise Assignment Tax Year To Date(_ASG_TYTD) dimension is used.
Balance Adjustments and Reversals
As the pre-payment process locks the Balance Adjustments and Reversals, the Payroll Archiver processes Balance Adjustments and Reversals.
Primary Balance
Primary balances are used to obtain the current and YTD values of the element when the Archive YTD for Elements flag set to Yes at the business group level. All required Primary balances for the element are created automatically when you create the element using the Element Design Wizard. The Primary balance creation is based on Element Classification and Calculation rule of the element.
| Calculation Rule /Elements | Hours * Rate | Flat Amount/Percentage of Earnings | Flat Amount Deduction / Percentage Deduction |
| Earnings | <Element_name> <Element_name>Hours <Element_name>EL |
<Element_name> <Element_name>EL |
Not Applicable |
| Deductions | Not Applicable | Not Applicable | <Element_name> <Element_name>Accrued <Element_name>Arrears <Element_name>Not Taken |
The Element Design Wizard creates the base primary balance with the same name as the Element name, the other primary balances prefixed with the element name.
For Hours* Rate elements, the Hours Primary Balance is used to archive Current and YTD Hours. The Element Design Wizard creates all the defined balances for the primary balance created for the given element. For the primary balances, the following dimensions are used in the Payroll Archiver.
-
Assignment Within Tax Unit Tax Year To Date (_ASG_TU_TYTD) (Only If Tax Unit is installed)
-
Assignment Tax Year To Date (_ASG_TYTD)
-
Payments (_PAYMENTS)
If you use the Element Description window to create elements, then the primary balances and defined balances are not created automatically. You must manually setup the required Primary balances and Defined balances for that element.
Archive YTD for Elements Flag
The Archive YTD for Elements flag controls the behaviour of the Payroll Archiver. If you set the value to Yes, then the Payroll Archiver uses Elements' Primary Balances to get the Current and YTD amounts. If you set the value to No, then Primary Balances are not used. The default value is set to No. You must change the value to Yes only if the Primary Balances exist for all the active elements.
The Payroll Archiver Process errors if there is no Primary Balance for the element which is to be archived or when the Primary Balance exists but the required defined balance does not exist for the Primary Balance.
You must associate all Primary Balances with the following Balance Dimensions to run Payroll Archiver if you want to archive YTD for Elements.
If Tax Unit is enabled for your legislation - the following dimensions are applicable - Assignment Run (ASG_RUN), Payments (_PAYMENTS), Assignment Within Tax Unit Tax Year To Date (_ASG_TU_TYTD) If Tax Unit is not enabled for your legislation - the following dimensions are applicable - Assignment Run (_ASG_RUN), Payments (_PAYMENTS, Assignment Tax Year To Date (_ASG_TYTD)
Further Element Information DFF
Primary Balance for the element is used in the Payroll Archiver to archive Current and YTD values if Archive YTD for Elements flag is set to Yes. You can create more than one primary balance for a given element. The Primary balance name can be different from the base element name. You can map the primary balance name with the base element using the Further Element Information DFF.
The Further Element Information DFF is enabled for all the classifications of the type Earnings and Deductions.
For all classifications of Earnings type :
-
Primary Balance
-
Hours Balance
The Hours Balance segment is specific to Hours * Rate elements and you must leave it t blank if the element does not require the Hours values to be archived.
For all the classifications of Deduction type:
-
Primary Balance
If you create new element using the Element Design Wizard, then the Further Element Information DFF is populated with the required Primary balance.
Generic Upgrade Mechanism
If you create the elements using the Element Design Wizard Elements, then those elements do not have Element Information Category column populated. You can use the Generic Upgrade Mechanism to populate update the Element Information Category with the required value (<leg_code>_<element_classification_name> ) for all the elements under abusiness group. You must run the Generic Upgrade Mechanism process with the parameter International Payroll: Upgrade Element Information Category for all the business groups you want to upgrade.
Enabling Currencies
Oracle HRMS enables you to use multiple currencies for entering information about employee compensation and benefits. You can also record your payment methods to employees in different currencies.
For example, if you have employees living and working temporarily in other countries, you might want to record specific earnings or deductions for these employees in local currencies. You might also want to pay these employees a fixed amount into a bank account in their home currency. The remainder you would pay in a local currency.
Your startup data includes the definitions of all world currencies. These definitions are shared by all Oracle Applications and are controlled by the system administrator responsibility. You enable those currencies you want to use in the Currencies window.
Note: You must enable at least one currency as the default currency for all information related to money in your system. This default is known as your Business Group currency.
To enable a currency
-
Query the currency you want to enable and check the Enabled check box. Save your choice to enable the currency.
You can never delete a currency, but you can disable it.
To disable a currency
-
Uncheck Enabled, or enter an End Date for the currency.
Running the International HRMS Setup Process
Use the International HRMS Setup process to apply a standard set of data when you are installing a legislation that is not currently supported. You do this after you have:
-
Installed HRMS.
-
Applied the latest patch.
-
Run hrglobal.
-
Applied the latest translation patch
You run the International HRMS Setup process from the Submit Requests window.
To run the International HRMS setup process
-
Enter your legislation. You can only do this for a legislation that is not currently supported.
-
Enter the currency for your legislation.
-
Enter the Tax Year Start Date.
-
Decide whether you want to use tax units.
-
Choose OK, and then submit your process.
This creates a legislation with the name, default currency, and tax year details that you specify. When you have completed these setup steps you can then add specific data for your legislation.
Setting up International HRMS Setup for Tax Unit
The tax unit determines whether the legislation will provide a mandatory tax unit segment in the Assignment Statutory Information flexfield. If the tax unit is to be supported then additional balance dimensions will be delivered so that balance values can be retrieved for particular tax units. The default is not to enable the Tax Unit.
To set up International HRMS Setup for Tax Unit
-
If you have already set the Tax unit to Yes then you cannot change it to No as it leads to data inconsistency with respect run balances. If the Tax Unit parameter is initially set to No then you can change to Yes, provided there are no payroll processes existing for the legislation which they are running the International HRMS setup.
Setting up Payroll Archiver (International Payroll) Process
Before you run the Payroll Archiver Process, ensure that the following steps are run:
-
Run the International HRMS Setup concurrent program.
-
Run the Generic Upgrade Mechanism concurrent process by selecting the parameter - International Payroll: Upgrade Element Information Category. Run this process for each business group.
-
Set the Archive YTD for Elements in the Reporting Preferences window at the Business Group level. This step decides whether the International Payroll Legislation requires to archive YTD Amounts of the Elements.
If you set to Yes, then the Payroll Archiver archives YTD values along with current values.
If you set to No then the Payroll Archiver archives current values of the Elements only.
Important: Steps 4 and 5 only applicable if the Flag is set to Yes.
-
Add the Primary Balances for all existing active elements in the Further Element Information DFF of the Element Description window.
-
Review and add the Defined Balances if these are not present already.
If the Tax Unit is enabled for your localization, then select the following dimensions - Assignment Run (ASG_RUN), Payments (_PAYMENTS), Assignment Within Tax Unit Tax Year To Date (_ASG_TU_TYTD)
If Tax Unit is not enabled for your localization, then select the following dimensions - Assignment Run (_ASG_RUN) . Payments (_PAYMENTS), Assignment Tax Year To Date (_ASG_TYTD).
If the element is created through Element Design, then the Step 4 and 5 are not applicable as the wizard automatically creates. Step 4 and 5 are applicable for the Elements which are created using the Element Description window.
-
Run the Payroll and Prepayment processes.
-
Run the Payroll Archiver (International Payroll) process.
Running the Payroll Archiver (International Payroll) Process
You run the Payroll Archive (International Payroll) Process to create a snapshot of information based on existing pre-payment actions which is then used as a data source for post payroll processes such as online payslip.
You run this process from the Submit Request window.
To run the Payroll Archiver (International Payroll) Process
-
Select Payroll Archive (International Payroll ) in the Name field.
-
If the parameters window does not open automatically, click in the Parameters field to open it.
-
Enter a start date and end date. Oracle Payroll archives information for payroll runs that have a check date between the user entered start and end dates.
-
Select the Payroll or Consolidation Set that you want to archive data for. If you select a payroll, the Consolidation Set automatically defaults.
-
Select OK, and then Submit.
-
After running the Payroll Archive, use the Payroll Actions Not Processed report to see any employees (and corresponding payroll processes) that were not archived but are within the report's parameters.
Entering Reporting Preferences Information
You enter the preferences to define whether you want to archive and display the year-to-date (YTD) values of elements for the Payroll Archive process or if you want to add custom information for the Direct Deposit process in the Reporting Preferences window. You record this information at the business group level.
To enter the Reporting Preferences Information
-
In the Organization window, query the Business Group or HR Organization if it does not already appear there.
-
In the Organization Classifications region, select Business Group or HR Organization, choose Others, and select Reporting Preferences.
-
Click in a field of the Additional Organization Information window to open the Reporting Preference window.
-
Select whether you want to archive the year to date (YTD) values for the payroll archive process.
-
Select Yes to archive the YTD values along with current values.
-
Select No to archive the current values of the elements only.
-
-
If you want to append custom data to the generated XML, then you must create the custom package and procedure and select it in the Direct Deposit XML Code field <package_name><procedure_name>
You can create the custom code as follows::
<package_name>.<procedure_name>
(p_action_id IN NUMBER,
p_document_type IN VARCHAR2,
p_node IN VARCHAR2)
The application invokes the custom procedure at the Payroll action level and at the Assignment action level so that the custom XML can be appended at required levels.
Payroll Action Level:
When the procedure is invoked at the Payroll Action level, then the parameter P_ACTION_ID includes the Payroll Action ID of Direct Deposit process and the application passes the parameter P_NODE as DEPOSIT_HEADER.
The tags generated are placed under the DEPOSIT_HEADER XML tag using the procedure
pay_payroll_xml_extract_pkg.load_xml('D','CONSOLIDATION_SET','IP CONSOLIDATION SET');The procedure includes the consolidation set under the DEPOSIT_HEADER XML tag as follows:
<DEPOSIT_HEADER>
<CONSOLIDATION_SET>IP CONSOLIDATION SET</CONSOLIDATION_SET>
</DEPOSIT_HEADER>
When you specify the parameter P_NODE as NULL, the Payroll Action ID is passed in the P_ACTION_ID parameter to retrieve the necessary details.
You can add your own XML tag as follows:
pay_payroll_xml_extract_pkg.load_xml('CS','DEPOSIT_HEADER_EXTRA','');
pay_payroll_xml_extract_pkg.load_xml('D','PAYMENT_EXTRA_INFO','SALARY PAYMENT');
pay_payroll_xml_extract_pkg.load_xml('CE','DEPOSIT_HEADER_EXTRA','');
The procedure will add the data under DEPOSIT_HEADER XML tag as follows:
<DEPOSIT_HEADER>
<DEPOSIT_HEADER_EXTRA>
<PAYMENT_EXTRA_INFO>SALARY PAYMENT</PAYMENT_EXTRA_INFO>
</DEPOSIT_HEADER_EXTRA>
</DEPOSIT_HEADER>
Assignment Action Level:
When the procedure is invoked at the Assignment Action level, then the parameter P_ACTION_ID includes the Assignment Action ID of Direct Deposit process and the application passes the parameter P_NODE as DEPOSIT_DETAILS. The tags generated are placed under DEPOSIT_DETAILS XML tag as follows:
pay_payroll_xml_extract_pkg.load_xml('D','PAY_BASIS','MONTHLY');The procedure adds the data under DEPOSIT_DETAILS XML tag:
<DEPOSIT_DETAILS>
<PAY_BASIS>MONTHLY</PAY_BASIS>
</DEPOSIT_DETAILS>
When you specify the parameter P_NODE as NULL, you can add the XML tags and details as follows:
pay_payroll_xml_extract_pkg.load_xml('CS','DEPOSIT_DETAILS_EXTRA','');
pay_payroll_xml_extract_pkg.load_xml('D','MANUAL_PAYMENT_INFO','1000.00');
pay_payroll_xml_extract_pkg.load_xml('CE','DEPOSIT_DETAILS_EXTRA','');
The procedure adds the data under the DEPOSIT_HEADER XML tag as follows:
<DEPOSIT_DETAILS>
<DEPOSIT_DETAILS_EXTRA>
<MANUAL_PAYMENT_INFO>1000.00</MANUAL_PAYMENT_INFO>
</DEPOSIT_DETAILS_EXTRA>
</DEPOSIT_DETAILS>
-
Save your work.
Setting Up Direct Deposit (International Payroll)
-
You record your organization payment details such as source bank name, account number, and account type and the date to make a direct deposit.
See : Organization Payment Method window
-
Record the employee personal, payment information, and additional information such as the employer name.
See : Entering Employee Information
-
If you want to append your own data to the XML file, create a package with the information you want to record and generate the XML. The custom code must be created in the following format:
<package_name>.<procedure_name>
(p_action_id IN NUMBER,
p_document_type IN VARCHAR2,
p_node IN VARCHAR2)
-
Run the prepayment process.
See: Running the PrePayments process
-
Run the Direct Deposit (International Payroll) process to generate the XML data.
See: Running the Direct Deposit Process (International Payroll) Process
-
Run the XML Report Publisher to merge the generate XML data file with an appropriate predefined template to generate a magnetic eText file.
See: Running the XML Report Publisher
Running the Direct Deposit (International Payroll) Process
Run the Direct Deposit (International Payroll) process to generate a PDF format of the employer and employee details and their payment information.
Note: The process of Direct Deposit is based on Pre-payments and it is not necessary to run Payroll Archiver Process.
You run the Direct Deposit (International Payroll) Process from the Submit Request window.
To run the Direct Deposit (International Payroll) Process
-
In the Name field, select Direct Deposit (International Payroll).
-
Select the name of the payroll or consolidation set. When you select a payroll name, the default consolidation set displays.
-
Select the start date and the end dates for the process.
-
Select the payment type and the method to make payments.
-
Optionally, enter an override deposit date, if the date of the deposit differs from the date of the payroll run.
-
Click OK and Submit.
Running the XML Report Publisher
You can produce a magnetic file using the XML data generated from the Direct Deposit process and a template using the XML Report Publisher process. Oracle provides a predefined template that can be used as a reference to create custom template.
You run the XML Report Publisher from the Submit Request window.
To run the XML Report Publisher
-
To run the XML Report Publisher process:
-
Select the request set.
-
Select the template application.
-
Select the template to merge the template with the generated XML data.
-
Specify the language.
-
Specify the format to generate the output.
-
Click OK and Submit.
Setting up Self Preference information (International Payroll)
To produce a PDF format of the Online Payslip for International Payroll users, you must set up the following information in Self Preference Information window at the business group level.
To set up Self Preference Information for Online Payslip
-
In the Organization window, query the Business Group or HR Organization if it does not already appear there.
-
Click in a field of the Additional Organization Information window to open the Self Service Preference window.
-
Select the document type to define preferences.
-
Select whether you want the document to be available online.
-
For online payslips if you are providing payslips in PDF format, specify:
-
The payslip template you wish to use.
-
If you wish to append custom data to the generated XML, specify the custom package/procedure in the XML Code field as follows:<custom_package><custom_procedure>
Note: Template and XML Code in Self-Service Preference can be configured at the Business Group, HR Organization and Location levels.
If both the fields are left blank, the application ends in error.
-
-
If you want to display the payslip with archived YTD or without YTD values, select the appropriate template.
-
If you want to display the TaxUnit (GRE) address as employer address, then specify GRE as the mode for the legislation rule CHOOSE PAYSLIP as given below.
Field Name CHOOSE_PAYSLIP Legislation Code <Legislation Code> Validation Name ITEM_PROPERTY Validation Type DISPLAY Target Location PAY_PAYSLIP Rule Type PAYSLIP_EMPLYR_ADDR Rule Mode GRE -
Save your work.
Using the Person Name Format Function
The person name format function enables you to specify how a person's name is returned in custom applications or reports etc. You use tokens to specify the format in which you want to see the name. You can call the function in various ways, including PL/SQL, SQL etc.
Note: This function cannot be used to format how names are displayed in windows in the application.
The tokens that you can use are as follows:
-
$FI - First Name
-
$MI - Middle Name
-
$LA - Last Name
-
$PR - Prefix
-
$SU - Suffix
-
$TI - Title
-
$FU - Full Name
-
$KN - Known As
-
$IF - Initial First
-
$IM - Initial Middle
A series of tokens are passed into the routine and the formatted name is returned.
If the date being passed to the routine is null then the system date is used. Likewise if the format being passed is null then the full_name is returned. If the person_id used is not valid, then an error is raised.
SQL Example 1
You can use a profile to define the name format you required. This ensures that all your reports or customizations to retrieve the name uniformly. If you then decide to change the profile value, the change is reflected everywhere you use the profile value as one of the parameters.
If you create a new profile called XX_NAME and assign the value $FI.$LA to it, you can use the following SQL to retrieve the name of person with the ID 972:
SQL> select hr_person_name.get_person_name(972,null,fnd_profile.value('XX_NAME')) from dual;
This returns the name in the format: Antonio.Bortoliero
SQL Example 2
The following example shows how to use the new function to retrieve the same person's name as of two days before the current system date:
SQL> select hr_person_name.get_person_name(972,sysdate-2,'$FI.$MI.$TI') name from dual;
This returns the name in the format: Antonio.D.Doctor
PL/SQL Example
The following shows a simple PLSQL use of the function:
declare
   l_name varchar2(2000);
begin
   l_name := hr_person_name.get_person_name
                     (p_person_id        => 972,
                      p_date             => trunc(sysdate),
                      p_format           => '$FI.$LA');
end;
In this example l_name would contain the name in the format 'Antonio.Bortoliero'.
Configuring SOE Information
Follow the steps given below to view the Statement of Earnings when you are using International HRMS:
-
Create a user category
Using the Other Definitions > Application Utilities Lookup window, you can specify a lookup code for the lookup type SOE_USER_CATEGORY.
-
Set the System Profile option
You can set a value to the user category created in step 1 using the System Profile option. Specify the profile name as PAY: Statement of Earnings User Category.
-
Enter the SOE Information.
Navigate to your Business Group and click Others. In the Additional Organization Information window, select SOE Information.
Select the user category that you entered PAY: Statement of Earnings User Category.
-
Select the Elements
In the SOE Information EIT, select the values for Element1 and Element2 from the element set of the type - Customization Set. The element sets hold Earnings and Deductions elements.
Note: The Element1 should have the Earnings element set and Element2 should have the Deductions element set.
Attach the element sets to Element 1 and Element 2.
-
The Information Region - Information1 segment of the SOE displays the elements of the element set Element1.
-
Enter the Balances and Balance Dimensions
In the SOE Information EIT, enter a value for Balance1. The list of values for the field Balance1 displays the predefined Balance Attribute - ONLINE_SOE_BALANCE_ATTRIBUTES belonging to International HR/Payroll .
You must set ONLINE_SOE_BALANCE_ATTRIBUTES as the attribute to the balance and link to the Balance Dimension combination for viewing on the SOE.
Navigate to the Balance Definition window for the balance that you want to display on the SOE. Click Dimensions and select Payments dimension to open attribute field. Select the seeded attribute ONLINE_SOE_BALANCE_ATTRIBUTES. In the field Dimensions, choose the dimension that you have selected previously.
-
Overriding the Predefined Name of the Elements and Balances
You can override the display name of the elements and balances in the SOE using the SOE Detail Information EIT.
-
Restart the Listener and Apache Server
After you complete this setup, restart the self-service listener and Apache server. You must ensure to clear your cache prior to viewing the SOE.
Please refer to the Clear Cache Server and Bounce Apache Server, note id 285484.1 for more information.
Enabling Run Balances
You can use run balances to optimize the performance while retrieving the non-latest balances. By storing run balances, users can sum the contributing rows to return other dimensions - YTD and QTD balances.
Follow the steps given below to enable Run Balances functionality for International Payroll.
To enable Run Balances for International Payroll
-
Run International HRMS setup process.
-
Run the Generic Upgrade Mechanism International Payroll: Update Primary Defined Balances Run Balance Flag if you want to enable existing primary balances to be saved as run balances.
-
To enable existing balances other than primary balances to be saved as run balances:
-
Query the balance
-
Attach Balance Category
-
Attach the following dimension to the balance:
-
Assignment Run, if legislation is installed without Tax Unit
-
Assignment Within Tax Unit Run, if legislation is installed with Tax Unit.
Note: If the above dimensions exist for a balance, then delete the dimension and recreate it.
-
-
Run the Generate Run Balances process to generate the balances.
-
-
If there are any user created balances, then:
-
Attach Balance Category while creating the balance.
-
Attach dimension Assignment within Tax Unit Run if legislation is installed with Tax Unit, otherwise attach dimension Assignment Run if legislation is installed with no Tax Unit.
-
-
Run the Run Balance Architecture Diagnostic Report to verify if there are any invalid balances. If there are any invalid balances, then run Generate Run Balances.
Setting up Cash Management Integration for EFT Payroll Payments
For setup steps to integrate Cash Management with Oracle Payroll, see:Setting Up Oracle Payroll for Oracle Cash Management Integration, Cash Management User Guide.
Follow the additional steps to reconcile EFT payments if you have installed the International HR and Payroll legislation.
-
Run the Enable EFT Payment Reconciliation (International Payroll) process by selecting the parameter Payment Type for which the reconciliation has to be enabled.
Add the unique identifier information in the extensible lookup PAYMENT_TRX_CONC_IDENTS.
-
Code : <Payment Type Name>
Meaning: Identifier List delimited by comma. (for example: Company Name, Company Bank Account Number, Payment Date)
Enabled: Y
-
-
As structure of the bank file and the information to be reconciled varies depending on the legislation you have installed there is a provision to write your own function to return the unique identifiers values for reconciling.
Create your own reconciliation function with the following as input parameters. The return value of this function must be of varchar2 type.
-
p_effective_date DATE
-
p_identifier_name VARCHAR2
-
p_payroll_action_id NUMBER
-
p_payment_type_id NUMBER
-
p_org_payment_method_id NUMBER
-
p_personal_payment_method_id NUMBER
-
p_assignment_action_id NUMBER
-
p_pre_payment_id NUMBER
-
p_delimiter_string VARCHAR2
The following sample code provides an outline on how to write the function:
FUNCTION function_name (p_effective_date IN DATE,
p_identifier_name IN VARCHAR2,
p_payroll_action_id IN NUMBER,
p_payment_type_id IN NUMBER,
p_org_payment_method_id IN NUMBER,
p_personal_payment_method_id IN NUMBER,
p_assignment_action_id IN NUMBER,
p_pre_payment_id IN NUMBER,
p_delimiter_string IN VARCHAR2)
RETURN VARCHAR2
IS
lv_value VARCHAR2(25):= NULL;
BEGIN
IF UPPER(p_identifier_name) = 'TRANSACTION_DATE'
THEN
/*
a) Write the code to fetch the Transaction Date.
b) Return the Transaction Date in the yyyy/mm/dd
format.
Example: lv_value := to_char(p_transaction_date,'YYYY/MM/DD');
*/
ELSIF UPPER (p_identifier_name) = 'TRANSACTION_GROUP'
THEN
/*
Return a unique number that identifies the Payroll
Batch for EFT Payments
Example: lv_value := to_char(p_payroll_action_id);
*/
ELSIF UPPER (p_identifier_name) = 'CONCATENATED_IDENTIFIERS'
THEN
/*
-
-
Write the code to get user specific unique identifiers which are defined at the lookup PAYMENT_TRX_CONC_IDENTS.
-
Return the unique identifiers concatenated with delimiter string. For example:
lv_value := l_acc_num||p_delimiter_string||l_bat_desc;
*/
END IF;
RETURN lv_value;
END;
-
Use the HRMS Manager responsibility to query for the Payment Method which is used with the payment type specified in Step 1.
Navigate to the Further Payment Method Info:
Payroll > Payment Methods > Others
Specify the new user-defined reconciliation function name in the Reconciliation Function field. The function name specified must be a qualified name of the function.
<package_name>.<function_name>
Running the Payroll Register Report (International Payroll)
The Payroll Register report (International Payroll) is a consolidated report in a PDF format of all or selected payroll runs within a specified payroll period. Use the Payroll Register report to get a consolidated overview of different payroll components such as earnings, deductions, tax balances, and net pay for all employees in a GRE. This report helps in identifying the discrepancy in earnings or deductions in the payroll run.
You run the report from the Submit Request window.
To run the Payroll Register Report (International Payroll)
-
In the Name field, select Payroll Register Report (International Payroll). The Parameters window opens.
-
Enter the start date of the period for which the report is run. This is a mandatory field.
-
You can generate the report based on the following parameters:
-
Payroll
-
Consolidation set
-
GRE
-
Consolidation Set
-
Assignment set
-
-
Select the balance dimensions that you want to include in the report.
-
If you select Current, then the current element level balance values will be reported.
-
If you select Current & YTD, then the current run level and year to date level balances will be reported. This option is enabled only when you set up the Archive YTD Values option as Yes at business group level (Business Group > Others > Reporting Preference).
-
-
Select employee name or payroll to sort the report.
-
Click OK and then Submit.
Creating Directory Objects in Oracle Database 19c
If you are on Oracle Database 19c and use the PER_DATA_EXCHANGE_DIR profile option for location while accessing the UTL_FILE.fopen() function, then the following steps are recommended:
To create directory objects in Oracle Database 19c
-
Create directory objects as SYS user:
SQL> create or replace directory PER_DATA_EXCHANGE_DIR as '<Directory provided by user';
SQL> grant read,write on directory PER_DATA_EXCHANGE_DIR to APPS;
-
Assign profile option value:
Enter the PER_DATA_EXCHANGE_DIR directory object name as the PER_DATA_EXCHANGE_DIR profile option value.