Oracle Order Management Information Discovery Plus
This chapter covers the following topics:
- Overview
- Open Orders Page
- Closed Orders Page
- Returns Page
- Customer Explorer Page
- Setting Up Oracle Order Management Information Discovery Plus
- Setup and Configuration Steps
- Access Control: Hide and Show EID Dashboards (User Interfaces) for Oracle Order Management Information Discovery Plus
- Scheduling Setup for Endeca Refresh
- Profile Options for Oracle Order Management Information Discovery Plus
- Post Installation Steps for Oracle Order Management Information Discovery Plus
- Views and Joins for Oracle Order Management Information Discovery Plus
- Menus for Oracle Order Management Information Discovery Plus
- Customer Explorer Product Configuration
- Setting up Customer Explorer
- Profiles in Customer Explorer
- Roles in Customer Explorer
- Grants in Customer Explorer
- Permission Sets in Customer Explorer
- Running the Full Load Graph
- Setting Up the Scheduler for Incremental Refresh
- Customizing Data Loads
Overview
The Oracle Order Management application is an order-to-cash solution that provides capabilities for customers, partners, and employees to select the right products and services, negotiate best prices, and ensure timely and accurate order fulfillment. Delays in order fulfillment impacts organization overhead, customer satisfaction, and revenue.
Oracle Order Management Information Discovery Plus enables you to search and filter Open Orders, Closed Orders, and Returns information on a wide range of search criteria. You can view and analyze order information and order fulfillment delays using Key Performance Indicators (KPIs), performance evaluation metrics, charts, graphs, and tables. Based on this data, organizations can take corrective action to streamline the order fulfillment process, meet periodic sales targets by prioritizing high value orders, and fix revenue leakage caused by RMAs.
This chapter provides product-specific details required to integrate Endeca Information Discovery (EID) with Oracle E-Business Suite (EBS) Release 12.2 V8 for the Oracle Order Management application. This supplements the information provided in Installing Oracle E-Business Suite Information Discovery, Release 12.2 V8 (Doc ID: 2214431.1). You must read this document and make note of the requirements before you begin your installation.
Oracle Order Management Information Discovery Plus User Interfaces
Open Orders Page
The Endeca Open Orders page displays dashboard metrics related to fulfillment delays on open sales order lines which are at various stages of the order-to-cash cycle, but not yet closed. The page displays information and data graphically and in tabular format. The following graphic displays a view of the Endeca Open Orders page.
From the Order Information Super User responsibility, navigate to the Open Orders page:
(N) Order Information > Information Discovery > Open Orders
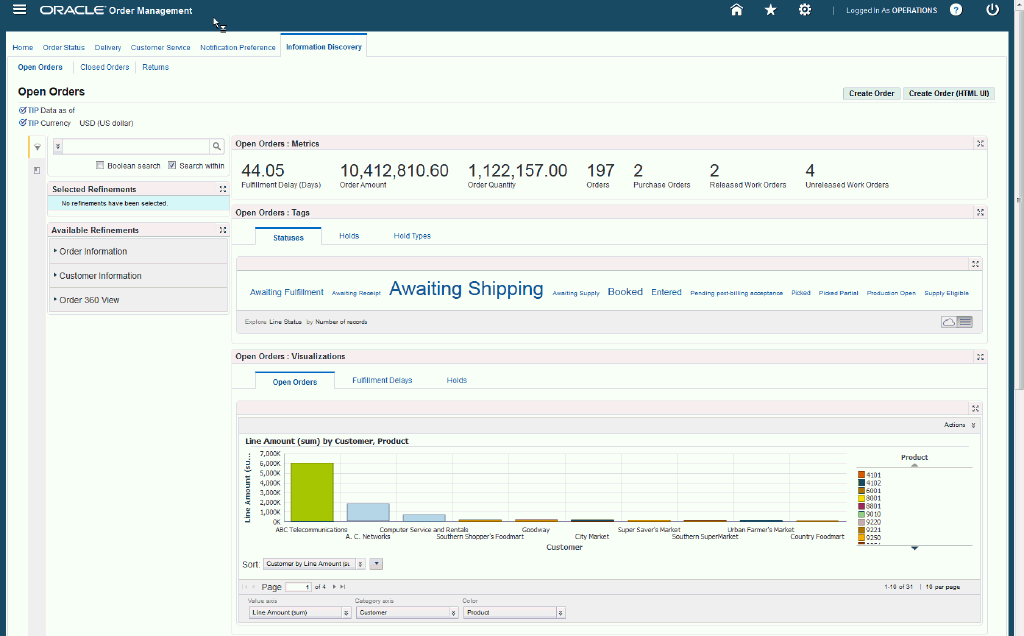
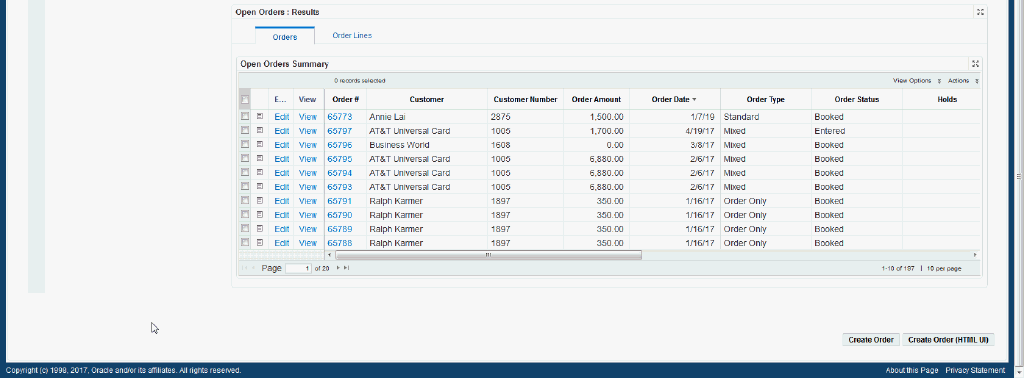
When you open the Endeca Open Orders page under the Information Discovery tab, you can search and filter order fulfillment delay information. You can analyze the data and review open order and production metrics, charts, graphs, and tables. You can click the Create Order button in the top right-hand region of the Open Orders page to launch the Sales Order form and enter new sales order details. In addition, you can click the Create Order HTML UI button to open the HTML user interface for Order creation.
The following table describes the Endeca Open Orders page regions and components:
| Region | Components |
|---|---|
Advanced Search
|
The Advanced Search component includes value search, record search, Boolean search, and partial search capabilities. You can submit keyword searches and the application provides type-ahead suggestions and displays attribute values that match the typed text. When you perform a search, the search term is added to the Selected Refinements component. As you type, you may be prompted to select a matching attribute value, or simply search for the entered text.
Additional Information: See the Advanced Search Capabilities appendix in this guide for details. |
| Selected Refinements | The Selected Refinements component displays all values that you have selected to filter data, and allows you to quickly make adjustments to the current refinement by removing items or clearing all filters from the list. |
| Bookmarks | The Bookmarks component allows you to save a given navigation and component state and return to it at a later time. |
| Available Refinements | The Available Refinements component allows you to filter data based on the currently available values or value ranges for selected attributes that are displayed within attribute groups. Expand the following attribute groups to view and select attribute names:
|
| Open Orders: Metrics (summarization bar) |
|
| Open Orders: Tags (tabbed component container) Statuses (tab) |
Statuses Tag Cloud Component
Note: The Statuses Tag Cloud Component displays the top ten open order line status values for open orders. Status values in this component are highlighted in progressively bolder and larger font based on the frequency of occurrence. |
| Open Orders: Tags (tabbed component container) Holds (tab) |
Holds Tag Cloud Component
Note: The Open Order Holds Tag Cloud Component displays the top ten hold reasons corresponding to both open orders and lines. Hold reasons in this component are highlighted in progressively bolder and larger font based on the frequency of occurrence. |
| Open Orders: Tags (tabbed component container) Hold Types (tab) |
Hold Type Cloud Component
Note: The Hold Type Tag Cloud Component displays the top ten hold types corresponding to both open orders and lines. Hold types in this component are highlighted in progressively bolder and larger font based on the frequency of occurrence. |
| Open Orders: Visualizations (tabbed component container) Open Orders (tab) |
Order Amount by Customer, Product (chart)
|
| Open Orders: Visualizations (tabbed component container) Fulfillment Delays (tab) |
Order Amount by Fulfillment Delay, Customer (chart)
|
| Open Orders: Visualizations (tabbed component container) Holds (tab) |
Order Amount by Holds, Customer (chart)
|
| Open Orders: Results (tabbed component container) Orders (tab) |
Open Orders Summary (results table)
|
| Open Orders: Results (tabbed component container) Order Lines (tab) |
Open Orders: Results (results table)
|
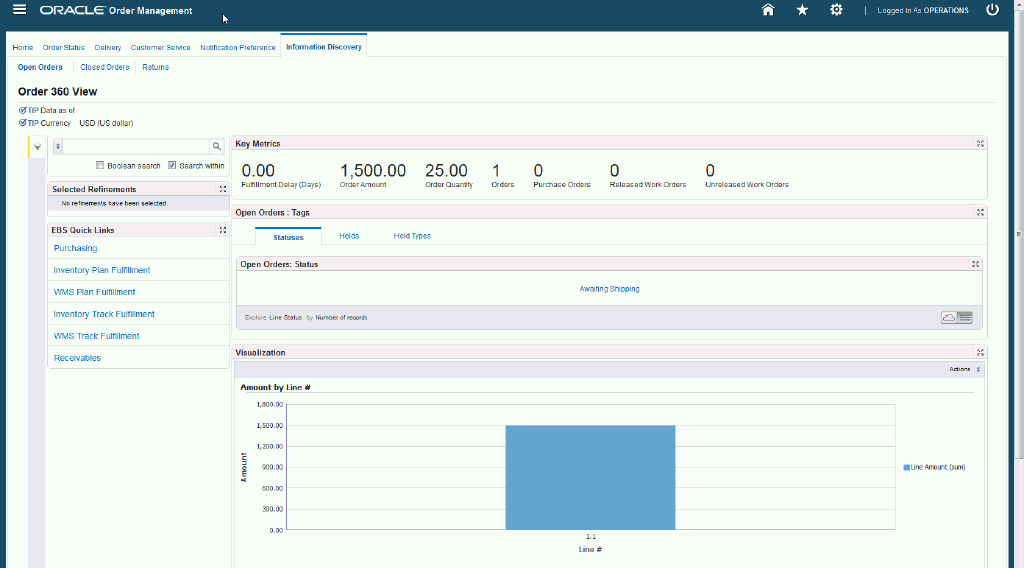
When you select the Order 360 View from the Actions link in the Open Orders: Results table, the Order 360 View page appears and displays Order Management data similar to that of the Open Orders page. This page also contains quicklinks components that point to other EID product pages. Click the quick links to navigate to other EID product pages. The following is a display of the Order 360 View page.

Closed Orders Page
The Endeca Closed Orders page displays dashboard metrics related to fulfillment delays on closed sales order lines. The page displays information and data graphically and in tabular format. The following graphic displays a view of the Endeca Closed Orders page.
From the Order Information Super User responsibility, navigate to the Closed Orders page:
(N) Order Information > Information Discovery > Closed Orders
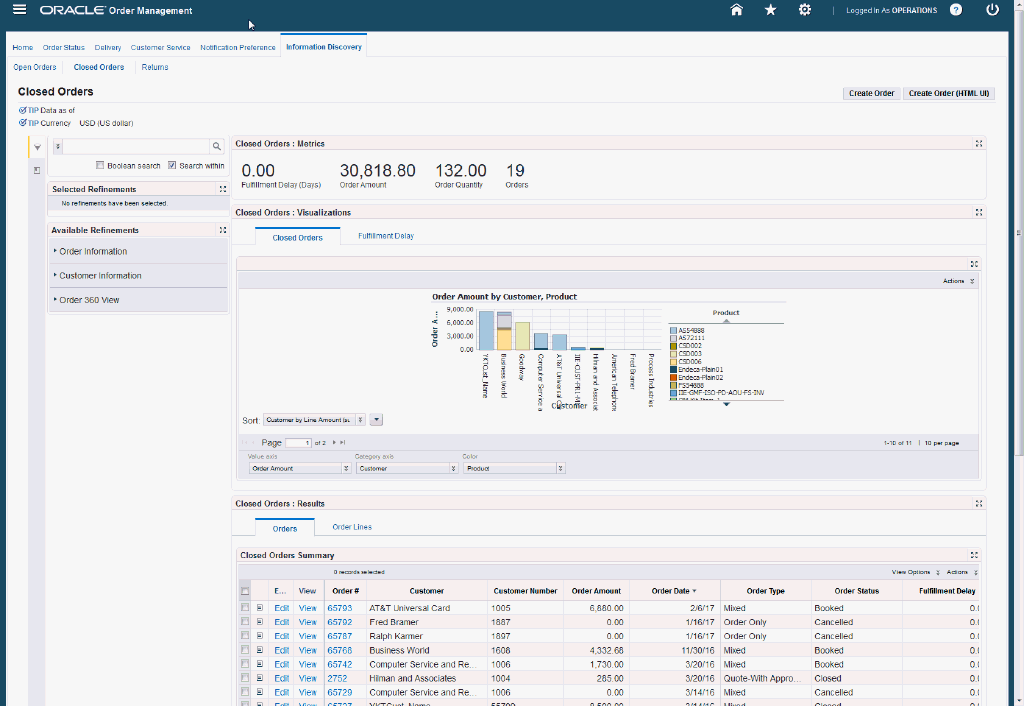
When you open the Endeca Closed Orders page under Information Discovery, you can search and filter order fulfillment delay information. You can analyze the data and review closed order line and production metrics, charts, graphs, and tables. You can also click the Create Order button in the top right-hand region of the Open Orders page to launch the Sales Order form and enter new sales order details.
The following table describes the Endeca Closed Orders page regions and components:
| Region | Components |
|---|---|
Advanced Search
|
The Advanced Search component includes value search, record search, Boolean search, and partial search capabilities. You can submit keyword searches and the application provides type-ahead suggestions and displays attribute values that match the typed text. When you perform a search, the search term is added to the Selected Refinements component. As you type, you may be prompted to select a matching attribute value, or simply search for the entered text.
Additional Information: See the Advanced Search Capabilities appendix in this guide for details. |
| Selected Refinements | The Selected Refinements component displays all values that you have selected to filter data, and allows you to quickly make adjustments to the current refinement by removing items or clearing all filters from the list. |
| Bookmarks | The Bookmarks component allows you to save a given navigation and component state and return to it at a later time. |
| Available Refinements | You can use the Available Refinements component to filter data using attribute groups. Expand the following attribute groups to view and select attribute names:
|
| Closed Orders: Metrics (summarization bar) |
|
| Closed Orders: Visualizations (tabbed component container) Closed Orders (tab) |
Order Amount by Customer, Product (chart)
|
| Closed Orders: Visualizations (tabbed component container) Fulfillment Delay (tab) |
Order Amount by Fulfillment Delay, Customer (chart)
|
| Closed Orders: Results (tabbed component container) Orders (tab) |
Closed Orders Summary (results table)
|
| Closed Orders: Results (tabbed component container) Order Lines (tab) |
Closed Order Lines: Results (results table)
|
Returns Page
The Endeca Returns page displays dashboard metrics related to order returns and reasons. Only fulfilled return lines and their parent returns are considered. The page displays information and data graphically and in tabular format. The following graphic displays a view of the Endeca Returns page.
From the Order Information Super User responsibility, navigate to the Returns page:
(N) Order Information > Information Discovery > Returns
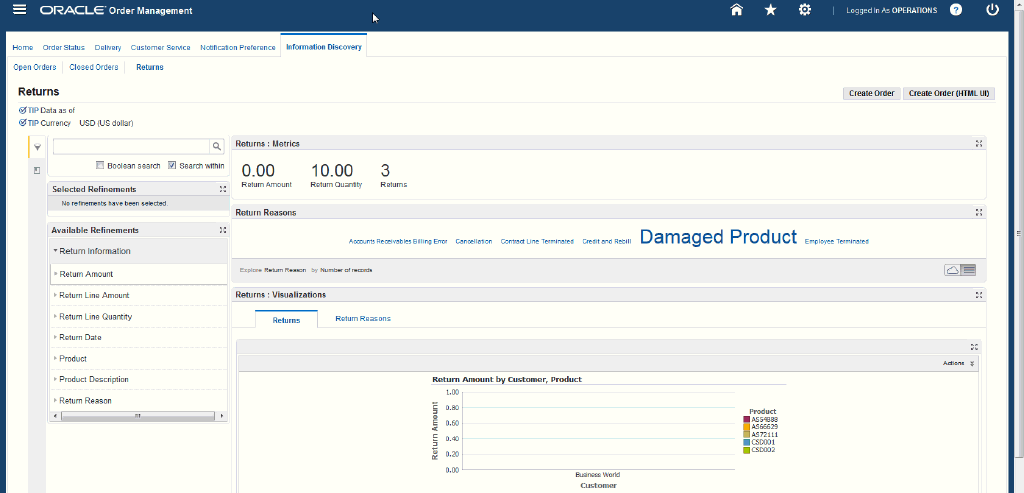
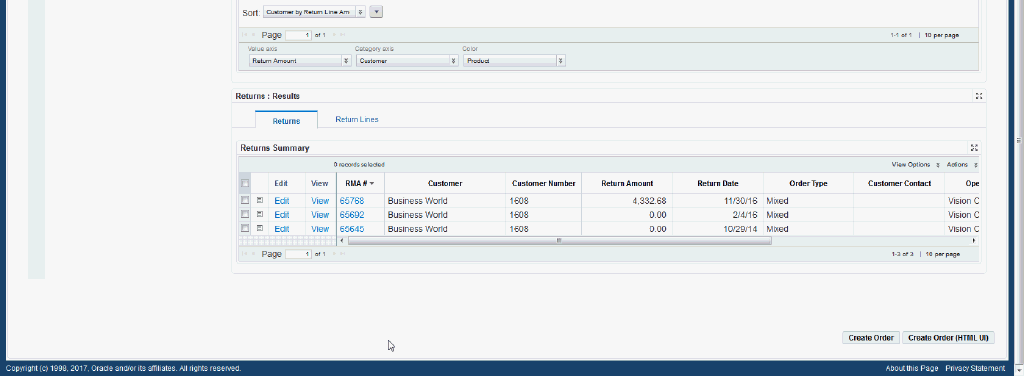
When you open the Endeca Returns page under the Information Discovery tab, you can search and filter various reasons that cause order returns. You can analyze the data and review returned orders and production metrics, charts, graphs, and tables. You can also click the Create Order button in the top right-hand region of the Open Orders page to launch the Sales Order form and enter new sales order details.
The following table describes the Endeca Returns page regions and components:
| Region | Components |
|---|---|
Advanced Search
|
The Advanced Search component includes value search, record search, Boolean search, and partial search capabilities. You can submit keyword searches and the application provides type-ahead suggestions and displays attribute values that match the typed text. When you perform a search, the search term is added to the Selected Refinements component. As you type, you may be prompted to select a matching attribute value, or simply search for the entered text.
Additional Information: See the Advanced Search Capabilities appendix in this guide for details. |
| Selected Refinements | The Selected Refinements component displays all values that you have selected to filter data, and allows you to quickly make adjustments to the current refinement by removing items or clearing all filters from the list. |
| Bookmarks | The Bookmarks component allows you to save a given navigation and component state and return to it at a later time. |
| Available Refinements | The Available Refinements component allows you to filter data based on the currently available values or value ranges for selected attributes that are displayed within attribute groups. Expand the following attribute groups to view and select attribute names:
|
| Returns: Metrics (summarization bar) |
|
| Returns: Reasons (tag cloud component) | Top Ten Return Reasons Tag Cloud Component
Note: The Returns: Reasons tag cloud component displays the top ten return reasons by frequency of occurrence. Return reasons in this component are highlighted in progressively bolder and larger font based on the frequency of occurrence. |
| Returns: Visualizations (tabbed component container) Returns (tab) |
Return Amount by Customer, Product (chart)
|
| Returns: Visualizations (tabbed component container) Return Reasons (tab) |
Return Amount by Return Reason, Customer (chart)
|
| Returns: Results (tabbed component container) Returns (tab) |
Returns Summary (results table)
|
| Returns: Results (tabbed component container) Return Lines (tab) |
Returns: Results (results table)
|
Customer Explorer Page
The Customer Explorer page enables you to search and filter data for customer parties using party, account, address and contact point attributes. You can view useful transactional metrics related to Open Claims, Closed Claims, Budgets, Sales Orders, Return Orders, Service Requests, Quotes, and Installed Base for a customer party. You can also drill into the related Information Discovery pages to view and update transactions. Within the Customer Explorer page, you can also access the Order 360 View to open the Transaction Summary window and view transaction metrics for selected parties.
The following graphic displays a partial view of the Customer Explorer page.
From the Order Information Super User responsibility, navigate to the Customer Explorer page:
(N) Order Information > Information Discovery > Customer Explorer
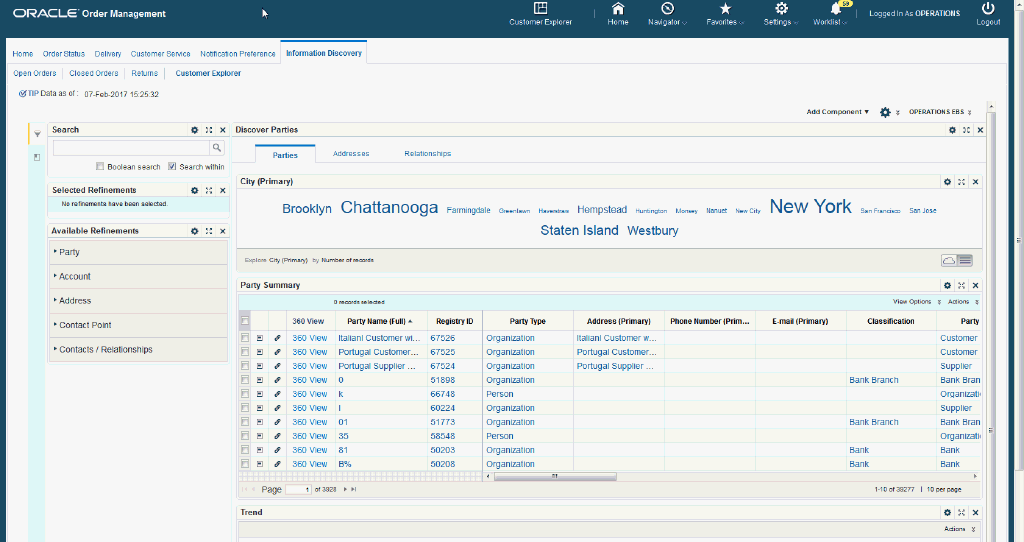

The following table describes the Customer Explorer page regions and components:
| Region | Components |
|---|---|
Advanced Search
|
The Advanced Search component includes value search, record search, Boolean search, and partial search capabilities. You can submit keyword searches and the application provides type-ahead suggestions and displays attribute values that match the typed text. When you perform a search, the search term is added to the Selected Refinements component. As you type, you may be prompted to select a matching attribute value, or simply search for the entered text.
Additional Information: See the Advanced Search Capabilities appendix in this guide for details. |
| Selected Refinements | The Selected Refinements component displays all values that you have selected to filter data, and allows you to quickly make adjustments to the current refinement by removing items or clearing all filters from the list. |
| Bookmarks | The Bookmarks component allows you to save a given navigation and component state and return to it at a later time. |
| Available Refinements | The Available Refinements component allows you to filter data based on the currently available values or value ranges for selected attributes that are displayed within attribute groups. Expand the following attribute groups to view and select attribute names:
|
| Discover Parties (tabbed component container) Parties (tab) |
City (Primary) (tag cloud)
Note: The City (Primary) tag cloud component displays the top ten primary cities where parties to orders reside, by frequency of occurrence. Cities in this component are highlighted in progressively bolder and larger font based on the frequency of occurrence. Party Summary (results table) The Party Summary results table displays all party information and contact detail.
Trend (chart) The Trend chart displays the Party Count by Creation Year. You can print, export, or save the image of the chart.
|
| Discover Parties (tabbed component container) Addresses (tab) |
Cities (tag cloud)
Note: The Cities tag cloud component displays the top ten cities that occur within addresses of orders, by frequency of occurrence. Cities in this component are highlighted in progressively bolder and larger font based on the frequency of occurrence. Map The Map displays a global view of party locations and address information.
Trend (chart) The trend chart displays the number of records by country.
Address Summary (results table) The Address Summary results table displays party address details.
|
| Discover Parties (tabbed component container) Relationships (tab) |
Cities (tag cloud)
Note: The Cities tag cloud component displays the top ten cities that occur within contacts and relationships of order parties, by frequency of occurrence. Cities in this component are highlighted in progressively bolder and larger font based on the frequency of occurrence. Job Title (tag cloud) Note: The Job Title tag cloud component displays the top ten job titles within contacts and releationships of order parties, by frequency of occurrence. Job titles in this component are highlighted in progressively bolder and larger font based on the frequency of occurrence. Contacts / Relationships Summary (results table) This results table displays information of a party's relationships and contacts.
|
Transaction Summary Page
The Transaction Summary page enables you to search and filter data for customer parties using party, account, address and contact point attributes. When you click the 360 View link in the Party Summary results table, the Transaction Summary page appears.
Using the responsibility assigned to you, use the Transaction Summary page to analyze data using various metrics, charts, graphs, and tables. The page contains the following regions and components:
| Region | Components |
|---|---|
| Party Name | The name of the party. |
| Party Type | The type of party. |
| Registry ID | The registry identifier associated with the party. |
| Identifying Address | The address of the party. |
| Tip Data as of: | Tip displays the date on which the data was last refreshed. |
| Tip Currency: | This displays the currency associated with the party. |
| Selected Refinements | The Selected Refinements component displays all values that you have selected to filter data, and allows you to quickly make adjustments to the current refinement by removing items or clearing all filters from the list. |
| Quick Links | The Quick Links region displays links to associated pages.
|
| Available Refinements | The Available Refinements component allows you to filter data based on the currently available values or value ranges for selected attributes that are displayed within attribute groups. Expand the attribute groups to view and select attribute names. |
| Transaction Metrics | Displays the following details:
|
| Open Amount | Displays data in the following tabs:
|
Oracle Order Management Information Discovery Plus Product Configuration
Setting Up Oracle Order Management Information Discovery Plus
The Oracle Order Management product configuration setup must be completed after the installation and common configurations are completed as described in Installing Oracle E-Business Suite Information Discovery, Release 12.2 V8 (Doc ID: 2214431.1).
Setup and Configuration Steps
To set up Oracle Order Management Information Discovery Plus, you must complete the following steps:
-
Set Access Control by assigning UMX roles and updating access grants.
-
Set Profile Options for Oracle Order Management.
-
Complete Post Installation Steps for Oracle Order Management.
Access Control: Hide and Show EID Dashboards (User Interfaces) for Oracle Order Management Information Discovery Plus
As part of the Oracle E-Business Suite-EID integration for the Oracle Order Management application, the following UMX Roles are provided:
| UMX Role | Internal Code Name |
|---|---|
| Order Management Endeca Access Role | UMX|ONT_ENDECA_ACCESS_ROLE |
| Order Management HTML User Interface Access Role | UMX|ONT_ENDECAHTML_ACCESS_ROLE |
| Order Mgmt Endeca Role for Customer Explorer | UMX|ONT_ENDECA_ICX_ACCESS_ROLE |
You must add the UMX roles 'Order Management Endeca Access Role' and 'Order Management HTML User Interface Access Role' to enable Endeca menus for the Order Information Super User responsibility and Order Management HTML User Interface responsibility (or any other custom responsibility which is using the Order Information Portal menu). You must assign these UMX roles to the Order Information Portal responsibility. When these UMX roles are assigned to the Order Information Portal, the Information Discovery tab will be visible.
If you want to use the Endeca-related roles with more than one responsibility, then you must have an additional grant with a security context corresponding to each responsibility. You can add grants for a given role as a separate process or when adding the role to the responsibility.
| Permission Sets | Internal Code Name |
|---|---|
| Order Management Endeca Pages Access | ONT_ENDECA_ACCESS_PS |
| Order Management HTML User Interface Access | ONT_ENDECAHTML_ACCESS_PS |
| Order Mgmt Permission Set for Customer Exp | ONT_CUST_EXP_PS |
Complete the following steps to enable Endeca Menus in Oracle E-Business Suite (EBS):
-
Assign a UMX Role to the Responsibility.
-
Update the following grants:
-
ONT_ENDECA_ACCESS_GRANT
-
ONT_ENDECA_CUST_EXP_GRANT
-
For assigning UMX Roles and Grants, refer to Appendix C in Installing Oracle E-Business Suite Information Discovery, Release 12.2 V8 (Doc ID: 2214431.1).
Note: You must add the 'Orders, Returns' function to the 'Order Information Super User' responsibility to access the Sales Order windows from the Results Set table.
Scheduling Setup for Endeca Refresh
The initial data upload for Oracle Order Management is complete when the Full graph is run as described in the Installing Oracle E-Business Suite Information Discovery, Release 12.2 V8 (Doc ID: 2214431.1). Full refresh deletes all data from Endeca and repopulates it with a full data extract from the E-Business Suite system. For incremental refresh, you should determine how often the Endeca data should be refreshed from E-Business Suite depending on your organizational requirements.
To schedule ETL on the Integrator Server
-
Login to Integrator server using your Clover login.
-
Click the Scheduling tab.
-
Select the New Schedule link.
-
Enter a Description for the schedule.
-
Select Periodic as the Type.
-
Select by interval as the Periodicity.
-
Enter a start date and time in the Not active before date/time field.
-
Enter an end date and time in the Not active after date/time field.
-
Enter a value in the Interval (minutes) field.
-
Ensure you select the Fire misfired event as soon as possible check box.
-
Select Start a graph from the Task Type list.
-
Specify Sandbox = 'ont', and then specify the graph for schedule to run. For example:
-
FullLoadConfig.grf - this graph loads all Endeca page metadata as well as order line transaction data, along with necessary audit information.
-
IncrementalLoadConfig.grf - this graph loads incrementally changed order line transaction data, along with necessary audit information.
Important: Customers should define data load schedules based on the FullLoadConfig.grf and IncrementalLoadConfig.grf graphs.
-
Data deleted in EBS (Order Management) will not be removed from Endeca by running Incremental Graph. You must run FullLoadConfig.grf graph to remove all the data from Endeca and then reload all data. Full refresh deletes all data from Endeca and repopulates it with a full data extract from the E-Business Suite system.
-
FullLoadConfig.grf is designed to create (and reset) the Endeca data domain for Order Management and perform the initial data load. IncrementalLoadConfig.grf is designed to transfer the updates from EBS Order Management into Endeca as of the completion of the previous data load. You must evaluate your requirements and carefully create the data refresh schedule. Such a schedule is typical and most likely created based on IncrementalLoadConfig.grf rather than the FullLoadConfig.grf.
-
You should allow sufficient time between two successive runs of a given graph (either FullLoadConfig.grf or IncrementalLoadConfig.grf) when defining the schedule. The time gap in the schedule must be greater than what the graph itself takes to complete. Failure to adhere to this guideline will result in excessive and wasteful computational load on hardware resources.
-
-
Click Create to set the scheduler.
Profile Options for Oracle Order Management Information Discovery Plus
Set the optional site level profile option OM: Endeca Display Currency to convert the transaction amount for all orders into the specified currency:
| Profile Option Name | Description |
|---|---|
| OM: Endeca Display Currency | This optional site-level profile option controls the conversion of the transaction amount for all orders into the specified currency. |
| OM: Days for Endeca Full Data Load | This optional site-level profile option controls the number of days that the full load graph pulls data. The default value is Null. If the value is Null, then full load graph will pull data for the previous 90 days. You can change this value to any positive numeric value. |
| OM: Maximum Attachment Size for Information Discovery Load (kb) | This optional site-level profile option controls the volume in kilobytes (kb) of line level attachment text to be loaded into Endeca during ETL. |
OM: Endeca Display Currency - If a currency is specified in this optional profile option, then the transaction amount for all orders will be converted (if required) into the specified currency. If a currency is not specified in this profile option, then the transaction amount for all orders will be converted (if required) into the functional currency of the legal entity.
Note: You can specify a currency in this profile option if there are users who have access to orders created in legal entities with different functional currencies. Once a currency is selected, Order Amounts on the Order Management Information Discovery Plus pages are converted into that currency at the exchange rate available in Oracle General Ledger tables on the day of the Ordered Date. If users of OIP have access to more than one operating unit, and each operating unit has its own different functional currency, then you can set this profile option to the appropriate common currency according to business requirements. If a currency is not specified in the profile option and there are multiple currencies for a user, then the Tip Text displays 'Currency: Multiple' and currency is added as a filter in the Available Refinements component for users with access to orders in multiple currencies, and they can filter by currency if desired.
OM: Maximum Attachment Size for Information Discovery Load (kb) - This profile option is a site-level profile option and displays numeric values for volume in kilobytes (kb) of line level attachment text to be loaded into Endeca during ETL. A blank or null value is equivalent to a zero value.
Post Installation Steps for Oracle Order Management Information Discovery Plus
Descriptive Flexfield Attribute Groups
The enabled attributes of the descriptive flexfields (DFF) 'Additional Line Attribute Information' and 'Additional Header Information' automatically display within the guided navigation portlet under the dynamically created attribute group 'Additional Information'. You can refine each of the attributes with specific search and selection requirements. Based on customer preferences and requirements, when implementing Oracle Order Management Information Discovery Plus, you can:
-
Add the dynamically created attribute group (Additional Line Attribute Information) as a new column set to the Endeca results tables.
Note: The Additional Header Information attribute group cannot be added to the Orders tab of the results table.
-
Change the default style of descriptive flexfield attribute filters in the guided navigation component configuration. For example, you can modify 'List of Values' to 'Range Filters' for numeric attributes.
Views and Joins for Oracle Order Management Information Discovery Plus
The following views are used by the ETL layer in Endeca to load Oracle Order Management data to the Endeca data domain:
| View Name | Purpose |
|---|---|
| OE_ENDECA_RETURNS_V | Loads Return Order Lines' data |
| OE_ENDECA_FULFILL_DELAY_V | Loads Fulfillment Analysis Information for open and closed lines. |
Menus for Oracle Order Management Information Discovery Plus
Oracle Order Management integration includes the following user menu functions:
| User Function Name | Function Name |
|---|---|
| Information Discovery | ONT_ENDECA_DISCOVERY |
| Information Discovery Page - Open Orders | ONT_ENDECA_OPN_ORDR_PG |
| Information Discovery Page - Fulfillment Delay | ONT_ENDECA_FULFILL_DELAY_PG |
| Information Discovery Page - Returns | ONT_ENDECA_RETURNS_PG |
| Transaction Summary Page (From OM) | ONT_IMC_TRANS_ENDECA_METRICS |
| Endeca Information Discovery Widget - Open Orders | ONT_ENDECA_OPN_ORDR |
| Endeca Information Discovery Widget - Fulfillment Delay | ONT_ENDECA_FULFILL_DELAY |
| Endeca Information Discovery Widget - Returns | ONT_ENDECA_RETURNS |
| Endeca 360 View Widget | ONT_ENDECA_360_VIEW |
| Endeca 360 View Page | ONT_ENDECA_360_VIEW_PG |
| Endeca 360 View Widget Closed | ONT_ENDECA_360_CLOSED |
| Order Management Endeca Actions Delegator Page | ONT_ENDECA_ACTIONS_DELEGATOR |
| Scheduling Organizer | ONT_OEXOEORD_SCH |
| Endeca 360 View HTML UI Page | ONT_ENDECA_360_VIEW_HTML_PG |
| Endeca 360 View Close Page | ONT_ENDECA_360_VIEW_CL_PG |
| Endeca 360 View HTML Close Page | ONT_ENDECA_360_CLOS_HTML_PG |
| Order Organizer | ONT_OEXOEORD_SUMMARY |
| Sales Orders | ONT_OEXOEORD |
Customer Explorer
Customer Explorer Product Configuration
Once you have completed installation and common configurations as described in Installing Oracle E-Business Suite Information Discovery, Release 12.2 V8 document (Doc ID: 2214431.1), you must complete the Customer Explorer product configuration setup as detailed in this section.
Setting up Customer Explorer
-
Add the UMX role IMC Endeca Access Role (UMX| IMC_TRANS_ENDECA_ACCESS_ROLE) to enable the Customer Explorer global link for the IMC application responsibility, or any other custom responsibility using the same menu. When this UMX role is assigned to the responsibility, the customer explorer global menu displays.
-
Update the grants associated with role IMC Endeca Access Role to have the right responsibility context set. For IMC Endeca Access Role, click the update icon for grant IMC_TRANS_ENDECA_ACCESS_GRANT and in the Security Context region of the update Grant page enter IMC responsibility as the Responsibility. For IMC Endeca Access Role, click on the update icon for grant IMC_ENDECA_INT_PROD_ACCESS_GRANT and in the Security Context region of the update Grant page enter IMC responsibility as the Responsibility.
-
To access the related Information Discovery pages (Open Claims, Closed Claims, Budgets, Sales Orders, Return Orders, Service Requests, Quotes and Installed Base) from Customer Explorer Page, complete the following additional steps:
-
Assign the Roles below (additionally, subject to the licensed Oracle Information Discovery page) to the IMC responsibility:
-
CS Endeca Access Role/UMX|CS_ENDECA_ACCESS_ROLE (Services)
-
CSI Endeca Access Role/UMX|CSI_ENDECA_ACCESS_ROLE (Installed Base)
-
Channel Endeca User Role/UMX|OZF_ENDECA_ACCESS_ROLE (Channel Revenue Management)
-
Order Management Endeca Access Role/UMX|ONT_ENDECA_ACCESS_ROLE (Order Management)
-
Quoting Endeca Quotes Access Role/UMX|QOT_ENDECA_QUOTES_ACCESS_ROLE (Quoting)
-
-
When you add the role to the responsibility, you must also update the associated grant for the product-specific Information Discovery related roles to reference the specific responsibility as the security context. You need a separate grant for each responsibility to which you are adding the role, so in this case you must duplicate the shipped grant rather than updating it. Create a copy of existing and in the Security Context region of the Update Grant page enter IMC responsibility as the Responsibility.
See: Oracle E-Business Suite System Administrator's Guide - Security for more information on how to assign roles.
See: Roles in Customer Explorer
See: Grants in Customer Explorer
See: Permission Sets in Customer Explorer
See: Appendix C: Adding Roles to Responsibilities and Setting Security Context in Installing Oracle E-Business Suite Information Discovery, Release 12.2 V8 (Doc ID: 2214431.1)
-
Set up the profiles HZ_ENDECA_DISPLAY_CURRENCY and HZ_CURR_CONVERSION_TYPE.
Profiles in Customer Explorer
Customer Explorer provides the following profile options:
-
HZ: Endeca Display Currency (HZ_ENDECA_DISPLAY_CURRENCY) – use this profile option to convert the transaction amount currency to the currency specified in this profile using the conversion type mentioned in profile HZ: Currency Conversion Type. You can update this profile only at the site level.
-
HZ: Currency Conversion Type (HZ_CURR_CONVERSION_TYPE) – use this profile option to define the conversion type to be used in the profile HZ: Endeca Display Currency. You can update this profile only at the Site level.
Roles in Customer Explorer
Customer Explorer provides the following roles:
| Role Name | Role ID | Application |
|---|---|---|
| IMC Endeca Access Role | UMX| IMC_TRANS_ENDECA_ACCESS_ROLE | Customer Explorer |
Grants in Customer Explorer
Customer Explorer provides the following grants:
| Name | Set | Grantee Type | Grantee |
|---|---|---|---|
| IMC_TRANS_ENDECA_ACCESS_GRANT | IMC Endeca Access Permission Set | Group Of Users | IMC Endeca Access Role |
| IMC_ENDECA_INT_PROD_ACCESS_GRANT | Customer Explorer Integrated Product Menu | Group Of Users | IMC Endeca Access Role |
Permission Sets in Customer Explorer
The following permission sets are available in Customer Explorer:
| Permission Set Name | Permission Set ID | Application |
|---|---|---|
| IMC Endeca Access Permission Set | IMC_TRANS_ENDECA_ACCESS_PS | Customer Explorer |
| Order Mgmt Permission Set for Customer Exp | ONT_CUST_EXP_PS | Order Management Customer Explorer |
Running the Full Load Graph
Once you have run the full load graph in accordance with the Installing Oracle E-Business Suite Information Discovery, Release 12.2 V8 document (Doc ID: 2214431.1), attribute configuration is loaded for all seeded attributes. Additionally, you need to run the following full data loads as follows:
To run a full Endeca Refresh on the Integrator Server
-
Login to Integrator server using your Clover login.
-
Click the Scheduling tab.
-
Select the New Schedule link.
-
Enter a Description for the scheduler, for example, Customer Explorer Full Load Scheduler.
-
Select Periodic as the Type.
-
Select by interval as the Periodicity.
-
Enter a start date and time in the Not active before date/time field.
-
Enter an end date and time in the Not active after date/time field.
-
Enter a value in the Interval (minutes) field.
-
Ensure you select the Fire misfired event as soon as possible check box.
-
Select Execute graph from the Task Type list.
-
Select imc from the Sandbox list, based on the module for which you are running the full load.
-
Select graph/FullLoadConfig.grf from the Graph list.
-
Click Create to set the scheduler.
Setting Up the Scheduler for Incremental Refresh
Once the Full graph is run in accordance with the Installing Oracle E-Business Suite Information Discovery, Release 12.2 V8 document (Doc ID: 2214431.1), initial data load for Oracle Customer Explorer is complete. For incremental refresh, you must determine how often the Endeca data should be refreshed from EBS depending upon your organizational requirements. Oracle recommends that you keep this near real time. As the data is updated in the EBS, you need to ensure it is updated in the endeca MDEX server.
To run a full Endeca Refresh on the Integrator Server
-
Login to Integrator server using your Clover login.
-
Click the Scheduling tab.
-
Select the New Schedule link.
-
Enter a Description for the scheduler, for example, Customer Explorer Incremental Load Scheduler.
-
Select Periodic as the Type.
-
Select by interval as the Periodicity.
-
Enter a start date and time in the Not active before date/time field.
-
Enter an end date and time in the Not active after date/time field.
-
Enter a value in the Interval (minutes) field.
-
Ensure you select the Fire misfired event as soon as possible check box.
-
Select Execute graph from the Task Type list.
-
Select imc from the Sandbox list, based on the module for which you are running the full load.
-
Select graph/IncrementalLoadConfig.grf from the Graph list.
-
Click Create to set the scheduler.
Customizing Data Loads
As an option, only a subset of the orders and lines created in the EBS environment can be loaded into the Endeca data domain by customizing the hook package 'oe_endeca_hook'.The package 'oe_endeca_hook' contains the following procedures:
-
APPEND_WHERE_CLAUSE
-
APPEND_WHERE_CLAUSE_RETURNS
-
APPEND_WHERE_CLAUSE_INCR
-
APPEND_WHERE_CLAUSE_INCR_RET
The procedure APPEND_WHERE_CLAUSE must be modified to restrict the data set loaded using the Full Load graph for the Open and Closed orders pages. The procedure APPEND_WHERE_CLAUSE_RETURNS must be modified to restrict the data set loaded using the Full Load graph for the Returns page.
Similarly, the procedure APPEND_WHERE_CLAUSE_INCR must be modified to restrict the data set loaded using the Incremental Load graph for the Open and Closed orders pages. The procedure APPEND_WHERE_CLAUSE_INCR_RET must be modified to restrict the data set loaded using the Incremental Load graph for the Returns page.
Additional Information: For examples and detailed instructions on the syntax to be followed while building the custom logic, refer to the package 'OE_ENDECA_HOOK' that is included in the file OEXHENDB.pls