Jobs and Positions
Work Places and Stellen
Work Places
A work place defines certain terms and conditions by which an employer performing a specific job is covered. For example, when you create a work place you must enter information such as; the organization to which the employee is assigned, the location in which the employee works, the FTE for the work place, and the functional description. Other information such as payroll or salary basis can also be recorded.
A work place usually only applies to one employee, though if your organization has multiple people doing the same job, then you can assign an FTE greater than one to the work place.
Once you have set up your work place you must create a validation for it. The method by which you create this validation is dependant on the employment type of the work place.
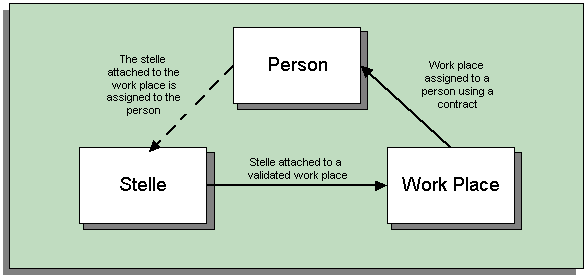
When you have attached the validation, you then attach a stelle with the same pay grade in order to maintain the costs for the work place. Finally you assign it to an employee using a contract. The following diagram shows the relationship between work places, stellen, and the employee.
Relationship Between Stellen, Work Places and People
Validations for a Workplace
The process to create a validation for a work place depends on the employment type of the work place, that is, white collar worker, blue collar worker, or civil servant, and the structure of your Remuneration Regulation hierarchy.
Validation for White Collar or Blue Collar Workers Using Additional Job Features
The validation for a white, or blue collar worker based on additional job features is done using the Remuneration Regulation hierarchy. After creating the validation you can select which tariff contract, tariff group, pay grade, and case group apply to this work place. Each option you select, limits the values you can select from the next level, for example, if you select BAT as the tariff contract, you can then only select tariff groups that belong to the BAT tariff contract. Alternatively you can select the correct case group straight away and the other information will be completed automatically.
Validation for White Collar Workers Using the Common Part
Validation using the Common Part compares the job features required for a work place with the job features assigned to case groups in the remuneration regulation hierarchy.
When creating a validation using the common part, you can either select structures from your operation plan, or you can create new ones during the validation.
For example, suppose your remuneration regulation contains the following setup:
-
Grade Vc, case group 1a, 50% thorough versatile knowledge and 33% independent performance
-
Grade Vc, case group 1b, 50% thorough versatile knowledge and 50% independent performance
-
Grade Vb, case group 1a: 50% thorough comprehensive knowledge and 50% independent performance
Within your organization there is a person who works in the human resources department for 20 days a month. Her job involves her working 5 days on payroll, 10 days on correspondence to applicants, and 5 days on interviewing applicants.
This means that when creating a validation for this work place you could enter the following details for the above operations:
-
Payroll: 25%. Job features: independent performance and thorough comprehensive knowledge
-
Correspondence to applicants: 50%. Job feature: thorough versatile knowledge
-
Interviewing applicants: 25%. Job feature: independent performance
This means that the total for this validation would be:
-
50% thorough versatile knowledge
-
50% independent performance
-
25% thorough comprehensive knowledge
If we compare this to the grade setup we see that the validation would return the values grade Vc and case group 1b as this is the highest level that is satisfied. Note that the 25% thorough comprehensive knowledge is not taken into account as to satisfy the next level 50% thorough comprehensive knowledge is required.
If you include job details in your validation then it behaves slightly differently. For example, suppose that for the above operation of payroll you have the following job details:
-
Entering Overtime. job feature: light job
-
Recalculation of payrolls. job feature: independent performance
When validating this operation, only the most important job feature is applied to the operation, in this case independent performance. Whenever you see the job features listed in the application they are always shown with the least important at the top.
Validation for Civil Servants
The validation for a civil servant is based on a list of levels with corresponding gradual value numbers, and a results set. The levels are criteria against which you can describe a person's job. An example of part of a list of levels is shown in the following table:
| Level 1 | Responsibility | Gradual Value Number |
|---|---|---|
| 1 | Little responsibility | 15 |
| 2 | Medium responsibility | 27 |
| 3 | High responsibility | 34 |
| Level 2 | Independence | Gradual Value Number |
| 1 | No independence | 24 |
| 2 | The job is ruled supervised; some independence in how to do the job. | 37 |
| 3 | Certain independence concerning the results of the job. | 49 |
The results set is used to map number ranges to particular grades. An example of this is shown in the following table:
| Gradual Value Number Range | Grade |
|---|---|
| 0 to 113 | A.1 |
| 114- 268 | A.2 |
| 268 to 384 | A.3 |
During the validation of a civil servant, you must select the appropriate level code for each level to describe the job the employee is performing. The total of the gradual numbers for each of the selected level codes is then compared to the results set to calculate the grade to assign to the civil servant.
Stellen and the Stellenplan
The Stellenplan forms part of the budget plan for public sector type organizations. It details the number of positions that are budgeted for each pay grade. To represent this, you use the components shown and described below. The following diagram shows how stellen plan items, stellen, and work places can be associated.
Stellen Plan Items, Stellen, and Work Places
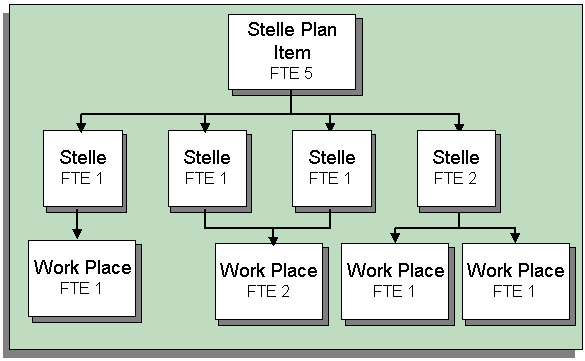
Stellen Plan Items
Stellen plan items are used to group together a number of positions that all have the same grade and the same budget plan structure. Each stelle plan item equates to one row of your stellenplan.
When you define a stelle plan item you specify to what type of employment it applies. This then controls to which work places the stelle plan item can be attached, for example, only stelle plan items with a civil servant employment type can be attached to work places of that type.
You must also include the FTE and the functional description for each stelle plan item. The functional description is entered using the job functionality and then selected here and could be values such as clerk or manager, or more detailed descriptions like junior inspector, chief inspector.
Stellen
The stelle is used to hold the budget details for individual work places, though they use FTE and not money. Once a stelle has been set up you attach it to a validated work place with the same employment type and pay grade to indicate that the number of people defined in the FTE are permitted to fulfill this work place.
For each stelle you must select a stellen plan item. This defaults some information such as budget plan unit 1, the functional description and the pay grade. These can be changed for the stelle. The employment type is also defaulted and cannot be updated.
Reserved Stellen
Reserved stellen are used to show stellen for which no costs appear during the financial year, for example because of maternity leave, or those which are delegated to another authority which takes over the payment.
A reserved stelle is stored for a particular person and cannot be assigned to anyone else. When the person returns to work they can be paid using the reserved stelle, or if there is a vacant stelle with the same criteria, then you end the reserved stelle and assign the person to the vacant stelle.
Substitute Stellen
Substitute stellen are used when you need to pay more than one person for a particular stelle for a period of time.
For example, during pre-retirement, if Employee A does not actually work for the last two years before his retirement, then you will probably need to recruit someone to fulfil the tasks that Employee A was doing. However, you cannot assign Employee A's stelle to the new employee as Employee A is still on the payroll. What you must do is create a substitute stelle with the same criteria that expires after two years. You then assign the substitute stelle to Employee A , and assign the normal stelle to the new employee.
Operation Plan
An operation plan stores all the operations, jobs, and associated job features for a particular office or department. Similar or related operations can be grouped together into an operation group.
For example, a typical operation may be Time Recording and Absence Administration within an operation group called HR Administration This operation would then typically have the following jobs:
-
Controlling closing balances
-
Checking errors
-
Entering and checking leave accruals
The structure of a typical operation plan is as follows:
Structure of Operation Plan
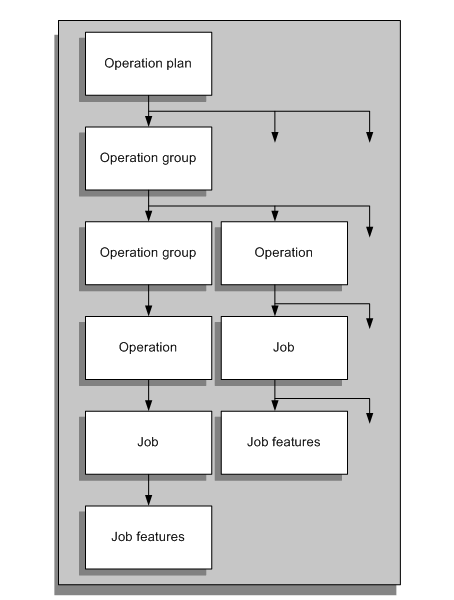
You define the operation groups, operations, and jobs using the self-service functionality. The operation group and job levels are optional.
Using the Operation Plan with Work Place Validation
Although creation of an operation plan is optional, it can be helpful to create an operation plan if you are using work place validation. By using an operation plan, you can ensure that the operations and job features for a particular work place are consistent throughout your organization. When you create your workplace validation, you can either add operations and job features directly to the validation or you can assign operations that have already been defined in an operation plan.
See: Work Places
Setting Up Workplaces
Setting Up Work Places
To set up work places for your enterprise you must complete the following steps.
To set up work places
-
Create your work places.
See: Creating Work Places, Stellen Plan Items, and Stellen, or if your organization uses position control, see: Creating Work Places, Stellen Plan Items, and Stellen using the Transaction Window
-
Validate your work places using the Validation of Work Place self service function.
-
Attach the validation to a work place
See: Creating Work Places, Stellen Plan Items, and Stellen, or if your organization uses position control, see: Creating Work Places, Stellen Plan Items, and Stellen using the Transaction Window
What Next?
You can now attached a stelle to the validated work place and assign it to an employee using a contract.
Setting Up Stellen
To set up stellen for your enterprise you must complete the following steps.
To set up stellen
-
Set up a stellen plan item for each of the rows in your enterprise's stellen plan.
See: Creating Work Places, Stellen Plan Items, and Stellen, or if your organization uses position control, see: Creating Work Places, Stellen Plan Items, and Stellen using the Transaction Window
-
Set up the stelle required by your enterprise and link it to an existing stellen plan item.
See: Creating Work Places, Stellen Plan Items, and Stellen, or if your organization uses position control, see: Creating Work Places, Stellen Plan Items, and Stellen using the Transaction Window
-
Attach each stelle to a work place using the Attach Stellen to Work Place self service function.
Creating Budget Plan Units
To fully identify where a stellen plan item or a stelle exist in the budget plan, it is necessary to assign two budget plan units to each of them.
The first of the budget plan units you select is an organization with the classification Budget Plan Unit. These organization make up your budget hierarchy.
You set up the second budget plan unit by creating a subset of values for the EMPLOYEE_CATG lookup. This means that for each of your employment category values, you can have multiple budget plan units.
Use the User Types and Statuses window to create budget plan units based on EMPLOYEE_CATG.
To create budget plan units
-
Select EMPLOYEE_CATG in the Name field.
-
Select the business group for which you want to create budget plan units.
Note: If you have already entered budget plan units for your business group you may wish to run a query on EMPLOYEE_CATG and your business group so that the existing values are displayed
-
Select the employee category in the System Type field, and enter the budget plan unit in the description field.
-
Save your work once you have entered all the required budget plan units.
Creating Work Places, Stellen Plan Items, and Stellen
You use the Work Places, Stellen Plan Items, and Stellen windows to define the budgeting and work place components required for your organizations and to add them to hierarchies. You can also enter the skills that position holders require and the grades to which they can be assigned.
Note: Use the Transaction window for work places, stellen plan items, and stellen that belong to organizations that you have selected for position control.
See: Creating Organization Hierarchies, Oracle HRMS Enterprise and Workforce Management Guide
Position Management Check Boxes
The check boxes at the top of the window are for information purposes only. They are checked if the component belongs to an organization selected for position control. The check boxes indicate whether the component is:
-
Open: unfilled
-
Under Review: changes to the position definition are in process using a position transaction
-
Approved Future Actions: the position or changes to it are approved for a future effective date
See: Defining a Position With a Position Transaction, Oracle HRMS Enterprise and Workforce Management Guide, Defining Transaction Templates, Oracle HRMS Enterprise and Workforce Management Guide
To create a work place, stellen plan item or stellen
-
Set your effective date early enough to handle any historical information about the component that you want to enter.
Note: Consider using a fixed date as a default for your initial setup, for example, 01-JAN-1901. This will simplify your data-entry.
-
The start date defaults to the effective date. Change this if you want this component to become active on a different date.
-
Enter a unique name for the component in the Date Effective Name field in the Details tabbed region.
Note: The Name field at the top of the window displays the latest name on record, irrespective of your effective date. This name is used on all other windows.
If there is more than one segment in the Position Name flexfield, a window opens when you enter the Name field. You must enter a unique combination of segments in this window.
-
Select the type. The choices are:
-
Single Incumbent, meaning that only one employee is allowed to at any time
-
Shared, meaning there can be several incumbents, up to the value of the FTE field
-
Pooled (Public Sector only), meaning it is loosely defined so rules about FTE and hours are not enforced by the system
-
None, which you can select if you do not need to record types
-
-
If the component is permanent and budgeted every year, select the Permanent check box.
-
For work places, select the organization and functional description, in the Job field. For stelle plan items and stellen, select the budget unit 1 and the functional description.
Note: You cannot change the organization, budget unit 1 or the functional description once you have saved the definition.
-
If you know that the position will be transferred to another organization budget unit or functional description in the future, enter the proposed end dates now, for information.
-
The Status field displays the type of component this is, either Work Place, Stellen Plan Item, or Stelle.
The Start Date field indicates when the current status came into effect.
-
Optionally, you can enter a proposed end date for Proposed or Active statuses, for information.
-
Select a location for a work place, or leave the default, which is the location of the organization. If you are creating a stellen plan item or a stelle, you can select a second budget unit to further describe where in the budget plan it exists.
-
Optionally, select a status for the position.
Selecting Valid or leaving the Status field blank enables employees to be assigned to the position, provided other conditions (such as an Active hiring status) are met. If the status is Invalid or any other status defined at your site, employees cannot be assigned to the position.
Entering Hiring Information
-
Enter the number of Full Time Equivalents to be assigned to this component. If the Type is Single Incumbent, FTE must be 1.0 or less.
-
If appropriate, select a bargaining unit code. This is usually the legally recognized collective negotiating organization.
Note: You set up your different bargaining units as values for the Lookup type BARGAINING_UNIT_CODE.
-
If required, enter the earliest date at which incumbents can be hired using this component. If you are creating a work place and have created a requisition and vacancy for it, the earliest hire date must be within the vacancy dates.
-
Enter the date by which it should be filled. This date must be on or after the Earliest Hire Date.
-
Select the Permit Recruiting check box if it is not open but you want to enable advertising, job posting and acceptance of applications.
For example, you might select this check box for a work place that is frozen but due to become active in the near future.
Proposed Entry Salary
-
Select the payroll to which the component's incumbents are normally assigned. This payroll's calendar can be used for calculations of budgeted amounts and commitments.
-
Select the salary basis to which the component's incumbents are normally assigned.
-
For stellen plan items and stellen, select the default grade to be used to determine the entry salary of position incumbents. The grade for work places is calculated during the work place validation.
-
Do one of the following or leave these fields blank:
-
If payment is made from a pay scale, select the grade step and scale rate that represent the entry level salary. The system displays the value of the step on the scale rate you selected.
-
If you maintain a grade rate to hold entry salary, select the appropriate grade rate. The value or range (minimum, maximum and midpoint values) for this grade rate are displayed.
Probation
-
If there is a probation period for this, you can enter its length in the Probation region.
Overlap
-
Select the length of time a new incumbent can overlap with a leaving incumbent for transfer of skills.
Note: You can enter proposed start and end dates for particular periods of overlap using the Extra Information Types window.
Entering Additional Details (Stellen Only)
-
If required, enter comments, a posting description for recruitment purposes, and any special confidentiality or security requirements, such as a clearance level.
Entering Stelle Details (Stellen Only)
-
Select a title of employment and status for the stelle. The employment type defaults from the stellen plan item and cannot be updated.
-
If the stelle is exempt from the Limitation Act, then check the check box and enter a reason.
Entering a Position/Budget Note (Stellen Plan Item and Stellen Only)
You use position notes to indicate that either a change to the FTE, employment type, or grade for a stelle plan item or stelle is required, or that a stelle plan item or stelle to become invalid, on a certain date. All stelle that are set to become invalid on a certain date are considered to be substitute stellen.
Note: These notes are for information only.
-
Select the type of note you want to create. The choices are:
-
KU - this indicates a change that is to be made in the future
-
KW - this indicates that the stelle or stellen plan item will become invalid on a certain date.
-
-
If you are making a change, then select the new FTE, type of employment or grade.
-
Enter the any reference that exists for the note, and select its status. Also enter any additional reason or explanation as required.
-
Save your work.
Attach Validation (Work Places Only)
For a work place to be available to assign to an employee, using a contract, you must first attach validation to it, to indicate that it is included in the budget plan. If a work place can be assigned to two different types of worker, for example white collar worker or civil servant, you can attach two validations to a work place. However, as it is usual to attach only one stelle to a work place then the employment type of the stelle defines what type of employee can fulfil the workplace.
-
Select the primary employment type, and select the validation for this employment type and work place. The version number for the validation is displayed.
-
Select the status of the primary validation. You can only assign work places with an active validation to a contract.
-
If you want to enter a validation for a secondary employment type, complete the fields as described above.
-
Save your work.
More Information for Positions
-
If you want to add the position to one or more position hierarchies, choose the Reporting To button. Select a hierarchy and the name of the position to which this position reports.
-
Choose the Evaluation button to enter evaluation information and an overall evaluation score for the position.
See: Entering Evaluation Information, Oracle HRMS Enterprise and Workforce Management Guide.
-
Choose the Valid Grades button to enter the grades to which position holders can be assigned.
See: Entering Valid Grades for Jobs or Positions, Oracle HRMS Enterprise and Workforce Management Guide
-
Choose the Others button to enter Requirements, Occupancy, Extra Information, Work Choices and Define Survey Mapping.
-
Choose Requirements to enter position requirements, such as required qualifications or valid experience, to help you match people to roles.
See: Entering Job and Position Requirements, Oracle HRMS Enterprise and Workforce Management Guide
Note: Check with your HR manager or system administrator whether this is the right window for entering position requirements. You use this window if requirements were defined using Special Information Types. Use the Competence Requirements window if you are following the competence approach.
-
Choose Occupancy to view all those people who have held a selected position or who are applying for it, and the dates of their occupancy. This information could be relevant for selecting people with the necessary skills for similar positions.
See: Viewing Position Occupancy, Oracle HRMS Enterprise and Workforce Management Guide
-
Choose Work Choices to enter work choices that can affect an employee's, applicant's, contractor's, or ex-employee's capacity to be deployed within your enterprise (or a customer's).
See: Entering Work Choices for a Job or Position, Oracle HRMS Enterprise and Workforce Management Guide
-
Choose Define Survey Mapping to link salary survey lines to your position.
See: Mapping Salary Survey Lines, Oracle HRMS Enterprise and Workforce Management Guide
-
Choose Extra Information to enter any additional information required by your enterprise.
See: Position Extra Information Types, Oracle HRMS Enterprise and Workforce Management Guide
See: Entering Extra Information, Oracle HRMS Enterprise and Workforce Management Guide.
-
-
-
-
-
-
-
-
-
Creating Work Places, Stellen Plan Items, and Stellen using the Transaction Window
Use the Transaction window to define and maintain work place, stellen plan item and stelle definitions for organizations that you have selected as position-control organizations. You use the stellen plan item and stelle components for budgeting, and you use the work place component to define working criteria for an employee.
For information about selecting organizations for position control, refer to Organization Hierarchies, Oracle HRMS Enterprise and Workforce Management Guide
Use the Transaction window to create or change a work place, stellen plan item or stelle definition. To view history prior to updating, choose Position Transaction History from the Tools menu.
To create or change a work place, stellen plan item or stelle
-
In the Apply Template dialog, select task template(s) from the list of values. Select the Enabled check box to use the template(s).
The Apply Template dialog is available only to the initiator. If you receive a routed transaction and wish to apply an additional task template, choose Apply Template from the Tools menu.
The application automatically applies your role template to the task template(s).
-
Enter a name.
-
To create a definition, complete the fields in the Position Flexfield dialog and choose OK.
-
To update a work place, stellen plan item or stelle definition, select the name from the list of values.
Note: When entering data in the window, you must enter the mandatory fields (shown in yellow) before saving or routing the transaction. You must complete the required fields (shown in blue) prior to applying the transaction.
-
-
In the Action Date field, enter the effective date.
The checkmarks in the Open, Under Review, and Approved Future Actions check boxes indicate the status of the transaction:
-
Open: You can fill the position, FTE is still available.
-
Under Review: A pending transaction for the position has an Under Review template applied. No one can process a transaction for that position until a user updates the current transaction.
-
Approved Future Actions: There is at least one pending transaction with a future effective date.
Complete one of the following sections according to the type of component you are creating.
Stellen Plan Items
-
Complete the fields for the Stellen Plan Item Details, Hiring Information, and Position/Budget Note as covered in Creating Work Places, Stellen Plan Items, and Stellen. Begin with the step that describes selecting the type. Once you have done this, go to step 8 in this procedure.
Stellen
-
Complete the fields for the Stellen Definition Details, Hiring Information, Additional Details, Stelle Details and Position/Budget Note as covered in Creating Work Places, Stellen Plan Items, and Stellen. Begin with the step that describes selecting the type. Once you have done this, go to step 8 in this procedure.
Work Places
-
Complete the fields for the Work Place Details, Hiring Information, and Attach Validation as covered in Creating Work Places, Stellen Plan Items, and Stellen. Begin with the step that describes selecting the type.
-
Choose Requirements from the list to enter position requirements such as ADA Disability Accom's and OSHA - reportable incident. Once you have done this, go to step 8 in this procedure.
-
Save your work. Route the transaction to gather the necessary approvals, and then apply and update the transaction when you have completed it.
See: Routing Budget Worksheets and Position Transaction, Oracle HRMS Enterprise and Workforce Management Guide
-
After you approve and update the data to the database, choose Position Transaction History from the Tools menu.
You can view all changes made to the currently selected position. These include changes made using the Position window and those that have a transaction status of Submitted or Applied.
-
-
-
Remuneration Regulations and Generic Hierarchies
Hierarchies for Remuneration Regulation and Local Cost-of-Living Allowance
You can create generic hierarchies to represent work structures such as remuneration regulations for tariff contracts in your enterprise. The advantage of using the generic hierarchy functionality is that you only need to define the hierarchies once and they can then be reused, for example, for several different types of employment.
Oracle Human Resources for Germany uses the following hierarchy types:
-
Local Cost of Living Allowance
-
Remuneration Regulation
These hierarchy types define the basic structure of the hierarchies, although you must setup the hierarchies for your tariff contracts based on these hierarchy types.
The following sections look at each of these hierarchies in turn:
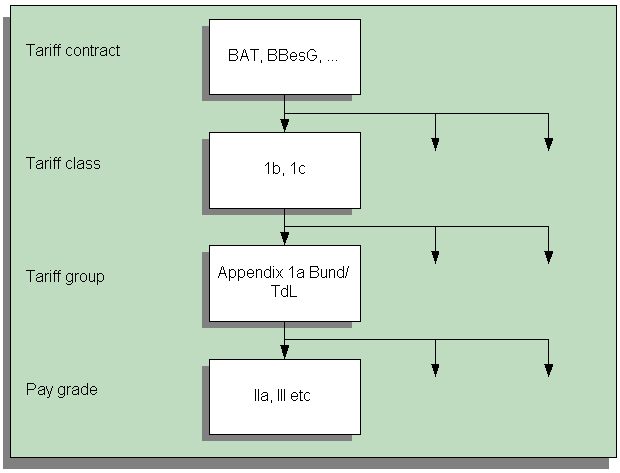
Remuneration Regulation
The remuneration regulation defines the structure of tariff contracts. It enables you to define work structures and jobs in accordance with the tariff contract. Each tariff contract stores information on a number of levels.
You can use the same generic hierarchy to store information about more than one tariff, for example, you can create a hierarchy to store information on both the BAT and the MTArb tariffs.
The following graphic illustrates possible tariff contract structures.
Remuneration Regulation Structures
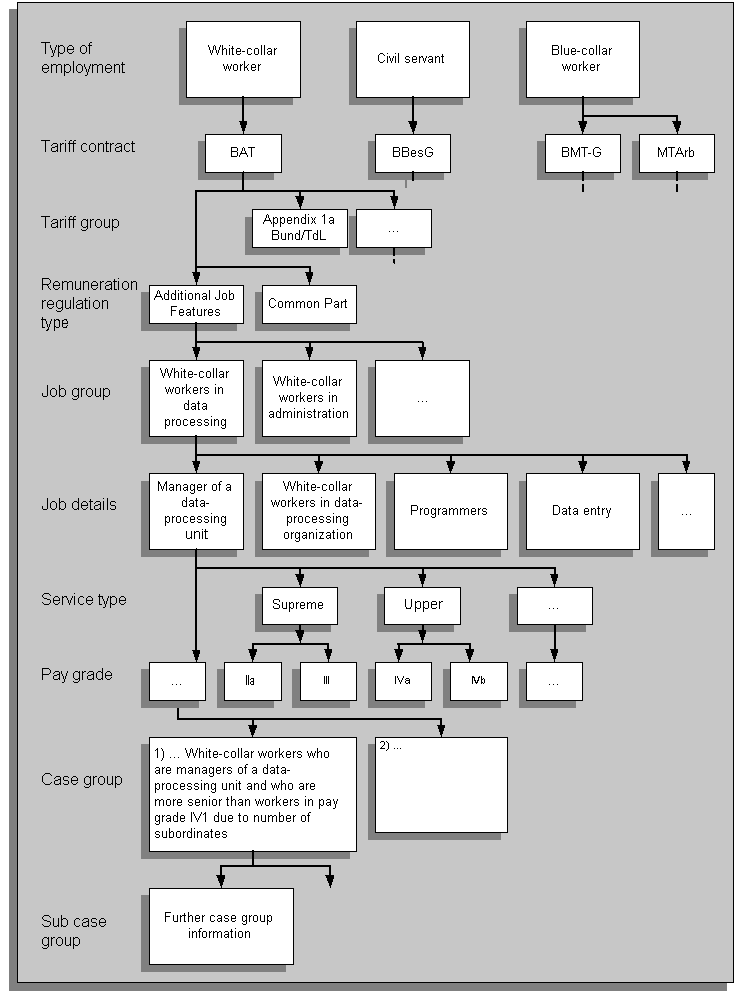
You enter information at the following levels:
Type of Employment
The type of employment classifies employees as either white-collar workers, blue-collar workers, civil servants, or apprentices.
Tariff Contract
The tariff contract is the legal agreement which defines the employee's work conditions and benefits. Examples of tariff contracts include the Bundesangestelltentarif (BAT), Bundesbesoldungsgesetz (BBesG), Ausbildungstarifvertrag (AZUBI).
Tariff Group
The tariff group is a subdivision of the tariff contract. For example, the tariff groups for the BAT tariff contract are: Appendix 1a Bund/TdL (White-collar workers in federal government and federal state governments), Appendix 1a VKA (White-collar workers in local government), and Appendix 1b (Public Sector employees in healthcare).
Remuneration Regulation Type
At this level, you define whether you are setting up the Common Part or the Additional Part of the remuneration regulation.
Job Group
You can group together the jobs in your remuneration regulation into Job Groups. For example, you could create a job group for all white collar technical workers.
Job Details
The job details level identifies a particular job in the remuneration regulation hierarchy. For example, within a job group for technical white-collar workers, you may have the following jobs:
-
Electrical manager
-
Electrical Line manager
-
Electrical assistant, and so on
Type of Service
For some tariff contracts, such as those for white collar workers or civil servants, you must specify a type of service. The type of service is a structure used for defining a pay grade and differs between tariff contracts.
Pay Grade
You set up pay grades and rates in the Professional Forms Interface. When you have set up your grades and rates, you can select them in the Pay Grade level.
See: Grades and Grade Structures, Oracle HRMS Compensation and Benefits Management Guide
You set up the data for the final two levels of the remuneration hierarchy using the self-service interface.
Case Group
You set up case groups using the Define Case Group self-service function. The information on the Case Group Details page corresponds to the remuneration hierarchy. When creating your case groups you select exactly where in the remuneration hierarchy the case group belongs.
You use the case group to store information on periods of probationary advancements to pay grades and other groups and on time advancements to pay grades and case groups. You can also store job features for case groups. Job features provide additional job information such as the level of knowledge required and form the basis for validating work places using the Common Part.
Sub Case Group
The sub case group is a further level of the case group. You enter sub case group information on the Case Group Details page of the self-service interface.
Local Cost of Living Allowance
The local cost-of-living allowance is a payment made to employees within the German Public Sector. The criteria used to calculate the allowance are determined by the tariff contracts to which the employee is assigned. The following table shows the collective agreements and the calculation criteria:
| Tariff Contract | Calculation based on |
|---|---|
| BAT 29 (BL, VKA, and KR) (white-collar workers) | Marital status, number of children, pay grade |
| BBesG (civil servants) | Marital status, number of children, pay grade |
| MTArb and BMT-G (blue-collar workers) | Number of children, pay grade |
In addition, the allowance amount is also determined by the area of Germany in which the employee lives (former East or West).
The following diagram shows the structure of the local cost-of-living allowance:
Local Cost-of-Living Allowance Structure
The local cost-of-living allowance uses some of the same structure levels as the remuneration regulation structure, however, the local cost-of-living allowance also uses the tariff class level which groups together several pay grades.