Workforce Sourcing and Deployment
People Management
Recording Primary and Secondary Employments
An employee can hold, at any one time, multiple employments with one or more employers. Only one of these employments represents the person's primary employment. Other jobs represent the employee's secondary employments. Primary employment determines a person's eligibility for certain compensation and benefits, and some statutory reports require records of primary employment. The employee submits a labor book to the employer to record the employee's primary employment record.
The following examples and figures illustrate primary and secondary employment.
For example: An employee works from 8 AM to 4 PM as a secretary in an organization. This is the employee's main job. For this job, the employee submits the labor book to the employer. Therefore, this becomes the employee's primary employment. In the same organization, the employee also works from 7 PM to 9 PM in a cleaning job after business hours. This becomes the employee's secondary employment. We consider two cases based on this example.
Retaining the Secondary Employment Only: Case 1
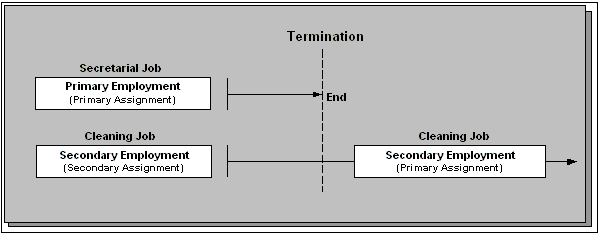
As shown in the preceding graphic, the employee decides to leave the job of secretary, which is the employee's primary employment, and wants to continue working in the secondary employment as a cleaner. The employee can have a secondary employment without having any primary employment.
Note: In Oracle HRMS, the employee's secondary employment becomes the primary assignment, because the employee must have a primary assignment at all times.
Changing Primary and Secondary Employments: Case 2
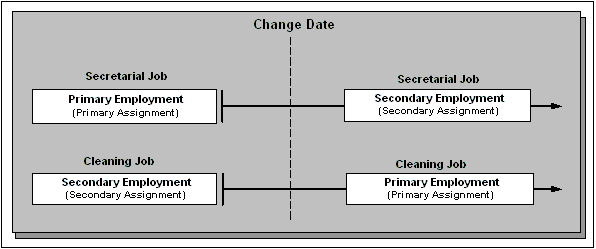
An employee with a primary and secondary employment can also change employments. As shown in the preceding graphic, if you offer the employee a full-time job as a cleaner, and a part-time position as secretary, you would record the employment change in the employee's labor book. You can choose whether to change the employee's assignment. Typically, the employment where the employee devotes the most time is their primary assignment. In this case, the application datetracks both the employments on the change date. As a result, the application keeps a history of the changes in the two employments. The DateTrack History also shows the changes made to the assignment types of these employments.
Employee's Length of Service
Oracle HRMS records an employee's uninterrupted years of service and total length of service. Uninterrupted years of service are an employee's continuous years of employment. Total length of service is the sum of the employee’s periods of service with all employers. In both cases, the application uses only the employee's primary employments for calculation. Therefore, you must capture whether an assignment is a primary or a secondary employment.
The application uses the uninterrupted years of service to calculate the employee’s sickness absence payments. The total length of service affects the employee's pension payment calculations. You use this information in the statutory pension reports.
Primary Employments Over a Period of Time
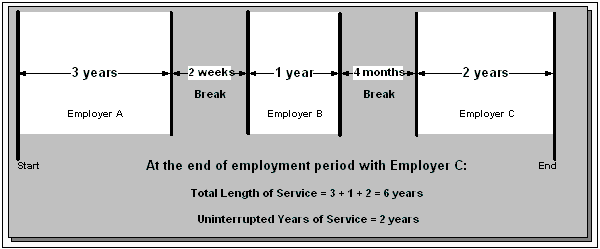
The preceding graphic refers to primary employment only. Consider the statutory rules for your enterprise, to determine if a break is allowed between jobs. In this example, a break of two weeks or less between jobs does not interrupt the total length of service. At the end of employment B, the employee has four years of uninterrupted service, and has a total of four years of service. At the end of employment C, the employee has two years of uninterrupted service and a total of six years of service.
Entering a New Person (People Window)
Use the People window to enter and maintain basic personal information for all person types, including employees and contingent workers.
Note: You can also use one of the template windows such as Entering Employees or Entering Contingent Workers to enter new people.
The minimum information to enter for all categories of people is name and action type. In addition, for employees you must enter gender, employee number (if your enterprise uses manual number entry), and date of birth (for assignment to a payroll). Your localization may require additional mandatory information.
To enter a new person:
-
Set your effective date to the appropriate date for adding the person to the application. If you are entering an employee, this should be their hire date.
-
Enter the person's name and other details in the Name region. Only the last name is required for most legislations, but some legislations require a first name too.
For UK users: The first name is a mandatory field. Ensure that the first character is an alphabet. The employee's last name is not a mandatory field, however, ensure that the first character is an alphabet.
For Romanian users: First and last names are mandatory.
-
You can use the Prefix field to enter the first part of the person's name, such as van der. In the case of someone whose last name is van der Zee, you can sort by the last word of the name, that is Zee. If the whole name van der Zee is entered in the Last Name field, the name is sorted under van.
For Romanian users only: Prefix is not required in Romania, so this field is not available to Romanian users.
For Russian users only: Prefix is not required in Russia, so this field is not available to Russian users.
For UAE users only: Prefix is recorded as additional personal information. Therefore, this field is not displayed in the Name region.
-
The Suffix field holds part of the last name, such as Junior or II. You can report on the suffix separately, as required in some government-mandated reports.
For Romanian users only: Suffix is not required in Romania, so this field is not available to Romanian users.
For Russian users only: Suffix is not required in Russia, so this field is not available to Russian users.
For UAE users only: Suffix is recorded as additional personal information. Therefore, this field is not displayed in the Name region.
-
For Russian users only: In the Genitive Last field, enter the genitive case of the person's last name. For example, Ivanovskogo is the genitive case of the last name Ivanovskii. The genitive last name is required for some statutory reports. If you do not enter the genitive last name, the application uses the nominative last name.
-
Select a gender, if required. In the US, you must choose Male, Female, or Unknown Gender. In the UK, you must enter the gender of each employee. For Poland, the PESEL you enter supplies the gender information. For Finland, the PIN (Personal Identification Number) supplies the gender information.
Note: For Norway users only: A gender value will be automatically generated based on the person`s National Identity number.
-
In the Action field, select an action type (such as Create Employment) and a person type. The person type you select displays immediately in the Person Type for Action field before you save it. If only one user person type exists for the action type, it displays automatically in the Person Type for Action field.
Note: If you enter a contingent worker who has a previous person type such as ex-employee, you can choose to revert the contingent worker back to the previous person type by using the Cancel Placement action.
If you are a Finnish user and need to pay salary to a contingent worker through Oracle payroll, you need to enter the person as an employee. You then change the person as a not employed person by changing the employee status in the Additional Assignment Details window. See: Entering Additional Assignment Details (Assignment Window), Oracle HRMS for Finland Supplement
You create user person types in the Person Types window. If you want to change a person type to another person type with the same system person type you must use the Person Type Usage window.
See: Changing Person Type Usage and Deleting OAB Person Type Usage, Oracle HRMS Enterprise and Workforce Management Guide
Entering Employee Information
Enter the following information if the person is an employee.
-
If desired, change the Latest Start Date field.
-
The Latest Start Date field displays your effective date.
-
For employees who have previously worked for your enterprise, the Date First Hired field displays the start date of the employee's earliest, previous period of service. This date must be on or before the start date of the earliest period of service. The Date First Hired field is situated on the Benefits Tab.
If the latest start date and the date first hired are the same, when you amend the latest start date, the date first hired is set to the same date.
If you amend the latest start date to earlier than the date first hired, the date first hired is set to the same date.
Note: In the US, before making a change to a latest hire date already entered for an employee, ensure that the start date of the employee's primary address is the same as or earlier than the new hire date. This preserves the integrity of the employee's tax records.
-
Entering Identification Information
Enter the person's identification information in the Identification region:
-
If your enterprise uses a manual number generation scheme, enter an employee, applicant or contingent worker number. If your enterprise uses automatic number generation (including Use Employee Numbering for contingent workers), the employee, applicant, or contingent worker number automatically displays when you save your entries in this window.
Note: If you query a person who has a combination of employee, applicant, and contingent worker numbers, the employee number displays in the Number field. If the person lacks an employee number but has a contingent worker number and an applicant number, the contingent worker number displays. However, you can choose to view any of the identification numbers held for a person by selecting them from the list.
-
Enter the national identifier for your country. For example, enter the National Insurance number in the UK, the Social Security number in the US, the Fiscal Code in Italy, the IRD Number in New Zealand, the Social Security Code (TAJ) in Hungary, the Individual Tax Payer's Number (INN) in Russia or the ID number in South Africa.
For Japanese users: If you have entered the personal number using the self-service pages, then you can view the masked personal number You cannot update the personal number here. This is a unique identification number and is used for taxation and social insurance purposes and for display on the withholding income tax report, notification of acquisition of insurance qualification.
If you are an Australian user, leave the National Identifier field blank. For Finland, the PIN (Personal Identification Number) supplies the values for gender, date of birth, and age.
Note: For Norway and Sweden users only: The PIN (Personal Identification Number) supplies the values for gender, date of birth, and age.
Entering Personal Details
Enter personal details in the Personal tabbed region.
-
Enter a date of birth. You must do this before you can assign an employee to a payroll. For Poland, the PESEL supplies the date of birth. For Finland, the PIN (Personal Identification Number) supplies the date of birth.
For UK users only: If you have not entered the NI Number, the Date of Birth is a mandatory field.
-
Enter additional birth information into the Town of Birth, Region of Birth, and Country of Birth fields.
For Hungarian, UAE, and Indian users only: Enter the place of birth instead of town of birth as this information identifies employees and appears in statutory reports.
For Belgian users only: Region of birth information is not required in Belgium, so this field is not available to Belgian users.
For Romanian users only: You must select the country of birth first. If the country of birth is Romania, then the Region of Birth field displays the counties and on selecting the county, the Town of Birth displays the localities. If the country of birth is not Romania, then the Region of Birth and Town of Birth are free text fields.
-
For Russian users only: Enter the place of birth code in the Place of Birth field. The application uses this information when generating tax and pension statutory reports. You can find this code in the document All Russian Classification of Subjects of Administrative and Territorial Division (OKATO).
-
For Finnish and Romanian users only: Enter the place of residence. The place of residence influences the regional membership. You use the place of residence and regional membership to calculate income tax and other statutory deductions. Romanian users can optionally specify whether the person is a resident of Romania, a non resident non European Union, or a non resident European Union.
For Japanese users only:Enter the country of birth.
-
If the Work Telephone field is displayed, enter a work telephone number. Otherwise, use the Phone Numbers window to enter this information.
-
In the Status field, select a marital status.
-
Select a nationality.
For UAE users only: Nationality is recorded as additional personal information. Therefore, this field is not displayed in the Personal tabbed region.
-
For Russian users only: Enter the employee's statutory Pension Insurance Fund identifier. It is the employee's ID in the Statutory Pension Insurance Fund.
-
For Russian, Swedish, and Romanian users only: Select the person's citizenship. In Russia, you require this information for some statutory reporting to migration authorities. In Sweden, you can use this information to track persons who are not Swedish citizens, since the taxation and pension insurance schemes differ from those for Swedish citizens. For Romania, you can optionally specify whether the person is a Romanian, European Union, or other citizen.
-
Select whether your employee, applicant or contingent worker is:
-
Registered disabled
-
Not registered disabled
-
Partially disabled
-
Fully disabled
Note: Whether employees are fully or partially disabled affects benefits eligibility calculations.
In the US, the Americans with Disabilities Act (ADA) Report includes employees set up as registered disabled, partially disabled, and fully disabled.
For Norway, Finnish, Danish, and Swedish users only: This field is not available.
-
-
For Dutch users only: Select Yes in the Work Abroad Exceeding One Year field, if your employee has worked abroad for more than a year.
-
For Belgian users only: enter the person's preferred correspondence language in the Other region.
-
Save your work.
-
If your data already includes a person with the same national identifier, or with the same surname and a first name and date of birth that is either the same or not entered, then a list of values shows all the people who share the details.
Note: People who are only entered with a person type of Other, that is someone external to your enterprise, are not shown in this list.
If you have entered neither a first name nor a date of birth, then the list of values displays all the records that match the information you have entered.
Note: The list of values displays only if your system administrator has set the HR: Cross Business Group profile option to Yes.
Do one of the following four tasks:
-
If the person you are entering already exists, but in a different business group, then select that person from the list of values. The person you are entering is saved in your current business group and linked to the existing person record to indicate they are the same person. If your application has person synchronization enabled, then the personal information entered for the new person is copied across to existing records in other business groups. If existing records have values for fields that the new record leaves blank, then these values appear in the new record. See: Person Record Synchronization, Oracle HRMS Workforce Sourcing, Deployment, and Talent Management Guide
-
If the person already exists in your current business group then select that person from the list of values. The application retrieves the existing record and cancels the save you were trying to make, as one business group cannot contain two records for the same person. Close the new record and scroll down to display the existing record.
Note: You cannot link to any entry in the list of values marked with an asterisk as these either belong to your business group, or are linked to a person in your business group.
-
If the person already exists in TCA, but not in HRMS, then select that person from the list of values. The person you are entering is saved in your current business group and linked to the existing person record to indicate they are the same person. The information held for the person in TCA is updated with that entered in HRMS. See: People in a Global Enterprise, Oracle HRMS Workforce Sourcing, Deployment, and Talent Management Guide
-
If the person you are entering does not match any of the records displayed, then select No Match in the lookup. Your new person record is saved.
-
What Next?
Optionally, you can enter additional information for people in the tabbed regions.
Note: The Background Information, Medical Information, and Rehire Information tabbed regions appear only if your system administrator has enabled them for you.
Entering Additional Personal Information (People Window)
Optionally, you can enter additional information for people in the tabbed regions of the People window described in the following steps.
Note: The Background Information, Medical Information, and Rehire Information tabbed regions appear only if your system administrator has enabled them for you.
To enter military details for an employee
-
Click the Military Details tab.
-
Select the employee’s military document type. If the document type is Military Assignment Certificate, proceed to Step 8. Otherwise, proceed to Step 3.
-
Select a reserve category.
-
Select the military rank.
-
Select the profile of this military rank.
-
Enter the military unit number.
-
Enter the full code of the military registration board. The military card provides this code.
-
Select the service readiness category. If the document type is Military Card, the default value displayed is Suitable for Military Service.
-
Enter the name of the military commissariat related to the place of employee registration.
-
If the employee was dismissed from the military service, select the conscription dismissal mark.
-
If the document type is Military Card, select the employee’s military registration type and enter details of this registration type.
To enter office information for a new hire, an existing employee, or contingent worker
-
Choose the Office Details tabbed region.
-
Enter the office number.
-
Enter the internal location of this office.
-
Enter the office identifier for internal mail.
-
Enter the person's e-mail address.
-
In the Mail To field, select Home or Office to indicate the person's preferred mail destination.
To enter information for an applicant
-
Choose the Applicant tabbed region.
-
If the applicant's resume is on file, check the Exists check box.
-
If the applicant's resume is on file, select the date indicating when the resume was last updated.
-
Select a final date a file is to be maintained for this applicant.
To enter background check information
-
Choose the Background tabbed region.
-
Check whether the person background check has been performed.
-
Select the date the background check was performed.
To enter rehire recommendation information for an applicant who was a former employee or contingent worker
-
Choose the Rehire tabbed region.
-
If the former manager has recommended the applicant for rehire, select the Recommended check box.
-
Select the reason for this recommendation.
To enter further name information
-
Choose the Further Name tabbed region.
-
Enter one or more honors or degrees (BA, MBA, or JD, for example) that the person has earned.
-
Enter the name (perhaps a nickname) by which the person prefers to be known.
-
If the person was previously known by a different name, enter the previous last name.
To enter medical information for a person
-
Choose the Medical tabbed region.
-
Select the date of the person's last medical test.
To enter other information for a person
-
Choose the Other tabbed region.
-
Enter the contact details of the employee's references in the company. For example, you can enter the name, designation, and phone details of the employee's reference person.
-
Enter the local coefficient of the territory if the employee works in the Last North region or the regions that are equated to Last North.
Note: Local coefficient is the value that is specified by the statutory authority for the Last North region and the regions that are equated to Last North. The application uses this value for the payroll calculation of the employee working in any of these regions.
-
Select the type of schedule in the Availability/Schedule field; for example, the days of the week your employee works.
-
Enter the person's current full time/part time availability to work with your company.
-
Select the language the person prefers for correspondence. For example, select German if the person prefers to correspond or receive company information such as terms of pension plan in German.
Note: The Correspondence Language list includes languages in the FND_LANGUAGES table. This table contains the languages that Oracle National Language Support Runtime Library (Oracle NLSRTL) supports. Check with your System Administrator for information on NLSRTL supported languages.
-
If the person has died, enter the date of death.
Date of death defaults to the person's termination date if:
-
In the Terminate window you enter the termination reason of deceased, but
-
You do not provide the actual termination date, and
-
You have not yet entered a date of death
-
-
-
Select the current student status, if the person is a student.
-
In the Date Last Verified field, you can enter the date the person last checked this personal information for accuracy.
-
Check the Military Service check box if the person is employed in a military service.
The value of this field can impact benefits calculations.
-
Check the Second Passport Exists check box if the person possesses multiple passports.
To enter benefits information
-
Choose the Benefits tabbed region.
Note: All fields in the Benefits tabbed region are optional. Most can help to determine plan eligibility or rates.
Note: If necessary, you can add the Benefits Tab to the People window. Query the BEN_MANAGER menu in the Menus window and add the HR View Benefits function to the menu.
-
Enter a benefit group for your employee or applicant. Benefit groups help determine a person's eligibility for a plan or set benefit rates. For example, benefit groups can address mergers and acquisitions where eligibility is complicated, or assist in grandfathering a person into a very old plan.
-
Enter what kind of tobacco (cigarettes, pipe, cigar, or chewing, for example) your employee uses, if any.
-
Enter the medical plan number, which is the policy or group plan number of an externally provided medical plan.
-
Enter the adoption date, if the employee has adopted a child. This information, with the child's date of birth, can determine dependent eligibility. You can enter the adoption date only if you have entered a date of birth for the person. The adoption date must be the date of birth or later.
-
Enter the date you received the death certificate of a deceased employee. You can enter this only after you have entered the date of death in the Other Information region. The receipt of the death certificate must be after or equal to the date of death.
-
Enter an adjusted service date for your employee. Benefits can use this date, rather than the date first hired, to determine the length of service for eligibility, enrollment, and rates. The adjusted service date can credit service for former employers, grandfathered benefits, or in the case of mergers and acquisitions.
-
Change the date first hired. For employees who have previously worked for your enterprise, the Date First Hired field displays the start date of the employee's earliest, previous period of service. This date must be on or before the start date of the earliest period of service.
-
Check the Other Coverage check box, if the employee or applicant has externally provided coverage.
-
Check the Voluntary Service check box, if your employee or applicant is volunteering, for example as a missionary.
Entering Additional Assignment Details (Assignment Window)
Once you have set up basic assignment details, you can enter additional information, such as supervisor details, special ceiling progression points, and salary information, in the tabbed regions of the Assignment window. The tabbed regions that appear in the Assignment window vary according to person type and localization.
Note: For countries other than the US or UK, your Oracle localization team may have created additional fields in a tabbed region to hold legislatively required additional information.
To enter salary information for an employee
Use the Salary page to enter a proposed salary change for an employee, associate this change with a performance review, and accept or revise the change later. To administer an employee's salary in this way, you first assign the employee to a salary basis in the Salary Information region.
-
Select a salary basis for the employee.
-
You can also enter the frequency of salary and performance reviews.
Note: When you change salary basis for an assignment, the application end dates the existing proposal and creates a new salary proposal. The new proposal updates the salary element entry automatically. When you remove a salary basis from an assignment, the application end dates the existing salary element entry, enabling you to manually create a new salary element entry effective from the date of the salary basis change.
For more information about salary administration, see: Salary Administration, Oracle HRMS Compensation and Benefits Management Guide
To enter supplier information for a contingent worker
You use the Supplier tabbed region to record information about the supplier providing the contingent worker to your enterprise. The procedure depends on whether you are using Oracle Services Procurement to provide purchase order information for contingent worker assignments.
If you are not using Oracle Services Procurement:
-
Choose the Supplier tabbed region.
-
Select the names of the supplier and the supplier site for the contingent worker.
-
Enter supplier IDs for the contingent worker and the assignment, if available. These values identify the worker and the assignment to the supplier.
If you are using Oracle Services Procurement:
-
Choose the Supplier tabbed region.
-
Select a purchase order number for this assignment.
-
If only one purchase order line exists, it appears in the Purchase Order Line field. Otherwise, select a purchase order line. Note that the Purchase Order Line field is enabled only when you select a purchase order.
-
Information from the purchase order appears automatically in the Supplier Name and Supplier Site fields. If the purchase order line includes a job value, it replaces any value in the Job field.
-
Enter supplier IDs for the contingent worker and the assignment, if available. These values identify the worker and the assignment to the supplier.
To enter supervisor information for an employee or contingent worker
-
Choose the Supervisor tabbed region.
-
Select the name and number of the worker's personal supervisor. If you use assignment-based supervisor hierarchies, select the supervisor's assignment number.
You can select a contingent worker as a supervisor only if the HR: Expand Role of Contingent Worker user profile option is set to Yes.
You can select a supervisor from another Business Group if the HR:Cross Business Group user profile option is set to Yes at your site.
Note: The application does not update this information. Use organization and position hierarchies to show management reporting lines.
To enter probation period and notice information for an employee
The probation period defaults from the employee's position.
-
Choose the Probation and Notice Period tabbed region.
-
Amend the default probation period for your employee's assignment, if required.
-
Enter the notice period for the assignment, if required.
To enter standard conditions information for an employee or contingent worker
The standard work day information (apart from the Hourly/Salaried field) defaults from the position. If standard conditions are not defined for the position, they default from the organization or Business Group.
-
Choose the Standard Conditions tabbed region.
-
Amend the standard work day information for your employee or contingent worker assignment, if required.
-
This step is for employees only. For benefit administration, enter whether the assignment is hourly or salaried. If you are in the US, benefits are often based on whether a person is paid hourly or receives a salary.
Note: If you are setting up benefits based on salaried or hourly pay you must set up the Hourly/Salaried field in addition to the Pay Basis. The Pay Basis identifies how pay is quoted within Salary Administration and enables an employee to have their pay quoted as hourly, but be paid a salary. Therefore, for benefits, you need to set up whether your employee is paid hourly or receives a salary.
To enter primary or secondary assignment and miscellaneous information for an employee or contingent worker
-
Choose the Miscellaneous tabbed region.
-
Enter the internal address details (such as the floor or office number), if required. The system adds the details to the location address.
-
Select a reason for adding or changing the assignment. For example, you can use the Start Reason field to record promotions for your employees. You define valid reasons as values for the lookup types Reason for Change to Employee Assignment (EMP_ASSIGN_REASON) for employees and Contingent Worker Assignment Reasons (CWK_ASSIGN_REASON) for contingent workers.
-
Select the Manager box if the assignment is at manager level and you want to include this worker in the Organization Hierarchy Report as a manager. (You can select Manager for a contingent worker assignment only if the HR: Expand Role of Contingent Worker user profile option is set to Yes.)
-
By default, the first assignment entered is the primary assignment, and the Primary box is automatically checked. If you are now entering a secondary assignment, you must ensure that the Primary box is unchecked.
Check the Primary check box to update a secondary assignment to Primary.
See: Changing Primary Assignments, Oracle HRMS Workforce Sourcing, Deployment, and Talent Management Guide
-
If you use Oracle Services Procurement to provide purchase order information for contingent worker assignments, the purchase order line may include the projected assignment end date. In this case, the date appears in the Projected Assignment End field. Otherwise, enter the projected end date of the assignment.
To enter special ceiling information for an employee
A special ceiling progression point is the highest point to which the Increment Progression Points process can automatically progress the employee.
-
Choose the Special Ceiling tabbed region.
-
Enter a special ceiling only if the employee is assigned to a grade, and if a grade scale is defined for this grade. This special ceiling overrides the ceiling defined for the grade scale.
To enter a billing title for an employee or contingent worker (Oracle Projects only)
-
Choose the Project Information tabbed region.
Note: The Project Information tabbed region displays only if you have installed Oracle Projects.
-
Enter a billing title. The information you enter in the Billing Title field serves as the default title on project customer invoices. You can override this information using Project Accounting.
-
Enter a project title.
To enter grade ladder information for an employee
You must enter grade ladder information to use the Grade/Step Progression process.
-
Choose the Grade Ladder tabbed region.
-
Select the grade ladder for this assignment. If you selected a grade for this assignment previously, all the grade ladders that use that grade are available. If you have not selected a grade, all the active grade ladders in your enterprise are available.
To enter bargaining unit and union membership information for an employee
-
Choose the Bargaining Unit tabbed region.
-
Enter a bargaining unit code for your employee's assignment. This is usually the legally recognized collective negotiating organization.
Note: You set up your different bargaining units as values for the Lookup type BARGAINING_UNIT_CODE
-
Select whether the employee associated with the assignment is a member of a union.
To enter employment terms for an employee
-
Choose the Employment Terms tabbed region.
-
Select the contract to be referenced by the assignment. The list of contracts is limited to those entered for the employee that have start dates on or before the assignment start date.
Note: If you are a German public sector user, selecting a contract defaults some values, for example pay grade, from the contract into the assignment. If you want to amend these values you must change them on the contract as you cannot update them in this window.
-
Select the agreement grade structure for the collective agreement. A window shows the grade factors for that grade structure.
-
Enter values for the grade factors. Or, choose the Combinations button and enter search criteria for one or more grade factors to display the reference grades that meet those criteria.
If you enter values directly into the grade factor fields, they must correspond to an existing reference grade unless the Override Allowed check box in the Agreement Grades window is checked.
Note: Any new combinations of values that you enter are unavailable for reuse with other assignments. To reuse a combination, you must define it as a reference grade in the Agreement Grades window.
-
Enter the additional pension years, months, and days that makes the person eligible for additional pension benefits. For example, you can enter these values for a person working in special conditions or field work.
To enter statutory contract details for an employee
-
Click the Statutory Information tab. Use this region to capture contract details for various statutory reports.
-
Select the employer name.
-
Enter the contract number.
-
Specify whether the current assignment relates to secondary employment.
Note: Whenever you create a new employee, HRMS sets the secondary employment field to null, meaning the current assignment relates to primary employment. To associate the assignment with secondary employment, set the Secondary Employment field to Yes.
-
Enter the contract issue date. This is the date when the person receives the contract.
-
If the employee has a limited-term contract, enter the contract end date. A limited-term contract is a temporary contract that expires on a fixed date.
Note: If the contract end date is not available, leave the field blank.
-
Select the reason for the contract being temporary in the Limited Term Reason field.
-
If you are terminating the employee's assignment, select an end reason.
To enter other details about the employee's assignment
-
Click the Other tab. Information you enter here influences payroll calculations, particularly those related to pension and sickness absence payments.
-
Select the special working conditions for this assignment.
-
Select the territory conditions for this assignment.
-
Select the Calculated Record of Service Reason (CSR). CSR specifies the reason for including the job in the calculation of the employee's total service record.
-
Enter CSR additional information. For example, you can enter information about the employee's type of work.
-
Select the Long Service Reason (LSR). LSR specifies the employee's special working conditions that make the employee eligible for premature retirement.
-
Enter LSR additional information. For example, you can enter information about the employee's type of work.
-
Select an Uninterrupted Service Record value. If you select Yes, then the application uses the employee's period of service with the employer for calculating the employee's uninterrupted years of service. Otherwise, the application ignores this period and all other employment periods before this employment for the calculation of the uninterrupted years of service.
-
Select a Total Service Record value. If you select Yes, then the application uses the employee's period of service with the employer for calculating the employee's total length of service. Otherwise, the application ignores this period for the calculation of the total length of service.
Entering Further Previous Job Information
Use the Further Previous Job Information window to enter additional information about the employee's previous job.
To enter further previous job information
-
In the Previous Job region of the Previous Employment Information window, click in the Further Information field to open the Further Previous Job Information window.
-
Select the territory conditions for the employee’s job.
-
Select the special working conditions for this job.
-
Select the Calculated Record of Service Reason (CSR). CSR specifies the reason for including the job in the calculation of the employee’s total service record.
-
Enter CSR additional information.For example, you can enter information about the employee’s type of work.
-
Select the Long Service Reason (LSR). LSR specifies the employee's special working conditions that make the employee eligible for premature retirement.
-
Enter LSR additional information. For example, you can enter information about the employee’s type of work.
-
Save your work.
Entering Previous Employment Details
Use the Previous Employment Information window to enter information about the employee's previous employment.
The Previous Employment Information window is divided into three regions with each region recording separate information about an employees previous employment. The three regions in the Previous Employment Information window are:
-
Previous Employer
-
Previous Job
-
Assignment - Previous Job Mappings
To enter previous employment details
-
Enter the previous employer name.
-
Enter an address.
-
Select a country.
-
Select the type of activity. If the type of activity is RABOTA, proceed to Step 9. Otherwise, proceed to Step 5.
Note: The activity type RABOTA signifies that the employee’s service record includes this employment.
To avoid inconsistent records, you cannot update the Type of Activity field.
-
Select a Total Service Record value. If you select Yes, then the application uses the employee's period of service with the employer for calculating the employee's total length of service. Otherwise, the application ignores this period for the calculation of the total length of service.
-
Select an Uninterrupted Service Record value. If you select Yes, then the application uses the employee's period of service with the employer for calculating the employee's uninterrupted years of service. Otherwise, the application ignores this period and all other employment periods before this employment for the calculation of the uninterrupted years of service.
-
Enter start and end dates for the employee's period of employment. These dates define the period of service in years, months, and days.
-
You can override the period of service calculation by entering your own period of service in the Years, Months and Days fields.
-
Use the Further Information flexfield to enter any additional information about the previous employer.
You can enter information about an employee's contact in a previous organization in the References field. This information may include the contact name, position, phone, and other details.
-
Select the All Assignments check box to specify that the service period is taken into account for all assignments.
Note: The All Assignments check box can only be selected if there are no further previous job usages defined in the Assignment region. Once the All Assignments check box is selected no further previous job usages can be defined.
-
Save your work.
Note: Enter the following information only if the type of activity is RABOTA. For other types of activity, this is not applicable.
To enter previous job details
-
Select an empty row in the Previous Job region or place you cursor within an existing row and choose the New button to add a new row.
-
Enter start and end dates for the previous job. The job entered must be associated with the employer and period of service entered at steps 1 to 11. The dates entered automatically calculate the period of service in years, months and days.
-
Enter a position title.
-
Select an employee category.
-
You can override the period of service calculation by entering your own period of service in the Years, Months and Days fields.
-
Select an Uninterrupted Service Record value. If you select Yes, then the application uses the employee's period of service with the employer for calculating the employee's uninterrupted years of service. Otherwise, the application ignores this period and all other employment periods before this employment for the calculation of the uninterrupted years of service.
-
Select the All Assignments check box to specify that the previous job period is taken into account for all assignments.
Note: The All Assignments check box can only be selected if there are no further previous job usages defined in the Assignment region. Once the All Assignments check box is selected no further previous job usages can be defined.
-
Use the Further Information flexfield to enter any additional information about the previous job.
-
Choose the Extra Information button to open the Previous Job Extra Information window.
See: Entering Extra Information, Oracle HRMS Configuring, Reporting, and System Administration Guide
-
Save your work.
To map previous jobs to an assignment:
-
Select an empty row in the Assignment region or place you cursor within an existing row and choose the New button to add a new row.
-
Select an assignment to map to a previous job specified at steps 12 to 19.
-
Select a job to map to the assignment selected at step 21. Selecting a job automatically displays the Start Date and End Date fields as specified for the job in the Previous Job region.
-
You can override the period of service calculation by entering your own period of service in the Years, Months and Days fields.
-
Use the Further Information flexfield to enter further previous job usage details.
-
Save your work.
Entering Addresses (Address Window)
You can enter as many addresses as necessary for each person, using the Address window.
Note: You cannot enter or update address information in the Address window for a contact who is also an employee or contingent worker. Instead, update the relevant employee or contingent worker record.
To enter an address for a person
-
Select a national address style and click in the Address field.
If a local address style exists for your country, it is displayed as the default. Otherwise, the international style is displayed.
Australia Users: There is a choice of Australia address style and Australia (International) address style. If you want change from Australia (International) address style to Australia address style, you can by running the Upgrade Australia Address Style process. This is an optional step.
Finnish Users: To display the postal code and post office on the same row in line with the Finnish Address standard, the application displays them in the same field, separated by a space. If you are not using Finnish postal codes upload functionality, you must enter postal codes and post offices manually. See: Entering Postal Codes, Oracle HRMS for Finland Supplement
Dutch Users: When you record foreign addresses, ensure you use the Dutch International address style. This address style enables you to report the address in the wage report in the required format.
US and Canadian Users: There is a choice of US address style and International address style if you have Vertex geocode data installed. If you are not maintaining DTW4 data and do not want to enforce the strict tax validation, then you can disable this using the HR:Enable DTW4 Defaults profile option.
US Payroll Users: If the Address Validation Using Vertex Web Services feature is enabled, then Vertex Web Services validates addresses in the Address window. See: Address Validation Using Vertex Web Services, Oracle HRMS Implementation Guide (US)
Singapore Users: When you record addresses for local employees, ensure you use the Singapore (Formatted) address style. This address style enables you to report the Primary address in the IRAS reports in the required format.
Note: You can change existing address styles or create new ones if required. See: Changing Default National Address Styles, Oracle HRMS Configuring, Reporting, and System Administration Guide
A window opens with the address format for the country you select.
-
Enter your address information in this window.
Note: India Users:If the city is Delhi, New Delhi, Mumbai, Bombay, Kolkata, Calcutta, Chennai, or Madras, the application sets the metro status to Yes, else it is set to No.
Note: Use the Phone Numbers window instead of this window to record telephone numbers otherwise you will be maintaining two lists of numbers.
Kuwaiti Users: You must select the Governorate (Muhafazat) for payroll processing.
UK Users: If you enter the employee's address, then the first line is mandatory and the remaining lines are optional. If you enter the post code, then you must also enter the first line of the employee's address. If you enter the country in the first line, then you must enter the employee's address.
Romanian Users: If you enter the county name, then you must ensure to enter the street information.
See: Adding Telephone Information, Oracle HRMS Workforce Sourcing, Deployment, and Talent Management Guide
Russian Users: Ensure you enter the zip code for the Residential address category so that the code appears in statutory reports.
-
Choose the OK button. This returns you to the Address window.
-
Select an address type, such as home, or weekend, or business. You can only have one address of each type at any time.
Singapore Users: If you use company quarters, be sure to choose this address type, so it appears in the A8A report.
-
Check the Primary checkbox to identify the person's main address. Otherwise, leave blank. By default, the first address you enter is the Primary address.
Dutch Users - Use the Population Register Address type to record an additional address. The NSI reports use this information to report to the Dutch population register.
Only one address at any time can be a person's Primary address.
Singapore Users: If you use the Singapore (Formatted) address, you must enter the block number or address number, the street name, and the postal code values within the address to ensure that the IRAS process validates correctly. If you enter the Unit Number, you must enter the Level (Floor) number in the XXX-XXXXX format.
-
Save your work.
To update the primary address
-
Enter an end date for the existing primary address.
Do not save.
-
Create the new primary address starting the next day and check the Primary Checkbox.
Note: An employee must always have a primary address, but you cannot enter more than one primary address for the same time period.
-
Save the new primary address.
To change from an international to a local address style
-
To change from a global (international) address style to a local address style, choose Change Global Style to Local. This button appears only when the current style is international.
The Personal Address Information window appears showing the new address structure. Values in fields common to both styles appear in the new structure.
If you choose Change Global Style to Local when there is no local style, Oracle HRMS displays an explanatory message and the style remains unchanged.
-
Complete the address definition, as appropriate.
-
Choose OK.
-
Save your work.
Entering Next of Kin and Other Contacts
Use the Contact window to hold information about contacts, for example:
-
People to contact in an emergency.
-
Dependents.
-
Beneficiaries of benefits such as insurance policies or stock purchase plans.
-
Individuals receiving payment of a wage attachment/third party payment deducted from the employee's salary.
A person entered as a contact can be one, some, or all of the above.
The coverage start date for an employee contact, is the employee hire date or the contact relationship start date, whichever is later. This can be important in benefits processing, where eligibility for certain benefits starts from the start date of a contact relationship.
Creating The Same Contact Relationship More Than Once
You can set up the same relationship more than once between the same two people. However, these relationships must not occur in the same time period. For example, you can set up that Person A married Person B from 01-Jan-1990 to 01-Feb-1991. Person A could then marry Person B again, starting from the 02-Feb-1991. However, you cannot enter that the couple remarried on 01-Jan-1991, as this would mean that they were married twice in the same time period.
Updating a Contact Relationship Start Date to Make it Earlier
You can update the contact relationship start date between two people, creating a supplementary record to cover the additional period.
For example, Person A exists on the application as an employee with a hire date of 01-Apr-1990. Person B exists on the application as a contact, with a creation date of 01-Jun-1990. Person A then marries Person B on 01-May-1990. As the application holds a contact coverage start date of 01-Jun-1990, a new contact record is entered to cover 01-May-1990 and 31-May-1990.
To enter a contact
-
Do one of the following:
-
Enter the name of a new person.
-
Select from a list of people already entered on the system.
-
-
If you enter a new person:
-
Enter their gender and date of birth.
For UAE users only: Additionally, you must enter the father, grandfather, and family name.
For Romanian users only: Enter the Numerical Person Code (NPC/FRN) as the identification information.
-
Select the user person type.
You can only select user person types which are set up for the system person type of Other, for example contact.
-
-
Enter details about the different contacts for your employee in the Contact Relationship fields.
-
For Japanese users only: You can view the masked personal number of the employee's dependent if the number has been entered using the self service pages.
To enter contact relationships
-
Select the contact relationship, for example child or spouse.
-
Enter the start and end date (if known) of the relationship.
Note: For Dutch users only, if you set up a spouse as a contact for an employee, whose full name format includes partner's prefix and surname, the full name of the employee changes automatically based on the spouse's name, if the contact relationship covers the employee's full period of employment. If it does not cover the full period the changes to the full name of the employee must be set manually on all datetrack records.
-
If you use Oracle Advanced Benefits or Standard Benefits, select a start and end reason for the relationship.
-
Select whether the contact:
-
Is the primary contact.
-
Is the recipient of a third party payment (for example, from a court-ordered deduction/wage attachment).
This enables you to select this person on the Personal Payment Method window when entering a third party payment method for the employee.
-
Shares the same residence as the employee.
-
Has a personal relationship with the employee. This identifies whether the third party should be considered as a possible dependent and/or beneficiary.
-
Is a beneficiary or dependent. You can only enter these fields if you do not use Standard or Advanced benefits.
-
-
You can enter a sequence number for the contact relationship. This must be a unique number for each contact the employee has. However, because sequence numbers are employee based, these numbers only need to be unique within the employee's record.
For example, Person A has a relationship type of spouse with Person B. This is given the sequence number of 1. Person A also has a relationship type of father to Person C. This is given the sequence number of 2.
Person A also has a relationship type of emergency contact with Person B. This must also have the sequence number of 1 as a relationship between these two people is already recorded against Person A.
Person B is also an employee and therefore has her own set of contacts recorded against her. She has a relationship type of spouse with Person A. However, this relationship does not have to have the same sequence number as the relationship recorded against Person A, that is, this relationship has a sequence number of 5.
-
Select whether you want to create a mirror relationship and enter the mirror relationship type.
Important: You can only enter a mirror relationship and type when you first create the contact. Once the mirror relationship is saved, the relationships are maintained independently of each other, except for mirror relationships that are created automatically.
Oracle HRMS automatically creates a mirror relationships when you enter a spouse, parent or child. For example, if you create the spouse relationship from person A to person B, when you query person B in the Contact window, a mirror relationship of spouse to person A is automatically created.
Furthermore, if you update a relationship that has had a mirror relationship automatically created, the mirror is also updated accordingly. For example, if you end date the relationship of spouse for person A, the spouse relationship for person B is also ended. If the relationship type is changed the relationships become independent.
-
Enter further information about the contact if your localization team has setup the configuration of the further information field.
For Spanish users only: Record if the contact (disabled dependant or a dependant) is financially dependent on the employee. The application uses this information to calculate the tax reductions the employee may be eligible for. You can also record if the employee is a single parent as this affects the employee's the tax-withholding rate.
For Russian users only: If the contact type is child, indicate whether the child is in full-time education. The application uses this information to calculate the employee's tax reductions. You must also record any disability information for the child contact, as this affects an employee's social security contributions, tax, and leave benefits.
-
Save your work. If a person already exists on your application with the same surname and a first name that is either the same or not entered, then a list of values is displayed that shows all the people who share the details. See: Multiple Person Records
What Next?
If you want to enter addresses or phones for the contact, choose the Contact Details button.