Integration with Oracle Application Express (APEX)
Introduction
Oracle Application Express (APEX) is a rapid web application development tool for Oracle Database. Using only a web browser and limited programming experience, users can develop professional applications that are both fast and secure with built-in features such as user interface themes, navigational controls, form handlers, and flexible reports. By doing so, Oracle Application Express accelerates the application development process.
Oracle Enterprise Command Center Framework (ECC) provides operation intelligence dashboards that are action-driven, and customers can take advantage of APEX to design action-focused forms. So, instead of navigating to regular Oracle E-Business Suite forms to perform a required action, users can navigate to the APEX form and perform the action.
Implementation
Refer to Installing Oracle Enterprise Command Center Framework, Release 12.2, My Oracle Support Knowledge Document 2495053.1 for instructions on the implementation of Oracle Application Express with Oracle Enterprise Command Center Framework. Also refer to Extending Oracle E-Business Suite Release 12.1.3 and Above Using Oracle Application Express (APEX), My Oracle Support Knowledge Document 1306563.1, and Oracle Application Express Tutorial: Building an Application for details on working in APEX.
The implementation process is described at a high level in the following illustration:
Implementation of Oracle APEX

-
Install Oracle REST Data Services (ORDS).
-
Copy APEX images to the webserver.
-
Start ORDS.
-
Log in to APEX administration:
http://<EBS_Hostname>:8080/apex/apex_admin
-
Create a custom schema and workspace for APEX.
-
Configure development users.
To integrate with Oracle E-Business Suite, the tasks in the following illustration should also be completed:
Integrating Oracle APEX with Oracle E-Business Suite

-
Grant rights to developers to create, read, and execute database objects to APEX schema.
-
Grant privileges to assign the Oracle E-Business Suite APPS schema in APEX applications.
-
Associate the APPS schema in APEX applications.
-
Build custom APIs or use public APIs for submitting an Oracle E-Business Suite transaction.
After performing the above tasks, you can leverage Oracle E-Business Suite artifacts.
Authentication and Authorization
Create an authorization scheme by navigating from Application to Shared Components and then select Authorization Schemes.
-
Enter the name of the authorization scheme,
<Authorization Scheme Name>. -
Select the scheme type PL/SQL Function Returning Boolean.
-
Provide the PL/SQL below inside the PL/SQL Function body:
begin
return fnd_ecc_apex_authorization.authorize_apex;
end;
-
Provide an error message in case of authentication or authorization failure after the processing of the above PL/SQL.
-
Save the authorization scheme changes.
This authorization scheme validates both the authentication and authorization of the user, so there is no need for explicit configuration for authentication. This API validates against the responsibility of the user accessing the application and then provides the required access.
In the respective pages, select the created scheme as the Authorization Scheme. For Authentication, select Page is Public (because authentication is also being validated as part of the authorization scheme).
The API used in the authorization scheme retrieves information such as "EBS User ID" and "EBS Language" in addition to performing authentication and authorization.
Building APEX Content
After completing the installation and authorization/authentication, you can start building the application that will contain the pages and forms needed for an action from an Enterprise Command Center dashboard. Use the following steps:
1. Create Fields
Add the required fields and buttons.

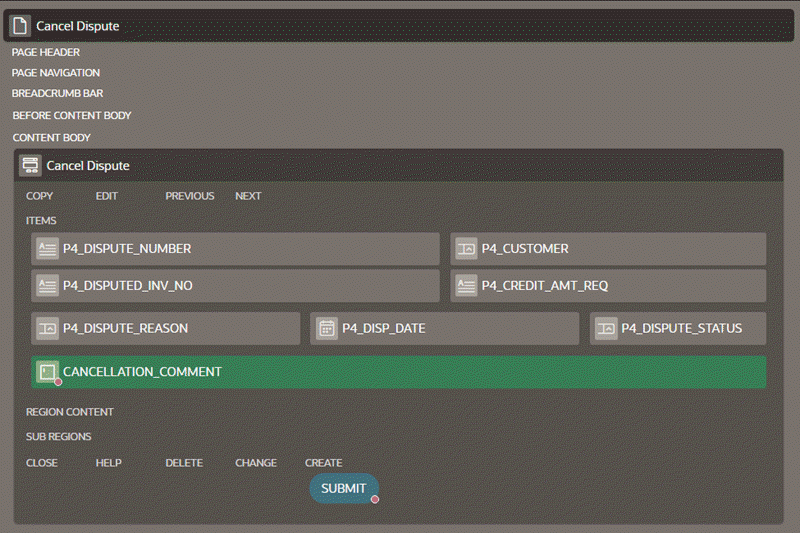
For example, there are often disputes in customer invoices due to reasons like incorrect calculations, duplicate line entries, incorrect rates, product damages, and so on. The ECC iReceivables dashboard provides a powerful solution to track customer disputes and cancel the disputes created by the customers.
In this example, we design an APEX form that can be displayed inside an ECC Pop-up window.
The requirements for such an APEX form are:
-
We need to display the details that are required to perform the action; that is, cancel the dispute.
-
The form will include display read-only details such as: Dispute Number, Customer Details, Disputed Invoice Number, Credit Amount Requested, Dispute Reason, Dispute Status, and Dispute Date.
-
A Cancellation Comment field is required where the user enters the comments required to cancel the dispute.
-
A Submit button is required to cancel the dispute.
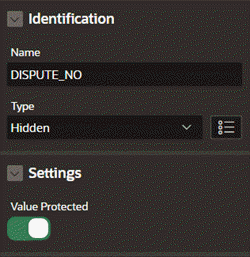
In addition, the URL Parameter(s) that are used in the ECC hyperlink configuration should be added as the hidden field(s) as these values need not be visible on the APEX page. The following illustration shows an example of a hidden field in a Cancel Dispute form.
Example of a Hidden Field

2. Fetch Data
The data from Oracle E-Business Suite need to be populated in the respective fields, such as in an Oracle Application Framework page. In the case of using APEX, we fetch the details that are required to perform an action as follows:
-
Select the type of a field as SQL Query.
-
In the SQL Query section, provide the query that fetches the value from Oracle E-Business Suite and assigns the value to the field.
Create an "After Submit" Process
To allow the user to complete the transaction by clicking Submit, create an "After Submit" process.
Here is an example of an "After Submit" process in the Cancel Dispute action:
-
Create an “After Submit” process in the Processing section to update the data in Oracle E-Business Suite tables/
-
Provide the following details for the process:
-
Identification Type: Specify "Execute Code"
-
Source location: Specify "Local Database"
-
Language: Specify "PL/SQL"
PL/SQL code to cancel the dispute under PL/SQL Code section API used:
iex_dispute_pub.cancel_dispute -
Success Message: Enter "Credit Memo Request has been cancelled successfully."
-
Error Message: Enter "Unable to process. Please try again."
-
This "After Submit" process will trigger the PL/SQL API code and performs the action.
Create an "After Processing" Branch
Create an "After Processing" branch in the processing section to redirect to the same page after the completion of the earlier process.
Below is an example of the creation of an "After Processing" branch in the "Cancel Dispute" form:
-
Create an After Processing branch in the processing section to redirect to the same page after completing the earlier process.
-
Select the behavior type "Page or URL (Redirect)" from the available list.
-
Select the same APEX page as the Target.
-
Set the server-side condition for "Submit Button" and "Cancellation Comment" as
dispute status <> 'CANCELLED'. This is required not to display the two fields when the page is redirected to itself.
Oracle Enterprise Command Center Framework Push Model Integration
The Push model is required to reflect the new changes of the updated transaction in Oracle Enterprise Command Center Framework. For more information on the Push model, see: Implementing the Push Model for Loading Data.
To integrate with the Push model, perform the following steps:
-
Create a legacy web service reference.
-
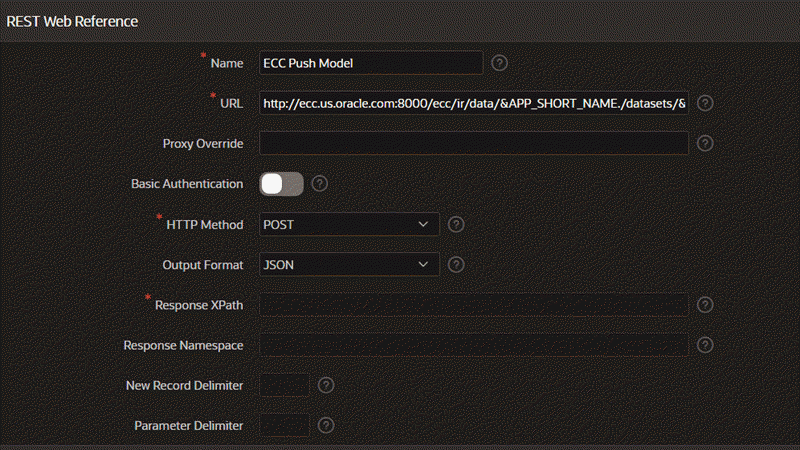
Provide the following details for the web service:
-
Name:
<NAME> -
URL:
<EBS_PROTOCOL>://<EBS_HOST>:<EBS_MANAGED_PORT>/ecc/ir/data/&APP_SHORT_NAME./datasets/&DATASET_KEY..json?gfmString=&ECC_GFM_TOKEN.&logLevel=ERROR&languages=US&loadType=DATA_LOAD&reqId=100&source=EBSIn APEX, we can refer to the values at runtime using the "
&ITEM_NAME." convention. The value will be substituted when the web service is triggered.Using the Cancel Dispute example:
&APP_SHORT_NAME.- This will be changed to "ar" at runtime. -
HTTP Method: JSON
-
Output Format: JSON
-
REST Input Parameters:
-
Input Type: Specified Body with Substitutions
-
Source: #PUSH_JSON_DATA#
-
-
Add "Content-Type" as HTTP Request Headers
-
Save the details.
-
An example of a legacy web service used for the Cancel Dispute example is shown below.
Example of a Legacy Webservice Reference

Embed in an Enterprise Command Center Pop-up Window
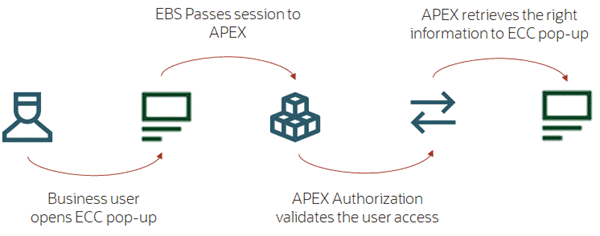
An APEX page can be made available from an ECC Pop-up window. The actions at runtime are described in the following illustration:
Runtime Actions for an APEX Page in an ECC Pop-up Window

-
The user opens the Oracle Enterprise Command Center pop-up window.
-
Oracle E-Business Suite passes the session to APEX.
-
APEX Authorization validates the user access.
-
APEX retrieves the appropriate information and sends it back to the ECC window.
As the authorization scheme validates both authentication and authorization of the user, the user does not need to log in again to view the APEX page. To disable the login page, enable the Deep Linking option under Security Attributes in Shared Components.
To embed the APEX page:
-
Set the Page Access protection as "Unrestricted" under the Security section of the APEX page as only authorized users will be able to access the page.
-
Enable the Friendly URL in APEX. Navigate to the Application home page in APEX. From the Edit Application Properties button, configure the Friendly URLs attribute.
This will be useful while passing parameters from ECC to APEX
-
When an external page is configured as part of ECC Pop-up, cross-origin issues might arise. To resolve the cross-origin issue, set the Oracle E-Business Suite URL as CSP Frame ancestors under HTTP Response Headers in the APEX Application security attributes.
To do this:
-
Navigate to Browser Security by selecting Application, then Shared Components, then Security Attributes, then Security, and finally Browser Security.
-
For HTTP Response Headers, enter the following:
Content-Security-Policy: frame-ancestors <EBS_PROTOTCOL>://<EBS_HOST>:<EBS_PORT>;
-
Add hidden fields:
-
APP_SHORT_NAME (with a static value as that of the respective application short name in ECC),
-
DATASET_KEY (with a static value as that of the respective data set key in ECC)
-
PUSH_JSON_DATA for the page
These fields are required while triggering the ECC Push Model to update the data.
-
-
-
Provide the following details for the Push Model process for the page. The process below will fetch the updated fields and their respective identifier (ECC_SPEC_ID) and prepare the data in JSON format.
After that, a request is triggered to ECC using ECC Push Model Integration with JSON data. This updates the corresponding fields for the respective ECC_SPEC_ID in Oracle Enterprise Command Center Framework..
-
Name:
<PROCESS_NAME> -
Type:
<EXECUTE_CODE> -
Source Location: Local Database
-
Language: PL/SQL
-
PL/SQL Code:
declare
PUSH_DATA_JSON VARCHAR2(32767) :=
'{"metadata":{"columnNames":"<COLUMN_NAMES_TO_BE_UPDATED_SEPARATED_BY_COMMA", "primarykey":"ECC_SPEC_ID", operation":"REPLACE"},"records":[[#PUSH_DATA#]]}';

PUSH_DATA_VALUE VARCHAR2(32767);

begin

SELECT replace(PUSH_DATA, '""', 'null') INTO PUSH_DATA_VALUE FROM (select
'<RESPECTIVE_COLUMN_VALUES_IN_DOUBLE_QUOTES_SEPERATED_BY_COMMA>');

-- Fetch GFM Token value
-- 60 is the value of time in seconds till which the token will be valid

:ECC_GFM_TOKEN := fnd_gfm.one_time_use_store('ECC',60);

-- Fetch Push Data value
:PUSH_JSON_DATA := REPLACE(PUSH_DATA_JSON, '#PUSH_DATA#', PUSH_DATA_VALUE);

END;
-
The following is an example of a Push Model Query for a Cancel Dispute transaction; this PL/SQL code pushes the updated details of the cancelled dispute:
declare

PUSH_DATA_JSON VARCHAR2(32767) := '{"metadata":{"columnNames":"DISPUTE_NUMBER,ECC_SPEC_ID,DISPUTE_STATUS_CODE,ECC_LAST_UPDATE_DATE","primarykey":"ECC_SPEC_ID","operation":"REPLACE"},"records":[[#PUSH_DATA#]]}';
PUSH_DATA_VALUE VARCHAR2(32767);

begin

SELECT replace(PUSH_DATA, '""', 'null') INTO PUSH_DATA_VALUE FROM (select '"' || DISPUTE_NUMBER || ECC_SPEC_ID || '","' || DISPUTE_STATUS_CODE || ECC_LAST_UPDATE_DATE AS PUSH_DATA

from (SELECT /*+ leading(cmreq_v.temp.process_t) full(cmreq_v.temp.process_t) */ DISPUTE_NUMBER,

ECC_SPEC_ID,DISPUTE_STATUS_CODE, to_char(ECC_LAST_UPDATE_DATE, 'yyyy-MM-dd"T"HH24:mi:ss"Z"') ECC_LAST_UPDATE_DATE, LANGUAGE

FROM ari_ecc_cmreq_v cmreq_v where dispute_number = :DISPUTE_NO AND language in ('US')));


:ECC_GFM_TOKEN := fnd_gfm.one_time_use_store('ECC',60);


:PUSH_JSON_DATA := REPLACE(PUSH_DATA_JSON, '#PUSH_DATA#', PUSH_DATA_VALUE);
END;
This query will trigger a "Data Load" request and update the data in Oracle Enterprise Command Center Framework.
Changes in Oracle E-Business Suite
Additional changes are required within Oracle E-Business Suite. You must define a function for the APEX page to cancel a dispute. The function definition would include the following attributes:
-
Function Code:
<FUNCTION_CODE> -
Function Name:
<Function Name> -
HTML Call:
GWY.jsp?targetAppType=APEX&targetAPEXPage=<APEX_PAGE_URL>
An example for the Cancel Dispute function in Oracle E-Business Suite is:
-
Function Code: APEX_DISPUTE
-
Function Name: APEX Dispute Details
-
HTML Call:
GWY.jsp?targetAppType=APEX&targetAPEXPage=/xx_apex/r/cancel-dispute/home
For more information on defining functions, see Overview of Function Security, Oracle E-Business Suite Security Guide.
Changes in Oracle Enterprise Command Center Framework
After creating the Oracle E-Business Suite function, configure the function as a link action in Oracle Enterprise Command Center Framework components, such as the Results Table, Grid, and Diagram, where the ECC Pop-up functionality is available. To do so, perform the following steps:
-
In the ECC component's configuration, enable Display in Popup.
-
Configure the URL with the Oracle E-Business Suite function ID along with required parameters.
Here is an example for an APEX Cancel Dispute Page URL:
/OA_HTML/OA.jsp?OAFunc=APEX_DISPUTE&DISPUTE_NO={0} -
Select Refresh Contents to see the data refreshed after closing the ECC Pop-up.
-
Close the ECC Pop-up to view the updated details in the ECC Dashboard.