9 Vaulting
This chapter describes vaulting and explains how to use an Oracle Secure Backup volume rotation policy to track a backup volume as it moves from its originating location to a storage location and is eventually recycled. It also explains how to set up and use automatic volume duplication, which can enhance both the security and convenience of a vaulting environment.
Volume rotation policies and automatic volume duplication are optional and independent. You can enable both simultaneously, either by itself, or neither. You can also enable either of them for some volumes, leaving the movement or duplication of other volumes unmanaged by Oracle Secure Backup.
This chapter contains the following sections:
9.1 Overview of Vaulting
This section discusses Oracle Secure Backup vaulting concepts. For step-by-step instructions on setting up a vaulting environment for the first time, see "Setting Up a Vaulting Environment".
This section contains these topics:
9.1.1 Locations
A location is a physical place where a volume can reside. Oracle Secure Backup vaulting enables you to organize your volumes as they move from location to location. Oracle Secure Backup recognizes the following location types:
-
Active locations
An active location is the starting point of a rotation. They are tape libraries and standalone tape drives, where volumes are either being written to or reside in storage elements. They are part of your Oracle Secure Backup administrative domain and are created when you configure your tape libraries and standalone tape drives during the Oracle Secure Backup installation process.
See Also:
Oracle Secure Backup Installation and Configuration Guide for more information on configuring tape devices -
Storage locations
These are places you put volumes when they are not being written to. Oracle Secure Backup creates a default storage location called the
Media_Recycle_Binthat you can use for volumes at the end of their rotation cycle. You can create as many additional storage locations as you want. Examples include fireproof closets, offsite data warehouses, and third-party storage vendors such as Iron Mountain.
9.1.2 Rotation Policies
You organize the movement of volumes from location to location by creating rotation policies. A rotation policy defines:
-
The starting point for a volume rotation, which must be an active location
-
All locations the volume can be moved to
-
The order of movement among locations
-
The length of time a volume is required to stay at each location before it is eligible to move to its next location
-
The event from which that length of time is measured
Each volume has its own rotation policy, which it inherits from its media family.
An example of a simple rotation policy is as follows:
-
A volume in a library is eligible to be moved one week after it was last written to.
The library, an active location, is the starting point for the rotation. Its duration at this location is one week past the last-write event.
-
The next location the volume moves to is a storage closet.
Oracle Secure Backup knows about the storage closet, because you have configured it following the procedure in "Adding Locations".
-
The volume is eligible to be moved out of the storage closet one day after it has expired.
Its duration in the storage closet is one day past the expiration event.
-
The volume then is moved to the media recycle bin.
9.1.3 Vaulting Scans
After you have created both active and storage locations, you can specify the days and times that Oracle Secure Backup performs vaulting scans. During a vaulting scan, Oracle Secure Backup searches its catalog for volumes eligible to be moved. If it finds one or more eligible volumes at a location, then it creates a media movement job for all eligible volumes at that location. A vaulting scan can scan one or more locations.
Setting up vaulting scans is a necessary part of creating a vaulting environment. If no vaulting scans exist, then Oracle Secure Backup creates no media movement jobs, which means that rotation policies are not enforced.
You want to schedule the vaulting scans to finish shortly before the times you have set aside for media movement jobs because the jobs are based on volume events and durations at the time of the scans. If there is a long lag between vaulting scans and media movement jobs, then media movement is based on stale data.
9.1.4 Media Movement Jobs
A media movement job is created whenever one or more volumes at a location are eligible to be moved. Only one media movement job is created for each location with volumes eligible to be moved. Media movement includes changing the location of a volume or recalling a volume. A media movement job can move volumes into or out of both active and storage locations.
The media movement jobs resulting from vaulting scans are not run automatically. They are created in a pending state and require action by an operator to run. You can override this behavior with the vaulting/autorunmmjobs policy.
9.1.5 Reports
Oracle Secure Backup produces several reports to assist you in the movement of volumes from location to location.
This section contains these topics:
9.1.5.1 Location Report
A location report displays a list of volumes at a particular location, ordered by volume ID. For each volume listed, it shows the next location it is expected to move to and the date that the volume is eligible to be moved to that next location. The next location and eligibility move date come from the rotation policy in effect for that volume. For volumes that are not associated with any rotation policy, the next location and move date fields display n/a. Missing volumes are excluded from this location report.
For content-managed volumes associated with an expiration event rotation policy, a specific Move Date cannot be provided until the volume expires. Until the volume expires, the location report will display the following text in the Move Date column: Volume not expired, not eligible to be moved.
See Also:
"Missing Volumes Report"If a volume has been flagged as in-transit by the media movement job that processes volumes eligible to be moved out of a storage location, then that volume shows the move date as in-transit since date-volume-was-marked-in-transit. You can limit the location report to in-transit volumes only, as in the following example:
ob> catrpt -t location -L vault -intransit
                                  Location: vault
     ------------------------------------------------------------------------
Volume ID             Next Location            Move Date
mf1-000001            library_1                in-transit since 2008/02/01.9:00
mf3-000001            library_2                in-transit since 2008/02/01.9:00
This location report shows that volumes mf1-000001 and mf3-000001 are in-transit from location vault to location library_1 and library_2 respectively.
9.1.5.2 Schedule Report
A schedule report contains the same information as a location report, but it is limited to volumes whose move-eligibility dates fall within a range that you specify.
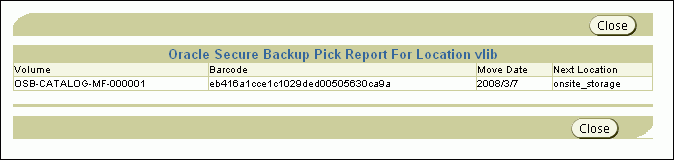
9.1.5.3 Pick Report
The pick report is created and emailed (if email IDs have been configured) when the media movement job is created and scheduled. The pick report lists all volumes to be picked for distribution to another location and the customer ID (if any) that was assigned to the next location. You can think of the pick report as a shopping list used to gather the volumes from a tape library or storage location to box and ship to their next location.
9.1.5.4 Distribution Report
Oracle Secure Backup creates a distribution report at the end of a media movement job. Unlike the pick report, it lists only the volumes that were actually ejected during that job. If a volume ejection fails during the media movement job for any reason, then that volume is not listed in the distribution report even though it might appear in the pick report created at the beginning of the media movement job.
The distribution report lists all volumes being sent to a particular location as the result of a media movement job and the customer ID (if any) that was assigned to the next location. You can think of the distribution report as a packing list to be included in the shipment of volumes to a location.
9.1.5.5 Exception Report
This report shows the current and expected locations for all volumes whose current and expected locations are different. If a volume is recalled from a storage location back into a tape library, for example, then that volume appears in the exception report for that tape library.
9.1.5.6 Missing Volumes Report
You can generate on-demand missing volume reports for one or more specific locations with the catrpt command in obtool. If no locations are specified, then the missing volumes report is generated for all locations. The following examples show the outputs of two catrpt commands. The first specifies the vault location, and the second applies to all locations:
ob> catrpt -t missing -L vault

Volume ID            Last location      Expected location     Missing since
mf1-000001           vault              library_1             2008/12/01.12:21
mf3-000001           vault              library_2             2008/12/01.12:21

ob> catrpt -t missing

Volume ID            Last location      Expected location     Missing since
mf1-000001           vault              library_1             2008/12/01.12:21
mf3-000001           vault              library_2             2008/12/01.12:21
mf4-000001           ironmtn            library_1             2008/12/01.12:21
9.1.6 The Vaulting Process
After you have set up storage locations, rotation policies, and vaulting scan schedules, managing the movement of your volumes through their respective life cycles becomes routine. At intervals defined by the vaulting scan schedule, Oracle Secure Backup performs the following actions:
-
Scans its catalog
-
Identifies volumes eligible to move to their respective next locations
-
Creates a media movement job for each location having at least one move-eligible volume
-
Creates pick and distribution reports to facilitate the movement of volumes from existing to different locations
The operator manually performs the following tasks:
-
Running the media movement jobs
-
Extracting volumes from their present active or storage locations with the help of pick reports
-
Packing the volumes with their distribution reports
-
Transporting volumes to their locations
For a greater margin of safety for your backup data, or to use different media families for on-site backups and off-site storage, combine the Oracle Secure Backup vaulting process with automatic volume duplication.
9.1.7 About Volume Duplication
Volume duplication can safeguard critical data. For example, multiple copies of a volume stored in different geographic locations protect against data loss from a site disaster. One copy could be shipped to a secure storage facility for long-term storage, while another is kept at the data center for ready access. In a restore operation, Oracle Secure Backup can intelligently select the volume that can be retrieved most quickly.
The contents of the original and duplicate volumes are the same. If the original volume is compressed, then the duplicate volume is also compressed. Each original or duplicate volume has a unique object identifier, referred to as VOID in lsvol output, and also shows the object identifier of the originating volume, referred to as OOID in lsvol output. The VOID and OOID of original volumes are identical. If the VOID and OOID of a volume are not identical, then that volume is a duplicate volume made from the volume whose object identifier is OOID.
The write window for a duplicate volume is always closed. This makes the duplicate volume read only. The duplicate volume can be reused only if it has expired, you forcibly unlabel the volume, or you rewrite the volume label. The write window of the original volume is closed after the first duplicate is created. This prevents writing to the original volume and maintains the integrity of the duplicate volume.
Oracle Secure Backup always tries to use the original volume for a restore operation. If the original volume is not available because it has been destroyed or is in an offsite location, for example, and a duplicate volume is in an active location, then Oracle Secure Backup automatically uses the duplicate volume for the restore operation.
9.1.8 Volume Duplication Policies
A volume duplication policy specifies the number of duplicate volumes to be created, the media family to be used for the duplication (which can be different from the media family of the original volume), and the trigger that makes a volume eligible for duplication. It can also specify that the duplicate volume is to replace the original volume. This is referred to as volume migration.
Volumes are associated with a duplication policy through their media families. A media family can have only one duplication policy.
9.1.9 Volume Duplication Schedules
A volume duplication schedule determines where and when volume duplication is scheduled, what priority the volume duplication job has, and how long Oracle Secure Backup waits before expiring a duplication job that has not run.
Scheduling volume duplication is similar to scheduling a vaulting scan. Oracle Secure Backup scans its catalog to determine which volumes are eligible for duplication, according to the duplication policies of their respective media families. If Oracle Secure Backup finds a volume eligible for duplication, then it creates a volume duplication job for that volume. Volume duplication jobs are performed automatically during a volume duplication window.
9.1.10 Volume Duplication Jobs
When a volume duplication job is scheduled to run within a duplication window, the Oracle Secure Backup scheduler reserves the required resources and dispatches the job to a media server.
If a resource restriction has been specified for the volume duplication job, then the scheduler picks up the specified resources for running the job. If no restriction has been specified, then the scheduler tries to pick up the best set of tape devices to be used for the duplication. The scheduler initially looks for tape devices attached to the same media server. If tape devices are available on the same media server, then the volume duplication job runs on that media server.
If the volume to be duplicated resides in an NDMP copy-enabled virtual tape library (VTL) and you have included the mkdev --class vtl option when creating its Oracle Secure Backup library object, then Oracle Secure Backup gives preference to the physical library or libraries connected to the VTL.
The duplicated volume retains the encrytption state of each backup section on the original volume. Therefore, an encrypted section on the original volume is also encrypted on the duplicated volume. If the volume to be duplicated was hardware-encrypted, then Oracle Secure Backup attempts to mount a tape capable of hardware-based encryption. If no such volume is found, then the job goes into a pending state and requires input from the backup operator.
Note:
An original volume can be duplicated only to another volume whose capacity at least equals the capacity of the original volume.You can also run on-demand volume duplication jobs with the dupvol command in obtool.
See Also:
-
Oracle Secure Backup Reference for complete syntax and semantics for the
mkdevcommand inobtool -
Oracle Secure Backup Reference for complete
dupvolsyntax and semantics
9.1.11 Volume Duplication Windows
A volume duplication window is the interval during which Oracle Secure Backup schedules duplication jobs to run. Oracle Secure Backup automatically generates a daily volume duplication window that begins at 10:00 and ends at 20:00.
9.1.12 NDMP Copy-Enabled Virtual Tape Library
An NDMP copy-enabled virtual tape library (VTL) is a virtual tape library with an embedded NDMP server and multiple access paths. The embedded NDMP server allows offloading the I/O associated with volume duplication from the application running on the media server to the VTL. Figure 9-1 shows a typical physical layout.
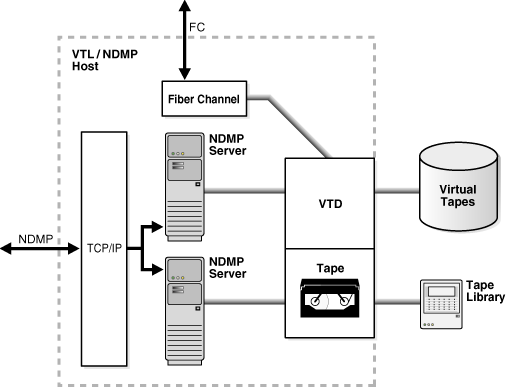
A traditional SCSI or Fibre Channel (FC) interface provides a direct access path from a media server to the virtual library and its drives. An embedded NDMP server provides network access to the virtual library and its drives. The NDMP server also provides network access to the physical library and drives attached to the VTL/NDMP host. The physical library is connected to the virtual library with a Fibre Channel path.
The SCSI/FC direct access path to a virtual drive is typically used for backing up data on the attached media server, because it can provide more bandwidth than a network connection.
The physical drive in the illustration is accessible only by way of the NDMP access path, because it is connected directly to the VTL. Another common arrangement is a physical library connected to a shared storage area network.
See Also:
"NDMP Volume Duplication"9.2 Setting Up a Vaulting Environment
This section contains step-by-step instructions for configuring a vaulting environment.
This section contains these topics:
9.2.1 Adding Locations
During the media life cycle, a volume can be located in an active location, such as a tape library, or in a storage location, such as an on-site storage room. Oracle Secure Backup automatically stores information about each active location in its administrative domain.
Storage locations represent any place outside of tape libraries or tape drives that a volume can be while being managed by Oracle Secure Backup. Oracle Secure Backup does not automatically gather information about storage locations. You must supply this information using the Web tool or obtool location commands.
See Also:
Oracle Secure Backup Reference for complete syntax and semantics ofobtool location commands-
From the Oracle Secure Backup Web tool Home page, click Configure.
The Configure page appears.
-
In the Media Life Cycle section, click Locations.
The Configure: Locations page appears.
This page lists active locations corresponding to tape libraries and tape drives in your administrative domain. The page also lists a storage location called
Media_Recycle_Bingenerated by Oracle Secure Backup. -
Click Add.
The Configure: Locations > New Locations page appears.
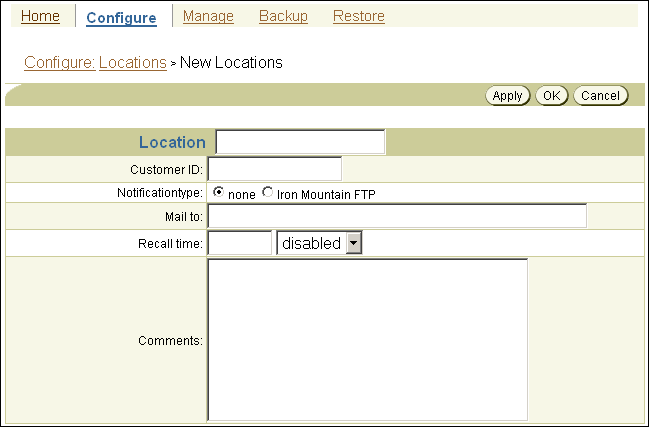
Description of the illustration osb_web22.gif
-
Enter a name for the storage location in the Location field.
This is the name you use for this location when you create rotation policies. This name also appears in the reports generated in the vaulting process.
See Also:
The name you enter must start with an alphanumeric character. It can contain only letters, numerals, dashes, underscores, and periods. The maximum character length that you can enter is 127 characters.
-
Enter a customer ID in the Customer ID field.
If a vaulting vendor requires an ID for your vaulting process, then you can set this field to that ID. Because the customer ID appears in all distribution reports created for media movement jobs for this location, it accompanies all volumes that are moved at the location.
This step is optional.
-
Select a type of notification that can be sent to the off-site vault vendor when requesting media to be moved. Your choices are none or Iron Mountain FTP.
Iron Mountain has published an FTP format required for handling electronic communication. If you select Iron Mountain FTP, then whenever Oracle Secure Backup requests a volume to be returned from this location, it creates additional pick and distribution reports in this format that you can send by FTP to your vault vendor. These reports contain a list of barcodes for all volumes being requested from an off-site location. Pick and distribution reports are distinguished by a
PorDin the report name and are placed in thedb/reportdirectory on all platforms.Note:
Oracle Secure Backup does not automatically send these reports to your vault vendor. You must send them by FTP yourself.See Also:
"Viewing Pick and Distribution Reports" for more information on pick and distribution reports -
Enter one or more e-mail addresses in the Mail to field.
The e-mail addresses specified here receive the pick or distribution reports for media movement involving volumes at this location. If user intervention is required for the processing of a media movement job, then the emails configured in the location object receive the notification.
An e-mail system must be operational on the administrative server for this feature to operate. Separate multiple entries with commas.
-
Enter a recall time in the Recall time field.
This option enables you to specify the time taken to recall a volume from this storage location back to the administrative domain. You can use this setting to determine whether to fail an RMAN-initiated restore request that requires use of volumes that cannot be supplied within the specified resource wait time period. If duplicate volumes exist, then this value determines which duplicate volume has the shortest recall time. This volume is used for the restore operation.
-
Enter a description of the storage site or other information in the Comments field.
-
Click OK.
The Configure: Locations page displays a success message, and your additional storage location appears in the list of locations.
9.2.2 Adding Rotation Policies
The rotation policy associated with a volume defines the physical management of that volume as it progresses through its life cycle. The policy determines in what sequence and at which times the volume moves from its initial active location where it is written, to another location, and so on, until it is reused.
A rotation policy is an ordered list of rotation rules. Each rotation rule specifies a location, the amount of time that a volume is retained at that location, and an event that starts the retention clock running. A rotation policy can consist of a single rotation rule, in which case the volume is eligible for recycling at the end of the retention period specified in its single rule.
A rotation policy is either of the following types:
-
Constrained rotation policy
This type of rotation policy names a specific tape drive or tape library where volumes controlled by the policy begin their life cycle. A backup adheres to the constraints of this policy. The backup uses only the resources defined by this constraint. It does not apply to volumes that begin their life cycle in any other active location.
-
Unconstrained rotation policy
This type of rotation policy specifies a wildcard (
*) as its first location. It can apply to volumes that begin their life cycle at any active location.
A buffer location is a storage location that you can specify in a rotation policy. Buffer locations have the following important properties:
-
Buffer locations are the final stops in the media life cycle.
If a buffer location is specified, then Oracle Secure Backup moves volumes to this location before they are recycled. If a buffer location is not specified, then Oracle Secure Backup returns the volumes using the rotation policy to their original location. Volumes returned from storage locations to your data center can be inserted directly into a tape library or standalone tape drive when received, or they can be stored in buffer locations until they are needed.
-
Buffer locations do not have durations.
Volumes in buffer locations remain there until they are inserted into a tape device to begin a life cycle. A volume is removed from the buffer location when it has been unlabeled or overwritten.
-
The use of buffer locations is optional.
Oracle Secure Backup ships with a predefined buffer location named
Media_Recycle_Bin. You can also define additional buffer locations. -
If a buffer location is specified for a policy, then it must be specified in the last rule of the policy.
To add a rotation policy with the Oracle Secure Backup Web tool:
-
From the Oracle Secure Backup Web tool Home page, click Configure.
The Configure page appears.
-
In the Media Life Cycle section, click Rotation Policies.
The Configure: Rotation Policies page appears.
This page displays a list of all currently configured rotation policies. If you are setting up a vaulting environment for the first time, then the list is empty because Oracle Secure Backup does not automatically generate any rotation policies.
-
Click Add.
The Configure: Rotation Policies > New Rotation Policy page appears.
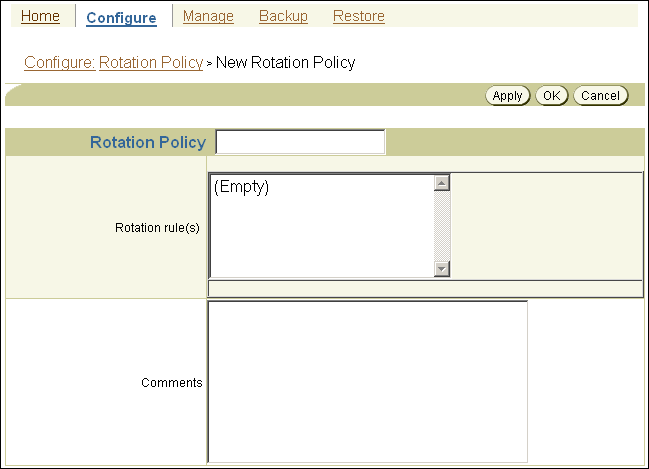
Description of the illustration osb_web23.gif
-
Enter a name for your rotation policy in the Rotation Policy field and click Apply.
You must click Apply after entering the name of the rotation policy to add rotation rules to the rotation policy.
The name you enter must start with an alphanumeric character. It can contain only letters, numerals, dashes, underscores, and periods. The maximum character length that you can enter is 127 characters.
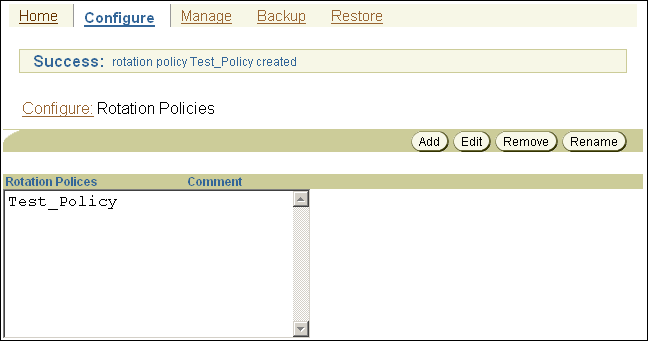
The Configure: Rotation Policy > policy_name page appears, letting you know that your additional rotation policy was created successfully.
Description of the illustration osb_web24.gif
-
Although your additional rotation policy exists, it cannot yet manage any volumes because it does not have any rotation rules. To add your first rotation rule:
-
Select a location from the Location list.
The first rotation rule in a rotation policy must specify an active location.
-
Select an event from the Event list.
The event you specify starts the retention clock for this volume. Your choices for an active location are:
-
firstwriteThe time at which the first write to a volume occurs.
-
lastwriteThe time at which the last write to a volume occurs. Each additional write to the volume resets the last write time for a volume.
-
nonwritableThe volume is full, the write window is closed, or the media family is configured as nonappendable.
-
windowclosedThe write window closes. The write window is the period for which a volume set remains open for updates, usually by appending another backup image. The write window opens at the volume creation time for the first volume in the set and closes after the write window period has elapsed.
Note:
The arrival and expiration events are valid only for storage locations. They are discussed in step 6. -
-
Enter a number in the Duration field and choose a unit of measure from the adjoining list.
The value you enter in the Duration field is the amount of time that must pass before a volume becomes eligible for a media movement job. The clock starts at the completion of the event you specify in the previous step.
If you specify
DISABLEDas the duration value, then the volume remains at the associated location forever. TheDISABLEDvalue is allowed only for the final location in a rotation policy. -
Select a position in the rotation policy for this rotation rule.
This field should be left at the default value 1, because this is your first rotation rule. The order of the rotation rules determines the order of movement of the volume from location to location.
-
Click Add.
The Configure: Rotation Policy > policy_name page is refreshed, and your additional rotation rule appears in the Rotation rule(s) field.
-
-
Optionally, specify additional rotation rules so that you can send volumes to a storage location when you are finished writing to them. To add additional rotation rules:
-
Select a location from the Location list.
-
Select an event from the Events list.
The event you specify starts the retention clock for this location. If you specify an active location for this rotation rule, then your event choices are those described in step 5. If you specify a storage location for this rotation rule, then your choices are:
-
arrivalThe time at which the volume arrives at this location. The arrival time is assumed to be the completion time for the media movement job that moved the volume to this location.
-
expirationThe time at which the volume expires.
-
-
Enter a number in the Duration field and choose a unit of measure from the adjoining list.
-
Select a position in the rotation policy for this rotation rule from the Insert into position list.
Select last to add a rotation rule at the end of the rotation policy or some number greater than one to add a rotation policy at an intermediate position. The first rotation rule in a rotation policy must specify an active location.
-
Add a description of this rotation rule in the Comments field.
This step is optional.
-
Click Add.
The Configure: Rotation Policy > policy_name page is refreshed, and your additional rotation rule appears in the Rotation rule(s) field.
-
-
Optionally, add a buffer location rotation rule.
-
When you are finished adding rotation rules, click OK.
The Configure: Rotation Policies page appears with your additional rotation policy in the Rotation Policies list.
9.2.3 Associating Rotation Policies with Media Families
A volume is associated with a rotation policy. The rotation policy for a volume is inherited from the media family for that volume. The movement of a volume through its life cycle is governed by the rotation policy in effect for its media family at the time the volume left its originating location.
Each media family can be assigned exactly one rotation policy, which applies to all volumes in the family. Associating a rotation policy with a media family is optional. If no rotation policy is associated with a media family, then Oracle Secure Backup does not manage the movement of the volumes created with that media family.
Changing the rotation policy of a media family changes the rotation policy of all volumes that are created with that media family and that are located in an active location at or after the time of the policy change. If a volume created with that media family is located in a storage location, then the rotation policy for that volume does not change. You cannot change the rotation policy of a media family that invalidates the active location of a volume made with that media family.
If a media family is associated with a constrained rotation policy, then backups using this family use only the tape device listed as the first location in the rotation policy. Although constrained rotation policies effectively restrict backups to one library, they do not impose restrictions on the choice of drives in a library. To restrict backups to specific drives, you must configure device restrictions for the schedule or backup. Note that Oracle Secure Backup does not permit configuration of device restrictions that can conflict with a constrained rotation policy.
If you use a constrained rotation policy to restrict media family mymf to tape library qualstar1, for example, then a volume in media family mymf cannot have any tape device other than qualstar1 as its originating location. If you subsequently attempt a backup specifying media family mymf and restricting the backup to tape library qualstar2, then the backup command conflicts with the constrained rotation policy, and the command fails with the following error:
Error: specified device restriction conflicts with media family device restriction.
To associate a rotation policy with a media family:
-
From the Oracle Secure Backup Web tool Home page, click Configure.
The Configure page appears.
-
In the Basic section, click Media Families.
The Configure: Media Families page appears.
Description of the illustration osb_web28.gif
-
Select the media family you want to associate with a rotation policy and click Edit.
The Configure: Media Families > family_name page appears.
Description of the illustration osb_web29.gif
-
Select a rotation policy from the Rotation policy list and click OK.
The Configure: Media Families page displays a success message.
9.2.4 Adding a Vaulting Scan Schedule
During a vaulting scan, Oracle Secure Backup scans one or more locations to determine which volumes are eligible to be moved, based on the rotation policies associated with the volumes at those locations. When it finds one or more volumes eligible to be moved from a location, Oracle Secure Backup creates one media movement job for all eligible volumes at that location. The media movement job is then placed in a pending status until an operator explicitly runs it.
Volumes pending duplication are not considered for media movement. If you cancel a duplication job, then Oracle Secure Backup assumes that you do not want to create a duplicate for that volume and clears it for media movement.
If you use a rotation policy, then you must create either one vaulting scan schedule for the entire administrative domain or individual vaulting scan schedules for each location in the rotation policy. Without the vaulting scan, Oracle Secure Backup cannot select eligible volumes to be moved.
See Also:
"Running Volume Duplication Jobs"-
From the Oracle Secure Backup Web tool Home page, click Manage.
The Manage page appears.
-
In the Media Life Cycle section, click Schedule Vaulting Scan.
The Manage: Schedule Vaulting Scan page appears.
-
Click Add.
The Manage: Schedule Vaulting Scan > New Schedule Vaulting Scan page appears.
Description of the illustration osb_web37.gif
-
Enter a name for the vaulting scan schedule in the Schedule Vaulting Scan field.
Schedule names are case-sensitive and must start with an alphanumeric character. They can contain only letters, numerals, dashes, underscores, and periods. They can contain at most 127 characters.
-
Enter a value in the Priority field.
The lower the value, the greater the priority assigned to the job by the scheduler. The default schedule priority is
100. Priority1is the highest priority that you can assign to a job. -
Optionally, select one or more locations from the Restrictions list.
You can use control-click to select multiple locations or shift-click to select a range of locations. If no locations are selected, then Oracle Secure Backup scans all locations.
-
Select the state in which the vaulting scan schedule is created:
-
Select Enabled if you want the vaulting scan schedule to be in effect immediately. This is the default setting.
-
Select Disabled if you do not want the vaulting schedule to be in effect immediately.
If you create a vaulting scan schedule in the Disabled state, then you can later change it to Enabled by returning to the Manage: Schedule Vaulting Scan page and editing the vaulting scan schedule.
See Also:
"Managing Vaulting Scan Schedules"
-
-
In Media family selections, optionally select one or more media families.
If you select a media family, then Oracle Secure Backup scans only the selected media family. If no media families are selected, then Oracle Secure Backup scans all media families.
-
Click Apply.
The Manage: Schedule Vaulting Scan > schedule_name page appears.
-
Click Triggers.
The Manage: Schedule Vaulting Scan > schedule_name > Triggers page appears.
Description of the illustration osb_web38.gif
-
In the Time section, select a trigger time from the hours and minutes lists.
-
Select a trigger type from the Trigger type list.
-
If you selected trigger type Day, then do the following:
-
Select the days you want the vaulting scan to run:
-
Select daily
This option produces a daily vaulting scan, seven days a week.
-
Select weekdays
This option produces a daily vaulting scan, Monday through Friday.
-
Select weekend
This option produces a vaulting scan only on Saturday and Sunday.
-
Select one or more days of the week
-
-
Select the week in the month you want the vaulting scan to run.
The default is all weeks.
-
In the Weekday exceptions section, you can specify days you do not want the vaulting scan to run by selecting except from the Except list, before or after from the Time list, and a particular weekday from the Specify day lists.
-
-
If you selected trigger type Month, then select an option in the Day in month section.
-
Click Add.
-
To add another trigger, go back to step 11.
When you are done adding triggers, click Schedule Vaulting Scan in the breadcrumbs at the top of the page.
The Manage: Schedule Vaulting Scans page appears with the additional vaulting scan schedule in the list of schedules.
9.2.5 Performing an On-Demand Vaulting Scan
You can use the Web tool to perform a one-time, on-demand vaulting scan without creating a scheduled scan.
To perform a one-time on-demand vaulting scan:
-
From the Oracle Secure Backup Web tool Home page, click Manage.
The Manage page appears.
-
In the Media Life Cycle section, click Vault Now.
The Manage: Vault Now page appears.
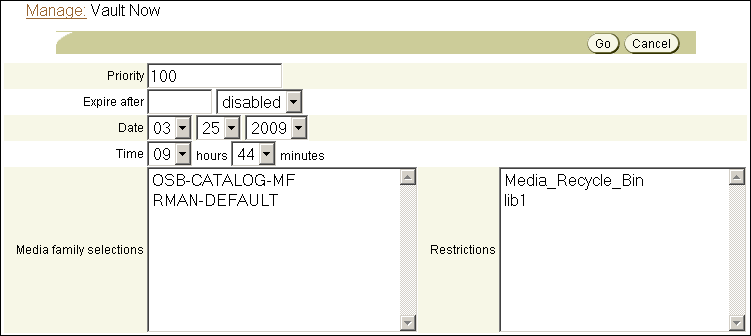
Description of the illustration vault_now_01.gif
-
In Priority, enter a priority for the on-demand vaulting scan.
The priority for a job is a positive numeric value. The lower the value, the greater the importance assigned to the job by the scheduler. The scheduler gives preference to dispatching more important jobs over those with lesser importance.
This step is optional. The default priority is 100.
-
In Expire after, optionally enter a number and select a unit from the adjacent list.
If the on-demand vaulting scan cannot run immediately, then Oracle Secure Backup waits the specified amount of time before deleting the job. If no duration is specified, then Oracle Secure Backup waits forever to run the job.
-
In Date and Time, optionally enter a date and time for the scan.
By default, the current date and time are shown, which means that Oracle Secure Backup performs an immediate scan.
-
In Media family selections, optionally select a media family.
You can select multiple media families by shift-clicking. If you select one or more media families, then Oracle Secure Backup only checks volumes belonging to those media families. If no media family is selected, then the on-demand vaulting scan checks all volumes.
-
Select a location from the Restrictions list.
You can select multiple locations by shift-clicking. If you select one or more locations, then Oracle Secure Backup only checks those locations.
This step is optional. If no location is selected, then the on-demand vaulting scan checks all locations.
-
Click Go.
The Manage: Vault Now page is refreshed, and a message like the following appears:
Info: vaulting scan request 1 submitted; job id is admin/3
You can check the progress of the vaulting scan at the Manage: Jobs page.
9.2.6 Running Media Movement Jobs
Vaulting in a typical large organization could be organized something like this:
-
The Oracle Secure Backup administrator tells the backup operator on which days and at which times the operator is to check for scheduled media movement jobs on the Web tool Manage: Jobs page.
-
For each scheduled media movement job in the list, the backup operator prints any reports needed to accompany the volumes to be moved.
Pick and distribution reports are created for every media movement job.
Note:
You can set media movement jobs to start automatically with theautorunmmjobspolicy, but manual intervention might still be required to complete a media movement job for a variety of reasons. See Oracle Secure Backup Reference for more information. -
The backup operator runs the media movement jobs.
-
The operator removes ejected volumes from the containing libraries.
The ejection type for the library determines what the operator must actually do to eject the volumes. The operator can use the pick report to verify the volumes that are ejected.
-
The operator packs the ejected volumes for transport, including a copy of the distribution report with the volumes.
See Also:
"Ejecting Volumes from Libraries"Volumes that are scheduled to return to the local data center from a storage location are listed on a distribution report. The report can be provided to the storage location operator, who might be an off-site storage vendor, to identify which volumes to be shipped back to the data center. Returned volumes are placed directly into a tape library or into some buffer location until they are needed to restock a tape library.
Run the media movement job created for returning volumes when the job is created. The volumes that need to be returned are marked as in-transit until either of the following actions occur:
-
The volume has been inserted into the destination library and an inventory is performed on the library.
-
A
chvol --notintransitcommand marks the volumes not in transit, which means that the volumes are located where they should be.
At smaller sites the Oracle Secure Backup administrator typically performs all of the preceding tasks.
See Also:
-
"Viewing Pick and Distribution Reports" for more information on distribution and pick reports
-
Oracle Secure Backup Reference to learn more about the
--notintransitoption of thechvolcommand
To run a media movement job using the Oracle Secure Backup Web tool:
-
From the Oracle Secure Backup Web tool Home page, click Manage.
The Manage page appears.
-
In the Management section, click Jobs.
The Manage: Jobs page appears.
Description of the illustration ob_manage_jobs_01.gif
-
By default, the Manage: Jobs page displays information about active jobs in the following categories:
-
File system backup
-
File system restore
-
Dataset
-
Oracle backup
-
Oracle restore
-
Media movement
-
Duplication
You can control what jobs are displayed on the Manage: Jobs page by deselecting any of the preselected options or by selecting any of the following additional options:
-
Complete
-
Pending
-
Input pending
-
Today
-
Scheduled time
-
From date
-
To date
-
Scan control
You can also control what jobs are displayed by choosing a host from the Hosts list, a user from the Users list, a dataset from the Dataset list, or any combination of these.
-
-
Select Pending in Job Statuses and click Apply.
The Manage: Jobs page is refreshed, and pending jobs appear in the list of jobs.
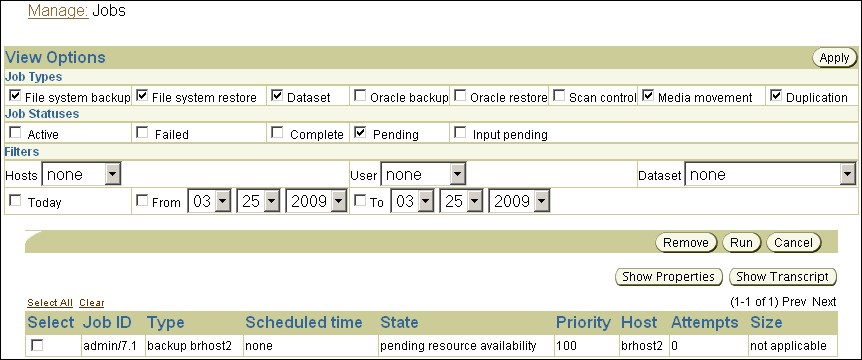
Description of the illustration ob_manage_jobs_02.gif
-
Select a media movement job and click Run.
A different page appears.
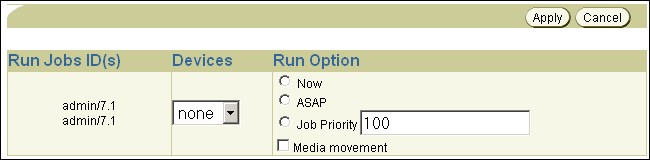
Description of the illustration ob_manage_jobs_03.gif
-
Select the Now and Media movement options.
-
Leave the Devices list set to none.
-
Click Apply.
The Manage: Jobs page displays a success message, indicating that the media movement job was submitted.
The State column of the jobs list indicates either that the job completed successfully or that operator assistance is required. If operator assistance is required to complete the media movement job, then Oracle Secure Backup users configured for e-mailed job summaries receive a message similar to the following:
Dear reader:

Oracle Secure Backup job 3 is requesting assistance.
The job will resume when an operator responds.

If you'd like to view and optionally respond to this request, use --
  . the Web tool's Manage/Jobs interface and its Show Transcript function, or
  . obtool's transcript display command:  obtool catxcr --tail 25 3

Thank you,
Oracle Secure Backup
If the preceding message appears, proceed to the next stop. Otherwise, stop here.
-
Provide operator assistance by following these steps:
-
On the Manage: Jobs page, click Show Transcript.
-
Scroll to the end of the transcript to see why operator assistance is required.
-
Enter the appropriate command in the Input Required! field.
-
Click Apply.
-
9.2.6.1 In-Transit Flags
If a media movement job moves a volume from a library to a storage location, then Oracle Secure Backup knows when the volume is ejected from the library and immediately updates its catalog to show the volume in the specified location. Several days may go by before the volume exists in the storage location, but no harm is done by updating the catalog immediately.
If a media movement job moves a volume from a storage location to a library, however, Oracle Secure Backup cannot determine whether the volume is out of the storage location. If Oracle Secure Backup were to update its catalog immediately to show the volume in its changed location, then operations depending on this volume would be in a pending state until the volume arrived.
For example, suppose that a volume is recalled from a storage location for a restore operation. The media movement job for the recall runs and immediately marks that volume as back in the library. The restore job that was waiting for this volume starts immediately but cannot progress because it cannot find the volume in the library.
To avoid this problem, Oracle Secure Backup does not immediately show volumes in their changed locations when moving them from a storage location to another storage location or to a library. Instead, these volumes are tagged with in-transit flags. If the volumes are being moved from storage to a library, these flags are removed automatically when the volumes are loaded into their changed locations and an inventory is done. Any operation that causes Oracle Secure Backup to read the in-transit volume clears the in-transit flag and updates the current location.
If volumes are being moved from one storage location to another storage location, then the in-transit flags must be removed manually. In-transit flags can be removed from one or more volumes in a single operation using either the Manage: Volumes page in the Oracle Secure Backup Web tool or the obtool chvol command.
See Also:
-
"Changing Volume Properties" for instructions on using the Oracle Secure Backup Web tool to remove in-transit flags
-
Oracle Secure Backup Reference for full syntax and semantics for the
chvolcommand
9.2.6.2 Minimum Writable Volumes
Specifying a minimum writable volumes for a tape library provides an automatic method for freeing up storage element slots in the library by rotating out non-writable volumes. The freed slots can then be filled with writable volumes. When Oracle Secure Backup scans a library for volumes to be moved, it also looks at the minimum writable volume threshold for each tape library. If the minimum writable volume threshold is nonzero, and if the number of writable volumes in that tape library has fallen to less than this threshold, then Oracle Secure Backup creates media movement jobs for the non-writable volumes. The non-writable volumes get media movement jobs even if their rotation policies do not yet require them to be moved. When this happens, Oracle Secure Backup notes in the vaulting scan job transcript that volumes have been moved early, as shown in the following example:
ob> catxcr -l0 1
2008/09/05.20:42:44 ______________________________________________________________
2008/09/05.20:42:44
2008/09/05.20:42:44 Transcript for job 1 running on stacr12
2008/09/05.20:42:44
2008/09/05.20:42:44 Processing location vlibminwrt
2008/09/05.20:42:44 Checking volume mf1-000001
2008/09/05.20:42:44 Volume mf1-000001 added to full volume list
2008/09/05.20:42:44 Checking volume mf1-000002
2008/09/05.20:42:44 Volume mf1-000002 added to full volume list
2008/09/05.20:42:44 Checking volume mf1-000003
2008/09/05.20:42:44 Volume mf1-000003 added to full volume list
2008/09/05.20:42:44 Checking volume mf1-000004
2008/09/05.20:42:44 Checking volume mf2-000001
2008/09/05.20:42:44 Full volume mf1-000001 added to volume movement list
2008/09/05.20:42:44 Full volume mf1-000002 added to volume movement list
2008/09/05.20:42:44 Full volume mf1-000003 added to volume movement list
2008/09/05.20:42:44 Created media movement request 1
2008/09/05.20:42:44 Done processing location vlibminwrt
2008/09/05.20:42:44 Media movement request 1 submitted; job id is 2
The vaulting scan job identified volumes mf1-000001, mf1-000002, mf1-00003 as non-writable volumes that can be moved to maintain the minimum writable volumes threshold. A media movement job for these volumes was created.
When a volume is rotated out of a tape library early, because the minimum writable volumes threshold has been reached, its duration at its next location is unchanged. For example, suppose a volume had a duration of four weeks after its write window closed in the tape library and six weeks after its arrival at Iron Mountain. If the volume is rotated early out of the tape library in its first week after its window closed, then its duration at Iron Mountain is still six weeks after arrival rather than nine weeks.
See Also:
Oracle Secure Backup Installation and Configuration Guide for instructions on setting a tape library minimum writable volumes threshold9.2.7 Ejecting Volumes from Libraries
Operator assistance can be required in a media movement job, depending in part on the ejection type you specified when configuring a tape library for use with Oracle Secure Backup.
See Also:
Oracle Secure Backup Installation and Configuration Guide for more information on configuring a tape library for use with Oracle Secure BackupThis section contains these topics:
9.2.7.1 Automatic Library Ejection
This ejection type is necessary only for libraries with at least one import/export element or cartridge access port (CAP). ACSLS libraries have different export requirements compared to non-ACSLS libraries. In ACSLS, an export fails if the CAP has any volumes. In non-ACSLS libraries, an export fails only if there are no vacant export elements.
For libraries configured for automatic ejection type, Oracle Secure Backup performs the following steps:
-
Update library inventory.
-
Determine the number of volumes that can be moved out of the library.
-
For an ACSLS library, the number of volumes that can be moved out depends on the CAP size. If a CAP name was not specified in the vaulting scan schedule, then Oracle Secure Backup picks the largest CAP available.
-
For a non-ACSLS library, the number of volumes that can be moved depends on the number of vacant export elements.
-
-
For each volume in the list of volumes to be moved, Oracle Secure Backup unloads the volume if it is in a drive and adds the volume to the list of volumes to be exported.
If the unload fails for a specific volume, then Oracle Secure Backup skips that volume and continues to process other volumes in the job. The skipped volume can be picked up by any subsequent media movement job for the same location.
-
Oracle Secure Backup exports the volumes from ACSLS libraries when all volumes in the media movement job have been added to the list, or when the number of listed volumes equals the maximum number of volumes that can be moved.
For non-ACSLS libraries, Oracle Secure Backup exports the volumes one at a time.
-
Any errors during this export are written to the media movement job transcript to be resolved by the Oracle Secure Backup operator.
-
If an export fails, either because the CAP/IEE is full or because the ACSCS
/maxacsejectwaittime/was reached, then Oracle Secure Backup retries the operation for a certain period and requests operator intervention if needed at the end of that time period.
9.2.7.2 On Demand Library Ejection
This ejection type is necessary only for libraries with at least one import/export element or cartridge access port (CAP). It is similar to the automatic ejection type, except that Oracle Secure Backup displays the following prompt once for each media movement job:
go - proceed with the volume movement
quit - give up and aborth this media movement job
The Oracle Secure Backup operator must then use the rpyjob command to enter one of these options.
9.2.7.3 Manual Library Ejection
No automation is used to eject volumes from the tape library. The backup operator determines which storage elements contain volumes ready to be ejected and manually removes them. This option can be useful when the library has no import/export slots.
Note:
Ifautomatic or ondemand was specified, but Oracle Secure Backup detects that there are no iee slots, then the software automatically switches to manual ejection mode.Oracle Secure Backup performs an initial library inventory during a media movement job and then shows the following prompt for each volume in the media movement job:
go - volume movement job completed, continue
goall - all volume movement completed for this job
quit - give up and aborth this media movement job
The Oracle Secure Backup operator must then use the rpyjob command to enter one of these options.
If the Oracle Secure Backup operator selects the quit option, then the media movement job fails. Volumes whose catalog entries had been updated retain those updated entries. Volumes whose catalog entries had not been updated remain as-is until the next media movement job for the library. These unprocessed volumes are listed in the job transcript.
If the Oracle Secure Backup operator selects the go option, then Oracle Secure Backup does an inventory of the library to determine if the specified volume is still located in the library. If the volume is still in the library, then Oracle Secure Backup prompts the operator with a different set of options:
go - volume movement really completed, continue
goforce - volume movement completed, skip inventory check for this volume
skip - skip the movement of this volume
If the operator again selects the go option, then Oracle Secure Backup does another inventory of the library and presents the same prompt again if the volume is found. If the volume no longer appears in the library, however, then Oracle Secure Backup updates the volumes catalog to reflect the changed location of the volume.
If the operator chooses the goforce option, then Oracle Secure Backup does not recheck the library inventory and assumes the volume has been removed. Oracle Secure Backup updates the volumes catalog with the changed location of the volume. But Oracle Secure Backup also puts a warning in the job transcript that, according to its inventory the physical volume is still in the library.
If the operator chooses the skip option, then Oracle Secure Backup does not update the volumes catalog for this volume. It is processed again as part of the next media movement job for this library. The job transcript shows that the operator chose to skip movement of this volume.
If multiple volumes were included in the media movement job, then Oracle Secure Backup repeats the inventory and prompt until all volumes have been processed.
If the Oracle Secure Backup operator selects the goall option, then the prompt is suppressed for all subsequent volumes in the media movement job.
9.2.8 Viewing Location Reports
Oracle Secure Backup provides three types of location reports:
-
Location report
A location report displays a list of volumes at a particular location, ordered by volume ID. For each volume listed, it shows the next location it is expected to move to and the date that the volume is eligible to be moved to that next location. The next location and eligibility move date come from the rotation policy in effect for that volume.
-
Schedule report
A schedule report contains the same information as a location report, but it is limited to volumes whose move-eligibility dates fall within a range that you specify.
-
An exception report shows the current and expected locations for all volumes whose current and expected locations are different. If a volume is recalled from a storage location back into a tape library, for example, then that volume appears in the exception report for that tape library.
A location report displays a list of volumes at a particular location. If a volume is associated with a rotation policy, then the next scheduled location and the move date are also displayed.
To view a location report:
-
From the Oracle Secure Backup Web tool Home page, click Manage.
The Manage page appears.
-
In the Media Life Cycle section, click Location Reports.
The Manage: Location Reports page appears.
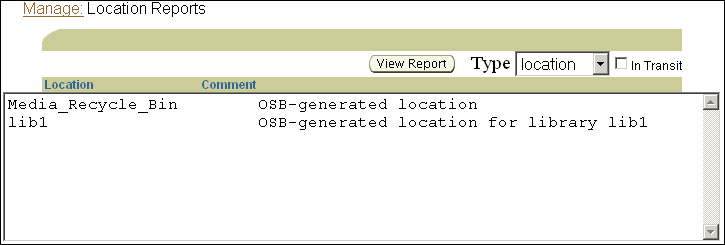
Description of the illustration osb_web30.gif
-
Select a location from the list of locations.
The location report page lists all configured locations within the administrative domain.
-
Select location from the Type list.
-
Click View Report.
A different page lists all volumes eligible for movement from that location. Each listing includes the volume name, next location, and move date.
Description of the illustration osb_web32.gif
9.2.9 Recalling a Volume
If an Oracle Secure Backup operator issues a restore command that requires one or more volumes that are not present in an active location, then Oracle Secure Backup automatically marks each required volume as being eligible for recall. A subsequent vaulting scan of the current location of each required volume results in a media movement job for recalling that volume.
When a volume is moving to an active location from a storage location, Oracle Secure Backup flags the volumes as in-transit and does not immediately update its volume catalog with the changed location of recalled volumes. The in-transit flag is necessary because Oracle Secure Backup cannot know whether the volume is still in the storage location or already moved from this location.
Note:
When a volume is moving to a storage location from an active location, Oracle Secure Backup performs an inventory at the end of the media movement job to ensure that the volume is absent from the library. For this reason thein-transit flag is not necessary.When volumes moved from storage arrive in the active location, they must be placed in their changed location. For a non-ACSLS library, volumes can be placed in a library slot or in an import/export slot. For an ACSLS library, volumes must be placed in a cartridge access port and injected into the ACSLS library from the ACSLS console.
You can update the Oracle Secure Backup volume catalog by selecting Inventory on the Libraries page. If a backup starts before the inventory has been updated, then Oracle Secure Backup updates it automatically. When the inventory is updated, the current location of any volume marked as in-transit is updated to contain the library location it resides in and the in-transit flag is removed from the volume record.
See Also:
-
"In-Transit Flags" for more information on in-transit flags
-
"Changing Volume Properties" for instructions on using the Oracle Secure Backup Web tool to remove in-transit flags
-
Oracle Secure Backup Reference for full syntax and semantics for the
chvolcommand -
Oracle Secure Backup Reference for more information on the
autorunmmjobspolicy
9.2.10 Releasing a Volume
When the restore operation requiring a recalled volume is complete, Oracle Secure Backup can create a media movement job to return the recalled volume to the location from which it was recalled. This media movement job, also known as releasing a volume, can be generated automatically by Oracle Secure Backup or manually by the backup operator. If a recalled volume is not released, then it is outside its rotation policy and unmanaged by Oracle Secure Backup.
If the autovolumerelease policy is set to yes, then volumes automatically recalled by Oracle Secure Backup are automatically released when the backup operation is completed. If the policy is set to no, then the volumes must be released manually. You can configure the autovolumerelease policy at the Oracle Secure Backup Web tool Configure: Defaults and Policies > Vaulting page. The autovolumerelease policy has no effect on volumes manually recalled by the backup operator.
Oracle Secure Backup enables a backup operator to do an on-demand recall of a volume from its current storage location using the Oracle Secure Backup Web tool Manage: Volumes page. Oracle Secure Backup creates a media movement job for the recalled volume, which can run immediately if the operator specifies so. The recalled volume can be inserted into any tape device to perform the restore operation.
See Also:
"Running Media Movement Jobs"Volumes recalled by a backup operator are not automatically released when the restore operation is completed. The backup operator must release the volume from its current location and return the volume to the proper place in its rotation as specified by the rotation policy that applies to that volume. The backup operator can use the Oracle Secure Backup Web tool Manage: Volumes page for this purpose. The volume is frozen at its current point in its rotation policy until it is released.
If you have enabled volume duplication in your vaulting environment, then multiple copies of a backup volume might be available. Oracle Secure Backup first looks in its volumes catalog for duplicate volumes, determines their locations, and identifies the volume with the lowest recall time. If the identified volume is not at an active location, then Oracle Secure Backup schedules a media movement request.
See Also:
-
Oracle Secure Backup Reference for more information on the
autovolumereleasepolicy
9.2.11 Viewing Pick and Distribution Reports
The following two reports are generated automatically when you run a media movement job:
-
This is a list of all volumes to be picked for distribution to another location: a shopping list used to gather the volumes from a tape library or storage location to box and ship to their next location.
-
This is a list of all volumes being sent to a particular location as the result of a media movement job: a packing list to be included in the shipment of volumes to a location.
In each case, the report name includes the media movement job number. Distribution and pick reports contain identical lists of volumes. In most cases, the only difference is that the distribution report also contains the customer ID (if any) assigned to the next location. However, the reports can differ when exceptions occur during media movement job processing. For example, if you skip the movement of a volume during job processing, then the pick report contains all volumes that should have been moved by the job, whereas the distribution report contains all volumes actually moved.
If you selected Iron Mountain FTP notification when you configured an off-site storage location, then whenever Oracle Secure Backup requests a volume be moved to or from that location, it creates additional pick and distribution reports in the format that Iron Mountain requires for handling electronic communication. These reports contain a list of barcodes for all volumes that are being requested from an off-site location.
You can send these reports by FTP to any vault vendor that supports the Iron Mountain FTP format. Pick and distribution reports are distinguished by a "P" or "D" in the report name. Both reports are placed in the OSB_HOME/db/report directory on all platforms.
Note:
Oracle Secure Backup does not automatically send these reports to your vault vendor. You must send them by FTP yourself.See Also:
"Adding Locations" for more information on Iron Mountain FTP notificationTo view distribution and pick lists:
-
From the Oracle Secure Backup Web tool Home page, click Manage.
The Manage page appears.
-
In the Media Life Cycle section, click Pick and Distribution Reports.
The Manage: Pick and Distribution Reports page appears.
-
Select the report you want to view and click View Report.
Description of the illustration osb_web35.gif
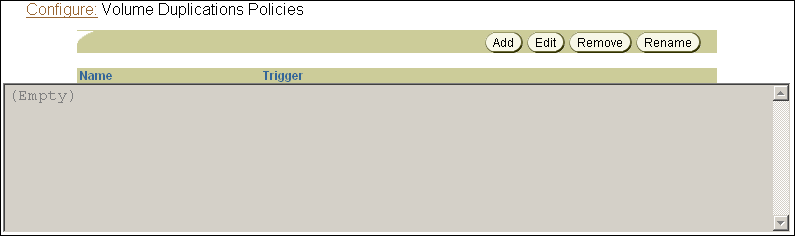
9.2.12 Adding Volume Duplication Policies
Each media family can have at most one associated duplication policy. It defines for all volumes in the media family:
-
At what point in their life cycles volumes are duplicated
-
Whether the original volumes continue to exist or are replaced by duplicate volumes
-
What media family the duplicates belong to (which can be different from the media family of the original volumes)
-
How many duplicates are made
-
Which tape devices are used for the duplications
Duplicate volumes cannot be reduplicated. If a duplication policy specifies that volume duplication uses a media family that itself has a volume duplication policy, then Oracle Secure Backup ignores requests for automatic duplication of volumes in that media family. Otherwise, it would be possible to configure policies that would require the endless duplication of volumes. To duplicate a duplicate volume, use on-demand duplication.
See Also:
"On-Demand Volume Duplication"-
From the Oracle Secure Backup Web tool Home page, click Configure.
The Configure page appears.
-
In the Media Life Cycle section, click Volume Duplication Policies.
The Configure: Volume Duplication Policies page appears.
Description of the illustration osb_web25.gif
-
Click Add.
The Configure: Volume Duplication Policies > New Volume Duplication Policies page appears.
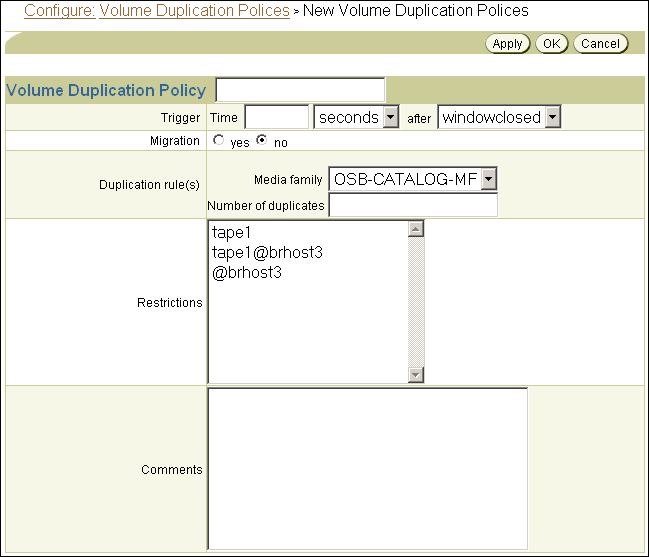
Description of the illustration osb_web39.gif
-
Enter a name for the volume duplication policy in the Volume Duplication Policy field.
The name you enter must start with an alphanumeric character. It can contain only letters, numerals, dashes, underscores, and periods. The maximum character length that you can enter is 128 characters.
-
In the Trigger section:
-
Enter a number in the Time field and select a unit of measure from the adjoining list.
-
Select a trigger event in the after list.
The event that causes duplication to occur can be one of these:
-
firstmoveThe time that a volume becomes eligible to be moved from its first active location. This is defined by the rotation policy for that volume.
-
firstwriteThe first write to a volume occurs.
-
lastwriteThe last write to a volume occurs.
-
nonwritableThe volume is full, the write window is closed, or the media family is configured as nonappendable.
-
windowclosedThe write window closes. The write window is the period for which a volume set remains open for updates, usually by appending another backup image. The write window opens at the volume creation time for the first volume in the set and closes after the write window period has elapsed.
-
For example, if you selected
1dayandwindowclosed, then duplication could occur one day after the volume can no longer be written to. A duplication job is scheduled only if the event occurs at the first active location in the rotation policy. -
-
In the Migration section, select yes or no.
Volume migration is the creation of a duplicate that replaces the original. If you select yes, then the original volume is deleted after it is successfully duplicated. You might want to do this when a volume has been in storage for an extended period or when the retention time required for a volume is longer than the expected lifetime of the physical media.
Volume migration is also recommended if you currently back up to a virtual tape library. A virtual tape library is not suitable for long time storage, because it has limited storage capacity. If you back up to a virtual tape library, then you can take advantage of its faster backup and use the volume migration feature of Oracle Secure Backup to migrate the data to tapes later. Migration copies the volume from the virtual tape library to a physical tape and unlabels the original volume on the virtual tape library. Unlabeling the original volume frees up memory used for that volume on the virtual tape library.
-
Select the media family you want to use for this duplication policy in the Media family list.
The media family you select in this step determines the rotation policy and retention period of the duplicate volume. Because this media family can be different from the media family of the original volume, duplicate volumes can have a different rotation policy and retention period than the original volume. But if the original volume has a content-managed expiration policy, then the duplicate volumes must be content-managed as well. Similarly, if the original volume has a time-managed expiration policy, then the duplicate volumes must be time-managed as well.
-
Enter the number of duplicates you want to make in the Number of duplicates field.
The default is one duplicate.
-
Select a restriction in the Restrictions field.
This step is optional. You can restrict volume duplication to specific tape devices. If you do not select a restriction, then volume duplications defined by the policy can use any available tape device on any media server, at the discretion of the Oracle Secure Backup scheduling system.
-
Enter a description of this duplication policy in the Comments field.
This step is optional.
-
Click OK.
The Configure: Volume Duplication Policies page displays a success message, and your additional duplication policy appears in the list.
9.2.13 Associating Volume Duplication Policies with Media Families
Oracle Secure Backup automatically duplicates a volume if a volume duplication policy is associated with that volume's media family. Each media family can be associated with at most one volume duplication policy. Associating a volume duplication policy with a media family is optional.
Duplicate volumes cannot be reduplicated. If a duplication policy specifies that duplicates are to be added to a media family, then Oracle Secure Backup ignores requests for automatic duplication of volumes in that media family. Otherwise, it would be possible to configure policies that would require the endless duplication of volumes. To duplicate a duplicate volume, use on-demand duplication.
See Also:
"On-Demand Volume Duplication"To associate a volume duplication policy with a media family:
-
From the Oracle Secure Backup Web tool Home page, click Configure.
The Configure page appears.
-
In the Basic section, click Media Families.
The Configure: Media Families page appears.
-
Select the media family you want to associate with a volume duplication policy and click Edit.
The Configure: Media Families > family_name page appears.
-
Select a volume duplication policy from the Volume duplication policy list and click OK.
The Configure: Media Families page displays a success message.
See Also:
"Associating Rotation Policies with Media Families" for screen shots of the Configure: Media Families and Configure: Media Families > family_name pages9.2.14 Adding Volume Duplication Windows
A volume duplication window is the interval during which Oracle Secure Backup schedules duplication jobs to run. Oracle Secure Backup automatically generates a daily volume duplication window that begins at 10:00 and ends at 20:00. If this duplication window is sufficient to your needs, then no action is required.
Oracle recommends that you eliminate any overlap between your duplication window and your backup window, so that a duplication job and a backup job do not contend for the same tape device. If your duplication window overlaps your backup window, then duplication jobs can get scheduled to run before backup jobs. If this happens, then some backup jobs might not have sufficient resources to run.
If a duplication job starts within a duplication window but does not finish within the window interval, then it is allowed to run until the duplication finishes. If subordinate or retry jobs are submitted by this job because of a duplication failure, then the newly created jobs are scheduled in the next duplication window.
-
From the Oracle Secure Backup Web tool Home page, click Configure.
The Configure page appears.
-
In the Advanced section, click Volume Duplication Windows.
The Configure: Volume Duplication Windows page appears.
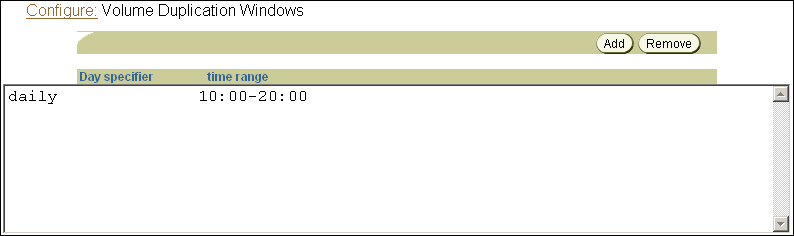
Description of the illustration osb_web26.gif
-
This page displays the default volume duplication window that Oracle Secure Backup generates automatically.
If you want a different volume duplication window, then select the default and click Remove.
A confirmation page appears.
-
Click Yes.
The Configure: Volume Duplication Windows page displays a success message, and the default volume duplication window no longer appears in the duplication window list.
-
Click Add.
A different page appears.
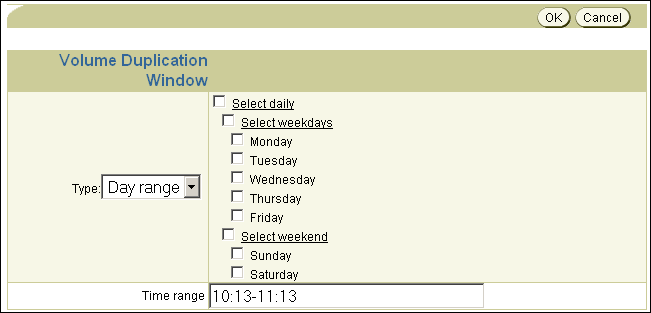
Description of the illustration osb_web27.gif
-
Select a volume duplication window type from the Type list.
-
If you selected Date in step 6, then select a month, day, and year from the Month, Day, and Year lists.
-
If you selected Day range in step 6, then select a day range from the following options:
-
Select daily
This is equivalent to selecting all seven days in a week
-
Select weekdays
This is equivalent to selecting Monday through Friday
-
Select weekend
This is equivalent to selecting Sunday and Saturday.
-
Any combination of individual days of the week
-
-
Enter a time range in the Time range field.
The time range must be in 24-hour hh:mm-hh:mm format with no embedded spaces.
-
Click OK.
The Configure: Volume Duplication Windows page displays a success message, and your additional volume duplication window appears in the list of volume duplication windows.
9.2.15 Adding Volume Duplication Schedules
A volume duplication schedule determines where and when a volume duplication job is scheduled, what priority the volume duplication job has, and how long Oracle Secure Backup waits before expiring a duplication job that has not run.
Scheduling volume duplication is similar to scheduling a vaulting scan. Oracle Secure Backup scans its catalog to determine which volumes are eligible for duplication, according to the duplication policies of their respective media families. If Oracle Secure Backup finds a volume eligible for duplication, then it creates a volume duplication job for that volume. Volume duplication jobs are performed automatically during the volume duplication window.
See Also:
"Adding Volume Duplication Windows"To add a volume duplication schedule:
-
From the Oracle Secure Backup Web tool Home page, click Manage.
The Manage page appears.
-
In the Media Life Cycle section, click Schedule Volume Duplication.
The Manage: Schedule Volume Duplication page appears.
-
Click Add.
The Manage: Schedule Volume Duplication > New Schedule Volume Duplication page appears.
-
Enter a name for the volume duplication schedule in the Schedule Volume Duplication field.
-
Enter a value in the Priority field.
The lower the value, the greater the priority assigned to the job by the scheduler. The default schedule priority is
100. Priority1is the highest priority that you can assign to a job. -
Select at least one location in the Locations list.
You can use control-click to select multiple locations or shift-click to select a range of locations. Only active locations can be specified in a volume duplication schedule.
-
Click Apply.
The Manage: Schedule Volume Duplication > schedule_name page appears.
-
Click Triggers.
The Manage: Schedule Volume Duplication > schedule_name > Triggers page appears.
-
In the Time section, select a trigger time from the hours and minutes lists.
-
Select a trigger type from the Trigger type list.
-
If you selected trigger type Day in step 10, then do the following:
-
Select the days you want the volume duplication scan to run:
-
Select daily
This option produces a daily volume duplication scan, seven days a week.
-
Select weekdays
This option produces a daily volume duplication scan, Monday through Friday.
-
Select weekend
This option produces a volume duplication scan only on Saturday and Sunday.
-
Select one or more days of the week
-
-
Select the week in the month you want the volume duplication scan to run.
The default is all weeks.
-
In the Weekday exceptions section, you can specify days you do not want the volume duplication scan to run by selecting except from the Except list, before or after from the Time list, and a particular weekday from the Specify day lists.
-
-
If you selected trigger type Month in step 10, then select an option in the Day in month section.
-
Click Add.
The Manage: Schedule Volume Duplication > schedule_name > Triggers page displays a success message, and the trigger appears in the Trigger list.
-
To add another trigger, go back to step 9.
When you are done adding triggers, click Schedule Volume Duplication in the breadcrumbs at the top of the page.
The Manage: Schedule Volume Duplication page appears with the additional volume duplication schedule in the list of schedules.
9.2.16 Running Volume Duplication Jobs
When a volume duplication job is scheduled to run within a duplication window, the Oracle Secure Backup scheduler reserves the required resources and dispatches the job to a media server. Oracle Secure Backup assigns a lower priority to a duplication job than to a backup job by default. But you can use the duplicationjobpriority policy to specify the priority of volume duplication jobs relative to other jobs.
If a resource restriction has been specified for the volume duplication job, then the scheduler picks up the specified resources for running the job. If no restriction has been specified, then the scheduler tries to pick up the best set of tape devices to be used for the duplication. The scheduler initially looks for tape devices in the same media server. If tape devices are available in the same media server, then the volume duplication job runs on that media server.
Note:
You must have multiple tape drives installed and configured in your Oracle Secure Backup administrative domain to duplicate a volume.If tape devices are not available in the same media server and the duplicateovernetwork policy is enabled, then the scheduler tries to run the volume duplication job with tape devices in other media servers. In this case, the scheduler runs the job on the media server where the original volume is located. The component on the media server performing the volume duplication job sends the data over the network to another media server.
Duplication over a network slows duplication performance considerably and might use significant network bandwidth. Duplication over networked tape devices is not advisable. Oracle Secure Backup does not make use of tape devices over the network by default.
See Also:
Oracle Secure Backup Reference for more information on duplication over networked tape devicesIf the duplicateovernetwork policy is not enabled and a tape device restriction in the duplication policy specifies tape devices that are in a different media server than the original server, then the restriction takes precedence, and the duplication procedure uses the tape devices over the network.
If the original volume is located on a media server which does not run Oracle Secure Backup software, such as a NetApp filer, then the volume duplication job runs on the Oracle Secure Backup administrative server.
The volume duplication job transcript reports the number of archive files (backups) copied from the source volume. This number is off by one from the actual number of archive files present in the source volume, because it includes a count for the end of data (EOD) marker.
9.2.16.1 Volume Duplication Job Failures
Volume duplication jobs run automatically and do not ordinarily require the attention of a backup operator. If a volume duplication job fails, however, then the job is moved to a retry state so that it can be run at a later time. The backup operator must check the list of pending jobs on the Oracle Secure Backup Web tool Manage: Jobs page to see if any volume duplication jobs are pending or have failed and require corrective action.
See Also:
"Running Media Movement Jobs" for instructions on running jobs from the Oracle Secure Backup Web tool Manage: Jobs pageThe destination volume must have capacity at least equal to that of the original volume. If Oracle Secure Backup finds that the destination volume is smaller than the original volume, then it logs an error and fails the volume duplication job. An additional job is scheduled, which tries to find another eligible volume.
If duplication is attempted in a tape library with a robotic arm, then Oracle Secure Backup tries to find an eligible volume. If an eligible volume is found, then duplication proceeds. If an eligible volume is not found, then Oracle Secure Backup fails the volume duplication job.
An original volume cannot move from its originating location until all specified duplicates have been successfully created. If a backup operator uses the exportvol command to export an original volume, then Oracle Secure Backup checks to see if that volume is to be duplicated. If the specified duplicates have not yet been created, then Oracle Secure Backup gives a warning.
9.2.17 On-Demand Volume Duplication
In addition to automatic volume duplication, Oracle Secure Backup enables you to duplicate a volume manually at any time using any available tape devices.
Oracle Secure Backup does not consider manually created duplicate volumes when deciding if a volume's duplication requirements have been met. These duplication requirements are specified by the duplication policy associated with the volume.
Oracle Secure Backup does not allow a volume to move out of a tape library during vaulting even if you have manually created its required number of duplicates. To move a volume before its required number of duplicates have been created automatically, you must first remove the duplication policy for the volume.
9.2.18 Exporting Duplicate Volumes to Another Domain
A backup administrator can create a duplicate of a backup volume in one Oracle Secure Backup administrative domain and import the duplicate into another Oracle Secure Backup administrative domain using the -G option of obtar. Because the duplicate volume is the only source of restore information in the second administrative domain, Oracle Secure Backup imports it as an original volume.
If a backup administrator tries to import multiple duplicate volumes into another Oracle Secure Backup administrative domain, and if all of the duplicates were created from the same original volume, then the first duplicate volume is imported as an original volume and subsequent volumes are imported as duplicates.
If an original volume is imported into another Oracle Secure Backup administrative domain after a duplicate volume has been imported, then the original volume is imported as a duplicate volume in the second administrative domain.
9.2.19 NDMP Volume Duplication
Oracle Secure Backup uses NDMP volume duplication whenever the source and destination volumes both reside on the same NDMP copy-enabled VTL.
See Also:
"NDMP Copy-Enabled Virtual Tape Library"9.3 Tracking Volumes Through a Vaulting Environment
This section describes a simple vaulting environment in terms of the volumes whose movements are being managed by Oracle Secure Backup. The administrative domain consists of a single host with a single tape library. The only volumes being managed are the Oracle Secure Backup catalog recovery volumes, and the only storage location is an on-site fire-resistant closet. Table 9-1 describes how the vaulting environment progresses from its inauguration on day 1 to an unchanging routine 10 days later.
The vaulting environment is set up following the procedures in "Setting Up a Vaulting Environment". Briefly, the necessary steps are:
-
Add a storage location called onsite_storage corresponding to the fire-resistant closet.
-
Add a rotation policy called catalog_recovery_rotation with the following locations, events, and durations:
library : firstwrite : 4 hours
onsite_storage : arrival : 1 week
Media_Recycle_Bin : arrival : disabled
-
Associate rotation policy catalog_recovery_rotation with the default media family
OSB-CATALOG-MF. -
Schedule a daily vaulting scan for both
libraryandonsite_storageat 0600.
Table 9-1 Inauguration of a Simple Vaulting Environment
| Day | Time | Event |
|---|---|---|
|
1 |
0000 |
An Oracle Secure Backup catalog recovery backup starts. The tape library moves a writable volume from a storage element to a tape drive and labels it |
|
1 |
0600 |
An Oracle Secure Backup vaulting scan starts. Because 6 hours have elapsed since the first write to |
|
1 |
0800 |
The Oracle Secure Backup operator checks the Web tool Manage: Jobs page and finds a media movement job for |
|
1 |
0815 |
The operator goes to the Web tool Manage: Pick and Distribution Reports page and reviews the distribution report for |
|
1 |
0830 |
The operator retrieves |
|
2-7 |
n/a |
The events of days 2 through 7 are identical to the day 1 events, except that the volume being written to and moved from the library to storage increments from |
|
8 |
0000 |
An Oracle Secure Backup catalog recovery backup starts. The tape library moves an unlabeled volume from a storage element to a tape drive and labels it |
|
8 |
0600 |
An Oracle Secure Backup vaulting scan starts. A pending media movement job is created for |
|
8 |
0800 |
The Oracle Secure Backup operator checks the Web tool Manage: Jobs page and finds a media movement jobs for |
|
8 |
0815 |
The operator goes to the Web tool Manage: Pick and Distribution Reports page and prints a distribution report for |
|
8 |
0830 |
The operator retrieves |
|
9 |
0000 |
An Oracle Secure Backup catalog recovery backup starts. The tape library moves an unlabeled volume from a storage element to a tape drive and labels it |
|
9 |
0600 |
An Oracle Secure Backup vaulting scan starts. A pending media movement job is created for |
|
9 |
0800 |
The Oracle Secure Backup operator checks the Web tool Manage: Jobs page and finds media movement jobs for |
|
9 |
0815 |
The operator goes to the Web tool Manage: Pick and Distribution Reports page and prints a distribution report for |
|
9 |
0830 |
The operator retrieves |
|
10+ |
n/a |
By day 10, the vaulting environment has reached a steady state. Every day follows the same routine as day 9. The only change from day to day is a one-digit increment in the volume name. |
9.4 Managing an Existing Vaulting Environment
This section provides step-by-step instructions for editing, renaming, and deleting objects in an existing Oracle Secure Backup vaulting environment.
This section contains these topics:
See Also:
"Changing Volume Properties" for instructions on moving a volume from one location to another or changing its rotation policy9.4.1 Managing Locations
This section provides step-by-step instructions for editing, removing, and renaming an existing storage location.
See Also:
Oracle Secure Backup Installation and Configuration Guide for more information on editing an active locationThis section contains these topics:
9.4.1.1 Editing or Viewing the Properties of a Storage Location
After you have set up a storage location, you might want to change one or more of its settings. For example, if a vaulting vendor adds support for Iron Mountain FTP notification, you could edit your storage location to change its notification type.
To edit or view storage location properties:
-
From the Oracle Secure Backup Web tool Home page, click Configure.
The Configure page appears.
-
In the Media Life Cycle section, click Locations.
The Configure: Locations page appears.
-
Select a storage location whose properties you want to edit or view and click Edit.
The Configure: Locations > location_name page appears.
-
Make whatever changes you want.
-
Click OK.
The Configure: Locations page displays a success message.
9.4.1.2 Removing a Storage Location
You can use the Web tool to remove a storage location. A location referenced by a rotation policy cannot be deleted. The reference to the location from the rotation policy must be removed before the location can be deleted. Also, a location that contains volumes managed by Oracle Secure Backup cannot be deleted. Those volumes must be relocated before the location can be deleted.
See Also:
"Managing Rotation Policies" for instructions on removing a storage location from a rotation rule-
From the Oracle Secure Backup Web tool Home page, click Configure.
The Configure page appears.
-
In the Media Life Cycle section, click Locations.
The Configure: Locations page appears.
-
Select the storage location you want to remove and click Remove.
A confirmation page appears.
-
Click Yes.
The Configure: Locations page displays a success message, and the selected storage location no longer appears in the list of locations.
9.4.1.3 Renaming a Storage Location
You can use the Web tool to rename a storage location. Note that renaming has consequences because Oracle Secure Backup assigns a UUID to each location object. All internal references use the UUID rather than the location name. If you change the name of a location, then all rotation policies that reference this name are updated.
To rename a storage location:
-
From the Oracle Secure Backup Web tool Home page, click Configure.
The Configure page appears.
-
In the Media Life Cycle section, click Locations.
The Configure: Locations page appears.
-
Select a storage location whose name you want to change and click Rename.
A different page appears.
-
Enter the different name in the Change location_name to field and click Yes.
The Configure: Locations page displays a success message, and the storage location appears with its different name in the list of locations.
9.4.2 Managing Rotation Policies
This section provides step-by-step instructions for editing, removing, and renaming an existing rotation policy.
This section contains these topics:
9.4.2.1 Editing or Viewing the Properties of a Rotation Policy
You can use the Web tool to edit or view the properties of an existing rotation policy. You must have the modify administrative domain's configuration right to change the rotation policy.
To edit or view rotation policy properties:
-
From the Oracle Secure Backup Web tool Home page, click Configure.
The Configure page appears.
-
In the Media Life Cycle section, click Rotation Policies.
The Configure: Rotation Policies page appears.
-
Select the rotation policy whose properties you want to view or edit and click Edit.
The Configure: Rotation Policy > policy_name page appears.
-
To add a rotation rule to the selected rotation policy:
-
Select a location from the Location list.
-
Select an event from the Event list.
-
Enter a number in the Duration field and select a unit of measurement from the adjoining list.
-
Select a position in the rotation policy for this rotation rule in the Insert into position list.
The first rotation rule in a rotation policy must specify an active location.
-
Click Add.
See Also:
"Adding Rotation Policies" for more information on rotation rules
-
-
To remove a rotation rule from the selected rotation policy, select it in the list of rotation rules and click Remove.
A location can be removed from a rotation policy if no volumes are currently at that location.
-
To add a descriptive comment to the selected rotation policy, enter text in the Comments field and click Apply.
9.4.2.2 Removing a Rotation Policy
You can use the Web tool to remove an existing rotation policy. You must have the modify administrative domain's configuration right to remove a policy.
To remove a rotation policy:
-
From the Oracle Secure Backup Web tool Home page, click Configure.
The Configure page appears.
-
In the Media Life Cycle section, click Rotation Policies.
The Configure: Rotation Policies page appears.
-
Select the rotation policy you want to remove and click Remove.
A confirmation page appears.
-
Click Yes.
The Configure: Rotation Policies page appears with a success message, and the selected rotation policy no longer appears in the Rotation Policies list.
9.4.2.3 Renaming a Rotation Policy
You can use the Web tool to rename an existing rotation policy. You must have the modify administrative domain's configuration right to rename the rotation policy.
To rename a rotation policy:
-
From the Oracle Secure Backup Web tool Home page, click Configure.
The Configure page appears.
-
In the Media Life Cycle section, click Rotation Policies.
The Configure: Rotation Policies page appears.
-
Select the rotation policy you want to rename and click Rename.
A different page appears.
-
Enter the different name in the Rename policy_name to field and click Yes.
The Configure: Rotation Policies page displays a success message, and the selected rotation policy appears with its different name in the Rotation Policies list.
9.4.3 Managing Rotation Policy/Media Family Associations
You can remove the rotation policy associated with a media family or replace it with a different rotation policy. The rotation policy of volumes associated with the media family is changed as well. Only those volumes still in their originating location have their rotation policy changed. The rotation policy of volumes that have moved out of their originating location is not changed.
To remove or change the rotation policy associated with a media family:
-
From the Oracle Secure Backup Web tool Home page, click Configure.
The Configure page appears.
-
In the Basic section, click Media Families.
The Configure: Media Families page appears.
-
Select the media family whose rotation policy you want to remove or change and click Edit.
The Configure: Media Families > family_name page appears.
-
To remove the existing rotation policy, select none in the Rotation policy list and click OK.
The Configure: Media Families page displays a success message.
-
To replace the existing rotation policy, select a rotation policy from the Rotation policy list and click OK.
The Configure: Media Families page displays a success message.
9.4.4 Managing Vaulting Scan Schedules
This section provides step-by-step instructions for editing, removing, and renaming an existing vaulting scan schedule.
This section contains these topics:
9.4.4.1 Editing or Viewing the Properties of a Vaulting Scan Schedule
You can use the Web tool to edit or view the properties of an existing vaulting scan schedule.
To edit or view the properties of a vaulting scan schedule:
-
From the Oracle Secure Backup Web tool Home page, click Manage.
The Manage page appears.
-
Click Schedule Vaulting Scan.
The Manage: Schedule Vaulting Scan page appears.
-
Select the vaulting scan schedule you want to edit or view and click Edit.
The Manage: Schedule Vaulting Scan > schedule_name page appears.
-
Select Disabled to disable the vaulting scan schedule without deleting it. You might want to do this when removing a host from service for an extended period.
Select Enabled to enable a previously disabled vaulting scan schedule.
-
Make whatever other changes you want to the vaulting scan schedule priority, locations, media families, or comments.
Click Triggers to add or remove a vaulting scan schedule trigger.
-
Click OK to accept the changes.
The Manage: Schedule Vaulting Scan page displays a success message, and the edited schedule appears in the list of schedules.
-
Click Cancel to return to the Manage: Schedule Vaulting Scan page without changing anything.
9.4.4.2 Removing a Vaulting Scan Schedule
You can use the Web tool to remove an existing vaulting scan schedule.
To remove a vaulting scan schedule:
-
From the Oracle Secure Backup Web tool Home page, click Manage.
The Manage page appears.
-
Click Schedule Vaulting Scan.
The Manage: Schedule Vaulting Scan page appears.
-
Select the vaulting scan schedule you want to remove and click Remove.
A confirmation page appears.
-
Click Yes.
The Manage: Schedule Vaulting Scan page displays a success message. The selected schedule no longer appears in the list of schedules.
9.4.4.3 Renaming a Vaulting Scan Schedule
You can use the Web tool to rename an existing vaulting scan schedule.
To rename a vaulting scan schedule:
-
From the Oracle Secure Backup Web tool Home page, click Manage.
The Manage page appears.
-
Click Schedule Vaulting Scan.
The Manage: Schedule Vaulting Scan page appears.
-
Select the vaulting scan schedule you want to rename and click Rename.
A different page appears.
-
Enter the different name for the schedule in the Rename schedule_name to field and click Yes.
The Manage: Schedule Vaulting Scan page displays a success message, and the selected schedule appears in the list of schedules with its different name.
9.4.5 Managing Volume Duplication Policies
This section provides step-by-step instructions for editing, removing, and renaming an existing duplication policy.
This section contains these topics:
9.4.5.1 Editing or Viewing the Properties of a Volume Duplication Policy
If a duplication policy is modified, then the policy settings that apply to a duplication job are the settings at the time the job runs, not the time when the job was created. The change in policy does not apply to existing duplicates.
To edit or view the properties of an existing volume duplication policy:
-
From the Oracle Secure Backup Web tool Home page, click Configure.
The Configure page appears.
-
In the Media Life Cycle section, click Volume Duplication Policies.
The Configure: Volume Duplication Policies page appears.
-
Select the volume duplication policy you want to edit or view and click Edit.
The Configure: Volume Duplication Policies > policy_name page appears.
-
Make whatever changes you want to the duplication policy and click OK.
-
To remove an existing duplication rule, select it in the Duplication rule(s) list and click Remove.
-
To add a duplication rule, select a media family from the Media family list, enter a value in the Number of duplicates field, and click Add.
The Configure: Volume Duplication Policies page displays a success message, and the edited duplication policy appears in the list.
-
9.4.5.2 Removing a Volume Duplication Policy
A duplication policy that is associated with one or more media families cannot be removed. The media families must first be updated to remove the references to the duplication policy.
To remove an existing volume duplication policy:
-
From the Oracle Secure Backup Web tool Home page, click Configure.
The Configure page appears.
-
In the Media Life Cycle section, click Volume Duplication Policies.
The Configure: Volume Duplication Policies page appears.
-
Select the duplication policy you want to remove and click Remove.
A confirmation page appears.
-
Click Yes.
The Configure: Volume Duplication Policies page displays a success message, and the selected duplication policy no longer appears in the list of duplication policies.
9.4.5.3 Renaming a Volume Duplication Policy
You can use the Web tool to rename an existing volume duplication policy.
To rename a volume duplication policy:
-
From the Oracle Secure Backup Web tool Home page, click Configure.
The Configure page appears.
-
In the Media Life Cycle section, click Volume Duplication Policies.
The Configure: Volume Duplication Policies page appears.
-
Select the duplication policy you want to rename and click Rename.
A different page appears.
-
Enter the different name in the Rename policy_name to field and click Yes.
The Configure: Volume Duplication Policies page displays a success message. The selected duplication policy appears in the list of policies with its different name.
9.4.6 Managing Volume Duplication Policy and Media Family Associations
You can use the Web tool to remove or change the rotation policy associated with a media family.
To manage duplication and media family associations:
-
From the Oracle Secure Backup Web tool Home page, click Configure.
The Configure page appears.
-
In the Basic section, click Media Families.
The Configure: Media Families page appears.
-
Select the media family whose volume duplication policy you want to remove or change and click Edit.
The Configure: Media Families > family_name page appears.
-
To remove the existing volume duplication policy, select none in the Volume duplication policy list and click OK.
The Configure: Media Families page displays a success message.
-
To replace the existing volume duplication policy, select a different volume duplication policy from the Rotation policy list and click OK.
The Configure: Media Families page displays a success message.
9.4.7 Managing Volume Duplication Windows
This section provides step-by-step instructions for removing a volume duplication window. You cannot edit an existing volume duplication window. If you want a longer volume duplication window, you can either remove and replace the existing window or simply add a second window with the extra hours you want. If you want a shorter volume duplication window, however, you must remove and replace the existing duplication window. For instructions on adding a volume duplication window, see "Adding Volume Duplication Windows".
Note:
If you add a volume duplication window that is identical to an existing window except for its time range, then the Configure: Volume Duplication Windows page displays only the additional time range appended to the existing volume duplication window.To remove a volume duplication window:
-
From the Oracle Secure Backup Web tool Home page, click Configure.
The Configure page appears.
-
In the Advanced section, click Volume Duplication Windows.
The Configure: Volume Duplication Windows page appears.
-
Select the volume duplication window you want to remove and click Remove.
A confirmation page appears.
-
Click Yes.
The Configure: Volume Duplication Windows page displays a success message, and the selected volume duplication window no longer appears in the list of windows.
Note:
If you have two or more duplication windows that differ only in their time ranges, then you cannot remove just one of them. You must remove all of them and then re-create the duplication windows you want to keep.
9.4.8 Managing Volume Duplication Schedules
This section provides step-by-step instructions for editing, removing, and renaming an existing volume duplication schedule.
This section contains these topics:
9.4.8.1 Editing or Viewing the Properties of a Volume Duplication Schedule
You can use the Web tool to edit or view the properties of a volume duplication schedule.
To edit or view the properties:
-
From the Oracle Secure Backup Web tool Home page, click Manage.
The Manage page appears.
-
In the Media Life Cycle section, click Schedule Volume Duplication.
The Manage: Schedule Volume Duplication page appears.
-
Select the volume duplication schedule you want to edit or view and click Edit.
The Manage: Schedule Volume Duplication > schedule_name page appears.
-
Make whatever changes you want to the volume duplication policy and click OK.
The Manage: Schedule Volume Duplication page displays a success message. The edited volume duplication schedule appears in the list.
9.4.8.2 Removing a Volume Duplication Schedule
You can use the Web tool to remove a volume duplication schedule.
To remove a volume duplication schedule:
-
From the Oracle Secure Backup Web tool Home page, click Manage.
The Manage page appears.
-
In the Media Life Cycle section, click Schedule Volume Duplication.
The Manage: Schedule Volume Duplication page appears.
-
Select the volume duplication schedule you want to remove and click Remove.
A confirmation page appears.
-
Click Yes.
The Manage: Schedule Volume Duplication page displays a success message, and the selected volume duplication schedule no longer appears in the list of schedules.
9.4.8.3 Renaming a Volume Duplication Schedule
You can use the Web tool to rename a volume duplication schedule.
To rename a duplication schedule:
-
From the Oracle Secure Backup Web tool Home page, click Manage.
The Manage page appears.
-
In the Media Life Cycle section, click Schedule Volume Duplication.
The Manage: Schedule Volume Duplication page appears.
-
Select the volume duplication schedule you want to rename and click Rename.
A different page appears.
-
Enter the different name for the volume duplication schedule in the Rename schedule_name to field and click Yes.
The Manage: Schedule Volume Duplication page displays a success message, and the selected volume duplication schedule appears with its different name in the list of schedules.
9.4.9 Changing Global Vaulting Policies
You can use the following global policies to control how Oracle Secure Backup performs vaulting:
-
autovolumereleaseSet the
autovolumereleasepolicy toyesto automatically release recalled volumes when restore jobs requiring those volumes have completed. Only volumes automatically recalled by Oracle Secure Backup are released. The default value isno. -
customeridstringUse the
customeridstringpolicy to define the default customer ID string used in reports generated by Oracle Secure Backup. You can override this policy for an individual location. -
invretrydelayUse the
invretrydelaypolicy to dictate the duration that Oracle Secure Backup waits before retrying an export operation or inventory operation (to verify that a volume has been physically removed from a library). This policy has a default value of 2 minutes. -
maxinvretrytimeUse the
maxinvretrytimepolicy to define the maximum duration for which the media movement job will continue retrying the export or inventory operation. This policy has a default of 15 minutes. After this duration is completed, Oracle Secure Backup places the job in an "input required" state. The job waits for user intervention. Oracle Secure Backup sends an alert email to the email recipients in the location object.As an example, suppose that the
invretrydelayandmaxinvretrytimepolicies are set to their default values. The Oracle Secure Backup media manager attempts to export a volume to anieeslot according to the automatic ejection mode, but does not find a vacant slot. Oracle Secure Backup retries the export every 2 minutes. Oracle Secure Backup continues trying for 15 minutes, at which time the job requires user input to progress further. -
minwritablevolumesUse the
minwritablevolumespolicy to specify the minimum number of writable volumes that must always be available in each tape library. If the number of writable volumes in a tape library drops to less than this value, then Oracle Secure Backup initiates early rotation of volumes in that tape library. You can override this policy for an individual location. -
reportretaintimeUse the
reportretaintimepolicy to define how long vaulting reports (pick/distribution) are retained. The default value is7days.
To change global vaulting policies:
-
From the Oracle Secure Backup Web tool Home page, click Configure.
The Configure page appears.
-
In the Advanced section, click Defaults and Policies.
The Configure: Defaults and Policies page appears.
-
In the Policy column, click vaulting.
The Configure: Defaults and Policies > Vaulting page appears.
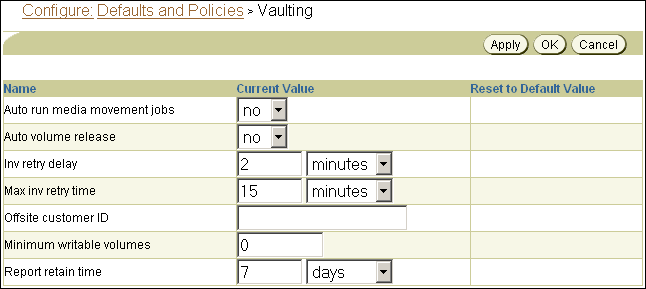
Description of the illustration osb_web40.gif
-
Make whatever vaulting policy changes you want and click OK.
-
If you later want to reset a policy to its default value, select the option in the Reset to Default Value column for that policy.
9.4.10 Changing Global Volume Duplication Policies
You can use the following global policies to control how Oracle Secure Backup performs volume duplication:
-
duplicateovernetworkUse the
duplicateovernetworkpolicy to control whether Oracle Secure Backup is allowed to duplicate a volume to a different media server than the one containing the original volume being duplicated. Oracle Secure Backup does not duplicate between tape devices attached to different media servers by default, because it requires heavy use of network bandwidth. -
duplicationjobpriorityUse the
duplicationjobprioritypolicy to specify the priority of volume duplication jobs relative to other jobs. The default value is200.
To change global volume duplication policies:
-
From the Oracle Secure Backup Web tool Home page, click Configure.
The Configure page appears.
-
In the Advanced section, click Defaults and Policies.
The Configure: Defaults and Policies page appears.
-
In the Policy column, click duplication.
The Configure: Defaults and Policies > Duplication page appears.
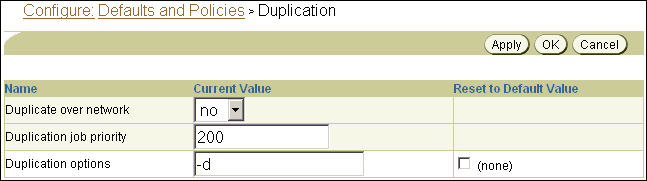
Description of the illustration osb_web41.gif
-
Make whatever volume duplication policy changes you want and click OK.
-
If you later want to reset a policy to its default value, select the option in the Reset to Default Value column for that policy.
9.5 Recovery Manager and Vaulting
Oracle Secure Backup vaulting is closely integrated with the Oracle Database 10g release 2 (10.2) and later Recovery Manager (RMAN) restore database preview and restore database preview recall commands. In Oracle Database 10g release 2 (10.2) and later, an RMAN restore fails immediately if it is determined that any needed volume is located at a storage location. You can use restore database preview to get the status of all volumes required for a restore, including volumes that are AVAILABLE but located remotely. You can use information from restore database preview to direct RMAN to avoid a restore if the volumes needed for the restore are at a storage location, as shown in the following example.
RMAN> startup force mount pfile=/jfersten_tstvw1/oracle/work/t_init1.ora ;
2> restore database preview;
3>

RMAN-06378: List of Backup Sets
RMAN-06379: ===================
RMAN-06389: BS Key  Type LV Size       Device Type Elapsed Time Completion Time
RMAN-06390: ------- ---- -- ---------- ----------- ------------ ---------------
RMAN-06391: 5       Full    340.95M    SBT_TAPE    00:01:48     10-AUG-07
RMAN-06392:         BP Key: 5   Status: AVAILABLE  Compressed: NO  Tag: TAG20080810T150035
RMAN-06355:         Handle: 05ip1s0j_1_1   Media: rmanvltfam-001,rmanvltfam-002,rmanvltfam-003,
RMAN-06335:   List of Datafiles in backup set 5
RMAN-06336:   File LV Type Ckp SCN    Ckp Time  Name
RMAN-06337:   ---- -- ---- ---------- --------- ----
RMAN-06338:   1       Full 308037     10-AUG-07 /jfersten_tstvw1/oracle/dbs/t_db1.f
RMAN-06338:   2       Full 308037     10-AUG-07 /jfersten_tstvw1/oracle/dbs/t_ax1.f

RMAN-08607: List of remote backup files
RMAN-06320: ============================
RMAN-06355:         Handle: 05ip1s0j_1_1   Media:
rmanvltfam-001,rmanvltfam-002,rmanvltfam-003,rmanvltfam-004RMAN-03091: Finished restore at 10-AUG-07

Recovery Manager complete.=====================================================================
The volumes rmanvltfam-001, rmanvltfam-002, rmanvltfam-003, and rmanvltfam-004 are required for the restore but are not located in a library. They are remotely located and must be recalled.
You can use restore database preview recall to start a recall for all volumes needed for a restore that are currently at a storage location. This RMAN command translates into an Oracle Secure Backup media movement job. When the volumes have been recalled from storage, the restore database preview output for the same restore indicates that these volumes are now available on-site. A restore can be completed successfully at this point.
Note:
The volumes recalled byrestore database preview recall must be manually released to return to return to their rotation schedules even if the autovolumerelease policy is set to yes.See Also:
-
Oracle Secure Backup Reference for more information on the
autovolumereleasepolicy
The following example shows the output from a restore database preview recall, and obtool commands showing the results of the resulting media movement job.
RMAN> startup force mount pfile=/jfersten_tstvw1/oracle/work/t_init1.ora ;
2> restore database preview recall ;
3>
RMAN-06196: Oracle instance started
RMAN-06199: database mounted

Total System Global Area     134217728 bytes

Fixed Size                     1259552 bytes
Variable Size                121636832 bytes
Database Buffers               8388608 bytes
Redo Buffers                   2932736 bytes

RMAN-03090: Starting restore at 10-AUG-07
RMAN-08030: allocated channel: ORA_SBT_TAPE_1
RMAN-08500: channel ORA_SBT_TAPE_1: sid=92 devtype=SBT_TAPE
RMAN-08526: channel ORA_SBT_TAPE_1: Oracle Secure Backup
RMAN-08030: allocated channel: ORA_DISK_1
RMAN-08500: channel ORA_DISK_1: sid=90 devtype=DISK

RMAN-06178: datafile 3 not processed because file is offline
RMAN-06378: List of Backup Sets
RMAN-06379: ===================
RMAN-06389: BS Key  Type LV Size       Device Type Elapsed Time Completion Time
RMAN-06390: ------- ---- -- ---------- ----------- ------------ ---------------
RMAN-06391: 5       Full    340.95M    SBT_TAPE    00:01:48     10-AUG-07
RMAN-06392:         BP Key: 5   Status: AVAILABLE  Compressed: NO  Tag: TAG20080
810T150035
RMAN-06355:         Handle: 05ip1s0j_1_1   Media: rmanvltfam-001,rmanvltfam-002,rmanvltfam-003,
RMAN-06335:   List of Datafiles in backup set 5
RMAN-06336:   File LV Type Ckp SCN    Ckp Time  Name
RMAN-06337:   ---- -- ---- ---------- --------- ----
RMAN-06338:   1       Full 308037     10-AUG-07 /jfersten_tstvw1/oracle/dbs/t_db1.f
RMAN-06338:   2       Full 308037     10-AUG-07 /jfersten_tstvw1/oracle/dbs/t_ax1.f
RMAN-12016: using channel ORA_SBT_TAPE_1
RMAN-12016: using channel ORA_DISK_1

RMAN-05035: archive logs generated after SCN 308037 not found in repository
RMAN-05033: Media recovery start SCN is 308037
RMAN-05034: Recovery must be done beyond SCN 308037 to clear data files fuzzines
s
RMAN-08608: Initiated recall for the following list of remote backup files
RMAN-07524: ==========================================================
RMAN-06355:         Handle: 05ip1s0j_1_1   Media: rmanvltfam-001,rmanvltfam-002,rmanvltfam-003,rmanvltfam-004
RMAN-03091: Finished restore at 10-AUG-07
==========================================================
RMAN has completed the restore database preview recall command. Oracle Secure Backup has created a media movement job for the remote volumes requested by RMAN. If the autorunmmjobs policy is set to no, then that job is in a pending state and must be started by the Oracle Secure Backup operator. An lsjob command returns the following information about this media movement job:
ob> lsjob --long --type mm
17:
    Type:                   media movement for TrustyVaultsInc
    Volumes:                rmanvltfam-001 rmanvltfam-002 rmanvltfam-003 rmanvltfam-004
    Scheduled time:         none
    State:                  pending enable by operator
    Priority:               100
    Run on host:            (administrative server)
    Attempts:               0
A catrpt command displays the distribution report for this media movement job:
ob> catrpt --type dist 17
                 Oracle Secure Backup Distribution List Report
                       Location - TrustyVaultsInc

  Volume ID     Barcode                         Move Date    Next Loc
------------------------------------------------------------------------
rmanvltfam-001  b1ee571429f5102ad52000cf1ce8d3a 2008/8/10    vlibrman
rmanvltfam-002  b22b696a29f5102ad52000cf1ce8d3a 2008/8/10    vlibrman
rmanvltfam-003  b26873be29f5102ad52000cf1ce8d3a 2008/8/10    vlibrman
rmanvltfam-004  b39fbf9429f5102a9f0000cf1ce8d3a 2008/8/10    vlibrman
The media movement job is in a pending state. The operator can run the media movement job with a runjob command:
ob> runjob --mediamovement --now 17
In releases before Oracle Database 10g release 2 (10.2), an RMAN restore operation requiring volumes currently at a storage location results in a corresponding Oracle Secure Backup restore job. The Oracle Secure Backup scheduler also starts a media movement job to recall the volumes from storage. The restore job waits in a pending state until all the required volumes have been successfully recalled.
Each storage location can be associated with a recall time. This is the time taken to recall a volume from this location. If this recall time exceeds the resource wait time configured for this restore job, then the recall operation is not started and the restore job fails.
You can also recall stored volumes needed for an RMAN restore with the recallvol command in obtool or with the Oracle Secure Backup Web tool, as described in "Recalling a Volume".
See Also:
-
"Adding Locations" for instructions on setting a recall time for a storage location
-
Oracle Secure Backup Reference for complete
recallvolsyntax and semantics
9.6 Troubleshooting Vaulting
This section discusses two problems that can surface in a vaulting environment. It also suggests what to do if you encounter these problems.
9.6.1 Misplaced Volumes
There are any number of reasons a volume might not be at the location currently recorded for it in the Oracle Secure Backup catalog:
-
The wrong volume is removed from a tape library for transportation to a storage location
-
The wrong volume is returned from a storage location
-
Two or more media movement jobs are occurring simultaneously, their distribution lists are interchanged, and they are transported to the wrong locations
-
A volume is lost or destroyed en route to or returning from a storage location
If a volume is manually removed from an active or storage location and misplaced, then Oracle Secure Backup does not flag it as misplaced. The Oracle Secure Backup catalog still shows it as residing in its former location. Its misplaced status is not discovered until it next becomes eligible for inclusion in a media movement job. In this case the volume is misplaced, but it is still somewhere in your administrative domain. Finding it might require a complete volumes inventory or physical search.
If the wrong volume is returned from a storage location, then two volumes are misplaced simultaneously. For example, suppose Oracle Secure Backup creates a media movement job to move vol000001 from storage to its Media_Recycle_Bin. But if vol000002 gets moved instead, then the Oracle Secure Backup catalog shows vol00001 in the Media_Recycle_Bin when it is really still at the storage location. Worse, it shows vol000002 at the storage location when it is really in the Media_Recycle_Bin. In this case the volumes are still somewhere in your administrative domain, but one of them (vol000002 in this example) is in danger of being overwritten by mistake. You can guard against this by requiring that all volumes be accompanied by distribution reports when moving between locations.
A volume misplaced en route to a storage location is arguably the worst case. The volume is no longer in your administrative domain, and you do not know it has been misplaced until Oracle Secure Backup generates the next media movement job for it. This next media movement job might be months after the volume is misplaced. You can guard against this case by generating two distribution reports for each media movement job: one distribution report accompanies the volume to the storage location, while the other is transmitted by itself to the storage location operator. If the storage location operator receives a distribution report but not a matching volume, then the operator knows immediately that a volume has been misplaced en route.
See Also:
"Viewing Pick and Distribution Reports"9.6.2 Volumes Outside Their Rotation Policies
Volumes are associated with rotation policies. Volumes inherit rotation policies from their media families. If you change the rotation policy associated with a media family, then the different policy applies to all volumes that belong to the media family and have not left their originating locations. The different rotation policy does not apply to volumes that belong to the media family but are not at their originating location.
Note:
A volume can also be assigned to a different rotation policy with thechvol --rotationpolicy command.If the different rotation policy includes all locations included in the old policy, then there is no problem with volumes that have left their originating locations. But if the different rotation policy omits one or more locations, then all volumes in the newly omitted locations at the time of the policy change are stranded. Oracle Secure Backup does not create media movement jobs for these volumes, because it does not look for them in the omitted locations.
Stranded volumes must be moved to a location specified in the different rotation policy with the Oracle Secure Backup Web tool Manage: Volumes page. These stranded volumes appear in the volume exception report.
9.6.3 Viewing Exception Reports
An exception report lists the media not in the correct location specified by its rotation policy, such as lost volumes, volumes not stored in the correct tape library, and expired volumes still in rotation.
To generate an exception report:
-
From the Oracle Secure Backup Web tool Home page, click Manage.
The Manage page appears.
-
In the Media Life Cycle section, click Location Reports.
The Manage: Location Reports page appears.
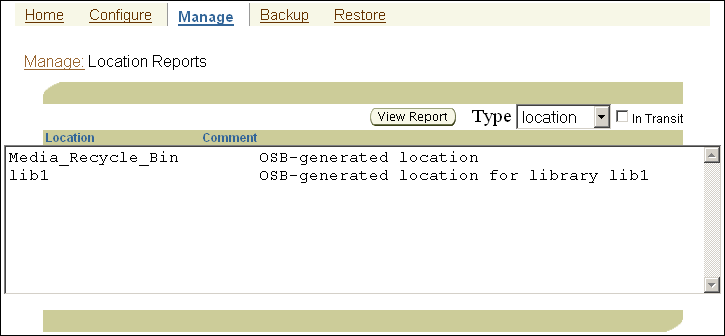
Description of the illustration osb_web36.gif
-
Select exception in the Type list and click View Report.
This report identifies volumes that are not in the locations currently recorded in the Oracle Secure Backup catalog. This includes volumes whose location is unknown, volumes in the wrong tape library, and expired volumes still in rotation.