5 Configuring and Managing the Administrative Domain
This chapter explains the basic steps involved in setting up an Oracle Secure Backup administrative domain after initial installation of the product on all of your hosts. Some steps, such as "Adding a Host to the Administrative Domain", are also useful when managing an existing administrative domain.
This chapter contains the following sections:
5.1 Administrative Domain Configuration Overview
This section describes the steps involved in configuring an Oracle Secure Backup administrative domain. It assumes you have installed the Oracle Secure Backup software on each host in the domain, as described in Chapter 2, "Installing Oracle Secure Backup on Linux or UNIX" or Chapter 3, "Installing Oracle Secure Backup on Windows".
These instructions explain how to configure the administrative domain with host and tape device information using the Oracle Secure Backup Web tool. You can perform the same tasks using the obtool command-line interface to Oracle Secure Backup.
The instructions set up administrative domain security in a default security configuration that should be adequate for most users. Further configuration of users, user classes, security options, and the Oracle Secure Backup media management layer for use with Recovery Manager (RMAN) in backing up Oracle databases might be required in some cases. For details, see Oracle Secure Backup Administrator's Guide.
5.1.1 Administrative Domain Configuration Steps: Outline
The required steps to configure Oracle Secure Backup after installation are as follows:
-
Use your Web browser to connect to the Oracle Secure Backup Web tool running on the administrative server as the
adminuser. "Using the Oracle Secure Backup Web Tool" describes this task. -
For each host in your domain to be set up for the role of media server, perform the following steps:
-
Add the host to the administrative domain. "Configuring the Administrative Domain with Hosts" describes this task.
Note:
If the administrative server is also assigned the media server role, then it is already part of the administrative domain and does not need to be added. -
Configure the administrative domain to include each tape device attached to this host. "Adding Tape Devices to an Administrative Domain" describes this task.
-
-
For each host to be set up only for the client role, add the host to the administrative domain, as described in "Configuring the Administrative Domain with Hosts".
After configuring each client host, ping it to ensure that it is reachable.
-
Initial configuration is complete. Oracle Secure Backup is installed on all hosts, and all clients, media servers and tape devices are accessible by Oracle Secure Backup. Network communication among hosts in the administrative domain is configured with the default security configuration described in "Default Security Configuration".
Note:
You must still identify files to be backed up, configure at least one backup schedule, and set up users, classes, and security policies. These tasks are described in the Oracle Secure Backup Administrator's Guide.5.2 Configuring the Administrative Domain with Hosts
This section explains how to configure your administrative domain to add your hosts. This section contains these topics:
5.2.1 About Administrative Domain Host Configuration
The host configuration process makes the administrative server aware of a media server or client to be included in the administrative domain. You must perform this process for every host in the administrative domain, including each host running Oracle Secure Backup natively and each network-attached storage device managed by Network Data Management Protocol (NDMP).
For any host to be added to the administrative domain, you must provide the following attributes:
-
Host name
-
IP address
-
Assigned roles: client, media server or both
-
Whether the host is in service or not in service at the moment
After adding a host to the administrative domain, Oracle recommends that you ping the host to confirm that it can be accessed by the administrative server.
See Also:
"Pinging a Host"For hosts that use NDMP access mode, such as network-attached storage devices, you must configure the following additional attributes:
-
NDMP authorization type
-
NDMP password
-
TCP port number for use with NDMP
See Also:
Oracle Secure Backup Reference for a complete account of host attributes5.2.2 Viewing the Hosts in the Administrative Domain
In the Oracle Secure Backup Web tool, on the Configure page, click Hosts to display the Hosts page. The Hosts page lists the host name, configured host roles, and the current status of the host. Figure 5-1 shows a typical Hosts page.
Figure 5-1 Oracle Secure Backup Web Tool: Hosts Page
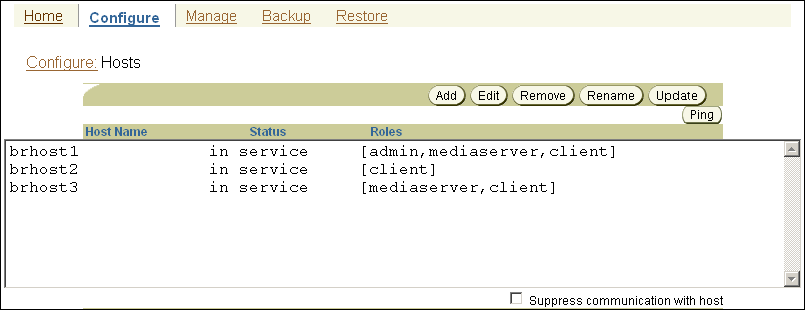
Description of "Figure 5-1 Oracle Secure Backup Web Tool: Hosts Page"
5.2.3 Adding a Host to the Administrative Domain
To add a host to an administrative domain:
-
From the Home page, click the Configure tab.
-
Click Hosts in the Basic section to display the Hosts page.
-
Click Add to add a host.
The Oracle Secure Backup Web tool displays a form for entering configuration information about the host.
-
In the Host field, enter the unique name of the host in the Oracle Secure Backup administrative domain.
In most cases, this name is the host name resolvable to an IP address using the host name resolution system (such as DNS or NIS) on your network. However, you can assign a different host name purely for use with Oracle Secure Backup.
The name you enter must start with an alphanumeric character. It can contain only letters, numerals, dashes, underscores, and periods. The maximum length of a host name is 127 characters.
-
You must enter a value in the IP Interface name(s) field in the following situations:
-
The name of this host cannot be resolved to an IP address using a mechanism such as DNS or NIS
-
The resolvable name of your host is different from the value entered in the Host field.
-
Your host has multiple IP interface names or IP addresses to use with Oracle Secure Backup
If any of the preceding conditions apply to this host, then enter one or more IP interface names in this field. Valid values are either resolvable host names or IP addresses. Separate multiple values with a comma.
For example, you can use
myhost.oracle.comfor a host name or141.146.8.66for an IP address.If a value is specified for this field, then Oracle Secure Backup tries the host names or IP addresses in the order specified when it must contact this host, rather than using the name specified in the Host field.
Note:
If some hosts should contact this host using a particular network interface, then you can use the Preferred Network Interface (PNI) capability to override this order for those hosts, after completing the initial configuration of the administrative domain. See "Configuring Preferred Network Interfaces (PNI)" for details. -
-
In the Status list, select one of these:
-
in service
Select this option to indicate that the host is available to perform backup and restore operations.
-
not in service
Select this option to indicate that the host is unavailable to perform backup and restore operations.
-
-
In the Roles list, select the roles for this host: admin, client or mediaserver.
-
In the Disable RDS field, select one of the following:
-
yes
Select this option to disable the use of Reliable Datagram Socket (RDS) over Infiniband for communication between the client and media server. The default protocol, TCP/IP, is used for communication.
-
no
Select this option to enable the use of Reliable Datagram Socket (RDS) over Infiniband for communication between the client and media server.
-
systemdefault
Select this option to specify that the administrative domain level setting, by using the operations policy
disablerds, is used to decide of RDS is enabled for the host. For example, if you setsystemdefaultat the host level and thedisablerdspolicy is set tono, the host uses RDS for data transfer.
See Also:
Appendix E, "Oracle Secure Backup and Reliable Datagram Socket (RDS)" for more information about RDS -
-
In the Access method field, select one of these:
-
OB
Select this option for Windows, Linux and UNIX hosts that have Oracle Secure Backup installed.
-
NDMP
Select this option for devices that support NDMP without an Oracle Secure Backup installation, such as a network-attached storage device.
Note:
OB access mode is a synonym for primary access mode. See "Oracle Secure Backup Host Access Modes" for a discussion of access modes. -
-
In Public and private key sizes, select the size for the public/private key associated with the identity certificate for this host.
For hosts using the ob access mode, skip to Step 17. For hosts such as Network Attached Storage (NAS) devices that must use NDMP mode, continue to Step 11. Steps 11 through 16 apply only to hosts in NDMP mode.
-
In the NDMP authorization type list, select an authorization type. The authorization type defines the way Oracle Secure Backup authenticates itself to the NDMP server. Typically, you should use the default setting.
Your choices are the following:
-
default
Select this option to use the value of the Authentication type for the NDMP policy.
-
none
Select this option to attempt to use the NDMP server from Oracle Secure Backup and provide no authentication data. This technique is usually unsuccessful.
-
Select this option to negotiate with the NDMP server to determine the best authentication mode to use.
-
Select this option to use unencrypted text to authenticate.
-
Select this option to use the MD5 digest algorithm to authenticate.
See Also:
Oracle Secure Backup Administrator's Guide to learn about NDMP-related policies -
-
In the Username field, enter the name used to authenticate Oracle Secure Backup to this NDMP server. If left blank, then Oracle Secure Backup uses the name in the NDMP policy.
-
In the Password list, select one of these options:
-
Use default password
Select this option to use the default NDMP password.
-
Use text password
Select this option to enter a password.
-
Set to NULL
Check this to use a NULL password.
The password is used to authenticate Oracle Secure Backup to this NDMP server.
-
-
In the Backup type field, enter an NDMP backup type. A backup type is the name of a backup method supported by the NDMP data service running on a host. Backup types are defined by each data service provider.
-
In the Protocol Version list, select 2, 3, 4, or as proposed by server. See "Oracle Secure Backup Host Access Modes" for details on NDMP protocol versions.
-
In the Port field, enter a port number. Typically, the TCP port (10000) in the NDMP policy is used. You can specify another port if this server uses a port other than the default.
-
If the host you are adding to the administrative domain is not currently accessible on the network, then select the Suppress communication with host option.
-
Click OK to save your changes.
5.2.4 Adding the Media Server Role to an Administrative Server
If you choose both the administrative server and media server roles when installing Oracle Secure Backup on a host, then that host is automatically part of the administrative domain. But it is not recognized as a media server until that role is explicitly granted to it using the chhost command in obtool or the Oracle Secure Backup Web tool.
Follow these steps to add the media server role to an administrative server using the Oracle Secure Backup Web tool:
-
On the Configure page of the Oracle Secure Backup Web tool, click Hosts.
The Configure: Hosts page appears.
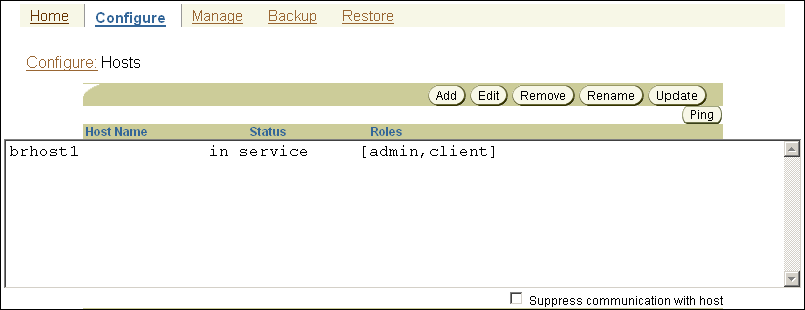
Description of the illustration ob_win19.gif
-
Select the administrative server and click Edit.
The Configure: Hosts > host_name page appears.
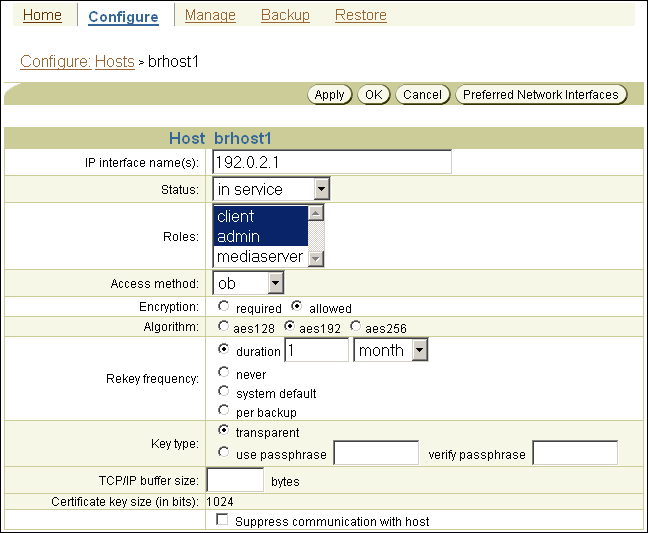
Description of the illustration ob_win20.gif
-
In the Roles list, shift-click to add the media server role and then click OK.
The Configure: Hosts page reappears with the media server role added to the administrative server host.
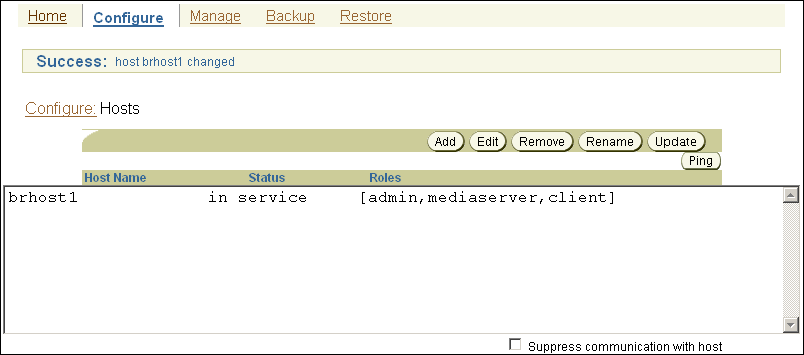
Description of the illustration ob_win21.gif
5.2.5 Adding Backup and Restore Environment Variables to an NDMP Host
Some NDMP hosts might require that you add backup and restore environment variables before they function with Oracle Secure Backup.
To add backup and restore variables:
-
In the field that appears next to the Backup environment vars or Restore environment vars field, enter a name-value pair.
-
Click Add to add the name-value pair as an environment variable.
If an environment variable name or value includes spaces, then you must use quotes around the name or value to ensure correct processing of the name or value. For example, enter A=B or "Name A"="Value B" (if the name or value includes spaces).
-
Select an existing environment variable pair and click Remove to remove the pair.
5.2.6 Configuring Preferred Network Interfaces (PNI)
Multiple physical data paths can exist between a client, which contains primary storage to be backed up or restored, a media server, which controls at least one secondary storage device that writes and reads the backup media, and the administrative server. For example, a host might have multiple network interfaces connected to the network containing the hosts in the administrative domain. You can specify a PNI that identifies the network interface on a media server to use when transmitting backup or restore data to another specified host, or receiving data from that host.
To configure a Preferred Network Interface (PNI):
-
From the Configure page, select the host you want to configure and click Edit.
The Configure Hosts > host_name page appears.
-
Click Preferred Network Interfaces.
The Configure Hosts > host_name > Preferred Network Interface page appears.
-
Select an IP address or name from the IP Address list.
This list shows each IP address or name by which this host can be referenced. Each is associated with a specific network interface. The IP address or name identifies the network interface that clients you select can use when communicating with the server.
-
Select one or more clients to use this IP address or DNS name from the Host list field.
-
Click Add.
The Oracle Secure Backup Web tool displays the PNI in the IP Address: Host List field.
To remove a Preferred Network Interface (PNI):
-
In the IP Address: Host List field, select the name of the PNI to remove.
-
Click Remove.
PNI and Network Connection Types
When multiple network connections exist between a client and the media server, Oracle Secure Backup uses the following criteria to determine which connection type is used:
-
If a PNI is configured, the network interface specified in the PNI is used to transfer backup and restore data between the client and media server.
-
If a PNI is not configured, Oracle Secure Backup selects the connection type based on the order of precedence described in "Order of Precedence for Network Connection Types".
For a particular connection type to be used, both the client and media server must support that connection type.
5.2.7 Network Load Balancing in Oracle Secure Backup
Network load balancing ensures that multiple network connections on a client are utilized optimally and no single connection carries the data load of all the concurrent backup and restore jobs. The transfer load of multiple backup and restore jobs is distributed across the network connections available on the client and media server. Load balancing is available starting with Oracle Secure Backup 10.4 and is supported for both file-system and Oracle Database backup and restore operations. Load balancing is turned off by default.
Note:
Load balancing is not supported for NDMP clients.Oracle Secure Backup sets up a data connection between the client and the media server over which the data transfer occurs. If a host contains more than one network interface of a particular type, Oracle Secure Backup uses all the available interfaces of that type for the data connections between the client and the media server. The type of network interface can be IPv4, IPv6, or RDS/RDMA (Reliable Datagram Socket over Remote Direct Memory Access) over Infiniband. Load balancing requires connectivity between the client and the media server on all the interfaces of the selected connection type.
Oracle Secure Backup selects a connection type only if both the client and the media server support that connection type. Therefore, if both the client and the media server support RDS/RDMA over Infiniband and the IPv6 connection types, then Oracle Secure Backup selects RDS/RDMA over Infiniband as the connection type.
If a Preferred Network Interface (PNI) is configured, then load balancing is disabled on the media server and PNI takes precedence. Load balancing will still be performed on the client.
Order of Precedence for Network Connection Types
When multiple network connections are available between a client and media server, Oracle Secure Backup decides which connection type to use based on the following order of precedence:
-
RDS/RDMA over Infiniband
-
IPv6
-
IPv4 (includes TCP/IP over Infiniband)
5.2.8 Pinging a Host
You can use the Oracle Secure Backup ping operation to determine whether a host responds to requests from Oracle Secure Backup on each of its configured IP addresses.
Pinging a host attempts to establish a TCP connection to the host on each of the IP addresses you have configured for it. For hosts running Oracle Secure Backup, the connection occurs on TCP port 400. For hosts that use the NDMP access mode, connections occur through the configured NDMP TCP port, usually 10000.
Oracle Secure Backup reports the status of each connection attempt and immediately closes each connection that has been established successfully.
To ping a host:
-
From the Hosts page, select a host to ping.
-
Click Ping.
A status line appears on the page with the results of the operation.
5.2.9 Viewing or Editing Host Properties
If you are having difficulties in configuration, then you might be required to view or edit the configuration of a host. To display or edit host properties:
-
From the Hosts page, select the name of the host whose properties require editing.
Select the Suppress communication with host option to edit a host that is currently not accessible through the network.
-
Click Edit.
The Oracle Secure Backup Web tool displays a page with details for the host you selected.
-
Make any desired changes to the host properties.
-
Click OK to save your changes.
5.2.10 Updating a Host
When you add or modify a host in an Oracle Secure Backup administrative domain, Oracle Secure Backup exchanges messages with that host to inform it of its changed state. If you select the Suppress communication with host option during an add or edit operation, however, then the host contains out-of-date configuration information. Use Update Host to send fresh state information to the host.
Updating is useful only for hosts running Oracle Secure Backup natively. Hosts accessed in NDMP mode, such as NAS devices, do not maintain any Oracle Secure Backup state data and therefore it is not necessary to update their state information.
To update a host:
-
From the Host page, select the name of the host to be updated.
-
Click Update.
5.2.11 Removing a Host
This section explains how to remove a host from an Oracle Secure Backup administrative domain. When you remove a host, Oracle Secure Backup destroys all information pertinent to that host, including:
-
Configuration data
-
Incremental backup state information
-
Metadata in the backup catalog for this host
-
Each device attachment
-
PNI references
When you remove a host, Oracle Secure Backup contacts that host and directs it to delete the administrative domain membership information it maintains locally. You can suppress this communication if the host is no longer accessible.
To remove a host:
-
From the Hosts page, select the name of the host to remove.
Check Suppress communication with host to remove a host that is not connected to the network.
-
Click Remove.
Oracle Secure Backup prompts you to confirm the removal of the host.
-
Click Yes to remove the host or No to leave the host undisturbed.
Oracle Secure Backup removes the host and returns you to the Host page.
5.3 Adding Tape Devices to an Administrative Domain
This section explains how to configure a tape drive or tape library for use with Oracle Secure Backup. This section contains these topics:
See Also:
"Configuring the Solaris sgen Driver to Provide Oracle Secure Backup Attach Points" to learn how to create attach points for tape devices on Solaris 10 systems5.3.1 Tape Device Names
A tape device can be assigned a logical name by the host operating system (such as nrst0a), but it also can have a worldwide name, such as nr.WWN[2:000:0090a5:0003f7]L1.a. On some platforms, such as a Fibre Channel tape drive or tape library connected to a Network Appliance filer, the logical name might vary at each operating system restart. Oracle Secure Backup supports such tape devices, but they must be referred to by their worldwide name, which does not change across operating system restarts.
Any substring of the raw device name for the attachment that is the string $WWN is replaced with the value of the WWN each time the tape device is opened. For example a usable raw device name for a Storage Area Network (SAN) Network Appliance filer is nr.$WWN.a, specifying a no-rewind, best-compression tape device having the World Wide Name found in the device object.
The WWN is usually automatically discovered by the device discovery function in Oracle Secure Backup. However, you can enter it manually if necessary.
5.3.2 About Configuring Tape Drives and Libraries
This section explains how to configure a tape drive or tape library for use with Oracle Secure Backup. You can add a tape device in one of two ways:
-
Manually
A tape device connected to a media server on which Oracle Secure Backup is installed must be added to the administrative domain manually.
-
Automatically discovery
Oracle Secure Backup can automatically discover and configure each secondary storage device connected to certain types of NDMP servers, such as a Network Appliance filer.
Note:
You must add the media server role to a host before adding any tape devices whose attachment point references that host. Oracle Secure Backup does not do this automatically.For both tape drives and tape libraries, you can configure the following attributes:
-
The name of the tape device
-
The attachment, which is the description of a physical or logical connection of a tape device to a host
-
Whether the tape device is in service
For tape drives, you can configure the following additional attributes:
-
The tape library in which the tape drive is housed, if the tape drive is not standalone
-
A storage element range that the tape device can use, if the tape drive is in a tape library
Note:
Oracle Secure Backup identifies each tape drive within a tape library by its data transfer element (DTE) number. You must assign each tape device a DTE number if it is installed within a tape library. DTEs are numbered1 through n. See the description of the --dte option to the mkdev command in Oracle Secure Backup Reference for more details on data transfer element numbers.For tape libraries, you can configure the following additional attributes:
-
Whether automatic cleaning is enabled
-
The duration of a cleaning interval
-
Whether a barcode reader is present
See Also:
Oracle Secure Backup Reference for a complete account of tape device attributes.To configure your administrative domain to include tape devices:
-
Disable any system software that scans and opens arbitrary SCSI targets before configuring Oracle Secure Backup tape devices.
If Oracle Secure Backup has to contend with other system software (such as monitoring software) for access to tape libraries and tape drives, then unexpected behavior can result.
-
Configure tape libraries locally attached to your media servers, as described in "Configuring a Tape Library".
Configure tape drives locally attached to your media servers, as described in "Configuring a Tape Drive"
-
Configure tape devices that are network-accessible but are not locally attached.
You must decide which media servers should control the tape devices and, for each media server, specify an attachment between the media server and the tape device. The procedure is identical to configuring a tape device attached locally to a media server.
-
Perform automatic device discovery to add every tape device attached to hosts that use NDMP access mode, such as NAS filers.
"Discovering Tape Devices Automatically on NDMP Hosts" describes this task.
-
Inventory each tape library, and then list its volumes.
Each volume in a tape library should show either a barcode or the status unlabeled. If a library shows a slot as occupied, then this slot is in an invalid state.
5.3.2.1 Updating a Tape Device Inventory
To update a tape library or tape drive inventory using the Oracle Secure Backup Web tool:
-
From the Oracle Secure Backup Web tool Home page, click Manage.
The Manage page appears.
-
In the Devices section, click Libraries.
The Manage: Libraries page appears.
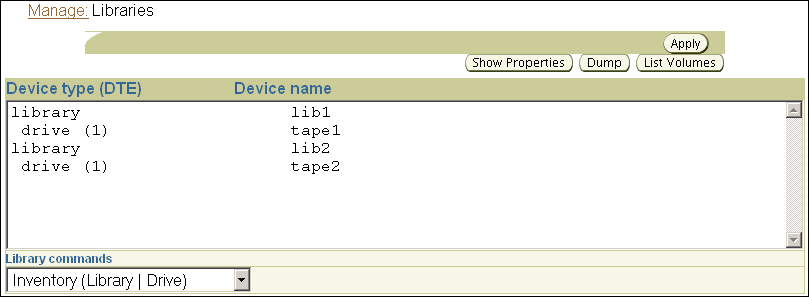
Description of the illustration obins008.gif
-
Select the tape drive or tape library you want to inventory in the Devices table.
-
Select Inventory (Library | Drive) in the Library commands list.
In this example,
lib1is selected. -
Click Apply.
The Manage: Libraries page appears.
-
Ensure that the Library list is set to the device you want to inventory.
-
Select the Force option.
Instead of reading from its cache, the tape library updates the inventory by physically scanning all tape library elements.
-
Click OK.
When the inventory is complete, the Manage: Libraries page reappears and displays a success message.
To see the results of the inventory, select the tape drive or tape library again and click List Volumes.
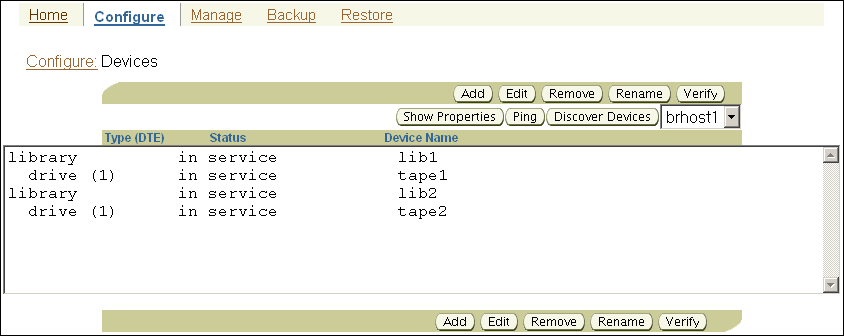
5.3.3 Displaying the Devices Page
The Devices page, illustrated in Figure 5-2, lists each tape library and tape drive that is currently in the administrative domain. The page lists the type, status, and name of every tape device.
5.3.4 Configuring a Tape Library
This section explains how to configure a tape library for use with Oracle Secure Backup.
To configure a tape library:
-
Disable any system software that scans and opens arbitrary SCSI targets before adding a tape device to an administrative domain. If Oracle Secure Backup has to contend with other system software (such as monitoring software) for access to a tape library or tape drive, then unexpected behavior can result.
-
From the Home page, click the Configure tab.
-
Click Devices in the Basic section to display the Devices page.
-
Click Add to add a tape device.
-
In the Device field, enter a name for the tape device.
The name must start with an alphanumeric character. It can only contain letters, numerals, dashes, underscores, or periods. It can contain at most 127 characters.
The tape device name is of your choosing. It must be unique among all Oracle Secure Backup device names. It is unrelated to any other name used in your computing environment or the Oracle Secure Backup administrative domain.
-
In the Type list, select library.
-
In the Status list, select one of these options:
-
in service
Select this option to indicate that the tape device is available to perform Oracle Secure Backup backup and restore operations.
-
not in service
Select this option to indicate that the tape device is unavailable to perform backup or restore operations.
-
auto not in service
This option indicates that the tape device is unavailable to perform backup or restore operation and is set automatically for a failed operation.
-
-
In the Debug mode list, select yes or no. The default is yes.
-
In the World Wide Name field, enter a worldwide name for the tape device, if required.
See Also:
"Tape Device Names" for more information on World Wide Names -
In the Barcode reader list, select one of these options to indicate whether a barcode reader is present:
-
yes
Select this option to indicate that the tape library has a barcode reader.
-
no
Select this option to indicate that the tape library does not have a barcode reader.
-
default
Select this option to indicate that Oracle Secure Backup should automatically determine the barcode reader using information reported by either the tape library, the external device file, or both.
-
-
In the Barcode required list, select yes or no. If you specify yes, then Oracle Secure Backup refuses to use any tape that lacks a readable barcode.
By default, Oracle Secure Backup does not discriminate between tapes with readable barcodes and those without. This policy ensures that Oracle Secure Backup can always solicit a tape needed for a restore operation by using either the barcode or the volume ID.
-
Set whether the tape library should use automatic cleaning.
-
In the Unload required list, select yes or no to specify if an unload operation is required before moving a tape from a tape drive to a storage element.
The default value is no.
-
Select an ejection type. Your choices are:
-
Whenever a volume becomes eligible to be ejected from the tape library, Oracle Secure Backup moves that volume to an export element and notifies the backup operator that it is available there. If no export elements are available, then Oracle Secure Backup requests operator assistance.
-
Whenever a volume becomes eligible to be ejected from the tape library, Oracle Secure Backup marks the volume to that effect. A media movement job then waits for the operator to reply to the job. The operator replies to the job through the job transcript. When the operator replies to the job to continue, Oracle Secure Backup ejects all such volumes through export elements.
-
No automation is used to eject volumes from the tape library. The backup operator determines which storage elements contain volumes ready to be ejected and manually removes them. This option can be useful when the tape library has no import/export slots.
-
-
Enter a value in the Minimum writable volumes field.
When Oracle Secure Backup scans tape devices for volumes to be moved, it looks at this minimum writable volume threshold. If the minimum writable volume threshold is nonzero, and if the number of writable volumes in that tape library is less than this threshold, then Oracle Secure Backup creates a media movement job for the full volumes even if their rotation policy does not require it. When this happens, Oracle Secure Backup notes in the media movement job transcript that volumes have been moved early.
-
Click OK to save your changes.
See Also:
"Adding a Tape Device Attachment"5.3.4.1 Configuring Automatic Tape Cleaning for a Library
Oracle Secure Backup can automatically clean each tape drive in a tape library. A cleaning cycle is initiated either when a tape drive reports that it needs cleaning or when a specified usage time has elapsed.
Oracle Secure Backup checks for cleaning requirements when a cartridge is either loaded into or unloaded from a tape drive. If at that time a cleaning is required, then Oracle Secure Backup loads a cleaning cartridge, waits for the cleaning cycle to complete, replaces the cleaning cartridge in its original storage element, and continues with the requested load or unload.
To configure automatic cleaning for a tape library:
-
In the Auto clean list, select yes to enable automatic tape drive cleaning or no to disable it. You can also manually request that a cleaning be performed whenever a tape drive is not in use.
Note:
Not all tape drives can report that cleaning is required. For those tape drives, you must define a cleaning interval.In the Clean interval (duration) field, enter a value and then select the cleaning frequency from the adjacent list. This interval is the amount of time a tape drive is used before a cleaning cycle is initiated. If automatic tape drive cleaning is enabled, then this duration indicates the interval between cleaning cycles.
-
In the Clean using emptiest field, select one of these options:
-
yes
Select this option to specify the emptiest cleaning tape, which causes cleaning tapes to "round robin" as cleanings are required.
-
no
Select this option use the fullest cleaning tape, which causes each cleaning tape to be used until it fills, then the next cleaning tape fills, and so on.
If there are multiple cleaning tapes in a tape library, then Oracle Secure Backup must decide which to use. If you do not otherwise specify, then Oracle Secure Backup chooses the cleaning tape with the fewest number of cleaning cycles remaining.
-
-
Click OK to save your changes.
See Also:
"Adding a Tape Device Attachment"
5.3.5 Configuring a Tape Drive
This section explains how to configure a tape drive for use with Oracle Secure Backup. If the tape drive you want to configure is attached to a tape library, then you must configure the tape library first, as described in "Configuring a Tape Library".
To configure tape drives for use with Oracle Secure Backup:
-
Disable any system software that scans and opens arbitrary SCSI targets before adding a tape device to an administrative domain. If Oracle Secure Backup has to contend with other system software (such as monitoring software) for access to tape libraries and tape drives, then unexpected behavior can result.
-
From the Home page, click the Configure tab.
-
Click Devices in the Basic section to display the Devices page.
-
Click Add to add a tape device.
-
In the Device field, enter a name for the tape device.
The name must start with an alphanumeric character. It can only contain letters, numerals, dashes, underscores, or periods. It can contain at most 127 characters.
The tape device name is of your choosing. It must be unique among all Oracle Secure Backup device names. It is unrelated to any other name used in your computing environment or the Oracle Secure Backup administrative domain.
-
In the Serial number field, enter the serial number of the tape drive.
This step is not required. But if you do not enter a serial number, then Oracle Secure Backup reads and stores the tape drive serial number the first time it opens the tape drive.
If the
checkserialnumberspolicy is enabled and you change the tape drive hardware, then you must enter the serial number of the tape drive before using it.See Also:
-
Oracle Secure Backup Reference for more information on the
checkserialnumberspolicy
-
In the Type list, select tape.
-
In the Status list, select one of these options:
-
in service
Select this option to indicate that the tape device is available to perform Oracle Secure Backup backup and restore operations.
-
not in service
Select this option to indicate that the tape device is unavailable to perform backup or restore operations.
-
auto not in service
This option indicates that the tape device is unavailable to perform backup or restore operation and is set automatically for a failed operation.
-
-
In the Debug mode list, select yes or no. The default is yes.
-
In the World Wide Name field, enter a worldwide name for the tape device, if required.
See Also:
"Tape Device Names" for more information on World Wide Names -
If the tape drive is located in a tape library, then select the tape library by name from the Library list.
-
In the DTE field, enter the data transfer element (DTE).
Note:
This option is not available for standalone tape drives. -
In the Automount field, select yes (default) or no to specify whether automount mode is on or off. Enable the automount mode if you want Oracle Secure Backup to mount tapes for backup and restore operations without operator intervention.
-
In the Error rate field, enter an error rate percentage or leave this field blank to accept the default setting. The default is 8.
The error rate is the ratio of restored write errors that occur during a backup job divided by the total number of blocks written, multiplied by 100. If the error rate for any backup is higher than this setting, then Oracle Secure Backup displays a warning message in the backup transcript.
Oracle Secure Backup also issues a warning if it encounters a SCSI error when trying to read or reset the tape drive error counters. Some tape drives do not support the SCSI commands necessary to perform these operations. To avoid these warnings, error rate checking can be disabled by selecting None.
-
In the Blocking factor field, enter the blocking factor or leave this field blank to accept the default setting. The default is 128 bytes.
The blocking factor value specifies how many 512-byte records to include in each block of data written to tape. The default value is 128, which means that Oracle Secure Backup writes 64K blocks to tape.
See Also:
"Tape Drives" for more information on blocking factors and maximum blocking factors -
In the Max Blocking factor field, enter the maximum blocking factor.
The largest value supported for the maximum blocking factor is 4096. This represents a maximum tape block size of 2MB.
Note:
Device and operating system limitations might reduce this maximum block size. -
In the Drive usage field, enter the amount of time the tape drive has been in use since it was last cleaned and then select the time unit from the adjacent list.
-
Leave the Current tape field empty during initial configuration. Update the tape drive inventory after configuration, as described in "Updating a Tape Device Inventory".
-
In the Use list group, select one of these options to configure the use list:
-
Storage element range or list
Select this option for a numeric range of storage element addresses. Enter a range in the field, for example, 1-20.
-
All
Select this option to specify all storage elements. For tape libraries with single tape drives, you can select this option to use all tapes. This is the default setting.
-
None
Select this option to indicate that no storage elements have yet been specified. If you select All or Storage element range or list, then this option is no longer visible.
Oracle Secure Backup allows all tapes to be accessed by all tape drives. The use list enables you to divide the use of the tapes for tape libraries in which you are using multiple tape drives to perform backups. For example, you might want the tapes in half the storage elements to be available to the first tape drive, and those in the second half to be available to the second tape drive.
-
-
Click OK to save your changes.
5.3.6 Discovering Tape Devices Automatically on NDMP Hosts
Oracle Secure Backup can detect changes in tape device configuration for some types of hosts accessed by NDMP, such as a filer, and it can automatically update the administrative domain device configuration based on this information,.
Oracle Secure Backup detects and acts on these kinds of changes:
-
Tape devices that were not previously part of the administrative domain are discovered. For each such tape device, Oracle Secure Backup creates a device with an internally-assigned name and configures a device attachment for it.
-
If a previously configured tape device has an attachment, then Oracle Secure Backup adds an attachment to the existing device.
-
If a previously configured tape device has lost an attachment, then Oracle Secure Backup deletes the attachment from the device.
Oracle Secure Backup detects tape devices that have multiple attachments by comparing the serial numbers for each tape device reported by the operating system. Oracle Secure Backup also determines whether any discovered tape device is accessible by its serial number. If the tape device is accessible by serial number, then Oracle Secure Backup configures each device attachment to reference the serial number instead of any logical name assigned by the operating system.
To discover tape devices attached to an NDMP host:
-
On the Hosts page select the name of the NDMP host in the list of hosts.
-
Click Discover.
If changed tape devices are discovered, then the Oracle Secure Backup Web tool displays a message similar to the following:
Info: beginning device discovery for host_name
host_name_c0t0l0  (new library)
WWN: [none]
new attach-point on host_name, rawname c0t0l0
host_name_c0t0l1  (new drive)
WWN: [none]
new attach-point on host_name, rawname c0t0l1
host_name_c0t0l2  (new drive)
WWN: [none]
new attach-point on host_name, rawname c0t0l2
If there are no changed tape devices to discover, then the Oracle Secure Backup Web tool displays a message similar to the following:
Info: beginning device discovery for host_name.
Info: no device configuration changes found for host_name
-
Click OK to return to the Devices page. The list of tape devices now includes the discovered tape devices.
5.3.7 Configuring an NDMP Copy-Enabled Virtual Tape Library
An NDMP copy-enabled virtual tape library (VTL) is a virtual tape library with an embedded NDMP server and multiple access paths. The embedded NDMP server allows offloading the I/O associated with volume duplication from the application running on the media server to the VTL.
An NDMP copy-enabled virtual tape library (VTL) must be represented in Oracle Secure Backup as a group of tape devices with multiple attach specifications. This ensures that the inventory data coming through the multiple access paths is identical.
Two Oracle Secure Backup host objects must be created to represent the VTL. One object must be associated with the media server to which the VTL is attached. The other host object must be associated with the VTL's embedded NDMP server. Both host objects must be assigned the media server role in Oracle Secure Backup.
One Oracle Secure Backup library device object with two attach specifications must be created for the virtual library. One access path is through the media server to which the VTL is attached. The other access path is through the embedded NDMP server.
An Oracle Secure Backup tape device object with two access paths must also be created for each virtual drive contained within the virtual library. As in the virtual library case, one access path is through the media server, and the other is through the embedded NDMP server.
One Oracle Secure Backup library device object with a single attach specification must be created for the physical library. The access path is through the VTL's embedded NDMP server. An Oracle Secure Backup tape device object with a single attach specification must also be created for each physical drive contained within the physical library. As in the physical library case, the access path is through the VTL's embedded NDMP server.
Note:
Multiple media servers may be able to access the physical library and its drives if they are all connected to a shared SAN. In this case, the Oracle Secure Backup device objects for the physical library and its drives must be created with multiple attach points.Here is an example of the obtool commands that would be used to configure an NDMP copy-enabled VTL. Many of the options that would be specified in a real environment have been omitted for clarity. Also, the device names shown are simply placeholders that may differ from the actual names in a real environment.
-
This command creates the Oracle Secure Backup host object associated with the media server to which the VTL is attached.
mkhost --access ob --ip ipname osb_media_server
-
This command creates the Oracle Secure Backup host object associated with the embedded NDMP server contained within the VTL.
mkhost --access ndmp --ip ipname ndmp_server
-
This command configures an Oracle Secure Backup device object that is associated with the virtual library
vlib.mkdev --type library --class vtl --attach osb_media_server:/dev/obl0,ndmp_media_server:/dev/sg0 vlibThis library and its drives are accessible through the Oracle Secure Backup media server and the embedded NDMP server.
-
This command configures an Oracle Secure Backup device object that is associated with virtual tape drive
vdrive1, which is contained in the virtual libraryvlib.mkdev --type tape --library vlib --dte 1 --attach osb_media_server:/dev/obt0,ndmp_media_server:/dev/nst0 vdrive1This command must be repeated for each tape drive in the virtual tape library.
-
This command configures an Oracle Secure Backup device object that is associated with the physical library
plib.mkdev --type library --attach ndmp_media_server:/dev/sg1 plibThis library and its drives are accessible only through the embedded NDMP server.
-
This command configures an Oracle Secure Backup device object that is associated with tape drive
pdrive1, which is contained in the physical libraryplib.mkdev --type tape --library plib --dte 1 --attach ndmp_media_server:/dev/nst1 pdrive1
See Also:
Oracle Secure Backup Administrator's Guide for more information on NDMP copy-enabled virtual tape libraries5.3.8 Adding a Tape Device Attachment
Oracle Secure Backup distinguishes between a tape device and a device attachment. A device attachment is the means by which that tape device is connected to a host. Each tape device can have one or more attachments, where each attachment describes a data path to the tape device from a host in the administrative domain.
An attachment is defined by the identity of the host to which the tape device is attached, and one of these names that represents the tape device on the host:
-
Linux or UNIX attach point name
-
Windows device name
-
NAS device name
Note:
For some older NAS devices, Oracle Secure Backup requires additional information to complete the attachment definition.Before configuring a device attachment, refer to the description of the mkdev command in Oracle Secure Backup Reference. The description of the aspec placeholder describes the syntax and naming conventions for device attachments.
To configure a device attachment:
-
After adding or editing a device, click Attachments.
-
Select a host in the Host list.
-
In the Raw device field, enter the raw device name. This is the operating system's name for the device, such as a Linux or UNIX attach point or a Windows device file. For example, a tape library name might be
/dev/obl0on Linux and//./obl0on Windows. -
This step is required only for hosts running certain NDMP version 2 and 3 servers, such as Network Appliance Data ONTAP 5.1 or 5.2.
-
In the ST device field, enter a device name.
-
In the ST target field, enter a target number.
-
In the SCSI device field, enter a SCSI device.
-
In the ST controller field, enter a bus target number.
-
-
In the ST lun field, enter a SCSI LUN for the device.
-
Click Add to add the attachment.
5.3.8.1 Pinging a Device Attachment
You can ping a device attachment to determine whether the tape device is accessible to Oracle Secure Backup using that attachment. Pinging device attachments is a good way to test whether you set up the attachment properly.
When you ping a device, Oracle Secure Backup performs the following steps:
-
Establishes a logical connection to the device
-
Inquires about the device's identity data with the
SCSIINQUIRYcommand -
Closes the connection
If the attachment is remote from the host running the Oracle Secure Backup Web tool (or obtool), then Oracle Secure Backup establishes an NDMP session with the remote media server to effect this function.
To ping an attachment from the Attachments page:
-
Select the attachment to ping in the host:raw device field.
-
Click Ping.
The Oracle Secure Backup Web tool opens a window that describes the status of the attachment.
-
Click Close to exit the page.
5.3.8.2 Displaying Device Attachment Properties
You can display device attachment properties from the Devices page.
To display attachment properties:
-
Select the name of the tape device whose attachment properties you want to view.
-
Click Show Properties.
The Oracle Secure Backup Web tool displays device attachments and other properties for the tape device you selected.
-
Click Close to exit the page.
5.3.9 Multiple Attachments for SAN-Attached Tape Devices
A tape device attached to a SAN often has multiple attachments, one for each host with local access to the tape device through its Fibre Channel interface. A tape device attached to a SAN is also distinguished by a World Wide Name (WWN), an internal identifier that uniquely names the tape device on the SAN. Systems such as a Network Appliance filer permit access to tape devices attached to a SAN through their WWN. Oracle Secure Backup includes a reference to the WWN in the device attachment's raw device name.
Tape devices such as certain Quantum and SpectraLogic tape libraries appear to be connected directly to an Ethernet LAN segment and accessed through NDMP. In fact, Oracle Secure Backup views these devices as having two discrete components:
-
A host, which defines the IP address and which you configure through the Oracle Secure Backup Web tool Hosts page or the
mkhostcommand -
A tape device, which has one attachment to the single-purpose host that serves as the front end for the tape device
Devices such as DinoStor TapeServer use a single host to service multiple tape devices.
For NDMP servers that run version 2, other data might be required to define SCSI parameters needed to access the tape device. These parameters are sent in an NDMP message called NDMP_SCSI_SET_TARGET. Oracle Secure Backup NDMP servers do not use this data or this message.
See Also:
The description of themkdev command aspec placeholder in Oracle Secure Backup Reference, which describes the syntax and naming conventions for device attachments5.3.10 Configuring Multihosted Device Objects
A multihosted device, also known as a shared device, is a tape library shared by multiple hosts within a single administrative domain. Shared devices are common in environments that deploy SAN or iSCSI-based tape equipment. These technologies give the user the flexibility to have multiple direct connections from hosts to tape devices, which enables all hosts to act as media servers.
When a device is shared by multiple hosts, you must create a single device object to ensure that the Oracle Secure Backup device reservation system to works correctly. You must then configure this device object to have a unique attach point that references each host sharing the device.
Table 5-1 shows the correct configuration of a single tape library and tape drive shared by two hosts: host_a and host_b. After the devices are configured, Oracle Secure Backup is aware of the devices and handles device reservation properly.
Table 5-1 Correct Configuration for Tape Library and Tape Drive
| Tape Device Object | Attach Point 1 | Attach Point 2 |
|---|---|---|
|
|
|
|
|
|
|
|
If the device is configured as two separate device objects that point to the same physical device, then there is potential for contention. In this case, simultaneous backups to the these devices fail. Table 5-2 shows the incorrect configuration of a single tape library and tape drive shared by two hosts: host_a and host_b.
5.3.11 Creating Attach Points for Solaris 10 SCSI and Fibre Channel Devices
See "Configuring the Solaris sgen Driver to Provide Oracle Secure Backup Attach Points".
5.4 Verifying and Configuring Added Tape Devices
This section explains how to verify that tape devices are reachable, display information about these devices, and configure serial number checking.
This section contains the following topics:
5.4.1 Pinging a Tape Device
To determine whether a tape device is reachable by Oracle Secure Backup through any available attachment, ping the tape device. You should ping each tape device after it is configured or discovered, to verify that it is configured correctly.
To ping a tape device:
-
In the Devices page, select a tape device to ping.
-
Click the Ping button.
The Oracle Secure Backup Web tool displays the status of the operation.
Note:
Pinging a tape library causes each service member tape drive in the tape library to be pinged as well.5.4.2 Displaying Device Properties
The Oracle Secure Backup Web tool can display tape device properties including:
-
Whether a tape device is in service
-
Which host or hosts the tape device is connected to
-
The tape device type
If a tape device is in service, then it Oracle Secure Backup can use it; if it is not in service, then Oracle Secure Backup cannot use it. When a tape device is taken out of service, no more backups are dispatched to it.
To display tape device properties:
-
In the Device page, select the name of the tape device whose properties you want to display.
-
Click Show Properties.
The Oracle Secure Backup Web tool displays a page with the properties for the tape device you selected.
5.4.3 Editing Device Properties
If you make an error during installation, such as not configuring every attachment for a tape device or incorrectly configuring its properties, then you can edit its properties.
To edit the properties for an existing tape device:
-
From the Devices page, select the name of the tape device.
-
Click Edit.
The Oracle Secure Backup Web tool displays a page with details for the tape device you selected.
-
Make any required changes.
-
Click OK to save your changes.
5.4.4 Verifying Tape Device Configuration
Oracle Secure Backup provides a method for checking for misconfigured tape and library devices:
-
From the Oracle Secure Backup Web tool home page, click Configure.
The Configure page appears
-
In the Basic section click Devices.
The Configure Devices page appears.
-
Select the drive whose configuration you want to check and click Verify.
The Configure: Libraries > Verify device_name page appears.
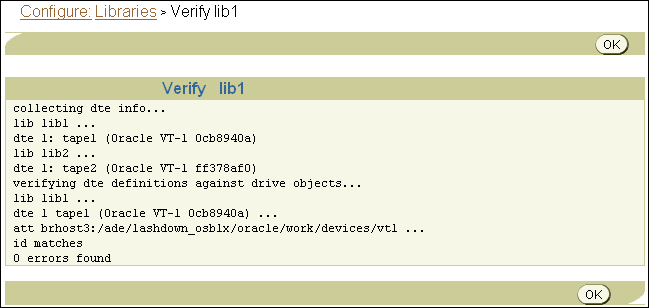
Description of the illustration obins011.gif
In this example, library
lib1is verified. No errors are found.
5.4.5 Setting Serial Number Checking
You can use the Oracle Secure Backup Web tool to enable or disable tape device serial number checking. If serial number checking is enabled, then whenever Oracle Secure Backup opens a tape device, it checks the serial number of that device. If the tape device does not support serial number reporting, then Oracle Secure Backup simply opens the tape device. If the tape device does support serial number checking, then Oracle Secure Backup compares the reported serial number to the serial number stored in the device object. Three results are possible:
-
There is no serial number in the device object.
If Oracle Secure Backup has never opened this tape drive since the device was created or the serial number policy was enabled, then it cannot have stored a serial number in the device object. In this case, the serial number is stored in the device object, and the open succeeds.
-
There is a serial number in the device object, and it matches the serial number just read from the device.
In this case, Oracle Secure Backup opens the tape device.
-
There is a serial number in the device object, and it does not match the serial number just read from the device.
In this case, Oracle Secure Backup returns an error message and does not open the tape device.
Note:
Oracle Secure Backup also performs serial number checking as part of the--geometry/-g option to the lsdev command in obtool. This option causes an Inquiry command to be sent to the specified device, and lsdev displays its vendor, product ID, firmware version, and serial number.To enable or disable tape device serial number checking:
-
From the Oracle Secure Backup Web tool Home page, click Configure.
The Configure page appears.
-
In the Advanced section, click Defaults and Policies.
The Configure: Defaults and Policies page appears.
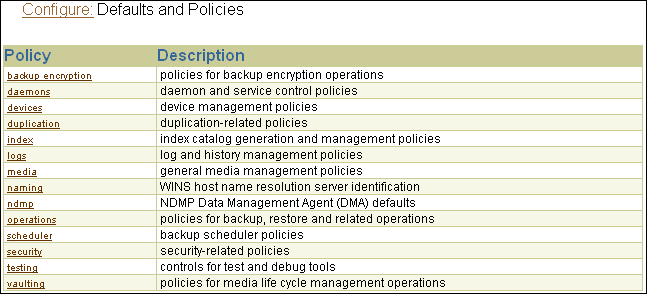
Description of the illustration obins012.gif
-
In the Policy column, click devices.
The Configure: Defaults and Policies > Devices page appears.
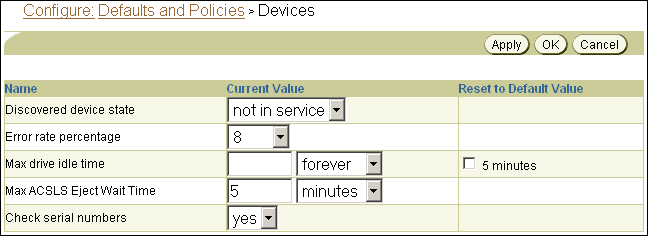
Description of the illustration obins013.gif
-
Do one of the following:
-
Select Yes from the Check serial numbers list to enable tape device serial number checking. This is the default setting.
-
Select No from the Check serial numbers list to disable tape device serial number checking.
-
-
Click OK.
The Configure: Defaults and Policies page appears with a success message.