| Oracle® Fusion Middleware Interaction Management Guide for Oracle WebLogic Portal 10g Release 3 (10.3.4) Part Number E14238-03 |
|
|
View PDF |
| Oracle® Fusion Middleware Interaction Management Guide for Oracle WebLogic Portal 10g Release 3 (10.3.4) Part Number E14238-03 |
|
|
View PDF |
You can use User Segments to dynamically group users based on conditions you define. Instead of creating groups of users, you can create groups of characteristics, such as gender, browser type, and date or time. If a user matches the characteristics, the user automatically and dynamically becomes a member of that User Segment. You can then target these groups with web content, and automatic e-mails based on the User Segment.
You can define User Segment conditions that identify gender, occupation, movie fans, or pet lovers. For example, you could classify all users who ordered more than five on-demand movies in the last 30 days. After you identify and group users into User Segments, you can target segments with personalized actions through Campaigns and Content Selectors.
Developers can use Oracle Enterprise Pack for Eclipse to create User Segments. Portal administrators can use the WebLogic Portal Administration Console to change the User Segment conditions to dynamically group users. Developer time is not required to update User Segments.
This chapter includes the following sections:
You can target visitors with web content and automatic e-mails by defining and using groups called User Segments (as in segments of a population). Instead of being groups of hard-coded users, User Segments are groupings of characteristics, such as gender, the type of browser being used, and date or time information. If users match the characteristics, they are automatically and dynamically members of that User Segment. When you use User Segments in Content Selectors and Campaigns, users that belong to those User Segments are targeted with the web content, or e-mail that you determine.
Note:
The steps in this chapter refer to the data\src folder in the Package Explorer View. Your data and src directories might be named differently.Perform the following steps to create a User Segment:
Start the WebLogic server by choosing Run As > Run on Server in Oracle Enterprise Pack for Eclipse. For instructions on configuring the WebLogic Server, see the Oracle Fusion Middleware Portal Development Guide for Oracle WebLogic Portal.
In the Portal Perspective, right-click the <data>\src\segments\GlobalClassifications folder in the Package Explorer View and choose New > User Segment.
In the New User Segment window, enter a name for the User Segment in the File name field and use the .seg file extension.
Click Finish. The User Segment Editor appears.
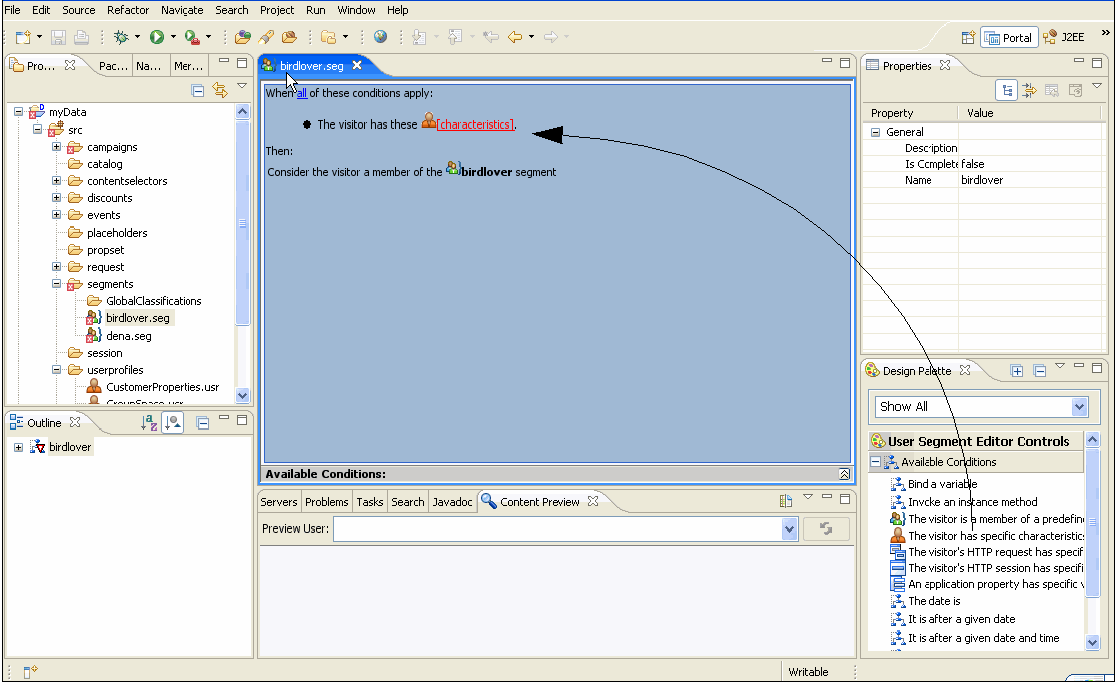
In the Design Palette tab, drag the conditions you want to use into the User Segment Editor. See Figure 5-1.
Figure 5-1 Add a Condition to the User Segment

For each condition you add to the User Segment, click the condition link to set the conditions.
For example, if you drag the condition The visitor has specific characteristics into the User Segment Editor, click the corresponding characteristics hyperlink in the User Segment Editor. The Visitor Characteristics window lets you select the User Profile properties and their values that will make a user a member of the User Segment. See Table 4-1, "Conditions that Identify Users to Target and the Actions that Will Occur".
Properties for the user, HTTP session, and HTTP request conditions are based on the User Profile, HTTP session, and HTTP request properties you created. For more information on conditions, see Section 2.1.1, "Understanding Conditions."
Save the file by choosing File > Save.
Note:
You can use User Segments in Content Selectors and Campaigns.This section contains the following topic:
When you set date and time conditions, the dates and times represent the time in your region. For example, if you are creating a Campaign action that will be triggered at 8 p.m., that means 8 p.m. in your region. For a time zone that is two hours behind you, the action will be triggered at 6 p.m. in that time zone.
The time zone also affects dates you set. The date you set becomes effective at midnight in your time zone. In a time zone that is six hours ahead of yours, that date becomes effective for that time zone at 6 p.m. your time the day before.
Time changes also affect time-triggered actions. For example, you created a Campaign that begins October 1 at noon and ends October 31 at noon. If a change to standard time (one hour earlier) occurs on October 29, the Campaign will actually end on October 31 at 11 a.m. So if you want the Campaign to end at noon on the new standard time, set the end time to 1 p.m.
Tip:
Because of the different dates and times on which actions will be triggered around the country or world, it is important to tell users that dates and times are effective for your time zone. This type of information allows users to calculate when in their time zone they can take advantage of your promotions.After you create a User Segment in Oracle Enterprise Pack for Eclipse, you can edit a User Segment using the following methods:
Oracle Enterprise Pack for Eclipse – Developers can use Oracle Enterprise Pack for Eclipse to modify a User Segment. See Chapter 12 for instructions.
WebLogic Portal Administration Console – Portal administrators can use the Administration Console to edit a User Segment's value. See Chapter 12 for instructions.