- 7.9.1. Viewing Virtual Machine Information and Events
- 7.9.2. Editing a Virtual Machine
- 7.9.3. Starting a Virtual Machine
- 7.9.4. Stopping (Shutting Down) a Virtual Machine
- 7.9.5. Killing a Virtual Machine
- 7.9.6. Restarting a Virtual Machine
- 7.9.7. Suspending a Virtual Machine
- 7.9.8. Resuming a Virtual Machine
- 7.9.9. Moving Virtual Machines Between Repositories
- 7.9.10. Migrating a Virtual Machine
- 7.9.11. Deleting a Virtual Machine
When you have created a virtual machine, there are a number of actions you can perform on them in Oracle VM Manager. This section describes the actions you can perform on virtual machines.
You can view about the configuration, networks, disks, and jobs associated with the virtual machine.
To edit the virtual machine details, see Section 7.9.2, “Editing a Virtual Machine”.
To view virtual machine details:
Click the Servers and VMs tab.
Select the server pool on which the virtual machine resides in the navigation tree.
Select Virtual Machines from the Perspective drop-down list. Select the virtual machine in the management pane.
Click the expand arrow to the left of the virtual machine name in the table.
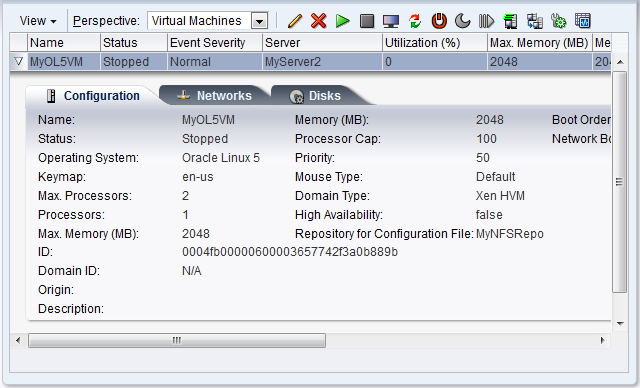
Three tabs displaying information about the virtual machine are displayed. Click each tab to view the following information about the virtual machine:
Configuration: General information about the virtual machine, such as the minimum and maximum memory and processors, operating system, domain type, high availability status, and so on.
Networks: Networks and vNICs used.
NoteThe IP address for a virtual machine is only displayed if the paravirtual drivers are installed. See Section 7.11, “Converting to Paravirtualized Guests or Installing Paravirtualized Drivers” for information on installing the paravirtual drivers.
Disks: Virtual and physical disks and ISOs attached to the virtual machine.
To view virtual machine events:
Click the Servers and VMs tab.
Select the server pool on which the virtual machine resides in the navigation tree.
Select Virtual Machines from the Perspective drop-down list. Select the virtual machine in the management pane, and click Display Selected VM Events
 in the management pane toolbar
The Events dialog box is displayed.
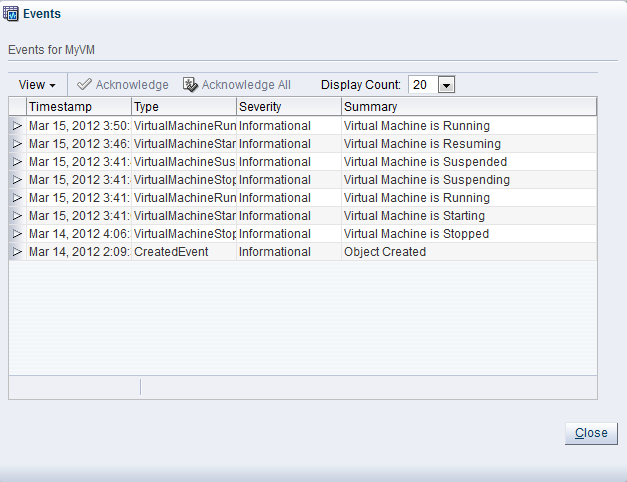
If a virtual machine has error event associated with it you must acknowledge the event to clear the error. See Section B.1.10, “Acknowledging Events/Errors” for information on acknowledging events. Click Close to close the dialog box.
To edit a virtual machine:
Click the Servers and VMs tab.
Select the server pool on which the virtual machine resides in the navigation tree.
Select Virtual Machines from the Perspective drop-down list. Select the virtual machine in the management pane, and click Edit...
 in the management pane toolbar
The Edit Virtual Machine dialog box is displayed.
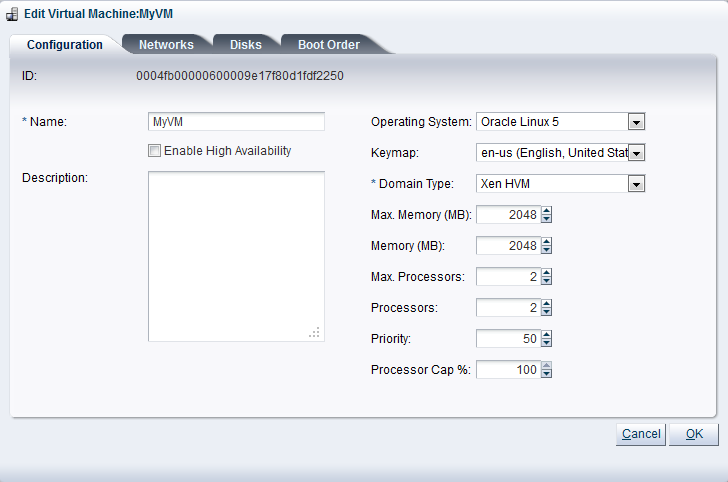
Select each tab to edit the virtual machine configuration. See Section 7.7, “Creating a Virtual Machine” for the details of each tab. Click OK to save the changes.
After a virtual machine is created, you can start it. Starting a virtual machine is analogous to starting a computer by pressing the Power On button.
To start a virtual machine:
Click the Servers and VMs tab.
Select the server pool on which the virtual machine resides in the navigation tree.
Select Virtual Machines from the Perspective drop-down list. Select the virtual machine to start in the management pane, and click Start
 .
.
The virtual machine is started.
When a virtual machine is not in use, you should shut it down to release system resources. Stopping a virtual machine is analogous to a normal shutdown of a physical computer.
If you want to save the state of the virtual machine, you should suspend it. See Section 7.9.7, “Suspending a Virtual Machine” for information on suspending a virtual machine.
To stop a virtual machine:
Click the Servers and VMs tab.
Select the server pool on which the virtual machine resides in the navigation tree.
Select Virtual Machines from the Perspective drop-down list. Select the virtual machine to start in the management pane, and click Stop
 .
.
You can also shut down a virtual machine from within your virtual machine, the same way you shut down a physical computer.
After issuing the stop command, the status of the virtual machine is changed to Stopped. However, this only indicates that the command was acknowledged. There is no guarantee that the virtual machine is effectively shut down correctly. This is expected behavior since an operating system running on a physical PC may also hang during the shutdown sequence.
If the virtual machine fails to shut down, you can power it off using the kill virtual machine option, which is similar to unplugging the power cable from a physical machine. To perform a power off (kill) of a virtual machine, see Section 7.9.5, “Killing a Virtual Machine”.
To kill a virtual machine is equivalent to performing a power off of a virtual machine, similar to unplugging the power cable from a physical machine. This is not the recommended method of shutting down a virtual machine, but may be used if the shut down command fails to shut down the virtual machine.
To kill a virtual machine:
Click the Servers and VMs tab.
Select the server pool on which the virtual machine resides in the navigation tree.
Select Virtual Machines from the Perspective drop-down list. Select the virtual machine to start in the management pane, and click Kill
 .
.
The virtual machine is powered off.
Restarting a virtual machine is analogous to rebooting a computer. You may need to restart a virtual machine if an operating system update requires you to restart the virtual machine, for example Microsoft Windows updates.
To restart a virtual machine:
Click the Servers and VMs tab.
Select the server pool on which the virtual machine resides in the navigation tree.
Select Virtual Machines from the Perspective drop-down list. Select the virtual machine to start in the management pane, and click Restart
 .
.
The virtual machine is restarted.
Suspending a virtual machine is analogous to putting a computer into sleep mode. When a virtual machine is suspended, the current state of the operating system, and applications is saved, and the virtual machine put into a suspended mode. When you resume the virtual machine, the operating system and applications continue from the same point you suspended the virtual machine.
The Oracle VM Server resources used by the virtual machine are not released. If you want to release these resources, you should shut down the virtual machine.
To suspend a virtual machine:
Click the Servers and VMs tab.
Select the server pool on which the virtual machine resides in the navigation tree.
Select Virtual Machines from the Perspective drop-down list. Select the virtual machine to start in the management pane, and click Suspend
 .
.
The virtual machine state is saved and the virtual machine suspended.
To resume the virtual machine, see Section 7.9.8, “Resuming a Virtual Machine”.
Resuming a suspended virtual machine is analogous to waking up a computer that has been in sleep mode. When you resume a suspended virtual machine, the operating system and applications continue from the same point you suspended the virtual machine.
The Oracle VM Server resources used by the virtual machine are not released. If you want to release these resources, you should shut down the virtual machine.
To resume a virtual machine:
Click the Servers and VMs tab.
Select the server pool on which the virtual machine resides in the navigation tree.
Select Virtual Machines from the Perspective drop-down list. Select the virtual machine to start in the management pane, and click Resume
 .
.
The virtual machine state is retrieved and the virtual machine started.
You should never manually move the files for a virtual machine from one repository to another. This can result in duplicate UUIDs for a virtual machine which can cause problems within your Oracle VM environment. If you need to move a virtual machine to another storage repository, alway use the tools provided within Oracle VM Manager.
You can move a non-running virtual machine from one repository to another. During the move you can specify where the disks should be moved to using a clone customizer. If you keep the clone customizers to the default settings (the same as the original virtual machine), a move is essentially the same as migrating the virtual machine to another Oracle VM Server. You can change the location of disks and the virtual machine configuration file to another storage repository when you move a virtual machine using a clone customizer.
The network information is not changed when moving a virtual machine, so you cannot move VNICs between networks. Any network changes you make in a clone customizer are ignored when moving a virtual machine. This allows you to preserve the virtual machine in its original state, while moving the configuration file and storage to a different repository.
To move a virtual machine:
Click the Servers and VMs tab.
Select the server pool on which the virtual machine resides in the navigation tree.
Select Virtual Machines from the Perspective drop-down list. Select the virtual machine in the management pane, and click Clone or Move
 .
.
The Clone or Move dialog box is displayed.
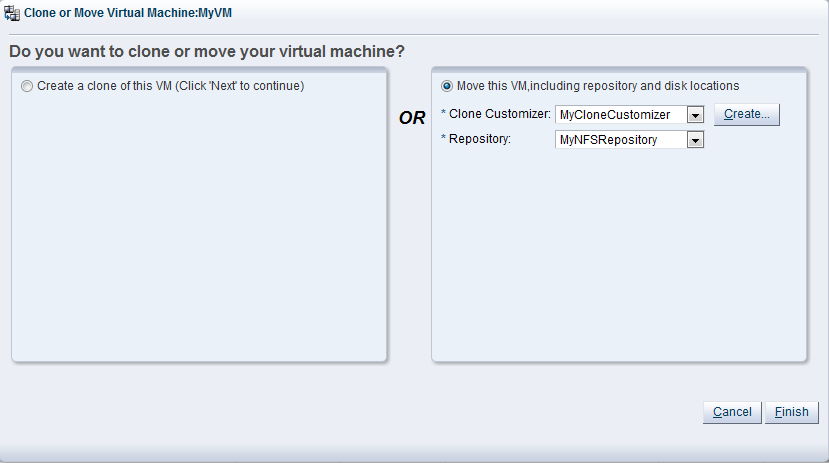
Select Move this VM.
Select a clone customizer from the Clone Customizer drop-down list. If no clone customizers are displayed or you want to create a new one, click Create. See Section 7.8.1.1, “Creating a Clone Customizer” for information on creating a clone customizer.
Select a repository from the Target Repository drop-down list. This is the location of the new virtual machine configuration file.
Click Finish to move the virtual machine.
Migrating a virtual machine is a process to move a virtual machine from one Oracle VM Server to another. If the virtual machine is running during the migration, the applications continue to run, uninterrupted. Migrating a virtual machine ensures high availability of virtual machines. This feature is important, and useful, when the existing Oracle VM Server may be out of commission, or on a planned shutdown for maintenance purposes.
You can only migrate one virtual machine at a time. Cross-server pool live migration is not allowed. You can only migrate virtual machines from one Oracle VM Server to another within the same server pool. CPU family and model number of the source and destination computers must be the same in order to perform live migration.
To migrate a virtual machine:
Click the Servers and VMs tab.
Select the server pool on which the virtual machine resides in the navigation tree.
Select Virtual Machines from the Perspective drop-down list. Select the virtual machine to start in the management pane, and click Migrate
 .
.
The Migrate Virtual Machine dialog box is displayed.
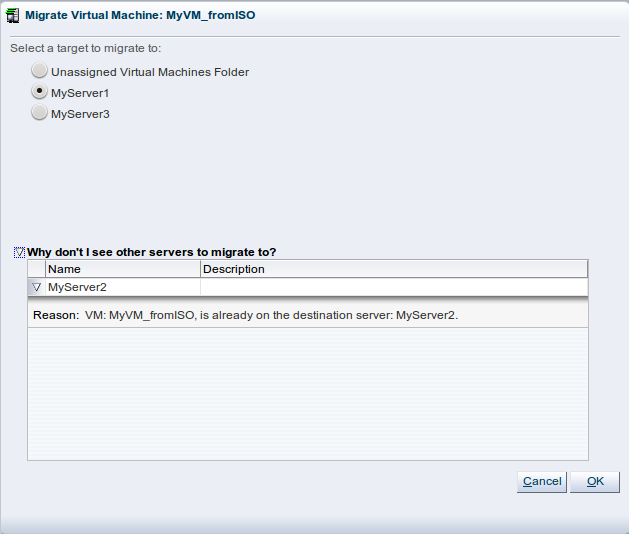
Select the Unassigned Virtual Machines folder to remove the virtual machine from the server pool, or select the Oracle VM Server to which you want to migrate your virtual machine and click OK.
If the Oracle VM Server you want is not listed in the radio list at the top of the dialog box, click the arrow next to Why don't I see other servers to migrate to?. A list of all Oracle VM Servers registered with Oracle VM Manager is displayed. Click the arrow next to the Oracle VM Server you want for an explanation as to why it is not available as a migration target.
The virtual machine is migrated.
When you delete a virtual machine, all the files and data associated with this virtual machine are removed from Oracle VM Manager. Before deleting a virtual machine, make sure you do not need it any longer. You can only delete a virtual machine when the virtual machine status is Stopped or Error.
To delete a virtual machine:
Click the Servers and VMs tab.
Select the server pool on which the virtual machine resides in the navigation tree.
Select Virtual Machines from the Perspective drop-down list. Select the virtual machine in the management pane, and click Delete
 in the management pane toolbar
The Delete Confirmation dialog box is displayed. Select any virtual disks associated with the virtual machine that you want to delete. Click OK to delete the virtual machine and the selected virtual disks.