3 Security Features
Oracle Enterprise Manager Ops Center provides security services for user authentication, custom user authorization, and protection for data in repositories and during network transmissions. Oracle Enterprise Manager Ops Center also provides network authentication between its infrastructure components using standard certificates.
Oracle Enterprise Manager Ops Center uses standard protocols and third-party solutions to secure data and operations, using SSL and X.509v3 certificates, and secure HTTP and PAM (Pluggable Authentication Modules) protocols to provide the following services:
-
Authentication
-
Authorization
-
Access Control
-
Data Protection
3.1 Configuring and Using Authentication
Authentication allows a system to verify the identity of users and other systems that request access to services or data. In a multi-tier application, the entity or caller can be a human user, a business application, a host, or one entity acting on behalf of another entity.
3.1.1 Identity Management for Users
Users log in to the browser interface to use the product. The credentials must be valid for the Oracle Enterprise Manager Ops Center installation.
Add users to Oracle Enterprise Manager Ops Center from the local authentication subsystem of the Enterprise Controller's operating system or from a separate directory server.
3.1.1.1 Configuring an LDAP Server
You can add directory servers to Oracle Enterprise Manager Ops Center. Users and roles are added to the product from the directory server. The information in this section is also in the Oracle Enterprise Manager Ops Center Administration Guide.
To Configure the Directory Server
-
Create the following user groups on the directory server:
-
ASSET_ADMIN
-
CLOUD_ADMIN
-
CLOUD_USER
-
EXALOGIC_ADMIN
-
FAULT_ADMIN
-
NETWORK_ADMIN
-
OPS_CENTER_ADMIN
-
PROFILE_PLAN_ADMIN
-
READ
-
REPORT_ADMIN
-
ROLE_ADMIN
-
SECURITY_ADMIN
-
SERVER_DEPLOY_ADMIN
-
STORAGE_ADMIN
-
Update_ADMIN
-
Update_SIM_ADMIN
-
USER_ADMIN
-
VIRT_ADMIN
-
-
Add users to these groups. The users within each group are given the role corresponding to the group.
-
Select Administration in the Navigation pane.
-
Click Directory Servers.
-
Click the Add Directory Server icon. The Remote Directory Server Connection Settings page is displayed.
-
Enter the following connection settings:
-
Name – The name of the directory server
-
Hostname – The name of the host for the directory server
-
Port – The port number to be used to access the directory server
-
Use SSL – Check this box to use SSL to connect to the directory server
-
Username – The user name used to access the directory server
-
Password – The password for the given user name
Click Next. The Remote Directory Server Schema Settings page is displayed.
-
-
Enter the following schema settings:
-
Root suffix – The root node of the directory hierarchy for the user search
-
User search DN – The subnode in which to search for users
-
User search scope – The scope of the user search. Acceptable values are base, one, subtree, baseObject, singleLevel, wholeSubtree, or subordinateSubtree.
-
User search filter – An LDAP search filter which users must meet for inclusion.
Click Next. The Summary page is displayed.
-
-
Review the summary, then click Add Directory Server.
3.1.1.2 Configuring PAM Authentication
Oracle Enterprise Manager Ops Center uses Pluggable Authentication Modules (PAM) to validate credentials for user accounts of users who log in to the browser interface. The default PAM service allows Oracle Enterprise Manager Ops Center users to log in to the system in the standard way.
The pam-service-name parameter sets the PAM service for the oem-ec instance of the cacao daemon.
-
Oracle Solaris: The default value is
pam-service-name=other -
Linux: The default value is
pam-service-name=passwd
If you require control of Oracle Enterprise Manager Ops Center's PAM configuration, create a PAM service with a different service name, which uses different PAM modules.
To see the current value of the pam-service-name parameter, use the following cacaoadm command:
./cacaoadm get-param -i oem-ec pam-service-name
To change the authentication service from the operating system's default to a different service name, use the following procedure. If this is a High Availability environment, perform the procedure on both the primary node and on the standby node.
-
On a Linux system, create a configuration file or edit the existing configuration file for the service to use. The configuration file has the same name as the service.
/etc/pam.d/filenameOn an Oracle Solaris 10 system, edit the following file:
/etc/pam.conf
-
Change the contents of the configuration file. For example:
auth       required     pam_warn.so debug
auth       required     pam_safeword.so.1 debug
account    include      system-auth
password   include      system-auth
-
To initialize the PAM service with the new configuration, stop the Enterprise Controller:
/opt/sun/xvmoc/bin/satadm stop
-
Change the value of the
pam-service-nameparameter./cacaoadm set-param -i oem-ec pam-service-name=opscenter
-
Verify the change:
./cacaoadm get-param -i oem-ec pam-service-name
-
Restart the Enterprise Controller:
/opt/sun/xvmoc/bin/satadm start
Note:
If you use the SafeNet SafeWord® Agent for PAM software (pam_safeword.so), you can use the SafeWord static password mode or single-use dynamic password mode, but you cannot use the dynamic challenge password mode. To use single-use dynamic passwords, you must modify the pam_safeword.cfg file to ensure that the User ID source is set to SYSTEM and not USER. The SYSTEM setting causes the authentication process to get the User ID from the /etc/passwd file.3.1.2 Credentials for My Oracle Support
In Connected mode, the Oracle Enterprise Manager Ops Center software requires the user to provide one or more sets of My Oracle Support credentials. These credentials are used to authenticate and authorize downloading product updates, creating Service Requests, and retrieving warranty information, in addition to the initial authentication between the Enterprise Controller's system and My Oracle Support.
3.1.3 Credentials for IAAS and Cloud Deployments
Some commands for the IAAS platform require a parameter for the location of the private key file. Because the private key authenticates a cloud user, this file is sensitive and must be managed as a security risk:
-
The file must be owned by the user running the IAAS command-line interface.
-
The file must have the highest restrictive permission: read-only by file owner.
3.2 Configuring and Using Authorization
Authorization allows a system to determine the privileges which users and other systems have for accessing resources on that system.
Roles grant users the ability to use the different functions of Oracle Enterprise Manager Ops Center. By giving a role to a user, an administrator can control what functions are available to that user and for which groups of assets.
An Enterprise Controller Admin can grant users different roles for the Enterprise Controller, the All Assets group, and any user-defined groups. A user who is assigned a role for a group receives the same role for all subgroups. See Follow the Principle of Least Privilege for a list of the available roles and their functions.
Caution:
A user with the Apply Deployment Plans, Exalogic Systems Admin, or SuperCluster Systems Admin role can apply an operational profile to a managed system using root access. Take care when assigning these roles because the role allows the user to use an operational profile to run scripts.3.2.1 Credential Management for Assets
Oracle Enterprise Manager Ops Center uses credentials to discover and manage assets and to establish trust between internal components. Examples of the types of credentials managed by Oracle Enterprise Manager Ops Center include:
To see a list of all the types of credentials, select Credentials in the Administration section, then click Create Credentials in the Actions pane. The drop-down list shows all of the supported protocols.
Oracle Enterprise Manager Ops Center requires remote network access and administrative privileges to discover and manage an asset. This can be done either by using a privileged account or by combining the credentials of a non-privileged user account with the credentials for the administrative account. In this case, Oracle Enterprise Manager Ops Center uses the non-privileged user account to connect to the system and then uses the administrative account to inquire about the characteristics of the system.
To discover an ILOM system, the account must have administrator privileges on the system, and both IPMI and ssh credentials must be provided.
Note:
IPMI communications from the Proxy Controller to the ILOM system are not encrypted. To protect the transmissions, isolate the ILOM system and the Proxy Controller it uses within your private administrative network.3.2.1.1 Using SSH Key-Based Authentication
If you prefer not to use password-based SSH credentials, create an SSH key to get access to remote assets, such as operating systems, ILOM service processors, and XSCF service processors. The assets must support the SSH protocol. Oracle Enterprise Manager Ops Center does not protect the SSH keys. If you choose to use this method, you must ensure the following:
-
You must create the SSH key on each Proxy Controller that needs to get access to the asset.
-
For an OS asset, you must add the SSH public key to the
~/.ssh/authorized_keysfile. For a hardware asset, you must use the asset's Web interface to upload the public SSH key.
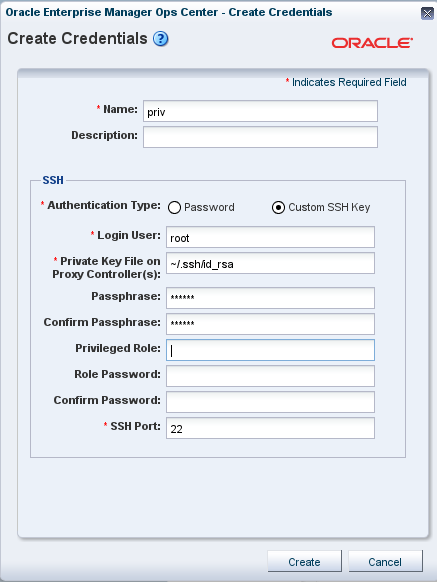
To create the SSH key, use the Create Credentials action.
-
Enter a name for the key.
-
Click the Custom SSH key button, as shown in Figure 3-1, to enable the remaining fields.
-
In Login User, enter the name of the account that uses this key.
-
The location of the key file is set to the default location for the
sshkey-genutility. If your site uses a different location, edit this field. -
(Optional) For OS assets, create a privileged user such as root, or a non-privileged user with keys. Provide a password for the role.
The passphrase is an optional addition to the password and is created at the same time as the key.
-
Click Create to create the SSH key.
3.2.1.2 Using the agentadm Command to Manage Assets
The information is this section is also in the Oracle Enterprise Manager Ops Center Feature Reference Guide.
Although it is possible to discover assets without providing credentials, Oracle Enterprise Manager Ops Center is limited in its ability to manage or monitor these assets. If you prefer not to store credentials for assets in the product software, install the Agent Controller on each asset manually.
Use these procedures to install an Agent Controller and to register the target system.
To use the agentadm command, you need the following information:
-
Administrative user name on the Enterprise Controller – Configuring an Agent Controller using user credentials requires using an administrative user account that exists on the Enterprise Controller. This user account provides authentication that supports Agent Controller registration. Use this user name as the argument for the
agentadm -uoption. -
Password for the administrative user name on the Enterprise Controller – If you use user credentials to configure your Agent Controller, use this password to populate the
/var/tmp/OC/mypasswdfile. Then use this file name as the argument for theagentadm -poption. -
The auto-reg-token registration token from the
/var/opt/sun/xvm/persistence/scn-proxy/connection.propertiesfile on the appropriate Proxy Controller – If you decide not to use user credentials to configure your Agent Controller software, use this token to populate the/var/tmp/OC/mytokenfile. Then use this file name as the argument for theagentadm -toption. -
IP address or host name of the Proxy Controller to be associated with the Agent Controller – Use this IP address or host name as the argument for the
agentadm -xoption. Typically, you would associate the Agent Controller with the Proxy Controller that is connected to the same subnet as the target system. -
The IP address of the network interface that the Agent Controller will use for registration – Use this IP address as the argument for the
agentadm -aoption.
Some example agentadm commands in this procedure use the alternative administrative user name droot. In these examples, the droot user exists on the Enterprise Controller.
When you install an Agent Controller on a global zone, the Agent Controller installation installs, or upgrades to, Java Runtime Environment (JRE) 1.6.0_21. Later versions of JRE are not affected.
3.2.1.2.1 Using User Credentials to Install and Configure an Agent Controller Manually
This procedure creates a file that holds the password of the administrative user for your Oracle Enterprise Manager Ops Center installation.
-
On the Enterprise Controller, change to the
/var/opt/sun/xvm/images/agent/directory, and list the files that it contains. This directory contains the Agent Controller installation archives. For example:# cd /var/opt/sun/xvm/images/agent/ # ls OpsCenterAgent.Linux.i686.12.1.0.zip OpsCenterAgent.Linux.i686.12.1.0.zip.sig OpsCenterAgent.SunOS.i386.12.1.0.zip OpsCenterAgent.SunOS.i386.12.1.0.zip.sig OpsCenterAgent.SunOS.sparc.12.1.0.zip OpsCenterAgent.SunOS.sparc.12.1.0.zip.sig #
-
Identify the Agent Controller archive that is appropriate for the system where you intend to install the Agent Controller.
-
On the system where you want to install the Agent Controller (the target system), create a directory named
/var/tmp/OC.# mkdir /var/tmp/OC
-
Use
scporftpto transfer the correct Agent Controller archive from the Enterprise Controller to the/var/tmp/OCdirectory on the target system. Respond to any authentication or confirmation prompts that are displayed. For example:# scp OpsCenterAgent.SunOS.sparc.12.1.0.zip root@10.5.241.74:/var/tmp/OC Password: OpsCenterAgent.S 100% |*********************************************************************| 34695 KB 00:32 #
-
On the target system, change to the
/var/tmp/OCdirectory.# cd /var/tmp/OC #
-
Use the
unzipcommand to uncompress the Agent Controller archive. For example:# unzip OpsCenterAgent.SunOS.sparc.12.1.0.zip (output omitted)
-
Run the
install -ascript in theOpsCenterAgentdirectory. For example:# OpsCenterAgent/install -a Installing Ops Center Agent Controller. No need to install 120900-04. No need to install 121133-02. No need to install 119254-63. No need to install 119042-09. No need to install 121901-02. No need to install 137321-01. Installed SUNWjdmk-runtime. Installed SUNWjdmk-runtime-jmx. (output omitted) 6 patches skipped. 19 packages installed. Installation complete. Detailed installation log is at /var/scn/install/log. Uninstall using /var/scn/install/uninstall. #
-
Create an empty file named
/var/tmp/OC/mypasswd, and set its permission mode to 400. For example:# touch /var/tmp/OC/mypasswd # chmod 400 /var/tmp/OC/mypasswd
-
Edit the
/var/tmp/OC/mypasswdfile so that it contains the password for the administrative user that exists on the Enterprise Controller to which the Proxy Controller is connected. The followingechocommand appends the password to the /var/tmp/OC/mypasswdfile. Replace password with the correct password. For example:# echo 'password' > /var/tmp/OC/mypasswd
-
Use the
agentadmcommand to associate the Agent Controller with the Proxy Controller.-
Oracle Solaris OS – Use the
/opt/SUNWxvmoc/bin/agentadmcommand. -
Linux OS – Use the
/opt/sun/xvmoc/bin/agentadmcommand
The example commands below use the following options:
-
configure– Causes an Agent Controller configuration operation to take place. -
-u– Specifies the administrative user that exists on the Enterprise Controller to which the Proxy Controller is connected. Be certain that the password that you specified in the/var/tmp/OC/mypasswdfile is correct for the user that you specify for this option.The example below uses
drootas the administrative user. -
-p– Specifies the absolute path name of the file that contains the password for the user that you specified with the-uoption. -
-x– Specifies the IP address or host name of the Proxy Controller to which this Agent Controller will connect. -
-a– Specifies the IP address to use during Agent Controller registration. This selects the network interface that the Agent Controller will use for registration. Accept the server's certificate when prompted. For example:# /opt/SUNWxvmoc/bin/agentadm configure -u droot -p /var/tmp/OC/mypasswd -x 172.20.26.218 agentadm: Version 1.0.3 launched with args: configure -u droot -p /var/tmp/OC/mypasswd -x 172.20.26.218 workaround configuration done. Certificate: Serial Number: 947973225 Version: 3 Issuer: CN=flyfishing_scn-proxy_ca Subject: CN=flyfishing_scn-proxy_Agent Controller Not valid before: Thu Jun 19 15:36:59 MDT 1969 Not valid after: Thu Apr 19 15:36:59 MDT 2029 Certificate: Serial Number: 1176469424 Version: 3 Issuer: CN=flyfishing_scn-proxy_ca Subject: CN=flyfishing_scn-proxy_ca Not valid before: Thu Jun 19 15:36:56 MDT 1969 Not valid after: Thu Apr 19 15:36:56 MDT 2029 Accept server's certificate? (y|n) y Connection registered successfully. scn-Agent Controller configuration done. Checking if UCE Agent Controller process is still running, it may take a couple of minutes ... Process is no longer running UCE Agent Controller is stopped. UCE Agent Controller is in [online] state. Checking if UCE Agent Controller process is up and running ... The process is up and running. UCE Agent Controller is started. Added the zone configuration automation successfully. Added the service tags recreate script successfully. #
Error messages similar to Connection cannot be registered in the following example typically indicate problems with the user credentials that you specified in the
agentadmcommand. In this example, the userdrootwas not authenticated on the Enterprise Controller. If you see this type of error, check that the user name that you supplied for theagentadm -uoption, and the password in the file that you specified for theagentadm -poption, match an existing administrative user on the Enterprise Controller.Accept server's certificate? (y|n) y Error with connection to CRS: com.sun.scn.connmgt.SCNRegClientException: droot, Code: 4, Code: 4 ERROR : Connection cannot be registered. Code--2 sc-console registration failed on [2]. sc-console : User authentication error. Error executing step : sc_console
If the system where you are installing the Agent Controller has multiple active network interfaces, use the
-aoption to specify the IP address of the interface that you want to use for Agent Controller registration. For example:# /opt/SUNWxvmoc/bin/agentadm configure -u droot -p /var/tmp/OC/mypasswd -x 172.20.26.218 -a 172.20.26.128 (output omitted)
-
-
If you encountered a
Connection cannot be registerederror message from theagentadmcommand, useagentadmto unconfigure the Agent Controller. For example:# /opt/SUNWxvmoc/bin/agentadm unconfigure agentadm: Version 1.0.3 launched with args: unconfigure verified sc_console command is OK End of validation {output omitted} End of configuration.Correct the connection problem and re-run the
agentadm configurecommand. -
Use the
sc-consolecommand to list the Agent Controller connection. For example:# sc-console list-connections scn-Agent Controller https://172.20.26.218:21165 urn:scn:clregid:a860a6d4-6899-4bcc-9ac7-a6ebaf71c1f5:20090420171121805 #
3.2.1.2.2 Using a Token to Install and Configure an Agent Controller Manually
This procedure uses a token to configure your Agent Controller software.
-
On the Enterprise Controller, change to the
/var/opt/sun/xvm/images/agent/directory and list the contents. This directory contains the Agent Controller installation archives.# cd /var/opt/sun/xvm/images/agent/ # ls OpsCenterAgent.Linux.i686.12.1.0.zip OpsCenterAgent.Linux.i686.12.1.0.zip.sig OpsCenterAgent.SunOS.i386.12.1.0.zip OpsCenterAgent.SunOS.i386.12.1.0.zip.sig OpsCenterAgent.SunOS.sparc.12.1.0.zip OpsCenterAgent.SunOS.sparc.12.1.0.zip.sig #
-
Identify the appropriate Agent Controller archive for the system where you intend to install the Agent Controller, the target system.
-
On the target system, create a directory named
/var/tmp/OC:# mkdir /var/tmp/OC
-
Use
scporftpto transfer the Agent Controller archive from the Enterprise Controller to the/var/tmp/OCdirectory on the target system. Respond to any authentication or confirmation prompts that are displayed. For example:# scp OpsCenterAgent.SunOS.sparc.12.1.0.zip root@10.5.241.74:/var/tmp/OC Password: OpsCenterAgent.S 100% |*********************************************************************| 34695 KB 00:32
-
On the target system, change to the
/var/tmp/OCdirectory.# cd /var/tmp/OC
-
Uncompress the Agent Controller archive:
# unzip OpsCenterAgent.SunOS.sparc.12.1.0.zip
(output omitted)
-
Run the
install -ascript in theOpsCenterAgentdirectory. For example:# OpsCenterAgent/install -a Installing Ops Center Agent Controller. No need to install 120900-04. No need to install 121133-02. No need to install 119254-63. No need to install 119042-09. No need to install 121901-02. No need to install 137321-01. Installed SUNWjdmk-runtime. Installed SUNWjdmk-runtime-jmx. (output omitted) 6 patches skipped. 19 packages installed. Installation complete. Detailed installation log is at /var/scn/install/log. Uninstall using /var/scn/install/uninstall.
-
On the Proxy Controller that will communicate with this Agent Controller instance, examine the
/var/opt/sun/xvm/persistence/scn-proxy/connection.propertiesfile. The last line in this file contains the auto-reg-token that is required for Agent Controller registration.# cat /var/opt/sun/xvm/persistence/scn-proxy/connection.properties #Generated by a program. Do not edit. All manual changes subject to deletion. (output omitted) trust-store=/var/opt/sun/xvm/security/jsse/scn-proxy/truststore auto-reg-token=5b51bd9f-1700-450d-b038-ece0f9482474\:1271743200000\:T
-
On the system where you have installed the Agent Controller software, create an empty file named
/var/tmp/OC/mytokenand set its permission mode to 400:# touch /var/tmp/OC/mytoken # chmod 400 /var/tmp/OC/mytoken
-
Edit the /
var/tmp/OC/mytokenfile so that it contains the auto-reg-token string from the Proxy Controller and make the following changes:-
Remove the
auto-reg-token=. -
Remove any backslash characters from the token string.
5b51bd9f-1700-450d-b038-ece0f9482474:1271743200000:T
-
-
Use the
agentadmcommand to associate the Agent Controller with the Proxy Controller.-
Oracle Solaris OS: Use the
/opt/SUNWxvmoc/bin/agentadmcommand. -
Linux OS: Use the
/opt/sun/xvmoc/bin/agentadmcommand.
The commands have the following options:
-
configure– Causes an Agent Controller configuration operation to take place. -
-t– Specifies the absolute path name of the file that contains the registration token. -
-x– Specifies the IP address or host name of the Proxy Controller to which this Agent Controller will connect. -
-a– Specifies the IP address to use during Agent Controller registration. This selects the network interface that the Agent Controller will use for registration. Accept the server's certificate when prompted.
# /opt/SUNWxvmoc/bin/agentadm configure -t /var/tmp/OC/mytoken -x 172.20.26.218
agentadm: Version 1.0.3 launched with args: configure -t /var/tmp/OC/mytoken -x 172.20.26.218
workaround configuration done.

Certificate:
Serial Number: 947973225
Version: 3
Issuer: CN=flyfishing_scn-proxy_ca
Subject: CN=flyfishing_scn-proxy_Agent Controller
Not valid before: Thu Jun 19 15:36:59 MDT 1969
Not valid after: Thu Apr 19 15:36:59 MDT 2029

Certificate:
Serial Number: 1176469424
Version: 3
Issuer: CN=flyfishing_scn-proxy_ca
Subject: CN=flyfishing_scn-proxy_ca
Not valid before: Thu Jun 19 15:36:56 MDT 1969
Not valid after: Thu Apr 19 15:36:56 MDT 2029

Accept server's certificate? (y|n)
y
Connection registered successfully.
scn-Agent Controller configuration done.
Checking if UCE Agent Controller process is still running, it may take a couple of minutes ...
Process is no longer running
UCE Agent Controller is stopped.
UCE Agent Controller is in [online] state.
Checking if UCE Agent Controller process is up and running ...
The process is up and running.
UCE Agent Controller is started.
Added the zone configuration automation successfully.
Added the service tags recreate script successfully.
#
If the system where you are installing the Agent Controller has multiple active network interfaces, use the
-aoption to specify the IP address of the interface that you want to use for Agent Controller registration. For example:# /opt/SUNWxvmoc/bin/agentadm configure -t /var/tmp/OC/mytoken -x 172.20.26.218 -a 172.20.26.128 (output omitted)
-
-
If you encountered a
Connection cannot be registerederror message, useagentadm unconfigurecommand to unconfigure the Agent Controller:# /opt/SUNWxvmoc/bin/agentadm unconfigure agentadm: Version 1.0.3 launched with args: unconfigure verified sc_console command is OK End of validation {output omitted} End of configuration.Correct the connection problem and re-run the
agentadm configurecommand. -
Use the
sc-consolecommand to list the Agent Controller connection. For example:# sc-console list-connections scn-Agent Controller https://172.20.26.218:21165 urn:scn:clregid:a860a6d4-6899-4bcc-9ac7-a6ebaf71c1f5:20090420171121805
3.2.1.3 Changing Credentials of Managed Assets
The information is this section is also in the Oracle Enterprise Manager Ops Center Administration Guide.
3.2.1.3.1 Upgrading Management Credentials From a Previous Version
Assets that were discovered and managed in prior versions of Oracle Enterprise Manager Ops Center might not have management credentials associated with them. You can associate new or existing sets of credentials with these assets.
To upgrade management credentials, select All Assets and click Upgrade Management Credentials. Select an asset category (operating systems; servers; or chassis, m-series, and switches). Select one or more assets of that category. To assign an existing set of credentials, select Assign existing set and then select an existing set of credentials. To assign a new set of credentials, select Create and assign new set and then enter a protocol, name, and credential information.
3.2.1.3.2 Updating Management Credentials
To update management credentials, select an asset or group and click Update Management Credentials in the Actions pane. Click Select to select an existing set of credentials, or click New to create a new set. Do not change the credentials for an asset in another manner, such as through its own user interface because Oracle Enterprise Manager Ops Center is not updated with new credentials that are added this way.
3.2.1.3.3 Creating Management Credentials
To create management credentials, select Credentials in the Administration section, then click Create Credentials in the Actions pane. Select a protocol, then enter a name for the set of credentials and the protocol's required information.
3.2.1.3.4 Editing Management Credentials
To edit management credentials, select Credentials in the Administration section, then select a set of credentials and click the Edit Credentials icon. Edit the description and the protocol information, then click OK to save the changes.
3.2.1.3.5 Copying Management Credentials
Copy an existing set of management credentials to create a new set.
To copy management credentials, select Credentials in the administration section, then select a set of credentials and click the Copy Credentials icon. Edit the name, description, and the protocol information, then click OK to save the new set of credentials.
3.2.1.3.6 Deleting Management Credentials
When you delete an existing set of management credential, discovery profiles that use the credentials might no longer function, and you must give any Agentless assets that were managed using the credentials a new set.
To delete management credentials, select Credentials in the administration section, then select a set of credentials and click the Delete Credentials icon.
3.2.1.4 Creating a Credential Plan
As an alternative to using the Create Credential and Edit Credential actions, create and apply a plan that updates credentials.
-
Expand Plan Management in the Navigation pane.
-
Scroll down to the Credentials section and click it.
-
Click Create Credentials in the Action pane.
-
Click the drop-down list of protocols to select the type of protocol. Enter a name and description of the purpose of these credentials, for example, the type of asset they support.
-
Enter the credentials.
-
Click the Create button.
3.2.2 Certificate Management
By default, Oracle Enterprise Manager Ops Centers uses self-signed certificates for authentication between the web container and the browser client. Oracle Enterprise Manager Ops Center does not provide certificates signed by a Certificate Authority such as Verisign because an Authority requires the name of the domain where the certificate will be used. The Oracle Enterprise Manager Ops Center software cannot be delivered with a generated signed certificate because the domain where the Web server of the Enterprise Controller runs is unknown until the customer installs the software. However, after installation, use the procedure in Substitute the Certificates for the Browser to replace the self-signed certificate with a certificate from a Certificate Authority.
3.3 Configuring and Using Access Control
Access control allows a system to grant access to resources only in ways that are consistent with security policies defined for those resources.
3.3.1 Protecting Session Data
Oracle Enterprise Manager Ops Center uses cookies to store session data for individual users. The cookies are encrypted using JSESSIONID with the "http-only" flag. The cookies are transmitted using the HTTPS protocol.
The browser controls a session's inactivity timer with a default time of 30 minutes. Consider changing the expiration time to a shorter duration, using the following procedure:
-
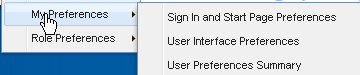
Click Setup in the title bar of the browser window.
-
Click My Preferences and then User Interface Preferences, as in Figure 3-2.
-
In the Time Intervals section of the User Interface Preferences window, change the value in the Session Timeout field.
3.4 Configuring and Using Data Protection
3.4.1 Using an NFS Server
NFS protocol requires agreement on the Domain Name System (DNS) that the NFS server and NFS clients use. The server and a client must agree on the identity of the authorized users accessing the share.
The Oracle Enterprise Manager Ops Center software prepares an NFS client to mount the share. Use the following procedure to prepare the NFS server on an Oracle Solaris 10. The same procedure is also supported in Oracle Solaris 11 system, or you can use a new procedure, described in Oracle Solaris Administration: ZFS File Systems.
Setting Up a Share on an NFS Server
-
Create the directory to share, and set its ownership and permission modes. For example:
# mkdir -p /export/lib/libX
# chmod 777 /export/lib/libX
-
Open the
/etc/dfs/dfstabfile on the NFS server. -
Add an entry to share the directory. For example, to share the directory named
/export/lib/libX, create the following entry:share -F nfs -o rw,"Share 0" /export/lib/libX
If you want the NFS share to be accessible from other network domains, use the
rwoption to specify a list of allowed domains:share -F nfs -o rw=IPaddress1,IPaddress2 "Share 0" export/lib/libX -
Share the directory and then verify that the directory is shared. For example:
# shareall
# share
export/lib/libX   rw, "Share 0"
The share now allows a root user on the NFS clients to have write privileges.
3.4.2 Backing Up and Restoring the Enterprise Controller
The information is this section is also in the Oracle Enterprise Manager Ops Center Administration Guide.
Oracle Enterprise Manager Ops Center has several tools that can be used for disaster recovery. These tools let you preserve Oracle Enterprise Manager Ops Center data and functionality if the Enterprise Controller or Proxy Controller systems fail.
Some of the procedures described in this section use the ecadm and proxyadm commands. See the Oracle Enterprise Manager Ops Center Feature Reference Guide for more information about this command.
-
On Oracle Solaris systems, this command is in the
/opt/SUNWxvmoc/bin/directory. -
On Linux systems, this command is in the
/opt/sun/xvmoc/bin/directory.
The ecadm backup and ecadm restore commands back up and restore the Enterprise Controller, but they do not back up or restore the co-located Proxy Controller or libraries.
The ecadm backup command creates a backup file that contains all of the Oracle Enterprise Manager Ops Center information stored by the Enterprise Controller, including asset data, administration data, and job history. Specify the name and location of the backup file and its log file.
If the Enterprise Controller system fails, use the ecadm restore command to restore the Enterprise Controller to its previous state. The ecadm restore command uses the backup file to configure the Enterprise Controller and restore the data. The new Enterprise Controller system must have Oracle Enterprise Manager Ops Center installed but not configured.
3.4.2.1 Backing Up an Enterprise Controller
Create a backup file of the Enterprise Controller using the ecadm command with the backup subcommand. By default, the server data is saved in the /var/tmp/sat-backup-date-time.tar file. You can specify a different name and location during the backup.
Note:
Theecadm backup command does not back up the software libraries because the size of OS image files can be large. As a good practice, create the software library for OS images on networked storage (NAS) and include the network storage device in your site's backup plan. As an alternative, back up the Enterprise Controller's directory manually and archive the files on another server, file-share facility, or a location outside of the /var/opt/sun directory.If you are using an embedded database, the backup file includes the Ops Center Schema. If you use a customer-managed database, use the --remotedb option to perform a logical backup (datapump dump) of the Ops Center Schema and ensure that the database administrator performs routine backups of the customer-managed database according to site policy.
Note:
Because the backup procedure includes the database password file, you must back up the Enterprise Controller each time you change the database credentials. If you do not, a restore operation overwrites the new database credentials.To Back Up an Enterprise Controller
-
From the command line, log in to the Enterprise Controller system.
-
Use the
ecadmcommand with thebackupsubcommand to back up the Enterprise Controller. Use the following options with the command:-
-o|--outputbackup_filename – Specify the file for the backup archive. The default output file is the/var/opt/sun/xvm/logs/sat-backup-date-time.tarfile. -
-c|--configdirdirectory – Specify an alternate backup configuration directory. -
-l|--logfilelogfile – Save output in a log file with the specified name. Log files are stored in the/var/opt/sun/xvm/logs/directory. -
-d|--descriptiontext – Include the text as the description of the backup archive. -
-r|--remotedb–When the Enterprise Controller uses a customer-managed database, this option exports the database schema to a file in the OC_DUMP_DIR directory on the database's server. This option does not perform a full database backup. The database administrator must perform a full database backup. -
-t|--tagtext – Include the text as the tag of the backup archive. -
-T|--tempdirdirectory – Specify the location of the temporary staging directory. -
-v|--verbose– Increase verbosity level (can be repeated)
For example:
ecadm backup -o /var/tmp/backup-file-name.tar
-
-
Save the contents of the most recent upgrade installation directory. This directory is a child of the
/var/opt/sun/xvm/update-saved-state/directory, and is named according to the version number. -
Copy the backup file to a separate system.
3.4.2.2 Restoring an Enterprise Controller
Use a backup file to return the Enterprise Controller to the state it had at the time of the backup.
If you are using an embedded database, the process restores the Ops Center Schema to the state of the schema as it was at the time of the backup. If you are using a customer-managed database, use the --remotedb option to restore the product schema on the customer-managed database.
To Restore an Enterprise Controller
This procedure restores the data from the archive created by the ecadm backup operation. See Example 3-1, Example 3-2, and Example 3-3 for variations.
-
Prepare the Enterprise Controller system.
-
If you are restoring the backup on the same system, but the software has become corrupt or an upgrade failed, uninstall the Enterprise Controller software.
Run the
installscript with the-eand-koptions. The-eoption uninstalls the Enterprise Controller and co-located Proxy Controller, and the-koption preserves the Oracle Configuration Manager software. For example:# cd /var/tmp/OC/xvmoc_full_bundle # install -e -k
-
If you are restoring the backup on the same system, and the software is functioning normally, unconfigure the Enterprise Controller.
-
-
Install the Enterprise Controller if it has not been installed, but do not configure the Enterprise Controller. The
restorecommand includes your configuration settings.-
Oracle Solaris OS: See the Oracle Enterprise Manager Ops Center Installation Guide for Oracle Solaris Operating System.
-
Linux OS: See the Oracle Enterprise Manager Ops Center Installation Guide for Linux Operating Systems.
-
-
If the Enterprise Controller is not at the same version as was running when the backup was made, upgrade the Enterprise Controller using the command line.
-
Invoke the
ecadm restorecommand with the-ioption that identifies the backup archive. The following options can be used:-
-i|--inputbackup_filename – Specify the file for the backup archive. The default file is/var/tmp/sat-backup-date-time.tar. -
-c|--configdirdirectory – Specify an alternate configuration directory. -
-l|--logfilelogfile – Save output in an alternate log file. The default log file is/var/opt/sun/xvm/logs/sat-restore-date-time.log. -
-r|--remotedb– If the Enterprise Controller uses a customer-managed database, this command restores the product schema on that database. -
-T|--tempdirdirectory –Specify the location of the temporary staging directory. -
-v|--verbose– Increase verbosity level (can be repeated)
-
-
For an Enterprise Controller with a co-located Proxy Controller, restart the co-located Proxy Controller using the
proxyadmcommand. Theproxyadmcommand is in the same directory as theecadmcommand.proxyadm start -w
-
For an Enterprise Controller with a co-located Proxy Controller, use the Add Assets method to rediscover the system. See the Oracle Enterprise Manager Ops Center Feature Reference Guide for more information about the Add Assets procedure. You do not need to re-register the assets.
Note:
After restoring the Enterprise Controller, the asset details might take several minutes to display completely in the user interface.Example 3-1 Restoring an Enterprise Controller With an Embedded Database
In this example, the restore command includes options to set the restore in verbose mode and to create a log file for debugging purposes. The input option specifies the backup file location.
# /opt/SUNWxvmoc/bin/ecadm restore -v -i /var/tmp/OC/server1/backup-May28-1812.tar -l SiteX_logfile-restore-May28-1812.log
Example 3-2 Restoring an Enterprise Controller With a Customer-Managed Database
In this example, the restore command includes the option to restore the database schema on a customer-managed database. The input option specifies the backup file location.
# /opt/SUNWxvmoc/bin/ecadm restore -i /var/tmp/OC/server1/backup-May28-1812.tar -r
Example 3-3 Restoring an Enterprise Controller With a Customer-Managed Database Without Restoring the Database Schema
In this example, the restore command includes options to set the restore in verbose mode and to create a log file for debugging purposes. The input option specifies the backup file location. The -r option is not included.
# /opt/SUNWxvmoc/bin/ecadm restore -v -i /var/tmp/OC/server1/backup-May28-1812.tar -l SiteX-logfile-restore-May28-1812.log