2 Asset Management
Asset management is the process through which you discover your assets and organize them using groups and tags.
The following features and topics are covered in this chapter:
2.1 Introduction to Asset Management
Asset management is the process through which Oracle Enterprise Manager Ops Center begins to manage and monitor your assets, which includes server hardware, chassis, racks, network equipment, operating systems, virtualization software and clustering software. Discovering and managing your assets is a prerequisite for almost every action in the software.
2.2 Roles for Asset Management
Table 2-1 lists the tasks and the role required to complete the task. Contact your administrator if you do not have the necessary role or privilege to complete a task. See Oracle Enterprise Manager Ops Center Administration Guide for information about the different roles and the permissions they grant.
Table 2-1 Asset Management Tasks and Roles
| Task | Role |
|---|---|
|
View Assets |
Read |
|
Add Assets |
Asset Admin |
|
Find Assets |
Asset Admin |
|
Create Discovery Profile |
Asset Admin |
|
Update Management Credentials |
Security Admin |
|
Edit Asset Attributes |
Asset Admin |
|
Edit Access Points |
Security Admin |
|
Delete Assets |
Asset Admin |
|
Edit Tags |
Asset Management |
|
Create Group |
Asset Admin Exalogic Admin |
|
Edit Group |
Asset Admin Exalogic Admin |
|
Move Group |
Asset Admin Exalogic Admin |
|
Add or Remove Assets From a Group |
Asset Admin Exalogic Admin |
|
Delete Group |
Asset Admin Exalogic Admin |
2.3 Actions for Asset Management
You can perform a variety of asset management actions, depending on the needs of your environment:
-
Add Assets by Declaring Servers for OS Provisioning
-
Add Assets by Declaring Servers for Service Processor Configuration
-
Add Assets Using a Discovery Profile
-
Find Assets
-
Create a Discovery Profile
-
Edit a Discovery Profile
-
Copy a Discovery Profile
-
Delete a Discovery Profile
-
Install Agent Controllers From the Command Line
-
Update Management Credentials
-
Edit Asset Attributes
-
Delete Assets
-
Use Access Points
2.4 Location of Asset Management Information in the User Interface
Asset Management actions and information are located in several sections of the user interface.
2.5 Discovering and Managing Assets
Assets that have been discovered and managed by Oracle Enterprise Manager Ops Center can be monitored and targeted with jobs. You can discover assets by using specific discovery criteria, by running a search for service tags, or by specifying server information.
After assets have been discovered, they are automatically managed, giving Oracle Enterprise Manager Ops Center full access to the assets and enabling you to monitor, update, and provision them. For an asset to be managed, it must be accessible on a network that is associated with a Proxy Controller.
Hardware assets are managed using a set of credentials. Operating systems and virtualization software can be managed using an Agent Controller installed on the system or using only a set of credentials.
Some features are not available when the operating system is managed agentlessly. Table 2-3 shows the information that are available for each management type.
Table 2-3 Information Available for Agent Managed and Agentlessly Managed Assets
2.5.1 Declaring Servers for OS Provisioning
The Declare Server option lets you declare one or more bare metal systems in preparation for OS provisioning, even if the systems have no service processor.
You can declare a single server by entering the server information directly into the wizard, or declare multiple servers using a discovery file containing the information for all of the servers.
To declare a single server for OS Provisioning, select All Assets in the Navigation pane, then click Add Assets in the Actions pane. Select Manually Declare a Server to be a Target of OS provisioning., then select Declare a Single Server. Enter the server information, then click Declare Asset.
-
Server Name – Name of the server in the UI.
-
IP Address – Specify an IP address to route the discovery to the correct Proxy Controller. You do not need to use a server's actual IP address. You can use an IP address that is on the same subnet as that of the server to be discovered.
-
Model Category – Select the category in which the asset model appears.
-
Model – The model of the asset.
-
MAC Address and Port combination – Used to connect to the server once it is available on the network. Click the Add or Edit icons to add or edit a MAC Address/Port combination, then select the combination.
Enter a logical port name for each network interface. One of these logical port names must be GB_0. Available logical port names are GB_0 through GB_11. You can also use mgmt as a management port. These logical port names will be mapped to network interfaces after the asset has been provisioned, according to the MAC addresses that you specify. If the server has only one network interface, use GB_0.
Enter the MAC addresses of the network interfaces in the server that you want to declare.
To declare multiple servers for OS Provisioning, perform the following steps:
Create a discovery file using the format in the example below.
-
Select All Assets in the Navigation pane, then click Add Assets in the Actions pane.
-
Select Manually Declare a Server to be a Target of OS Provisioning, then select Declare All Servers.
-
Enter the location of the discovery file, then click Declare Asset.
Here is an example of a discovery file.
<?xml version='1.0' encoding='utf-8'?>
<servers>
<server name="T5440" model="Sun SPARC Enterprise T5440 Server"
        guid="12345678"
        proxyHostname="server"
        ipAddress="10.0.0.0" >
<ethernetPort name="GB_0" mac="01:23:45:67:89:AB"/>
</server>
</servers>
The following variables can be used:
-
server name – The name that the server has in the UI
-
model – Must be a model supported by Oracle Enterprise Manager Ops Center
-
guid – A unique identifier for the server
-
proxyHostname – The Proxy Controller to be used to connect to the server
-
ipAddress – The IP address for the server
-
netmask – (Optional.) The netmask for the server
-
gateway – (Optional.) The gateway for the server
-
unconfigured – (Optional.) Specifies that the server is unconfigured when set to true.
-
ethernetPort – Used to connect to the server once it is available on the network. You can specify multiple Ethernet ports. Includes:
-
Ethernet port name – The name of the Ethernet port
-
Ethernet Port mac – The MAC address for the Ethernet port
-
2.5.2 Declaring Servers for Service Processor Configuration
The Declare Servers for Service Processor Configuration option lets you declare one or more bare metal systems in preparation for service processor configuration.
The assets being declared do not need to be physically connected to the network at the time of the discovery, because the assets produced by an asset declaration are skeletal representations of the real assets. These assets can then be targeted with service processor configuration jobs. Once the real assets are connected to the network, provisioned and discovered, they are correlated with the declared version into complete assets.
To declare unconfigured assets for service processor configuration, perform the following steps:
-
Select All Assets in the Navigation pane, then click Add Assets in the Actions pane.
-
Select Declare an Unconfigured Hardware Asset, then enter data for the servers to be declared:
-
Number of Servers – The total number of servers to be discovered.
-
Model Categories – The model category of the servers.
-
Model – The specific model of the servers.
-
Server Names – The names of the servers, including:
-
Prefix – A prefix that appears before each server name. This field is required.
-
Starting Number – The number of the first server. The number is increased by one for each additional server. This field is required.
-
Suffix – A suffix that appears after each server name.
-
-
Network – The network on which the server or servers is added.
-
IP addresses – The IP addresses to be used for the servers.
-
MAC Addresses – The MAC Addresses of the servers.
Figure 2-1, "Declare Unconfigured Hardware Assets" shows the Declare Unconfigured Hardware Assets Wizard.
Figure 2-1 Declare Unconfigured Hardware Assets
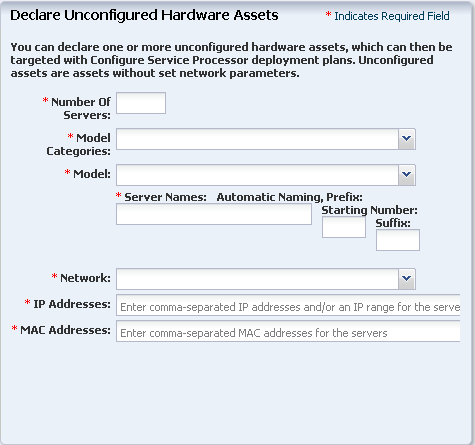
Description of "Figure 2-1 Declare Unconfigured Hardware Assets"
-
-
Click Declare Asset.
2.5.3 Adding Assets Using a Discovery Profile
After you have created a discovery profile, you can run it to discover and manage assets. This lets you discover assets using a pre-existing set of protocols and credentials, and manage assets consistently.
To declare unconfigured assets for service processor configuration, perform the following steps:
-
In the Navigation pane, select All Assets.
-
In the Actions pane, click Add Assets.
-
Select Add and Manage Various Types of Assets via Discovery Probes, then select a discovery profile.
-
Add or edit the IP addresses, host names, and credentials for the targets, then click Add Now.
Any host names must be resolvable from the Enterprise Controller to be discovered.
2.5.4 Finding Assets
Service tags are small XML files containing product information. Many Oracle systems come equipped with service tags. If you have hardware assets equipped with service tags, you can discover them using the Find Assets Wizard. This method lets you discover large numbers of assets quickly.
The Find Assets Wizard searches known networks for service tags, then uses credentials that you specify to manage the discovered assets.
Products without service tags cannot be discovered using this method. For example, ALOM systems do not have service tags.
To find assets, perform the following steps:
-
In the Navigation pane, select All Assets.
-
In the Actions pane, click Find Assets.
-
Select Run Discovery Now.
-
When the initial discovery is complete, select the assets in each category (hardware, operating systems, and engineered systems) that you want to manage and provide credentials for them, then click Finish.
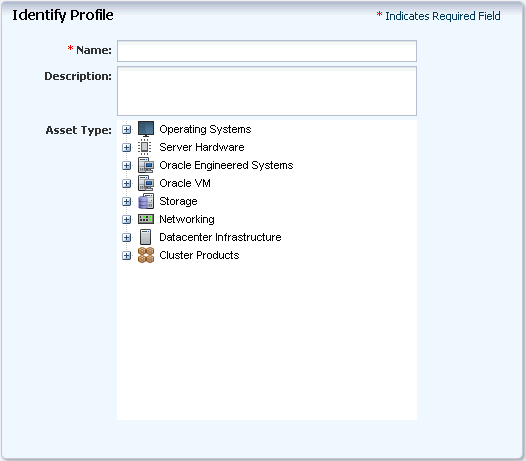
2.5.5 Creating a Discovery Profile
You can create a discovery profile and then discover the assets that comply with the profile.
To create a discovery profile, perform the following steps:
-
In the Navigation pane, click Plan Management.
-
Under Profiles and Policies, click Discovery.
-
In the Actions pane, click Create Profile.
Figure 2-2, "Create Discovery Profile" shows the Identify Profile step of the Create Profile Wizard.
-
Enter a name for the discovery profile and select a type of asset to discover. You can also add a description. Click Next.
-
(Optional.) Click the add icon to add one or more tags to discovered assets, then click Next.
-
(Optional.) Click the add icon to add one or more IP ranges. If you do not add IP ranges when creating a discovery profile, you can do so when you run the profile. Enter the following information for each IP range:
-
Name – A name for the IP range.
-
Description – A description of the IP range.
-
Network – Identify the managed network associated with the host names or IP addresses to route the discovery to the correct Proxy Controller. Select Automatic to route the job to the most appropriate Proxy Controller. The IP address of a target must resolve to only one known network for automatic routing to succeed.
-
IP ranges – An IP range or comma-separated list of IP addresses. If you want to target specific host names, you must enter them when you run the discovery profile.
-
-
Provide the discovery credentials information, then click Next.
-
Click New to add new discovery credentials for each protocol, or click Select to select an existing set of credentials.
-
Select Deploy Agent Controller to deploy an Agent Controller on discovered operating systems, or select Manage Without Agent Controller to manage discovered operating systems without installing an Agent Controller.
-
If the service tag parameters have been modified for the target assets, enter the Service Tag parameters:
Service tag passphrase – Necessary if a service tag has been configured to be encrypted.
Service tag port – Necessary if a service tag has been configured to use a port other than the default of 6481.
Service tag timeout – The default value is 20 seconds.
-
-
Review the summary and click Finish to create the discovery profile.
2.5.6 Editing a Discovery Profile
To edit a discovery profile, perform the following steps:
-
In the Navigation pane, click Plan Management.
-
Under Profiles and Policies, click Discovery.
-
Select the profile and click the Edit Profile icon.
-
Edit any of the information in the discovery profile, then click Finish to save your changes.
2.5.7 Copying a Discovery Profile
To copy a discovery profile, perform the following steps:
-
In the Navigation pane, click Plan Management.
-
Under Profiles and Policies, click Discovery.
-
Select the profile and click the Copy Profile icon.
-
Edit any of the information in the discovery profile, then click Finish to save the new discovery profile.
2.5.8 Deleting a Discovery Profile
To delete a discovery profile, perform the following steps:
-
In the Navigation pane, click Plan Management.
-
Under Profiles and Policies, click Discovery.
-
Select the profile and click the Delete Profile icon. The discovery profile is deleted.
2.5.9 Installing Agent Controllers From the Command Line
Use these procedures to install an Agent Controller and to register the target system.
To use the agentadm command, you need the following information:
-
Administrative user name on the Enterprise Controller – Configuring an Agent Controller using user credentials requires using an administrative user account that exists on the Enterprise Controller. This user account provides authentication that supports Agent Controller registration. Use this user name as the argument for the
agentadm -uoption. -
Password for the administrative user name on the Enterprise Controller – If you use user credentials to configure your Agent Controller, use this password to populate the
/var/tmp/OC/mypasswdfile. Then use this file name as the argument for theagentadm -poption. -
The auto-reg-token registration token from the
/var/opt/sun/xvm/persistence/scn-proxy/connection.propertiesfile on the appropriate Proxy Controller – If you decide not to use user credentials to configure your Agent Controller software, use this token to populate the/var/tmp/OC/mytokenfile. Then use this file name as the argument for theagentadm -toption. -
IP address or host name of the Proxy Controller with which you will associate the Agent Controller – Use this IP address or host name as the argument for the
agentadm -xoption. Typically, you would associate the Agent Controller with the Proxy Controller that is connected to the same subnet as the target system. -
The IP address of the network interface that the Agent Controller will use for registration – Use this IP address as the argument for the
agentadm -aoption.
Some example agentadm commands in this procedure use the alternative administrative user name droot. In these examples, the droot user exists on the Enterprise Controller.
When you install an Agent Controller on a global zone, the Agent Controller installation installs, or upgrades to Java Runtime Environment (JRE) 1.6.0_51. Later versions of JRE are not affected.
To Manually Install and Configure an Agent Controller Using User Credentials
This procedure creates a file that holds the password of the administrative user for your Oracle Enterprise Manager Ops Center installation.
-
On the Enterprise Controller, change to the
/var/opt/sun/xvm/images/agent/directory, and list the files that it contains. This directory contains the Agent Controller installation archives. For example:# cd /var/opt/sun/xvm/images/agent/ # ls OpsCenterAgent.Linux.i686.12.1.0.zip OpsCenterAgent.Linux.i686.12.1.0.zip.sig OpsCenterAgent.SunOS.i386.12.1.0.zip OpsCenterAgent.SunOS.i386.12.1.0.zip.sig OpsCenterAgent.SunOS.sparc.12.1.0.zip OpsCenterAgent.SunOS.sparc.12.1.0.zip.sig #
-
Identify the Agent Controller archive that is appropriate for the system where you intend to install the Agent Controller.
-
On the system where you want to install the Agent Controller (the target system), create a directory named
/var/tmp/OC.# mkdir /var/tmp/OC
-
Use scp or ftp to transfer the correct Agent Controller archive from the Enterprise Controller to the
/var/tmp/OCdirectory on the target system. Respond to any authentication or confirmation prompts that are displayed. For example:# scp OpsCenterAgent.SunOS.sparc.12.1.0.zip root@10.5.241.74:/var/tmp/OC Password: OpsCenterAgent.S 100% |*********************************************************************| 34695 KB 00:32 #
-
On the target system, change to the
/var/tmp/OCdirectory.# cd /var/tmp/OC #
-
Use the
unzipcommand to uncompress the Agent Controller archive. For example:# unzip OpsCenterAgent.SunOS.sparc.12.1.0.zip (output omitted)
-
Run the
install -ascript in theOpsCenterAgentdirectory. For example:# OpsCenterAgent/install -a Installing Ops Center Agent Controller. No need to install 120900-04. No need to install 121133-02. No need to install 119254-63. No need to install 119042-09. No need to install 121901-02. No need to install 137321-01. Installed SUNWjdmk-runtime. Installed SUNWjdmk-runtime-jmx. (output omitted) 6 patches skipped. 19 packages installed. Installation complete. Detailed installation log is at /var/scn/install/log. Uninstall using /var/scn/install/uninstall. #
-
Create an empty file named
/var/tmp/OC/mypasswd, and set its permission mode to 400. For example:# touch /var/tmp/OC/mypasswd # chmod 400 /var/tmp/OC/mypasswd
-
Edit the
/var/tmp/OC/mypasswdfile so that it contains the password for the administrative user that exists on the Enterprise Controller to which the Proxy Controller is connected. The following echo command appends the password to the /var/tmp/OC/mypasswdfile. Replace password with the correct password. For example:# echo 'password' > /var/tmp/OC/mypasswd
-
Use the
agentadmcommand to associate the Agent Controller with the Proxy Controller.-
Oracle Solaris OS – Use the
/opt/SUNWxvmoc/bin/agentadmcommand. -
Linux OS – Use the
/opt/sun/xvmoc/bin/agentadmcommand. The example commands below use the following options: -
configure – Causes an Agent Controller configuration operation to take place.
-
-u – Specifies the administrative user that exists on the Enterprise Controller to which the Proxy Controller is connected. Be certain that the password that you specified in the
/var/tmp/OC/mypasswdfile is correct for the user that you specify for this option.Note:
The example below uses droot as the administrative user. -
-p – Specifies the absolute path name of the file that contains the password for the user that you specified with the
-uoption. -
-x – Specifies the IP address or host name of the Proxy Controller to which this Agent Controller will connect.
-
-a – Specifies the IP address to use during Agent Controller registration. This selects the network interface that the Agent Controller will use for registration. Accept the server's certificate when prompted. For example:
# /opt/SUNWxvmoc/bin/agentadm configure -u droot -p /var/tmp/OC/mypasswd -x 172.20.26.218
agentadm: Version 1.0.3 launched with args: configure -u droot -p /var/tmp/OC/mypasswd -x 10.0.0.0
workaround configuration done.
Certificate:
Serial Number: 947973225
Version: 3
Issuer: CN=flyfishing_scn-proxy_ca
Subject: CN=flyfishing_scn-proxy_Agent Controller
Not valid before: Thu Jun 19 15:36:59 MDT 1969
Not valid after: Thu Apr 19 15:36:59 MDT 2029
Certificate:
Serial Number: 1176469424
Version: 3
Issuer: CN=flyfishing_scn-proxy_ca
Subject: CN=flyfishing_scn-proxy_ca
Not valid before: Thu Jun 19 15:36:56 MDT 1969
Not valid after: Thu Apr 19 15:36:56 MDT 2029
Accept server's certificate? (y|n)
y
Connection registered successfully.
scn-Agent Controller configuration done.
Checking if UCE Agent Controller process is still running, it may take a couple of minutes ...
Process is no longer running
UCE Agent Controller is stopped.
UCE Agent Controller is in [online] state.
Checking if UCE Agent Controller process is up and running ...
The process is up and running.
UCE Agent Controller is started.
Added the zone configuration automation successfully.
Added the service tags recreate script successfully.
#
Error messages similar to Connection cannot be registered in the following example typically indicate problems with the user credentials that you specified in the
agentadmcommand. In this example, the userdrootwas not authenticated on the Enterprise Controller. If you see this error, check that the user name that you supplied for theagentadm -uoption, and the password in the file that you specified for theagentadm -poption, match an existing administrative user on the Enterprise Controller.Accept server's certificate? (y|n) y Error with connection to CRS: com.sun.scn.connmgt.SCNRegClientException: droot, Code: 4, Code: 4 ERROR : Connection cannot be registered. Code--2 sc-console registration failed on [2]. sc-console : User authentication error. Error executing step : sc_console
If the system where you are installing the Agent Controller has multiple active network interfaces, you can use the
-aoption to specify the IP address of the interface that you want to use for Agent Controller registration. For example:# /opt/SUNWxvmoc/bin/agentadm configure -u droot -p /var/tmp/OC/mypasswd -x 10.0.0.0 -a 10.0.0.1 (output omitted)
-
-
If you encountered a Connection cannot be registered error message from the
agentadmcommand, useagentadmto unconfigure the Agent Controller. For example:# /opt/SUNWxvmoc/bin/agentadm unconfigure agentadm: Version 1.0.3 launched with args: unconfigure verified sc_console command is OK End of validation {output omitted} End of configuration.After the Agent Controller has been unconfigured, correct the problem that was indicated by the error message, and re-run the
agentadm configurecommand. -
Use the
sc-consolecommand to list the Agent Controller connection. For example:# sc-console list-connections scn-Agent Controller https://10.0.0.0:21165 urn:scn:clregid:abcdef12-6899-4bcc-9ac7-a6ebaf71c1f5:20090420171121805 #
To Manually Install and Configure an Agent Controller Using a Token
This procedure uses a token to configure your Agent Controller software.
-
On the Enterprise Controller, change to the
/var/opt/sun/xvm/images/agent/directory, and list the files that it contains. This directory contains the Agent Controller installation archives. For example:# cd /var/opt/sun/xvm/images/agent/ # ls OpsCenterAgent.Linux.i686.12.1.0.zip OpsCenterAgent.Linux.i686.12.1.0.zip.sig OpsCenterAgent.SunOS.i386.12.1.0.zip OpsCenterAgent.SunOS.i386.12.1.0.zip.sig OpsCenterAgent.SunOS.sparc.12.1.0.zip OpsCenterAgent.SunOS.sparc.12.1.0.zip.sig #
-
Identify the Agent Controller archive that is appropriate for the system where you intend to install the Agent Controller.
-
On the system where you want to install the Agent Controller (the target system), create a directory named
/var/tmp/OC.# mkdir /var/tmp/OC
-
Use scp or ftp to transfer the correct Agent Controller archive from the Enterprise Controller to the
/var/tmp/OCdirectory on the target system. Respond to any authentication or confirmation prompts that are displayed. For example:# scp OpsCenterAgent.SunOS.sparc.12.1.0.zip root@10.5.241.74:/var/tmp/OC Password: OpsCenterAgent.S 100% |*********************************************************************| 34695 KB 00:32 #
-
On the target system, change to the
/var/tmp/OCdirectory.# cd /var/tmp/OC #
-
Use the
unzipcommand to uncompress the Agent Controller archive. For example:# unzip OpsCenterAgent.SunOS.sparc.12.1.0.zip (output omitted)
-
Run the
install -ascript in theOpsCenterAgentdirectory. For example:# OpsCenterAgent/install -a Installing Ops Center Agent Controller. No need to install 120900-04. No need to install 121133-02. No need to install 119254-63. No need to install 119042-09. No need to install 121901-02. No need to install 137321-01. Installed SUNWjdmk-runtime. Installed SUNWjdmk-runtime-jmx. (output omitted) 6 patches skipped. 19 packages installed. Installation complete. Detailed installation log is at /var/scn/install/log. Uninstall using /var/scn/install/uninstall. #
-
On the Proxy Controller that will communicate with this Agent Controller instance, examine the
/var/opt/sun/xvm/persistence/scn-proxy/connection.propertiesfile. The last line in this file contains the auto-reg-token that is required for Agent Controller registration. For example:# cat /var/opt/sun/xvm/persistence/scn-proxy/connection.properties #Generated by a program. Do not edit. All manual changes subject to deletion. (output omitted) trust-store=/var/opt/sun/xvm/security/jsse/scn-proxy/truststore auto-reg-token=abcdef12-1700-450d-b038-ece0f9482474\:1271743200000\:T #
-
On the system where you have installed the Agent Controller software, create an empty file named
/var/tmp/OC/mytoken, and set its permission mode to 400. For example:# touch /var/tmp/OC/mytoken # chmod 400 /var/tmp/OC/mytoken
-
Edit the /
var/tmp/OC/mytokenfile so that it contains the auto-reg-token string from Proxy Controller with the following changes:-
Remove the
auto-reg-token=. -
Remove any backslash characters from the token string. For example:
abcdef12-1700-450d-b038-ece0f9482474:1271743200000:T
-
-
Use the
agentadmcommand to associate the Agent Controller with a Proxy Controller.-
Oracle Solaris OS – Use the
/opt/SUNWxvmoc/bin/agentadmcommand. -
Linux OS – Use the
/opt/sun/xvmoc/bin/agentadmcommand. The example commands below use the following options: -
configure – Causes an Agent Controller configuration operation to take place.
-
-t – Specifies the absolute path name of the file that contains the registration token.
-
-x – Specifies the IP address or host name of the Proxy Controller to which this Agent Controller will connect.
-
-a – Specifies the IP address to use during Agent Controller registration. This selects the network interface that the Agent Controller will use for registration. Accept the server's certificate when prompted. For example:
# /opt/SUNWxvmoc/bin/agentadm configure -t /var/tmp/OC/mytoken -x 10.0.0.0
agentadm: Version 1.0.3 launched with args: configure -t /var/tmp/OC/mytoken -x 10.0.0.0
workaround configuration done.

Certificate:
Serial Number: 947973225
Version: 3
Issuer: CN=flyfishing_scn-proxy_ca
Subject: CN=flyfishing_scn-proxy_Agent Controller
Not valid before: Thu Jun 19 15:36:59 MDT 1969
Not valid after: Thu Apr 19 15:36:59 MDT 2029

Certificate:
Serial Number: 1176469424
Version: 3
Issuer: CN=flyfishing_scn-proxy_ca
Subject: CN=flyfishing_scn-proxy_ca
Not valid before: Thu Jun 19 15:36:56 MDT 1969
Not valid after: Thu Apr 19 15:36:56 MDT 2029

Accept server's certificate? (y|n)
y
Connection registered successfully.
scn-Agent Controller configuration done.
Checking if UCE Agent Controller process is still running, it may take a couple of minutes ...
Process is no longer running
UCE Agent Controller is stopped.
UCE Agent Controller is in [online] state.
Checking if UCE Agent Controller process is up and running ...
The process is up and running.
UCE Agent Controller is started.
Added the zone configuration automation successfully.
Added the service tags recreate script successfully.
#
If the system where you are installing the Agent Controller has multiple active network interfaces, you can use the
-aoption to specify the IP address of the interface that you want to use for Agent Controller registration. For example:# /opt/SUNWxvmoc/bin/agentadm configure -t /var/tmp/OC/mytoken -x 10.0.0.0 -a 10.0.0.1 (output omitted)
-
-
If you encountered a Connection cannot be registered error message from the
agentadmcommand, useagentadmto unconfigure the Agent Controller. For example:# /opt/SUNWxvmoc/bin/agentadm unconfigure agentadm: Version 1.0.3 launched with args: unconfigure verified sc_console command is OK End of validation {output omitted} End of configuration.After the Agent Controller has been unconfigured, correct the problem that was indicated by the error message, and re-run the
agentadm configurecommand. -
Use the
sc-consolecommand to list the Agent Controller connection. For example:# sc-console list-connections scn-Agent Controller https://10.0.0.0:21165 urn:scn:clregid:abcdef12-6899-4bcc-9ac7-a6ebaf71c1f5:20090420171121805 #
2.5.10 Using Management Credentials
Oracle Enterprise Manager Ops Center stores the credentials that are used to manage each asset. You can update, edit, and delete these credentials.
2.5.10.1 Upgrading Management Credentials From a Prior Version
Assets that were discovered and managed in prior versions of Oracle Enterprise Manager Ops Center might not have management credentials associated with them. You can associate new or existing sets of credentials with these assets.
If a discovered asset is blacklisted, the same can be removed by updating the management credentials.
To upgrade management credentials, perform the following steps:
-
On the Navigation pane, select All Assets.
-
In the Actions pane, click Upgrade Management Credentials.
-
Select an asset category: operating systems; servers; or chassis, m-series, and switches.
-
Select one or more assets of that category.
-
To assign an existing set of credentials, select Assign existing set and then select an existing set of credentials.
-
To assign a new set of credentials, select Create and assign new set and then enter a protocol, name, and credential information.
-
2.5.10.2 Updating Management Credentials
You can change the set of management credentials used by an asset or group of assets.
To update management credentials, perform the following steps:
-
On the Navigation pane, select an asset or group.
-
In the Actions pane, click Update Management Credentials.
-
Click Select to select an existing set of credentials, or click New to create a new set.
2.5.10.3 Creating Management Credentials
You can create a new set of management credentials. These credentials can then be used to discover and manage new assets or to manage existing assets.
To create management credentials, perform the following steps:
-
On the Navigation pane, under Administration, select Credentials.
-
In the Actions pane, click Create Credentials.
-
Select a protocol, then enter a name for the set of credentials and the information required by the protocol.
-
Click Create to create the management credentials.
2.5.10.4 Using Custom SSH Keys for OS Discovery
You can use SSH keys as an option when performing the OS discovery.
You must create SSH keys on each PC that might access the target asset and also add the SSH public key to the ~/.ssh/authorized_keys location on the remote OS or use the hardware's web interface to upload the public keys.
-
On the Navigation pane, under Administration, click Credentials.
-
In the Actions pane, click Create Credentials.
-
In the Name field, enter a name for the credential.
-
In the Description field, enter a description for the credential.
-
In the SSH section, select Custom SSH Key as Authentication Type.
-
In the Login User field, enter the login credential.
-
In the Private Key File on Proxy Controller(s) field, the location is set by default; change this value if you want to refer to other keys.
-
In the Passphrase field, enter the passphrase, if one was specified, that was set when the key was created.
-
In the Confirm Passphrase field, enter the passphrase again.
-
In the SSH Port field, enter the SSH port number, the default is 22.
-
Click Create.
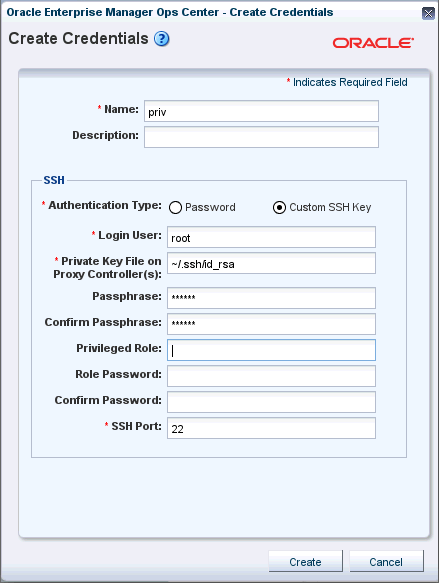
For a nonprivileged user, enter the Privileged User role credentials in the Privileged Role and Role Password fields respectively.
2.5.10.5 Editing Management Credentials
You can edit an existing set of management credentials to reflect changes to the managed assets.
To edit management credentials, perform the following steps:
-
On the Navigation pane, under Administration, select Credentials.
-
In the center pane, select a set of credentials and click the Edit Credentials icon.
-
Edit the description and the information required by the protocol, then click Update to save the changes.
2.5.10.6 Copying Management Credentials
You can copy an existing set of management credentials to create a new set.
To copy management credentials, perform the following steps:
-
On the Navigation pane, under Administration, select Credentials.
-
In the center pane, select a set of credentials and click the Copy Credentials icon.
-
Edit the name, description, and the information required by the protocol, then click Copy to save the new set of credentials.
2.5.10.7 Deleting Management Credentials
You can delete an existing set of management credentials. Discovery profiles that use the credentials might no longer function, and Agentless assets that are managed using the credentials must be given a new set.
To delete management credentials, perform the following steps:
-
On the Navigation pane, under Administration, select Credentials.
-
In the center pane, select a set of credentials and click the Delete Credentials icon.
-
Click OK to delete the credentials.
2.5.11 Editing Asset Attributes
All assets have a description and a set of tags that can be edited.
The description field can be used for descriptive information about a system.
You can use tags to categorize assets and simplify later searches. Each tag consists of a tag name and a value.
To edit asset attributes, perform the following steps:
-
On the Navigation pane, under Assets, select an asset.
-
In the Actions pane, click Edit Asset.
-
Edit the name, description, and tags, then click Save.
2.5.12 Using Access Points
An asset's access points show how Oracle Enterprise Manager Ops Center connects to the asset.
The following are possible access points:
-
The discovery credentials used to discover the asset.
-
The discovery credentials used to discover a related asset. For example, an access point for a service processor is the discovery credentials of its operating system.
-
Agent Controller installed on the asset.
-
A virtual asset's virtualization host.
To view access points, select an asset and click the Configuration tab.
To delete an access point, perform the following steps:
-
On the Navigation pane, under Assets, select an asset and click the Configuration tab.
-
Select one or more access points, then click Delete Access Point.
2.5.13 Deleting Assets
The Delete Asset option uninstalls Agent Controller software if it is present, removing the asset from Oracle Enterprise Manager Ops Center. All data for the asset is removed. You delete assets to stop managing them with Oracle Enterprise Manager Ops Center.
The operating systems that support the Enterprise Controller and Proxy Controllers cannot be deleted or removed.
Note:
Deleting a global zone also deletes its non-global zones. However, if a global zone is managed with an Agent Controller, its non-global zones continue to be managed agentlessly even if their Agent Controllers are removed.-
Click All Assets in the Assets section of the Navigation pane.
-
Select the asset or assets that you want to delete from the Managed Assets or Unprocessed Assets tabs.
-
Click Delete Asset.
-
If the assets do not have Agent Controllers, a confirmation window is displayed. Click Delete. A job is launched to delete the assets.
-
If the assets have Agent Controllers, the Management Credentials page is displayed. Provide management credentials using one of the following methods:
-
Click New to create a new set of credentials. Enter a name and the credential information, then click Ok.
-
Click Select to select an existing set of credentials. Select an existing set of credentials, then click Ok.
-
-
Click Next.
The Summary page is displayed.
-
Review the summary, then click Finish.
2.5.14 Special Discovery and Management Procedures
Most assets can be discovered and managed using the procedures in Discovering and Managing Assets. However, some types of assets must be discovered or managed using special procedures. Use these procedures when any of the following asset types is discovered or managed.
-
Oracle Solaris 11 – You can discover and manage Oracle Solaris 11 operating systems only if the Enterprise Controller and Proxy Controller are installed on Oracle Solaris 11 and the Oracle Solaris 11 Update Library is configured.
-
Microsoft Windows – You must enable Windows Management Instrumentation (WMI) on Microsoft Windows systems before discovering them. Once WMI is enabled, they can be discovered normally.
-
Sun SPARC Enterprise M-Series Servers – You must ensure that user privileges and the status of each dynamic system domain are correct before discovering a Sun SPARC Enterprise M-Series server.
-
Sun ZFS Storage Appliances – You must discover both the storage appliance and its service processor, and follow special procedures to manage them.
-
Oracle Solaris Clusters – You must discover and manage Oracle Solaris Clusters in a specific order so that Oracle Enterprise Manager Ops Center can manage the entire cluster.
2.5.14.1 Windows Systems
Microsoft Windows systems can be discovered and managed using normal discovery and management procedures. However, before the system can be discovered, the Windows Management Instrumentation (WMI) utility must be configured and have access through the Windows Firewall or Internet Connection Firewall.
This procedure allows the Enterprise Controller or a Proxy Controller to connect to the target system.
-
Log in to the WMI on the target host.
-
Click Administrative Tools, then click Computer Management.
-
Expand Services and Applications.
-
On WMI Control, right click Properties.
-
Click the Security tab.
-
Click the Security button.
-
Select the Administrators group.
-
Select the option to allow Remote Enable.
To Allow WMI Through the Windows Firewall
This procedure allows WMI to send data through the target system's firewall.
-
Go to the command prompt on the target system.
-
Use the
netshcommand to allow WMI to send data through the firewall.-
On Windows Server 2008 R2, use the following command:
netsh advfirewall firewall set rule group="remote administration" new enable=yes
-
On other Windows systems, use the following command:
netsh firewall set service RemoteAdmin enable
-
2.5.14.2 Servers
Most servers can be discovered using the normal discovery and management procedures. However, certain servers must be properly configured before they can be discovered and managed.
Discovering a SPARC Enterprise M-Series Server
The SPARC Enterprise M-series servers have a dedicated processor for system control that is independent of the system processor. A SPARC Enterprise M3000, M4000, and M5000 server has one service processor. The SPARC Enterprise M8000 and M9000 servers, each have two service processors; however, only one service processor is active at a time. The eXtended System Control Facility (XSCF) firmware runs on the dedicated service processor. The firmware manages hardware configuration, monitors cooling system (fan units), domain status, and error status, and can power on and power off peripheral devices.
The XSCF firmware can also create dynamic system domains. Each domain is a logical unit that can function as a system. An Oracle Solaris OS can operate in each domain.
To discover a Sun or Fujitsu SPARC Enterprise® M3000, M4000, M5000, M8000, or M9000 server, run an Add Assets Using Discovery Profile job for the XSCF service processor. The discovery job discovers the XSCF service processor and its dynamic system domains.
Perform the following tasks to discover this type of asset:
-
In the XSCF service processor, create a user account with
platadmprivilege if one does not exist. -
Ensure that user privileges and the status of each dynamic system domain are correct.
-
Check the status of each dynamic system domain, using the
showdomainstatus -acommand. Oracle Enterprise Manager Ops Center can only discover domains that do not have a "-" status. -
Log in to the XSCF shell from an XSCF-LAN port or from the serial port.
-
Discover the system using the Add Assets Using a Discovery Profile procedure.
A Discovery job is launched. Dynamic system domains and the XSCF service processor are discovered at the same time.
When the job is complete, the XSCF service processor and the dynamic system domains appear in the Managed Assets tab. Additionally, the service processor and the domains appear under the M-Series Servers group in the Assets tree.
2.5.14.3 Sun ZFS Storage Appliance
The Sun ZFS Storage Appliance family of products provides rich and efficient data services for file and block storage formats. Each appliance has the Analytics feature for observing the condition and behavior of the appliance in real time and the ZFS Hybrid Storage Pool that uses Flash-memory devices, high-capacity disks, and DRAM memory within a data hierarchy to provide solid-state response time with spinning disk capacity.
When you manage Sun ZFS Storage Appliances within the Oracle Enterprise Manager Ops Center environment, you not only manage the appliance as one of the assets in the data center, but you can also make use of the storage provided by these appliances as a backing storage for storage libraries and software libraries.
Because the storage appliance contains a service processor, it is possible to discover the service processor but not the appliance, discover the appliance but not the service processor, or to discover both. The recommended procedure is to discover both aspects of the Sun ZFS Storage Appliance.
-
Use Find Assets. Each storage appliance is discovered as two assets: a service processor and a storage appliance. Select both the appliance and its service processor and enter the user credentials. Oracle Enterprise Manager Ops Center displays the asset in the Storage section.
-
Use Add Assets and a discovery profile to discover the storage appliance first and then discover its service processor. When you discover the storage appliance, Oracle Enterprise Manager Ops Center displays the device in the Storage section of the Assets tree. When you discover the service processor, its information is mapped to the discovered appliance.
Note:
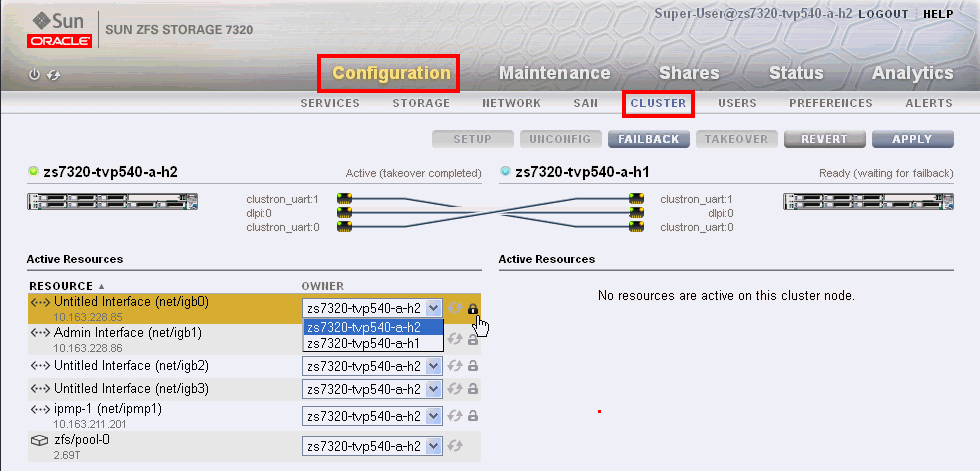
If you change the order of discovery, the result is the same. However, Oracle Enterprise Manager Ops Center displays a generic asset in the Server section of the Asset tree. When the appliance discovery succeeds, Oracle Enterprise Manager Ops Center removes the generic server from the Servers section and displays a new asset in the Storage section.Oracle Sun ZFS Storage 7320 and 7420 Appliances provide a two-node cluster configuration. To discover the storage appliance, the administrative interfaces of both nodes must be private so that each node has a different static IP address. To verify that the appliance's nodes are using private administrative interfaces, you must use the appliance's user interface.
The following is the general procedure for discovering a Sun ZFS Storage Appliance. Each step is described in the following sections.
-
From the Sun ZFS Storage Appliance's User Interface:
-
Set up the Sun ZFS Storage Appliance to use the Fibre Channel protocol and, to use dynamic storage libraries, the iSCSI protocol.
-
Create an account for Oracle Enterprise Manager Ops Center
-
If the Sun ZFS Storage Appliance uses a cluster configuration, verify that the administrative interfaces for the nodes are private.
-
-
From Oracle Enterprise Manager Ops Center's User Interface:
-
Create a discovery profile for the Sun ZFS Storage Appliance
-
Discover the storage appliance, which creates a dynamic storage library.
-
Setting Up the Sun ZFS Storage Appliance's LUNs
These procedures specify the type of LUN, the access to the LUN, and the path to the LUN, using the Fibre Channel and iSCSI protocol. Fibre Channel has a physical connection between the storage device and the server that uses the storage. The iSCSI standard is a network connection. These procedures are performed on the Sun ZFS Storage Appliance and use its UI. These instructions configure the Sun ZFS Storage Appliance to expose LUNs as Fibre Channel and iSCSI LUNs. You can configure one type of LUN.
See the Sun ZFS Storage Appliance Administration Guide or the Sun ZFS Storage Appliance's on-line help for current and specific configuration procedures. The following procedures are examples of the varied ways to configure the Sun ZFS Storage Appliance.
You must identify the ports through which the LUNs can be reached. These are called target ports. By default, all the ports are initiator ports. Change at least one port from an initiator port to a target port. Then create a target group and include the target ports in the target group.
Another way to protect access to LUNs is to specify which initiators can write to the LUN. Although the new storage library will be using the LUNs, the library has not yet been created and the Sun ZFS Storage Appliance has not yet been discovered by Oracle Enterprise Manager Ops Center so these entities cannot be included in the Initiators list.
-
Log into the Sun ZFS Storage Appliance.
-
Select Configuration and then select SAN.
-
Click the Fibre Channel Ports tab, if it is not selected.
-
Select at least one port and change its role from Initiator to Target.
-
Reboot the storage appliance.
-
(Optional.) Each port is identified by its WWN. To create an alternate name, select Configuration, then SAN, and then click the (i) icon to see Port Details. In the Alias field, enter a name for the port, for example a combination of host name and port number.
-
To create a new target group, select the port, drag it to the Target Group table, and drop it at the (+) icon. Click the Edit icon to name the new group. Drag more target ports to the group. Make a note of all the target groups you create because you will provide the names in the discovery procedure.
-
Select Configuration and then Services to verify that the iSCSI service is running and that the iSNS and Radius services are disabled.
-
Select Configuration and then select SAN.
-
Click the Targets tab and then iSCSI Targets.
-
Create a target with the following attributes:
-
Name:
OC-iSCSI-Target -
IQN: Auto-assign
-
Authentication: None
-
-
To create a new target group, select the new target, drag it to the Target Group table, and drop it at the (+) icon.
-
Click the Edit icon to rename the new group to
OC-iSCSI
You will provide the name of the target group and target in the discovery procedure.
Create an Account for Oracle Enterprise Manager Ops Center
To create and maintain a SAN storage library, Oracle Enterprise Manager Ops Center must be able to log into the Sun ZFS Storage Appliance. Create a user account on the appliance with the username ocuser, with the basic administration role, and with the following permissions and characteristics:
-
(Required.) Permission to administer, configure and restart the SNMP service.
-
Permission to configure alert filters and thresholds so that an Oracle Enterprise Manager Ops Center user with the appropriate role can set up the monitoring feature.
-
Permission to administer the Phone Home Service so that an Oracle Enterprise Manager Ops Center user with the appropriate role can use the Enable Appliance Phone Home or Disable Appliance Phone Home actions.
-
Permission to power off the appliance so that an Oracle Enterprise Manager Ops Center user with the appropriate role can power off the storage appliance remotely.
In addition, the ocuser account has these requirements:
-
Must not be a kiosk type.
-
Must not require session annotation.
Figure 2-4 shows how the permissions are set. For some types of Sun ZFS Storage Appliances, the window uses multiple pages to display all options. See the Sun ZFS Storage Appliance documentation for information about creating user accounts. To view the Sun ZFS Storage 7000 System Administration Guide, log in to the Unified Storage System software interface and click Help in the top right corner of any screen.
Figure 2-4 User Account for Sun ZFS Storage Appliance
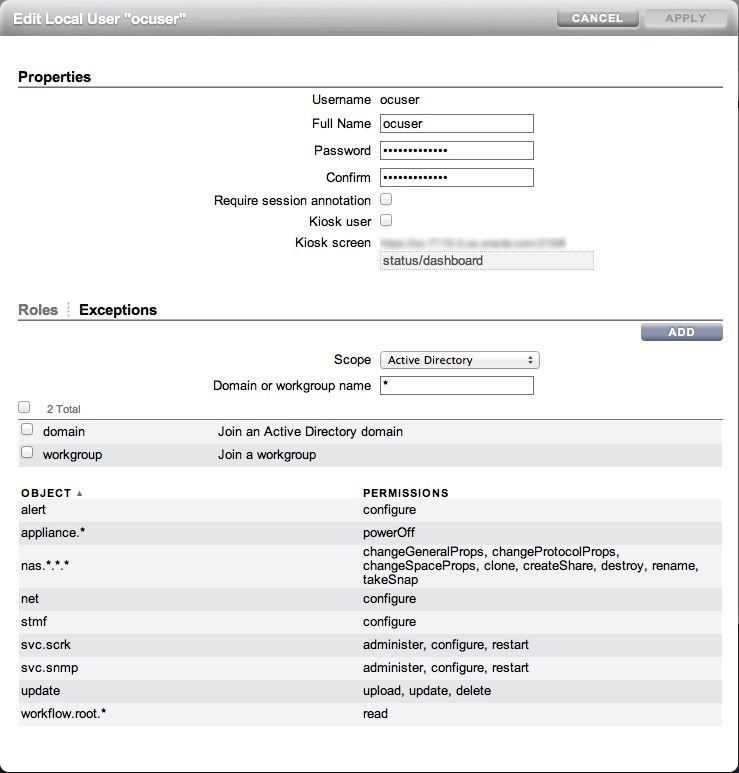
Description of "Figure 2-4 User Account for Sun ZFS Storage Appliance"
Verify the Administrative Interfaces
Use this procedure if the Sun ZFS Storage Appliance is a model with cluster configuration.
-
Select Configuration and then Clusters.
Figure 2-5 Configuration Window for Sun ZFS Storage Appliance
Description of "Figure 2-5 Configuration Window for Sun ZFS Storage Appliance"
The Resource table includes the Administrative Interfaces. A private resource has an icon of a closed lock in bold.
-
To set the administrative interface as private, click the open lock icon and then click Apply.
-
In the Profiles and Policies section, click Discovery.
-
Click Create Profile in the Actions pane.
-
Enter a name for the discovery profile.
-
For Asset Type, expand the Storage section and select Sun ZFS Storage Appliance. Click Next.
-
(Optional.) The Tags step of the wizard provides a way to add information for semantic tags. All assets discovered by this profile will have the same tags. Click Next.
-
In the Targets step, both the NFS and iSCSI targets are enabled. In the Plugin Specific Information field, enter the names of the target group and target that you configured on the Sun ZFS Storage Appliance.
Figure 2-6 Targets for Sun ZFS Storage Appliance
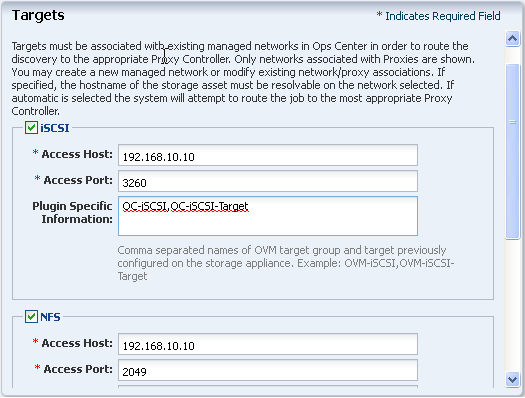
Description of "Figure 2-6 Targets for Sun ZFS Storage Appliance"
-
Specify the credentials needed to get access to the storage appliance's service processor. Set the ssh credentials and, for iSCSI targets, the CHAP credentials. To create new credentials, you must have the Security Admin role.
-
Review the summary and click Finish to create the discovery profile.
Discovering a Sun ZFS Storage Appliance
Use the discovery profile to find the Sun ZFS Storage Appliance on the network, retrieve its configuration information, and make it a managed asset.
-
Expand All Assets in the navigation pane.
-
Click Add Assets in the Actions pane.
-
Select the option Add and Manage Various Types of Assets via Discovery Probes.
-
Select the new discovery profile.
Figure 2-7 Discovery Profile for Sun ZFS Storage Appliance
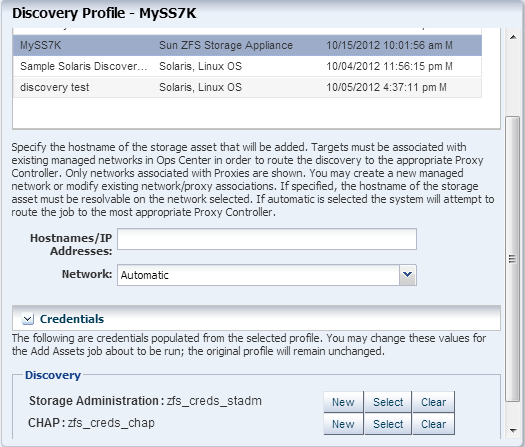
Description of "Figure 2-7 Discovery Profile for Sun ZFS Storage Appliance"
-
To direct the discovery probe, enter the host name of the storage appliance or its IP address.
-
For Network, select Automatic. This directs the discovery probe to locate the Proxy Controller closest to the storage appliance.
-
Because you added the credentials when you created the discovery profile, this procedure uses the same credentials. When you use this discovery profile in the future, you have the option of changing the credentials.
-
Click Add Now to submit the discovery job.
Oracle Enterprise Manager Ops Center displays the Sun ZFS Storage Appliance in the Storage section of the Assets tree. The LUNs defined in the storage appliance are now available for a new storage library. Because you discovered the storage appliance's iSCSI targets, a dynamic block storage library is created.
2.5.14.4 Oracle Solaris Cluster
Discovering and managing an Oracle Solaris Cluster has some specific requirements. The discovery and management must be performed in the correct order.
Note:
Do not configure a new zone cluster or add a new global node during the discovery and management process.To Discover an Oracle Solaris Cluster
-
Verify that all global nodes in the cluster are in cluster mode.
-
Discover all of the cluster's global nodes using a discovery profile. Create both ssh credentials and JMX credentials for the agent on each global node.
-
Discover the cluster using a discovery profile.
2.6 Using Tags
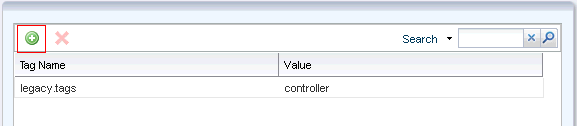
A tag is a set of information attached to an asset. Each tag consists of a tag name, which is drawn from a list of values appropriate for each asset, and a tag value, which can be any text string. For example, an asset could have a tag with a tag name of oracle.cloud.resource.creation.time and a value of 12 June.
You can use tags to associate information with assets, and to group assets based on their tags or tag values. You can add tags to assets during or after discovery.
2.6.1 Adding Tags
To add tags to one or more assets, perform the following steps:
-
On the Navigation pane, select an asset or group.
-
In the Actions pane, click Edit Tags.
-
Click the add icon and select a tag name from the drop-down list. Enter a tag value, then click Save.
2.6.2 Viewing Tags
Tags are displayed in the dashboard tab for managed assets. Select an asset, then mouseover the tags icon in the center pane to display the tags.
2.6.3 Grouping Assets Using Tags
To add assets to a group using tags, create a new group or edit an existing group using the procedures described in the Using Groups section, and create one or more rules that add assets based on tags.
2.7 Using Groups
Assets are automatically placed into system groups based on asset type. You can also create your own groups and add assets to them, either by manually adding assets or by creating rules that add assets automatically based on asset characteristics.
2.7.1 Types of Groups
Two types of groups are available in Oracle Enterprise Manager Ops Center: System groups, and User-defined groups. System groups are automatically generated for each category of asset. User-defined groups can contain any assets, and can be configured with rules to add assets that meet the rule criteria.
You can take any action on a group that is applicable to the assets in the group. For example, you can update Automated Service Request (ASR) contacts for all assets in a group, or target a group containing operating systems with an OS update job.
2.7.1.1 System Groups
Oracle Enterprise Manager Ops Center automatically creates groups of major asset types called system groups. Within these system groups, a subgroup is created for each type of asset that Oracle Enterprise Manager Ops Center is managing. You can use System Groups to locate and view assets of a specific type. You can also act on System Groups, such as changing monitoring thresholds and updating management credentials.
You can view system groups by selecting them from the drop-down list at the top of the Assets section in the Navigation pane.
Oracle Enterprise Manager Ops Center creates these system groups:
-
All Assets – Contains all discovered and managed assets. This is the default view of the assets section.
-
Operating Systems – Contains all operating systems with subgroups for each type of operating system such as Oracle Solaris OS, Oracle Linux, and SUSE Linux. The subgroups are further organized by version, such as Oracle Solaris 9 and Oracle Solaris 10 software.
-
Servers – Contains all hardware that can receive OS provisioning.
-
Chassis – Contains all hardware that can receive firmware updates but not OS provisioning.
-
Server Pools – Contains all server pools.
-
Storage – Contains all storage systems.
-
Racks – Contains all racks.
-
Oracle Engineered Systems – Contains all Oracle Engineered Systems.
-
Oracle Solaris Clusters – Contains all Oracle Solaris Clusters.
2.7.1.2 User-Defined Groups
User-defined groups can contain any type of asset and can be organized by any criteria. You can configure rules for user-defined groups that automatically add assets with specific characteristics to the group.
You can specify the following characteristics for a user-defined group:
-
Group Name
-
Description
-
Group Location
-
Group Rules – Group rules add any assets to the group that match the attributes and rules.
-
Subgroups – Groups can be organized hierarchically.
2.7.2 Viewing Group Data
Each group can list all the assets in the group and can display data about their assets. Chassis and hardware groups display power usage information, and operating system groups display CPU, network, memory, and system load information.
You can select a group to see a dashboard page with information about the group, including:
-
A group summary that shows the group's name, description, tags, location, and number of members.
-
A membership graph showing the group's assets, any child groups, and any parent groups.
-
A status summary showing the problems of the assets within the group.
-
An asset summary showing basic data about the assets within the group.
2.7.3 Creating a Group
You can organize your assets into groups to aid in management and inventory.
To create a group, click Create Group in the Actions pane, then enter the group information:
-
Group Name – This name is displayed in the User-Defined Groups of the Navigation pane.
-
Description – (Optional) This is a description of the group that is displayed in the group's dashboard.
-
Group Location – A group's position within the tree. You can create a group at the top level (root) or as a child of an existing user-defined group.
-
Configure Group Rules – Use this option to specify the membership rules. Any assets that match the rules are added to the group.
-
Configure Subgroups – Use this option to specify any existing user-defined group as a child of this group.
-
Preview Group Before Creation – If you are configuring group rules or subgroups, select this option to see the assets and subgroups that will be added to the new group before it is created.
If you are creating a rules-based group, provide the rule information:
-
Matching Policy – A rule can contain one or more attributes. For each rule, specify whether an asset must match all of the rule's attributes or any of the rule's attributes.
-
Asset Type – Select the asset type that uses the rule.
-
Attribute – Select an attribute to be considered by the rule. For example, if you select Name, the rule compares the asset's name to a given value. The available attributes vary depending on the selected asset type. You can add additional attributes to a rule using the Add Attribute icon.
-
Condition – Select a condition for the rule. For example, if you select Contains for the Name attribute, the rule includes assets if their name contains a given value.
-
Value – Enter a value to be used by the rule. For example, if you select Name as an Attribute, Contains as a condition, and Pod3 as a value, any asset of the specified type with Pod3 in its name is added to the group.
If you are adding subgroups, drag and drop one or more groups from the available groups list to the selected groups list.
If you chose to preview the group, view the assets and subgroups that will be added to the group. If necessary, go back and change the group rules or the list of subgroups.
See Appendix A for a list of the asset attributes that can be used in group rules.
2.7.4 Editing a Group
You can change the attributes of an existing group, including its name, description, rules, subgroups, and parent group. If you change or remove the rules of an existing group, assets added by those rules are removed if they do not match the new rules. However, assets that were added manually can only be removed manually.
To edit a group, perform the following steps:
-
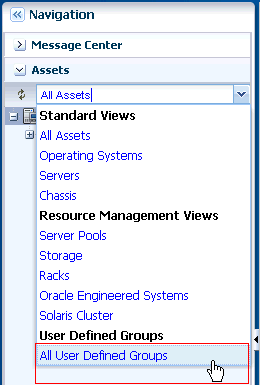
On the Navigation pane, select All User Defined Groups from the Assets drop-down list.
-
In the Actions pane, click Edit Group.
You can edit any of the group's characteristics. If you edit a group's rules, assets that were added by group rules will be removed if they do not meet the new rules, but assets that were manually added will not be affected.
See Appendix A for a list of the asset attributes that can be used in group rules.
2.7.5 Adding Assets to a Group
You can place assets into user-defined groups to organize them. When an asset is added to a group, it continues to be displayed in the All Assets section. Assets can be added to any number of groups.
To add assets to a user-defined group, select the assets in either the managed assets tab of the center pane or the Assets section of the Navigation pane. Click Add Asset to Group, select the destination group, and click Add Assets to Group.
2.7.6 Removing Assets from a Group
You can remove assets from any user-defined group. The assets remain in any other groups.
Note:
If an asset was added to a group by the group's rules, it cannot be manually removed.To remove an asset from a group, select the group. Select the asset and click Remove Asset from Group.
2.7.7 Moving Assets to a Group
When you move assets to a new user-defined group, the assets are removed from the current group and added to the new group.
Note:
If the current group has rules that match the asset you want to move, the asset is not removed from the original group.To move assets to a new group, perform the following steps:
-
On the Navigation pane, under Assets, select All User Defined Groups.
-
Select the group that currently contains the assets.
-
Select one or more assets and click Move Asset to Group.
-
Select the destination group and click Move Assets to Group/Subgroup.
2.8 Related Resources for Asset Management
For instructions in performing actions or to learn more about the role of this feature, go to one of the following resources: