38 Configuring Reports
This chapter describes Oracle Identity Manager Reports and contains the following topics:
38.1 What is Oracle Identity Manager Reports?
Oracle Identity Manager Reports enables you to use Oracle BI Publisher as the reporting solution for Oracle Identity Management products.
Note:
Oracle Identity Manager Reports are classified based on the functional areas. For instance, Access Policy Reports, Attestation, Request and Approval Reports, Password Policy Reports and so on. It is no longer named Operational and Historical.Oracle Identity Manager Reports provides a restricted-use license for Oracle BI Publisher and easy-to-use reporting packages for multiple Oracle Identity Management products.
As shown in Figure 38-1, Oracle Identity Manager Reports uses Oracle BI Publisher to query and report on information in Oracle Identity Management product databases. With minimal setup, Oracle Identity Manager Reports provides a common method to create, manage, and deliver Oracle Identity Manager Reports.
Figure 38-1 Oracle Identity Manager Reports Architecture
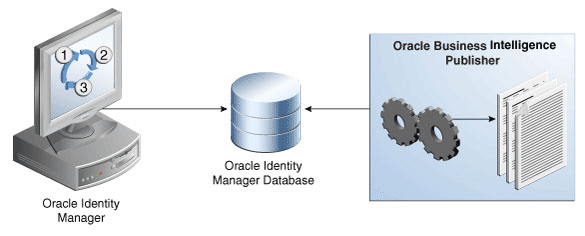
Description of "Figure 38-1 Oracle Identity Manager Reports Architecture"
The report templates included in Oracle Identity Manager Reports are standard Oracle BI Publisher templates. However, you can customize each template to change its look and feel. If schema definitions for an Oracle Identity Management product are available, you can use that information to create your own custom reports.
Note:
Oracle strongly recommends creating back-up copies of the original default report templates before customizing them.38.2 What is Oracle BI Publisher?
Oracle BI Publisher is an Oracle's enterprise reporting solution and provides a single reporting environment to author, manage, and deliver all of your reports and business documents. Utilizing a set of familiar desktop tools, such as Microsoft Word, Microsoft Excel, or Adobe Acrobat, you can create and maintain report layouts based on data from diverse sources, including Oracle Identity Management products.
See Also:
Oracle Business Intelligence Publisher Documentation to learn more about Oracle BI Publisher functionality.38.3 Supported Products
Oracle Identity Manager Reports 11g Release 2 (11.1.2) supports the products listed in Table 38-1.
38.4 Licensing
Oracle Identity Manager can be separately licensed, independent of any Oracle Application Server or WebLogic edition. BI Publisher is included when you separately license Oracle Identity Manager:
-
Shipped BI Publisher reports. Layout changes are allowed, AND
-
Shipped or newly created BI Publisher reports that are modified to access data from the existing Identity Management schema that has not been customized.
38.5 Deploying Oracle Identity Manager Reports
This section explains how to deploy Oracle Identity Manager Reports 11g Release 2 (11.1.2) and contains the following topics:
38.5.1 Creating the Metadata Repository
Each Oracle Business Intelligence system (BI domain) requires its own set of database schemas. Two or more systems cannot share the same set of schemas or repositories.
You must create a repository in your database by using the Repository Configuration Utility (RCU) before installing BI Publisher 11g (11.1.1.6). For this, you need the RCU utility, which you can download from the Oracle Web site by using the following URL:
For installing BI Publisher 11g (11.1.1.6), the following metadata repositories are required:
-
Matadata Store (MDS)
-
Business Intelligence Platform (BI Platform)
To create the repository in your database by using the RCU utility:
-
Log in to the database as SYSDBA.
To run RCU, you must have the DBA privilege. Therefore, you must log in as SYSDBA, for example, as user SYS.
-
Navigate to the RCU_HOME/bin/ directory.
-
To start RCU:
-
For UNIX, run:
./rcu -
For Microsoft Windows, run:
rcu.bat
-
-
In the Welcome screen that is displayed, click Next. The Repository Creation Utility wizard is displayed.
-
In step 1 of the wizard, select Create, and then click Next. Step 2 of 7: Database Connection Details page is displayed.
-
Specify the connection details, as listed in the following table:
Field Data to Enter Database Type Oracle Database Host Name Name of the host on which the database is deployed. Port Port number to connect to the host identified in the Host Name field. Service Name A string that is the global database name, a name comprised of the database name and domain name, entered during installation or database creation. If you are not sure what the global database name is, then you can obtain it from the combined values of the SERVICE_NAMES parameter in the database initialization file, which is INITSID.ORA. For example, a service name can be SALES.COM, where SALES is the database name and COM is the domain. Username Username for a database schema user that has access to Oracle Identity Manager, such as SYS. Password Password for the user identified in the Username field. Role The role with DBA privilege, such as SYSDBA. -
Click Next. Step 3 of 7: Component Detail page is displayed.
-
Select the Oracle Business Intelligence component. This action automatically selects the MDS schema under the AS Common Schemas group, which is also required by Oracle Business Intelligence.
-
Click Next. Step 4 of 7: Schema Passwords page is displayed.
-
Specify the same password for schemas.
-
Click Next. Step 5 of 7: Map TableSpaces page is displayed.
-
Click Next. A message is displayed after the validation is complete.
-
Click OK. Step 6 of 7: Summary page is displayed with the details about the component, schema owner, tablespace type, and tablespace name.
-
Click Next. Step 7 of 7: Completion Summary page is displayed.
-
Click Close. The metadata repository is created in your database.
Tip:
The log files are saved in the RCU_HOME\log\ directory.
38.5.2 Installing BI Publisher 11g (11.1.1.6)
All Oracle Business Intelligence products run on Oracle WebLogic Server domains. Therefore, Oracle WebLogic Server must be installed and configured before you install BI Publisher 11g (11.1.1.6).
If you do not have Oracle WebLogic Server installed, then OBIEE 11g installs the WebLogic Server by default, and creates the bi domain named bifoundation_domain under the user_projects/domains directory.
Installing BI Publisher 11g (11.1.1.6) is described in the following sections:
-
Installing BI Publisher 11g (11.1.1.6) When Oracle WebLogic Server is Not Installed
-
Installing BI Publisher 11g (11.1.1.6) When Oracle WebLogic Server is Installed
Starting the Oracle Business Intelligence Wizard
To start the Oracle Business Intelligence wizard, go to the bishiphome/Disk1/ directory, and run the following:
For UNIX:
./runInstaller
For Microsoft Windows:
setup.exe
Installing BI Publisher 11g (11.1.1.6) When Oracle WebLogic Server is Not Installed
After starting the Oracle Business Intelligence wizard, perform the following steps:
-
In Step 1 of 15: Welcome page of the wizard that is displayed, click Next. Step 2 of 15: Type Install page is displayed.
-
Select the Install Software Updates option, and click Next. Step 3 of 15: Select Installatation Type page is displayed.
-
Select the Enterprise Install option, and click Next. Step 4 of 15: Pre-requisite Check page is displayed.
-
Click Next. Step 5 of 15: Create or Scale BI System page is displayed.
-
Select the Create New BI System option. Then, enter values in the following fields:
User Name: Enter the WebLogic user name.
Password: Enter a password for the WebLogic user.
Confirm Password: Re-enter the password for the WebLogic user.
Doman Name: Name of the WebLogic domain, which is bifoundation_domain by default.
-
Click Next. Step 6 of 15: Specify Install Location page is displayed.
-
Enter the directory paths for the installation, and click Next.
-
Click Next. Step 7 of 12: Configure Components page is displayed.
-
Click Next. Step 8 of 12: Database Details page is displayed.
-
Enter the details of your database with the credentials that you have specified in the Step 5 of "Creating the Metadata Repository".
-
Complete the remaining steps of the wizard by clicking Next.
Installing BI Publisher 11g (11.1.1.6) When Oracle WebLogic Server is Installed
When BI Publisher 11g (11.1.1.6) is already installed, perform the following steps in the Oracle Business Intelligence wizard:
-
In Step 2 of 15: Type Install page, select the Simple Install option, and click Next. Step 3 of 15: Prerequisite Check page is displayed.
-
Click Next. Step 4 of 12: Middleware Home page is displayed.
-
Enter the Middleware home directory path without trailing space, for example, /u01/app/ Oracle_IDM1/Middelware/.
-
Click Next. Step 5 of 12: Administrator Details page is displayed.
-
Enter the administrator user name and password. This account is used for the administration of the WebLogic Server and Enterprise Manager.
-
Click Next. Step 6 of 12: Configure Components page is displayed.
-
Click Next. Step 7 of 12: Database Details page is displayed.
-
Enter the details of your database with the credentials that you have specified in the Step 5 of "Creating the Metadata Repository".
-
Complete the remaining steps of the wizard by clicking Next.
38.6 Configuring Oracle Identity Manager Reports
This section describes configuring BI Publisher 11g (11.1.1.6) in the following topics:
38.6.1 Configuring Security on BI Publisher 11g (11.1.1.6)
To configure security in BI Publisher 11g (11.1.1.6):
-
In the Oracle_IDM1/Middleware/user_projects/domains/bifoundation_domain/config/bipublisher/repository/Reports/ directory, create a new directory and name it as Oracle Identity Manager.
Note:
After installing BI Publisher 11g (11.1.1.6), the Oracle_IDM1/Middleware/user_projects/domains/bifoundation_domain/config/bipublisher/repository/Reports/ directory is created in the WebLogic domain. -
Extract the contents of the OIM_11gR1_BIP11gReports.zip file in the newly created Oracle Identity Manager directory.
-
Login to BI Publisher. To do so:
-
In a Web browser, enter the URL in the following format:
http://HOST_NAME:PORT_NUMBER/xmlpserver/
For example, http://localhost:7001/xmlpserver/
-
In the Oracle BI Publisher login page, enter the username and password with WebLogic privileges.
-
-
Select Administration, Security Centre. Then, click Security Configuration.
-
Go to the Security Model page and select the security model according to the implementation. In OBIEE, the default security model is Oracle Fusion Middleware Security Model. For information about configuring Oracle Fusion Middleware security model, refer to the following URL:
http://docs.oracle.com/cd/E21764_01/bi.1111/e13880/T526682T559093.htm#ofm1 -
According to the selected security model, login to BI Publisher as the Administrator or OIM User. The Home page is displayed.
-
Upload Oracle Identity Manager reports to BI Publisher. To do so:
-
Select Administration, System Maintenance, and then click Server Configuration.
-
Scroll down to the Catalog section and verify that the path to the repository folder is correct in the BI Publisher repository field.
-
Click Upload to BI Presentation Catalog to upload the Oracle Identity Manager reports to BI Publisher.
-
If required, restart both the BI Publisher managed server and admin server for the changes to take affect.
-
Login to BI Publisher again and click Catalog. Expand the Shared Folders tree in the left pane to verify that the reports are present.
-
38.6.2 Configuring Data Sources for Running Oracle Identity Manager Reports
For Oracle Identity Manager reports, JDBC connections described in the following sections are required:
38.6.2.1 Configuring Oracle Identity Manager JDBC Connection
To configure Oracle Identity Manager JDBC connection:
-
Click the Administration link on the top of the Home page. The BI Publisher Administration page is displayed.
-
Under Data Sources, click the JDBC Connection link. The Data Sources page is displayed.
-
In the JDBC tab, click Add Data Source to create a JDBC connection to your database. The Add Data Source page is displayed.
-
Enter values in the following fields:
-
Data Source Name: Specify the Oracle Identity Manager JDBC connection name, for example, OIM JDBC.
-
Driver Type: Select a driver type to suit your database. For example, you can select Oracle 10g or Oracle 11g to suit your database.
-
Database Driver Class: Specify a driver class to suit your database, such as oracle.jdbc.driver.OracleDriver.
-
Connection String: Specify the database connection details in the format jdbc:oracle:thin:@HOST_NAME:PORT_NUMBER:SID. For example, jdbc:oracle:thin:@localhost:7003:orcl.
-
User name: Specify the Oracle Identity Manager database user name.
-
Password: Specify the Oracle Identity Manager database user password.
-
-
Click Test to verify the connection, and then click Apply to establish the connection.
-
If the connection to the database is established, a confirmation message is displayed indicating the success. Click Apply.
In the JDBC page, you can see the newly defined Oracle Identity Manager JDBC connection in the list of JDBC data sources.
38.6.2.2 Configuring BPEL-Based JDBC Connection
In BI Publisher, only one data source can be assigned to a report. The first data source is the Oracle Identity Manager data source. The following reports have a secondary data source, which connects to the BPEL database to retrieve BPEL data:
-
Task Assignment History
-
Request Details
-
Request Summary
-
Approval Activity
To configure a secondary data source for BPEL-based reports:
-
In the BI Publisher Home page, click Administration. The BI Publisher Administration page is displayed.
-
Under Data Sources, click the JDBC Connection link. The Data Sources page is displayed.
-
In the JDBC tab, click Add Data Source to create a JDBC connection to your database. The Add Data Source page is displayed.
-
Enter values in the following fields:
-
Data Source Name: Specify the BPEL JDBC connection name, for example, BPEL JDBC.
-
Driver Type: Select a driver type to suit your database. For example, you can select Oracle 10g or Oracle 11g to suit your database.
-
Database Driver Class: Specify a driver class to suit your database, such as oracle.jdbc.driver.OracleDriver.
-
Connection String: Specify the database connection details in the format jdbc:oracle:thin:@HOST_NAME:PORT_NUMBER:SID. For example, jdbc:oracle:thin:@localhost:7003:orcl.
-
User name: Specify the SOA database user name.
-
Password: Specify the SOA database user password.
-
-
Click Test to verify the connection, and then click Apply to establish the connection.
-
If the connection to the database is established, a confirmation message is displayed indicating the success. Click Apply.
In the JDBC page, you can see the newly defined BPEL JDBC connection in the list of JDBC data sources.
38.7 Generating Oracle Identity Manager Reports
This section explains how to generate Oracle Identity Manager Reports and contains the following topics:
Note:
BI Publisher cannot be accessed through the Oracle Identity Self Service or Oracle Identity System Administration. You must open BI publisher explicitly to access the Oracle Identity Manager 11g reports.38.7.1 Generating Sample Reports Against the Sample Data Source
If you want to see an example of what report data will look like without running a report against the production JDBC Data Source, you can generate a sample report against the Sample Data Source. You must create the Sample Data Source before you can generate sample reports. Refer to appropriate section for your Oracle Identity Management product in "Configuring Oracle Identity Manager Reports" for information on creating the Sample Data Source.
After you create the Sample Data Source you can generate sample reports against it by performing the following steps:
-
Login to Oracle BI Publisher. See step 3 in Configuring Security on BI Publisher 11g (11.1.1.6) for more information about logging in to Oracle BI Publisher.
-
Click Shared Folders, Oracle Identity Manager Reports, and then select Sample Reports.
-
Click View for the sample report you want to generate.
-
Select an output format for the sample report and click View.
The sample report is generated.
38.7.2 Generating Reports Against the Oracle Identity Manager JDBC Data Source
To generate reports against the Oracle Identity Manager JDBC data source:
-
Log in to Oracle BI Publisher. See step 3 in Configuring Security on BI Publisher 11g (11.1.1.6) for more information about logging in to Oracle BI Publisher.
-
Navigate to Oracle Identity Manager reports. To do so:
-
In the BI Publisher Home page, under Browse/Manage, click Catalog Folders. Alternatively, you can click Catalog at the top of the page.
The Catalog page is displayed with a tree structure on the left side of the page and the details on the right.
-
On the left pane, expand Shared Folders, and navigate to Oracle Identity Manager. All the objects in the Oracle Identity Manager folder are displayed.
You are ready to navigate to BI Publisher 11g and use the Oracle Identity Manager BI Publisher reports.
-
-
Click View for the report you want to generate.
-
Select an output format for the report and click View.
The report is generated.
See Also:
Oracle Business Intelligence Publisher Documentation to learn more about Oracle BI Publisher.38.7.3 Generating Reports Against the BPEL-Based JDBC Data Source
The following four reports have a secondary data source, which connects to the BPEL database to retrieve BPEL data:
-
Task Assignment History
-
Request Details
-
Request Summary
-
Approval Activity
These reports have a secondary data source, which is the BPEL-based JDBC Data Source, and is called BPEL JDBC.
To generate reports against the BPEL-based JDBC data source:
-
Ensure that a BPEL data source exists in BI Publisher. This BPEL Data Source must point to the BPEL database. See "Configuring BPEL-Based JDBC Connection" for more information about creating a BPEL data source.
-
Log in to Oracle BI Publisher. See step 3 in Configuring Security on BI Publisher 11g (11.1.1.6) for more information about logging in to Oracle BI Publisher.
-
Navigate to Oracle Identity Manager reports. To do so:
-
In the BI Publisher Home page, under Browse/Manage, click Catalog Folders. Alternatively, you can click Catalog at the top of the page.
The Catalog page is displayed with a tree structure on the left side of the page and the details on the right.
-
On the left pane, expand Shared Folders, and navigate to Oracle Identity Manager. All the objects in the Oracle Identity Manager folder are displayed.
You are ready to navigate to BI Publisher 11g and use the Oracle Identity Manager BI Publisher reports.
-
-
Click View for the report you want to generate.
-
Select an output format for the report, and click View.
The report is generated based on the BPEL-based JDBC data source.