17 Coexistence of Oracle Access Manager 10g with Oracle Access Management Access Manager 11.1.2
This chapter describes how to setup an environment where both Oracle Access Manager 10g and Oracle Access Management Access Manager (Access Manager) 11g Release 2 (11.1.2) deployments coexist, after you migrate from Oracle Access Manager 10g to Oracle Access Management Access Manager 11.1.2. In this coexistence scenario, the Oracle Access Manager 10g Server does the authentication for all the resources.
This chapter contains the following sections:
-
Optional: Installing and Configuring Oracle HTTP Server 11g (OHS-1 and OHS-2)
-
Configuring OHS-2 as a Reverse Proxy for Access Manager 11.1.2 Managed Server
-
Optional: Installing and Configuring WebGate 10g-1 and WebGate 10g-2
-
Configuring Separate Primary Cookie Domains for two WebGate Instances
-
Protecting the Authentication End Point URL of Access Manager 11.1.2 in Oracle Access Manager 10g
17.1 Coexistence Overview
During the process of migration from Oracle Access Manager 10g to Access Manager 11.1.2, you can have both Oracle Access Manager 10g and Access Manager 11.1.2 deployments coexisting, so that some applications are protected by Oracle Access Manager 10g while others are protected by Access Manager 11.1.2. It is desirable for end-users to have a seamless single sign-on experience when they navigate between these applications. This is called the coexistence mode.
In this mode, Access Manager 11.1.2 protects the migrated applications and any new applications registered with Access Manager 11.1.2; whereas Oracle Access Manager 10g continues to protect the applications that are not migrated to Access Manager 11.1.2.
In this coexistence mode, Oracle Access Manager 10g performs the authentication for all the resources protected by Access Manager 11.1.2.
17.2 Coexistence Topology
Figure 17-1 illustrates how the Oracle Access Manager 10g Server coexists with the Access Manager 11.1.2 Server.
Figure 17-1 Coexistence of Oracle Access Manager 10g with Access Manager 11.1.2
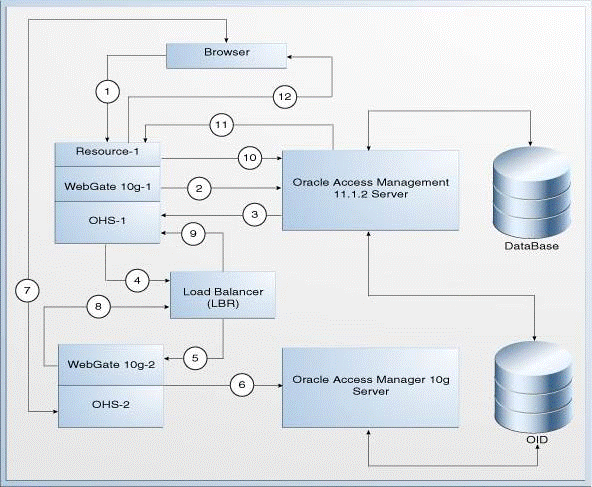
Description of "Figure 17-1 Coexistence of Oracle Access Manager 10g with Access Manager 11.1.2"
The topology consists of disjoint Oracle Access Manager 10g and Access Manager 11.1.2 setups. The numbers 1-12 in the topology show the sequence in which the requests flow in the coexistence environment. Table 17-1 describes the request flow.
This coexistence setup contains the following:
-
Oracle Access Manager 10g WebGate partners registered against Access Manager 11.1.2 Server.
-
Oracle Access Manager 10g WebGate partners registered against Oracle Access Manager 10g Server.
-
WebGate 10g-1: This refers to the 10g or 11g WebGate partner registered with Access Manager 11.1.2 Server. It is deployed on Oracle HTTP Server 11g namedOHS-1.WebGate 10g-1protects the resources or applications that are migrated to Access Manager 11.1.2. -
WebGate 10g-2: This refers to the Oracle Access Manager 10g WebGate partner registered with Oracle Access Manager 10g Server. It is deployed on Oracle HTTP Server 11g namedOHS-2.WebGate 10g-2protects the resources or applications that are not migrated to Access Manager 11.1.2, and are supposed to be protected by Oracle Access Manager 10g. It also protects the credential collector URLs. -
OHS-1: This refers to the Oracle HTTP Server 11g on whichWebGate 10g-1is deployed. -
OHS-2: This refers to the Oracle HTTP Server 11g on whichWebGate 10g-2is deployed.OHS-2acts as a reverse proxy for Access Manager 11.1.2 Managed Server's host and port. It front-ends the credential collector of Access Manager 11.1.2. For this reason, you must use the OHS module for WebLogic. -
Resource-1: This is any resource protected by Access Manager 11.1.2 Server. -
Load Balancer (LBR): This is a logical load balancer that maps to the configuration in Access Manager 11.1.2.
Table 17-1 describes the request flow. The numbers in the Step column correspond to the numbers shown in the topology in Figure 17-1.
| Step | Description |
|---|---|
|
1 |
User requests access to
where |
|
2 and 3 |
|
|
4 and 5 |
|
|
6 |
WebGate 10g-2 is registered against the Oracle Access Manager 10g Server, and Access Manager 11.1.2 Server authentication end point URL itself is protected by Oracle Access Manager 10g with desired authentication scheme such as form authentication scheme. Therefore, |
|
7 |
When the user provides the credentials, |
|
8, 9, and 10 |
Once |
|
11 |
The Access Manager 11.1.2 server asserts (using header OAM_REMOTE_USER) as |
17.3 Task Roadmap
Table 17-2 lists the steps to set up and configure the topology shown in Figure 17-1.
Table 17-2 Tasks to be Completed
| Task No | Task | For More Information |
|---|---|---|
|
1 |
Understand and get familiar with the coexistence topology before you start the configuration process. |
See, Coexistence Topology |
|
2 |
Complete the prerequisites. |
|
|
3 |
Install two new Oracle HTTP Server 11g instances ( If you do not wish to install two new Oracle HTTP Server instances, you can use the Oracle HTTP Server instance, which is available as part of your Oracle Access Manager 10g migration. |
See, Optional: Installing and Configuring Oracle HTTP Server 11g (OHS-1 and OHS-2) |
|
4 |
Configure |
See, Configuring OHS-2 as a Reverse Proxy for Access Manager 11.1.2 Managed Server |
|
5 |
Update the authentication module LDAPNoPasswordAuthModule in Access Manager 11.1.2, and point the User Identity Store to the data source that is created in Access Manager 11.1.2 as a result of migration. |
See, Updating LDAPNoPasswordAuthModule in Access Manager 11.1.2 |
|
6 |
Install two WebGates:
If you do not wish to install new WebGates, you can use the WebGates that are available as part of your Oracle Access Manager 10g migration. |
See, Optional: Installing and Configuring WebGate 10g-1 and WebGate 10g-2 |
|
7 |
Configure separate primary cookie domains for each of the WebGates. |
See, Configuring Separate Primary Cookie Domains for two WebGate Instances |
|
8 |
Protect all the resources at Access Manager 11.1.2. |
|
|
9 |
Protect the Access Manager 11.1.2 authentication end point URL in Oracle Access Manager 10g. |
See, Protecting the Authentication End Point URL of Access Manager 11.1.2 in Oracle Access Manager 10g |
|
10 |
Configure the logout settings to make sure that the logout works at both the WebGates and the Access Manager 11.1.2 server. |
|
|
11 |
Configure the session management. |
|
|
12 |
Verify the configuration. |
17.4 Prerequisites for Coexistence
You must complete the following prerequisites before you start performing tasks required for coexistence of Oracle Access Manager 10g with Access Manager 11.1.2.
-
Read the Oracle Fusion Middleware System Requirements and Specifications document to ensure that your environment meets the minimum requirements for the products you are installing, upgrading, and migrating.
Note:
For information about Oracle Fusion Middleware concepts and directory structure, see "Understanding Oracle Fusion Middleware Concepts and Directory Structure" in the Oracle Fusion Middleware Installation Planning Guide for Oracle Identity and Access Management.
-
Verify that the version of Oracle Access Manager 10g that you are using is supported for coexistence. For more information about supported starting points for coexistence of Oracle Access Manager 10g with Access Manager 11.1.2, see Section 11.7, "Supported Starting Points for Coexistence of Oracle Access Manager 10g With Oracle Access Management Access Manager 11.1.2".
-
Migrate the artifacts of Oracle Access Manager 10g to Access Manager 11.1.2. For more information, see Chapter 12, "Migrating Oracle Access Manager 10g Environments".
-
Make sure that Oracle Access Manager 10g and Access Manager 11.1.2 share the same user store.
-
Make sure that the Oracle Access Manager 10g and the Oracle Access Management 11.1.2 servers are up and running.
17.5 Optional: Installing and Configuring Oracle HTTP Server 11g (OHS-1 and OHS-2)
Install and configure Oracle HTTP Server 11g (OHS-1 and OHS-2, as shown in Figure 17-1). Alternatively, you can use the Oracle HTTP Server instances that exist after migration from Oracle Access Manager 10g to Access Manager 11.1.2.
For more information, see "Installing and Configuring Oracle HTTP Server 11g" in the Oracle Fusion Middleware Installation Guide for Oracle Identity and Access Management.
17.6 Configuring OHS-2 as a Reverse Proxy for Access Manager 11.1.2 Managed Server
You must configure OHS-2 as a reverse proxy for Access Manager 11.1.2 server, so that it front ends the Access Manager 11.1.2 Server authentication end point, which is the Access Manager 11g Managed Server's host and port.
Note:
As mentioned earlier, OHS-2 can be either an existing OHS installation on which WebGate 10g is installed and configured with Oracle Access Manager 10g or a new OHS installation.
To configure OHS-2 as a reverse proxy for Access Manager 11.1.2 server, do the following:
-
Set up
OHS-2to forward requests with the URL prefix "/oam" to the Access Manager 11.1.2 Server, by configuringmod_wl_ohs, the OHS plug-in for Oracle WebLogic ServerFor more information about configuring OHS module for WebLogic, see "Configuring the mod_wl_ohs Module" in Oracle Fusion Middleware Administrator's Guide for Oracle HTTP Server.
While configuring
mod_wl_ohs, theWebLogicHostandWebLogicPortparameters should point to the host and port of the appropriate Access Manager 11.1.2 Server. -
Restart
OHS-2. -
Log in to the Oracle Access Management 11.1.2 console using the following URL:
http://host:port/oamconsole
In this URL,
hostrefers to the fully qualified domain name of the machine hosting the Oracle Access Management 11.1.2 console (Administration Server)portrefers to the designated bind port for the Oracle Access Management 11.1.2 console, which is the same as the bind port for the Administration Server/oamconsolerefers to the Oracle Access Manager console login page -
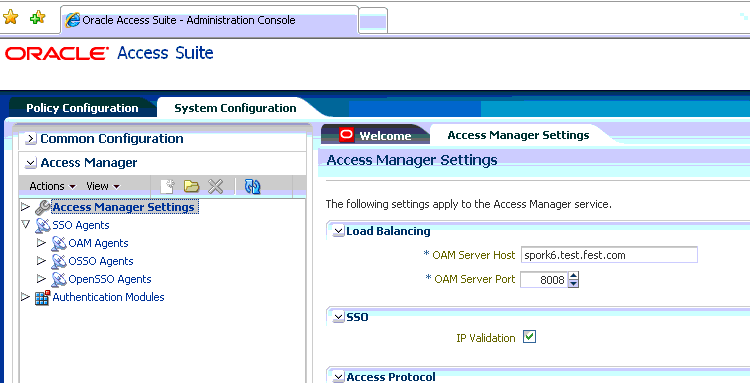
Go to the System Configuration tab, and then double-click on Access Manager Settings.
-
In the section Load Balancing, specify the hostname of
OHS-2in the OAM Server Host field, and the port number ofOHS-2in the OAM Server Port field. -
Click Apply.
Figure 17-2 shows the Access Manager 11.1.2 console where you must change the Access Manager Settings.
Figure 17-2 Changing the Load Balancing Settings
Description of "Figure 17-2 Changing the Load Balancing Settings"
-
To use the IP validation feature of
WebGate 10g-1, which is configured with Access Manager 11.1.2 Server, you must make changes to the Access Manager 11.1.2 Server, so that the Access Manager 11.1.2 Server uses the IP address of the client to create an SSO token. To do this, complete the following steps:-
Log in to the WebLogic Administration console using the following URL:
http://host:port/console
where,
hostis the hostname of the machine on which WebLogic is runningportis the port number of the machine on which WebLogic is running -
Expand Environments under Domain Structure in the left navigation pane.
-
Select Servers.
-
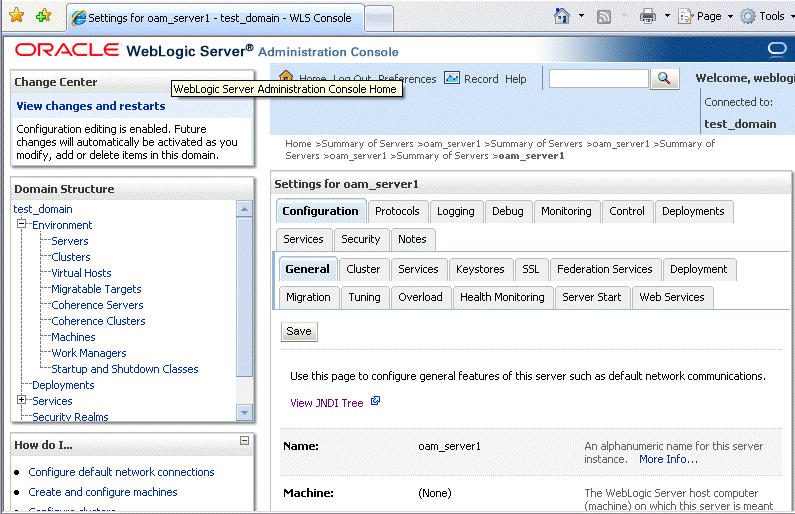
Select OAM Server from Summary of Servers in the right panel.
-
Select the Configuration tab, and then click the General tab.
Figure 17-3 shows the tabs that you must select in WebLogic console.
-
Click Advanced, and then select the WebLogic Plug-In Enabled option.
Figure 17-4 shows the checkbox that you must select.
Figure 17-4 Selecting WebLogic Plug-In Enabled

Description of "Figure 17-4 Selecting WebLogic Plug-In Enabled"
-
Click Save.
-
Restart the WebLogic Administration Server and the Access Manager 11.1.2 Managed Servers by completing the following tasks:
-
Stop the WebLogic Administration Server.
-
Stop the Access Manager Managed Servers.
-
Start the WebLogic Administration Server.
-
Start the Access Manager Managed Servers.
For more information about starting and stopping the servers, see "Starting and Stopping Administration Servers" and "Starting and Stopping Managed Servers" in the Oracle Fusion Middleware Administrator's Guide.
-
-
17.7 Updating LDAPNoPasswordAuthModule in Access Manager 11.1.2
LDAPNoPasswordAuthModule is the authentication module used by the authentication scheme - OAM10gScheme.
You must update the authentication module LDAPNoPasswordAuthModule to point to the data source that is created in Access Manager 11.1.2 as a result of migration. To do this, complete the following steps:
-
Log in to the Oracle Access Management 11.1.2 console using the following URL:
http://host:port/oamconsole
In this URL,
-
hostrefers to fully qualified domain name of the machine hosting the Oracle Access Manager console (Administration Server). -
portrefers to the designated bind port for the Oracle Access Management 11.1.2 console, which is the same as the bind port for the Administration Server.
-
-
Go to the System Configuration tab.
-
Expand Access Manager, and then expand Authentication Modules.
-
Expand LDAP Authentication Module.
-
Click LDAPNoPasswordAuthModule, and update the User Identity Stores to point to the data source that is created in Access Manager 11.1.2 as a result of migration.
17.8 Optional: Installing and Configuring WebGate 10g-1 and WebGate 10g-2
After the Oracle Access Manager 10g migration, you will have the old WebGate which communicates with the Oracle Access Manager 10g Server (WebGate 10g-2), and the migrated WebGate, which communicates with the Access Manager 11.1.2 Server (WebGate 10g-1). You can either use these two WebGate instances for setting up the coexistence environment, or install two new WebGate instances.
If you wish to install new WebGates instances: WebGates 10g-1 and WebGates 10g-2, you must configure them as follows:
-
WebGate 10g-1: This WebGate instance can be Oracle Access Manager 10g WebGate or Access Manager 11.1.2 WebGate. You must install a 10g or 11g WebGate on Oracle HTTP Server 11g (OHS-1), as shown in Figure 17-1, and configure it with the Access Manager 11.1.2 Server.For information on installing 10g WebGate, and configuring it with the Access Manager 11.1.2 server, see "Locating and Installing the Latest 10g Webgate for Oracle Access Manager 11g" in the Oracle Fusion Middleware Administrator's Guide for Oracle Access Management.
For information on installing 11g WebGate, and configuring it with the Access Manager 11.1.2 server, see "Installing and Configuring Oracle HTTP Server 11g Webgate for OAM" in the Oracle Fusion Middleware Installation Guide for Oracle Identity and Access Management.
-
WebGate 10g-2: This is a 10g WebGate instance that acts as a proxy for WebLogic. You must install 10g WebGate on Oracle HTTP Server 11g (OHS-2), as shown in Figure 17-1, and configure it with the Oracle Access Manager 10g Server.For information on installing 10g WebGate, and configuring it with the Oracle Access Manager 10g Server, see "Installing the WebGate" in the Oracle Access Manager Installation Guide for release 10g (10.1.4.3).
Note:
For more information about managing 10g WebGates with Access Manager 11.1.2, see "Managing 10g Webgates with Oracle Access Manager 11g" in the Oracle Fusion Middleware Administrator's Guide for Oracle Access Management.
17.9 Configuring Separate Primary Cookie Domains for two WebGate Instances
If the resource WebGate (WebGate 10g-1) configured with the Access Manager 11.1.2 Server is of type 10g WebGate, you must create separate primary cookie domains for each of the WebGate instances (WebGate 10g-1 and WebGate 10g-2). To do this, complete the following steps:
-
Create different primary cookie domain for each of the WebGates. You can do this by modifying the profiles of both the WebGate instances.
To modify the profile of
WebGate 10g-1that is configured with the Access Manager 11.1.2 server, do the following:-
Log in to the Oracle Access Management 11.1.2 console using the following URL:
http://host:port/oamconsole
-
Go to the System Configuration tab.
-
Click Access Manager, and then click SSO Agents.
-
Double-click OAM Agents.
-
Search for the WebGate for which profile needs to be modified, by typing the WebGate ID in the Search panel to the right of the console window. Click the pencil icon to edit the profile.
-
Change the value of the parameter Primary Cookie Domain, and click Apply.
-
-
Similarly, modify the profile of
WebGate 10g-2that is configured with Oracle Access Manager 10g Server, and specify the appropriate value for the parameter Primary HTTP cookie Domain. For more information, see "Modifying an AccessGate" in the Oracle Access Manager Access Administration Guide for release 10g (10.1.4.3). -
Use virtual hosting to get different domains for the two WebGates on OHS. For more information, see "Configuring Virtual Hosts by Editing the HTTP Server Configuration Files" in the Oracle Fusion Middleware Enterprise Deployment Guide for Oracle Identity Management.
Since you are using virtual hosting to create different domains for the WebGates, you must make some configuration changes to the WebGate. For more information about configuring virtual hosting for the WebGates, see "Configuring Virtual Web Hosting" in the Oracle Access Manager Access Administration Guide for release 10g (10.1.4.3).
17.10 Protecting Resources at Access Manager 11.1.2
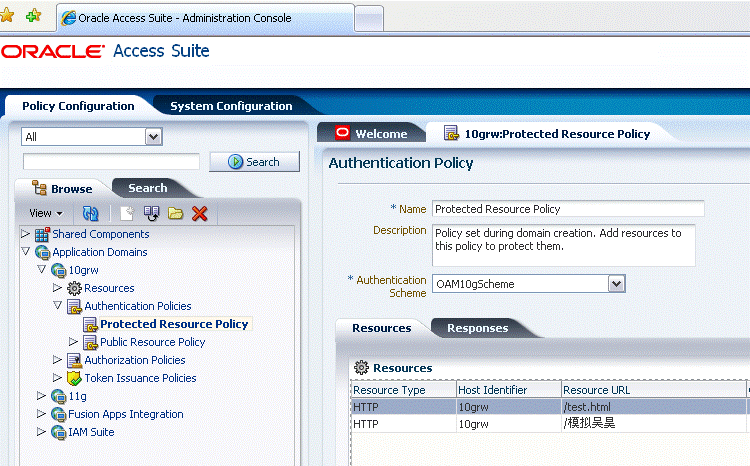
Resource WebGate 10g-1, which is configured with the Access Manager 11.1.2 Server has to protect the resources with the special authentication scheme (OAM10gScheme).
To achieve this, you must either change the authentication scheme of the existing authentication policy, or you must have a new application domain and create a new policy.
For information about making changes to the authentication scheme of the existing policy, see "Viewing or Editing an Authentication Policy" in the Oracle Fusion Middleware Administrator's Guide for Oracle Access Management.
For information about creating and managing policies, see "Managing Policies to Protect Resources and Enable SSO" in the Oracle Fusion Middleware Administrator's Guide for Oracle Access Management.
Figure 17-5 shows the authentication scheme that you must select for the authentication policy which protects the resources.
Figure 17-5 Protected Policy with Authentication Scheme
Description of "Figure 17-5 Protected Policy with Authentication Scheme"
17.11 Protecting the Authentication End Point URL of Access Manager 11.1.2 in Oracle Access Manager 10g
In this coexistence environment, WebGate 10g-2 that is configured with Oracle Access Manager 10g Server, and the associated Oracle Access Manager 10g server performs authentication on behalf of Access Manager 11.1.2 by protecting the authentication end point URL of Access Manager 11.1.2.
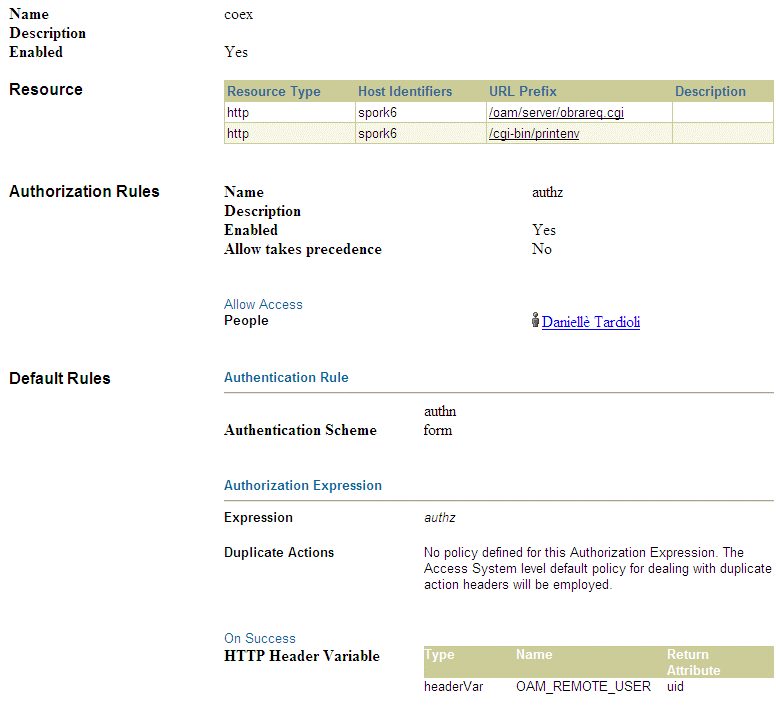
The following resource must be protected by an Oracle Access Manager 10g policy:
/oam/server/obrareq.cgi
To protect this resource, create an Oracle Access Manager 10g policy and do the following:
-
Specify the desired authentication scheme
-
Specify the list of users who are authorized to access the resource /oam/server/obrareq.cgi
-
Configure OAM_REMOTE_USER as the HTTP header success action in the authorization expression. You must set the value of the user ID to this header.
For more information about creating policies, see "Protecting Resources with Policy Domains" in the Oracle Access Manager Access Administration Guide for release 10g (10.1.4.3).
Figure 17-6 shows a sample policy domain.
17.12 Configuring Logout Settings
You must configure the logout settings, and make sure that logout works at both the WebGates and the Access Manager 11.1.2 Server. To do this, complete the following steps:
-
Modify the profile of
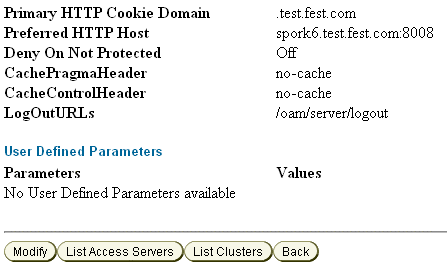
WebGate 10g-2, and set the value of LogOutURLs. This value must be the same as that of the logout end point URL of Access Manager 11.1.2 Server, that is /oam/server/logout. For more information, see "Modifying an AccessGate" in the Oracle Access Manager Access Administration Guide for release 10g (10.1.4.3).Figure 17-7 shows a sample profile of
WebGate 10g-2. -
Perform the following steps to configure logout, depending on the type of
WebGate 10g-1that is configured with the Access Manager 11.1.2 Server.If the resource WebGate (WebGate 10g-1) is a 11g WebGate:
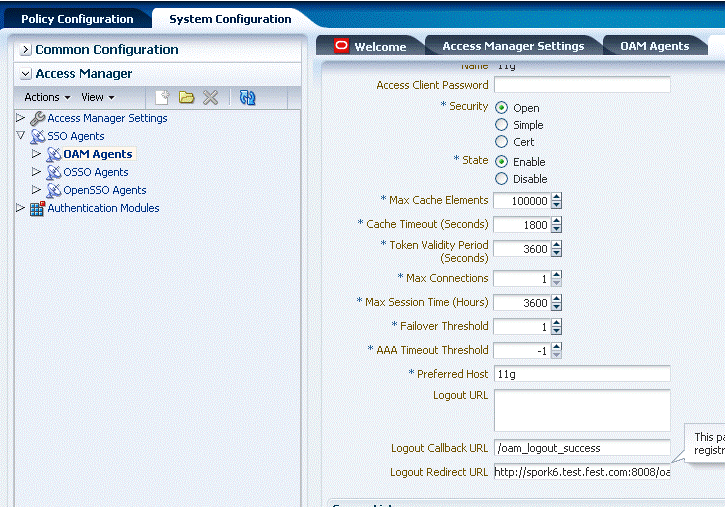
Make sure that the Logout Redirect URL parameter is set to the URL pointing to the host and port of
OHS-2, as shown in the following example:http://OHS-2_host:OHS-2_port/oam/server/logout
In this URL,
OHS-2_hostis the host on whichOHS-2is running.OHS-portis the port ofOHS-2.To do this, complete the following steps:
-
-
Log in to the Oracle Access Management 11.1.2 console using the following URL:
http://host:port/oamconsole
-
Go to the System Configuration tab.
-
Click Access Manager, and then click SSO Agents.
-
Double-click OAM Agents.
-
Search for the WebGate for which profile needs to be modified, by typing the WebGate ID in the Search panel to the right of the console window. Click the pencil icon to edit the profile.
-
Change the value of the parameter Logout Redirect URL, and click Apply.
Figure 17-8 shows the WebGate profile where you must specify the Logout Redirect URL.
Figure 17-8 WebGate Logout Redirect URL Configuration
Description of "Figure 17-8 WebGate Logout Redirect URL Configuration"
-
-
Use the following URL to initiate and verify logout from the resource WebGate (
WebGate 10g-1):http://OHS-1_host:OHS-1_port/logout.html
In this URL,
OHS-1_hostis the host on whichOHS-1is running.OHS-1_portis the port ofOHS-1.As this URL is directed to
logout.html,WebGate 10g-1clears the SSO cookie, and redirects to the Logout Redirect URL that you specified in step-1. Since the host and port ofOHS-2is used for the Logout Redirect URL, this request comes toWebGate 10g-2which is deployed onOHS-2. The logout URL forWebGate 10g-2is /oam/server/logout, and theWebGate 10g-2clears SSO cookie, and forwards the request to the Access Manager 11.1.2 Server. The Access Manager 11.1.2 Server finally clears all the sessions. -
Use the following URL to initiate and verify logout from the authentication WebGate (
WebGate 10g-2):http://OHS-2_host:OHS-2_port/oam/server/logout
In this URL,
OHS-2_hostis the host on whichOHS-2is running.OHS-2_portis the port ofOHS-2.As the logout URL for
WebGate 10g-2is /oam/server/logout, WebGate 10g-2 clears the SSO cookie, and forwards the request to the Access Manager 11.1.2 server. Access Manager 11.1.2 Server now clears the session, and calls the Logout Callback URL ofWebGate 10g-1. This makes theWebGate 10g-1to clear its own SSO cookie.
If the resource WebGate (WebGate 10g-1) is a 10g WebGate:
-
Modify the
logout.htmlfile which is generated when you registerWebGate 10g-1with the Access Manager 11.1.2 Server. Set the variableSERVER_LOGOUTURLin thelogout.htmlfile to the logout URL, which points to the host and port ofOHS-2as shown in the following example:var SERVER_LOGOUTURL="http://OHS-2_host:OHS-2_port/oam/server/logout
In this URL,
OHS-2_hostis the host on whichOHS-2is running.OHS-2_portis the port ofOHS-2. -
Use the following URL to initiate and verify logout from the resource WebGate (
WebGate 10g-1):http://OHS-1_host:OHS-1_port/logout.html
In this URL,
OHS-1_hostis the host on whichOHS-1is running.OHS-1_portis the port ofOHS-1.This clears the SSO cookie at
WebGate 10g-1, andWebGate 10g-1redirects to the Logout Redirect URL, which, in turn, directs toOHS-2because the Logout Redirect URL points to the host and port ofOHS-2. The request comes to WebGate 10g-2 which is deployed onOHS-2. The logout URL forWebGate 10g-2is /oam/server/logout. Therefore,WebGate 10g-2clears the SSO cookie, and forwards the request to the Access Manager 11.1.2 server. The Access Manager 11.1.2 server finally clears all the sessions. -
To initiate logout from the authentication WebGate (
WebGate 10g-2), add theend_urlparameter pointing to the full logout URL of the resource WebGate (WebGate 10g-1) as a query string to the logout URL, as shown in the following example:http://OHS-2_host:OHS-2_port/oam/server/logout?end_url=http://OHS-1_host:OHS-1_port/logout.html
In this URL,
OHS-2_hostis the host on whichOHS-2is running.OHS-2 portis the port ofOHS-2.OHS-1_hostis the host on whichOHS-1is running.OHS-1_portis the port ofOHS-1.This clears the SSO cookie at the authentication WebGate (
WebGate 10g-2), andWebGate 10g-2forwards the request to the Access Manager 11.1.2 Server. The Access Manager 11.1.2 Server now clears the session, and redirects it to the local logout URL of the resource WebGate (WebGate 10g-1) as we have specified theend_urlparameter. The resource WebGate (WebGate 10g-1) clears its own SSO cookie.
-
-
Optional: If you wish to allow users to access the logout URL, configure a policy in Oracle Access Manager 10g. For information about creating an Oracle Access Manager 10g policy, see "Protecting Resources with Policy Domains" in the Oracle Access Manager Access Administration Guide for release 10g (10.1.4.3).
17.13 Configuring Session Management Settings
When a user accesses a resource on the resource WebGate (WebGate 10g-1), a separate session is established with the Access Manager 11.1.2 server, after the Oracle Access Manager 10g Server authenticates the user. On session timeout or idle session timeout for the session with the Access Manager 11.1.2 Server, the user is redirected to the authentication WebGate (WebGate 10g-2). On WebGate 10g-2, the user is prompted for re-authentication on session timeout or the idle session timeout of the Oracle Access Manager 10g Server session.
As a result, session timeouts are derived from the 10g WebGate configured with 10g server (10g-2).
For 10g or 11g WebGate (WebGate 10g-1) that is configured with Access Manager 11.1.2 server, the parameters that affect the session management are Session Lifetime and Idle Timeout. To view or edit these parameters, do the following:
-
Log in to the Oracle Access Management 11.1.2 console using the following URL:
http://host:port/oamconsole
-
Go to the System Configuration tab, and click Common Configuration.
-
Select Common Settings.
For 10g WebGate (WebGate 10g-2) that is configured with Oracle Access Manager 10g server, the parameters that affect session management are Maximum user session time and Idle Session Time, which are part of the WebGate profile. You can change the values of these parameters by modifying the profile of WebGate 10g-2. For more information, see "Modifying an AccessGate" in the Oracle Access Manager Access Administration Guide for release 10g (10.1.4.3).
You must ensure that the sessions of both the WebGates are synchronized. For this, make sure that the values specified for the parameters Maximum user session time and Idle Session Time of WebGate 10g-2 are equal to or less than the values specified for the corresponding parameters of WebGate 10g-1: Session Lifetime and Idle Timeout.
Note:
For more information about session management of the Access Manager 11.1.2 Server, see "Managing Sessions" in the Oracle Fusion Middleware Administrator's Guide for Oracle Access Management.
17.14 Verifying the Configuration
You must verify the configuration by doing the following:
-
After you access the protected resource on
WebGate 10g-1, observe the HTTP header and verify that it redirects toWebGate 10g-2, that is, the host and port ofOHS-2. If the redirection occurs, you are prompted to provide credentials for authentication according to the authentication scheme used to protect /oam/server/obrareq.cgi. -
Verify that the resource that you requested in step-1 is displayed in the browser. Also, verify whether the SSO token is set for the configured domain at
WebGate 10g-1andWebGate 10g-2. -
Initiate logout from the same browser, and verify whether the SSO cookies are unset or set to
loggedoutat both the WebGates.
