5 Integrating Oracle Internet Directory with Access Manager
This chapter describes post-installation enablement of a centralized LDAP store for use with Oracle Access Management Access Manager. Oracle Internet Directory is featured in this chapter. Tasks are the same regardless of your chosen LDAP provider.
This chapter provides the following sections:
See Also:
Oracle Fusion Middleware Securing Oracle WebLogic Server
5.1 Introduction
Oracle Access Management Access Manager (Access Manager ) addresses each user population and LDAP directory store as an identity domain. Each identity domain maps to a configured LDAP User Identity Store that is registered with Access Manager. Multiple LDAP stores can be used with each one relying on a different supported LDAP provider.
During initial WebLogic Server domain configuration, the Embedded LDAP is configured as the one and only User Identity Store for Access Manager. Within the Embedded LDAP, the Administrators group is created with weblogic seeded as the default Administrator.
Note:
The Embedded LDAP performs best with fewer than 10,000 users. With more users, consider a separate enterprise LDAP server. In a highly available configuration, Oracle recommends that an external LDAP is used as the User Identity Store.
Access Manager requires a System Store and a Default Store. During initial WebLogic domain configuration, the Embedded LDAP store is configured as the one and only User Identity Store that is designated as both the System Store and the Default Store:
-
System Store: Only a single User Identity Store can (and must) be designated as the System Store. This is used to authenticate Administrators signing in to use the Oracle Access Management Console, remote registration tools, and custom administrative commands in WLST.
Note:
Once a remote User Store is designated as the System Store, you must change the
OAMAdminConsoleSchemeto use an LDAP Authentication Module that references the same System Store. -
Default Store: As the name implies, the LDAP store designated as the Default Store is the automatic choice for LDAP Authentication Methods unless you configure a different store.
Note:
Oracle Security Token Service uses only the designated Default Store. When adding User constraints to a Token Issuance Policy, for instance, the identity store from which the users are to be chosen must be Default Store.
After registering a User Identity Store with Access Manager, administrators can reference the store in one or more authentication plug-ins or modules that form the basis for Access Manager Authentication Schemes. When you register a partner (either using the Oracle Access Management Console or the remote registration tool), an application domain can be created and seeded with a policy that uses the default Authentication Scheme. When a user attempts to access an Access Manager-protected resource, she is authenticated against the store designated by the authentication plug-in or module.
5.2 Prerequisites
Before starting tasks in this chapter, be sure to get familiar with your installed LDAP directory server. The focus in this chapter is Oracle Internet Directory; however, the same tasks apply for any supported LDAP operating with Access Manager:
To prepare to integrate an LDAP store for Access Manager
-
Install the desired LDAP Directory Server (Oracle Internet Directory, in this example), as described in Oracle Fusion Middleware Administrator's Guide for Oracle Internet Directory.
-
Install and set up Access Manager with the desired LDAP directory, as described in Oracle Fusion Middleware Installation Guide for Oracle Identity and Access Management (see also "Configuring Oracle Internet Directory").
-
Extend the LDAP directory schema for Access Manager, as described in Oracle Fusion Middleware Installation Guide for Oracle Identity and Access Management.
-
Create Users and Groups in the LDAP directory, as described in Oracle Fusion Middleware Installation Guide for Oracle Identity and Access Management.
-
Proceed to "Registering Oracle Internet Directory With Access Manager".
5.3 Registering Oracle Internet Directory With Access Manager
This section describes post-installation registration of a supported LDAP user identity store to provide connectivity with OAM Servers. See the following topics:
5.3.1 About the LDAP Store Registration Page
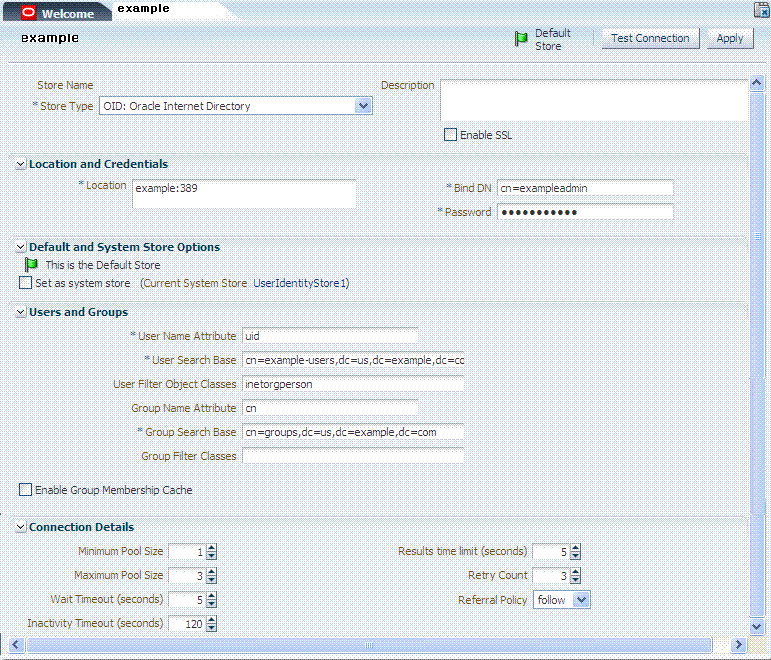
In this procedure, you register Oracle Internet Directory with Access Manager. The steps are the same regardless of the supported LDAP you are registering. Your completed registration page will look something like Figure 5-1.
See Also:
Oracle Fusion Middleware Administrator's Guide for Oracle Access Managementfor full details of each element.
Figure 5-1 Completed Registration for the Designated Default Store

Description of "Figure 5-1 Completed Registration for the Designated Default Store"
5.3.2 Registering a User Identity Store with Access Manager
The user identity store must be installed and running, as described in Prerequisites
To register Oracle Internet Directory with Access Manager
-
Go to the Oracle Access Management Console and log in as an administrator. For example:
https://examplehost:port/oamconsole/ -
In Oracle Access Management Console, open the User Identity Stores node:
System Configuration tab
Common Configuration section
Data Source node
-
Click the User Identity Stores node, then click the Create (+) button in the tool bar.
-
In the Create: user Identity Store page, enter or select appropriate values for your LDAP store and deployment, then click Apply. For example:
Store Name: example
Store Type: OID Oracle Internet Directory
Enable SSL:
Location: example:389
Bind DN cn=exampleadmin
Password ********
Users Name Attribute uid
User Search Base cn=example-users,dc=us,dc=example,dc=com
User Filter Object Classes initorgperson
Group Name Attribute
Group Search Base cn=groups,dc=us,dc=example,dc=com
Group Filter Object Classes
Enable Group Cache
Group Cache Maximum Size (Mb) 0
Group Cache Time to Live (Seconds) 0
Minimum Pool Size 1
Results time limit (seconds) 5
Maximum Pool Size 0
Retry Count 3
Wait Timeout (seconds) 5
Referral Policy follow
Inactivity Timeout (seconds) 120 -
Click Apply to submit the registration.
-
Test Connection: Click the Test Connection button to confirm connectivity, then close the Confirmation window.
-
Close this page.
-
Proceed to "Designating the System Store, Administrators, or the Default Store".
5.3.3 Designating the System Store, Administrators, or the Default Store
When you open a User Identity Store registration page, you can select Default or System Store options and define Administrator users and roles. By default, the Access Manager Administrators role is the same as the WebLogic Administrators role (user weblogic). This can be changed if your enterprise requires independent sets of Administrators.
All Administrator roles, users, and groups must be stored in the LDAP store that is designated as the System Store with Access Manager. If the System Store designation changes, appropriate Administrator roles must be added to the new System Store.
Note:
Administrator login works only when the LDAP Authentication Module used by the OAMAdminConsoleScheme used by the IAMSuiteAgent uses the LDAP store that is designated as the System Store.
Registering a User Identity Store with Access Manager.
The following procedure presumes that Oracle Internet Directory will be set as both the System Store and Default Store. You environment will be different. Perform only steps that apply to you. Skip steps that do not apply to your deployment.
To designate a System Store, Administrators, or Default Store
-
From the Oracle Access Management Console, open the DesiredStore registration page:
System Configuration tab
Common Configuration section
Data Source node
User Identity Stores node
DesiredStore (example in this case) -
Set the System Store: Administrator roles and credentials must reside in this store.
-
In the registration page, Default and System Store Options section, check the box beside Set as system store (for domain wide authentication and authorization operations).
-
Click Apply, close the Confirmation window.
-
Authentication Module: Later you will be instructed to set the
LDAPAuthentication Module used byOAMAdminConsoleSchemeto use this System Store:"Configuring Authentication Between Access Manager and Your User Identity Store".
-
-
Add Administrator User Roles (System Store):
-
In the LDAP store to be designated as the System Store, add Administrator roles, users, and groups using your vendor documentation as a guide.
-
From the Oracle Access Management Console, open the registration page for the DesiredStore under Data Source, User Identity Stores node.
-
Click the Add (+) button in the Access System Administrators table to display the Add System Administrator Roles dialog box.
-
From the Type list, select User and click the Search button.
-
In the results table, click your DesiredUser and click the Add Selected button.
-
Repeat as need to add more Administrator User roles.
-
Click Apply to submit user roles.
-
-
Add Administrator Group Roles (System Store):Ensure that your Administrators group is available in the group search base.
-
From the Oracle Access Management Console, open the registration page for the DesiredStore under Data Source, User Identity Stores node.
-
Click the Add (+) button in the Access System Administrators table to display the Add System Administrator Roles dialog box.
-
From the Type list, select Group and click the Search button.
-
In the results list, click your DesiredGroup and click the Add Selected button.
-
Repeat as need to add more Administrator Group roles.
-
Click Apply to submit Group roles.
-
-
Test the New Role: Close the browser window, then re-open it.
-
Sign out of the Oracle Access Management Console and close the browser window.
-
Start up the Oracle Access Management Console and attempt to log in using the previous Administrator role to confirm that this attempt fails.
-
Log in using the new Administrator role to confirm that this attempt is successful.
Login Failure: See "Administrator Lockout" in the Troubleshooting section of the Oracle Fusion Middleware Administrator's Guide for Oracle Access Management.
-
-
Set Default Store (for migration only, when patching): The
LDAPAuthentication Module used byOAMAdminConsoleSchemeshould not point to this store unless it is also designated as the System Store.-
From the Oracle Access Management Console, open the DesiredStore registration page.
-
Check the box beside Set as default store.
-
Click Apply, close the Confirmation window.
-
-
Proceed to "Setting Up Authentication Providers with WebLogic Server".
5.4 Setting Up Authentication Providers with WebLogic Server
You perform this step to create an authenticator for your LDAP provider to avoid multiple login pages when accessing the Oracle Access Management Console.
Whether you authenticate through Oracle Access Management Console or directly through the WebLogic Server Administration Console, confirm that all authentication providers are set to SUFFICIENT for single sign-on:
WebLogic Provider
IAMSuiteAgent
OracleInternetDirectoryAuthenticator
DefaultIdentityAsserter
Note:
Setting any provider to REQUIRED means re-authenticating rather than reaching both Access Manager and WebLogic Server with a single sign-on.
Registering Oracle Internet Directory With Access Manager
To configure your LDAP provider with WebLogic Server
-
Log in to the WebLogic Server Administration Console as usual. For example:
http://AdminServerHost:7001/console -
Add Your LDAP Authenticator:
-
Click Security Realms, myrealm, then click Providers.
-
Click New, enter a name, and select a type. For example:
Name:
OID AuthenticatorType: OracleInternetDirectoryAuthenticator
OK
-
In the Authentication Providers table, click the newly added authenticator.
-
On the Settings page, click the Common tab, set the Control Flag to SUFFICIENT, then click Save.
-
Click the Provider Specific tab, then specify the following values for your deployment:
Host: LDAP host. For example:
examplePort: LDAP host listening port.
3060Principal: LDAP administrative user. For example:
cn=*********Credential: LDAP administrative user password.
********User Base DN: Same search base as the LDAP user.
All Users Filter: For example:
(&(uid=*)(objectclass=person))User Name Attribute: Set as the default attribute for username in the LDAP directory. For example:
uidGroup Base DN: The group searchbase (same as User Base DN)
Note:
Do not set the All Groups filter; the default works fine as is.
Save.
-
-
Set DefaultIdentityAsserter:
-
From Security Realms, myrealm, Providers, click Authentication, click DefaultIdentityAsserter to see the configuration page.
-
Click the Common tab and set the Control Flag to SUFFICIENT.
-
Save.
-
-
Reorder Providers:
-
On the Summary page where providers are listed, click the Reorder button
-
On the Reorder Authentication Providers page, select a provider name and use the arrows beside the list to order the providers as follows:
WebLogic Provider
IAMSuiteAgent
OracleInternetDirectoryAuthenticator
DefaultIdentityAsserter -
Click OK to save your changes
-
-
Activate Changes: In the Change Center, click Activate Changes.
-
Reboot Oracle WebLogic Server.
-
Proceed with "Configuring Authentication Between Access Manager and Your User Identity Store".
5.5 Configuring Authentication Between Access Manager and Your User Identity Store
External LDAP repositories can provide user, role, and group membership information to be used:
-
When evaluating policies during authentication
-
When evaluating identities for authorization conditions in a policy
-
When using LDAP to search for identities for conditions in an authorization policy
This section outlines the authentication configuration required to use your new user identity store with Access Manager. While Oracle Internet Directory is featured, this task applies to all supported LDAP repositories. See following topics:
-
About Access Manager Authentication Modules, Plug-ins, and Schemes
-
Defining Authentication in Access Manager for Your User Identity Store
-
Managing Access Manager Policies that Rely on Your LDAP Store
5.5.1 About Access Manager Authentication Modules, Plug-ins, and Schemes
Access to a resource or group of resources can be governed by a single authentication process. At the core is an Authentication Scheme that defines the Challenge Method and the Authentication Method or plug-in required to authenticate the user.
The Basic or Form Challenge Methods require an Authentication Method that points to a specific LDAP store. For instance, OAMAdminConsoleScheme relies on the LDAP module for Administrator Roles and credentials. If you define a new System Store, be sure to change the LDAP module to point to it.
Note:
Correct any Authentication Methods that use the System Store to ensure these point to a new System Store.
Table 5-1 identifies the pre-configured Authentication Schemes that use the LDAP Challenge Method. For more information, see Oracle Fusion Middleware Administrator's Guide for Oracle Access Management.
Table 5-1 Form and Basic Authentication Schemes Using LDAP Authentication Module
5.5.2 Defining Authentication in Access Manager for Your User Identity Store
The following procedure guides as you set up an LDAP Authentication Method that points to your registered User Identity Store and an Authentication Scheme that uses this LDAP module for Form or Basic authentication. OAMAdminConsoleScheme is used in this example on the presumption that you designated your new LDAP store as the System Store. Your environment might be different.
Setting Up Authentication Providers with WebLogic Server
Ensure that the designated User Identity Store contains any user credentials required for authentication.
To use your identity store for authentication with Access Manager
-
Authentication Modules and Plug-ins: Open the following in Oracle Access Management Console.
System Configuration tab
Access Manager Settings section
Authentication Modules node
-
LDAP Modules: Open LDAP Authentication module, select your User Identity Store, and click Apply.

-
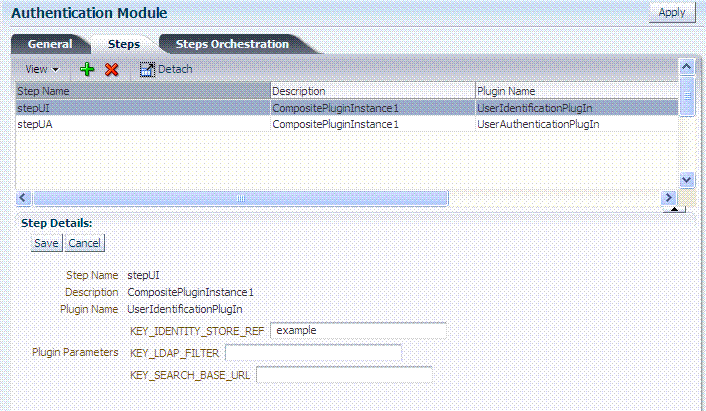
Custom Authentication Modules: In
LDAPPluginSteps (stepUI,UserIdentificationPlugIn), specify your KEY_IDENTITY_STORE_REF, and click Apply. For example:
System Configuration tab
Access Manager section
Authentication Modules
Custom Authentication module
LDAPPlugin
Steps tab
stepUIUserIdentificationPlugIn

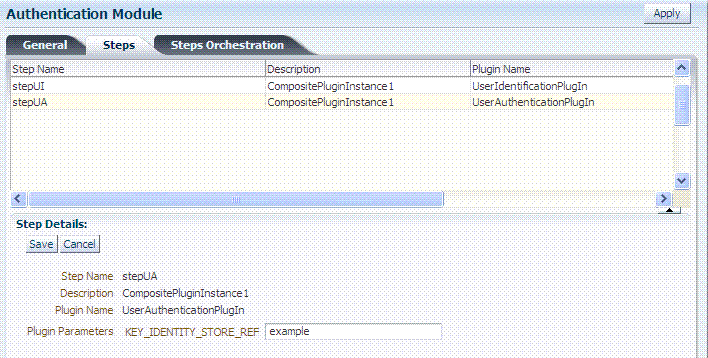
Repeat this step for the stepUA
UserAuthenticationPlugInplug-in, and Apply your changes, as shown here:
-
-
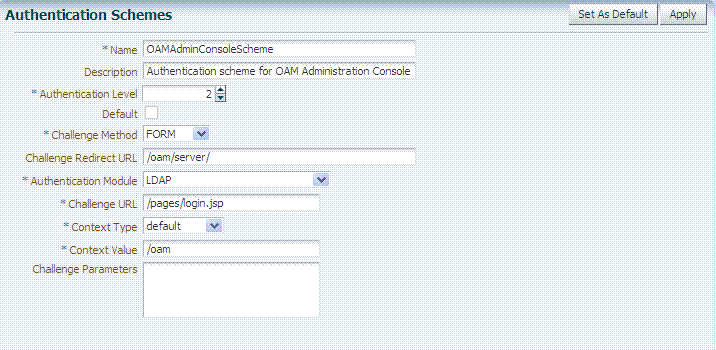
Authentication Scheme Challenge Methods: Form and Basic Challenge Methods require a reference to the LDAP Authentication Module or Plug-in that points to your User Identity Store. For example:
Oracle Access Management Console
Policy Configuration tab
Shared Components node
Authentication Schemes node
DesiredScheme (OAMAdminConsoleSchemeor any Form or Basic scheme)
-
Confirm that the Authentication Module references the LDAP module or plug-in that points to your Identity Store.
-
Click Apply to submit the changes (or close the page without applying changes).
-
Dismiss the Confirmation window.
-
-
Proceed to "Managing Access Manager Policies that Rely on Your LDAP Store".
5.5.3 Managing Access Manager Policies that Rely on Your LDAP Store
Access Manager policies protect specific resources. The policies and resources are organized in an Application Domain. This section describes how to configure authentication policies to use the Authentication Scheme that points to your User Identity Store.
When you register a partner (either using the Oracle Access Management Console or the remote registration tool) using the Auto Create Policies option, an application domain is created and seeded with policies. The seeded Authentication Policy uses the Authentication Scheme that is designated as the Default. Alternatively, you can create an application domain and policies without registering a partner.
See Also:
Oracle Fusion Middleware Administrator's Guide for Oracle Access Management for more information.
Defining Authentication in Access Manager for Your User Identity Store
To create an application domain and policies that use LDAP authentication
-
From the Oracle Access Management Console, open:
Oracle Access Management Console
Policy Configuration tab
Application Domains node -
Locate and open the desired Application Domain (or click the Create (+) button, enter a unique name, and save it).
-
Resource Definitions: Add a definition as described in Oracle Fusion Middleware Administrator's Guide for Oracle Access Management.
-
Authentication Policies: Open (or Create) the desired Authentication Policy. For example:
-
On the Policy page: Select the scheme that references the LDAP module or plug-in that points to your User Identity Store.
Authentication Scheme: LDAP (or another LDAP module or plug-in)
-
Click Apply, close the Confirmation window.
-
Resources for Authentication Policy:
Click the Resources tab on the Authentication Policy page.
Click the Add button on the tab.
Choose a URL from the list.
Repeat these steps as needed to add more resources. -
Complete the Authentication Policy with any desired Responses.
-
-
Authorization Policy Conditions: Create or modify an Authorization Policy for specific resources and include with any Responses, Conditions, and Rules as described in the Oracle Fusion Middleware Administrator's Guide for Oracle Access Management.
-
Token Issuance Policy Conditions: Choose the desired user identity store when setting Identity Conditions in Token Issuance Policies. See he Oracle Fusion Middleware Administrator's Guide for Oracle Access Management.
-
Proceed to "Validating Authentication and Access".
5.6 Validating Authentication and Access
The procedure here provides several methods for confirming that Agent registration and authentication and authorization policies are operational. The procedures are nearly identical for both OAM Agents and OSSO Agents (mod_osso). OSSO Agents use only the authentication policy, not the authorization policy.
-
Users and groups who are granted access must exist in the LDAP User Identity Store that is registered with Access Manager and designated in the Authentication Module or Plug-in used by the Authentication Scheme that is protecting the resource
-
Agents must be registered to operate with Access Manager. After registration, protected resources should be accessible with proper authentication without restarting the Administration or Managed Server.
-
Application domain, authentication policies, and authorization policies must be configured for specific resources.
To verify authentication and access
-
Using a Web browser, enter the URL for an application protected by the registered Agent to confirm that the login page appears (proving that the authentication redirect URL was specified appropriately). For example:
http://exampleWebserverHost.sample.com:8100/resource1.html -
Confirm that you are redirected to the login page.
-
On the Sign In page, enter a valid username and password when asked, and click Sign In.
-
Confirm that you are redirected to the resource and proceed as follows:
-
Success: If you authenticated successfully and were granted access to the resource; the configuration is working properly.
-
Failure: If you received an error during login or were denied access to the resource, check the following:
-
Authentication Failed: Sign in again using valid credentials.
-
Access to URL ... denied: This userID is not authorized to access this resource.
-
Resource not Available: Confirm that the resource is available.
-
Wrong Redirect URL: Verify the redirect URL in the Oracle Access Management Console.
-
-