2 Oracle Identity Self Service Interface
This chapter will help you familiarize with Oracle Identity Self Service. This will enable you to quickly find the information you need and complete the required tasks easily.
This chapter discusses the following topics:
2.1 Logging in to Oracle Identity Self Service
To log in to Oracle Identity Self Service:
-
Browse to the following URL by using a Web browser:
http://HOSTNAME:PORT/identity
In this URL,
HOSTNAMErepresents the name of the computer hosting the application server andPORTrefers to the port on which the server is listening.Note:
The application name, identity, is case-sensitive.
-
After the Identity Self Service login page is displayed, log in with your user name and password.
See Also:
"Accessing Oracle Identity Self Service" for detailed information on logging in
2.2 Overview of the Oracle Identity Self Service Interface
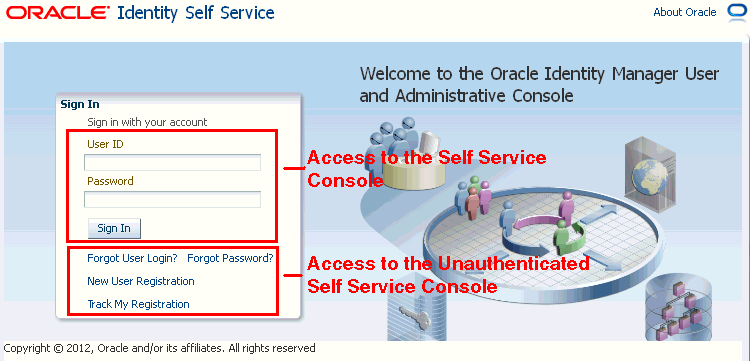
Oracle Identity Self Service provides user self-service and delegated identity administration features that serve most of the users of Oracle Identity Manager. This console provides access to the self service console and unauthenticated self service console. Figure 2-1 shows these two consoles.
Figure 2-1 Login Page of Oracle Identity Self Service

Description of "Figure 2-1 Login Page of Oracle Identity Self Service"
Identity Self Service supports access to unauthenticated self-service tasks in the Unauthenticated Self Service Console. Users who have not authenticated into, or not logged in to Identity Self Service can access the Unauthenticated Self Service Console by clicking the Forgot User Login?, Forgot Password?, New User Registration, or Track My Information links. This console enables an unauthenticated user to retrieve a forgotten user login ID or password, register to the Oracle Identity Manager environment, and track the registration. See "Registering to Self Service" and "Accessing Oracle Identity Self Service" chapters for more information.
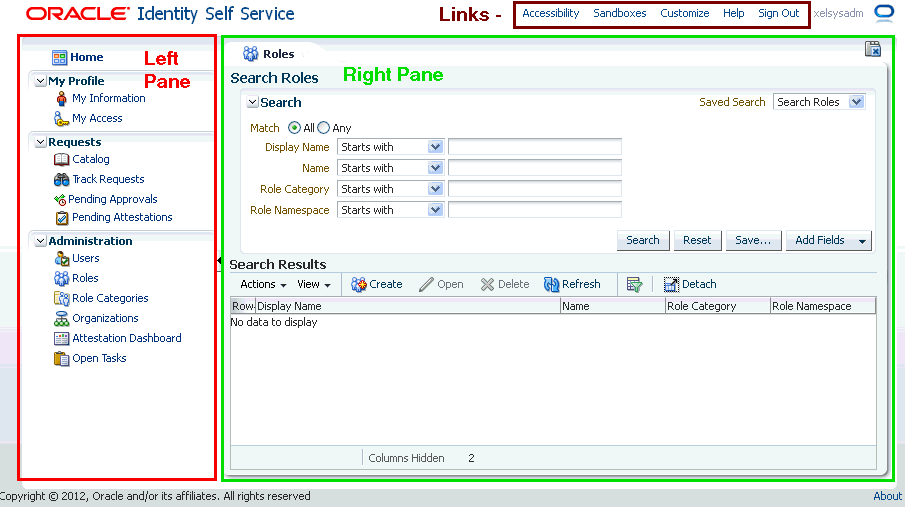
Access to authenticated self-service tasks is available by logging in to Identity Self Service. The interface of Identity Self Service is composed of the following areas:
Figure 2-2 shows a sample page and the layout of Identity Self Service.
Figure 2-2 Layout of Oracle Identity Self Service

Description of "Figure 2-2 Layout of Oracle Identity Self Service"
2.2.1 Links
This area consists of the following links in the upper-right-hand corner of the interface:
2.2.1.1 Accessibility
Identity Self Service has been designed to adhere to the standards set in Section 508 of the Rehabilitation Act and the World Wide Web Consortium's Web Content Accessibility Guidelines 2.0 AA (WCAG 2.0 'AA").
When you click the Accessibility link in the upper right corner of the page, the Accessibility dialog box is displayed. You can select one of the following options from the Accessibility dialog box:
-
I use a screen reader
Select this option if you want to use a screen reader.
-
I use high contrast colors
Select this option to use the high-contract color scheme that you have specified in your operating system, rather than using the default color scheme specified in Identity Self Service.
-
I use large fonts
Select this option if you want to change the font size for easy viewing and readability.
2.2.1.2 Sandboxes
A sandbox represents an area where metadata objects can be modified without affecting their mainline usage. In other words, a sandbox is a temporary storage area to save a group of runtime page customizations before they are either saved and published to other users, or discarded.
In the Manage Sandboxes page, you can create, delete, activate, deactivate, and publish sandboxes. See the "Managing Sandboxes" section in Oracle Fusion Middleware Developer's Guide for Oracle Identity Manager for detailed information.
2.2.1.3 Help
Identity Self Service includes a help system. Clicking the Help link opens the help system in a new window. In addition, Identity Self Service provides context-sensitive help. For example, if you are in the Catalog page and click the Help link, then help content related to catalog is displayed.
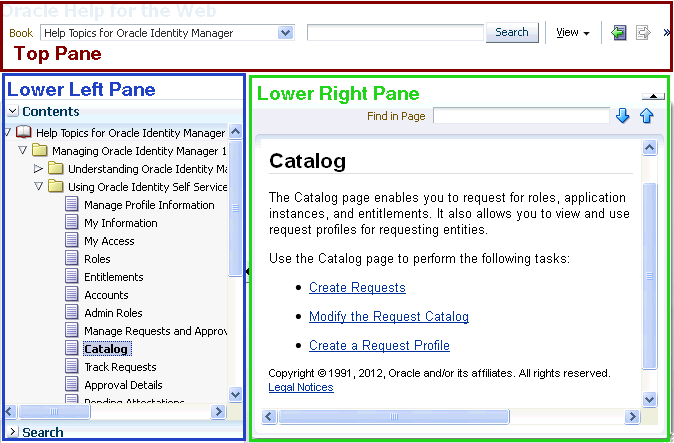
Figure 2-3 shows a sample page and default layout of the help interface.
The default view of the help system consists of three panes:
2.2.1.3.1 Top Pane
The top pane consists of the following:
-
Book drop-down list: From this drop-down list you can select one of the following values:
-
Help Topics for Oracle Identity Manager: Select this value to open all help topics for Oracle Identity Manager.
-
Administrator's Guide for Oracle Identity Manager: Select this value to open the online help version of Oracle Fusion Middleware Administrator's Guide for Oracle Identity Manager.
-
Developer's Guide for Oracle Identity Manager: Select this value to open the online help version of Oracle Fusion Middleware Developer's Guide for Oracle Identity Manager.
-
User's Guide for Oracle Identity Manager: Select this value to open the online help version of Oracle Fusion Middleware User's Guide for Oracle Identity Manager.
-
Custom Help Topics for Oracle Identity Manager: Select this value to open any custom help topics.
-
-
Search field: Specify any word or term to search for in the help system.
-
View: From the View menu, you can select any one of the following options:
-
Maximize Reading Pane: Collapses the lower left pane to maximize the reading pane, which is the lower right pane.
-
Restore Default Window Layout: Restore the current layout of the help system to the default layout.
-
Contents: Restores the lower left pane to display the Contents region along with the help topics, if it is not already being displayed.
-
Search: Displays the Search region in the lower left pane. In the Search region, you can search for help topic and the search results are displayed in a tabular format. Here are a few guidelines on performing a search:
-
Search criterion specified in the Search field can be made case sensitive by selecting the Case Sensitive option.
-
To define your search precisely, you can specify the boolean operators & (for AND), |(for OR), ! (for NOT) in your search criterion, select the Boolean expression option, and then click Search.
-
To search for help topics containing all words specified in the search criterion, select All words.
-
To search for help topics containing any word specified in the search criterion, select Any words.
-
-
Show permanent link for this topic page: If you want to save the link to a help topic for future reference, then from the View menu, select Show permanent link for this topic page. In the dialog box that is displayed, right-click the link to the help topic and select one of the following options:
-
Bookmark This Link: Adds the help topic URL to the browser bookmarks.
-
Copy Link Location: Copies the help topic URL to the clipboard.
-
-
-
Toolbar: The help system contains a toolbar that provides action buttons for certain tasks. You can view the name of the button by moving the mouse pointer over the button. The following buttons are available:
-
Go back one page: Takes you back to the page containing the previous help topic.
-
Go forward one page: This icon is enabled only if you have clicked the Go back one page icon. Clicking the Go forward one page icon takes you to the next page in the sequence of topics you visited.
-
Print this topic page: Prints the current help topic.
-
Email this topic page: Drafts an email with a link to the help topic currently displayed in the help system. This draft can be sent to the desired email recipient.
-
Link to this topic page: Saves the link to a help topic for future reference by right-clicking the link to the help topic in the dialog box that is displayed, and then selecting one of the following options:
-
Bookmark This Link: Adds the help topic URL to the browser bookmarks.
-
Copy Link Location: Copies the help topic URL to the clipboard.
-
-
2.2.1.3.2 Lower Left Pane
The left pane contains the Contents and Search regions. By default, the Contents region is expanded. The Contents region displays links to help topics depending on the option you select from the Book drop-down list in the top pane. You can click the arrow icon beside Contents to expand or collapse the Contents region.
2.2.1.3.3 Lower Right Pane
The lower right pane displays any help topic that you search for or open from the Contents and Search regions in the lower left pane. This pane is also known as the reading pane.
2.2.1.4 Sign Out
Click the Sign Out link to log out of Identity Self Service.
2.2.2 Left and Right Panes
Every page in Identity Self Service is divided into two panes. The left pane consists of sections that contain links to regions using which a variety of tasks can be accomplished. The left pane is the primary navigation tool and is displayed on all web pages of Identity Self Service. Depending on the link that you click in the left pane, corresponding details are displayed in the right pane.
The left pane consists of these regions:
2.2.2.1 Home
The Home page provides you a snapshot of the various functions in Identity Self Service. By default, this page contains the Pending Requests, Pending Approvals, My Accounts, Direct Reports, Getting Started Help Topics, and Change Password containers. You can personalize the Home page by rearranging, hiding, removing, or modifying containers.
See "Personalizing Self Service" for more information.
2.2.2.2 My Profile
The My Profile region contains the following:
-
My Information
Use this page to view and modify personal details of your profile such as changing passwords, setting challenge questions and response, and so on.
See "Managing Profile Information" for more information.
-
My Access
This page displays entities such as Roles, Entitlements, Accounts, and Admin Roles, to which you have access. In this section, you can request for, remove, or modify entities.
See "Managing Access" for more information.
2.2.2.3 Requests
The Request region contains the following:
-
Catalog
Use this page to search for, view, and request catalog items such as roles, entitlements, and application instances.
See "Using the Access Request Catalog" for more information.
-
Track Requests
Use this page to search for and track requests raised by you and requests raised for you. You can search for requests based on request ID, status, request type, requested date, beneficiary, and requester.
See "Tracking a Request" for more information.
-
Pending Approvals
Use this page to view and manage approval tasks that correspond to requests that are in the user or administrator's queue to be approved.
See "Managing Approval Tasks" for more information.
-
Pending Attestations
Use this page to view and manage attestation tasks that correspond to outstanding attestation process in the user or administrator's queue.
See "Managing Attestation Tasks" for more information.
2.2.2.4 Administration
The Administration region contains the following:
-
Users
Use this page to view and manage users. Some of the user management tasks that you can perform in this page include creating, modifying, deleting, enabling, and disabling users.
See "Managing Users" for more information.
-
Roles
Use this page to view and manage roles. Some of the role management tasks that you can perform in this page include creating, viewing, administering, and deleting roles.
See "Managing Roles" for more information.
-
Role Categories
Use this page to view and manage role categories. See "Creating and Managing Role Categories" for more information.
-
Organizations
Use this page to view and manage organizations. Some of the organization management tasks include creating, viewing, modifying, and deleting organizations.
See "Managing Organizations" for more information.
-
Attestation Dashboard
Use this page to view the state of attestation processes that are owned by any group of which you are a member.
See "Using the Attestation Dashboard" for more information.
-
Open Tasks
Use this page to view and manage provisioning tasks that correspond to tasks instantiated by requests, or pending manual provisioning tasks, or failed automatic provisioning tasks in the user or administrator's queue.
See "Managing Provisioning Tasks" for more information.
