 Understanding SEPA
 This chapter presents an overview of SEPA requirements and transactions and discusses how to:
Set up SEPA credit transfers.
Set up SEPA direct debits.
Set up SEPA payments for PeopleSoft Global Payroll.
Understanding SEPA The European Commission (EC), and the European Central Bank (ECB) working with the Eurosystem, created the Single Euro Payments Area (SEPA). The Eurosystem is supported by the European Payments Council (EPC), which is charged with bringing together the European payments industry. SEPA enables citizens, companies, and other economic actors to make and receive payments in euros (EUR) between and within national boundaries in Europe with the same basic conditions, rights, and obligations, regardless of their location.
Oracle's PeopleSoft applies SEPA rules and standards to these specific areas of functionality:
The enforcement of SEPA rules and standards that apply to the storage and use of BIC, which is assigned by the Society for Worldwide Interbank Financial Telecommunication (SWIFT) and same as Swift Code along with International Bank Identifier Number (IBAN) in the system.
The application of SEPA rules and standards to the initiation and processing of SEPA credit transfers used for single, bulk, and repetitive payments.
The application of SEPA rules and standards to the initiation and processing of SEPA direct debits.
 SEPA Glossary
|
Basic Bank Account Number (BBAN) |
The identifier used by financial institutions in individual countries as part of a National Account Numbering Scheme(s) which uniquely identifies an account of a customer at a financial institution. This is also known as the Domestic Bank Account Number. |
|
Bank Identifier Code (BIC) |
An 8 or 11 character ISO code assigned by the Society for Worldwide Interbank Financial Telecommunication (SWIFT), which is used to identify a financial institution in financial transactions. It is based on ISO 9362. Note. In Oracle's PeopleSoft applications, BIC is entered in the DFI ID qualifier field when the DFI qualifier value is set at 02. |
|
Creditor |
ISO definition: The party to which an amount of money is due. For example, the seller of goods or services or a collection agency. |
|
Creditor Agent |
ISO definition: The financial institution servicing an account for the creditor. |
|
Debtor |
ISO definition: Party that owes an amount of money to the (Ultimate) Creditor. For example, the debtor could be the party ordering the services or goods, shared service centers, the buyer of services or goods. |
|
Debtor Agent |
ISO definition: The financial institution servicing an account for the debtor. |
|
Direct Debit |
A request for payment of an amount to be collected from the debtor's bank account by an originator (the creditor). |
|
DFI Qualifier (depository financial institution qualifier) and DFI ID (depository financial institution identification) |
DFI qualifier indicates the format—the number of characters and numerics—that is used in the bank's DFI ID, which identifies a bank. If you use intermediary routings, this bank represents the final bank into which funds are transferred. Each type has a specific number of digits that you can enter:
|
|
Forwarding Agent |
ISO definition: The financial institution that receives the instruction from the initiating party and forwards it to the next agent in the payment chain for execution. The forwarding agent could be the same as debtor agent or it could be different, such as the debtor's bank or the concentration bank. |
|
Initiating Party |
ISO definition: The party initiating the payment. This can either be the debtor or the party that initiates the payment on behalf of the debtor. |
|
Intermediary Bank |
ISO definition: The agent between the debtor agent and creditor agent, such a correspondent bank. |
|
International Bank Identifier Number (IBAN) |
A bank account number that is assigned according to international ISO standards, and uniquely identifies a bank account in cross-border financial transactions between European and other international countries. |
|
International Standards Organization (ISO) |
A worldwide federation of National Standards Bodies. |
|
ISO 20022 (International Standards Organization 20022) |
A Universal Financial Industry message scheme (UNIFI) that was prepared by Technical Committee ISO TC68 Financial Services and defines various financial messages that are used by the global financial services community. SEPA messages are based on this standard. |
|
ISODateTime (International Standards Organization Date Time) |
The date and time within a particular calendar year represented by YYYY-MM-DDThh :mm :ss, which is based on ISO 8601. |
|
Mandate |
An authorization and expression of consent given by the debtor to the creditor, which enables the creditor to initiate collections by debiting the specified debtor's bank account and enables the debtor's bank to comply with these instructions in accordance with the SEPA Rulebook. |
|
Single Euro Payments Area (SEPA) |
Enables citizens, companies, and other economic actors to make and receive payments in euros (EUR) between and within national boundaries in Europe with the same basic conditions, rights, and obligations, regardless of their location. |
|
Society for Worldwide Interbank Financial Telecommunication (SWIFT) |
A cooperative owned by the financial services industry, which operates a financial messaging network through which financial services companies can exchange messages. |
|
Ultimate Creditor |
ISO definition: The ultimate party to which an amount of money is due. The ultimate creditor could be the same as creditor or it could be different, such as the seller. |
|
Ultimate Debtor |
ISO definition: The ultimate party that owes an amount of money to the (ultimate) creditor, such as the buyer of services or goods. |
SEPA BIC Requirements
SEPA usage rules require the use of BIC, which is assigned by SWIFT, and IBAN (International Bank Identifier Number) to identify the banks and bank accounts of the creditor and debtor in all euro cross-border payments. It is imperative that the IBAN and BIC codes are correct to avoid repair fees that the bank charges due to processing errors. In addition, the validation of the IBAN and BIC codes avoids delays in processing payments and collections due to the time-consuming correction of these errors. IBAN also makes it easier to validate foreign account numbers. The IBAN format is an internationally agreed upon standard that is defined in ISO 13616.
Depending on how the IBAN is formatted for a country, the IBAN can be manually entered or the system will display the code after a user enters the first two check digits of the code.
The BIC value is defined when you select 02 as the DFI Qualifier (Depository Financial Institution Qualifier), which is set up for SWIFT/BIC. Once you select 02 for the qualifier, you can enter the BIC code in the DFI ID field, which can be 8 or 11 characters, where positions 5 and 6 must be a valid two-character country code.
The DFI Qualifier and DFI ID fields and the IBAN fields appear on these PeopleSoft application pages:
Cash Management, Fees and Transfers, Enter Transfer Template, Destination page.
Note. The DFI Qualifier, DFI ID, and IBAN fields only appear for EFT transfer templates.
Cash Management, Fees and Transfers, EFT Request, Destination page.
Banking, Bank Accounts, Settlement Instructions, Beneficiary Bank page
Vendors, Vendor Information, Add/Update, Vendor, Location, click the Payables link to access the Payables Options page, open the Vendor Bank Account Options section.
Customers, Customer Information, MICR Information, Customer Bank page.
Employee Self-Service, Travel and Expenses, Review/Edit Profile, Bank Accounts page, click the Bank icon, Pay to Bank Accounts page; or Travel and Expenses, Manage Employee Information, Update Profile, Bank Accounts, click the Bank icon, Pay to Bank Accounts page.
eSettlements, Supplier Information, Review Supplier Details, Create a New Supplier, Locations, Add a New Location or Maintain Locations, and click the Update Bank Information link in the Payment Terms and Remitting Options group box on the Maintain Locations page.
See Understanding IBAN.
See Single Euro Payments Area (SEPA) Requires IBAN and Bank Identifier Code (BIC).
SEPA Credit Transfer and Direct Debit Initiation
To initiate a SEPA Credit Transfer or SEPA Direct Debit, PeopleSoft Financial Gateway delivers predefined payment layouts in the Layout Catalog.
Credit transfer initiation layouts for SEPA include these:
SEPA_CT (SEPA Credit Transfer, Pain.001.001.02)
SEPA_CT_03 (SEPA Credit Transfer V3, Pain.001.001.03; adheres to Rulebook 4.0)
Direct debit initiation layouts for SEPA include these:
SEPA_DD (SEPA Direct Debit, Pain.008.001.01)
SEPA_DD_02 (SEPA Direct Debit V2, Pain.008.001.02; adheres to Rulebook 4.0)
PeopleSoft Financial Gateway also delivers predefined ISO payment formats in the Layout Catalog. ISO 20022 layouts are generic layouts, which are used for credit transfers and direct debits that are not related to SEPA.
Generic credit transfer initiation layouts include these:
ISOV2 (ISO 20022 Credit Transfer V2, Pain.001.001.02)
ISO_CT_03 (ISO 20022 Credit Transfer V3, Pain.001.001.03)
Generic direct debit initiation layouts include these:
ISOV2_DD (ISO 20022 Direct Debit, Pain.008.001.01)
ISO_DD_02 (ISO 20022 Direct Debit, Pain.008.001.02)
For a complete list of delivered payment layouts, including SEPA, ISO, and miscellaneous formats:
See Understanding the Layout Catalog.
These SEPA layouts dispatch payments electronically as XML messages from PeopleSoft Financial Gateway using the Credit Transfer Initiation Message or the Customer Direct Debit Initiation Message. The PeopleSoft payment methods ACH (Automated Clearing House), WIR (Treasury Wire), and EFT (Electronic File Transfer) support the SEPA credit transfer layouts and the direct debit payment method supports the SEPA direct debit layouts.
To enable PeopleSoft Financial Gateway to perform SEPA credit transfers and direct debits, you must access the Bank Integration Layouts page and associate each layout with an existing bank. Once the layouts are set up for a selected bank, they can be used with any bank accounts associated with that bank. You must access one or more external bank accounts that you want to set up to perform SEPA credit transfers or direct debits and attach the layouts to the bank account.
For example, you might access the Collections page of a bank account associated with a French bank, select Direct Debit as the Payment Method, and select SEPA_DD as the payment layout. This is also where you indicate that you want to dispatch the direct debit transaction electronically using PeopleSoft Financial Gateway.
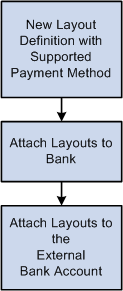
Layout Process Flow
SEPA Credit Transfer
SEPA schemes, rules, and standards enable the providers of payment services to offer credit transfer services throughout SEPA for single, bulk, and repetitive payments. The standards for the scheme facilitate payment initiation, processing, and reconciliation based on straight-through processing. The scheme permits the end-to-end carrying of remittance data on a structured and unstructured basis appropriate to the nature of payment.
The SEPA credit transfer scheme defines a common set of rules and processes for credit transfers denominated in the euro currency. The scheme defines a common service level and a time frame under which financial institutions participating in the scheme must, at a minimum, conduct SEPA credit transfers.
To enable a SEPA credit transfer to occur, PeopleSoft does this:
Predefines SEPA credit transfer layouts, which adhere to ISO 20022 credit transfer standards and are in compliance with SEPA rules.
Provides the functionality to initiate an input message with SEPA compliant information to PeopleSoft Financial Gateway.
Provides the functionality to accept the SEPA format for rejecting and returning a message and store the format in PeopleSoft Financial Gateway.
SEPA credit transfers begin with the initiation of SEPA credit transfer payments by the payment originator. To transfer the funds, the payment originator instructs the bank in which the originator holds a bank account to move the funds to the account of the beneficiary. The originator's bank then processes the SEPA credit transfer payment instruction according to the SEPA credit transfer scheme and transfers the funds using clearing and settlement mechanisms to the beneficiary's bank. The beneficiary's bank then credits the account of the beneficiary.
The initiation process of the funds transfer typically affects PeopleSoft Payables, because payments are most often triggered by the purchase of goods and services. However, this process may also be initiated from PeopleSoft Cash Management if funds are transferred between accounts or payments that are made to a Treasury counterparty or from a third-party application.
The XML message, which is sent by the payment originator to the bank, contains all of the relevant information related to the payment instruction. Based on SEPA, the bank and customer can agree on how to transfer payment instructions and in which format. However, the banks will typically follow the EPC recommendation.
![]()
SEPA Credit Transfer Message Structure
SEPA Direct Debit
The SEPA direct debit instrument is designed to act as a local collection instrument for SEPA regions that transcend national borders. SEPA implementation guidelines for direct debits are based on the adoption of the ISO 20022 or UNIFI standard. A SEPA direct debit pulls funds from the debtors bank account into the creditors bank account. The pull is based on a direct debit mandate provided by the debtor to the creditor.
A mandate is a form given by the debtor to the creditor that authorizes the creditor to initiate collections on a debt. The mandate allows a debit from the debtor's specified account and enables the debtor's bank to comply with the instructions in accordance with the SEPA Rulebook. The collections are separate transactions from the underlying contract on which they are based. The underlying contract is agreed on between the creditor and the debtor. PeopleSoft Financial Gateway enables the creditor to print the mandate form with a reference number assigned by the system.
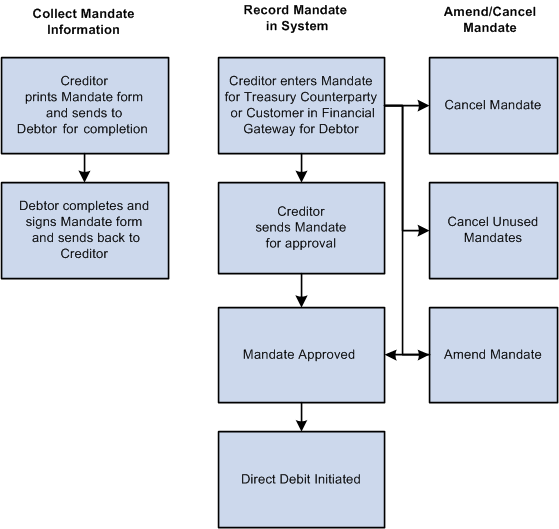
Mandate process flow
The debtor can be a Treasury counterparty or a customer. After the debtor completes and signs the mandate form, the debtor must return the completed mandate to the creditor. The creditor must enter the mandate information from the paper form in PeopleSoft Financial Gateway on the Direct Debit for Counterparties page if the debtor is a Treasury counterparty, or on the Direct Debit Mandate for Customers page if the debtor is a customer. The mandate must be signed by the debtor.
The debtor can amend the mandate form by informing the creditor of any necessary changes and state the reason for the amendment. The creditor selects a reason code on the amendment section of the form, which appears when the creditor makes the change and saves the change to the form in the system.
You can amend an approved mandate. Once you have amended the mandate, it must be approved again. Each mandate line must be approved. If you amend a mandate before it is approved, then two lines must be approved—the original line and the amended line.
You set up these pages to assist in performing SEPA direct debits:
Transfer Template page: Identify the SEPA Direct Debit layout where the payment method is Direct Debit, select an external account that supports direct debit, and fill in the mandate information.
EFT Transfer page: Select the SEPA Direct Debit Transfer Template, or you can identify payment method as Direct Debit and an external account that supports direct debit collection, and fill in the mandate information.
Treasury Counterparties page: View direct debit mandates and their status.
The initiating party sends the Customer Direct Debit Initiation message to the forwarding agent or creditor agent using PeopleSoft Financial Gateway. The message requests a single or bulk collection of funds from one or more of the debtor's accounts for a creditor. A prenotification of the collection must be issued fourteen days before initiating the direct debit.

SEPA Direct Debit Message Structure
SEPA direct debits can be initiated from PeopleSoft Receivables or by creating an EFT request in PeopleSoft Cash Management, which treats direct debits as collection items. Both products must identify the SEPA direct debit layout and euro (EUR) as the currency, and capture the BIC/IBAN and mandate information.
SEPA Payment Cancellations and Reversals
PeopleSoft predefines layouts in the system to handle cancellations and reversals for SEPA credit transfers and direct debits.
SEPA layouts:
SEPA_RVSL (Payment Reversal)
SEPA_RVS_2 (Payment Reversal, Pain 007.001.02)
ISO 20022 layouts: (generic)
ISO_CNCL (ISO Payment Cancellation Layout)
ISO_RVSL (ISO Payment Reversal)
See Understanding the Layout Catalog.
These layouts are used to cancel or reverse payment messages electronically as XML messages from PeopleSoft Financial Gateway.
These layout properties will be attached to the existing SEPA layouts to help identify the layouts to use for cancellation or reversal messages electronically as XML messages from PeopleSoft Financial Gateway.
In PeopleSoft Payables, you can cancel a SEPA cash transfer payment and reverse the cancellation. However, in PeopleSoft Receivables, you can reverse a SEPA direct debit, but you cannot cancel it.
Users can define their own reason codes and reasons for payment cancellation and reversals.
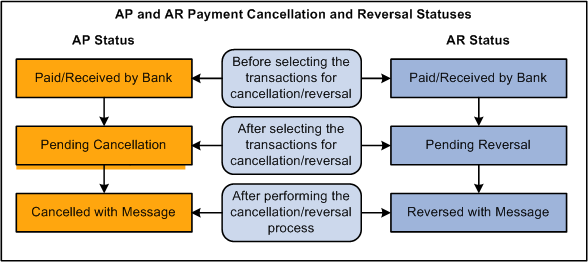
PeopleSoft Payables and Receivables Cancellation and Reversal Statuses
You must run the Payment Cancellation process to send the cancellation message to the bank, which will change the current status to Cancelled with Message for PeopleSoft Payables SEPA cash transfer transactions.
You must run the Payment Reversal process, which will change the current status to Reversed with Message for PeopleSoft Receivables SEPA direct debit transactions.
SEPA Payment Cancellation and SEPA Payment Reversal messages can be sent for payments received from third-party systems into Financial Gateway.
SEPA Credit Transfer Cancellation
Typically, when a SEPA cash transfer payment transaction is received by the bank and there are problems with the transactions, you use the PeopleSoft Payables cancellation process to cancel the payment. The PaymentCancellationRequest message is sent by the initiating party or any agent to the next party in the payment chain. It is used to request the cancellation of a previously sent instruction.
You perform a SEPA direct debit reversal in PeopleSoft Receivables the same way you perform a non-SEPA direct debit reversal. You can cancel a direct debit with a status of Paid, which transmits a reversal to PeopleSoft Financial Gateway. This action ends the life cycle of a direct debit in PeopleSoft Receivables and you cannot change it back again. However, when a direct debit is canceled in Receivables, this reopens the item and the item can then be processed through the Direct Debit system again and generate a new direct debit, which can eventually be paid through PeopleSoft Financial Gateway.
The Direct Debit Customer Payment Reversal message is sent by the initiating party to the next party in the payment chain. It is used to reverse a payment that was previously executed. The message is exchanged between a non-financial institution customer and an agent to reverse a CustomerDirectDebitInitiation message that has been settled. The result will be a credit on the debtor's account.
PeopleSoft predefines layouts in the Layout Catalog for the document type Payment Acknowledge. This layout will be used to import the Payment Status report XML file that is sent by the bank. The file that will be imported is an acknowledgement file sent by the bank adhering to ISO 20022 XML standards.
PMT_STATV2 (ISO 20022 payment status V2, Pain.002.001.002)
PMT_STATV3 (ISO 20022 payment status V3, Pain.002.001.003)
See Understanding the Layout Catalog.
The PaymentStatusReport message is exchanged between an agent and a non-financial institution customer to provide status information on instructions previously sent. Its usage is governed by a bilateral agreement between the agent and the non-financial institution customer.
The PaymentStatusReport message provides information about the status (rejection or acceptance) of the initiation of a SEPA credit transfer, a SEPA direct debit, or other customer instructions, such as a SEPA payment cancellation or reversal request.
The Acknowledgement Files page in PeopleSoft Financial Gateway enables the user to select the bank, bank account, the PMT_STATV2 and PMT_STATV3 layouts, specific transaction ID, Payment file ID, and a date range to view this PaymentStatusReport message.
Important! PeopleSoft Treasury has added these 9.1 SEPA features to PeopleSoft 8.9 and PeopleSoft 9.0.
Entering and Managing Direct Debit Mandates
This section discusses how to:
Print a direct debit mandate form.
Enter and update a direct debit mandate for Treasury counterparties.
Enter and update a direct debit mandate for customers.
Approve a direct debit mandate.
Cancel an individual direct debit mandate.
Cancel unused mandates.
Pages Used to Enter and Manage Direct Debit Mandates|
Page Name |
Definition Name |
Navigation |
Usage |
|
PMT_SEQ_NUM_SEC |
Set Up Financials/Supply Chain, Business Unit Related, General Ledger, General Ledger Definition, Definition, and click the Mandate Sequence Number link. |
Identify the sequence type (mandate ID and reference number), beginning sequence number, maximum length and last auto-assigned number to apply to a mandate form. |
|
|
RUN_PRT_MANDATE |
Financial Gateway, Maintain Mandate, Print Mandate Form, Print Direct Debit Mandate Form |
Print the mandate paper form that must be completed by a debtor for a creditor. |
|
|
PMT_MANDATE_DTL |
Financial Gateway, Maintain Mandate, Mandate for Counterparties, Direct Debit Mandate for Counterparties |
Enter and update direct debit mandate information. |
|
|
PMT_MANDATE_DTL |
Financial Gateway, Maintain Mandate, Mandate for Customers, Direct Debit Mandate for Customers |
Enter and update direct debit mandate information for customers. |
|
|
PMT_MAN_ATTACH_SEC |
Click the Attachments link on the Direct Debit Mandate for Counterparties or Direct Debit Mandate for Customers pages. |
Add attachments to a direct debit mandate. |
|
|
PMT_APPR_MANDATE |
Financial Gateway, Maintain Mandate, Approve Mandate, Approve Direct Debit Mandates |
Approve direct debit mandates. |
|
|
PMT_CAN_MANDATE |
Financial Gateway, Maintain Mandate, Mandate for Customers, Cancel Individual Mandate, Cancel Direct Debit Mandates |
Cancel individual direct debit mandates. |
|
|
PMT_CANCEL_MANDATE |
Financial Gateway, Maintain Mandate, Mandate for Customers, Cancel Unused Mandates, Cancel Unused Mandates |
Cancel unused mandates. |
Printing a Direct Debit Mandate Form
Access the Print Direct Debit Mandate Form page (Maintain Mandate, Print Mandate Form, Print Direct Debit Mandate Form).
You can print a blank mandate form to send to the creditor to complete, or you can print a copy of a mandate that contains the form details that you entered for a Treasury counterparty or customer.
|
Creditor Company |
Select the company that issues the mandate to the debtor to complete. The creditor must provide a pre-numbered SEPA direct debit mandate either in a paper form or the pre-numbered blank form can be sent electronically to the debtor to complete. The creditor prints the SEPA Direct Debit Mandates on a paper form with a pre-numbered mandate reference number. The system stores the last number used and automatically generates the next number. |
Entering and Updating a Direct Debit Mandate for Treasury Counterparties
Access the Direct Debit Mandate for Counterparties page (Financial Gateway, Maintain Mandate, Mandate for Counterparties, Direct Debit Mandate for Counterparties).
|
Mandate ID |
When you add a mandate and select a business unit, the next mandate ID is automatically generated based on the General Ledger business unit applied to this mandate. The Mandate ID appears on the form when the form is created or printed. This ID is used to track the mandate in the system and is automatically sequenced each time the mandate is modified or changed. |
|
Contract and Contract Description |
Enter the contract number associated with this mandate. |
|
Mandate Status |
Default value when you add a new mandate to the system is Issued. This is a read-only field. If you cancel this mandate, this value changes to Cancelled. |
|
Mandate Type |
Default read-only value is Paper. |
|
Signed By |
Enter the name of the debtor who signed this direct debit mandate. This is a required field. |
|
Signed At |
Enter the city or town in which the creditor signed this direct debit mandate. This is a required field. |
|
Signed On |
Select the date on which this direct debit mandate form was signed. This is a required field. |
|
Effective Date |
Select the date from which the information entered on this mandate is effective. |
|
Approval Status |
The default value for a new mandate is Pending For Approval. This is a read-only field. Once the mandate is approved, this value changes to Approved. |
|
Sequence |
The default value of a new mandate is 1. Change this sequence number if you have added more than one mandate for a the same effective date. |
|
Mandate Reference # (mandate reference number) |
Enter the reference number provided on the mandate paper form signed by debtor. This is a required field. |
This section identifies the name and location of the creditor involved in the SEPA direct debit transaction.
|
Creditor's Name |
This name is derived from the business unit that you selected for this mandate. It is a read-only field. |
|
Creditor's Identifier |
The default value for this field is derived from the value that you entered on the GL Business Unit ID Numbers page. This value consists of :
This is a read-only field. Important! Make sure that the number that you enter for this field in the business unit is correct, because the system does not verify the accuracy of the number. |
|
Payment Type |
Select one of these payment types:
|
|
Country |
Select the country code that represents the country in which this creditor is located. |
|
Address 1, Address 2, Address 3, City, County, State, and Postal |
Enter the address information for this creditor. |
This section identifies the name and location of the debtor involved in the SEPA direct debt transaction. In this case the debtor is a Treasury counterparty.
|
Debtor Type |
Default value is Treasury Counterparty, which is read-only. You must set up a counterparty before you can enter mandate information. |
|
Counterparty |
Select the associated counterparty. |
|
Debtor's Identifier |
Enter the identifier associated with this debtor. For business users, enter any code in this field that you want to have quoted by your bank. |
|
Debtor Party |
Enter the name of the party that owes an amount of money to the creditor. This can be the debtor or identify a party on whose behalf the debtor proposes to make the payment. This is a required field. |
|
DFI ID (depository financial institution identification) |
Enter the DFI ID (BIC) code for this debtor. All of the SWIFT validations for BIC are executed upon entering this code. This is a required field for SEPA direct debits. |
|
IBAN (International Bank Identifier Number) |
Enter the IBAN for this debtor in the IBAN field. This is a required field for SEPA direct debits. See SEPA Glossary. |
|
Attachments |
Click the attachment link to access the Mandate Attachments page where you can click the Add Attachments button to add documents to this form. This feature is primarily used to enable the creditor to attach a scanned image of the Direct Debit Mandate paper form to the online mandate. |
|
Save |
Click to save the page. |
Entering and Updating a Direct Debit Mandate for Customers
Access the Direct Debit Mandate for Customers page (Financial Gateway, Maintain Mandate, Mandate for Customers, Direct Debit Mandate for Customers).
See Entering and Updating a Direct Debit Mandate for Treasury Counterparties.
Most of the fields that appear on the Direct Debit Mandate for Customers page are identical to the fields on the Direct Debit for Mandate for Counterparties page with these exceptions:
Name of Debtor
|
Debtor Type |
Displays Customer as the read-only default value. |
|
Customer ID |
Select the customer ID for this debtor. |
|
MICR ID (magnetic ink character recognition) |
Select the MICR ID for this debtor customer or search for and enter a new MICR ID for this customer. You must enter a MICR ID for this customer so that the DFI ID and IBAN values will display on the page. |
|
Debtor Party |
Enter the debtor party. This is a required field. This is the name of the party that owes an amount of money to the creditor. This can be the debtor or identify a party on whose behalf the debtor proposes to make the payment. |
|
DFI ID (depository financial institution identification) and IBAN (International Bank Identifier Number) |
Displays the DFI ID and IBAN values based on the values entered for the MICR ID associated with this customer (debtor). This fields are read-only and are not available for entry for a customer. |
Amending a Direct Debit Mandate
Access the Mandate Amendment Details section of the Direct Debit Mandate for Customers (or Counterparties) page (Financial Gateway, Maintain Mandate, Mandate for Customers or Mandate for Counterparties)
You can amend both an approved and pending approval mandate form. To amend a mandate form, you must add a new row when you click the Add icon in the Mandate Scroll area. You can change the effective date to a future date or change the sequence number if you have more than one amendment for the same date.
|
Reason Code |
Enter a reason code that represents the reason for amending the mandate. Reason codes are set up in Set Up Financials/Supply Chain, Common Definitions, Codes and Auto Numbering, Reason Codes. |
|
User ID |
The user id of the user who amends the mandate appears in this field. |
|
Signed On |
Select the date on which this mandate amendment was created. The default date is the system date. |
|
Signed At |
Enter the city (location) where the amendment was signed. |
|
Original Creditor ID (original creditor identifier) |
Displays the Creditor ID of the original creditor who issued the mandate and entered the mandate information. This value only appears if it was included in the amendment. |
|
Original IBAN |
Displays the creditor's original IBAN number. This value only appears if it was included in the amendment. |
|
Original BIC |
Displays the creditor's original BIC/SWIFT DFI ID code. This value only appears if it was included in the amendment. |
|
Original Mandate Ref # (original mandate reference number) |
Displays the original mandate reference number. Value only appears if mandate reference number is updated in the amendment. |
Approving a Direct Debit Mandate
Access the Approve Direct Debit Mandates page (Financial Gateway, Maintain Mandate, Approve Mandate, Approve Direct Debit Mandates).
|
Creditor's Company From and Creditor's Company To |
Select the creditor's company in the From field. The company you selected also appears in the To field. If the company has more than one or a series of offices or branches, select the last company that you want to include in the search. The system will search through all creditor companies that have mandates associated with them based on the selected search criteria, if you leave these fields blank. |
|
Date From and Date To |
Select a single date or a date range that includes the mandates that you want to have approved. The system will search through all mandate dates that fall within the selected search criteria if you leave these fields blank. |
|
Mandate ID From and Mandate ID To |
Enter a single mandate ID or a range of mandate ID values. If you leave these fields blank, the system will list all mandate ID values that fall within the selected search criteria. |
|
Mandate Reference Number From and Mandate Reference Number To |
Select a single mandate reference number for which to search or select a range of reference numbers. The system searches for and lists the mandates based on your selection. You can leave this field blank and the system will search for and list all mandate reference numbers based on any other selected search criteria. |
|
Search |
Click button to search for and display mandates that match the selected search criteria in the Approval Details group box. |
|
Approve |
Select the mandates in the Approve Mandate grid that you want to approve and click this button. The Approval Status values in for the mandates that were selected for approval changes to Approved after you click the Approve button. |
Canceling an Individual Direct Debit Mandate
Access the Cancel Direct Debit Mandates page (Financial Gateway, Maintain Mandate, Cancel Individual Mandate, Cancel Direct Debit Mandates).
|
Search |
Enter one or more values in the search criteria fields and click this button to search and list the mandates based on the selected criteria. |
|
Cancellation Remarks |
Enter the reason for the cancellation or any additional remarks. |
|
Cancel |
Click this button to cancel the selected mandates. Canceling a mandate updates the Mandate Status field to Cancelled for each mandate that was canceled. |
Canceling Unused Mandates
Access the Cancel Unused Mandates page (Financial Gateway, Maintain Mandate, Cancel Unused Mandate, Cancel Unused Mandates).
Based on SEPA usage rules, if the creditor does not present a collection under a given valid mandate for a period of 36 months, the creditor must cancel the mandate. The creditor is no longer allowed to initiate collections based on this canceled mandate. The PMT_CANCEL process is used to cancel all unused mandates associated with the selected creditor. You can print a list of mandates that need to be canceled. You can also undo the cancellation of mandates executed by this process.
|
Language |
Select the language of the mandate that you want to cancel. English is the default language, which you can override. |
|
Creditor Company |
Select the creditor company associated with any unused mandates. |
|
Date |
Select the date on which you are canceling the mandates. This date is used as the basis for calculating the 36-month period, which is used to check for unused mandates eligible for cancellation. |
|
Process |
Select one of these processes:
|
|
Process Instance |
Select or enter the process instance number of an unused mandate that you have already canceled when you select Undo Cancel for the Process value. |
Integrating with PeopleSoft Global Payroll
The PeopleSoft Global Payroll product is now integrated with PeopleSoft Cash Management to enable each country affected by SEPA regulations to comply with SEPA credit transfer requirements. While the PeopleSoft Global Payroll Core banking process prepares all the payment data, Financial Gateway provides this functionality:
Formats the payment data based on Global Payroll Country setup.
Produces the SEPA payment file.
Sends the payment files to and receives responses from the banks.
Sends acknowledgements back to Global Payroll.
The SEPA Credit Transfer layout (SEPA_CT, pain.001.001.02) is the only payment format currently supported from Global Payroll through Financial Gateway.
See Defining Financial Gateway Integration Options.
Prerequisites
To use the SEPA processing with Global Payroll payments, PeopleSoft Global Payroll 9.1 and PeopleSoft Cash Management 9.1 are required, as well as PeopleTools 8.51 or above.
Setting Up Global Payroll for SEPA Processing
The delivered SEPA framework for HCM is an addition to the existing banking features in PeopleSoft Global Payroll Core and PeopleSoft Global Payroll Country Extensions for European countries. You must set up core and country extensions to prepare all the payment data for SEPA processing through Financial Gateway. For detailed information, refer to PeopleSoft Global Payroll documentation.
See PeopleSoft Global Payroll 9.1 PeopleBook.
Set up Global Payroll banking.
Bank data from Global Payroll must match the bank information defined in Financial Gateway. Bank ID as well as IBAN and BIC have to be identical on both HCM and FMS instances for a given bank and bank account. You must also set the default currency to euro (EUR) in both systems.
Set up IBAN and BIC for Global Payroll banking for each country.
Populate the IBAN Country Setup page (Set Up HRMS, Common Definitions, Banking, IBAN Country Setup) for each country for which you want to process SEPA payments.
Enter a valid IBAN number for each employee in Global Payroll who will receive SEPA payments.
Employees can add this information on the Personal Bank Accounts - Add Account Details page.
Define banking at the country level in Global Payroll.
This involves these two steps:
Define how the system populates the Global Payroll SEPA payment (GP_PAYMENT_FG) record for each country on the Banking Country Setup page (Set Up HRMS, Product Related, Global Payroll & Absence Mgmt, Banking, Banking Country Setup).
Set up and order country-specific SQL statements to populate the GP_PAYMENT_FG record according to your specific business process on he Banking Preparation Definition page (Set Up HRMS, Product Related, Global Payroll & Absence Mgmt, Banking, Banking Preparation Definition).
Setting Up Financial Gateway for Global Payroll SEPA Payments
To support payment transfer from Global Payroll through Financial Gateway, you must set up banking in Financials, map banks and accounts to the SEPA_CT payment layout, and register Global Payroll as a third-party source. In addition, you must associate Global Payroll with Integration Broker to pass the data and subscribe to the asynchronous, outbound service operation (PAYMENT_RESPONSE_OUT_ASYNC) to handle requests sent from Global Payroll.
Define banks and branches for payroll payments processing in PeopleSoft Financials.
Bank data from Financial Gateway must match the bank information defined in Global Payroll. Bank ID as well as IBAN and BIC have to be identical on both HCM and Financials instances for a given bank and bank account. You must set the default currency to euro (EUR) in both systems.
See PeopleSoft Banks Setup and Processing 9.1 PeopleBook, "Setting Up Banks."
Set up external bank accounts to be used by Global Payroll.
The GP option on the External Accounts page (Banking, Bank Accounts, External Accounts, External Accounts) designates an account for use by Global Payroll for a SEPA credit transfer (SEPA_CT).
Account data, including bank account number, from Financial Gateway must match the accounts defined in Global Payroll. IBAN and BIC have to be identical on both HCM and FMS instances for a given bank and account.
See PeopleSoft Banks Setup and Processing 9.1 PeopleBook, "Setting Up External, Internal, and Netting Accounts."
Associate the SEPA_CT layout with the banks and bank accounts.
Before the SEPA_CT layout can be associated with external bank accounts, it must be set up for a selected bank on the Bank Integration Layouts page (Banking, Administer, Bank Integration, Bank Integration Layouts).
See Defining Bank Integration Layouts for Payments.
Then you access one or more external bank accounts that you want to set up to perform SEPA credit transfers and attach the layout to the bank account. You also have to set up the payment method to dispatch the credit transfer transaction electronically using PeopleSoft Financial Gateway.
See PeopleSoft Banks Setup and Processing 9.1 PeopleBook, "Setting Up External, Internal, and Netting Accounts."
Define a subsystem or transaction source to identify Global Payroll as the originator of the payment.
Although the GP source system is registered as system data, you assign attributes including payment status and payment numbering properties on the Source Registration page (Financial Gateway, Administration, Source Registration). For integration with Global Payroll, Integration Broker is selected to pass data between the source application and Financial Gateway.
Note. Financial Gateway delivers the GP source system with an additional override payment status option. On the Override Payment File Status page (Financial Gateway, Administration, Override Payment File Status), you can override erroneous payments with an Error status to mark them as Canceled so there is closure on the business process for that payment.
See Registering a Source Application with Financial Gateway.
(Optional) Set up load error responses.
You can choose an option on the Source Registration page to receive errors only during the Payment Load process. The default is to receive all response messages.
See Registering a Source Application with Financial Gateway.
Enable the service operation PAYMENT_RESPONSE_OUT_ASYNC in Integration Broker to pass the data between Global Payroll and Financial Gateway.
See Setting Up PeopleSoft Integration Broker for Bank Statements, Payments, and Payment Acknowledgements.
See PeopleTools 8.51 PeopleBook: PeopleSoft Integration Broker.