 Understanding Trees and Cash Positions
This chapter provides an overview of trees and cash positions and discusses how to:
Set up trees and positions.
Manage position worksheets.
Create intraday bank reporting worksheets.
Create cash position worksheet (CPW) data manually.
Generate Cash Management position reports.
Understanding Trees and Cash Positions
This PeopleSoft application provides a tool for managing your treasury organization's positions. Using PeopleSoft Tree Manager, you can define hierarchical structures that describe the specific information that is important for your organization. You can use these trees for risk analysis, cash management, position management, deal validation, limit analysis, and any other functions that you deem applicable.
Position trees are used in Treasury Management for many purposes, including:
Cash position analysis
Deal validation
Limit checking
In Treasury Management, a position is the total financial value of a particular set of transactions that are performed on behalf of an enterprise. A cash position analyzes cash flows to determine the amount of cash that is available at a particular time.
Think of a position as a way of categorizing the entire PeopleSoft enterprise transaction database into subgroups, or sources, with totals. Using Tree Manager and PeopleSoft online pages, you can depict the hierarchy for a position (using tree nodes), specify the data sources to include, and define which fields to sum to provide the total for a particular position.
See Also
Common Elements Used in This Chapter|
Alias Name |
Enables you to create more intuitive field names for use in the cash position process. |
|
Position Source ID |
Displays the data source of the node. |
|
Position Source Set |
Displays the criteria set to which the node belongs. |
|
Process Frequency |
Select Always, Once, or Never. |
|
Weighting |
Set the percentage that you apply to your Position Manager. For example, you use the weight of 1.1 to forecast a 10 percent increase or 110 percent of your current situation. Similarly, you use a weight of .9 for a 10 percent decrease or 90 percent of your current situation. |
|
|
Click the Field Description button to enter a description for each row. |
Setting Up Trees and Positions
To define tree and position information, use the following components:
Use the TR_POS_TIME_SPAN_GBL component interface to load data into the Time Span tables.
Use the TR_POS_CREATE_SQL_GBL component interface to load data into the Create Position SQL tables.
Use the POS_GENERIC_ENTRY_GBL component interface to load data into the Manual Position Entry tables.
Note. Additional integration-setup information is available for creating CPWs from data that are imported from JD Edwards General Accounting.
See JD Edwards Application Integrations with PeopleSoft Applications, "Setting Up the Cash Position Worksheet Integration"
Complete these steps to set up trees and positions:
Define position field types.
Define a position source.
Create a position tree.
Complete the position bin pages. (You should have four or five position bin pages, depending on the tree.)
Enter position-tree, source information.
Specify tree-wide options.
Define tree nodes.
Define node properties.
(Optional) Define node property SQL selection criteria.
Define position limits.
Create position SQL.
Schedule position tree SQL.
Define time buckets.
Schedule position time spans.
PeopleSoft Tree Definition
The position management tool enables you to calculate positions based on enterprise-wide data. This PeopleSoft application delivers sample position fields and sources in the sample database; however, we also provide pages that you can use to define the data that you want to track within the position analysis. Typically, you implement page-level security to limit access to these pages to the appropriate people within your organization. Two pages control the database fields that are available to position management: Position Field Types and Position Field Source.
Five pages are in the Position Bins component that is used to define a tree. The purpose of the tree is to determine which position bin pages you must complete. You do not necessarily need to complete every page in the component. One of these pages, Position Limits, applies only to Treasury Management position trees. If you are working with a cash position tree, this page does not appear.
You need to set up your position sources and alias names before creating a position tree. After you have created the tree, you generate the SQL and define time sets and cash position worksheets. This diagram illustrates the setup process:
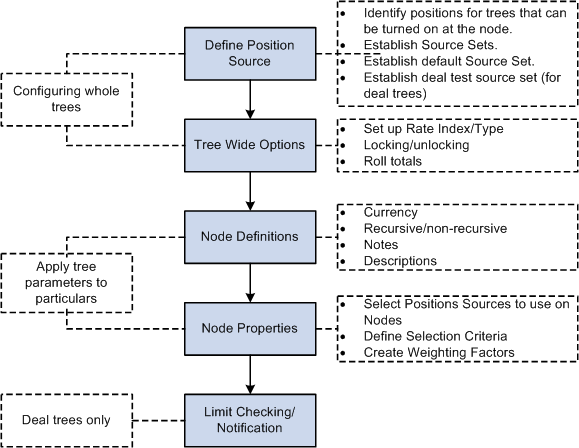
Setting up trees for Treasury Management
Each tree node corresponds to one or many position sources. Because you can define an unlimited number of position trees, you can analyze your data in as many ways as you think necessary. For Treasury Management position trees, you can also associate limits with a node.
When analyzing positions, use time spans to define the periods for which to view the data. Time spans add another dimension—time—to your positions. The system stores the position records, and you can use them for historical analysis and to forecast future positions.
Effective Dating of Treasury Trees
Cash Management Cash Position functionality does not support trees that are defined with multiple effective dates. In Cash Management, each tree can have only one effective date. To use the same tree with different (multiple) effective dates, you must copy the tree, save it with a unique name, and specify an effective date. For example, to define the TR_CASH_POSITION tree with three effective dates (January 1, 2000; January 1, 2001; and January 1, 2002), you need to create these three trees:
|
Tree Name |
Effective Date |
|
TR_CASH_POSITION_2000 |
01/01/2000 |
|
TR_CASH_POSITION_2001 |
01/01/2001 |
|
TR_CASH_POSITION_2002 |
01/01/2002 |
See Also
PeopleTools PeopleBook: PeopleSoft Tree Manager
 Common Elements Used in This Section
|
Node Definition |
Define characteristics for a node, including data source, summarization rules, and revaluation currency. |
|
Node Properties |
Determine which subset of records to include in a tree node. SQL is required for nonrecursive nodes but is optional for recursive nodes. |
|
Position Limits |
Define internal and external limits for a tree, and notification rules when limits are breached. This limit applies only to trees that use the structure TR_POSITION. |
|
Pos Tree Source (position tree source) |
Define the source of data to include in a tree. This setting applies to the entire tree and is defined only once for each tree. |
|
Tree-Wide Options |
Set revaluation options, deal validation rules, and running total options for an entire tree. |
Pages Used to Set Up Trees and Positions|
Page Name |
Definition Name |
Navigation |
Usage |
|
Position Field Types |
POS_FIELD_TYPE_PNL |
Set Up Financials/Supply Chain, Product Related, Treasury, Position Field Types |
Define the sets of table fields that are available to the position management tool. |
|
Position Source |
POS_SOURCE_TBL |
Set Up Financials/Supply Chain, Product Related, Treasury, Position Source |
Provide a more intuitive list of fields from which to select in the Position Manager. Use these alias names when entering selection criteria for position nodes |
|
Tree Manager |
PSTREEMGR |
Tree Manager, Tree Manager |
Add a position tree and insert the tree nodes. See PeopleTools PeopleBook: PeopleSoft Tree Manager. |
|
Position Tree Source |
POS_TREE_SOURCE |
Click Edit Data on the Tree Manager page. Select the Pos Tree Source (position tree source) tab. |
Enter general information about the position source. |
|
Tree Wide Options |
POS_TREE_PNL |
Click Edit Data on the Tree Manager page. Select the Tree Wide Options tab. |
Specify the market rate index to use for currency revaluation and define whether a deal needs to meet the criteria for an end node on the tree during deal validation. You can also select an option to compute running totals during position analysis. |
|
Node Definition |
POS_DEF_OPER_PNL |
Click Edit Data on the Tree Manager page. Select the Node Definition tab. |
Specify the characteristics for each node of a tree. |
|
Node Properties |
POS_SOURCE_SET_PNL |
Click Edit Data on the Tree Manager page. Select the Node Properties tab. |
Define sources for the specified node. |
|
Node Properties - All Selection Criteria |
POS_ALL_CNDTN_SEC |
Click View All Selection Criteria on the Node Properties page. |
Create SQL statements of selection criteria for position source IDs. |
|
Selection Criteria |
POS_DEF_WHERE_SEC |
Click Selection Criteria on the Node Properties page. |
Enter selection criteria for a specific source ID. |
|
Position Limits |
POS_LIMITS |
Click Edit Data on the Tree Manager page. Select the Position Limits tab. |
Use this page for treasury position trees only to define your own internal treasury organization's limits, any external limits, and the limit currency to apply to the current tree node. You also indicate when limit checking should occur, who should be notified, and under what conditions. If you are using the Limit Checked workflow, you must establish position limits for the system to generate notifications. |
|
Create Position SQL |
POS_CREATE_SQL |
Cash Management, Administer Cash, Create Position SQL |
Translate conversational language into the language of database operations. You can roll up functions by extending SQL statements downward from the parent level. This page is automatically accessed if needed when you are running position trees in the Position Manager. |
|
Schedule Position Tree SQL |
TR_AE_RUNCNTL |
Cash Management, Administer Cash, Schedule Position Tree SQL |
Run the Schedule/Calculate Tree SQL process (TR_POS_CSQL) to set up the intervals in which your SQL is to run. |
|
Define Time Buckets |
POS_TIME_SPAN_PNL |
Cash Management, Administer Cash, Time Bucket Definition |
Categorize information from your treasury position or generated cash position. For example, you can define time spans with varying intervals, such as daily for a week, weekly for a quarter, and then quarterly for a year. The time spans that you define can overlap, run consecutively, or both. |
|
Calculate Position Time Spans |
TR_AE_RUNCNTL |
Cash Management, Administer Cash, Calculate Position Time Spans |
Run the Find Position Time Spans to Calculate process (TR_POSN_TSPAN) to set up the time spans for positions. |
Defining Position Field Types
Access the Position Field Types page (Set Up Financials/Supply Chain, Product Related, Treasury, Position Field Types).
Select a the Field Type in the system that you want this position field type Alias Name to represent.
Prompting Method
Select a Prompt option to indicate how to control prompting for values for the selected Field Type.
|
Record |
Select to base the prompts on the actual database records. In theRecord Prompt field, enter the field on which prompting is based. |
|
Translate |
Select to base prompting on translate values rather than the records themselves, and select the field name to use for translation. This value applies only to field records that use translate values. |
Define Meta Text
|
Meta Field |
Select to incorporate a SQL statement with this alias. (Typically, you do not select this check box.) |
In the Treasury Management sample database, %THIS DEAL is an example of a meta field. The following table lists the alias names that are delivered with the sample database:
|
Alias Name |
Description |
|
%THIS DEAL |
This Deal |
|
ACCOUNT |
Account |
|
ACCRUED INTEREST |
Accrued Interest |
|
ACQUISITION CODE |
Acquisition Code |
|
AMORTIZED DISCOUNT |
Amortized Discount |
|
AMOUNT |
Amount |
|
ASSET CATEGORY |
Asset Category |
|
ASSET CLASS |
Asset Class |
|
ASSET COST TYPE |
Asset Cost Type |
|
ASSET STATUS |
Asset Status |
|
BANK ACCOUNT CD |
Bank Account Code |
|
BANK ACCOUNT KEY |
Bank Account Key |
|
BANK BALANCE |
Bank Balance |
|
BANK COUNTERPARTY |
Bank Counterparty |
|
BANK ID NUMBER |
Bank ID Number |
|
BANK SET ID |
SetID for Bank |
|
BANK TYPE |
Bank Type |
|
BASE CURRENCY |
Base Currency |
|
BOOK |
Book |
|
BOOK VALUE |
Book Value |
|
BROKER |
Broker |
|
BUDGET JOB CODE |
Budget Job Code |
|
BUDGET PROPOSAL ID |
Budget Proposal ID |
|
BUDGET SCENARIO |
Scenario |
|
BUSINESS UNIT |
Business Unit |
|
COUNTRY |
Country |
|
CPTY |
Counterparty |
|
CURRENCY |
Currency |
|
DEAL AMOUNT |
Deal Amount |
|
DEAL DATE |
Deal Date |
|
DEAL MATURITY DATE |
Deal Maturity Date |
|
DEAL SETTLEMENT DATE |
Deal Settlement Date |
|
DEAL STATUS |
Deal Status |
|
DEAL TERM |
Deal Term |
|
DEALER |
Dealer |
|
EXCLUDE FROM POSITION |
Exclude From Position |
|
FACILITY ID |
Facility ID |
|
FACILITY REFERENCE |
Facility |
|
FINANCIAL ASSET |
Financial Asset |
|
GL ACCOUNT |
GL Account |
|
GL AFFILIATE |
GL Affiliate |
|
GL BUDGET LEDGER |
Budget Ledger |
|
GL DEPARTMENT ID |
GL Department ID |
|
GL PRODUCT |
GL Product |
|
GL PROJECT ID |
GL Project ID |
|
INSTRUMENT |
Instrument |
|
INSTRUMENT BASE TYPE |
Instrument Base Type |
|
INTEREST ACCRUED |
Interest Accrued to Date |
|
LIMIT RESERVED |
Limit Reserved |
|
ORIGINAL DEAL TERM |
Original Deal Term |
|
PARENT ID |
Parent ID |
|
PORTFOLIO |
Portfolio |
|
REFERENCE |
Reference |
|
SETTLEMENT DATE |
Settlement Date |
|
TRANSACTION ISSUER |
Issuer |
|
TREASURY DEAL ID |
Treasury Deal ID |
|
TREASURY DEAL LEG |
Treasury Deal Leg |
|
TREASURY DEAL LINE |
Treasury Deal Line |
|
VALUE DATE |
Value Date |
Defining Position Sources
Access the Position Source page (Set Up Financials/Supply Chain, Product Related, Treasury, Position Source).
This PeopleSoft application includes sample position sources in the sample database, including the ENTERPRISEONE -AP and ENTERPRISEONE -AR, which are used for integrating with the JD Edwards database.
Note. At the time of installation, you should evaluate the appropriateness of the delivered data to your business context and assess whether to create your own position sources. In many cases, you must create your own.
|
Integration Map ID |
Select the appropriate preconfigured field mapping if you are importing source data from the JD Edwards database to generate the CPW. See JD Edwards Application Integrations with PeopleSoft Applications, "Setting Up the PeopleSoft Treasury with JD Edwards General Accounting Integration," Setting Up Cash Position Worksheet Integration |
|
Record |
Select the database from which the position source derives data. |
|
Deal View |
Select to permit remapping of amount fields for different instruments. |
Position Source Mappings
|
Field Name |
Displays available field names of the selected record. |
|
|
Click Position Field Types to define the sets of table fields that are available to the position management tool. |
|
|
Click Long Description to enter a comprehensive description for the field. |
Note. To improve performance when calculating the CPW, you
should reorganize high-volume transaction tables at the database level. For
example, for the PS_ITEM table, modify the PS0ITEM index by adding the DUE_DT field
to the end of the index with the dates arranged in ascending order.
Custom indexes can be added depending on the size of the table and the
complexity of the data that are used in the trees.
Entering Position Tree Source Information
Access the Pos Tree Source page (click Edit Data on the Tree Manager page).
|
Position Source Set |
Define the source for the tree (for example, CASH or DEAL). Select the check box to set this as the default source set. For a deal tree, you can specify this position source set as a deal test. |
|
Position Source ID |
The value that you select determines how the Amount Fields grid appears. Complete all of the fields. |
Specifying Tree-Wide Options
Access the Tree Wide Options page (click Edit Data on the Tree Manager page and select the Tree Wide Options tab).
|
Market Rate Index and Rate Type |
When the currency of the amount that is used for determining a position is not the same currency that you define as the node currency, use these fields to revalue the amount. |
You must establish market rates for each currency pair that you revalue from the currency of the source position to the currency of the node position, or the system excludes the data. For example, suppose that you have various sources of data in which the currency is USD, GBP, DEM, and JPY, and the position currency for the node is set to USD. You define the following exchange rates:
|
From |
To |
|
USD |
USD |
|
GBP |
USD |
|
DEM |
USD |
|
JPY |
USD |
Note. When an exchange rate is entered from its own currency to its own currency, you must set the rate to 1.
Tree Options
|
Allow Manual Updates |
Select to enable manual updates to the Lock/Unlock function on the CPW. |
|
Carry Total Forward |
Select to compute running totals when the position is evaluated. The system adds ending balance amounts for one period to the beginning balance amounts for the next period. If you select this check box, also select the node, in the Add Total to Node field, to which you will carry the totals forward. Typically, you use this functionality for cash position trees, and the node that you select is the node that represents your beginning ledger balance. |
|
Deal Must Exist as a Leaf |
If you are working with a cash position tree, this option does not apply, and it will not appear on this page. Select this option if you require that a deal match the criteria for an end node (leaf) of a tree to be valid. Deal validation testing occurs when you click the Deal Test button at deal entry. If this check box is not selected, then deals that do not specifically match the criteria for an end node, but that do meet the criteria for a level in the tree hierarchy, are considered valid. |
Note. For deal validation using the Deal Test button, a tree must include %THIS DEAL in its root node selection criteria.
Defining Tree Nodes
Access the Node Definition page (click Edit Data on the Tree Manager page and select the Node Definition tab).
Note. End nodes, or leaves, of a tree must always be set to Non-recursive, and nonrecursive nodes must have selection criteria defined for each position source they use.
Defining Node Properties
Access the Node Properties page (click Edit Data on the Tree Manager page and select the Node Properties tab).
|
Use This Source |
Deselect this check box to prevent use of a position source ID. |
|
Selection Criteria |
Click to view the Selection Criteria page for the selected position source ID, or click the View All Selection Criteria button to view all selection criteria information. |
Defining Node Properties SQL Selection Criteria for Position Source
Sets
Access the Node Properties - All Selection Criteria page (click View All Selection Criteria on the Node Properties page).
After you create SQL statements with selection criteria for position source IDs, use the Create Position SQL page to process the SQL statements for the tree.
|
Open and Close |
Select a character to open or close the statement. |
|
Operator |
Select a mathematical operator, and specify the value for the alias name. |
|
Oper (operand) |
Select a value when concatenating multiple SQL statements. |
See Also
Defining Position Limits
Access the Position Limits page (click Edit Data on the Tree Manager page and select the Position Limits tab).
|
Position Type |
Select from the following options: Long Limit Only: Select this option if you want notification in conditions in which you have a long position. Specify values in the Min (minimum), Max (maximum), and Long fields. Short and Long Limit: Select this option if you want notification in conditions in which you have either a short or a long position. Specify values in the Max Short and Max Long fields. Short Limit Only: Select this option if you want notification in conditions in which you have a short position. Specify values in the Min Short and Max Short fields. |
|
Internal/External Limits |
Indicate whether the limit is determined by an Internal source or is imposed from an External source, such as a counterparty. |
|
Currency |
Enter the long and short limit amounts for the defined currency. |
Limit Check
Use the Limit Check grid to indicate when these position limits are checked. You can select both the Pre-Defined and Deal Entry check boxes.
|
Pre-Defined |
Select for position limits to be automatically checked, and define a value in the Recurrence field to check position limits at regular intervals. |
|
Deal Entry |
Select to ensure that these position limits can be checked at deal entry (by clicking the Test Limits button on the Deal Detail page). |
Limit Warning Notification
|
Role Name |
Select a role name to receive warning notification. Specify either a limit value or select the Percentage check box, and enter a limit percent that activates the warning notification. |
See Also
Defining Instrument Types and Instrument Templates
Creating Position SQL
Access the Create Position SQL page (Cash Management, Administer Cash, Create Position SQL).
|
Create SQL |
Click to generate the SQL for the tree. When the process finishes, a dialog box appears with this message: Completed creating SQL. |
|
SQL Statement |
Displays the SQL statement that the system generates for the node. |
Scheduling Position Tree SQL
Access the Schedule Position Tree SQL page (Cash Management, Administer Cash, Schedule Position Tree SQL).
|
Bind Variable Name |
In the Parameters grid is an Application Engine run control function that enables you to specify the variable for which you are setting the value. Select the bind variable name of TREE_NAME, and enter the specific tree name to be calculated in the Value field. You can add records and specify as many bind variable names as are pertinent to the job. |
Defining Time Buckets
Access the Define Time Buckets page (Cash Management, Administer Cash, Time Bucket Definition, Define Time Buckets).
|
Number |
Indicates the sequential time segment that you are modifying. |
|
Start |
Select a start type to indicate how the system determines when a time segment starts. Values are: Defined by Period above: Starts the current time segment when the prior time segment ends. You cannot select this option for the first segment. Specific Date: Starts the current time segment on a specific date. When you select this option, enter the date in the Start Date field. Specific Period: Starts the current time segment on the first day of a specified period. When you select this option, select the calendar on which to base the period start. Today: Starts the current time segment today. Select this value when you want the time span to be based on a current date. Every time the system calculates the time span, this field is updated with the current date. |
|
Cycle |
Select a cycle type to indicate the repetition frequency of a time segment. Values are: Relative: Cycles the time segment a relative number of times. When you select this value, enter the number of times it repeats, and then enter the frequency of repetition in the Relative field. You can repeat this a number of days, months, or years. For example, to have this time segment repeat daily for five days, you would enter 5 in the Number field, and select Days in the Relative field. Use Period Definitions: Cycles the time segment based on the period definitions from a business calendar. When you select this value, select the calendar on which to base this frequency. For example, suppose that you want this time segment to cycle by quarters. Select a defined quarterly calendar in frequency. |
|
End |
Use to control when a time segment ends. After completing the appropriate number of cycles, the following values are available to control the end of the segment: End of Next Cycle: Completes the time segment at the end of the next cycle. Select the calendar to use to determine the ending. End of Period: Completes the time segment when the period that is defined by the selected calendar ends. Select the calendar to use to determine the ending period. End of Previous Cycle: Completes the time segment when the previous cycle ends. Select the calendar to use to determine the ending period. Number of Periods: Completes the time segment after repeating the cycle a given number of periods. Enter the number of times the period should cycle. |
|
Calculate |
Click to generate the time span intervals. Your results appear in the Resulting Time Periods group box. |
Calculate Position Time Spans
Access the Calculate Position Time Spans page (Cash Management, Administer Cash, Calculate Position Time Spans).
|
Bind Variable Name |
The Parameters grid contains an application-engine, run-control function that enables you to specify the variable for which you are setting the value. Select the bind variable name of TIME_SET, and enter the specific time span to be calculated in the Value field. You can add records and specify as many bind variable names as are pertinent to the job. |
Managing Position Worksheets
To define position forecasting rules, use the Position Forecasting Rules component (POS_FORECAST_RULES).
After you have created your position trees, use the Position Manager to generate the worksheet and manipulate the cash position data.
The Position Manager is based on trees that use the TR_CASH_POSITIONS structure. Trees provide a hierarchical structure and enable you to generate numbers that are not automatically captured. Many options are available for generating your worksheet. For example, you can:
Forecast your position over a period of time or evaluate it for just one day.
Base your position on a previous worksheet, adjusting the amounts by a specified factor to estimate future cash positions.
Calculate the position for an entire tree or for a particular node of a tree.
Step through the tree nodes that compose the worksheet, zooming into the detail transactions.
You can copy worksheets to compare actual totals to projected amounts using the copy and forecasting functionality. Actual cash position data that are calculated for a tree, can be copied forward and used for forecasting future cash positions using the parameters that are defined on the Position Forecasting Rules page.
Note. For each tree, only one worksheet can be stored for each calculation date. If you recalculate (using the same calculation date) a worksheet that was previously stored, the new worksheet overwrites the values of the first worksheet. The calculation date is set by the system when the worksheet is generated. You should print files for later comparison. You can generate an online, cash position report using BI Publisher functionality.
This section provides an overview of methods for viewing cash position worksheets, lists common elements, and discusses how to:
Generate position worksheets.
Define Position Manager options.
Create an ad hoc position worksheet.
View Position Manager results.
View transaction details by source.
Create forecasting rules.
Copy worksheets.
Schedule Position Manager.
Export worksheets with PS/nVision.
Note. The method for exporting worksheets using PS/nVision is deprecated functionality in PeopleSoft 9 Treasury. A more robust method using BI Publisher is available from the Position Manager Options page.
Load CPW data from an JD Edwards database
Methods for Viewing Cash Position WorksheetsAfter a CPW is generated, you can view it in several ways:
Online using the Position Manager Results page.
Using PS/nVision to export the CPW to a Microsoft Excel® spreadsheet.
Using BI Publisher to generate CPW reports in PDF, HTML, RTF, and XLS file formats.
Use the RTF template to generate the CPW using BI Publisher.
See PeopleTools PeopleBook: BI Publisher for PeopleSoft .
Common Elements Used in This Section|
Calculation Preferences |
Specify a predefined, calculation-preferences sheet (Position Manager Options) to calculate your cash position. |
|
The Other node is created during CPW generation to balance node amount discrepancies resulting from such things as foreign exchange rates, nonrecursive node modes, and so forth. When viewing CPWs using BI Publisher, only one, general **Other** node is created that displays the total sum of all Other nodes, regardless of their position in the tree hierarchy. |
|
|
Position |
Controls which portion of the tree the system uses when calculating the worksheet. Typically, you generate the worksheet from the root node, therefore, the system automatically uses the top level or root node of the tree. If you want to calculate a worksheet for a particular node, however, enter that node here. |
|
Worksheet |
Select the tree to use as the basis of your worksheet. |
Pages Used to Manage Position Worksheets|
Page Name |
Definition Name |
Navigation |
Usage |
|
Position Manager |
POS_IMPCT_MGR |
Cash Management, Cash Position, Position Manager |
Administer your worksheets from a central location. |
|
Position Manager Options |
POS_IMPCT_OPT_PNL |
Click the Edit icon
|
Define the options for the Position Manager. |
|
Ad-Hoc Position Worksheet |
POS_IMPCT_OPT_PNL |
Click the Create an Ad-Hoc Worksheet link on the Position Manager page. |
Set up ad hoc positions to generate a current, one-time cash position worksheet. Unlike cash position worksheets that are generated using options that are defined on the Position Manager Options page, the calculation preferences and results of the ad hoc worksheet are not saved. |
|
Position Manager Results |
POS_IMPCT_RSLT_PNL |
Click the Calculate button on the Ad-Hoc Position Worksheet page. |
Display the results of the calculation on the Position Manager page. This page appears automatically when you calculate your cash position from the Position Manager page. |
|
Position by Source |
POS_IMPCT_RSLT_DT1 |
Click Drill to Detail on the Position Manager Results page. |
View the source transactions for the node. |
|
Position Forecasting Rules |
POS_FORECAST_RULES |
Cash Management, Administer Cash, Position Forecasting Rules |
Set up rules for forecasting. |
|
Copy/Apply Forecasting Rules |
POS_HIST_FORECAST |
Click Copy on the Position Manager Results page. |
Generate a copy of a worksheet. To create projected forecasts or modify cash flow amounts, you must create a worksheet copy. |
|
Schedule Position Manager |
TR_POS_RUNCNTL |
Cash Management, Cash Position, Schedule Position Manager |
Run the Cash Position/Position Monitor Application Engine process (TR_POS_TOTAL) to schedule the Position Manager to run at specified times. |
|
Position Report Periods |
POS_REPORT_PNL |
Cash Management, Cash Position, Position Report Periods |
Use PS/nVision to generate a Microsoft Excel file of Position Manager. See PeopleTools PeopleBook: PS/nVision |
|
Position Manager Data Load |
TR_AE_RUNCNTL |
Cash Management, Cash Position, Position Manager Data Load |
Run the Application Engine to load the external data from the JD Edwards database using the JDBJ API. Run this process only if your system is set up to generate a CPW from data that are imported from a JD Edwards database. See JD Edwards Application Integrations with PeopleSoft Applications, "Using the PeopleSoft Treasury with JD Edwards General Accounting Integration" |
Generating Position Worksheets
Access the Position Manager page (Cash Management, Cash Position, Position Manager, Position Manager).
|
|
Click the Edit icon to access the Position Manager Options page and define options and limitations for working with your positions. |
|
Calculate |
Click to generate position results for the specified worksheet, position, and calculation preferences. |
Note. Poor performance while you are generating the CPW might be rectified through modifications that affect how the position sources data are accessed.
See Also
Defining Position Manager Options
Access the Position Manager Options page (click the Edit icon on the Position Manager page).
|
Load External Data |
Select to generate the CPW from data that are imported from the JD Edwards General Accounting tables. See JD Edwards Application Integrations with PeopleSoft Applications, "Using the PeopleSoft Treasury with JD Edwards General Accounting Integration," Retrieving Data from JD Edwards for the PeopleSoft Cash Position Worksheet |
Time Horizon Options
Indicate how to group the position totals over time. The time spans must be calculated before you generate the worksheet.
|
Value Date |
To generate a worksheet with totals for a single day, select and enter the date. |
|
Source Set |
Similar to a value date, but you can compare two similar tree structures. Source sets enable you to combine multiple tree structures into a single tree, for example, where actual versus projected positions have slightly different selection criteria. |
|
Time Set |
To create the position totals over a period of time, select the particular time set from the list of values. This option enables you to generate totals that range over a period of time that is segmented, for example, by the cycles that are defined in your business calendars, such as daily for a month, quarterly for six months, and then yearly for two years. |
|
|
Click to access and edit the Position Time Spans page to define time spans. |
Recalculation Options
|
Recalculation Option |
Select from the following options to indicate how to calculate the worksheet:
|
Position Impact Functions
Select any combination of the following options:
|
Use Source Weighting |
Select to use weighting values that you set on the Position Forecasting Rules page or the Copy/Apply Forecasting Rules page. |
|
Include Copied Data |
Select to include data from the most recent Copy/Apply Forecasting Rules page. |
|
Show Non Business Day Columns |
Select to view data columns for regular nonbusiness days (for example, Saturday and Sunday) and holidays. |
|
Use Lock Reminder |
Select this check box if you are doing intraday reporting and cash position analysis (or intraday cash position analysis). If this check box is selected, the system prompts you with a reminder message on the Position Manager page when you click the Return to Position Manager link. |
Transfer Options
Select a transfer option and specify a corresponding template to use on the Funds Transfer page, which is accessible from the Position Results page.
Revalue Positions
|
Revalue Currency |
Select a currency, other than the system currency, in which to calculate the worksheet. |
|
Revalue Date Type |
Select one of the following values: Use Current Date: The system uses the current system date to calculate the worksheet. Use Calculation Date: The system uses the as of date that is specified by the Use Data Calculated On value to calculate the worksheet. |
Additional Criteria
For additional flexibility, you can specify criteria that further limits the amounts that are included in the Position Manager, either a particular currency or bank information.
Note. To view a worksheet that was calculated with additional criteria, you must specify the same criteria when you select the Use Data Calculated On value to display the worksheet.
BI Publisher Report Options
|
Generate Position Report |
Select to automatically generate a cash position report using BI Publisher each time the cash position is calculated. |
|
Output Format Type |
Select a format for viewing and printing the cash position report. Options are:
Note. You must select an output format type even if the Generate Position Report check box is not selected. This selection enables you to generate a report manually, at your discretion, from the Position Manager Results page. |
See Also
PeopleTools PeopleBook: BI Publisher for PeopleSoft
Creating an Ad Hoc Position Worksheet
Access the Ad-Hoc Position Worksheet page (click Create an Ad Hoc Worksheet on the Position Manager page).
The Ad-Hoc Position Worksheet page contains functionality that is similar to that of the Position Manager Options page, with the addition of theWorksheet andPosition fields and the Calculate button.
See Also
Defining Position Manager Options
Viewing Position Manager Results
Access the Position Manager Results page (click the Calculate button on the Ad-Hoc Position Worksheet page).
You run the cash position calculation from the Position Manager page. When the calculation of the worksheet is complete, the results appear automatically.
Note. The amounts that appear are in the base currency that
was specified for the source tree, unless another currency was selected in
the Revalue Currency field on the Position Manager
Options page. In such cases, the amounts will appear in the currency selected
there and revalued based on the defined exchange rate. All entries must be
of a currency for which an exchange rate is established; otherwise, they will
not be included in the generation of the CPW. Exchange rates are set on the
Market Rates page.
When you manually enter new amounts on this page, the system assumes
that the values entered are in the base currency of the tree, not in the revalued
currency. Manually entering new amounts in the revalued currency and clicking
Refresh Totals will generate unexpected, and possibly erroneous, new totals.
|
Position |
Indicates the node that you are viewing. |
|
Refresh Totals |
Click to recalculate column totals. |
|
Calculate |
Recalculates the cash position based on your defined calculation options. If you edit a node amount but do not save and lock the edited field, then clicking Calculate returns the worksheet to its original state. |
|
Step Back |
You can drill down into node detail and then return to overall node data. |
|
Copy |
Click to access the Copy/Apply Forecasting Rules page to use a forecasting function. |
The remainder of the page displays the worksheet, with the amounts broken down by the periods of the time set. Each period is listed, along with its start and end date.
|
|
If the row is a detail node, that is, if it has no subordinate (child) nodes, click the Drill to Detail button to view the source transactions for the node. |
|
|
Click the Transfer button to access the Funds Transfer page. |
|
|
Click the Lock button to lock the value, which you would enter on an ad hoc basis. To see your new, updated totals, save the worksheet and click the Calculate button to refresh the data. To enable locking, open the tree in Tree Manager and select the Allow Manual Updates check box. If a node is locked, the value does not change if the tree is recalculated. It stays as it is until it is unlocked. |
|
|
Click the Unlock button to unlock the value and edit the cell. The next time that you recalculate the worksheet, the system enters this number from system data. |
|
Scroll Left and Scroll Right |
Click to navigate the time periods of the worksheet. |
|
Enter Manual Position |
Click to apply tree functionality to ad hoc data. |
|
View Position Report |
Click to generate a cash position report using BI Publisher. |
Each row of the worksheet represents a child node of the position that is listed.
If a row contains additional nodes beneath it, you can navigate down the tree to those child nodes by clicking the Next Step button. The Position field is updated to indicate the current node.
To navigate back up to the previous level, click the Step Back button.
The worksheet displays only the nodes at the next immediate level below the position node. As shown in the following diagram, when the position node is CASH POSITION, you see only the nodes at the next immediate level; you see the four children of that node. To see the worksheet that is composed of the rows AR RECPTS, LOCKBOX RCPTS, AP DISBURSMTS, and CONTR DISB, change the position node to OPER. REC./DISBURSE.

Viewing children of a position node
See Also
Viewing Transaction Details by Source
Access the Position by Source page (click Drill to Detail on the Position Manager Results page).
|
Position Source ID |
Enter search parameters to view position source transactions for a specified period. Select a position source ID and period, and then click the Search button. |
Creating Forecasting Rules
Access the Position Forecasting Rules page (Cash Management, Administer Cash, Position Forecasting Rules).
You can create forecasting rules that apply to three variables: business day convention, increasing/decreasing by a factor, or shifting days. A forecasting rule would apply at the tree level. In addition, you can refine these variables at the node or source level.
Copying Worksheets
Access the Copy/Apply Forecasting Rules page (click Copy on the Position Manager Results page).
Worksheet Offset
Specify the search parameters to return data for the Worksheet Data region.
|
Business Day Convention |
Select the convention that applies to your scenario, and then enter the number of years, months, and days that you want to extend your worksheet. These numbers can be positive or negative, generating future or historical worksheets. |
|
Apply Worksheet Offset |
Click to populate fields in the Worksheet Data region automatically with parameters that are specified in the Worksheet Offset group box. |
|
Clear |
Click to clear your applied worksheet offsets and repopulate the Worksheet Data region with the original information. |
|
OK |
Click to save your worksheet changes and return to the Position Manager Results page. This button is unavailable until you enter worksheet offset information and click the Apply Worksheet Offset button. |
Note. The system retains only one historic worksheet per calculated date.
Scheduling Position Manager
Access the Schedule Position Manager page (Cash Management, Cash Position, Schedule Position Manager).
Refer to the documentation of the Position Manager Options page for the descriptions of fields on this page.
See Defining Position Manager Options.
|
Generate Position Report |
Select to generate a cash position report using BI Publisher. |
BI Publisher Report Options
|
Output Format Type |
Select a format for viewing and printing the cash position report. Options are:
|
See Also
PeopleTools PeopleBook: BI Publisher for PeopleSoft
Exporting the Worksheet with PS/nVision
Access the Position Report Periods page (Cash Management, Cash Position, Position Report Periods).
This PeopleSoft application provides a PS/nVision layout with which you can generate a Microsoft Excel™ file for your Position Manager. The layout uses the TR_CASH_POSITION tree to create the file. The PS/nVision layout must be configured to create a spreadsheet that is based on a different tree.
|
Time Set |
Select the length of time for each period. The field options are created on the Define Time Buckets page. The delivered options are:
|
|
Process |
Before you use PS/nVision, you must create the time periods for the report. Click to generate the report periods that are used by PS/nVision. The system updates the page and displays the periods. |
See PeopleTools PeopleBook: PS/nVision
Loading CPW Data from a JD Edwards Database
Access the Position Manager Data Load page (Cash Management, Cash Position, Position Manager Data Load).
Run the Position Manager Data Load Application Engine process (TR_POS_WKSLD), which loads the CPW data tables with data from the JD Edwards database that is specified on the Installation Options - Treasury page. The Application Engine requires passing the name of the integration map ID to use for importing the data. The map ID is set using the Bind Variable Name field. This process allows for importing the data before generating the worksheet. An option is available to reimport the data just before the worksheet is generated.
|
Bind Variable Name |
Select the bind variable that identifies the integration map ID that is used to determine which data to retrieve. INTEGRATION_MAP_ID is delivered as the default setting. |
|
Value |
Enter the value of the bind variable for the particular run of the process that you define on the Position Manager Field Map page. The E1_AR_MAP and the E1_AR_MAP integration maps are delivered preconfigured for the CPW integration process. See JD Edwards Application Integrations with PeopleSoft Applications, "Setting Up the Treasury Integration in the PeopleSoft Database," Setting Up the Cash Position Worksheet Integration |
See Also
Creating Intraday Bank Reporting WorksheetsThis section provides an overview of intraday bank reporting and cash positions, lists prerequisites, and discusses how to calculate intraday cash position reporting worksheets.
Understanding Intraday Bank Reporting and Cash PositionsIntraday reporting and cash position functionality that are included with Cash Management enable you to monitor your organization's cash position several times in a day. You can establish three cash positions (10 a.m., 2 p.m., and 4 p.m.). You then monitor each position's progress during the day by importing updated same bank statement information, making changes, and locking down your cash positions as required.
To help you with intraday bank reporting and cash positions, we have added a tree (INTRADAY_CASH_POS) to the Tree Manager sample data, a worksheet (INTRADAY_CASH_POS), and two node (INTRADAY_INFLOWS and INTRADAY_OUTFLOWS) to the Position Manager page.
The INTRADAY_CASH_POS tree includes the following five nodes:
Bank Balance.
Intraday Outflows.
Intraday Inflows.
Treasury Cash flows.
Target Balance.
The INTRADAY_CASH_POS worksheet corresponds to the INTRADAY_CASH_POS tree and is preconfigured with three source sets for 10 a.m., 2 p.m., and 4 p.m. The INTRADAY_INFLOWS and INTRADAY_OUTFLOWS positions are associated with their corresponding tree node. When you select one of these positions to calculate the worksheet, the system derives information from the sources that are specified for that node. You can then track the intraday activity through the position worksheet calculations.
During the course of a day, you use the Load Electronic Statements feature to load the same-day bank statement table with updated information. Using the worksheet's lock feature, you can store any position with its existing current information. When the worksheet is recalculated, existing data in any open unlocked position is overwritten with the updated bank information. For example, you can load the updated bank statement information and lock the positions in this manner:
Perform the initial daily load of the bank statement table at 10 a.m., and lock the 10 a.m. position.
Reload the bank statement table at 2 p.m. (the system recalculates the 2 p.m. and 4 p.m. positions), and lock the 2 p.m. position.
Perform the final load of the bank statement table at 4 p.m. (the system recalculates the 4 p.m. position), and lock the 4 p.m. position.
You can lock any one position and have the other positions appear as unlocked. You can also use one position as the final position for the day, either the current locked position or the last position for the day (the 4 p.m. position).
PrerequisitesBefore creating position worksheets, you should reconcile bank transactions and review same-day bank balance information to identify your true cash flow.
See Also
Updating Current Day Bank Statements
Pages Used to Create Intraday Bank Reporting Worksheets|
Page Name |
Definition Name |
Navigation |
Usage |
|
Current Day Balances |
BANK_SDBAL_ENTRY |
Banking, Bank Statements, Enter Current Day Statements |
Review the same-day bank balance information that is automatically imported into the system before using it in the intraday cash position worksheet. |
|
Enter Current Day Transactions |
BANK_SDSTMT_ENTRY |
Banking, Bank Statements, Enter Current Day Statements Select the Current Day Transactions tab. |
Review the same-day bank transaction information that is automatically imported into the system before using it in the intraday cash position worksheet. |
|
Position Manager |
POS_IMPCT_MGR |
Cash Management, Cash Position, Position Manager |
Administer your worksheets from a central location. |
|
Position Manager Options |
POS_IMPCT_OPT_PNL |
Click Edit on the Position Manager page. |
Set up the options for the Position Manager. |
|
Ad-Hoc Position Worksheet |
POS_IMPCT_OPT_PNL |
Click Create an Ad Hoc Worksheet on the Position Manager page. |
Set up ad hoc positions. |
|
Position Manager Results |
POS_IMPCT_RSLT_PNL |
Click Calculate on the Ad-Hoc Position Worksheet page. |
Display the results of the calculation on the Position Manager page. This page appears automatically after the calculation is complete. |
|
Position by Source |
POS_IMPCT_RSLT_DT1 |
Click Drill to Detail on the Position Manager Results page. |
View the source transactions for the node. |
|
Position Forecasting Rules |
POS_FORECAST_RULES |
Cash Management, Administer Cash, Position Forecasting Rules |
Set up rules for forecasting. |
|
Copy/Apply Forecasting Rules |
POS_HIST_FORECAST |
Click Copy on the Position Manager Results page. |
Generate a copy of a worksheet. To create projected forecasts or modify cash flow amounts, you must create a worksheet copy. |
|
Schedule Position Manager |
TR_POS_RUNCNTL |
Cash Management, Cash Position, Schedule Position Manager |
Run the Cash Position/Position Monitor Application Engine process (TR_POS_TOTAL) to schedule the Position Manager to run at specified times. |
|
Position Report Periods |
POS_REPORT_PNL |
Cash Management, Cash Position, Position Report Periods |
Use PS/nVision to generate a Microsoft Excel file of Position Manager. |
Calculating Intraday Cash Position Reporting WorksheetsBefore calculating an intraday cash position, determine whether you need to load information into the bank statement table.
See Understanding Intraday Bank Reporting and Cash Positions.
The following example assumes that you are working with the 10 a.m. position.
To calculate an intraday, cash position reporting worksheet:
Select INTRADAY_CASH_POS in the Worksheet field on the Position Manager page.
Select a tree node value for the position:
INTRADAY INFLOWS
INTRADAY OUTFLOWS
OPENING AVAILABLE
TARGET BALANCE
TOTAL
TREASURY CASH FLOWS
Specify TODAY for the worksheet calculation preferences.
Click the Edit button to access the Position Manager Options page.
In the Time Horizon Option region, specify a time horizon of Source Set and a source set of the current (system) date.
For the Recalculation Options field, select the Recalculate Entire Worksheet value.
Select the Use Lock Reminder check box, save the page, and then click the Return to Position Manager link.
Click Calculate on the Position Manager page.
On the Position Manager Results page, the bottom row of lock buttons are the Lock All Nodes buttons. Each lock button is associated with a particular time: 10:00 a.m., 2:00 p.m., and 4:00 p.m. (Move your cursor over the button to view the hover text.)
Edit the particular node, and click the associated Lock All Nodes button (in this example, the 10 a.m. node). Save the page.
Click the Return to Position Manager link. The system displays the reminder message. Check your locked positions, and click the Return to Position Manager link.
Click Calculate on the Position Manager page.
Review the calculation results on the Position Manager Results page.
You need to repeat this process to recalculate the worksheet for the next intraday position. To do this, reload the same day bank statements and repeat steps 1–12 for the 2 p.m. or 4 p.m. position. This action causes the system to refresh the worksheet calculations with the updated same-day bank information.
See Updating Current Day Bank Statements.
Creating CPW Data Manually
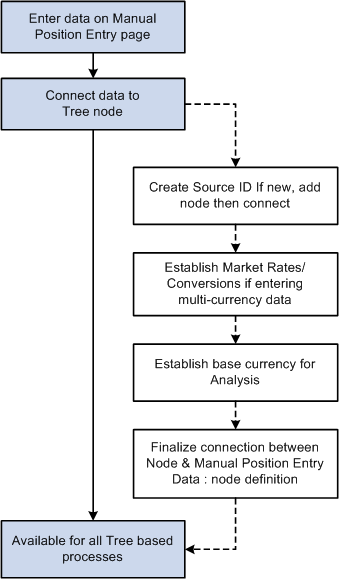
With Manual Position Entry, you enter data manually, create a source over it, and then place the source on a particular tree node. This diagram shows an overview of the Manual Position Entry process:
Manual Position Entry process
This section discusses how to:
Enter manual position information.
Define additional search criteria.
Copy data forward.
Pages Used to Create Position Worksheet Data Manually|
Page Name |
Definition Name |
Navigation |
Usage |
|
Enter Manual Position |
POS_GENERIC_ENTRY |
Cash Management, Cash Position, Enter Manual Position |
Search existing Position Manager data, and apply tree functionality to ad hoc data. This page is used to capture the data and begin structuring it so that you can connect it to an existing tree. |
|
Additional Search Criteria |
POS_GEN_ENT_SRCH |
Click Additional Search Criteria on the Manual Position Entry page. |
Increase the granularity of your search options. |
|
Copy Data Forward |
POS_GEN_ENT_COPY |
Click Copy on the Manual Position Entry page. |
Specify date and repeat parameters for copying forward rows of position entry information. |
|
Additional Information |
POS_GENERIC_ENTRY |
Select the Additional Information tab on the Enter Manual Position page. |
Add supplementary information to the manual position entry. |
Entering Manual Position Information
Access the Enter Manual Position page (Cash Management, Cash Position, Enter Manual Position).
|
Additional Search Criteria |
Click this link to narrow your search by selecting supplementary search categories. |
|
Category |
Displays another name for the target tree node. |
|
Copy |
Click to specify parameters for copying forward rows of position entry information. |
Note. All lines that are added to the Manual Position Entry grid must be of a currency for which an exchange rate is established; otherwise, the lines will not be included in the generation of the CPW. Exchange rates are set on the Market Rates page.
See Also
Defining Additional Search Criteria
Access the Additional Search Criteria page (click Additional Search Criteria on the Manual Position Entry page).
|
From Date and To Date |
Specify a date range for your data searches. Alternatively, you can specify to search on a particular day of the week, month, or day of the month. |
Copying Data Forward
Access the Copy Data Forward page (click Copy on the Manual Position Entry page).
|
Date From and Date To |
Enter a date range to copy cells of position entry information into the manual position worksheet. You can also specify the number of times to repeat the copied information. |
Generating Cash Management Position Reports
When you have created your cash position worksheet, you can generate reports to analyze the position data.
This section lists the pages that are used to generate cash management position reports.
Pages Used to Generate Cash Management Position Reports|
Page Name |
Definition Name |
Navigation |
Usage |
|
Actual vs Projected by Business Unit |
RUN_TRC1004 |
Cash Management, Reports, Actual v Projected by BU |
Generate the Actual vs. Projected by Business Unit report (TRC1004 [Crystal] or TRX1004 [BI Publisher]). Use the report to compare actual versus projected cash positions by a specified business unit. |
|
Actual vs Projected by Position |
RUN_TRC4060 |
Cash Management, Reports, Actual v Projected by Position |
Generate the Actual vs Projected by Position report (TRC4060 [Crystal] or TRX4060 [BI Publisher]). Use the report to compare actual versus projected cash positions by a specified value date. |
|
Actual vs Projected by Account |
RUN_TRC1009 |
Cash Management, Reports, Actual vs.Projected by Account |
Generate the Actual vs Projected by Account report (TRC1009 [Crystal] or TRX1009 [BI Publisher]). Use the report (broken down by account) to compare positions. |