 Understanding Counts
This chapter provides an overview of counting inventory and discusses how to:
Set up inventory counts.
Create counting events.
Collect counting data using the physical inventory EIP.
Enter count data from a counting sheet report.
Use manual counting events.
Create reconciliation reports.
Update counting events.
Update stock quantities.
Calculate utilization type classifications.
Understanding Counts
PeopleSoft Inventory counts enable you to:
Complete system-generated counts or define manual counts.
Collect count data manually or with third-party electronic data collection devices.
Close storage locations manually or continue to record transactions during a cycle count.
Analyze and resolve discrepancies in inventory data using the Reconciliation report.
When you finish collecting and analyzing count data, the system updates count quantities and generates the appropriate accounting transactions to ensure that the inventory is properly reported in the system and properly valued.
With PeopleSoft Inventory, you can also set up cycle counts or physical inventory counts. After determining the type of count to perform, you create a manual count or a system-defined counting event. System-defined counting events can be blind or non-blind. You can further control the counting event by including or excluding zero-quantity items and using the count date and time to ensure that the count is accurate if inventory transactions are allowed during the cycle count process.
In addition to using the PeopleSoft Inventory system, you can use mobile devices to count inventory for counting events created in the Inventory system. Using PeopleSoft Mobile Inventory Management, you can enter guided counts, counts by location, counts by item, and manual counts. After the stock count quantities are recorded, PeopleSoft Inventory can produce a reconciliation report showing the differences between the counted item quantities and the item quantities currently recorded in the inventory business unit.
For more information about the application and counting inventory, see the Mobile Inventory Management 9.1 PeopleBook.
See Also
Counting Inventory Stock Using Mobile Devices
 Count Types
With PeopleSoft Inventory, you can perform both cycle and physical inventory counts:
You can create the following types of counting events:
Note. Physical inventory counts are always system-defined counts. Cycle counts can be either system-defined or manual counting events.
Count Processes
This section details the steps and status changes for system-defined and manual counts.
This diagram illustrates the processing flow for completing a system-defined count, a manual count, and using an EIP to record count results. A system-defined counting event is created before the stock is physically counted; however, a manual count completes the actual warehouse count first and then creates the counting event. The PHYSICAL_INVENTORY EIP is an asynchronous inbound service operation that reports counting data (system-defined or manual) from a third-party application, such as a warehouse management system. The Physical Inventory process validates the third-party count data. All methods run the reconciliation report and the Stock Quantity Update process to complete the inventory count:
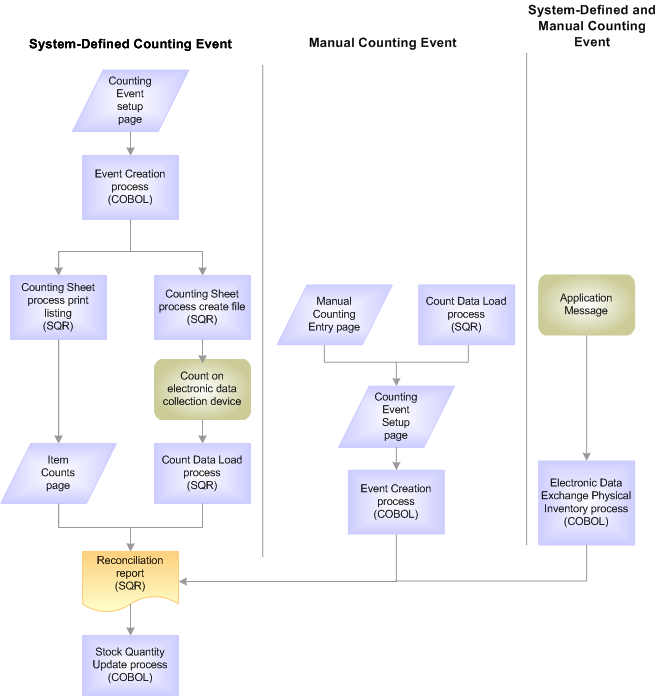
A comparison of the business process flows between the system-defined inventory count, a manual count, and using the PHYSICAL_INVENTORY service operation
Non-Blind System-Defined Counts
To perform non-blind system-defined counts:
Request a counting event using the Event Creation page.
The Event Creation process (INPCCREA) adds the specified item count lines from the inventory storage location quantity table to the counting event and sets the status of each detail line to New.
Use the Counting Sheet page to generate a printed listing or a file to download to electronic data-collection devices.
Running the Counting Sheet report enters the system balance in the Count Quantity field of each counting event detail line and changes the status of the detail lines from New to Ready to Update Stock Quantityand updates the current system data and time to the count date and time.
Go to the storage locations specified by the counting sheet listing or file and count the items.
You only need to record the count quantity if it does not match the system balance printed on the listing or displayed by the electronic data collection device.
Enter the collected count quantity data into PeopleSoft Inventory.
If you collected the count quantity data manually using the counting sheet listing, enter the quantity information using the Item Counts page. The system balance appears in the count quantity field, so you only need to modify item count lines for which the count quantity does not match the quantity expected by the system.
If you collected count quantity data with an electronic data collection device, upload the data using the Count Data Load page or the Physical Inventory process (INPIPHYS).
Run the Physical Accounting Reconciliation report to detect any recovery or shrinkage and to determine whether you need to correct any mistakes.
If you elected not to close storage locations during the cycle count, all inventory transactions that occurred during the counting process are recorded on the TRANSACTION_INV table. The Reconciliation process (INS5050) uses this table to calculate quantity adjustments. If you determine that a discrepancy on the Reconciliation report is due to a data entry error or a timing issue, correct the error on the Item Counts page. If necessary, you can also change the item status manually to include it on another counting sheet listing or to exclude it from the Stock Quantity Update process (INPOPOST).
Run the Stock Quantity Update process to update the inventory quantities with the count data.
Only counting event detail lines with a status of Ready to Update Stock Quantities and with the Need Reconciliation option cleared are eligible for the Stock Quantity Update process. If the system does not find errors, the Stock Quantity Update process updates the system tables with the data in the counting event detail lines and then changes the status of these detail lines to Stock Quantity Updated.
If the system finds an error is found in a detail line, the status of the detail line remains Ready to Update Stock Quantities and an error message (such as Container-multiple locations) appears on the Item Counts page. You can then find the error message in the Message Log Inquiry for the process instance.
See Using Error Messages from the Stock Quantity Update Process.
The system balance is not entered in the count quantity field for blind system-defined counts.
If you elected not to close the storage locations during the cycle count, all inventory transactions that occurred during the cycle count are recorded on the TRANSACTION_INV table. The Reconciliation process uses this table to calculate quantity adjustments. If you determine that a discrepancy on the Reconciliation report is due to a data entry error or a timing issue, correct the error on the Item Counts page. You can also change the item status manually to include it on another counting sheet listing or to exclude it from the Stock Quantity Update process.
To perform a blind system-defined count:
Run the Stock Quantity Update process to update the inventory quantities with the count data.
Request a counting event using the Event Creation page.
The Event Creation process adds the specified detail lines to the counting event and sets the status of each detail line to New.
Use the Counting Sheet page to generate a printed listing or a file to download to electronic data collection devices.
Running the counting sheet listing changes the status of the counting event detail lines from New to Counting. For blind counts, the count quantity field of each item record remains blank.
Go to the storage locations specified by the counting sheet listing or file and count the items.
You must collect count quantity data for every counting event detail line included on the listing or displayed by the electronic data collection device.
Enter the collected count quantity data into PeopleSoft Inventory.
If you collected count quantity data manually using the counting sheet listing, enter the quantity information using the Item Counts page. If you collected count quantity data with an electronic data collection device, upload the data using the Count Data Load page or the Physical Inventory process. When you enter the count quantity data, either with the Item Counts page or by uploading the electronic data collection device file, the status of the counting event detail line changes from Counting to Ready to Update Stock Quantity.
Run the Physical Accounting Reconciliation report to detect any recovery or shrinkage and to determine whether you need to correct any mistakes.
Only counting event detail lines with a status of Ready to Update Stock Quantitiesand with the Need Reconciliation option turned off are eligible for the Stock Quantity Update process. If no errors are found, the Stock Quantity Update process updates the system tables with the data in the counting event detail lines and changes the status of these detail lines to Stock Quantity Updated.
If an error is found in a detail line, the status of the line remains Ready to Update Stock Quantities and an error message (such as Container-multiple locations) appears on the Item Counts page.
See Using Error Messages from the Stock Quantity Update Process.
You can use the existing counting procedures with PeopleSoft Inventory.
To perform a manual count:
Count the quantity in the inventory storage locations.
Collect the data using pen and paper or an electronic data collection device, formatting the data according to PeopleSoft file specifications.
Enter the collected count data.
If you collected count data manually, enter the data using the Manual Counting Entry page. If you collected count data with an electronic data collection device, upload the data using the Count Data Load page. PeopleSoft Inventory stores the data in the Manual Count table (COUNT_INF_INV).
Modify the count data, as necessary.
Before you create a counting event, you can modify the count data in the Manual Count table using the Manual Counting page. After you run the Event Creation process, however, you must use the Item Counts page to make adjustments because the Event Creation process creates the counting event and moves the manual count data into the Counting Event table (COUNT_INV).
Request a manual counting event using the Event Creation Process page.
The Event Creation process moves the counting event detail lines in the Manual Count table to the Counting Event table and sets the status of each detail line to Ready to Update Stock Quantity.
Run the Physical Accounting Reconciliation report to detect any recovery or shrinkage and to determine whether you need to correct any mistakes.
If you elected not to close the storage locations during the cycle count, all inventory transactions that occurred during the cycle count are recorded to the TRANSACTION_INV table. The Reconciliation process uses this table to calculate quantity adjustments. If you determine that a discrepancy on the Reconciliation report is due to a data entry error or a timing issue, correct the error on the Item Counts page. You can also change the status manually to include it on another counting sheet listing or to exclude it from the Stock Quantity Update process.
Run the Stock Quantity Update process to update the inventory quantities with the count data.
Only counting event detail lines with a status of Ready to Update Stock Quantities are eligible for the Stock Quantity Update process. If no errors are found, the Stock Quantity Update process updates the system tables with the data in the counting event detail lines and changes the status of these detail lines to Stock Quantity Updated.
If an error is found in a detail line, the status of the line remains Ready to Update Stock Quantities and an error message (such as Container-multiple locations) appears on the Item Counts page.
Count Event Statuses
The status of a counting event is shown on the Counting Event Header page in the Perform Count component. The following statuses are available:
|
Open |
Includes counting event detail lines with any item status: New, Counting, Ready to Update Stock, Quantity Entered-Hold, or Canceled. |
|
Canceled |
Contains only those counting event detail lines with a status of Canceled or Stock Quantity Updated. After an event is canceled manually on the Counting Event Header page, the status of all its event detail lines changes to Canceled, except for those detail lines with a status of Stock Quantity Updated. You cannot change a canceled event. |
|
Finished |
Contains only those counting event detail lines with a status of Canceled or Stock Quantity Updated. After the status changes to Finished by the Stock Quantity Update process on the Counting Event Header page, the status of all event detail lines changes to Stock Quantity Updated, except for those detail lines with a status of Canceled. You cannot change a finished event. |
Note. You cannot change the status of a counting event to Finished on the Counting Event Header page if it contains detail lines with a Ready to Update Count Quantities status. You must first run the Stock Quantity Update process or change the status of these detail lines manually on the Item Counts page.
Zero-Quantity Items
PeopleSoft Inventory stores information for items received and put away into the PeopleSoft Inventory business unit. After items have been either adjusted to zero or shipped completely out of a storage location, the PHYSICAL_INV table reflects the zero quantity. Because the Event Creation process includes these zero-quantity records in each counting event, you count event lines for stock that is not there, requiring more time to run the cycle counts and making it harder to identify exactly which items need to be counted. The Counting Event Setup - Count Options page and the Event Creation page both include options that eliminate or limit the number of zero-quantity rows included in counting events.
The zero-quantity count option is not applicable to all cycle count options. For example, a negative balance cycle count includes only items in storage locations with negative available quantities. Additionally, a manual cycle count includes only the items that you choose to include in the counting event.
Eliminating zero-quantity records from the counting event excludes storage locations identified by the system as empty (associated with zero-quantity items). To confirm empty locations, add the empty locations to the existing counting event, using the Item Counts page, or perform a manual count.
In addition to using the zero-quantity count option, you can remove zero-quantity item records from the Physical Inventory table (PHYSICAL_INV) using the physical inventory purge routine. Perform this purge periodically to minimize the number of zero-quantity stock records in the PHYSICAL_INV table.
See Also
Purging and Archiving Inventory Data
Count Dates and Times
Because you do not have to freeze a storage location for a cycle count, the date and time that a counting event is created, loaded back into the system from an electronic data collection device, or updated using pages are important. If you do not freeze the storage location, you can create a counting event at 9:30 a.m. Wednesday and continue putting away stock into the storage location, picking stock from the storage location, and completing ad hoc adjustments to the storage location.
As a result, if you complete the count at 4:00 p.m. Friday, you must indicate when you are entering the count results. Recording this current date and time ensures that inventory transactions occurring since the counting event was created are accounted for. If you counted items in a storage location at 3:00 p.m. Wednesday and you do not update the count date and time, the system automatically changes the creation date and time of the counting event, and the inventory transactions that have occurred between 9:30 a.m. Wednesday and 3:00 p.m. Wednesday are incorrectly considered as the system updates the inventory balance for the storage location.
Common Elements Used in This Chapter
|
Transfer |
Click to search for storage locations. On the Transfer page, click the Storage Location Search link. |
|
Cycle Count Option |
Select a default for the type of cycle counting that you perform most often. Values are: Due to Count: Creates a cycle counting event to count those items that are due to be counted based on the last cycle count date and the cycle interval defined on the Counting Event Setup - Utilization Types page. Family: Creates a cycle counting event for items in a specific item family. Item ID: Creates a cycle counting event for items with a specific item ID. Manual Count: Creates a manual cycle counting event for count quantity data loaded from an electronic data collection device or entered using the Manual Counting Entry page. Because the manual counting event is restricted to the specified items, selecting this option makes the Zero Qty Count Options (zero quantity count options) field unnecessary and, therefore, unavailable for entry. Negative Balance: Creates a cycle counting event for items in storage locations with a negative available quantity. Because the negative balance counting event considers only items with negative quantity balances, selecting this option makes the Zero Qty Count Options field unnecessary and, therefore, unavailable for entry. Storage Location: Creates a cycle counting event for items in specific storage locations. |
|
Max Items (maximum items) |
The number of items to include in the count. To include all of the items, leave this field blank. |
|
Utilization Type |
Classifies inventory items based on their demand and usage. If you leave the field blank, the counting event includes all items with defined cycle intervals until the maximum number is reached. |
|
Count Qty (count quantity) |
The amount that you enter for a count. |
|
Zero Quantity Option |
Controls the number of zero-quantity item rows included in the counting event. Values are: Include All: Ensures that all valid items are included in the event, regardless of their quantity. Exclude Zero Quantity: Excludes all zero-quantity items from the event. If you select this option, storage locations that the system identified as empty are not included in the event. To confirm that these storage locations are empty, perform a manual count of the empty storage locations either by adding a new line to the existing counting event on the Item Counts page or by requesting a separate counting event on the Manual Counting Entry page. Include Zero Quantity: Includes all zero-quantity items in the event that inventory transactions occur after the date that you entered in the As of Transaction Date field. Use that field to limit the zero-quantity items that you include in the counting event. The counting event includes all zero-quantity items with transaction records that have transaction dates falling on or after the as of transaction date that you enter. |
|
Inv Tag ID (inventory tag ID) |
A sequential number automatically assigned to each counting event detail line when you run the Counting Sheet process (INS9051). This number is also printed on each count line of the Counting Sheet report. You can confirm that you are entering the correct data line from the report by comparing the tag ID on the report with the ID that appears on the page. |
|
Unit Cost |
The minimum cost per unit. The system calculates the cost variance by multiplying the quantity variance by the unit cost. The item's unit cost depends on the cost method and cost flag and is extracted from PeopleSoft Cost Management tables.
|
Setting Up Inventory Counts
To specify global default values for physical inventory and cycle counts for the business unit, use the Counting Event Setup (COUNT_SETUP1_INV) component.
This section discusses how to:
Set up count report and display parameters.
Set up count defaults.
Define utilization type count data.
Pages Used to Set Up Inventory Counts|
Page Name |
Definition Name |
Navigation |
Usage |
|
Setup Counting Event - General |
COUNT_SETUP1_INV |
Inventory, Inventory Counts, Prepare Counting Event, Setup Counting Event, General |
Specify count reporting and display parameters. |
|
Setup Counting Event - Count Options |
COUNT_SETUP2_INV |
Inventory, Inventory Counts, Prepare Counting Event, Setup Counting Event, Count Options |
Set up default values for the Event Creation process. |
|
Setup Counting Event - Utilization Types |
COUNT_UTIL_INV |
Inventory, Inventory Counts, Prepare Counting Event, Setup Counting Event, Utilization Types |
Identify the utilization types to be used in this cycle count. |
Setting Up Count Report and Display Parameters
Access the Setup Counting Event - General page (Inventory, Inventory Counts, Prepare Counting Event, Setup Counting Event, General).
Use the Reconciliation Reporting group box to determine the discrepancies that should appear on the Reconciliation report.
|
Percent Tolerance |
Sets an allowable difference between the system balance and the count quantity. |
|
Value Tolerance |
Sets an allowable cost variance. The variance is calculated using the difference between count quantity and the system balance for a storage location. |
|
Zero Qty Transaction History (zero quantity transaction history) |
Indicates that the Stock Quantity Update process should create transaction entries for all items processed in the count, including items with an adjustment of zero. You can view these transaction entries using the Transaction History Inquiry page. If you do not select this check box, the Stock Quantity Update process only creates entries for items with non-zero adjustments. |
|
Blind Count |
Indicates that system balance quantities are not included on the counting sheet listing or in the file sent to the electronic data collection device. You must enter the count quantity for all detail lines in the event. For non-blind counts, expected quantities are included on the count sheet listing or in the electronic data collection device file. The default expected quantities appear in the Quantity field of the counting event detail line. When you use non-blind counts, enter only exceptions to the count quantity field before running the Reconciliation report. |
|
Cancel Unprocessed Items |
Indicates that the Stock Quantity Update process should change the status of any uncounted items in a cycle counting event to Canceled. Uncounted items include those with status of New, Counting, or Quantity Entered-Hold. This selection does not apply to physical inventory counting events. Before you run the Stock Quantity Update process, you can change the status of items in the counting event manually using the Item Counts page in the Update Counting Event component. |
|
Distrib. Type (distribution type) |
Select to assign a distribution type to the adjustment results. The distribution type should be assigned based on the Count Options that you select on the Counting Event Setup - Count Options page. |
Note. If an order has been through the Picking Confirmation process, its picked quantity is not included in the counting event because the order quantity was moved from storage to shipping. If the processed order was not moved and was included in the location quantity count, a reconciliation error occurs. On the other hand, quantities for picked orders not processed by the Picking Confirmation process are included in the counting event because the quantity was not removed from storage. If the unprocessed order quantity is physically removed and not included in the location quantity count, a reconciliation error occurs.
See Also
Structuring Your Cost Management System
Setting Up Count Defaults
Access the Setup Counting Event - Count Options page (Inventory, Inventory Counts, Prepare Counting Event, Setup Counting Event, Count Options).
The options that you select appear on the Event Creation page.
|
Physical Inventory |
Creates a physical inventory counting event for the entire PeopleSoft Inventory business unit. Before creating a physical inventory counting event, you must freeze the business unit by selecting Prohibit Material Movements on the Inventory Definition - Business Unit Definition page. |
|
Cycle Count |
Creates counting events for a subset of items in a business unit. You do not need to freeze storage locations to perform cycle counts. Transactions can continue as usual, and the Stock Quantity Update process accounts for those transactions that occurred after the counting event was created. However, if you want to freeze a location for cycle counting, use the Material Storage Locations page. |
|
Cycle Count Option |
Select if you have chosen Cycle Count. Values include: Due to Count Family Item ID Manual Count Negative Balance Storage Location |
|
Zero Quantity Option |
Select if you have chosen Cycle Count. Values include: Exclude Zero Quantity Include All Include Zero Quantity |
|
As of Transaction Date |
Limits the zero-quantity items that you want included in the counting event. All zero-quantity items with inventory transactions occurring after the specified date are included in the counting event. |
See Also
Establishing a PeopleSoft Inventory Business Unit Structure
Defining and Maintaining Material Storage Locations
Defining Utilization Type Count Data
Access the Setup Counting Event - Utilization Types page (Inventory, Inventory Counts, Prepare Counting Event, Setup Counting Event, Utilization Types).
|
Utilization Group |
The default utilization group for cycle counts that you defined on the Util Groups Inv (Inventory Utilization Groups) page. Note. If you use the Due to Count cycle count option, you must have defined a default utilization group for cycle counting. If you have not, an error message appears here. |
|
Utilization Type |
Select the type of utilization. |
|
Cycle Interval (days) |
Enter the number of days for the interval between cycle counts. (These are consecutive calendar days, not the number of warehouse working days.) When you request the creation of a due to count counting event on the Event Creation page, the Event Creation process calculates which items are due to count by adding the cycle interval to the date of the last cycle count for the selected utilization type. If the due-to-count calculated date is on or before the current date, the system adds the item to the counting event. You can view the cycle interval using the Business Unit Item Definition - Inventory: Utilization Types page. The next cycle count field is informational only. |
|
Utilization Percent |
The percentage of items that are categorized for each utilization type. The system populates the field each time you run the Utilization Type Calculation process (IN_UTIL_AE). |
|
Review Period (days) |
Define how often you want to review utilization definitions for accuracy. The field is informational only. |
See Also
Creating Counting Events
You create counting events by launching the Event Creation process. You can create counting events before or after entering the count quantity data. A counting event includes a header and a list of the items being counted. The item information includes storage location, lot ID, serial ID, container ID, staged date, quantity, and unit of measure (UOM). The system obtains this information from the Manual Count table for manual counting events or from the PHYSICAL_INV for system-defined counting events.
Note. To support parallel counting events in multiple storage locations, you can create multiple counting events referencing the same item ID. However, to prevent counting stock twice, system edits do not permit you to have an item with the same combination of storage location, lot ID, serial ID, stage date, container ID, and storage UOM in more than one open counting event.
The Create Counting Event component includes two process pages: the Event Creation page and the Cycle Count Options page. Use both pages to define the parameters for specific request ID.
This section discusses how to:
Define parameters for the Event Creation process.
Define counting events.
Pages Used to Create Counting Events
|
Page Name |
Definition Name |
Navigation |
Usage |
|
Event Creation |
CNT_CRE_INV_REQ |
Inventory, Inventory Counts, Prepare Counting Event, Create Counting Event, Event Creation |
Define parameters for the Event Creation process. |
|
Cycle Count Options |
CNT_CRE_INV_RQ2 |
Inventory, Inventory Counts, Prepare Counting Event, Create Counting Event, Event Creation. Select the Cycle Count Options tab. |
Use with the Event Creation process page to define parameters for the Event Creation process for both wall-to-wall and cycle counts. |
Defining Parameters for the Event Creation
Process
Access the Event Creation process page (Inventory, Inventory Counts, Prepare Counting Event, Create Counting Event, Event Creation).
|
Count Options |
The default value comes from the Counting Event Setup - Count Options page and cannot be overridden. Event Creation process values include: Physical Inventory: Creates a physical inventory counting event for the entire PeopleSoft Inventory business unit. Cycle Count: Creates a counting event for items that you specify. If this option appears, you can override the default value in the Cycle Count Option field. |
|
Zero Quantity Option |
Values include: Exclude Zero Quantity, Include All, and Include Zero Quantity. |
|
Commit Batch |
Controls database commit level processing and is applicable only for cycle counting events using the Due to Countoption on the Cycle Count Options Process page. The standard default for PeopleSoft Inventory processes is 100 rows per SQL commit command. |
See Also
Defining Counting Events
Access the Cycle Count Options process page (Inventory, Inventory Counts, Prepare Counting Event, Create Counting Event, Event Creation. Select the Cycle Count Options tab).
|
Cycle Count Option |
Select the cycle count criteria you'd like to use. Different fields display depending on which type of cycle count you select. Values include: Due To Count: Select if you'd like the system to select all items that are past their due to count date, which is displayed on the Define Business Unit Item, Inventory, Utilization Types page. Family: Select if you'd like the system to select all items that are part of an item family. Item ID: Select if you'd like the system to select a specific item ID. Manual Count: Select if you'd like the system to process a manual count. Negative Balance: Select if you'd like the system to select all items that have a negative balance. Storage Location: Select if you'd like the system to select all items that are stored in a specific storage location or a range of storage locations. Note. If you select the Storage Location option, the last cycle count date used to identify when that item should be counted next is not updated. This design reflects the fact that an item ID can be stored in multiple storage locations. Completing a cycle count for a specific storage location does not provide a valid last-cycle count date for the item ID. |
|
Max Items and Utilization Type |
These fields are available if you select the Due To Count cycle count option. Enter the maximum number of items if you wish to limit the system's selection, and the utilization type code for the business unit. |
|
Item |
This is available if you if you select the Item ID cycle count option. |
|
Family |
This is available only if you select the Family cycle count option. |
|
Single Storage Location or Range of Locations |
Complete for the location required. |
See Also
Searching for Material Storage Locations
Calculating Utilization Type Classifications
Collecting Counting Data using the Physical
Inventory EIP
The PHYSICAL_INVENTORY EIP is an asynchronous inbound service operation that reports counting data from a third-party application, such as a warehouse management system. The count data can be from a cycle count or a complete warehouse (business unit) count. After the counting data has been inserted in the PeopleSoft inbound message staging tables (BCT_CTL and BCT_DTL), run the Physical Inventory process to validate the third-party count data and move the valid data into the Counting Event table in PeopleSoft Inventory.
This section discusses how to:
Generate data-collection files to download.
Upload count data files.
Define physical inventory processing parameters.
Warehouse Management
In a Warehouse Management System integration, this counting data is used to synchronize the quantity balances between the two systems. PeopleSoft Inventory processes this data as a stock quantity update from a counting event.
Setting Up the Physical Inventory EIP
PeopleSoft delivers the service operations in PeopleSoft Integration Broker with a default status of Inactive. You must activate each service operation before attempting to send or receive data from a third-party source or another PeopleSoft system, such as CRM.
To set up the Physical Inventory EIP within PeopleSoft Integration Broker and Enterprise Components, use the information in the table below and refer to the setup instructions in the PeopleSoft Supply Chain Management Integrations 9.1 PeopleBook, "Implementing Integrations" chapter, Setting Up Service Operations section.
|
Service Operation |
Direction and Type |
Handlers |
Chunking Available? |
Integrates With |
|
PHYSICAL_INVENTORY |
Inbound Asynchronous |
PhysicalInventory |
No |
Third-party systems such as WMS |
See Setting Up Service Operations.
See PeopleTools PeopleBook: Integration Broker
See Processing Enterprise Integration Points (EIPs).
Data Collection
If you use electronic data collection devices to count the inventory, you must send the system-defined counting events to the electronic data collection devices before performing the count. Similarly, if you perform the count by hand, you need to print a count sheet listing to carry to the count storage locations.
After you create a counting event:
Create a counting sheet listing to record the quantity information that you gather during the counting process.
Gather and record the quantity-count information.
Manually enter or electronically upload that information into the system.
You might have to provide other data, such as a lot or serial ID, depending on the item's attributes and the setup parameters.
See Also
Understanding Warehouse Management Systems
Pages Used to Collect Counting Data using
the Physical Inventory EIP
|
Page Name |
Definition Name |
Navigation |
Usage |
|
Create Counting Sheet |
RUN_INS9051 |
Inventory, Inventory Counts, Prepare Counting Event, Create Counting Sheet, Counting Sheet |
Generate a file to download to an electronic data collection device or to print a counting sheet listing. |
|
Load External Count Data |
RUN_INS9050 |
Inventory, Inventory Counts, Perform Count, Load External Count Data |
Upload the data file to the database if you collect count quantity data with electronic data collection devices. |
|
Physical Inventory |
BCT_INV_REQPHYS |
SCM Integrations, Process Transactions, Inventory, Physical Inventory |
Establish run control parameters for the Physical Inventory process. The process moves counting event data, staged by third-party applications using the Physical InventoryEIP to the Counting Event table in PeopleSoft Inventory. |
Generating Data-Collection Files to Download
Access the Create Counting Sheet page (Inventory, Inventory Counts, Prepare Counting Event, Create Counting Sheet).
|
File Name |
Defines the counting sheet file. |
|
Max Items (maximum number of items) |
Defines the largest number of items to include in a file or printed count sheet. Leave the field blank to include all items. You can enter a number greater than the number of items specified on the Counting Event Setup - Count Options page if you are unsure of the number of items available to count. You can also enter a smaller number to minimize the number of items in the counting event. To include the remaining items in the file or printed count sheet listing, run the Counting Sheet process again. |
|
Print Listing |
Includes all counting event detail lines with a status of Newon the counting sheet listing if you are collecting count quantity data on paper. |
|
Create File |
Creates an electronic counting sheet file to download to the device if you are counting with an electronic data collection device. The file name must be an eight-character name. Do not include a directory, drive name, or file extension. Your environment settings define where to create the file. The Counting Sheet process appends a .DWN extension to the file name. If the file already exists, an error message appears. |
|
Reprint All Items |
Includes all counting event detail lines in the printout regardless of their counting status. |
|
Sort By |
Sorts information on the Item Counts page. Values are: Location: Sorts by storage location (storage area, storage level 1, storage level 2, storage level 3, storage level 4), item ID, lot ID, serial, container, staged date, and UOM. Item ID: Sorts by item ID, storage location (storage area, storage level 1, storage level 2, storage level 3, storage level 4), lot ID, serial, container, staged date, and UOM. |
See Also
Generating Printed or Downloadable Par Location Files
Uploading Count Data Files
Access the Load External Count Data page (Inventory, Inventory Counts, Perform Count, Load External Count Data).
|
Event ID |
Select an ID for the counting event if you are loading count quantity data for a previously created, system-defined counting event. PeopleSoft Inventory updates the counting event detail lines with the quantities from the electronic data collection device and changes the status of the items to Ready to Update Stock Quantity. Leave the Event ID field blank to load the count data into the Manual Count table if you are loading count quantity data for a manual count. The Event Creation process moves the detail lines in the Manual Count table to the Counting Event table during the creation of the manual counting event. |
|
File Name |
Enter the count data file to load. Do not include a directory, drive name, or file extension. Your environment settings indicate where to find the file. |
Defining Physical Inventory Processing Parameters
Access the Physical Inventory page (SCM Integrations, Process Transactions, Inventory, Physical Inventory).
See Also
Processing Enterprise Integration Points (EIPs)
Understanding Warehouse Management Systems
Entering Count Data from a Counting Sheet
Report
Use the Item Counts page in the Update Counting Event component to enter the count data for a system-defined count that you recorded on the counting sheet.
See Also
Using Manual Counting Events
In manual counts, you enter the count data first and then create the counting event with its header, counting event detail lines, and count quantities. You can collect the count quantities using electronic data collection devices or with pen and paper. With manual counting events, you can incorporate the previously established counting methods with PeopleSoft Inventory.
This section discusses how to:
Enter count results.
Change count results.
Pages Used for Manual Counting Events
|
Page Name |
Definition Name |
Navigation |
Usage |
|
Manual Count |
COUNT_INF_DE_INV |
Inventory, Inventory Counts, Perform Count, Manual Count |
Enter count results into the system. |
|
Manual Counting |
COUNT_INF_INV |
Inventory, Inventory Counts, Perform Count, Update Manual Count, Manual Counting |
Change the information that you entered on the Manual Count page or uploaded from an electronic data collection device. |
Entering Count Results
Access the Manual Count page (Inventory, Inventory Counts, Perform Count, Manual Count).
The Manual Counting page is used to manually enter your count results. This page runs in deferred mode. Therefore all page edits are performed when you save the page.
Depending on the item and the setup parameters, other fields may be required:
If the item is lot controlled, enter the Lot ID.
If the item is serial controlled, enter the Serial ID.
If you use staged-date tracking, enter the Staged Date.
|
Count Date/Time |
Update this field if you have not frozen the storage location. If you do not make an entry, the system enters the current date and time in the field when you save the page. Transactions occurring since the creation of the counting event are not taken into account when the system makes adjustments for the location. |
|
Lot ID, Serial ID, Stage Date, Qty Reserved, Storage Location and Configuration Code |
These fields display depending on setup on the Business Unit Display Options page. |
See Also
Defining PeopleSoft Inventory Business Unit Display Options
Changing Count Results
Access the Manual Counting page (Inventory, Inventory Counts, Perform Count, Update Manual Count, Manual Counting).
Note. Use this page to change the manual count data before creating the counting event. To change data after creating the counting event, use the Item Counts page.
Click the Search button to populate the page with records from the Manual Count table.
See Also
Entering Count Data from a Counting Sheet Report
Searching for Material Storage Locations
Managing Inventory by Item Status
Creating Reconciliation Reports
After entering counting data, use the Reconciliation report to detect any recovery or shrinkage and to determine whether you need to correct mistakes. You must run the Reconciliation report to calculate the system quantity at the time of the count.
The system does this calculation by subtracting transactions occurring since the count from the current quantity. The adjustment to the storage location represents difference between the count quantity and the calculated system quantity at the time of the count. Adjustments are applied by the Stock Quantity Update process.
Page Used to Create Reconciliation Reports
|
Page Name |
Definition Name |
Navigation |
Usage |
|
RUN_INS5050 |
Inventory, Inventory Counts, Reconcile Inventory Balances, Reconciliation Report, Reconciliation |
Analyze and resolve discrepancies in collected data. |
Updating Counting Events
This section discusses how to:
Maintain event headers.
Review event history.
Display event statistics.
Enter item count data.
Retrieve event detail lines.
Pages Used to Update Counting Events
|
Page Name |
Definition Name |
Navigation |
Usage |
|
Counting Event Header |
COUNT_HDR1_INV |
Inventory, Inventory Counts, Perform Count, Update Counting Event, Counting Event Header |
Change a count event's status, description, or reporting tolerances. |
|
COUNT_HDR2_INV |
Inventory, Inventory Counts, Perform Count, Update Counting Event, Counting Event History |
View information about a specific counting event. |
|
|
Counting Event Statistics |
COUNT_HDR3_INV |
Inventory, Inventory Counts, Perform Count, Update Counting Event, Counting Event Statistics |
View statistics for a specific counting event. |
|
Item Counts |
COUNT_INV |
Inventory, Inventory Counts, Perform Count, Update Counting Event, Item Counts |
Enter count data for the system-defined count recorded on the counting sheet listing. Also, after running the Reconciliation report, modify count quantities and item status for all counting events before running the Stock Quantity Update process. |
|
Item Count Search |
COUNT_SRCH_INV |
Click the Search button on the Item Counts page. |
Retrieve counting event detail lines. |
Maintaining Event Headers
Access the Counting Event Header page (Inventory, Inventory Counts, Perform Count, Update Counting Event, Counting Event Header).
|
Count Header Status |
Select the state of the count event. Values are: Open: Includes counting event detail lines with any item status: New, Counting, Ready to Update Stock, Stock Quantity Updated, Quantity Entered-Hold, or Canceled. Canceled: Contains only detail lines with a status of Canceled or Stock Quantity Updated. Once a counting event has been canceled, its data cannot be modified. Finished: Contains only detail lines with a status of Canceled or Stock Quantity Updated. Once the status of a counting event changes to Finished, its data cannot be modified. |
|
Count Grade |
Describes the counting event. For example, you may want to assign a grade to the counting event after reviewing the error percentage on the Reconciliation report. |
|
Percent Tolerance |
The default values come from the global settings defined for the business unit on the General page in the Setup Counting Event component. You can change them before running the Reconciliation report for the counting event. |
To cancel a counting event:
Set the Count Header Status to Canceled.
Save the page.
PeopleSoft Inventory sets all the detail line statuses of the counting event to Canceled except for the detail lines with a status of Stock Quantity Updated, which remain the same.
If you use the Item Counts page to change all of the counting event detail lines manually to Canceled, the Stock Quantity Update process automatically changes the header status of the counting event to Canceled.
When the counting event contains only Stock Quantity Updated detail lines, or only Canceled and Stock Quantity Updated detail lines, the Stock Quantity Update process automatically changes the status of the counting event to Finished.
You can change the header status to Finished only if the status of all the detail lines is Canceled or if the Stock Quantity Update process has processed all detail lines in the counting event.
See Also
Creating Reconciliation Reports
Displaying Event Statistics
Access the Counting Event Statistics page (Inventory, Inventory Counts, Perform Count, Update Counting Event, Counting Event Statistics).
|
Number of Records |
The total number of records in the event. The Number of Records and Number Updated Stock Qty fields are equal only if you selected the Zero Qty Transaction History (zero quantity transaction history) check box on the Counting Event Setup - General page. Otherwise, transactions with zero quantities are not included in the calculation, resulting in a discrepancy between the two totals. |
|
Number Updated Stock Qty (number of updated stock quantity) |
The number of records that have been updated by the Stock Quantity Update process. |
|
Last Stock Qty Update (last stock quantity update) |
The most recent date that you ran the Stock Quantity Update process. |
|
Quantity Total |
The quantity of items counted for the counting event. |
|
Quantity Error |
The difference between the total quantity that the system expected and the total number actually counted for the event. |
|
Quantity Percent Error |
The error quantity divided by the total quantity, then multiplied by 100. |
Entering Item Count Data
Access the Item Counts page (Inventory, Inventory Counts, Perform Count, Update Counting Event, Item Counts).
Note. If you count an item that was put away or transferred to the specified storage location but you did not make PeopleSoft Inventory aware of the new stock, you can specify the item in this location for a count. If you have not searched the item count lines, you can bypass the Item Count Search page and enter the count information in the blank row that appears. Otherwise, you can add a row and insert the count information. The system increments the storage area where the item was put away to the appropriate quantity. However, if the stock is from a putaway transaction for which the Load Stage Items process (INPSSTGE) found an data error, this technique may result in duplicate quantity updates for the storage location. If you add a row and insert the count information, the system updates the storage location quantity. When the system corrects the data error and processes the putaway transaction, it increments the storage location.
|
Record Count Quantity of Zero |
Indicates that the system should record a count quantity of zero. If you enter a non-zero count quantity and select this option, it resets the count quantity to zero. Similarly, if you enter a non-zero count quantity after selecting the option, it clears the check box. Changing the item status to Canceled, Quantity Entered - Hold, New, or Counting also clears the check box. |
|
Date/Time |
If you are performing a cycle count and have not frozen the location using the Material Storage Locations page in the Structuring Inventory menu, you must update this field to reflect the actual time of the count. If you do not update the field, the system may create adjustments for the location after erroneously considering transactions that occur after the creation of the counting event and before the actual time of the count. Transactions that occur before the actual time of the count should not be included in the adjustment calculation. |
|
Needs Reconciliation |
Indicates whether you must run the Reconciliation report before running the Stock Quantity Update process. The option is set automatically as follows:
When the Reconciliation report process picks up an item count line, it clears the check box and updates the count item status of the line to Ready to Update Stock Quantity. |
|
Count Item Status |
Changes the status of the counting event detail line. Values include: New: Includes the uncounted line in the Counting Sheet report or file when you run the Counting Sheet process. The Counting Sheet process changes the status to Counting for blind counts or to Ready to Update Stock Quantity for non-blind counts. Events with new detail lines have a header status of Open. Counting: The Counting Sheet process changes the status of detail lines in a blind, system-defined counting event from New to Counting. Detail lines with a status of Counting are considered uncounted. When you enter a count quantity for items with a Counting status, the status automatically changes to Ready to Update Stock Quantity. Events with items in a Counting status have a header status of Open. Quantity Entered - Hold: Prevents the count quantity of a detail line from being applied to system tables by the Stock Quantity Update process. Events with items in a Hold status have a header status of Open. Ready to Update Stock Quantity: When you run the Stock Quantity Update process, the system uses quantities in counting event detail lines (with this status) to update tables. If you change the quantity of a detail line, PeopleSoft Inventory automatically changes the status to Ready to Update Stock Quantities. Events with detail lines in a Ready to Update Stock Quantity status have a status of Open. Stock Quantity Updated: Lines with a Ready to Update Stock Quantity status change to Stock Quantity Updated. When all detail lines in a counting event have a status of Stock Quantity Updated, the counting event header status changes to Finished. Canceled: The Stock Quantity Update process ignores lines with a status of Canceled. You can change events with only detail lines that have a status of Canceled or Stock Quantity Updated to Finished. |
The Stock Quantity Update process checks counting event detail lines with a status of Ready To Update Count Quantities for errors before updating the system tables. If the system finds an error in a detail line, the status does not change, and an error message appears on the Item Counts page.
See Also
Using Error Messages from the Stock Quantity Update Process
Searching for Material Storage Locations
Retrieving Event Detail Lines
Access the Item Count Search page (Click the Search button on the Item Counts page).
|
New |
Returns the detail lines in a non-blind system-defined counting event for which you have not run the Counting Sheet process. |
|
Counting |
Returns the detail lines in a blind system-defined counting event. |
|
Quantity Entered - Hold |
Returns counting event detail lines with statuses that you changed manually on the Item Counts page to prevent the Stock Quantity Update process from updating the stock quantity of an item. |
|
Ready to Update Stock Quantity |
Returns counting event detail lines with quantities that are to be used to update the system tables when you run the Stock Quantity Update process. |
|
Stock Quantity Updated |
Returns counting event detail lines with quantities that have already been posted to the system tables by the Stock Quantity Update process. |
|
Canceled |
Returns detail lines that are to be ignored by the Stock Quantity Update process. |
|
From Tag ID and To Tag ID |
Defines the beginning number to retrieve. The value pertains to the To Tag ID field and appears on the counting sheet listing. Tag IDs are unique numbers that the Counting Sheet process assigns to counting event detail lines (in sequence) to identify items in a count more easily. Note. The Counting Sheet process assigns tag IDs. If a counting sheet is not generated for the counting event, you cannot retrieve it according to a tag ID number. |
See Also
Searching for Material Storage Locations
Updating Stock Quantities
The Stock Quantity Update process:
Updates inventory quantities.
Creates transactions for any shrinkage or recoveries.
Adjusts storage location quantities by the difference between the count quantity and the system quantity at the actual time of the count.
For cycle counts, the process takes into consideration all transactions that have occurred since the counting event date and time stamp and the date and time that you ran the Reconciliation report.
When updating lot-controlled items, the process calculates lot availability, retest, and expiration dates if you have defined shelf life, availability lead time, and retest lead time values for the item in the business unit. These dates are not recalculated if they already exist in the system.
Note. If the business unit requires closure calendar validation and processing for material management activities as you defined on the Closure Calendar page, and the calculated lot retest date falls on a defined closure date, the system uses the first previous valid date that you defined for the function.
For an item count line representing a positive quantity adjustment, the Stock Quantity Update process inserts a new row with a unit cost into the Actual Cost table (CM_ACTUAL_COST). If the item count line is for a perpetual costed item and if no record exists in the Perpetual Cost table (CM_PERPAVG_COST) for the item, the Stock Quantity Update also inserts a row with a unit cost of zero into the CM_PERPAVG_COST table, using the same keys as the adjustment transaction record in the TRANSACTION_INV table.
This section discusses how to:
Define stock update parameters.
Use error messages from the Stock Quantity Update process.
See Also
Calculating Utilization Type Classifications
Page Used to Update Stock Quantities
|
Page Name |
Definition Name |
Navigation |
Usage |
|
Stock Quantity Update |
CNT_PST_INV_REQ |
Inventory, Inventory Counts, Reconcile Inventory Balances, Update Stock Quantity, Stock Quantity Update |
Define parameters for the Stock Quantity Update process. After you enter the counting data for a counting event, you must run the Stock Quantity Update process to update the system balances for the counted storage locations. |
Defining Stock Update Parameters
Access the Stock Quantity Update page (Inventory, Inventory Counts, Reconcile Inventory Balances, Update Stock Quantity, Stock Quantity Update).
The Commit Batch option controls database commit level processing. The standard default for PeopleSoft Inventory processes is 100 rows per SQL commit command. The Stock Quantity Update process makes adjustments for those counting event detail lines with a status of Ready to Update Stock Quantity and for which a Reconciliation report has been run. After the process completes, you must also release storage locations on the Material Storage Locations page if any were frozen for the counting event.
Using Error Messages from the Stock Quantity
Update Process
The Stock Quantity Update process checks for errors before updating the system tables. If it finds errors, the status of the detail line remains Ready to Update Stock and the system displays an error message on the Item Counts page.
|
Error Message |
Cause |
Resolution |
|
No Lot Control Record |
The combination of item and lot on the counting event detail line was not located in the business unit's LOT_CONTROL_ INV table. The data-collection file may have included an incorrect or incomplete lot ID. |
|
|
The business unit was not set up for creating lots automatically. |
Do one of the following:
|
|
|
Duplicate Serial Item found |
A duplicate serial-controlled item exists in this location. The quantity for a serial-controlled item can be a non-zero value in only one location, indicating that incorrect data was included in the counting event. |
Cancel the counting event line. |
|
Missing UOM Conversion Rate (missing unit of measure conversion rate) |
A conversion rate is not on file for the given UOM to the item's standard UOM. |
Set up a UOM conversion rate on the Units of Measure page in the Define Items menu. |
|
Serial ID - multiple locations |
A serial ID exists in a location other than the one included in the counting event detail line. You cannot insert the same serial-controlled item into two different locations. The quantity for a serial-controlled item can be a non-zero value in only one location. |
Do one of the following:
|
|
Container - multiple locations |
The container ID exists in a location other than the one included on the counting event detail line. You cannot insert a container into two different locations. |
Do one of the following:
|
|
Wrong Item - Single Item Cntr (wrong item in single item container) |
Another item ID with a non-zero value is stored in this single-item container. You cannot put an item into a single-item container to which another item is assigned. |
Do one of the following:
|
|
Incomplete Item Definition |
The counting event detail line is missing required item definition information from the Master Item table (MASTER_ITEM_TBL), Business Unit-Items table, or both. This error generally indicates that the item ID is incorrect or is new and has not been defined in the Define Item component. |
Do one of the following:
|
|
No standard cost for the item |
A standard cost item is missing a standard cost. You need to add a standard cost for the item and rerun the Stock Quantity Update process or cancel the counting event line. |
Do one of the following:
|
|
New Container Not Allowed |
The business unit was not set up to create containers automatically. |
|
|
Negative balance not allowed for this business unit |
The Allow Negative Inventory option on the Business Unit Options page is not active for the business unit, and the current transaction results in a negative quantity. This error appears only if transactions are still occurring during a cycle count. |
Do one of the following:
|
|
Standard Qty fail in a whole # (standard quantity failed to result in a whole number) |
The entered count quantity is not in a standard UOM and it is entered as a decimal number. The standard UOM for this item is defined as a whole number on the Units of Measure page. The Stock Quantity Update process tried to convert the decimal count quantity to the standard UOM and it failed to result in a whole number. |
Change the count quantity on the Item Count page. |
|
Whole # required for Count Qty(whole number required for count quantity) |
The entered count quantity is a decimal number and the count UOM for this item is defined as a whole number on the Units of Measure page. |
Change the count quantity to a whole number on the Item Counts page. |
|
Storage Qty fail in a whole # (storage quantity failed to result in a whole number) |
The entered count quantity is a decimal number and the count UOM is different from the storage UOM (PHYSICAL_INV.Unit_of_Measure). The storage UOM for this item is defined as a whole number on the Units of Measure page. The Stock Quantity Update process tried to convert the decimal count quantity to a storage UOM quantity and it failed to result in a whole number. |
Change the count quantity on the Item Count page. |
|
From/To UOM Rate must be a whole# (from/to unit of measure rate must be a whole number) |
When the Stock Quantity Update process converts the count quantity to a different UOM, it must then validate the original quantity by reconverting the updated quantity to the original UOM. If the reconverted quantity does not equal the original count quantity, you receive this error message. |
Change the count quantity on the Item Count page. |
Calculating Utilization Type Classifications
In PeopleSoft Inventory, you can calculate the ABC classifications (utilization types) for the business unit and item ID combination. You can view the utilization types on the Define Business Unit Item-Inventory: Utilization Types page. This ABC classification primarily drives cycle count frequency. However, you can create multiple utilization types per item for different purposes. Define a separate utilization group for each purpose, such as, cycle count, planning, material handling, and so on. Based on the utilization group, the system stores a separate utilization type per business unit and item ID combination.
To define utilization rules, use the Setup Utilization Rules (UTIL_RULES_INV) component. To initiate a process to automatically assign items to a utilization rule, use the Utilization Type Calculation (UTIL_REQ_INV) component.
Use the Utilization Type Calculation process to assign items to utilization type ABC classifications automatically. Use the utilization reporting features to evaluate the results.
To classify items using the Utilization Type Calculation process:
Define utilization types.
Create utilization types to define the ABC classifications to use in your environment. For example, you may decide to classify items as A, B, and C, or High, Medium, and Low. On the Utilization Types page under the Define Controls menu, define utilization types for the setID.
Define utilization groups.
Create a separate utilization group for each ABC grouping that you want to maintain in the system. For example, establish utilization groups for cycle counting, planning, material handling, or performance reporting. Each utilization group can use different parameters to assign items to a specific utilization type. For example, the inventory control supervisor may consider an item to be a C item because it is a slow mover, but the purchasing department may consider that same item to be a B item because of its lead time. On the Util Group Inv (Inventory Utilization Group) page, you can assign items to a utilization group and select default utilization groups for cycle counting and planning.
Define utilization type calculation rules.
On the Utilization Rules Setup page and the Utilization Type Setup Parameters page, define rules that the Utilization Type Calculation process should use to assign utilization types to items.
Run the Utilization Type Calculation process in Calculation mode until you are satisfied with the item classifications that it generates.
You can run the Utilization Type Calculation process in either calculation or update mode. Run the process in calculation mode and print utilization type calculation reports to view the item classifications that result from the utilization rules. Adjust the utilization rules as necessary and rerun the Utilization Type Calculation process in Calculation mode.
Run the Utilization Type Calculation process in Update mode.
When you are satisfied with the item classifications generated by the Utilization Type Calculation process, run the process in update mode to assign the calculated utilization type to the items.
This section discusses how to:
Define calculation rules for utilization types.
Define attributes for item utilization type calculations.
Define parameters for the Utilization Type Calculation process.
Print Utilization Type Calculation reports.
See Also
Pages Used to Calculate Utilization Type
Classifications|
Page Name |
Definition Name |
Navigation |
Usage |
|
Utilization Rules Setup |
UTIL_RULES_INV |
Inventory, Inventory Counts, Prepare Counting Event, Setup Utilization Rules, Utilization Rules Setup |
Specify parameters for the Utilization Type Calculation process for a specified utilization group. |
|
Utilization Type Setup Parameters |
UTIL_SETUP_INV_SEC |
Click the Required Rule Parameters button on the Utilization Rules Setup page. |
Select the parameters for calculating the item utilization type, and define whether the values that you used in the Utilization Type Calculation process are static numbers or percentages. |
|
Copy Utilization Rules |
UTIL_CLONE_SEC |
Click the Clone Utilization Rules button on the Utilization Rules Setup page. |
Copy the utilization rules from the current business unit to other business units. |
|
Utilization Type Calculation |
UTIL_REQ_INV |
Inventory, Inventory Counts, Prepare Counting Event, Utilization Type Calculation |
Calculate the utilization types (ABC classifications) that should be assigned to each item within a business unit and utilization group. Indicate whether the process should run in Calculation or Update mode. |
|
Utilization Type Report |
RUN_INS5100 |
Inventory, Inventory Counts, Prepare Counting Event, Utilization Type Report |
Print reports from the last run of the Utilization Type Calculation process. |
Defining Calculation Rules for Utilization
Types
To define calculation rules for utilization types, use the Utilization Rules Setup component.
Access the Utilization Rules Setup page (Inventory, Inventory Counts, Prepare Counting Event, Setup Utilization Rules, Utilization Rules Setup).
|
Required Rule Parameters |
Click to access the Utilization Type Setup Parameters page, where you can select attributes to use in the utilization type calculation. Click this button if you are entering data for this business unit and utilization group for the first time or if you want to make changes. |
|
Clone Utilization Rules |
Click to access the Copy Utilization Rules page, where you can copy this business unit's rules to other business units. |
|
Priority |
Enter a priority ranking to each calculation rule. The Utilization Types Calculation process assigns items to the highest-rank priorities first. |
|
Utilization Type |
Enter an ABC classification and enter the minimum values for the attributes that you defined on the Utilization Type Setup Parameters page. The Utilization Type Calculation process uses these values to determine which items to assign to a utilization type. |
Note. The system categorizes an item into a particular utilization type classification (such a A) when the item meets just one of the parameters that you defined here. The Utilization Type Calculation process assigns each item to the highest utilization type that it meets. For example, if an item meets the A classification for on-hand quantity and the B classification for unit cost, then the system classifies the item as an A item.
Defining Attributes for Item Utilization
Type Calculations
Access the Utilization Type Setup Parameters page (Click the Required Rule Parameters button on the Utilization Rules Setup page).
Define the parameters or calculation rules to be used for this business unit and utilization group combination. For each calculation rule, indicate whether the Utilization Type Calculation process should use Static (fixed) or Percent (percentage) values. The process uses the values that you define on the Utilization Rules Setup page.
|
Forecasted Amount |
The minimum forecasted amount required for this utilization type. The system calculates the forecasted amount by multiplying the item's unit cost by its forecasted quantity. |
|
Forecasted Quantity |
The minimum forecasted quantity for this utilization type. The system calculates an item's forecasted quantity for a specified forecast set and a specified forecast date that is less than or equal to the requested forecast horizon date. |
|
Historical # of Transactions (historical number of transactions) |
The minimum number of historical transactions for this utilization type. Note. Historical usage calculations include the data from the following transactions: issues, physical accounting adjustments, adjustments, transfers, component kit, and component consumption. |
|
Historical Adjustment Amount |
The minimum historical adjustment amount for this utilization type. The historical adjustment amount is calculated by multiplying the item's unit cost by its historical adjustment quantity. |
|
Historical Adjustment Quantity |
The minimum historical adjustment quantity (the minimum quantity adjusted over a given period of time) for this utilization type. |
|
Historical Usage Amount |
The minimum historical usage amount for this utilization type. The historical usage amount is calculated by multiplying the item's unit cost by its historical usage quantity. |
|
Historical Usage Quantity |
The minimum historical usage quantity (the minimum quantity transacted over a given period of time) for this utilization type. |
|
Lead Time (Days) |
The minimum lead time for this utilization type. If the installation includes PeopleSoft Purchasing, the system uses the standard lead time for purchasing; otherwise, the system uses the lead time for replenishment. |
|
On Hand Amount |
The minimum on-hand amount for this utilization type. The on-hand amount is calculated by multiplying the item's unit cost by its on-hand quantity. |
|
On Hand Quantity |
The minimum on-hand quantity permitted for this utilization type. The on-hand quantity is retrieved from the business unit and item level. |
|
Unit Cost |
The minimum cost per unit for the utilization type. The unit cost is derived as follows:
|
|
Percent or Static |
Select to use:
|
Copying Utilization Rules to Other Business Units
Access the Copy Utilization Rules page (Click the Clone Utilization Rules button on the Utilization Rules Setup page).
Defining Parameters for the Calculation
Process
To define parameters for the calculation process, use the Utilization Calculation component.
Access the Utilization Type Calculation page (Inventory, Inventory Counts, Prepare Counting Event, Utilization Type Calculation).
The fields required vary depending upon the rules selected on the Utilization Type Setup Parameters page.
|
Generate Report |
Select the check box and a report type to print the Detail Utilization Type Calculation report, the Summary Utilization Type Calculation report, or both reports after you run the Utilization Type Calculation process. To generate the report later using the Utilization Type Calculation report page, deselect the check box and select No Reports. Note. The choices that you make on the Process Scheduler page determine report generation. If you run only the Utilization Type Calculation process, PeopleSoft Inventory does not generate reports even if you have selected the Generate Report check box and a valid report type. If you run both the Application Engine process and the SQR reports, the report option that you select here determines what is printed. |
|
Update Utilization Type |
Select to assign the utilization types calculated by the Utilization Type Calculation process to the items. |
|
Build Group Items |
Select to rebuild the BU_ITEM_UTIL_CD table. This table adds all appropriate items to the utilization group that entered on this page based on the criteria for the group. If you select this check box for an existing utilization group, the system replaces all items with items that meet the criteria that you specified here. |
|
Historical Start Date |
Select a date to use with any utilization rules that calculate historical quantities or amounts over a period of time. |
|
Forecast Horizon Date |
Select a date to use with forecasted quantity and forecasted amount rules. |
|
Forecast Set |
Select a forecast set to use with forecasted quantity and forecasted amount rules. |
Printing Utilization Type Calculation Reports
Access the Utilization Type Report page (Inventory, Inventory Counts, Prepare Counting Event, Utilization Type Report).
|
Report Option |
Values are: Both Summary and Detail Report: Prints both the Utilization Type Calculation Detail report and the Utilization Type Calculation Summary report for the last run of the Utilization Type Calculation process. Detail Report Only: Prints the Utilization Type Calculation Detail report for the last run of the Utilization Type Calculation process. Summary Report Only: Prints the Utilization Type Calculation Summary report for the last run of the Utilization Type Calculation process. No Report: Generates no report. |