 Using the Capacity Workbench
This chapter discusses how to: .
Use the Capacity Workbench.
Create PeopleSoft Supply Planning Capacity reports.
Using the Capacity WorkbenchYou use capacity plans to manage resources and determine the amount of capacity that is required to produce products in the future. With the capacity plan, you can view capacity by user-specified buckets and navigate to production details where you can add, delete, or cancel production, reschedule tasks, and change quantities.
This section provides an overview of the Capacity Workbench and capacity calculations and discusses how to:
Define Capacity Workbench search criteria.
Maintain capacity plans.
Modify workbench row types.
Review required capacity.
 Understanding the Capacity Workbench
Use the Capacity Workbench to view the capacity-plan details based on certain selection and sort criteria. After you have identified the overloaded resources, you can view the loads in a bucketed format over time. You can also make manual adjustments to the capacity plan to resolve capacity problems.
Use the Capacity Workbench search functionality to define search criteria and generate a list of resources to review. From this page, you can select one resource, multiple resources, or all of the returned resources and generate a resource summary.
On the Capacity Workbench Summary page, you can review multiple resources and aggregations, and navigate to display summaries for individual resources. To access the Capacity Workbench summary page, you can select any individual resource or a group of resources on the Capacity Workbench Search page. Then click the Generate Summary button.
Note. On the Capacity Workbench Summary page, the system displays only that resource information in a period size that matches an individual resource's bucket size. If you select multiple resources, the system ensures that all of the resources have the same bucket size.
Understanding Capacity Calculations
This section discusses how PeopleSoft Supply Planning calculates available and required capacity.
Available Capacity Calculation and Resource Class by Time
The system calculates available capacity using this equation if you have defined the Resource Class field as Time:
Available Capacity = Calendar Work Hours × Capacity Multiplier × Availability Percentage
You can navigate to the Work Centers page to define the capacity Multiplier/Units and Availability Percentage fields.
On the Daily Calendar page, you can review the calendar work hours that are defined for the corresponding calendar code.
Available Capacity Calculation and Resource Class by Unit
The method that the system uses to calculate available capacity when you have defined the Resource Class field as Unit depends on how you have defined the bucket for the capacity multiplier. For capacity multipliers that are defined using daily buckets:
Available Capacity = Calendar Work Hour/24 x Capacity Multiplier x Availability Percentage.
For capacity multipliers that are defined using weekly buckets:
Available Capacity = Calendar Work Hour Daily x Number of Days/(24x7) x Capacity Mulitplier x Availability Percentage.
Required Capacity Calculation and Resource Class by Time
If you have defined the Resource Class field as Time, the system sums the capacity for all of the operations on the Required Capacity page to determine total required capacity for a bucket.
Required Capacity Calculation and Resource Class by Unit
The system calculates required capacity using this equation if you have defined the Resource Class field as Unit:
Required Capacity = Total Bucket Task Duration/Total Duration x Remaining Quantity.
Note. When calculating required capacity, the system also considers the allocation strategy that you define for spreading capacity over multiple buckets for the resource. The system uses the allocation strategy that you define to allocate the entire task to the first bucket, the last bucket, or proportionally across all of the buckets.
Pages Used for the Capacity WorkbenchDefining Capacity Workbench Search Criteria
Access the Capacity Workbench Search page (Supply Planning, Solve Plan, Capacity, Capacity Plan Workbench).
Note. When you access the Capacity Workbench Search and Capacity Workbench Summary pages from the Review Capacity Plan Summary menu, you can analyze the capacity usage for a resource or group of resources. You cannot, however, add or maintain production when you access these pages from the Review Capacity Plan Summary menu. To make changes to the capacity plan, access the Capacity Workbench Search and Capacity Workbench Summary pages through the Capacity Plan Workbench menu.
|
Resource Code |
Select to limit the search to a specific resource. Define resources on the Define Work Centers - Resource page. Note. Use wildcard characters to perform partial searches for resource codes. |
|
Planning Bucket Size |
Limit the search to resources that are defined with a specific bucket size. |
|
Template |
Select a row type template, which determines which row type values appear on the Capacity Work Bench - Summary page with default display options and charting options. |
|
Display Row Types (button) |
Click the Display Row Types button to access the Capacity Plan Workbench - Display Row Types page, where you can modify which row types appear on the Capacity Plan Workbench Summary page, and the order in which they appear. Define the row types that initially appear on the Capacity Workbench Summary page by associating row types with a template on the Define Display Templates page and selecting that template in the Template field on this page (or on the Capacity Workbench Search page). You can access the Capacity Plan Workbench - Display Row Types page on all of the workbench and review pages where row types are used, including the Material Plan Workbench, Review Material Summary Plan, Buyer Workbench, and Review Buyer Purchases pages. |
|
Resource Class |
Values are:
|
|
Work Center Group |
Select to limit the search to resources that are associated with a specific work center group. |
|
Ignore Violations |
Select to limit the search to resources that solvers ignore when solving for capacity. On the Define Work Center - Planning Options page, you can select Ignore Violations to report over-capacity resources but not repair them during the optimization process. If you select this check box for a resource, the violations for that resource are not repaired by the solvers. You can select this option for noncritical resources to enable the solvers to ignore these resources and focus on critical resources for capacity repair. You can also select this option to generate what-if scenarios. |
|
Search |
Click to display all of the capacity plan items that meet the criteria that you defined in the Search Criteria group box. |
|
Clear |
Click to clear all of the field values in the Search Criteria group box. |
Display Options
|
Start Date |
Define the exact starting time for the period of time that you want to review in the capacity plan. You can review data from the start of the plan or at different intervals in the plan. If you do not enter a start date, the system uses a default value based on the bucket size. Values are:
|
|
Beginning Start Date |
Elect to begin the start date of the first period at the Beginning of Period or at the Start Date Entered in the Start Date field. For example, suppose that you entered a start date that occurs midweek and you are processing weekly buckets; select Beginning of Period to begin the first period on the previous Sunday; select Start Date Entered to begin the first period on the specific date that you entered in the Start Date field. |
|
Number of Periods |
Define the number of buckets that appear. The system initially populates this field with the value that you entered for the Default Number of Periods field on the Define Display Template page. The number of periods that you define determines the number of tabs that appear in the summary. |
|
Decimal Positions |
Define the decimal precision that you want to include in the quantity buckets. |
Summary Options
|
Select All |
Click to select all of the items that appear in the Resource List group box. |
|
Clear All |
Click to clear all of the selected resources that appear in the Resource List group box. |
|
Generate Summary |
If you have selected multiple items in the Resource List group box on the Capacity Workbench Search page, click this button to access the Capacity Workbench Summary page, where you can view the load of each resource in a bucketed format. |
|
Summarize by Resource Class |
Select to display an aggregate summary for all of the resources selected by resource class on the Capacity Workbench Summary page. When you select this option, the system displays an extra row per resource class that represents the summation of all of the selected resources within that class. |
|
Show Detail |
Select to display the aggregate summary and supporting detail for all of the resources. |
Resource List
|
Selection check box |
Select those items that you want to include for review on the Capacity Workbench Summary page. |
|
Resource Code |
Click any value in this column to access the Capacity Workbench Summary page, where you can review and maintain capacity usage for the resource. Define resources on the Define Work Centers - Resource page. See Defining Resources. |
|
Allocation Strategy |
Displays the method for spreading the time or unit capacity over multiple buckets for the resource. Values are:
|
Maintaining Capacity Plans
Access the Capacity Workbench Summary page (Supply Planning, Solve Plan, Capacity, Capacity Plan Workbench).
Display Options
This section displays additional search criteria fields. Click the Refresh button to update the data on the Capacity Workbench Summary page.
|
Start Date |
Define the exact starting time for the period of time that you want to review in the capacity plan. You can review data from the start of the plan or at different intervals in the plan. If you do not enter a start date, the system uses a default value based on the bucket size. Values are:
|
|
Planning Bucket Size |
Limit the search to resources that are defined with a specific bucket size. |
|
Template |
Select a row type template, which determines which row type values appear on the Capacity Work Bench - Summary page. |
|
Beginning Start Date |
Elect to begin the start date of the first period at the Beginning of Period or at the Start Date Entered in the Start Date field. For example, suppose that you entered a start date that occurs midweek and you are processing weekly buckets: select Beginning of Period to begin the first period on the previous Sunday; select Start Date Entered to begin the first period on the specific date that you entered in the Start Date field. |
|
Number of Periods |
Define the number of buckets that appear. The system initially populates this field with the value that you entered in the Default Number of Periods field on the Define Display Template page. The number of periods that you define determines the number of tabs that appear in the summary. |
|
Decimal Positions |
Define the decimal precision that you want to include in the quantity buckets. |
|
Refresh |
Click to update the information in the Resource Summary group box when you change any of the values in the filter criteria fields. |
|
Instance Start Date and Instance End Date |
Displays the start and end dates for the corresponding planning instance. |
Plan Summary
Contains a set of data for each row that is selected in the Resource List group box on the Capacity Workbench Search page.
|
Resource Code, Resource Class |
Displays the resource and class that are detailed in the Resource Summary group box. |
|
Summarize by Resource Class |
If on the Capacity Workbench Search page, you elected to display an aggregate summary for all of the resources that are selected by resource class, this field appears and specifies the corresponding resource class that is being aggregated. |
Chart For
Override the row types to chart (initially defined on the Define Display Templates page) and define the type of chart that you want to use to depict the graphic.
Note. The system does not automatically generate charts. Select a graph type to display the row type chart data, and click the Graph button to generate a graph.
Resource Summary
|
Row Type |
Represents a type of planning data. The data can be cumulative or calculated on a period-by-period basis. Click any link in the Required Capacity row to make changes to the plan. Row types that appear in this column are those row types that you elected to include in the workbench (the default row types that are associated with the template that you defined on the Define Display Templates page) in the sort order that you defined. |
|
Date columns |
These sequential dates correspond to the period duration that you define for the page. The dates can be at daily, weekly, or monthly intervals. |
Note. When calculating values for row types, the system ignores production where you selected Ignore Capacity (IGNORE_CAPACITY). Additionally, the system does not include canceled production in the summary bucket calculation.
Modifying Workbench Row Types
Access the Capacity Plan Workbench - Display Row Types page (click the Display Row Types button on the Capacity Workbench Search page).
Note. You can access the Display Row Types page on all of the workbench and review pages where row types are used, including the Material Plan Workbench, Review Material Summary Plan, Buyer Workbench, and Review Buyer Purchases pages.
|
Sort Order Number |
Define the order in which the row types appear on the workbench. |
|
Display Row Type |
Select to include the corresponding row type on the workbench display. |
|
Include in Chart |
Select to include the row type in generated graphic representations. |
|
Select All Row Types |
Click to select all row types for display on the workbench. |
|
Clear All Row Types |
Click to exclude all row types for display on the workbench. |
See Also
Reviewing Required Capacity
Access the Required Capacity page (click any value in the Required Capacity row on the Capacity Workbench Summary page).
Note. On the Required Capacity page, you can review required capacity for production and planned production. The fields that appear in the Production grid area and the Planned Production grid area are identical and are defined only once in this section.
Common Information
|
Resource Code and Resource Class |
Displays the resource and class that are detailed in the Resource Summary group box. |
|
Start Date |
Displays the start date that is currently scheduled for the operation. |
|
End Date |
Displays the end date that is currently scheduled for the operation. |
|
Available Capacity |
Displays the total capacity that is available for utilization. |
|
Required Capacity |
Represents the header level capacity requirements for all of the production operations that are included in the planning instance. |
|
Utilization |
Displays the ratio between required capacity and available capacity. |
|
Production ID |
Click to access the maintenance page for the corresponding production operation in the Supply Planning - Refine Plan menu. |
|
Planning Sequence Number |
Represents the numbering scheme that the system uses to synchronize planned orders in the Optimization Framework table with those in the transaction system. Each time that you run the Optimization Table Load process in Regeneration mode, the process initializes the next available planning sequence number to zero. The process resequences all of the planned orders that exist in the transaction system when inserting them into the Optimization Framework table. After inserting all of the orders into the table, the process updates the next available planning sequence number on the problem instance table to equal the last planning sequence number that was used plus one. As new planned orders are inserted within the Optimization Framework table, the system increments the planning sequence number for each new record inserted. |
|
Show Supply (button) |
Click the Show Supply button for an order to access the corresponding Show Supply page, where you can view a list of orders, the outputs of which will be used to satisfy the demands of the selected order. |
|
Show Demand (button) |
Click the Show Demand button for an order to access the corresponding Show Demand page, where you can view a list of orders that will use the items that are supplied from the selected order. |
|
Operation Sequence |
Indicates where in the manufacturing or rework process you need the component. The operation sequence refers to an operation on the assembly item's routing. For manufacturing bills of materials (BOMs), this is the item's production routing. For rework BOMs, this value is the item's rework routing. The default operation sequence is 0, which is the first operation of the manufacturing or rework process. Define operation sequence on the item's routing by using the Routing Definition Summary page. If you set the operation sequence for all of the items to 0, the system assumes that all of the items are needed at the beginning of production and must be issued at the start of the first operation. |
Usage Details Tab
Select the Usage Details tab.
|
Usage Start Date/Time |
Displays the start time that the system uses to calculate and allocate the remaining capacity requirement for the production task when a portion of the task has been completed. The system calculates a load duration value based on the remaining task quantity, then uses that value with the task end time to establish the load start time. |
|
Usage End Date/Time |
Displays the operation end date and time plus any additional post production time that is required. |
|
Required Capacity |
Represents the capacity requirements for the corresponding production operation. |
|
Percent Load |
Displays the percentage of the required capacity in the period attributed to this production operation. |
|
Status |
Displays the status for the corresponding production ID. |
|
Frozen |
If selected, indicates that this production order cannot be rescheduled automatically by a planning solver. |
Operation Details Tab
Select the Operation Details tab.
|
Planning Start Date/Time |
Displays the current date that PeopleSoft Supply Planning intends to begin the operation. |
|
Planning End Date/Time |
Displays the current date that PeopleSoft Supply Planning intends to finish the operation. |
|
Item ID |
Displays the item that is produced by the corresponding production operation. |
Configuration Code
|
Configuration Code |
If the item is a configured item, the unique identifier appears. Configuration codes are 50-character, alphanumeric identifiers for configured items. The system automatically generates configuration codes as you configure items, using information about the customer's selections that you define as elements of the code. Configuration codes enable you to identify the options for a configured item. You can also use configuration codes to track and cost configured inventory. After you define the elements of the configuration code for an item, the system automatically assigns a configuration code to each product that it configures during distribution configuration. If the item is configuration coded, a valid configuration code is required. |
Creating PeopleSoft Supply Planning Capacity ReportsThis section provides an overviews of the Capacity report and XML Publisher setup and discusses how to:
Define XML Publisher Capacity report templates.
Run Capacity reports.
View XML Publisher Capacity reports.
Understanding the Capacity ReportYou use the Planning Capacity Report (SPL_CAPX_RPT) process to view capacity usage for work center resources for a production period. This helps you determine whether the resource is over or under used and whether it is available for new or future production. By producing the output for multiple business units and resources, you can compare the usage across a location. The Capacity report enables you to produce a capacity usage report using the Process Scheduler or Oracle's XML Publisher. This section describes the Process Scheduler report.
To create the Capacity report, the system accesses the planning engine on the application server. The engine has a model of the planning instance in memory. The planning instance contains all the data that relates to a supply plan for the demand profile. The capacity usage profile is stored in the planning engine along with the supply plan data. You use the Process Scheduler to extract and publish the SPL_CAPX_RPTApplication Engine process. This report is also available for use with XML Publisher.
See Understanding XML Publisher Setup.
Note. You can also use the Supply Planning Capacity Workbench to view capacity usage for a business unit, work center, and periods of time. The workbench is interactive and real-time.
The next drawing illustrates how a planner would prepare for and run the Capacity Report. First, planners normally define the planning instance and load it into the system. Next, they run either the material plan to determine material requirements or the Feasible solver to resolve material feasibility for resolvable material violations. Finally, planners run the Capacity Report using the SPL_CAPX_RPT Application Engine process, after which they can review the report using Oracle's XML Publisher. Planners can update the supply or demand and repeat the steps. This drawing illustrates the steps:
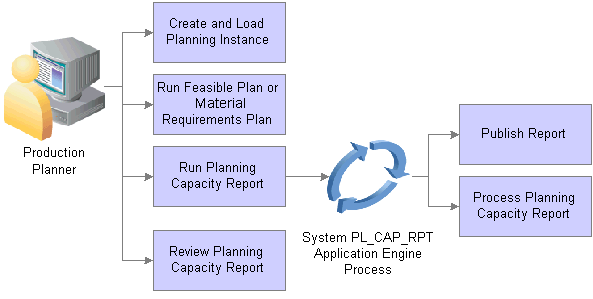
Capacity report creation
Understanding XML Publisher SetupYou can use Oracle's XML Publisher to access and review Capacity Reports. The advantage of using XML Publisher is that you can generate the report for a large number of resources and business units at anytime, view it later, and share it with others. XML Publisher is a template-based reporting solution that separates business data processing from the report layout and enables you to reuse extracted application data in multiple report layouts. You can customize the report layout without impacting the data logic.
XML Publisher uses a template that uses Microsoft Word as the design format. The template provides a template builder using Microsoft Word or Adobe Acrobat applications to develop a reporting solution. Using a single XML Publisher template, you can publish reports in a variety of formats including PDF, RTF, Excel, and HTML files. XML Publisher is integrated into PeopleTools and does not require separate installation, or extra integration effort. A template for the Capacity Report is delivered with the Supply Planning application.
Integration Broker Setup for the Capacity Report
Along with an XML Publisher report template definition, Supply Planning provides the SPL_OPT_CALL_CAP service operation. A service operation definition consists of general information about an operation and specifies an operation type that determines how the operation is to be processed, synchronously or asynchronously. The SPL_OPT_CALL_CAP service operation is processed synchronously, meaning that the system waits for a response to the message.
In addition, the service operation definition contains routings that determine the direction, inbound or outbound, of the service operation. A service operation has one or more handlers, which contain and run the programming logic for sending or receiving the message and manipulating service operation content. The request and response message for the Capacity Report is SPL_OPT_CALL_CAP.VERSION_1.
Integration Broker settings for sending and receiving Planning Capacity XML Publisher report messages include:
A service SPL_OPT_CALL that is provided by Supply Planning.
The SPL_OPT_CALL_CAP service operation provided by Supply Planning and that should be set to an Active status.
To access the service operation, select: Integration Broker, Integration Setup, Services Operations.
Web service access that provides security for the SPL_OPT_CALL_CAP service operation.
To access the page, select: Integration Broker, Integration Setup, Services Operations. Then, click the Service Operation Security link on the Service Operation - General tab page.
Ensure that the REQUESTHDLR handler is active for the SPL_OPT_CALL_CAP service operation.
A routing setting for the SPL_OPT_CALL_CAP_LCL routing is set to Active.
See "Understanding PeopleSoft Integration Broker," Incoming and Outgoing Request Flows, PeopleTools: PeopleSoft Integration Broker PeopleBook
Pages Used to Create Capacity Reports|
Page Name |
Definition Name |
Navigation |
Usage |
|
Definition |
PSXPRPTDEFN |
Reporting Tools, XML Publisher, Report Definition. |
Define Planning Capacity XML Publisher report templates. |
|
Capacity Report |
PL_CAPACITY_REPORT |
Supply Planning, Solve Plan, Reports, Capacity Click the Run button on the Capacity Report page to create the report. |
Run Capacity Reports. |
|
Definition |
CDM_INDEX |
Click the Report Manager link on the Capacity Report page and select the Administration tab. |
View XML Publisher Capacity Reports. |
Defining XML Publisher Capacity Report TemplatesAccess the Definition page (Reporting Tools, XML Publisher, Report Definition).
You use the page Report Definition page - Definition tab to define the report ID and its attributes. Report definitions associate a data source with template files. The previous page displays the Capacity Planning report definition that is provided with PeopleSoft Supply Planning. You can use the definition as a template to build other report definitions. A template is used to associate different layout formats as required by different countries or regions or as required by different channels such as web posting, printer, facsimile, and so on.
See Understanding XML Publisher Setup.
Template Tab
Select the Template tab.
The Template group box of the Template page refers to a particular template layout, because one report definition can associate multiple template layouts differentiated by language code or channel. Within each template layout is one or more effective-dated versions of the template.
Output Tab
Select the Output tab.
The output destination determines the location and format for the Capacity Report. Destinations include: Any, File, Printer, and Web. The default value for the location is Any. This enables you to select different locations when running the Process Scheduler.
Security Tab
Select the Security tab.
The Security page captures attributes regarding who can view web-posted output in the Report Manager repository and through the XML Publisher Report Repository Search page. Supply Planning uses the system default values for this page.
Bursting Tab
Select the Bursting tab.
Bursting is an optional advanced feature that is only available when reports are run through Process Scheduler and is not intended for real-time online viewing. It is typically used when you are repeating the generation of a template report layout many times for multiple like sets of data. Supply Planning uses the system default values for this page.
Running Capacity ReportsAccess the Capacity Report page (Supply Planning, Solve Plan, Reports, Capacity).
To define the parameters for a Capacity Report, select the run control ID, complete the print options and filter criteria and click the Run button. When running the program, the system extracts the capacity data and invokes XML Publisher. Using Integration Broker message transactions, the system processes the supply planning transactions and retrieves the capacity profiles from the application engine, processes them, and saves them to database tables where capacity data can be extracted for the report.
|
Planning Instances |
Identifies a complete set of data that you use to analyze and create a feasible supply plan. |
|
Start Planning Engine |
Click to start the planning engine automatically for the corresponding planning instance. If the planning engine is already running, the system ignores this option and uses the domain on which the planning engine is currently running to run the solver. If you select Start Planning Engine and the planning engine is not currently running, the system starts the planning engine for the corresponding planning instance using the domain that you specify in the URL field. If you specify no domain, or if the planning engine fails to start on the domain that you specify in the URL field, the system uses the default URL that you define on the Planning Engine Domains page |
|
URL (uniform resource locator) |
Specify the location of a planning server where you want to start the planning engine after the Load Planning Instance has finished. If you do not specify a URL here, the system uses the default URL. To obtain a URL, the system uses the domain that you use to run solver if the planning instance is running. If the planning instance is not running, and you did not specify a domain, or if the planning instance fails to start on the domain that you specify, the system uses the default domain that you define on the Planning Engine Domains page. |
Report Print Options
Use this grid to define the print options for the Capacity report.
|
Template |
Select a row type template. The template determines which row type values appear in the Capacity report. PeopleSoft Supply Planning provides standard display templates that you can use to set up of default templates where you can define unique row types, graphs, period durations, and other display defaults for workbenches and review pages. When you create reports for XML Publisher, you can also use a delivered default template. |
|
Start Date Option |
Select the date option that you want to use to generate the Capacity report. Options include: Date and Offset. To define a specific date, select Date. If you select a specific date, enter the date in the Date field. If you select the Offset value, enter the number of offset days from the current date in the Offset field. |
|
Date |
Select a specific date on which to generate the Capacity report. |
|
Offset |
Enter the number of days that you want to offset the report generation date. For example, if you enter an offset of 10, and if the current date is 12/01/2009, the system calculates the start date as 12/01/2009 plus 10 days and sets the offset date as 12/11/2009 for generating the Capacity Report. |
|
Beginning Start Date |
Define the start date of the first bucket. Values are Beginning of Period, in which the start date falls on a specific start date that you entered in the Date field. Initially, the system uses Beginning of Period as the default value. Templates with capacity-based display types always use Beginning of Period. |
|
Number of Periods |
Enter the number of buckets that the system should calculate and display in the Capacity Report. The system initially populates this field with the value that you entered for the Default Number of Periods field on the Define Display Template page. This value defines how far into the future, that the report displays the capacity usage profile. For example, if you enter 30, the report displays 30 bucketed values for capacity usage for the bucket size specified, such as 30 days, 30 weeks, or 30 months. |
|
Decimal Positions |
Enter the decimal precision that the system should uses for Capacity Report quantity buckets. |
|
Summarize by Resource Class |
Select to display an aggregate summary on the Planning Resource report for all of the resources defined by the resource class (Time or Unit) selected in the Resource Class field. The system aggregates them across multiple resource codes; however, not across the business unit. Only resources that belong to the same resource class, and with the same planning bucket and same business unit can be aggregated. If you do not provide the filter for the resource class, planning bucket size, or business unit, the report will contain multiple summarizations for each combination of resource class, planning bucket size and business unit. The work center group is used only as filter. The system summarizes the Capacity Report across work center groups. If you enter a value for the resource code without a wildcard symbol, the summarization section will not be displayed in the report, because there is nothing to summarize. |
|
Show Detail Information |
Select to include the aggregate summary and supporting details for all resources in the Capacity Report. You use this check box only with the Summarize by Resource Class check box. If you select both the Summarize by Resource Class and Show Detail Information, check boxes, the report summarizes the resource usage over time, and detail or individual resource usage over time. If the Show Detail Information check box is deselected, then the report only displays the summarized information. |
|
Show Production Detail |
Select to include production details in the Capacity Planning report. These details include the resource for the given time frame, either planned or actual. |
Report Filter Criteria
|
Business Unit |
Select a single business unit or leave it the field blank to select all business units. You cannot use wildcard searches for this field. |
|
Resource Class |
Select a resource class value our leave the field blank to select both resources classes. Values are Time that displays aggregate resources based on the amount of time that is available in the time bucket that you select, and Unit that displays aggregate resources based on the number of units the resources can produce in a time bucket. |
|
Work Center Group |
Select a work center group. Work center groups can consist of one or more people and machines and represents a logical grouping of machines, a department, or a cost center. You can also user wildcard searches for this field. |
|
Planning Bucket Size |
Select either Daily, Weekly, or Monthly planning buckets on . A value is required in this field. If you want to see a daily and weekly report, you must, for example generate two reports. |
|
Violation Rule |
Select a value to limit the search for resources. Possible values are: All Resources: Includes all resources in the search. Consider Violations: Limits the search to resources where solvers consider violations when solving for capacity. Ignore Violations: Limits the search to resources that solvers ignore when solving for capacity. You use the Work Center page to indicate that you want to report over-capacity resources but not repair them during the optimization process. To access the page, select: Supply Planning, Refine Plan, Manufacturing. |
|
Utilization Percentage |
Select an operator by which you want to limit the resource search. After selecting an operator, enter a value to use in conjunction with the operator. This filters the range of the utilization percentage. For example, if you select the > (greater than) field value and enter the an operator value of 90, the Capacity Report will display capacity usage for only those resources with utilization greater than 90 percent. The utilization is the result from the solver that divides the usage by availability. Availability is calculated using the definition defined on the Work Center page. |
Viewing XML Publisher Capacity ReportsAccess the Report Detail page (click the Report Manager link on the Capacity Report page, select the Administration tab, and then select a report).
You can open the report by clicking the report link. To view the report results in another browser window, click the description of the required report. To view the report results or any associated log or message file, click the Details link. Click the name of the report or message to display the output in another browser window.
See Viewing Reports,"Using Report Manager," PeopleTools: PeopleSoft Process Scheduler PeopleBook
The Capacity report has five sections. The sections that appear in the report depend on the report options selected when the report was created.
Column labels for the Capacity Report are dynamic and depend on the Supply Planning display template. Column values are also dynamic and are based on the row types that has been selected for the display template. Business data is prepared using PeopleCode. XML Publisher processes the number and date formats and checks settings on the header for production, detail, and summary to determine the sections to hide or show.
The report provides these sections:
The Report Header section displays planning instance details, report print options, and report filter criteria in addition the business unit, resource code, and some associate attributes, such as the aggregate strategy and plan bucket size.
The Capacity Usage Summary section displays a list of resources that are summarized. The detail section displays one record with bucketed information about the aggregated resource detail. When you run the report, ensure that you select the Summarize by Resource check box to include these details.
The Capacity Usage Detail section displays the bucketed resource usage over time. The detail displays the start time and end time for each bucket, capacity available, capacity required, capacity unused, capacity utilization percentage, and capacity over-utilization percentage.
The Capacity Usage Summarized section displays resources with the same resource class and planning bucket along with an aggregate resource report on the resource's availability, requirement and utilization percentage. Select the Show Detail Information Summarize by Resource Classcheck boxes to include this information in the report.
The Required Capacity Usage Detail section displays information about the production ID or planned production associated to the resource for a given bucket. Select the Show Production Detail and check box when you generate the report to include required usage details in the Capacity Report.