3 Installing and Configuring Oracle Fusion Middleware
This chapter provides an overview about how to install and configure Oracle Fusion Middleware and how to start and stop Oracle Fusion Middleware processes, including Administration and Managed Servers, components, and applications.
This chapter contains the following topics:
3.1 Overview of the Procedures in This Chapter
This chapter describes how to use the installation and configuration tools to create the following:
-
Using the Oracle Fusion Middleware Metadata Repository Creation Utility, you create the necessary schemas in an existing database.
-
Using Oracle WebLogic Server Installer, you create a Middleware home, which contains an Oracle WebLogic Server home.
-
Using the installer, you create an Oracle home containing the binaries for Oracle SOA Suite.
-
Using Oracle WebLogic Server Configuration Wizard, you create and configure:
-
An Oracle WebLogic Server domain
-
An Oracle WebLogic Server Administration Server
-
An Oracle WebLogic Server Managed Server in which Oracle SOA Suite is deployed
-
An Oracle WebLogic Server Managed Server in which Oracle Business Activity Monitoring is deployed
-
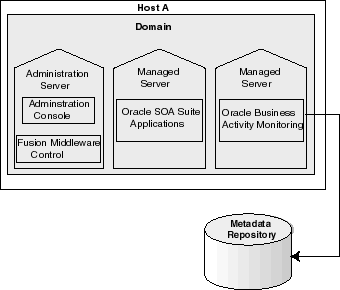
Figure 3-1 shows the domain with the Administration Server and Managed Servers.
Figure 3-1 Oracle WebLogic Server Domain with Administration Server and Managed Servers

Description of "Figure 3-1 Oracle WebLogic Server Domain with Administration Server and Managed Servers "
3.2 Installing and Configuring Oracle Fusion Middleware
The following are the general steps you need to take to install and configure Oracle Fusion Middleware:
-
Many components, such as Oracle SOA Suite, require a database-based metadata repository. If you are installing these components, you must have an existing database. Then, you use RCU to create a repository in the database. Section 3.2.1 provides information about using RCU.
For some installation types and components, you can use a file-based repository to store product metadata. The file-based repository is created during installation.
-
Install Oracle WebLogic Server. See Section 3.2.2.
-
Install other Oracle Fusion Middleware products. See Section 3.2.3.
-
Configure Oracle WebLogic Server and other Oracle Fusion Middleware products. See Section 3.2.4.
3.2.1 Creating the Schemas in a Database
Most components require a database-based repository. In those cases, you must use the Oracle Fusion Middleware Metadata Repository Creation Utility (RCU) to create the metadata repository in an existing database. You use RCU to create schemas to hold configuration information for particular components, and optionally, for overall configuration information.
In addition, you can use RCU to create a particular type of repository, the MDS Repository, which contains metadata for certain types of deployed applications. Those applications include custom Java applications developed by your organization and some Oracle Fusion Middleware Java components, such as Oracle B2B.
The following components do not require a database-based repository. They can store their configuration information in a file-based repository:
-
Oracle HTTP Server
-
Oracle Web Cache
-
Oracle Web Services Manager
See:
-
The appendix "Metadata Repository Schemas" in the Oracle Fusion Middleware Administrator's Guide for a list of schemas created for each component
-
Oracle Fusion Middleware Repository Creation Utility User's Guide for information about using RCU
-
For information about which versions of Oracle databases are supported, and other prerequisites, see:
http://www.oracle.com/technology/software/products/ias/files/fusion_certification.html
The procedure in this section assumes that you have an existing Oracle Database and that you have installed RCU.
Note:
Oracle recommends that all metadata repositories reside on a database at the same site as the components to minimize network latency issues.
To create schemas in a database:
-
Invoke RCU, using the following command:
(UNIX) RCU_HOME/bin/rcu
(Windows) RCU_hOME\bin\rcu.bat
-
On the Welcome page, click Next.
The Create Repository page appears.
-
To create the repository, which loads the component schemas into the database, select Create, then click Next.
The Database Connection Details page appears.
-
Provide the following information about the database into which you want to load the component schemas:
-
Database Type: Select the type of database. This example assumes that you are using an Oracle Database.
-
Host Name: Enter the host name for the computer where the database is installed, for example:
myhost.example.com. -
Port: Enter the port number, for example:
1521. -
Service Name: Enter the Service Identifier (SID) for the database.
-
Username: Enter a user name for the database which is assigned the SYSDBA role, for example:
SYS. -
Password: Enter the password for the user.
-
Role: Select SYSDBA.
-
-
Click Next.
The Checking Prerequisites dialog box is displayed.
-
When the operation completes, click OK.
The Select Components page appears.
-
On this page:
-
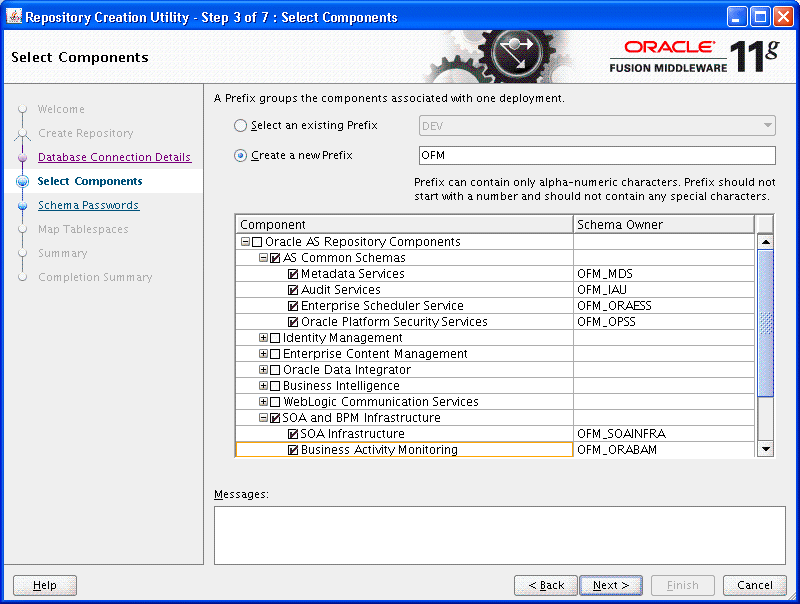
Select Create a New Prefix, and enter characters to be added to the beginning of the schema names. For example, if you enter OFM, the Oracle Business Activity Monitoring schemas are named OFM_ORABAM.
-
In the component table, select the components. For example, if you want to install Oracle SOA Suite components, select SOA and BPM Infrastructure, as shown in the following figure:

Description of the illustration rcu_comp.gif
-
-
Click Next.
-
The Checking Prerequisites dialog box is displayed. When the operation completes, click OK.
The Schema Passwords page appears.
-
You can use the same password for all schemas, or enter passwords for each schema. If you enter passwords for each schema, you can specify that auxiliary schemas use the same password as the main schema. In this case, select Use same passwords for all schemas. Then, enter the password and re-enter it to confirm.
-
Click Next.
The Custom Variables page appears if you selected the Oracle Data Integrator schema on the Select Components page.
-
If the Custom Variables page appears, enter values for the passwords.
-
Click Next.
The Map Tablespaces page appears.
-
This page displays the default tablespaces for each schema. You can manage the tablespaces, configuring the size, storage type, and data files for the tablespaces. In addition, depending on the components you selected, you may be able to specify additional tablespaces for the components.
For this example, assume the default tablespace is adequate. Click Next.
-
A dialog box is displayed that says that any tablespaces that do not already exist are created. Click OK.
-
A progress box is displayed. When the operation completes, click OK.
The Summary page appears.
-
Review the information and click Create.
A progress dialog box is displayed.
-
When it completes, note the details in the Completion Summary, and click Close.
Now, you have created a database-based metadata repository and have populated it with the required schemas.
3.2.2 Installing Oracle WebLogic Server
You use the Oracle WebLogic Server installation program to install Oracle WebLogic Server. For the scenarios in this book, accept the default values in the installer, creating a new Middleware home.
When the installation completes, you have a Middleware home and a WebLogic Server home. By default, the Middleware home is:
(UNIX) user_home/Oracle/Middleware
(Windows) user_home\Oracle\Middleware
See Also:
Oracle Fusion Middleware Installation Guide for Oracle WebLogic Server for more information.
3.2.3 Installing Additional Oracle Fusion Middleware Components
You use the installer to install, and, in some cases, to optionally configure Oracle Fusion Middleware.
For the procedures in this book, use the Oracle SOA Suite install type. Refer to the Oracle Fusion Middleware Installation Guide for Oracle SOA Suite and Oracle Business Process Management Suite. To make it easier to complete the procedures in this book, note the following on the Specify Installation Location page:
-
For Oracle Middleware Home, specify the Middleware home directory that was created when you installed Oracle WebLogic Server. For example, if your Middleware home is
/scratch/oracle/Oracle/Middleware, then specify the following:/scratch/oracle/Oracle/Middleware
-
For Oracle Home Directory, specify a name for the Oracle home. For example:
Oracle_SOA1
The Oracle Home is created as a subdirectory of the Middleware home.
3.2.4 Configuring Oracle Fusion Middleware Components
You can configure some components, such as Oracle HTTP Server or Oracle Web Cache, when you install them. For other components, such as Oracle WebLogic Server, Oracle SOA Suite, or Oracle WebCenter Portal, you must configure the components using the Oracle Fusion Middleware Configuration Wizard.
To configure Oracle WebLogic Server and Oracle SOA Suite:
-
Invoke the Configuration Wizard, which is located in the following directory:
(UNIX) ORACLE_HOME_for_component/common/bin/config.sh
(Windows) ORACLE_HOME_for_component\common\bin\config.cmd
-
Follow the directions in the Installation Guide for the components. For example, for Oracle SOA Suite, follow the directions in the section "Configuration Instructions" in the Oracle Fusion Middleware Installation Guide for Oracle SOA Suite and Oracle Business Process Management Suite.
Note the following:
-
In the Welcome screen, select Create a new WebLogic domain.
-
In the Select Domain Source screen, select Oracle SOA Suite, Oracle Enterprise Manager, and Oracle Business Activity Monitoring. This automatically also selects Oracle JRF, and Oracle WSM Policy Manager.
-
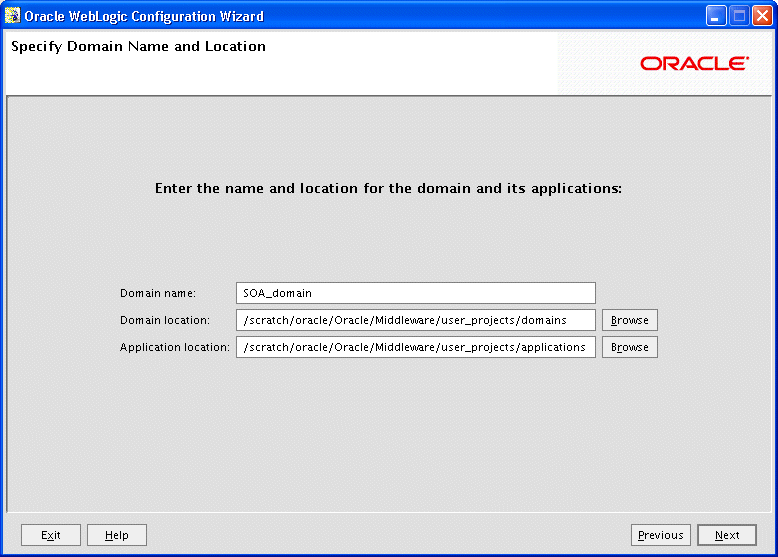
In the Specify Domain Name screen, specify SOA_domain for the name of the domain and take the default for the domain location, as shown in the following figure:

Description of the illustration config_wiz.gif
-
In the Configure Administrator User Name and Password screen, enter a user name and password. Then, re-enter the password.
-
In the Configure Server Start Mode and JDK screen, select Production Mode.
-
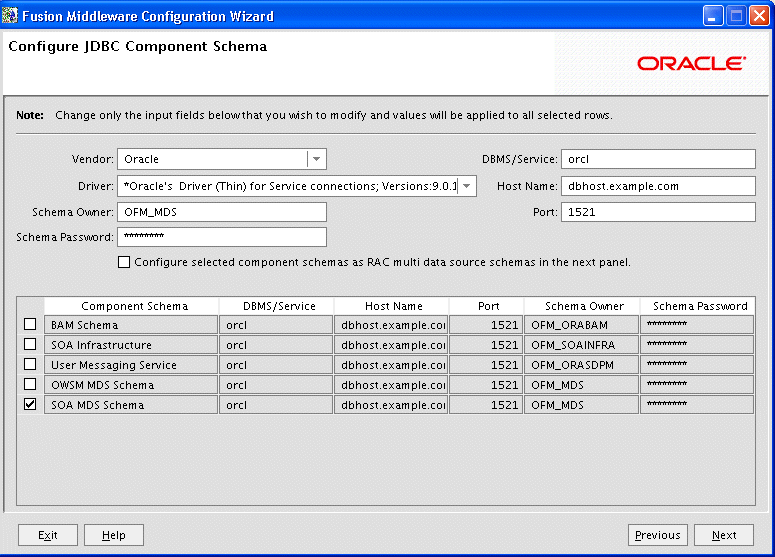
In the Configure JDBC Component Schema screen, the following instructions assume that you have the same password and database for all of the schemas:
-
Select all of the schemas.
-
For Vendor, select Oracle.
-
For Driver, select Oracle's Driver (Thin) for Service connections; Versions:9.0.1,9.2.0,10,11.
-
For Schema Owner, do not enter anything if the schemas listed in the table are correct. Each data source uses the user name specified in the table.
If you need to change the schema owner, select each schema individually, then change the owner name.
-
If you used the same password for all schemas when you created the schemas, enter the password in Schema Password.
Alternatively, you can specify different passwords for each data source by entering them in the password column of the table.
-
With all of the schemas selected, for DBMS/Service, enter the SID of the database.
-
With all of the schemas selected, for Host Name, enter the host name of the database.
-
With all of the schemas selected, for Port, enter the listening port of the database.
The following figure shows the Configure JDBC Component Schema page:

Description of the illustration config_wiz2.gif
-
-
Click Next.
The Test JDBC Component Schema screen is displayed. If the test is successful, click Next. If the test is not successful, click Previous and correct the information.
-
In the Select Optional Configuration screen, take the defaults. Click Next.
The Configuration Summary screen is displayed.
-
Click Create.
-
When the operation has completed, note the Admin Server URL in the Creating Domain screen. For example:
Admin Server URL: http://hostname.domainname.com:7001
Now, you have created a domain, including an Administration Server and two Managed Servers, soa_server1 and bam_server1.
-
-
Start the Administration Server. For example, on Linux, if your domain is SOA_domain, run the following script (MW_HOME is the Middleware home):
MW_HOME/user_projects/domains/SOA_domain/bin/startWeblogic.shProvide the user name and password when prompted.
-
Start the Managed Servers. For example, on Linux, if your server is named soa_server1, run the following script, entering the user name and password when prompted:
MW_HOME/user_projects/domains/SOA_domain/bin/startManagedWebLogic.sh
         soa_server1 http://hostname:7001
-
When your environment contains Oracle Fusion Middleware products other than Oracle WebLogic Server, such as Oracle SOA Suite, Oracle WebCenter Portal, or Oracle JRF, you must configure Node Manager to enable starting and stopping Managed Servers using Fusion Middleware Control. See Section 3.4.3.
When the configuration completes and you have started the Administration Server and the Managed Servers, you can view and manage Oracle Fusion Middleware using the graphical user interfaces or command-line tools. For example, to use Fusion Middleware Control to view and managed your environment, enter the Admin Server URL you noted from the Creating Domain screen, with /em appended. For example:
http://hostname.domainname:port/em
By default, the port is 7001.
Note:
You can extend a domain to include the templates for other components by using the Configuration Wizard. For example, you can extend a domain that was initially created to support Oracle SOA Suite so that it can now also support Oracle WebCenter Portal or Oracle HTTP Server. For more information, see Section 9.2.
For information about using the tools to view and manage Oracle Fusion Middleware, see:
-
For graphical user interfaces: Section 2.2 and Section 2.3.
-
For command-line tools: Section 2.4.
See Also:
For more information about configuring components, see the Installation Guide for that component.
3.3 Setting Up Environment Variables
When you installed Oracle Fusion Middleware, you were logged in to your operating system as a particular user. You should always log in as this user to manage your installation because this user has permission to view and modify the files in your installation's Oracle home.
To use Oracle Fusion Middleware, you must set environment variables as shown in the following tables:
Table 3-1 Environment Variables for Linux and UNIX
Table 3-2 shows the environment variables for Windows.
Table 3-2 Environment Variables for Windows
3.4 Starting and Stopping Servers, Components, and Applications
You can start and stop servers, components, and applications using the command line, the Oracle WebLogic Server Administration Console, or Fusion Middleware Control. The following topics describe how to start and stop these entities using Fusion Middleware Control, the command line, or both:
-
Starting and Stopping Oracle WebLogic Server Administration Server
-
Starting and Stopping Oracle WebLogic Server Managed Servers
3.4.1 Starting and Stopping Oracle WebLogic Server Administration Server
You can start and stop Oracle WebLogic Server Administration Servers using the WLST command line or scripts. When you start or stop the Administration Server, you also start or stop the processes running in the Administration Server, including the WebLogic Server Administration Console and Fusion Middleware Control.
To start an Oracle WebLogic Server Administration Server, use the following script:
MW_HOME/user_projects/domains/domain_name/bin/startWebLogic.sh
   -Dweblogic.management.username=weblogic
   -Dweblogic.management.password=password
   -Dweblogic.system.StoreBootIdentity=true
To stop an Oracle WebLogic Server Administration Server, use the following script:
MW_HOME/user_projects/domains/domain_name/bin/stopWeblogic.sh
    username password [admin_url]
3.4.2 Starting and Stopping Oracle WebLogic Server Managed Servers
Fusion Middleware Control and the Oracle WebLogic Server Administration Console use Node Manager to start Managed Servers. If you are starting a Managed Server that does not contain Oracle Fusion Middleware products other than Oracle WebLogic Server, you can start the servers using the procedure in this section.
However, if the Managed Server contains other Oracle Fusion Middleware products, such as Oracle SOA Suite, Oracle WebCenter Portal, or Oracle JRF, you must first configure Node Manager, as described in Section 3.4.3.
To start or stop a Managed Server using Fusion Middleware Control:
-
From the navigation pane, expand the farm, then WebLogic Domain, and then the domain.
-
Select the Managed Server.
-
From the WebLogic Server menu, select Control, then Start Up or Shut Down.
3.4.3 Configuring Node Manager to Start Managed Servers
If a Managed Server contains other Oracle Fusion Middleware products, such as Oracle SOA Suite, Oracle WebCenter Portal, or Oracle JRF, the Managed Servers environment must be configured to set the correct classpath and parameters. This environment information is provided through the start scripts, such as startWebLogic and setDomainEnv, which are located in the domain directory.
If the Managed Servers are started by Node Manager (as is the case when the servers are started by the Oracle WebLogic Server Administration Console or Fusion Middleware Control), Node Manager must be instructed to use these start scripts so that the server environments are correctly configured. Specifically, Node Manager must be started with the property StartScriptEnabled=true.
There are several ways to ensure that Node Manager starts with this property enabled. As a convenience, Oracle Fusion Middleware provides the following script, which adds the property StartScriptEnabled=true to the nodemanager.properties file:
(UNIX) ORACLE_COMMON_HOME/common/bin/setNMProps.sh.
(Windows) ORACLE_COMMON_HOME\common\bin\setNMProps.cmd
For example, on Linux, execute the setNMProps script and start Node Manager:
ORACLE_COMMON_HOME/common/bin/setNMProps.sh
MW_HOME/wlserver_n/server/bin/startNodeManager.sh
When you start Node Manager, it reads the nodemanager.properties file with the StartScriptEnabled=true property, and uses the start scripts when it subsequently starts Managed Servers. Note that you need to run the setNMProps script only once.
Also note that when the StartScriptEnable property is set to true, the Node Manager reads the startWebLogic script, which in turns reads the setDomainEnv script. As a result, you must make any tuning changes by editing the setDomainEnv script. Any changes that are performed using the command line or Administration Console will not be implemented when Node Manager starts the servers. For example, if you use the Administration Console to change the server start arguments, those changes are written to config.xml, but the Node Manager ignores these settings and uses those in setDomainEnv.
See Also:
"Using Node Manager" in the Oracle Fusion Middleware Node Manager Administrator's Guide for Oracle WebLogic Server for other methods of configuring and starting Node Manager
3.4.4 Starting and Stopping Components
You can start and stop a component from the dynamic target menu in Fusion Middleware Control.
To start or stop Java components, such as Oracle Business Activity Monitoring:
-
From the navigation pane, expand the farm.
-
Expand the component type, such as BAM, then select the component.
-
From the dynamic target menu, choose Control, then Start Up or Shut Down.
To start or stop restart system components, such as Oracle HTTP Server:
-
From the navigation pane, expand the farm and then the installation type, such as Web Tier.
-
Select the component, such as ohs1.
-
From the dynamic target menu, choose Control, then Start Up or Shut Down.
3.4.5 Starting and Stopping Applications
You can start or stop an application deployed in Oracle Fusion Middleware from the Application Deployment menu of Fusion Middleware Control.
To start or stop an application:
-
From the navigation pane, expand Application Deployment.
-
Select the application.
-
From the Application Deployment menu, choose Control, then Start Up or Shut Down.
3.4.6 Starting and Stopping Fusion Middleware Control
If Fusion Middleware Control is configured for a domain, it is automatically started or stopped when you start or stop an Oracle WebLogic Server Administration Server, as described in Section 3.4.1.
3.4.7 Starting and Stopping Oracle Management Agent
Oracle Management Agent is designed specifically for monitoring Oracle Fusion Middleware system components, such as Oracle HTTP Server and Oracle Web Cache.
To start Oracle Management Agent:
opmnctl startproc ias-component=EMAGENT
To stop Oracle Management Agent:
opmnctl stopproc ias-component=EMAGENT
3.5 Learn More
For more information about the topics covered in this chapter, see:
-
Oracle Fusion Middleware Repository Creation Utility User's Guide
-
"Starting and Stopping Oracle Fusion Middleware" in the Oracle Fusion Middleware Administrator's Guide