
| StorageTek Tape Analytics Configuration Guide, Version 1.0.2 |
| E28378-04 |

|

|

|

|
Use this procedure to define the STA server as an authorized recipient of SNMP traps, and to define the traps that the library will send.
Note – Before performing this procedure, you must obtain the IP address of the STA server, which was established during the STA installation. For details, see the “Installing STA” chapter within the StorageTek Tape Analytics Planning and Installation Guide.
Note – If you want to configure STA to support Dual TCP/IP on an SL3000 or SL8500 library, you may need to use policy routing. For more information, consult the SL3000 or SL8500 Host Connectivity Guide. If you need assistance with Dual TCP/IP configuration, contact Oracle Support.
Note – The SNMP v3 trap recipient you create in this procedure must have the same name as the SNMP v3 user you created previously. See “Create an SNMP v3 User”.
Note – For SL500 libraries, you can choose to perform this procedure with either the CLI or the SL Console. For SL3000 and SL8500 libraries, you must use the CLI. For SL150 libraries, you use the browser-based user interface.
▼ |
With the CLI (All libraries except SL150) |
Note – Because of the complexity of this command, it is recommended that you create it in a text file on your PC or workstation, and then copy and paste the command directly into the CLI command line. See “CLI Usage Tips” for details.
Note – For SL3000 and SL8500 libraries, do not include trap level 4. It is not supported by the SL3000 and SL8500 libraries.
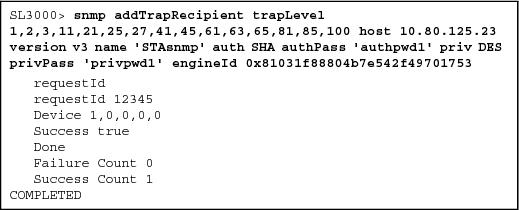
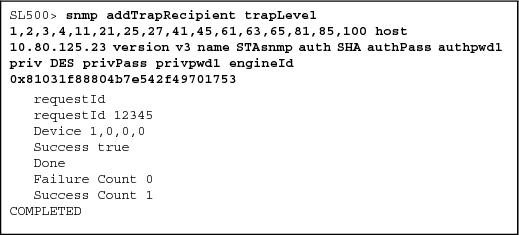
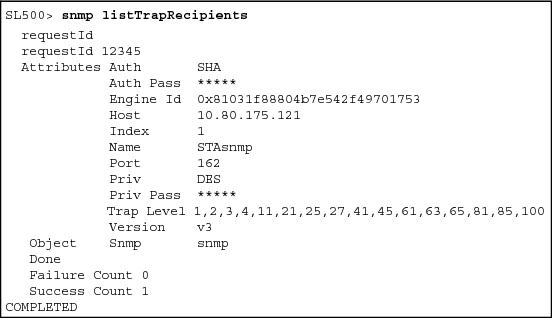
snmp addTrapRecipient trapLevel 1,2,3,4,11,21,25,27,41,45, 61,63,65,81,85,100 host STA_server_IP version v3 name recipient_name auth SHA authPass auth_password priv DES privPass priv_password engineId library_engineID
Note – Trap levels must be entered individually, separated by commas (,).
Note – For the SL3000 and SL8500 libraries, the user name and both passwords must be enclosed in single quotes. However, for the SL500 library, quotes are not required, and if you enter them they will be accepted as text.
Note – Passwords must be at least eight characters in length. Type help snmp at the CLI command line for a list of valid characters.
|
•
|
STA_server_IP is the IP address of the STA server.
|
|
•
|
recipient_name is the SNMP user name you created in the previous procedure, “Create an SNMP v3 User”.
|
|
•
|
|
•
|
|
•
|
library_engineID is the library engine ID you displayed in “Retrieve the Library SNMP Engine ID”. You MUST include the 0x prefix.
|
Note – If you saved the engine ID in a text file, you can copy and paste it directly into this command.
Note – The SL8500 display is similar.
Note – Do not include trap level 4. It is not supported by the SL3000 and SL8500 libraries.
|
•
|
If you are configuring an SL3000 or SL8500 library that does not use the Dual TCP/IP feature, proceed to “Set the Drive Cleaning Warning”.
|
|
•
|
If you want to configure STA to support Dual TCP/IP on an SL3000 or SL8500 library, you may need to use policy routing. For more information, consult the SL3000 or SL8500 Host Connectivity Guide. If you need assistance with Dual TCP/IP configuration, contact Oracle Support. Then, proceed to “Set the Drive Cleaning Warning”.
|
▼ |
With the SL Console (SL500 libraries only) |
|
1.
|
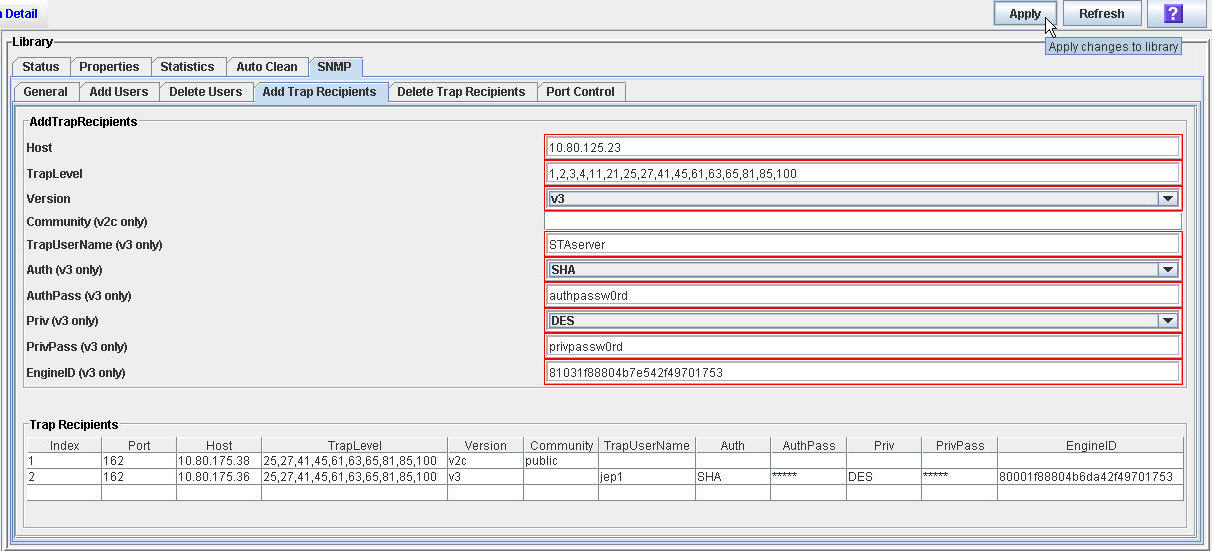
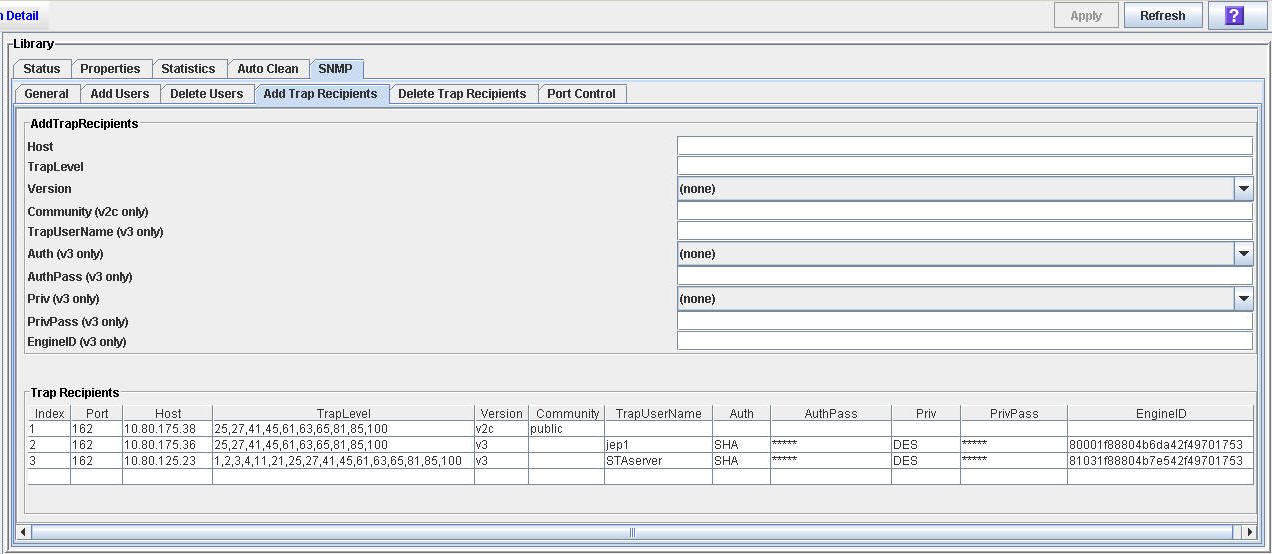
Select System Detail > Library > SNMP > Add Trap Recipients.
|

|
•
|
Host – Enter the IP address of the STA server.
|
|
•
|
TrapLevel – Specify the trap levels that the library should send to STA: 1,2,3,4,11,21,25,27,41,45,61,63,65,81,85,100
|
Note – Trap levels must be entered individually, separated by commas (,).
|
•
|
Version – Select v3 from the menu.
|
|
•
|
TrapUserName – Enter the SNMP user name you created in the previous procedure, “Create an SNMP v3 User”.
|
|
•
|
Auth – Select SHA from the menu.
|
|
•
|
|
•
|
Priv – Select DES from the menu.
|
|
•
|
|
•
|
EngineID – Enter the library engine ID you displayed in “Create an SNMP v3 User”. Do NOT include the 0x prefix.
|
Note – Future SL500 firmware may require the 0x prefix.
Note – If you saved the engine ID in a text file, you can copy and paste it directly into this field.
|
3.
|
The trap recipient is added and the screen is updated.

|
•
|
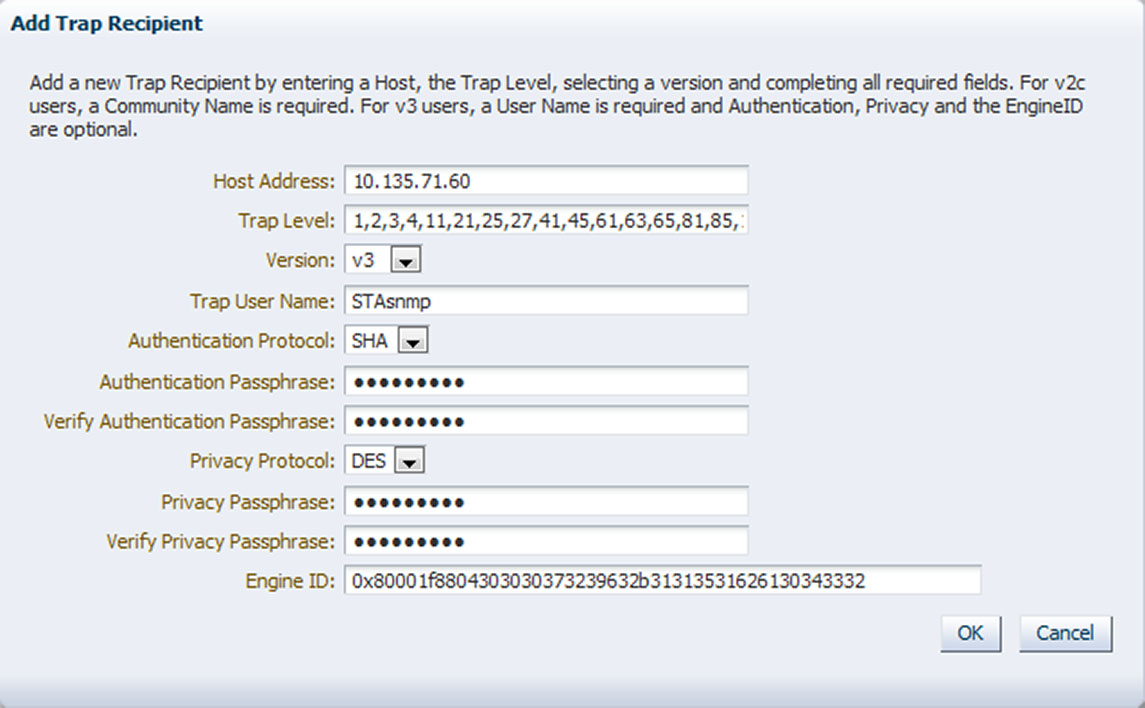
Host Address – Enter the IP address of the STA server.
|
|
•
|
Trap Level – Specify the trap levels that the library should send to STA: 1,2,3,4,11,21,25,27,41,45,61,63,65,81,85,100
|
Note – Trap levels must be entered individually, separated by commas (,).
|
•
|
Version – Select v3.
|
|
•
|
Trap User Name – Enter the SNMP user name you created in the previous procedure, “Create an SNMP v3 User”.
|
|
•
|
Authentication Protocol – Select SHA.
|
|
•
|
Authentication Passphrase – Enter the authorization password you created in “Create an SNMP v3 User”.
|
|
•
|
Verify Authentication Passphrase – Re-type the passphrase.
|
|
•
|
Privacy Protocol – Select DES.
|
|
•
|
|
•
|
Verify Privacy Passphrase – Re-type the passphrase.
|
|
•
|
Engine ID – This field will auto-populate. Do not modify the value.
|
|
5.
|
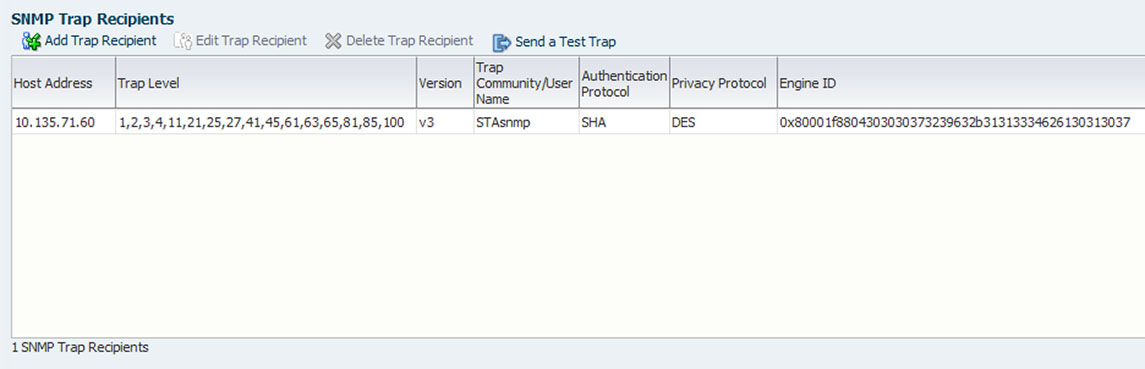
The trap recipient is added and the screen is updated.
Note – Do not click the “Send a Test Trap” button, as test traps are not supported by STA.
|
|
|
|
|

|
| Copyright © 2012, 2013 Oracle and/or its affiliates. All rights reserved. | Legal Notices |