 Understanding Third Party Integrations
This chapter provides an overviews of third party integrations and discusses how to:
Set up recruiting vendors.
Set up autoscreening for data received from vendors.
Set up data mapping.
Set up resume email accounts.
Review the integration transaction log.
See Also
Posting Jobs to PeopleSoft Services Procurement
Understanding Third Party Integrations
This sections provides overviews of:
The open integration framework.
Job board setup.
Resume extractor setup.
Background screener setup.
 The Open Integration Framework
Sharing job opening and candidate information is essential to the success of the recruitment process. PeopleSoft provides an open integration framework that enables you to integrate with:
Staffing suppliers.
Resume extractors.
Background screening providers.
This generic open integration framework enables customers to integrate with any third party provider that they choose. For incoming data, the process is initiated by an incoming message. Using PeopleSoft PeopleTools Integration Broker, the open integration framework process reads the XML document contained in the message and uses the standard XSLT to transform the XML according to the vendor's specifications. Finally, the open integration framework maps the transformed data to the corresponding recruiting data and processes that information.
For outgoing data, a functional process such as posting a job opening or requesting a background screening check initiates the outgoing message. The process reads from the recruiting tables and uses data mapping to create an XML document. This initial XML document may be changed into to an HR-XML document. Another change is then applied to either the initial XML document or to the subsequent HR-XML document, depending on the supplier's needs, to create a final document. The final document is then sent using PeopleSoft PeopleTools Integration Broker
This diagram illustrates how the Open Integration Framework manages the exchange of information between PeopleSoft Recruiting Solutions and external service providers:
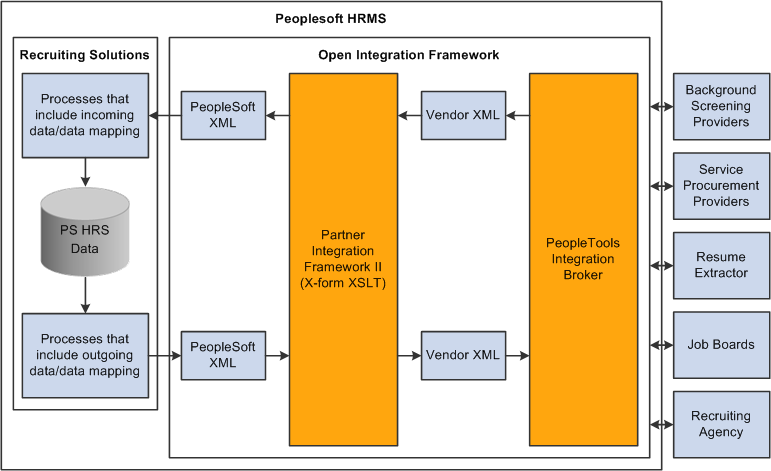
The Open Integration Framework manages integration between PeopleSoft Recruiting Solutions and external systems
Job Board Setup
Job board vendors enable you to post job openings to vendors such as job boards, services procurement providers, and recruitment agencies. To set up job board vendors:
Set up the job board vendor in the Vendor Setup component.
Set up a recruitment source in the Recruitment Sources component, and associate it with the vendor.
(Optional) Set up data mapping to support the recruitment source.
Integration With PeopleSoft Service Procurement
Oracle delivers prebuilt integration points between Talent Acquisition Manager and PeopleSoft Service Procurement. The PeopleSoft Service Procurement PeopleBook provides detailed information about this integration and how to set it up. The integration requires those recruiting users who post jobs to Services Procurement to also be users of the Services Procurement system, with identical user IDs and passwords in both systems.
See Posting Jobs to PeopleSoft Services Procurement.
Resume Extractor Setup
Resume extractors enable users to start with a resume in electronic form (such as HTML, PDF, DOC, and so on) and have the information from that resume extracted into more meaningful data. Applicants might embed resumes in email messages as either text or an attachment, and then the resume extractor can process as much information as it can recognize and load data into the PeopleSoft applicant related tables. Similarly, applicants can use their electronic resume to prepopulate their online job applications in PeopleSoft Candidate Gateway when they apply for jobs online. Recruiters can also use the extraction process to load data from resumes that they receive into the PeopleSoft applicant related tables. Finally, staffing providers can send resumes that require an extraction process.
To set up resume extractors:
Set up the resume extractor.
Follow the vendor-provided instructions.
Set up the resume extractor vendor.
Additional Setup Steps for Different Channels
Applicant resumes can come into the Recruiting Solutions system from one of several channels. The additional setup that you must complete to utilize resume extraction functionality varies slightly depending on the channels that the organization uses to receive resumes. For example, the additional setup that you must complete to receive resumes through email is different from the setup that you must complete to accept resumes from applicants who apply online through Candidate Gateway. However, the setup steps that you use to set up the actual resume extractor vendor are exactly the same for all channels. Therefore, you can set up a single resume extractor to use for all channels, or use a different resume extractor for each.
This table describes the setup steps for each channel:
|
Step |
Apply Online |
|
Open Integration Framework |
Resume Load Process |
|
1 |
Set up a resume extractor (might be optional) |
Set up a resume extractor (might be optional) |
Set up a resume extractor (might be optional) |
Set up a resume extractor (might be optional) |
|
2 |
Set up a resume extractor vendor |
Set up a resume extractor vendor |
Set up a resume extractor vendor |
Set up a resume extractor vendor |
|
3 |
Set up a site |
Set up an email server and email account to receive resumes |
Set up a job board vendor |
N/A |
|
4 |
N/A |
Set up an email node definition |
N/A |
N/A |
|
5 |
N/A |
Set up an email account |
N/A |
N/A |
|
6 |
(Optional) Set up Marketing type recruitment sources |
Set up a Vendor type recruitment source |
Set up a Vendor type recruitment source |
(Optional) Set up Marketing type recruitment sources |
|
7 |
(Optional) Create data mapping assignment for site |
(Optional) Create data mapping assignment for recruitment source |
(Optional) Create data mapping assignment for recruitment source |
(Optional) Create data mapping assignment for recruitment source |
Note. Step one might be optional because although an organization can set up and maintain a resume extractor locally, some resume extractor providers might want to set up and maintain the resume extractor remotely. Whether the step is optional depends on the agreement between the resume extractor provider and the organization.
Background Screener Setup
Background screeners enable recruiters or managers to request formal background checks on applicants that are nearing completion of the recruitment process and are about to be hired. To set up background screeners:
Set up pre-employment vendors.
(Optional) Set up data mapping to support the pre-employment vendor.
Setting Up Recruiting Vendors
To set up recruiting vendors, use the Vendor Setup (HRS_VENDOR_SETUP) component.
This section provides an overview of how to set up recruiting vendors and discusses how to:
Load a vendor configuration file.
Define settings for pre-employment vendors.
Understanding How to Set Up Recruiting VendorsRegardless of the type of recruiting vendor you are going to set up, you must complete some common tasks:
Set up your local gateway using PeopleTools Integration Broker.
See PeopleTools: Integration Broker PeopleBook
Verify security and class setup.
PeopleSoft delivers the permission list HCCPRS1010 and the role RS Technical Administrator for this purpose. To have full access to all integration components, the permission list must be linked to the menu HRS_HROI.
Load the vendor-provided configuration file.
Work with the vendor to obtain this file.
(Optional) Map competencies, accomplishments, and postal codes from the vendor to PeopleSoft Recruiting Solutions.
Although data mapping is optional, it makes integration much more effective.
Pages Used to Set Up Recruiting Vendors|
Page Name |
Definition Name |
Navigation |
Usage |
|
HRS_VENDOR_FILE |
Set Up HRMS, Product Related, Recruiting, Integration, Vendor, Vendor Setup |
Load a new vendor configuration file, or view and modify details after loading a vendor configuration file. |
|
|
HRS_PREEMPL_VNDR |
Click the Extended Setup link on the Vendor Setup page. |
Define settings for pre-employment vendors. |
|
|
Integration Test |
HRS_VENDOR_TEST |
Click the Test link for a transaction on the Vendor Setup page. |
Test vendor integration. |
Loading a Vendor Configuration File
Access the Vendor Setup page (Set Up HRMS, Product Related, Recruiting, Integration, Vendor, Vendor Setup).
|
Submit Configuration File |
Click to display a File Attachment dialog box, where you identify and upload the vendor's configuration file. After the system uploads the file, this button is hidden and the page instead displays page elements that you use to review and configure the vendor data. |
Configuring Vendors
Access the Vendor Setup page (Set Up HRMS, Product Related, Recruiting, Integration, Vendor, Vendor Setup).
When you access an existing vendor, or after you upload the configuration file for a vendor that you are adding, the page displays vendor setup fields.
The Vendor Setup and Transactions group boxes are automatically populated with the information that is provided in the configuration file. The transactions that appear in the Transactions group box are those that are defined on the Open Integration Framework - Transaction Group Setup page for the transaction group that is associated with the vendor configuration file.
Vendor Setup
|
Status |
Indicate whether the vendor is Active or Inactive. |
|
Allow Node Updates on Upload |
The node definitions are set up by the process of loading the vendor configuration file. If subsequent loads of the file are necessary (perhaps a customer gets an updated configuration file from the vendor), the Allow Node Updates on Upload check box enables the user to update the node definition or keep allowing the nodes to be updated. |
|
Vendor Administration |
Click to access the vendor's administration page. Not all vendors will support this option. |
|
Extended Setup |
Click to access the Pre-Employment Vendor Setup page, where you can define settings for pre-employment vendors. This link appears only for vendors in the PreEmployment transaction group, based on the setup in the Extension Configuration group box on the Open Integration Framework - Transaction Group Setup page. |
Transactions
|
Log Style |
Defines when to log messages on the Integration Log page. Values are: Log All: An entry is entered into the integration log every time a message is received from the vendor. Never Log: An entry is never made to the integration log. On Error: An entry is made to the integration log only when an error occurs. |
|
Node |
Displays the node name that is associated with the vendor's transaction. These node names are dynamically created. Click a node link to access the Connectors page in PeopleTools Integration Broker. |
|
Test |
Click to access the Integration Test page, where you can test the integration setup for outgoing messages. The Test links do not apply to incoming transactions. |
Defining Settings for Pre-Employment Vendors
Access the Pre-Employment Vendor Setup page click the Extended Setup link on the Vendor Setup page).
|
Display Adjudication |
Select this check box to make the adjudication status visible to managers, recruiters, and recruiting administrators on the Manage Applicants - Pre-employment Check and Pre-employment Check - Pre-employment Check Details pages. If you deselect this check box, the system displays Not Displayed in the Adjudication Status fields on these pages. |
|
View Results on External Site |
Select this check box to make the View Results link on the Pre-employment Check - Pre-employment Check Details page visible to managers, recruiters, and recruiting administrators. Users click the View Results link to access a detailed page of the pre-employment inquiry on the vendor site. |
Testing Vendor IntegrationAccess the Integration Test page (click the Test link for a transaction on the Vendor Setup page).
|
Integration Test |
This grid lists the fields that require data in order for the test to be performed. Enter values for each field. |
|
Run Test |
Click to test the integration. The system displays the Integration Log page, where you can review the results of the test. |
Setting Up Autoscreening For Data Received from VendorsTo set up autoscreening for data received from vendors, use the AutoScreen Setup (HRS_AUTOSCREEN) component.
This section provides an overview of autoscreening and discusses how to set up autoscreening criteria for resumes received from vendors.
Understanding AutoscreeningAutoscreening definitions represent one or more application classes for screening applicant data that is received from a third-party vendor.
You associate an autoscreening definition with a vendor when you set up the recruitment source definition for the vendor.
See Setting Up Recruitment Sources.
Page Used To Set Up Autoscreening For Data Received from Vendors|
Page Name |
Definition Name |
Navigation |
Usage |
|
HRS_AUTOSCREEN |
Set Up HRMS, Product Related, Recruiting, Recruitment Sources, AutoScreen, AutoScreen Setup |
Identify an application class to automatically screen incoming applicant data. You reference autoscreening definitions from recruiting source definitions for vendors. |
Setting Up Autoscreening Criteria for Vendor Recruitment Sources
Access the AutoScreen Setup page (Set Up HRMS, Product Related, Recruiting, Recruitment Sources, AutoScreen, AutoScreen Setup).
Setting Up Data Mapping
To set up data mapping, use the Data Mapping Assignments (HRS_DM_MAP_SETUP), Category Setup (HRS_DM_CAT_SETUP), Data Mapping (HRS_DM_MAPPING), and Postal Map (HRS_HRXML_POSTAL) components.
This section provides an overview of data mapping and discusses how to:
Create data mapping assignments.
Set up categories.
View key lists.
View value lists.
Map unmapped data.
Map keys.
Map values.
Map inbound postal information.
Map outbound postal information.
Understanding Data Mapping
Data mapping enables you to take information coming into your system, run it through an interpreter, and then have it presented to you in a format that fits your system. Data mapping is also used for outgoing messages in a similar fashion. The types of data mapping are:
Assignments and categories.
Postal.
Predefined mappings.
Data mapping assignments define how the system translates the words or phrases coming into the system to the words or phrases used by your system. You can set up data mapping definitions based on site, recruitment source, vendor, or the default All mapping. You can also have just one data mapping definition to everything coming into your system.
Data mapping categories are data objects that are used by the assigned maps to define how data is mapped. PeopleSoft delivers 11 data mapping categories:
Competencies.
Honors and Awards.
Language (accomplishment).
Licenses and Certifications.
Memberships.
Degrees.
Major.
School.
Country.
State/Providence.
Language (translate values).
These delivered data mapping categories were created to support Manage External Postings, Resume Management, and Background Screening. You can create a new data mapping category; however, some development work is necessary to define an appropriate application class.
For example, suppose a user creates a new entry in the School table for Stanford University with School ID = Stanford. This alone is not enough to map school data to or from the school ID Stanford. To begin mapping to or from this ID, the user must first run the synchronization process after creating the entry for Stanford University. To enable users to more efficiently process the synchronization for data mappings, PeopleSoft delivers a batch process that enables users to synchronize all data mapping categories at the same time. To initiate this process, navigate to PeopleTools, Process Scheduler, System Process Requests and create a new run control. Click the Run button, select a process server, select the Datamapping Sync (HRS_DM_SYNC) process, and click OK.
Postal
When postal information needs to be exchanged between an XML document and a Recruiting Solutions database, decisions of how this exchange occurs must be determined. This determination is at the country level.
Data Mapping Setup Steps
To set up data mapping:
Create data mapping assignments.
Synchronize data for each data mapping category.
(Optional) Create the Verity indexes for each category.
Establish postal mappings for each country's postal address.
Establish the necessary open integration framework vendors.
Pages Used to Set Up Data Mapping|
Page Name |
Definition Name |
Navigation |
Usage |
|
HRS_DM_MAP_SETUP |
Set Up HRMS, Product Related, Recruiting, Integration, Data Mapping Assignments, Assigned Mapping Setup |
Create data mapping assignments. |
|
|
HRS_DM_CAT_SETUP |
Set Up HRMS, Product Related, Recruiting, Utilities, Data Mapping Categories, Category Setup |
Set up categories. |
|
|
HRS_DM_CAT_KEYLIST |
Set Up HRMS, Product Related, Recruiting, Utilities, Data Mapping Categories, Key List |
View key lists. |
|
|
HRS_DM_CAT_VALLIST |
Set Up HRMS, Product Related, Recruiting, Utilities, Data Mapping Categories, Value List |
View value lists. |
|
|
HRS_DM_UNMAPPED |
Set Up HRMS, Product Related, Recruiting, Integration, Data Mapping, Unmapped Data |
Map unmapped data. |
|
|
HRS_DM_MAPING_DICT |
Set Up HRMS, Product Related, Recruiting, Integration, Data Mapping, Key Data Mapping |
Map keys. |
|
|
HRS_DM_VALUE |
Set Up HRMS, Product Related, Recruiting, Integration, Data Mapping, Value Data Mapping |
Map values. |
|
|
HRS_HRXML_PSTL_IN |
Set Up HRMS, Product Related, Recruiting, Integration, Postal Map, Inbound Map |
Map inbound postal information. |
|
|
HRS_HRXML_PSTL_OUT |
Set Up HRMS, Product Related, Recruiting, Integration, Postal Map, Outbound Map |
Map outbound postal information. |
Creating Data Mapping Assignments
Access the Assigned Mapping Setup page (Set Up HRMS, Product Related, Recruiting, Integration, Data Mapping Assignments, Assigned Mapping Setup).
Assigned Map
Use this group box to specify the vendors, sites, or recruitment sources that will not use the default data map. The description is used on the Unmapped Data, Key Data Mapping, and Value Data Mapping pages.
Setting Up Categories
Access the Category Setup page (Set Up HRMS, Product Related, Recruiting, Utilities, Data Mapping Categories, Category Setup).
|
AppClass (application class) |
Select an application class category. These categories are defined on the Application Class Registry page. |
|
Run Sync Now (run synchronization now) |
Click to synchronize the data that is associated with the selected data mapping category with the data actually existing in the corresponding component. This process populates the Key List and Value List pages. |
Viewing Key Lists
Access the Key List page (Set Up HRMS, Product Related, Recruiting, Utilities, Data Mapping Categories, Key List).
|
Subcategory |
Serves as a secondary key for the data mapping functionality. Not all categories use the subcategory secondary key. Subcategories themselves must also be data mappings. |
|
Keys |
Displays the primary key for the category. These keys are determined by the data in the associated data mapping category tables. Click the key link to access the Key Data Mapping page. This page displays all the values that are mapped to the given key. |
Viewing Value Lists
Access the Value List page (Set Up HRMS, Product Related, Recruiting, Utilities, Data Mapping Categories, Value List).
The Value List page lists all the values that are being mapped to a category key. Click a link in the Keys column to access the Value Data Mapping page.
Mapping Unmapped Data
Access the Unmapped Data page (Set Up HRMS, Product Related, Recruiting, Integration, Data Mapping, Unmapped Data).
|
Minimum Score |
Identifies a threshold for the Make Suggestions search. Only results that are greater than or equal to the minimum score appear in the Key ID field. The score of every suggestion found appears to the right of each key ID item in parentheses. |
|
Make Suggestions |
Click to run a search that provides a suggested mapping based on the minimum score that you entered. |
Mapping Keys
Access the Key Data Mapping page (Set Up HRMS, Product Related, Recruiting, Integration, Data Mapping, Key Data Mapping).
This page displays a complete list of all the values that are mapped to a given key.
Values
This group box enables you to add other values to the key. The values must be chosen from the unmapped data values.
|
Value |
Select the values that are associated with the key. |
|
Assigned Map |
Select the data mapping assignment that the key is associated with. |
|
Language Code |
Select the language that the value is assigned to |
|
Use |
Select to use this data mapping for incoming data, outgoing data, or both. |
|
Insert |
Click to add a row to the group box. |
Mapping Values
Access the Value Data Mapping page (Set Up HRMS, Product Related, Recruiting, Integration, Data Mapping, Value Data Mapping).
Displays all the keys that are mapped to the given value.
Keys
This group box displays all the keys that are mapped to the value and enables you to map more keys to the value. The keys that you add come from the unmapped data values.
|
Key |
Select the key ID of the data mapping. |
|
Assigned Mapping ID |
Select the data mapping assignment that the key is associated with. |
|
Use |
Select to use this data mapping for incoming data, outgoing data, or both. |
Mapping Inbound Postal Information
Access the Inbound Map page (Set Up HRMS, Product Related, Recruiting, Integration, Postal Map, Inbound Map).
This page displays the field names that are associated with the Country table.
|
HR XML Postal |
Select the XML element where you want the corresponding PeopleSoft field to be written for incoming messages. |
|
Map Default |
Click to have the system make an initial guess at what the mapping from the XML should be. |
Mapping Outbound Postal Information
Access the Outbound Map page (Set Up HRMS, Product Related, Recruiting, Integration, Postal Map, Outbound Map).
This page displays the address field names that are associated with the Country table.
|
HR XML Postal |
Select the XML element where you want the corresponding PeopleSoft field to be written for outgoing messages. |
|
Map Default |
Click to have the system make an initial guess at what the mapping from the XML should be. |
|
Sequence |
When multiple data elements from the PeopleSoft address table are mapped to a single element in the XML document, the sequence number determines the order in which the PeopleSoft fields are mapped. |
Setting Up Resume Email Accounts
To set up resume email accounts, use the (HRS_EMAIL_SETUP) component.
This section provides an overview of resume email accounts and discusses how to:
Set up resume email accounts.
View lists of emails.
View email attachments and select resumes.
Understanding Resume Email Accounts
If the organization requires applicants or staffing suppliers to submit resumes using email, you must set up one or more email accounts to receive those emails. In most cases, the applicants that send resumes to an email account are external applicants.
The system can process resumes that applicants send using email as attachments and resumes that are included in the body of the email message. If no attachment is found on the email, the system assumes that the resume is in the body of the email message. The system enables recruitment administrators to select which part of the email is the resume that will be passed to the resume extractor on the View Email Message/Attachments page.
The system does not support multiple resumes per email. If the system receives an email with multiple attachments, it processes the email as a single applicant even if it contains resumes from multiple applicants. This enables an applicant to send individual cover letter, resume, and reference attachments.
Setting Up Resume Email Accounts
To receive incoming resumes by email:
Set up an email account, user name, password, and email server to receive resumes.
Set up a resume extractor vendor.
Set up a recruitment source of type Vendor to associate with the incoming emails.
Set up an email node on the Connectors page.
PeopleSoft delivers the following standard email node: MCF_GETMAIL.
You must select a valid value in the Value column for the MCF_AttRoot property.
This value specifies where email attachments are temporarily stored. The MCF_AttRoot value is supplied to the Path field on the Resume Email page by default when you create a new email account.
Select True in the Value column for the MCF_Force_Download_Attachments property.
Create an email account on the Resume Email page.
Associate the email address, user name, password, email server, resume extractor vendor, recruitment source, and email node with the email account.
(Optional) Set up data mappings to support applicants from the recruitment source.
To process emails that you receive in the email account:
Run the Email Checking Process Application Engine process (HRS_HROI_EML).
When you run this process, the system checks the email account for emails, deletes the emails from the email account in box, and writes the emails to the database. Because the system deletes all emails from the email account in box, you should not use a personal email address when you create the email account. The emails that the system writes to the database appear on the Email List page. The system stores all content from the email in the database, including the HTML, text, subject line, email address, and attachments.
Run the Process Awaiting Email Application Engine process (HRS_PRCS_EML).
This process extracts data from the resumes for all email messages that are written to the database. The system processes all resumes that appear on the Email List page.
The recruitment source that you assign to the email account determines how the system handles incoming resumes. For example, the system uses the resume extractor, country, and language that you associate with the recruitment source to extract data from the resumes, and the system uses the screening setup parameters that you specify for the recruitment source to determine which status to assign to each resume and what notification to send to each applicant, if any, based on the assigned status.
Schedule the Email Checking Process and Process Awaiting Email processes to run by using the Process Scheduler Request page in PeopleTools. You can also manually run the Email Checking Process by clicking the Check Email button on the Email List page.
See PeopleTools: PeopleSoft Process Scheduler PeopleBook
Pages Used to Define Resume Email Accounts|
Page Name |
Definition Name |
Navigation |
Usage |
|
HRS_EMAIL_SETUP |
Set Up HRMS, Product Related, Recruiting, Integration, Resume Email, Email Setup |
Set up resume email accounts where organizations or individuals will send resumes. |
|
|
HRS_EMAIL_LIST |
Set Up HRMS, Product Related, Recruiting, Integration, Resume Email, Email List |
View a list of emails that have been retrieved from the email account. |
|
|
HRS_EMAIL_VIEW |
Click the subject link for an email that is listed on the Email List page. |
View email attachments and select resumes. |
Setting Up Resume Email Accounts
Access the Email Setup page (Set Up HRMS, Product Related, Recruiting, Integration, Resume Email, Email Setup).
|
Status |
Select a status: Active or Inactive. If you select Inactive, the system does not run the Email Checking Process. However, the system does run the Process Awaiting Emails process for all resumes in the Awaiting Resolution state. |
|
Email, User, and Password |
Enter the email address where you want to receive applicant emails, and the user ID and password for the email address. |
|
Server |
Enter the email server where you set up the email address. |
|
Node |
Select the node that you set up to receive emails. PeopleSoft delivers the following standard email node: MCF_GETMAIL. |
|
Path |
Enter the path where the email node stores email attachments. By default, the value that you specify for the MCF_AttRoot property on the Connectors page appears here. |
|
Source |
Select the recruitment source with which you want to associate the incoming emails. Only recruitment sources with a source type of Vendor appear in the prompt. This is not a required field; however, you should populate this field with a source to properly manage incoming resumes. Define recruitment sources by using the Source Setup (HRS_SOURCE_SETUP) component. |
|
Test Setting |
Click to test the setup. In this process, the system obtains an email count. If the system can get a count, even if the count is zero, the setup is a success. A success or fail message appears depending on whether the setup is a success or failure. |
Viewing Lists of Emails
Access the Email List page (Set Up HRMS, Product Related, Recruiting, Integration, Resume Email, Email List).
Use this group box to view a list of emails that have been retrieved from this email address.
|
Resume Attachment |
Displays the filename of the attachment that the system has selected to use as the applicant's resume in the resume extraction process. The system always selects the last attachment to use as the applicant's resume. If no attachments are in the email message, the system uses the text in the email message for the applicant's resume. If you determine that the attachment that the system selects is not the applicant's resume, use the View Email Message/Attachments page to select the appropriate attachment. Click an attachment link to view the file. |
|
Email From |
Displays the email address of the sender. |
|
Subject |
Displays the text that appears as the subject for the email. Click to access the View Email Message/Attachments page, where you can view the email message text and email attachments, and select the attachment that you want the system to use as the applicant's resume in the resume extraction process. |
|
Date From |
Displays the date and time that the email was received in the email account. |
Additional Page Element
|
Check Email |
Click to run the Email Checking Process. |
Viewing Email Attachments and Selecting Resumes
Access the View Email Message/Attachments page (click the subject link for an email that is listed on the Email List page).
Use this page to view the email message text and email attachments, and select the attachment that you want the system to use as the applicant's resume in the resume extraction process.
|
Message |
Displays the exact message text from the email message. |
Attachments
|
Attachments |
Displays all of the attachments that the system detects in the email message. Click an attachment link to view the file. The Plain Text attachments contain the actual message text from the email message. |
|
Set Resume |
Click to set the associated attachment as the applicant's resume. This button is inactive for the attachment that the system selects as the resume. |
Reviewing the Integration Transaction Log
This section discusses how to review the integration transaction log.
Pages Used to Review the Integration Transaction LogReviewing the Integration Transaction Log
Access the Integration Log page (Set Up HRMS, Product Related, Recruiting, Integration, Integration Log, Integration Log).
Search Results
This group box displays the messages received from vendors that match the search criteria that you enter in the Search Integration Log group box.
Reviewing Outgoing Message DetailsAccess the Integration Log Outgoing Msg page (Click a transaction link on the Integration Log page).
This page includes the following fields that display detailed information about integration messages:
Request
Vendor Request
Vendor Response
Response
Error