 Understanding Positive Input
This chapter provides an overview of positive input and discusses how to:
Enter positive input.
Create and use template-based pages to enter positive input.
Make retroactive adjustments to positive input.
Review positive input.
Understanding Positive Input
This section discusses:
Characteristics of positive input.
Sources of positive input.
Instances and bundling.
Eligibility rules.
Action types and processing rules.
Segmentation considerations.
Batch processing and positive input.
 Characteristics of Positive Input
Positive input is earning and deduction data that you enter for one pay period. The data—such as hours worked or a one time bonus—is payee-specific and can change each period. You can enter positive input manually or receive it from applications such as PeopleSoft Time and Labor.
When entering positive input for an earning or deduction element, you can enter a flat amount or values for the components of the element's calculation rule. For example, if the rule for calculating a payee's regular pay element is Regular Pay = Rate × Units , you can enter an amount that overrides the calculation rule or specify a value for rate, units, or both rate and units. If you enter values, you can enter numeric values, such as 40 hours, or select a rate code element that retrieves the component's value from PeopleSoft HR.
Global Payroll offers optional features that you can use when entering positive input. You can select the currency that applies to an entry; override a payee's department, job code, or location; or enter information that's specific to your organization and can be transmitted to your general ledger system.
Note. The data that you enter applies to one pay period only. Set up long-term overrides for elements on the Element Assignment By Payee page or the Payee Assignments by Element page.
Sources of Positive Input
Positive input can come from various sources. You can:
Manually enter data through the positive input pages.
Receive data from Time and Labor, the Manage Variable Compensation business process in HR, or third-party applications.
Run the Absence Take process (GPPDPRUN) to convert paid and unpaid absences into positive input.
Include a generate positive input section in your process list, causing the system to create positive input for a different pay calendar.
With one exception, manual entries override positive input generated by other sources. (Manual entries with an action type of Add do not override automated entries.) If a payee has system-generated entries from multiple sources, such as Time and Labor and the Absence Take process, but no manual entries, the system processes all automated entries during the pay run.
You can edit positive input only if it was entered into the system manually. To add, delete, or correct a system-generated entry, enter positive input that overrides the system-generated entry; if the data was generated by another application, correct the source records and retransmit the data.
See Also
Generate Positive Input Sections
Integrating with PeopleSoft Time and Labor
Integrating with Variable Compensation Functionality
Instances and BundlingThis section provides an overview of positive input entry instances and bundles.
Positive input entries are also called instances. When entering positive input into the system manually, you assign an instance number to each entry. So, if a payee works overtime at three rates and you make three separate entries of positive input for the OVERTIME element, each entry has a different instance number. The following example assumes that the calculation rule is (Overtime) = (Rate) × (Units)
|
Element |
Instance |
Rate × Units |
|
Overtime |
1 |
25 × 10 |
|
Overtime |
2 |
35 × 5 |
|
Overtime |
3 |
30 × 5 |
When positive input comes from external sources, the system assigns instance numbers. Whether the system assigns a separate instance number to each entry of positive input or to a group of entries depends on whether bundling occurred.
Positive input created by the Absence Take process, Time and Labor, or a third-party application is often bundled by pay period into an array, for more-efficient processing. If a payee works eight hours a day on a weekly pay frequency, five eight-hour entries can be bundled into one 40 hour entry. Bundling has no impact on processing or results other than that it creates a single row of output (GP_RSLT_ERN_DED) instead of multiple rows.
Each bundle receives an instance number. Instance numbers begin with 1 and are assigned to each bundled element in a calendar run.
Rules for bundling data depend on the positive input source. This diagram illustrates the sources of positive input and bundling:
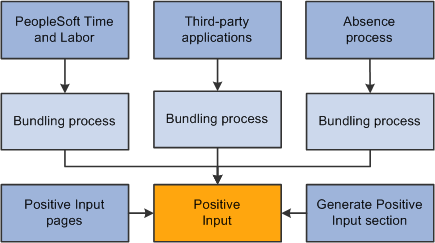
Sources of positive input and bundling
Bundling Rules for Time and Labor
Positive input entries received from Time and Labor (called payable time in that application) are bundled by slice or segment when they contain compatible data—that is, when the values for the following types of data are identical:
Rate.
Currency.
Rate as of date.
Task entities*.
* To be considered for bundling, selected task entities defined in Time and Labor—including business unit, product, and department—must be mapped to system elements or variable elements in Global Payroll using the Mapping page.
Example 1
A payee has five positive input entries, one for each weekday. Each entry specifies a rate value as in the table. The rate earned every day except Thursday is the same. Therefore, the system bundles and creates one instance for the four days with a rate of 10 and creates a separate instance for Thursday, with a rate of 12:
|
Day |
Hours Worked |
Rate |
|
Monday |
8 |
10 |
|
Tuesday |
4 |
10 |
|
Wednesday |
8 |
10 |
|
Thursday |
8 |
12 |
|
Friday |
8 |
10 |
Example 2
A payee performs work in two departments. The positive input entries include a system element that defines the department (A or B) and a variable element that specifies the hours worked. Because the system elements must match for bundling to occur, the system bundles all entries for department A and creates another bundle for the department B entries:
|
Day |
Variable |
System Element |
|
Monday |
8 |
Department A |
|
Tuesday |
8 |
Department A |
|
Wednesday |
8 |
Department B |
|
Thursday |
8 |
Department B |
|
Friday |
8 |
Department A |
Bundling Rules for Absence Take
Positive input that's created by the Absence Take process and that falls in the same slice or segment can be bundled, depending on the take element definition:
If you didn't select the Multiple Instances option for the take element, positive input for absences taken for the same reason during the pay period is bundled.
If you allocated the positive input associated with an absence take element to more than one earning or deduction element (on the Absence Take - Day Formula page), the system bundles the positive input for each earning and deduction element separately.
Bundling Rules for Third-Party Applications
Positive input received from third-party applications can be bundled or unbundled, depending on the bundling group tag assigned to each instance before transmission to Global Payroll. The third-party application must use a unique value for the Source (PI_SOURCE) field and handle any segmentation requirements. It is the responsibility of the third-party interface to bundle entries as required by Global Payroll.
Eligibility Rules
For positive input to be resolved, all of the following conditions must be met:
The payee must be selected and identified for processing.
You enter criteria for selecting payees when creating the calendar for the pay period. You identify payees to be calculated when you set up the run control for the payroll process.
The element cannot be excluded from the calendar.
The element must be included in a section of the process list that's executed during processing.
The element must belong to the payee's eligibility group, or positive input must be selected as an override on the Pay Entities - Processing Details page.
Why Positive Input Might Not Be Resolved
If you discover that some instances of positive input weren't resolved during processing, the most likely causes—besides the aforementioned eligibility issues—are that:
The value of a component of the element's calculation rule is defined as requiring payee level input, but you didn't specify the component's value through positive input or a payee override.
If you enter positive input without values for the components, the element is resolved using the element's definition and payee override, if any.
You entered positive input after running the last iteration of the payroll processing calculate phase or after freezing calculations for payees.
See Also
Action Types and Processing Rules
When you manually enter an instance of positive input, you select an action type that tells the system how to process the instance. You can select from the following action types:
Override
Add
Do Not Process
Resolve to Zero
A brief explanation of each action type follows.
Override
When you enter positive input with the action type of Override, you can enter an amount that overrides the calculation rule for the instance of the element or enter a value for components of the element's calculation rule: rate, unit, percent, or base. (If the calculation rule is defined as amount, you can enter only an amount.)
Suppose that you define an earning code as a flat amount of 100 EUR. You want to give the payee 90 EUR instead. You enter the amount of 90 EUR on the Positive Input page, specifying the action type as Override. The system overrides the definition amount of 100 EUR that is resolved, and the payee receives 90 EUR.
Add
When you enter positive input with the action type of Add, the system processes the normal resolution of the element based on the element definition or instructions entered on the Element Assignment By Payee page or the Payee Assignments by Element page, if any. In addition, it processes the element again based on the values that you enter in positive input, resulting in multiple occurrences.
Suppose that you define an earning code as a flat amount of 100 EUR. You want to give the payee an extra 50 EUR. From a data entry standpoint, the administrator enters the additional 50 EUR on the Positive Input page, specifying the action type as Add. The system processes the definition amount of 100 EUR and then resolves the additional amount of 50 EUR, so that the payee receives 150 EUR.
Do Not Process
When you enter positive input with the action type of Do Not Process, you prevent the system from processing this element for the payee when calculating the calendar. No result is written to the result table.
Do Not Process instructions apply to all instances of positive input for the element—manual or system-generated—in all segments and slices of the calendar, unless you enter an end date (on the Other Data page), which enables you to limit the instructions to instances that fall in the same slice or segment.
Suppose that instance 1 has an action type of Do Not Process, and that instance 2, for the same element, has an action type of Override. If you don't enter an end date for instance 1, the Do Not Process instructions apply to both instances and neither is processed.
Resolve to Zero
When you enter positive input with the action type of Resolve to Zero, the system resolves the instance of the earning or deduction with a value of 0.
Unlike Do Not Process , Resolve to Zero writes an amount of 0 to the results table, making a zero amount on the payslip possible. Also, Resolve to Zero instructions do not affect any other instances.
Rules for Mixed Action Types
The following rules apply when positive input occurs with mixed action types within a segment:
Where positive input entries are a combination of Add and Override action types, the system does not resolve the element definition because of the presence of the override entry.
Instead, the system processes all positive input entries with action types of Override and Add in this order (hierarchically): first the entry with an action type of Override, then the entry with an action type of Add.
Suppose that E3 is a flat amount of 100 USD. You create two positive input entries, one (instance #1) with an Add action type for 30 USD and one (instance #2) with an Override action type for 200 USD.
Despite the presence of what could be considered conflicting action types, the system processes both entries, regardless of the order in which you enter them. The system processes the entry with an action type of Override first and creates a row for 200 USD on the earning/deduction result table. Then the system processes the entry with an action type of Add and creates a row for 30 USD on the earning/deduction result table.
The result is that the payee receives 230 USD for E3 with two rows on the earning/deduction result table. The system does not resolve the element based on its rule definition.
Regardless of the combination of action types, the presence of an entry with an action type of Do Not Process always overrides any other positive input entries for that segment.
In other words, the system processes nothing for the element. The Do Not Process value supersedes all action types.
The action type Resolve to Zero affects only the current positive input instance.
Where the action types of Override, Add, and Resolve to Zero are combined, the system processes all entries.
Suppose that E4 is a flat amount of 500 USD. You create three positive input entries with the following attributes:
Action type of Override for 700 USD.
Action type of Resolve to Zero.
Action type of Add for 300 USD.
The end result is that the system processes all three positive input entries and the payee receives 1000 USD for E4 with three rows (instances) in the earning/deduction result table. The system does not resolve the element through its definition. Also, the system creates a row with a result amount of 0.
See Also
Defining Interactions Between Positive Input Entries and Element Assignments with User Field Sets
Segmentation Considerations
When a calendar pay period has period or element segmentation, positive input isn't prorated. It's assigned to a single segment or slice, based on the instance's end date:
If the end date falls before the calendar period begin date, the instance is assigned to the pay period's first segment or slice (see Instance 1 in the diagram).
If the end date falls in the pay period, the instance is assigned to the segment or slice in which the end date falls (see Instance 2).
When no end date is specified, the instance is assigned to the pay period's last segment or slice.
It's assumed that the end dates for the instance and the calendar are identical (see Instance 3). There is one exception: you can enter Do Not Process instructions to prevent the element's resolution. If you enter this instruction with no end date, the element isn't resolved in any slice or segment.
If the end date falls after the pay period end date, the instance isn't processed (see Instance 4).
This diagram illustrates instances assigned to segments and slices by end date:
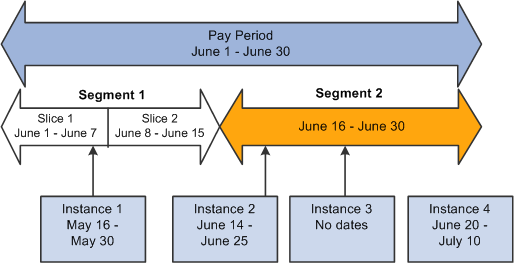
Instances assigned to segments and slices by end date
Example 1: Effect of Period Segmentation on Positive Input
You're processing your January payroll. On January 16, a payee is promoted, causing period segmentation (two gross-to-net payments). In an unrelated transaction, You enter positive input for the payee's earning element with a begin date of January 20 and an end date of January 21. Because the end date for the positive input falls in segment 2, it's processed in segment 2 only. In segment 1, the earning element is processed as usual, unaffected by the positive input:
|
Segment 1 January 1−15 |
Segment 2 January 16−31 |
|
Element is processed normally. |
Positive input is processed. |
Example 2: Effect of Element Segmentation on Positive Input
You're processing your January payroll. On January 16, a payee's compensation rate changes, causing element segmentation (slices). Positive input is entered for the payee with a begin date of January 20 and an end date of January 21. Because the end date for the positive input falls in slice 2, the positive input is assigned to that slice. The element isn't processed in slice 1. In other words, the positive input overrides the element slicing. (The slice dates are still relevant to accumulators.)
|
Slice 1 January 1−15 |
Slice 2 January 16−31 |
|
Positive input entered for element is not processed. |
Positive input is processed. |
Note. This example illustrates an important point: if an element is sliced, and there is a positive input override targeted to one slice but not another in the same segment, the element is resolved only in the slice that receives the override, using the override values. There is no additional resolution of the element in other slices. This is because positive input overrides the normal resolution of the element for the entire segment (not just a single slice).
Example 3: Effect of Element Segmentation on Payroll Calculations
Rules for assigning positive input to slices and segments can affect payroll calculations.
Assume that (GROSS) = (PAY1) + (PAY2) . Without positive input or segmentation, the elements' value is:
|
Element |
Element Value Without Segmentation |
|
PAY1 |
3000 |
|
PAY2 |
900 |
|
GROSS |
3900 |
|
TAX |
10% × GROSS |
Tax = 390 [10% × 3900]
On June 10, the tax rate increases to 20 percent, triggering element segmentation. The segmentation event definition includes PAY1, PAY2, and TAX.
With element segmentation but no positive input, the value of each element is now as follows, assuming that PAY1 and PAY2 are prorated:
|
Element Name |
Slice 1 June 1−10 |
Slice 2 June 11−30 |
|
PAY1 |
1000 |
2000 |
|
PAY2 |
300 |
600 |
|
GROSS |
1300 |
2600 |
|
TAX |
10% × GROSS |
20% × GROSS |
Tax = 650 [(10% × 1300) +(20% × 2600)]
Now suppose that you enter an instance of positive input, as follows:
|
Element |
Amount |
Begin Date |
End Date |
|
PAY1 |
3300 |
June 2 |
June 8 |
Because positive input is assigned to a slice based on its end date and the end date of our instance falls in slice 1, positive input for PAY1 is resolved in slice 1 and overrides the element's standard calculation. In addition, PAY1 isn't resolved in slice 2, since positive input for an element overrides the regular resolution in all slices within the same segment.
With positive input and element segmentation, the elements' value is:
|
Element Name |
Slice 1 June 1−10 |
Slice 2 June 11−20 |
|
PAY1 |
3300 |
0 |
|
PAY2 |
300 |
600 |
|
GROSS |
3600 |
600 |
|
TAX |
10% × GROSS |
20% × GROSS |
Tax = 480 [(10% × 3600) + (20% × 600)]
If the instance of positive input has the following begin and end dates instead, the input is assigned to slice 2, making the 3300 subject to 20 percent tax:
|
Element |
Amount |
Begin Date |
End Date |
|
PAY1 |
3300 |
June 8 |
June 12 |
Then the elements' value is:
|
Element Name |
Slice 1 June 1−10 |
Slice 2 June 11−20 |
|
PAY1 |
0 |
3300 |
|
PAY2 |
300 |
600 |
|
GROSS |
300 |
3900 |
|
TAX |
10% × GROSS |
20% × GROSS |
Tax = 810 [(10% × 300) + (20% × 3900)]
The tax amount is now 1080, not the 660 it would have been with the instance assigned to slice 1. The slice or segment to which positive input is assigned can significantly affect payroll calculations.
Note. This example illustrates an important point: if an element is sliced, and there is a positive input override targeted to one slice but not another in the same segment, the element is resolved only in the slice that receives the override, using the override values. There is no additional resolution of the element in other slices. This is because positive input overrides the normal resolution of the element for the entire segment (not just a single slice).
See Also
Batch Processing and Positive Input
This section describes how batch processing works with positive input.
Unprocessed Positive Input
You can finalize a calendar run without processing all positive input. For example, if a payee has 10 units of positive input, and you change the units to 12 after running the Calculate phase, the system generates an iterative trigger (assuming that the units field is set up to generate iterative triggers). If you don't rerun the Calculate phase, only 10 units are processed. If you run a retroactive process, all 12 units are processed (assuming that the units field is also set up to generate a retroactive trigger).
Arrears - Payback
If positive input instances with the action type of Override exist, the system determines any arrears payback amount and adds it to the first positive input instance. If the element resolves multiple times per segment in the current period, the following hierarchy is observed when applying the Arrears - Payback amount:
Normal resolution of the element.
Override occurrence.
Additional occurrence.
When there are only Add type instances of positive input (and no other action types such as Override), the system applies the arrears payback to the initial calculation based on the normal resolution of the element and not to the subsequent additional resolutions of the element. If there is a mix of Override and Add action types, the system applies the arrears - payback amount to the override resolution of the element. Lastly, if a normal resolution of the element does not exist, and an override resolution of the element does not exist, then the system applies the arrears - payback to the additional resolution of the element. It is important to ensure that the system applies the arrears payback amount only once.
Frequency Conversion, Rounding, and Proration
The system does not apply frequency conversion, rounding, or proration to any numeric component or amount entered in positive input. For components not entered through positive input, normal rule processing occurs based on the element definition.
How the Batch Process Stores Positive Input
Manually entered positive input is maintained in a separate record from positive input that's automatically generated. However, all positive input considered during processing is stored in the same output record (GP_RSLT_PI_DATA), regardless of source. A second record (GP_RSLT_PI_SOVR) stores data for supporting elements, such as department or job codes that you entered manually or received from Time and Labor.
One row of data is written to the output table for each instance. Therefore, if entries are bundled, one row of data is written to the output table for the entire bundle. When a separate instance number is assigned to each entry, a row of data is written to the output table for each entry.
The instance numbers stored in the output table enable you to link each entry to the processing results. An automatically generated source code (PI_Source) identifies the origin of the entry: Absence, Generated PI, Manual, or Time & Labor.
Entering Positive Input
This section provides instructions and tips for entering positive input, and explains how to:
Enter positive input for one payee.
Enter positive input for multiple payees.
Override positive input details.
Methods for Entering Positive Input
Before you can enter positive input, you must set up the calendar with which the positive input is associated. Create the calendar with a run type of payroll. After creating the calendar, you can begin.
Global Payroll provides several options for manual entry of positive input. You can:
Enter positive input for a single payee associated with the pay group and calendar that you select.
Enter positive input for multiple payees associated with the same pay group and calendar.
Use a template to create your own data entry page for payees in the same pay group.
See Also
Creating and Using Template-Based Pages to Enter Positive Input
Tips and Tricks for Entering Positive Input
This section provides tips for entering positive input.
Positive Input for a Payee with Different Payment Keys
Positive input is applied to the payment key of the period for which the positive input is processed. For example, if a change in a contract ID causes segmentation, the positive input is applied to the contact ID that's in effect for that segment. You can direct the positive input to a specific contract by entering the applicable begin and end dates for the instance. If positive input applies to a prior period contract, enter it in the applicable calendar. Retroactive processing occurs, if appropriate.
Positive Input for a Payee Who's Compensated at Different Rates for Different Types of Work
You can:
Enter the applicable numeric rate or select the rate code that the system uses to retrieve the rate.
Override the job code system element, if the earning element is defined with a non base-pay rate code.
The system retrieves the rate that's applicable to the job code that you select.
See Also
Entering Processing Details for a Pay Entity
Positive Input for Finalized or Approved CalendarsPositive input that's entered for finalized or approved payees is processed only during a retroactive pay run for the same calendar. If the pay group and calendar for which you are entering positive input has been finalized, or if there are payees associated with the calendar who have already been approved for banking, the following message appears on the data entry page:
"Pay Calendar has been finalized/approved. Any changes will be considered during retro processing."
Pages Used to Enter Positive Input|
Page Name |
Definition Name |
Navigation |
Usage |
|
GP_PI_MNL_ERNDED |
Global Payroll & Absence Mgmt, Payee Data, Assign Earnings and Deductions, One Time (Positive Input), Positive Input |
Enter positive input for one payee. (You select the employee ID, pay group, and calendar to access this page.) |
|
|
GP_PI_GRP_ERNDED |
Global Payroll & Absence Mgmt, Absence and Payroll Processing, Prepare Payroll, Positive Input by Calendar, Positive Input By Calendar |
Enter, edit, or view positive input for payees in the same pay group and calendar. |
|
|
GP_PI_MNL_SEC |
Click Details on the Main Components tab of the Positive Input page or the Element Overrides tab of the Positive Input By Calendar page. |
Enter a rate code or a numeric value for a percent, base, rate, unit, or amount component; change the currency; add a description; and enter begin and end dates. You can also override system and variable elements associated with positive input, such as department, job code, or rate as of date. |
See Also
Pages Used to Work with Templates
Entering Positive Input for One Payee
Access the Positive Input page (Global Payroll & Absence Mgmt, Payee Data, Assign Earnings and Deductions, One Time (Positive Input), Positive Input).
To enter positive input for a payee:
On the Action tab, select the earning or deduction element for which to enter positive input, assign it an instance number, and specify the action to take during processing.
On the Main Components tab, enter numeric values for the components of the element's calculation rule, if applicable.
To enter a numeric value for percent or base or to select a rate code element for any components of the element's calculation rule, click the Details link on the Main Components tab.
You can also override the value of a system or variable element, if applicable.
Action
Select the Action tab.
Enter each instance of positive input that applies to this payee.
|
Entry Type |
Select Earnings or Deduction to indicate the type of element for which you're entering positive input. |
|
Element Name and Element Description |
Select the element for which you want to enter positive input by either name or description. You can select from those elements that meet all these conditions:
|
|
Instance |
Enter a number from 1 to 999 to identify the instance of positive input that you're entering for the element. The default entry for the first row is 1, but if a payee has more than one row of positive input for the same element, the system assigns an instance number incrementally from the highest instance number assigned to existing rows. Instance numbers provide the system with a way to prioritize multiple rows of positive input for the same element. The lower the instance number, the higher the priority. |
|
Action Type |
Select the type of action to perform when processing this instance of positive input. Values are Override, Add, Do Not Process, and Resolve to Zero. When you select Resolve to Zero, you cannot enter information on the Positive Input – Details page. |
Main Components
Select the Main Components tab.
The fields that you can complete depend on the value that you select in the Action Type field and the calculation rule used by the earning or deduction element.
|
Unit |
If unit is a component of the element's calculation rule, you can enter a positive or negative number of units in this field. To select a rate code element to retrieve the unit's value from HR, click the Details link to access the Positive Input – Details page. If you don't enter a value and the units are defined on the element's Calculation page, the system checks the element's as of date to determine the appropriate value. |
|
Rate |
Similar to the Unit field. |
|
Amount |
Enter a positive or negative amount to override the element's calculation rule. The system uses this amount to resolve the element, regardless of its calculation rule. If you enter an amount, you can still enter a numeric value in the Unit or Rate field—if these are components of the element's calculation rule. Although the values that you enter aren't used for calculations, the system moves them to the earnings and deductions results table, making the information available for payslips. For example, if you have an earning element defined as rate × units and enter an amount and a rate, the system uses the amount that you enter to resolve the element and passes the amount and rate to the results table. |
|
Currency Code |
When you select a rate or amount, the code for the processing currency appears (as defined by the element definition or the pay entity). To use another currency, select it here. |
|
Details |
Click the Details button to access the Positive Input – Details page, where you can select a rate code or enter a numeric value for any component of the element's calculation rule (percent, base, rate, amount, or unit). You can also override a variable or system element that is associated with this instance of positive input, such as the business unit, department, or job, and enter other instructions. A check mark appears in the Details check box if instructions have been entered on the Positive Input – Details page. |
Source
Select the Source tab.
|
Updated By User and Last Update Date/Time |
These fields display the ID of the user who last updated the positive input information along with the date and time of the update. |
|
Batch Code |
Enter a unique batch code to assist in further identifying the positive input entry with which a payee record is associated. |
Entering Positive Input for Multiple Payees
Access the Positive Input By Calendar page (Global Payroll & Absence Mgmt, Absence and Payroll Processing, Prepare Payroll, Manage Positive Input by Cal, Positive Input By Calendar).
You can use this page to add, change, or view positive input for multiple payees associated with the same pay group and calendar. You cannot delete positive input from this page.
Search For Existing Entries
Use this group box to specify which positive input records to display or edit. The system retrieves the entries that meet all your selection criteria.
To display positive input entries for payees or edit unprocessed entries:
Enter the search criteria for the positive input entries to review.
To search by department or location, you must first select the business unit.
To search by batch code, there must be at least one payee who matches your search criteria and has an assigned batch code. This is because the Batch Code field in the Search for Existing Entries group box prompts against a derived table of all batch codes assigned to payees that match your search criteria.
Click the Search button.
Review or edit the entries on both tabs in the Earnings and Deductions group box.
Earnings and Deductions
Fields in this group box are similar to those on the Positive Input page that you use to enter positive input for a single payee.
To enter positive input entries for payees:
(Optional) On the Source tab, enter a unique batch code for each payee row to assist in further identifying the positive input entry with which a payee record is associated.
Complete the remaining required and optional data entry fields on this tab.
(Optional) Click the Details button to access the Positive Input - Details page, where you can enter rate codes, begin and end dates, and other instructions for each payee.
You can also override system and variable elements associated with the positive input.
Add rows of data entry fields, as needed.
To add rows of data entry fields:
Select the Copy Values From Selected Row check box to copy the values that you entered in a given row into the new rows.
Deselect this check box to add blank rows.
Click the Add New Rows (+) button on the row that you are copying and enter the number of rows to add in the user prompt field that appears.
The system does not copy the EmplID or the Empl Record field value.
Enter an ID and other values for all new rows on both the Elements and Element Overrides tabs.
See Also
Entering Positive Input for One Payee
Overriding Positive Input Details
Overriding Positive Input Details
Access the Positive Input - Details page (click Details on the Main Components tab of the Positive Input page or the Element Overrides tab of the Positive Input By Calendar page).
The title that appears at the top of the page depends on whether you access this page from the Positive Input page or the Positive Input By Calendar page.
Specify Values OR Elements
The fields for units, rate, base, and percent are enabled only when they are components of the calculation rule for the selected earning or deduction element. Any numeric values that you entered on the Positive Input page appear here.
You can enter a positive or negative numeric value or select a rate code element that retrieves the unit value from HR. If you don't enter a value for the component and the component's value is defined on the element's Calculation page, the system uses the element's as of date to determine the value.
|
Begin Date and End Date |
Enter the start date for the instance of positive input. If you enter a begin date, you must also enter an end date, and vice versa. The system doesn't use the begin date for processing. Enter the end date if it differs from the calendar end date. If the calendar period is segmented, the end date that you enter determines the segment or slice to which the instance of positive input is assigned. The end date must be on or before the calendar end date. |
|
Currency Code |
When you enter a value in the Rate Value, Base Value, or Amount Value field, the code for the processing currency (as defined by the element definition or the pay entity) appears in this field. To use another currency, select it from the list. |
Absence Dates
Complete the following fields if you're entering positive input for an earning or deduction element associated with an absence take.
|
Absence Begin Date and Absence End Date |
Enter the dates of the absence event. |
|
Period Begin Date |
Enter the later of the begin date of the absence event or of the calendar period. |
|
Period End Date |
Enter the earlier of the end date of the absence event or of the calendar period. |
Other Data
|
Batch Code |
The system populates this field by default with the batch code on the Element Overrides tab, if any. Batch codes are optional, and assist in further identifying the positive input entry with which a payee record is associated. You can use this identifier as a search value on the Positive Input By Calendar page. Note. For each payee, the system synchronizes the batch code that you enter on the Positive Input By Calendar page with the batch code on the Element Overrides tab, and vice versa. |
|
Description of PI (description of positive input) |
Enter a description to be stored in the GP_RSLT_PI_DATA record. You might use this feature to print a description besides the element description defined on the Element Name page (GP_PIN) when printing payslips or reports. |
Supporting Element Overrides
You can override system or variable elements associated with an instance of positive input. For example, you can override the department, job code, or location associated with an instance. When you override the job code for a non base-pay earning element, the system uses the compensation rate that's applicable to the job that you specify.
Assume that a payee does two types of work for your organization, with two pay rates. During the pay period, the payee works 32 hours at Job A—the regular job—and eight hours at Job B. You enter the 32 hour instance of positive input for Job A. Because the entry applies to the payee's regular job, you need do nothing more with this instance. You enter the eight-hour instance for Job B and override the standard job code for the eight-hour instance in the Supporting Element Overrides group box.
An override applies to one instance of positive input only. After the instance is resolved, the supporting element reverts to its previous value. The fields that you can complete depend on the element's format: numeric, character, or date. You cannot enter monetary values.
Note. The Supporting Element Overrides group box may appear different from the exhibit shown in this documentation. Using the configurable element overrides feature, you can modify the labels, fields, and prompt displays for each element, thereby enhancing the ease and accuracy of data entry for supporting element overrides.
See Configuring Element Overrides.
|
Business Unit |
To select a business unit other than the one to which the payee is assigned (through the Job Data component in HR), select from the prompt table. The system loads the prompt tables, so that they are available when completing the Supporting Element Overrides group box. |
|
Element Entry Type |
Select the type of element to override. Values are SystemElem and Variable. |
|
Element Name |
Enter the name of the element to override, from elements that meet all the following conditions:
|
|
Character Value |
If the supporting element that you selected uses character values, you can enter up to 25 characters in this field. The field is unavailable when you select the system element of department, job code, or location unless you previously selected a business unit. When you've selected a business unit and department, job code, or location, the system displays a prompt table that lists the values applicable to the business unit that you selected. You can select the override value from the prompt table. For example, if you select 123 as the business unit and Job Code as the element name, the prompt table lists all job codes associated with business unit 123. |
|
Numeric Value |
Enter the number for system use if the supporting element uses numeric values. |
|
Date Value |
Enter the date for system use if the supporting element uses date values. |
See Also
Creating and Using Template-Based Pages to Enter Positive Input
To create positive input templates, use the Positive Input Templates (GP_PI_BULK_TMPLT) component.
This section provides an overview of templates and discusses how to:
Create a data entry page for positive input.
Enter positive input on a template-based page.
Understanding TemplatesYou can use a template to design your own data entry pages that prompt users for the positive input information that's specific to your payees. You can include fields for up to six earning and deduction elements, enable two component overrides, and enable three supporting element overrides for each earning or deduction element. Users can then access the page that you've designed to enter positive input quickly for multiple payees in the same pay group.
See Also
Pages Used to Work with Templates|
Page Name |
Definition Name |
Navigation |
Usage |
|
GP_PI_BULK_TMPLT |
Set Up HRMS, Product Related, Global Payroll & Absence Mgmt, Elements, Payroll Elements, Positive Input Templates, Positive Input Templates |
Define the fields that are to appear on your data entry page (the Positive Input by Template page). |
|
|
GP_PI_BULK_SSN |
Global Payroll & Absence Mgmt, Absence and Payroll Processing, Prepare Payroll, Positive Input by Template, Positive Input by Template |
Enter positive input for payees in the same pay group and calendar. The page is built dynamically according to a template created with the Positive Input Templates page. |
Creating a Data-Entry Page for Positive Input
Access the Positive Input Templates page (Set Up HRMS, Product Related, Global Payroll & Absence Mgmt, Elements, Payroll Elements, Positive Input Templates, Positive Input Templates).
Note. Each template is associated with the operator country of the template's creator.
Elements and Main Components
Select up to six earning or deduction elements that allow positive input as an override, as specified on the Element Name (GP_PIN) page. These are the earnings and deductions that will appear on your data entry page.
|
Element Type |
Select an element type of Earning or Deduction. |
|
Element |
Enter the element for which you want to allow positive input as an override. Do not select the same element more than once for a template. If you do, you will receive an error when you try to save the template. If you enter an element that has a configuration that could conflict with the supporting element specifications of the template, you will receive a warning message when you save the template. |
|
Component |
For each selected earning or deduction element, you can include fields for one to three component overrides. (Components are used in the calculation rule of an earning or deduction element.) Select the type of component that users can override. Values are: Amount, Base, Percent, Rate, and Unit. Except for Amount, which is always a valid value, only components that are part of the element's calculation rule are available values in this field. The system cross-validates the values in the three Component fields for an element to ensure that there are no duplicates. |
Store Option
When you enter payroll data into the system using a template-based positive input page, Global Payroll uses a component interface to load this data into the actual positive input records. To restrict what is sent and saved to these records, use the fields in the Store Option group box.
Select Always Store to have the system store positive input for the payee regardless of whether values are specified for components or supporting element overrides.
Select When Components are Non-Zero to have the system store the positive input for the payee only when values are specified for one or more of the components.
Select When Supporting Elements Exist to have the system store positive input when values are specified for supporting element overrides, regardless of whether component values are entered.
Element Attributes
|
Currency Code |
To include a field that displays the currency code that applies to all entries, select the appropriate currency. If you select Component values of Amount, Base, or Rate, you must either enter a value in the Currency Code field or deselect the Prevent override to currency check box. Note. The value you select here is the default currency code value at the payee level. |
|
Prevent override to currency |
Select to disallow overrides to the currency for positive input instances using this template. |
|
Enable entry of Begin/End Date |
Select to have Begin Date and End Date fields appear on the data entry page. They enable you to enter the begin and end date of a positive input instance. When a calendar period is segmented, the end date determines the segment or slice to which the instance is assigned. |
|
Enable entry of Business Unit |
Select to have Business Unit field appear on the data entry page. It enables you to specify a business unit for a positive input instance. |
|
Number of Decimals Enabled |
Enter the number of decimal places that can be used for positive input entries associated with this template. The value you enter here determines how many decimal places are available when entering positive input associated with this template at the payee level. |
Supporting Element Overrides
You can select up to three system or variable elements that users can override when entering positive input on the Positive Input by Template page.
|
Entry Type |
Values are SystemElem and Variable. |
|
Supporting Element |
Enter the name of the supporting element that users can override. You can select a given element only once. |
See Also
Overriding Positive Input Details
Entering Positive Input on a Template-Created Page
Access the Positive Input by Template page (Global Payroll & Absence Mgmt, Absence and Payroll Processing, Prepare Payroll, Positive Input by Template, Positive Input by Template).
Note. The fields that appear vary by template. The Positive Input by Template page is intended for rapid data entry for single positive input instances.
You can enter one row of data for each combination of employee ID and employee record number. When you save your entries, the system checks them against existing positive input and inserts valid new entries into the positive input tables. The system indicates successful entries by selecting the Stored check box next to them.
Once you save your entries for a given payee, you can no longer edit them through this component. All subsequent modifications or additions to that payee's positive input entries must be made through the Positive Input component or the Positive Input By Calendar component, both of which enable you to create multiple positive input instances. You can rapidly enter your initial input through the Positive Input by Template component, and then, if necessary, call up all of the positive input entries for a specified pay group/pay calendar through either of the two aforementioned components (Positive Input and Positive Input By Calendar). At that point, you can enter multiple instances, if desired, or modify the initial entry.
Store Option
This group box displays the store option that you selected when you created the positive input template. You cannot override this value on the Positive Input by Template page.
Select Calendar
|
Pay Group |
Select the pay group for which you are entering positive input. |
|
Calendar ID |
Select the calendar ID for which you are entering positive input. The system displays the calendar period's begin and end dates. |
Set Common Attributes
Select the action type to apply to each instance of positive input that you enter.
See Action Types and Processing Rules.
|
Batch Code |
This optional field enables you to enter a unique batch code to apply to each instance of positive input that you enter. Batch codes assist in further identifying a positive input entry with which a payee record is associated. You can use this identifier as a search value on the Positive Input By Calendar page. You can also modify or edit this value on the Positive Input By Calendar page or the Positive Input – Details page. |
If a Payee has Positive Input for these Elements
The options in this group box determine how the system handles new entries when it encounters existing positive input for a combination of payee and element that you are trying to insert. All of the options in the group box function at a payee level.
|
Do not insert new entries |
If you select this option, the system does not insert a row of positive input if positive input already exists for a payee and element. Instead, when you click Save, the system displays a message indicating that one or more payees have existing positive input data that match a row that you are trying to insert. The Stored check box in the Payee List group box remains deselected for any rows that the system does not insert. |
|
Insert after confirmation |
If you select this option, the system prompts you to confirm that you want to insert a positive input row if positive input already exists for a payee and element. Click OK to accept and insert the positive input entry. Click Cancel to prevent inserting the entry. The Stored check box in the Payee List group box remains deselected for any rows that you prevent the system from inserting. |
|
Insert without confirmation |
If you select this option, the system inserts and stores all new positive input entries, regardless of any existing positive input that your payees might have. |
When Adding Row in Payee List
|
Copy Values From Selected Row |
Select to copy the values that you entered in a given row into the new rows. Deselect this check box to add blank rows. With the check box selected, you can click the Add New Rows (+) button on the row that you are copying and enter the number of rows to add in the user prompt field that appears. The system does not copy the EmplID or the Empl Record. |
Payee List
Use this group box to enter rows of positive input for payees. The tabs that appear in this group box vary between different templates.
|
Stored |
The system selects this check box next to a row of positive input to indicate that it has been successfully inserted into the positive input tables. |
Making Retroactive Adjustments to Positive Input
This section provides an overview of retroactive adjustments and discusses how to correct positive input entries.
Understanding Retroactive AdjustmentsThis section discusses:
Positive input and the recalculation option.
Deleting positive input.
Applying deltas.
Mismatched segments and slices and the do not recalculate option.
Version numbers.
Positive Input and the Recalculation Option
Positive input overrides an element's recalculation rule during retroactive processing; the system uses the values provided through positive input to resolve an instance whether or not you selected the Always Recalculate check box on the element's Calculation page.
An exception to this rule applies to deleting positive input.
Deleting Positive Input
If you delete positive input for an element marked never recalculate, and the pay calendar has been finalized, it's best to keep the original entry and change the action to Do Not Process. Then when you rerun the payroll, the system doesn't resolve the element. If you delete the entry instead and there's element or period segmentation, results can be unpredictable.
Applying Deltas
To bring forward retroactive deltas as adjustments into the current period when segments match, the system sums deltas for the element and forwards them to the first segment in the current calendar. If the first segment is sliced, the system forwards the adjustments to the first slice within this first segment. When the element resolves multiple times per segment in the current period, the system observes the following hierarchy when it applies the summed deltas:
Normal resolution of the element.
Override occurrence.
Additional occurrence.
In the current period, when multiple instances of positive input with only the Add action type exist, the system applies the adjustment to the normal resolution of the element, not to the additional resolutions. Where multiple rows exist as a result of Override and Add action types, the system applies the retroactive adjustment to the override resolution of the element. Lastly, if a normal resolution of the element does not exist, and an override resolution of the element does not exist, then the system applies the retroactive adjustment to the additional resolution of the element. It applies the adjustment amount only once.
Mismatched Segments and Slices
When retroactive processing occurs where element segmentation exists, the system compares the number of resolutions from the original calculation to the number of slices in the recalculation to determine if there is a mismatch. The system excludes positive input instances with an action type of Add in the count because this would cause a false mismatch.
Version Numbers
When you make retroactive adjustments to positive input from a non manual source, the system uses a versioning scheme to differentiate original entries from revised entries. The original entries are assigned the version number 1, populating the PI_VER_NUM field. The version numbers are incremented for subsequent adjustments. This versioning scheme differs from the version and revision numbers for tracking retroactive pay run results.
The system updates the version number assigned to all generated instances of positive input for that calendar, including any unchanged instances, so that you can differentiate between the complete set of original entries and the complete set of entries for retroactive processing.
Say the Absence Take process generates an instance of positive input with a value of 1000. Version 1 is automatically assigned to this and every other non manual entry. Now, two months later, a retroactive adjustment changes the value to 1200. When you rerun the payroll for the target calendar, the updated entry and all other non manual entries of positive input are automatically named version 2.
See Also
Defining Retroactive Processing
Correcting Positive InputTo correct an instance of positive input, make the correction in the pay period of the original entry. Assuming that you've defined retroactive triggers to detect the online changes, your entries are written to a trigger occurrence table. When you run the next payroll cycle for the payee, the system reads the data from the table and adjusts the positive input retroactively.
Reviewing Positive Input
After you run the Calculate phase of the payroll process, you can view positive input on pages in the Results by Calendar component and the Results by Calendar Group component.
See Also
Viewing Positive Input Results