 Using the Org Chart Viewer
This chapter discusses how to:
Use the Org Chart Viewer.
View worker job history.
(USF) View employee personal and job data.
View other summary pages in PeopleSoft Human Resources.
Using the Org Chart Viewer
Use the Org Chart Viewer component to view employee personal and job data within the context of your organization's various hierarchical reporting structures.
This section provides an overview of the Org Chart Viewer, folder tabs, and page functionality and discusses how to:
Define Org Chart Viewer personal preferences.
Search for a person in the Org Chart Viewer.
View the organizational chart for a person.
View a person's profile.
Update a personal photo.
Manage additional contact information.
Manage personal links.
Enter a personal statement or text.
View the Teams page.
 Understanding the Org Chart Viewer, Folder Tabs, and Page Functionality
The Org Chart Viewer enables your employees and managers to search for people across the organization, to see a visual representation of the organization based on your defined hierarchical structures, and enable actions from the visualization. Users are able to collaborate with co-workers by selecting the communication methods available within the organization including email, telephone options, instant messaging, links to social networks, and a free form text field to add additional personalized information.
The Org Chart Viewer pages present the user with different views of the organization. When enabled and granted access, users can view the hierarchical structure of their organizations through the Company Directory folder or tab, view their direct-line structure through the Direct-Line Reports folder or tab, or view matrix teams through the Org Chart Viewer matrix folders or tabs or Teams menu links.
See Understanding the Org Chart Viewer Features and Functionality.
Access the Org Chart Viewer component by selecting an org view type folder directly from the root menu.
Folder Tabs to Represent Org View Types
When you access the Org Chart Viewer, you could be present with the option to select from three types of org view types: a Company Directory folder, a Direct-Line Reports folder (if you are a manager with direct reports), or folders that represent matrix teams (dotted-line reports), with which you are associated.

Org Chart Viewer drop-down menu navigation
The menu navigation structure provides a quick overview of the reporting structures for each organizational viewer format. The menu navigation shows the following folder order structure when all folders are enabled and a user has access:
|
Org View Type Folder |
Description |
|
Company Directory |
The first menu folder displays the Company Directory. The Company Directory folder tab appears as the first tab in the Org Chart Viewer tab folders. Depending upon your security access and reporting structure, this may be the only org view type for which you have access. The Org Chart page reflects the reporting structure of your organization and you can perform searches for anyone in the Company Directory. |
|
Direct-Line Reports |
If applicable, the next folder in the menu structure shows the Direct-Line Reports folder for managers. The Direct-Line Reports folder tab typically appears as the second tab in the Org Chart Viewer tab folders. If you do not have access to this page or do not have direct reports, this folder tab will not be available to you. The Org Chart page reflects the reporting structure of your direct and indirect reports. You can perform searches for any employees that report to you. If you have access to the Manager Dashboard page, you can also access that pagefrom this folder tab by clicking the Manager Dashboard link in the Search bar. |
|
Matrix Reports (teams) |
The remaining folders, if applicable, represent the Matrix Reports (teams) folders and are identified by the team name. You can view matrix teams through these various methods:
The matrix team pages reflect the reporting structure of each team and you can perform searches for anyone in that team. |
After you have accessed the Org Chart Viewer component, you can use the folder tabs to access the different org view types, as shown in this example.
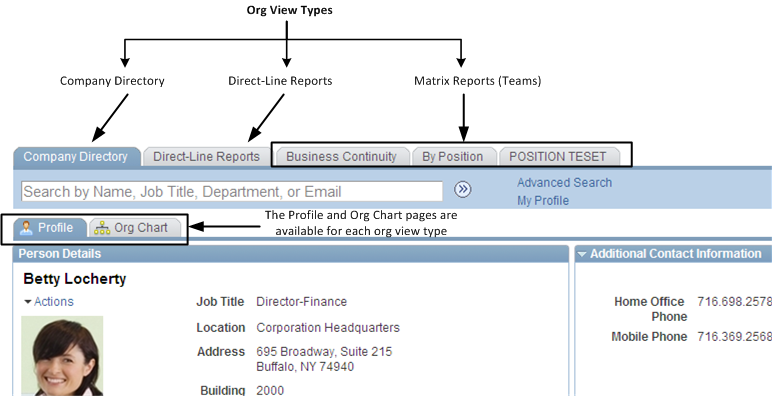
The Org Chart Viewer showing the folder tab after you access the component
There are also elements within the Org Chart Viewer common to all org view types. These include:
At the top of Org Chart Viewer users will have access to set personal preferences.
A search feature that enables users to look for individuals within the org view type tab folder from which the search was initiated.
Each org view type folder consists of a Profile and an Org Chart page.
The Profile page enables users to view profile details about a person, such as job specifics, and provides access to additional contact information.
The Org Chart page shows the reporting structure specific to the org view type folder you have accessed. You can view this information in a chart or list format.
When the appropriate functionality is enabled, users can initiate IM chats and email communication directly from the Org Chart Viewer pages.
When the appropriate functionality is enabled, users can export Org Chart Viewer details to Excel or Visio.
Pages Within Each Org View Type
Each org view type folder contains two page tabs:
|
Page Within the Org Chart Viewer Folder |
Description |
|
Org Chart Viewer |
View a person within the context of the reporting structure for the org view type you are accessing. It displays a three-tiered graphical representation. The chart focuses on a person and where he or she fits within the reporting structure or that org view type. |
|
Profile Page |
Displays up to five sections: two company related sections on the left side and three personalized sections on the right. The Profile tab of the page provides additional information about a person, such as his or her job details; links to other people with whom he or she is associated, such as direct reports, peers, and the manager; as well as personalized sections, which enable the user to enter additional contact details, personal links, and free from text. Information the user enters on his or her own Profile page will appear on the Profile page of each org view type folder, it is not org view type specific. |
Performing Personal Updates Through Self Service Transactions
When an individual views his or her content, whether from the Org Chart tab or the Profile tab within the Org Chart Viewer pages, he or she can be granted the ability to access HCM related self service transactions using the Actions menu link. The manager can also be granted the ability to access HCM related manager self service transactions using the Actions menu link for his or her subordinates.
For a list of delivered Self Service and Manager Self Service transactions, see the “Setting Up the Administer Workforce Business Process” chapter in this book.
See Related Actions and Self Service Transactions.
See Reviewing and Updating Personal Information.
Pages Used to View the Org Chart Viewer|
Page Name |
Definition Name |
Navigation |
Usage |
|
HRCD_USER_PREF_SEC |
Click the Preferences link at the top of any of the Org Chart Viewer pages. |
Define Org Chart Viewer personal preferences to determine how you want the startup page content or layout to appear. The start page content is specific to the Org Chart Viewer: Company Directory page. |
|
|
HRCD_SEARCH |
Click the Advanced Search link within the header of any of the Org Chart Viewer folders or pages. |
Search for a person in the Org Chart Viewer by entering any number of search criteria to locate an individual in the corresponding Org Chart Viewer folder tab. For example, if you perform a search from the Direct-Line Reports tab, the system will search for that person within your direct-line reports. Use the Advanced Search page to enter multiple criteria to search for an individual, or use a basic search by entering a name, job title, department, or email in the search field in the Org Chart Viewer header. Note. Searches from within an org view type folder tab will perform a search within that folder only. |
|
|
HRCD_MAIN |
|
View an organizational chart for a person as a three-tiered chart with the person in the focus node in the middle level. Or, you can view a hierarchal list of people with the retrieved person’s record at the top of the list. |
|
|
HRCD_MAIN |
|
View a person's profile information from the Company Directory folder, such as contact information, company details, and other personal information. Users can enter additional contact information, links, and text on this page for their own profile. |
|
|
HRCD_MAIN |
|
View an organizational chart with you as the top node and your direct reports below. Or, you can view a hierarchical list of your direct-line reports with you at the second level and your manager at the top. When you search for a specific person, the page will display that person’s manager at the top with their direct-line reports below. |
|
|
HRCD_MAIN |
|
View a person's profile information from the Direct-Line Reports folder for you or one of your direct-line reports, such as contact information, company details, and other personal information. Users can enter additional contact information, links, and text on this page for their own profile. |
|
|
HRCD_MAIN |
|
View a tiered organizational chart containing the matrix team’s members. |
|
|
HRCD_MAIN |
|
View a matrix team member's profile information, such as contact information, company details, and other personal information. Users can enter additional contact information, links, and text on this page for their own profile. |
|
|
Teams |
HRCD_LIST_SEC |
Click the name of a matrix team on any person’s node or profile. |
View all the members of a matrix team as an Hgrid list, with matrix leads appearing as expandable rows. |
|
HRCD_USER_PICS_SEC |
Click the Update Photo link on any Org Chart Viewer - Profile page when you are on your own profile. |
Select photo display options, such as no photo, upload your own photo, or use the HR photo that is on file, for your personal profile. The photo select here is used on all the org chart view types. |
|
|
HRCD_USER_CNTC_SEC |
Click the Edit Additional Contact (pencil
|
Add additional contact information to your personal profile, such as home phone number, mobile, IM address, or email addresses. The data you enter here is the same across all org view type Profile pages. |
|
|
HRCD_USER_LINK_SEC |
Click the Edit My Profile Links Contact (pencil
|
Add web site links to your own personal profile. The data you enter here is the same across all org view type Profile pages. |
|
|
HRCD_USER_TEXT_SEC |
Click the Edit Personal Contact (pencil
|
Include a personal statement or comments using a rich text formatting to your own personal profile. The data you enter here is the same across all org view type Profile pages. |
Defining Org Chart Viewer Personal Preferences
Access the Preferences page (click the Preferences link above the header of any Org Chart Viewer page).
Select Start Page Content
This section enables you to determine how the start page of the Company Directory folder tab should display for yourself as a user.
Note. This group box is specific to the Company Directory tab and does not display when you access the Preferences link from the Direct-Line Reports or matrix team folder tabs.
|
Search Box Only |
Select this option to display the search field only, where you can search by name, job title, department, or email for any active person in the system. |
|
Show My Information |
Select this option to have the system display your information as the user accessing the page. Your information will appear as the focus of the Org Chart node or on the Profile page, depending on the layout setting you have selected. The search field is also available at the top of the page when you select this option. |
|
Show Other Person's Info |
Select this option to enter a person's name in the Enter a Name field. This person's information will appear as the initial focus of the Org Chart node or Profile page, depending on the layout setting you have selected. The search field is also available at the top of the page when you select this option. |
|
Enter a Name |
Enter the name of the person who should appear as the focus when you first access the Company Directory page. For example, you may want to enter the name of a person you contact frequently, such as your HR or accounting representative. This field is available only when Show Other Person's Info is selected. |
Select Directory Layout
This section enables you to select which page within the Org Chart Viewer folder tabs the system should display first: the Org Chart or Profile page. This group box applies to all the Org Chart Viewer tabs and changing the layout style on one folder tab will change it for all of them.
|
Profile First |
Select this option to have the system display the Profile page for the focus person of the page. The Profile page displays detailed information about the person, such as contact information, company details, and personalized links and information. |
|
Org Chart First |
Select this option to have the system display the Org Chart page for the focus person of the page. The Org Chart page displays a three-leveled graphical representation of this person's reporting structure, with the focus person in the middle level. |
Searching for a Person in the Org Chart Viewer
The Org Chart Viewer feature enables you to search and retrieve people through various methods. You can use the basic search field, enter multiple search criteria through an advanced search page, use SmartNavigation that appears in the navigation header as breadcrumbs and fly-out menus, or select the links of other names on the Org Chart or Profile pages of the Org Chart Viewer component.
The Org Chart Viewer will perform a search for an individual based on the org view type folder tab you are currently viewing. For example, if you have accessed a matrix team folder tab from within the Org Chart Viewer, the system will search for that person within that team. If the person does not exist in that matrix team, the search will return no results.
This section discusses:
The search for people: single field search.
The search for people: advanced search page.
The SmartNavigation menu structure.
The search for people with multiple jobs.
The Search for People: Single Field Search
Access the search header of any Org Chart Viewer page.
The header for each org view type folder will display this search field and enables you to perform a single field search for a person. When a user accesses the Company Directory org view type folder tab, only the header (with the search field) will display on the page when the Search Box Only option is selected for the user's personal preferences.
|
Search by Name, Job Title, Department, or Email |
Enter the name, job title, department, or email for the person that you want to retrieve. Searches are not case sensitive and will perform partial name searches. Note. Searches are specific to the org view type folder you have selected. |
|
Advanced Search |
Click this link to access the Advanced Search page where you can enter multiple search criteria to narrow a search. |
|
My Org Chart |
Click this link to have the system display your information as the focus on the Org Chart page. This link appears if the layout for the start page is set to show the Org Chart page first or when you are on the Org Chart page. |
|
My Profile |
Click this link to have the system display your information as the focus on the Profile page. This link appears if the layout for the start page is set to show the Profile page first or when you are on the Profile page. |
|
Preferences |
Click this link to access the Preferences page and configure personal start up page and layout preferences. |
|
|
Select the appropriate button in the page header to export profile or org chart information to a Microsoft Excel or Visio spreadsheet. These icon buttons are available only if enabled during setup |
The Search for People: Advanced Search Page
Access the Org Chart Viewer - Search For People: Advanced Search page (click the Advanced Search link in the search header of any of the Org Chart Viewer pages).
Enter search criteria in one or more of the fields on this page and click Search.
The SmartNavigation Menu Structure
The system uses Application Based Navigation (ABN), or SmartNavigation, which enables you an alternative method of navigating directly to an employee in the Org Chart Viewer (bypassing the search). The SmartNavigation menu navigation and breadcrumbs also provide a quick overview of the reporting structure of the employee jobs in the directory.
Searches for People with Multiple Jobs
When searching for a person who holds multiple jobs or assignments, and the Org Chart Viewer setup tables and trees are set up to support multiple jobs, the search will retrieve each active job held by the employee.
Click the name link for the job title you wish to view. If, after clicking the name you find you accessed the wrong job information, you can select another job title for the person from the Org Chart or Profile pages.
See Also
Viewing a Person's Multiple Jobs from the Org Chart Page
Viewing a Person's Multiple Jobs from the Profile Page
Viewing an Organizational Chart for a Person
Access the Org Chart page (Org Chart Viewer, the access the Org Chart page from any org view type folder tab).
Each Org Chart page reflects the reporting structure of the org view type folder tab you are currently viewing.
The chart displays a maximum of three vertical levels at any time. If the person in the focus node does not report to another person (is in the top-most or root node position), or when the person in the focus node does not have any direct reports, the Org Chart page will display two levels only.
The focus node is displayed in a contrasting color from other nodes in the chart. You can change the focus node by clicking the Org Chart link in each node of the chart. Changing the focus node updates the contents of the Profile page to reflect the person who is in the focus node. Clicking the name link on a node will transfer you to the Profile page for that person and refocus the org chart on that node.
The fields that appear within the nodes are determined on the Chart and Profile Settings - Org Chart Content page.
|
|
The org chart appears with a navigator widget and zoom bar in the upper left-hand corner of the chart. Use the directional arrows to navigate left, right, up, or down. Click the dot in the center of the widget to center the chart on the focus node. If all of the nodes fit within the visible area of the chart, this widget does not appear. Use the zoom in feature (plus sign) to see more detail about a person in the node. As you zoom out (negative sign), you will see more nodes on a level associated with the hierarchical structure but less detail on each individual node. |
|
Chart and List |
Select either of these links at the top of the Org Chart page to view the reporting structure as a three-tiered org chart or in an hierarchical grid (Hgrid) list format. See the Viewing the Org Chart as a List subtopic in this section. |
|
<a person's name link> |
Click the name to access profile information for the person you have selected. |
|
|
Click the Org Chart link to move the focus of the chart to another node. This also sets the focus of profile page to the newly selected node. |
|
Actions |
Select a self service action for yourself, or as a manager, select an action to perform for your employees. The system will direct you to the respective self service page. The Actions menu link will display only for yourself or your direct reports if enabled. PeopleSoft delivers the various self service transactions to work in conjunction with the Org Chart Viewer. These related actions enable employees or managers to view or manage personal or employee information in the PeopleSoft database as they would from the self service pages. See Performing Personal Updates Through Self Service Transactions. |
|
Teams |
Click this menu drop-down list to see a list of teams with which this person is associated. Select a team to open the Teams page and view the matrix team structure in a list format. The Team drop-down is not available if the person is not associated with a team or the team has not been made public. |
Viewing the Org Chart as a List
Access the List page (click the List link at the top of the Org Chart page).
When you select the List link, you change the display of the Org Chart page to a grid or hierarchal list view. You can expand or collapse the reporting structure to see who reports to whom.
The List layout contains the same fields as the Chart option, as defined by the Org Chart Viewer administrator on the setup pages.
|
Focus Org Chart on
|
Click the icon button in the Focus Org Chart on column to transfer back to the chart layout, with that person as the focus. |
|
Actions |
Select an transaction to perform self service actions for yourself, your direct reports, or for those team members for which you are granted self service access. |
Viewing a Person's Multiple Jobs from the Org Chart Page
When you are on the Org Chart page and a person holds multiple jobs, the node will display a Job Title drop-down arrow and menu link that enables you to select any job that this person holds. When you select a job from the drop-down list, the org chart refocuses on the newly selected job.
Information about setting up the Org Chart Viewer to support multiple jobs is documented in the set up pages of the Org Chart Viewer.
See Setting Up the Org Chart Viewer.
Viewing a Person's Profile
Access the Profile page (Org Chart Viewer, the access the Profile page from any org view type folder tab).
This page displays details regarding the person in focus on the organizational chart. This page displays up to five sections, depending on how the system administrator has configured this page on the Org Chart Viewer setup. A user can modify the sections on the right side of the Profile page when viewing his or her own profile. These sections are:
Contact Information
Depending on the set up, this section can include items such as job and location information, contact information, links for e-mail addresses, and a drop-down list for a user to perform self service actions for him or herself. This section is not editable to the user.
Company Details
Depending on the set up, this section can include items such additional job information and co-worker and reports to links. This section is not editable to the user.
Additional Contact Information
Users can enter their own person contact data, such as phone numbers and emails, on their own profile.
My Profile Links
Users can enter person links, such as web engines and social web sites, on their own profile.
Personal Statement
Users can enter personalized text to appear on their own profile.
Fields on this page will also vary depending upon the setup. Use the links on the page to access other people's Profile pages. Enter or edit content for the personalized sections by using the edit (pencil) icon to access the specific pages for your own profile.
|
Actions |
Select a self service action for yourself, or as a manager, select a self service action to perform for your employees. The system will direct you to the appropriate self service page. PeopleSoft delivers the various self service transactions to work in conjunction with the Org Chart Viewer that enable employees or managers to view or manage personal or employee information in the PeopleSoft database as they would from the self service pages. This link will be available for your profile or for your direct-line reports’ profiles, if enabled. See Related Actions and Self Service Transactions. |
|
Update Photo |
Click this link to open the Org Chart Viewer - Update Photo page and change your photo display options. |
|
|
Click this edit icon to access the corresponding edit page for the personalization sections of the Profile page This icon is available for your Profile only. Note. Any edits or updates made in the editable sections of this page are not written to the HR records. This data is stored in the Org Chart Viewer only |
|
Teams |
Displays a list of published matrix teams with which this person is associated. Click a team link to open the Teams page and see a list of team members. |
Viewing a Person's Multiple Jobs from the Profile Page
When you are viewing the Profile page and a person holds multiple jobs, the Job Title field will display a drop-down list that enables you to select another job for this person. Select another job to have the system redirect you to the Profile page for that job.
See Setting Up the Org Chart Viewer.
Updating a Personal Photo
Access the Org Chart Viewer - Update Photo page (Click the Update Photo link on the Profile page for your profile).
This page is available when the Photo check box is enabled during setup. The photo option you select on this page will also appear on the Org Chart page.
|
No Photo |
Select this option to have the Profile page display a default photo image. |
|
Display HR System Photo |
Select this option to have the Profile page display the company stored photo image of yourself. |
|
Display My Photo |
Select this option to have the Profile page display a photo image of yourself you have uploaded. If you have not uploaded an image for yourself, this option will not be available. |
|
Upload a Photo |
Click this link to upload your own photo image to appear on the Profile page. Photo must be of file type JPEG and not exceed 256KB. This option is available when the Allow User to Add Own Image check box is selected on the Chart and Profile Settings - Profile Content page |
Managing Additional Contact Information
Access the Edit Additional Contacts page [Click the Edit Additional Contact (pencil) icon on the Profile page for your own profile].
Additional Contact Information
|
Contact Type, Label, and Value |
Select a contact type and the related label will appear. You can enter your specific contact details in the Value field. When the Other contact type is available and selected, the you can enter your own label name, which will serve as the field description on the Profile page. Contact types are defined by the administrator on the Additional Contacts page. |
|
Add Contact |
Click this button to insert another contact row to add additional contact types. |
|
Delete Selected |
Click this button to delete the contact rows you have selected. |
Note. Any edits or updates made in the Additional Contact Information section are not written to the HR records. This data is stored in the Org Chart Viewer only.
Instant Message Grid
|
IM Protocol, IM Domain, and Network ID |
Identify the IM protocol that the system should use when displaying the IM icon. Valid values include GTALK, MSN, XMPP, and YAHOO, which will display the Instant Message domain associated with the IM Protocol. Enter the you chat ID as the Network ID. |
|
Add IM Contact |
Click this button to insert another IM contact row. |
|
Delete Selected IM |
Click this button to delete the IM contact rows you have selected. |
Managing Personal Links
Access the Edit My Profile Links page [Click the Edit My Profile Links (pencil) icon on the Profile page for your own profile].
|
Displays As and Web Address |
Enter the label name and web site address that should appear as a link on your Profile page. |
|
Add Link |
Click this button to insert another link row and enter how the name should display in your profile and the web address. |
|
Delete Selected |
Click this button to delete the link rows you have selected. |
Note. Any edits or updates made in the My Profile Links section are not written to the HR records. This data is stored in the Org Chart Viewer only.
Entering a Personal Statement or Text
Access the Edit Personal Statement page [Click the Edit Personal Statement (pencil) icon on the Profile page for your own profile].
The Edit Personal Statement page opens up in a modal, resizable window. Enter data and click OK to save your text that will display on the Profile page, Personal Statement section.
Note. Any edits or updates made in the Personal
Statement section are not written to the HR records. This data
is stored in the Org Chart Viewer only.
For more information on using the Rich Text Editor, see PeopleTools
PeopleBook: Using PeopleSoft Applications, "Using PeopleSoft Application
Pages," Working With the Rich Text Editor.
Viewing the Teams Page
Access the Teams page (click a team link from the Teams drop-down menu list on a node or from the Teams field on the Profile page).
Use this page to view the members and reporting structure of a matrix team. The fields on this page are determined by the Org Chart Viewer administrator during setup of the Matrix Reports.
User access to the self service self service transaction pages is determined by security access or when setting up the matrix team.
See Also
Associating Manager Self-Service Transactions to a Matrix
Assigning Transaction Access to Matrix Owners and Leads
Viewing Worker Job History
Viewing worker job history provides a quick summary of important job details of current and historic work records.
This section discusses how to:
View worker job history.
View compensation information.
Pages Used to View Employee Job History|
Page Name |
Definition Name |
Navigation |
Usage |
|
WF_JOB_SUMMARY |
Workforce Administration, Job Information, Review Job Information, Workforce Job Summary, Workforce Job Summary |
View an employee's job history. |
|
|
JOB_SUMMARY_JPN |
Workforce Administration, Job Information, Review Job Information, Job Summary JPN, Job Summary JPN |
View a Japanese employee's job history. |
|
|
COMP_JOB_SUMM_SEC |
Click the Components link on the Compensation tab of the Workforce Job Summary page. |
View compensation information. |
|
|
WCS_RTCD_DETAILS |
Click the Details link on the Controls tab of the on the Salary Components page. |
Review the description, compensation rate type, and rate code class associated with the rate code. |
See Also
Adding a Person in PeopleSoft Human Resources
(USF) Processing Personnel Action Requests
Viewing Worker Job History
Access the Workforce Job Summary page (Workforce Administration, Job Information, Review Job Information, Workforce Job Summary, Workforce Job Summary).
The Job Summary page displays the person's name, organizational relationship, and ID.
Common Page Information
|
Effective Date and Seq (sequence) |
Displays the effective date and effective date sequence, if any, for each personnel action. The sequence tracks actions that occur on the same day. |
|
Org Relation (organizational relationship) |
Indicates the type of organizational relationship, EMP (employee), CWR (contingent worker), or POI (person of interest). |
|
Empl Record (employment record) |
The sequential number of the employment instance for the same ID. |
Select the General tab.
|
Action and Action Reason |
Displays the action taken and reason for the row's existence. |
|
Job Data |
Click this link to display the Job Data component. The system initially displays the current row, regardless of which row's link you click. To access a specific row after you access the Job Data component, use the Go To Row button on the Work Location page. |
Select the Job Information tab.
|
Job Code |
Displays the job code information for this worker after each personnel action. |
|
Empl Type (employee type) |
Displays the worker type after each personnel action. |
|
Empl Status (employee status) |
Displays the worker's status after each personnel action. |
|
Full/Part Time |
Indicates whether the worker is full or part time after each personnel action. |
|
Reg/Temp |
Indicates whether the worker is regular or temporary after each personnel action. |
|
Standard Hours |
Displays the standard hours per work period after each personnel action. |
|
Work Period |
Displays the work period after each personnel action. |
Select the Work Location tab.
|
Position, Agency, Department, Location, and Reports To |
The workers position, company code, department, location, and supervisor after each personnel action. |
Select the Salary Plan tab.
|
Sal Plan (salary plan), Grade, Step, Pay Group, and Frequency |
Displays the worker's salary plan, grade, step, pay group, and payment frequency after each personnel action. |
Select the Compensation tab.
|
Annual Rt (annual rate), Monthly Rt (monthly rate), Daily Rt (daily rate), Hrly Rate (hourly rate), Currency, and Change Percent |
Displays the worker's compensation rate in annual, monthly, daily, or hourly terms in the given currency. When there has been a change in the compensation rate for this employee, the system displays the percentage of change from the previous row. |
|
Components |
Click the link to access the Salary Components page. |
Select the Military Information tab.
|
Service |
The specific branch of armed forces (for example, Army, Navy, Air Force, Marines, and so forth) |
|
Component |
The type of service (for example, Regular, Active Reserve, Inactive Reserve, Emergency Reserve, or Guard). |
|
Job Family |
The job classification associated with the job code (for example, Intelligence, Ammunitions, Medical, Aviation). |
|
Job Function |
The function associated with the job code (for example, Cryptography, Doctor, Nurse, Pilot). |
|
Subfunction |
The subfunction associated with the job code (for example, Surgeon, Pathology, Radiology, Light-wing pilot). |
|
Rank |
Rank held permanently, as opposed to while serving in a particular post. When relieved of command, a holder of substantive rank remains at that rank. |
|
Worn Rank |
Actual or temporary rank held while serving in a particular post. |
|
Rank Type |
The rank category (for example, Substantive, Temporary, Frocked, Acting, Acting Lacking, Honorary, Provisional, Probationary). |
|
Skill Grade |
The overall evaluated grade level for the individual after the personnel action. |
Viewing Compensation Information
Access the Salary Components page (click the Components link on the Compensation tab of the Workforce Job Summary page).
Common Page Elements
|
Rate Code |
Rate codes are IDs for pay components. The system displays compensation information associated with this rate code in the compensation grid. |
|
Seq (sequence) |
Indicates multiple occurrences of the same rate code. |
Amounts
Select the Amounts tab.
|
Comp Rate (compensation rate) and Currency |
Displays the compensation rate for the pay component rate codes and the currency. |
|
Frequency |
Displays the compensation frequency for the pay component's rate. |
|
Points |
Displays the salary points associated with this rate code, if there are any. |
|
Percent |
If the rate type for this rate code is percent, the system displays the percent to be applied to the job compensation rate or to a rate code group (if you are using rate code groups). |
|
Rate Code Group |
A rate code group enables you to be more specific when calculating percentage-based components as part of your worker compensation package. |
Select the Controls tab.
|
Source |
Indicates how the pay component was assigned to the Compensation grid. Manual indicates that the pay component was added manually; Salary Step indicates that the pay component defaulted from the Salary Step; Job Code indicates that the pay component defaulted from the job code definition, and so on. |
|
Calculated by |
Values are:
|
|
Manually Updated |
Indicates whether the pay component's value was manually entered or the pay rate contains only defaulted values. |
|
Default Without Override |
Indicates whether the default rate value of the pay component can be overridden. |
|
Details |
Click to access the Comp Rate Code page and review the description, compensation rate type, and rate code class associated with the rate code. |
Select the Changes tab.
|
Change Amount |
Displays the overall change amount in this pay component rate relative to the previous Job Data row. |
|
Change Points |
Displays the overall change amount (in points) for this pay component. This field is visible only if Salary Points is selected on the Installation Table page. |
|
Change Percent |
Displays the overall change amount for this pay component. This field isn't available for rate codes that have a rate code type of percent or points. |
Select the Conversion tab.
|
Converted Comp Rate (converted compensation rate) |
Displays the converted compensation rate for this pay component. The system converts all base pay components to the currency and compensation frequency specified. |
|
Apply FTE (apply full time equivalent) |
Indicates that the value associated with the rate code is to be multiplied by the FTE factor for annualization and deannualization. FTE is the percent of full time the employee should normally work in the corresponding job. This field isn't applicable for rate codes of type percent. |
(USF) Viewing Employee Personal and Job Data
Use the Personal Data inquiry component to view employee personal and job data.
This section discusses how to:
View employee personal data.
View employee job data.
View employee benefit programs.
Pages Used to View Personal and Job Data|
Page Name |
Definition Name |
Navigation |
Usage |
|
GVT_PERS_INQ |
Workforce Administration, Job Information, Review Job Information, Personal Data USF, Personal Data |
View employee personal data. |
|
|
GVT_MAILADDR_SEC |
Click the Mailing Address link on the Personal Data page. |
View the employee's mailing address. |
|
|
GVT_VETINF_INQ_SEC |
Click the Veterans Info link on the Personal Data page. |
View veteran's information for this employee. |
|
|
GVT_JOB_INQ |
Workforce Administration, Job Information, Review Job Information, Personal Data USF, Job Data1 |
View employee job data. |
|
|
GVT_BENDAT_INQ_SEC |
Click the Benefits/FEHB Data link on the Job Data1 page. |
View the benefit program in which the employee is enrolled for benefits in PeopleSoft Human Resources or in PeopleSoft Benefits Administration. |
|
|
GVT_JOB_INQ2 |
Workforce Administration, Job Information, Review Job Information, Personal Data USF, Job Data2 |
View additional job data, including quoted pay and expected pay information. |
|
|
GVT_EMPLOY_INQ |
Workforce Administration, Job Information, Review Job Information, Personal Data USF, Employment Data |
View employment data. |
Viewing Employee Personal Data
Access the Personal Data page (Workforce Administration, Job Information, Review Job Information, Personal Data USF, Personal Data).
The Personal Data page displays information on employee hire date, birth date, home address, marital status, birth information, citizenship, draft status, Medicare entitlement, race, and handicaps. Click the Mailing Address link to view the employee's mailing address. Click the Veterans Info link to view veteran's information for this employee.
Viewing Employee Job Data
Access the Job Data1 page (Workforce Administration, Job Information, Review Job Information, Personal Data USF, Job Data1).
This page displays the employee's position number, job code, employee type, class, type of appointment, position occupied, work schedule, agency, subagency, department, location, tax location, LEO position, FLSA status, and other job-related information.
Click the Benefits/FEHB Data link to view information on this employee's benefits and retirement data.
Viewing Employee Benefit Programs
Access the Benefits/Retirement Data page (click the Benefits/FEHB Data link on the Job Data1 page).
See Also
Setting Up Base Benefits Core Tables
Viewing Other Summary Pages in PeopleSoft Human Resources
Several other display-only pages summarizing employee data are available for you to review in PeopleSoft Human Resources. Most of them derive information that you enter in other PeopleSoft Human Resources business processes, such as Planning Compensation, Track Global Assignments, and Administering Training. However, you'll also find them useful for planning and analysis when you work in the Workforce Administration menu.
Following are some of the summary pages:
Employee Data Summary: Displays information on employee current status, hire date, birth date, marital status, standard work hours, pay group, job code, and other job- and compensation-related information. Benefits, Employee/Dependant Information, Review HR/Job/Payroll Data.
Organizational Summary: Displays a summary of all the organizational relationships for a person. Workforce Administration, Personal Information, Person Organizational Summary.
Career Assignment Summary: Displays the actual job path the employee has followed in the organization. By tracking employee movements through salary structures and manager levels, you'll get a feel for where the employee has been in your organization so far. Workforce Development, Career Planning, Review Career Summaries, Career Assignments.
Compensation History: Displays the history of all pay rate changes the employee has received, which is particularly useful when you are planning new increases. Compensation, Base Compensation, Review Salary Information, Employee Compensation History. The Compensation History page is also in Workforce Development, Career Planning, Review Career Summaries.
Immediate Family Summary: Lists all dependents that are a part of the employee's immediate family. Immediate family is defined as dependents that are the employee's spouse, son, or daughter. You'll find this page helpful for determining eligibility for various types of benefits your organization offers to employees, their spouses, and children. Benefits, Employee/Dependant Information, Review Dep/Ben Summary.
Training Summary: Displays student training history, which is helpful when determining whether students are receiving adequate training to perform their current jobs, to see if they've taken all course prerequisites, and for career and succession planning. Enterprise Learning, Result Tracking, Review Training Summary.
Injury Summary: Provides an overview of the health and safety incidents in which this individual has been involved, including injuries and illnesses and the nature of the incidents. Workforce Monitoring, Health and Safety, Obtain Incident Information, Review Employee Injury Summary.
 and
and