 Understanding Custom Statements
This chapter provides an overview of custom statements and discusses how to:
Use the Custom Statement page.
Use custom statement types.
Set up mathematical operations.
Set up group definitions.
Assign final and temporary variables.
Use the three types of clauses.
Configure operands.
Set up a spouse eligibility statement.
Understanding Custom Statements
No two pension plans are alike. Within the parameter pages, PeopleSoft includes many of the types of calculation processes that your plans may use. However, because of the numerous variations that are possible, PeopleSoft also provides the custom statement, a tool that you can use to build your own custom logic statements. You can use the Custom Statement page to set up mathematical operations and conditional statements. The values that you calculate on this page can be referenced from other calculation components. These values do not, however, appear on the calculation worksheet or on any online page.
Note. Several components of the plan rules use the Custom Statement page as the main parameter page. The Plan Eligibility, Benefit Formula, Group Definition, Spouse Eligibility, and Code Definition pages are all custom statements. This is why they all use the generic PA_CUSTOM_PNL page.
See Also
Using the Custom Statement Page
To create custom statements, use the Custom Statement (CUSTOM_STATEMENT) component.
This section provides an overview of the Custom Statement page, lists the page used to create custom statements, and discusses how to create custom statements.
 Understanding the Custom Statement Page
You use the Custom Statement page to define variables that the other Pension Administration utilities cannot accommodate. A custom statement can perform mathematical operations, evaluate Boolean statements, and perform certain predefined functions (such as minimum and maximum).
The Custom Statement page is much more flexible than most Pension Administration pages. Rather than presenting you with predefined choices, a custom statement gives you the latitude to set up your own rules. For example, given the uniqueness of most benefit formulas, PeopleSoft cannot offer you a complete list of formulas from which to choose. Instead, you can use the Custom Statement page as a tool for setting up your own formulas.
Page Used to Create Custom Statements|
Page Name |
Definition Name |
Navigation |
Usage |
|
PA_CUSTOM_PNL |
Set Up HRMS, Product Related, Pension, Calculation Rules, Custom Statement, Custom Statement |
Define variables that the other Pension Administration utilities cannot accommodate. |
See Also
Understanding Group Statements
Creating Custom Statements
Access the Custom Statement page (Set Up HRMS, Product Related, Pension, Calculation Rules, Custom Statement, Custom Statement).
Custom Statement page
|
Custom Statement |
Name the custom statement when you add it to the system. |
|
Statement Type |
The statement type is determined by the way you access the Custom Statement page, as a standalone statement or through one of the functions that incorporates this page. Standalone statements have the custom user statement type (C). |
Statements
|
Seq (sequence) |
The heart of the custom statement is a series of clauses that together produce a result. Each row on the Custom Statement page constitutes such a clause. The clauses (rows) are ordered by sequence numbers. The system assigns a unique sequence number when you create a clause. You cannot directly edit the numbers to change the clause order. Instead, you have to create and delete rows to change the order. Sequence numbers also serve to identify the clauses within error messages. If the system detects an error when you try to save a custom statement, the error message uses the sequence number to direct you to the row with the error. For example, if you try to use an alias that does not exist, you might see a custom statement error message. |
|
Type |
Identifies whether the clause is a Boolean, function, or (mathematical) operation clause. |
|
Keyword |
There are logical operators that can be associated with each type of clause. When you enter a keyword value for a clause, the system automatically enters the appropriate clause type based on the keyword. Some clauses do not have keywords, so you enter the type manually. Clauses without keywords include arithmetic operation clauses and continuations of Boolean or function phrases. For example, the following Boolean phrase encompasses two clauses, but only the first has a keyword: |
|
Operand1 and Operand2 |
These fields prompt against existing variables. The operands within a clause can be either constants or variables. You are free to mix constants and variables as long as the results make sense. For example, you can add two numbers, but you cannot add a number and a character. You always reference at least one variable in a custom statement. |
|
Op1 and Op2 (operator 1 and operator 2) |
The Op1 and Op2 fields contain operators specific to the clause type. For example, "greater than" operators are only available in Boolean clauses, while arithmetic operators are only available in operation clauses. Function clauses do not use these fields. |
|
Operand3 |
The Operand3 field contains the names of any temporary variables you set up within a statement, as well as the final assignment that is necessary in a mathematical statement. |
|
History |
You can select the History check boxes underneath the Operand1 and Operand1 fields to use the history feature, which evaluates eligibility requirements over time. See Using History. |
|
Date |
You can select the Date check boxes underneath the Operand1 and Operand1 fields to enter unformatted dates. |
|
Temp |
You can select the Temp check boxes underneath the Operand3 fields to make temporary assignments to help you group your clauses. |
|
Show Algorithm |
Click this button to toggle the long text field between the Description field and an Equation field that translates your statement into an equation, showing the custom statement as a formula, complete with parentheses grouping the clauses. Each time you toggle to the Equation field, you refresh the equation. |
Warning! You cannot reference group types of custom statements, including Group Definitions, Plan Eligibility, Spouse Eligibility, and Status Code Definitions, from another custom statement of any type. All the group types of custom statements are time-sensitive and thus cannot be reliably resolved from another custom statement.
Using Custom Statement Types
On the Custom Statement page, the default value for the Statement Type field is determined by the way you access the page.
The six statement types are:
|
Statement Type |
Navigation |
|
Benefit Calculation |
Set Up HRMS, Product Related, Pension, Components, Benefit Formula |
|
Custom User Statements (or "standalone custom statements") |
Set Up HRMS, Product Related, Pension, Calculation Rules, Custom Statement |
|
Group Function Definition |
Set Up HRMS, Product Related, Pension, Pension Plan Implementation, Group Definition |
|
Plan Eligibility |
Set Up HRMS, Product Related, Pension, Components, Plan Eligibility |
|
Spouse Eligibility |
Set Up HRMS, Product Related, Pension, Calculation Rules, Spouse Eligibility |
|
Code Definition |
Set Up HRMS, Product Related, Pension, Status Rules, Code Definition |
Benefit calculations and standalone custom statements are typically mathematical formulas.
Group definitions, eligibility definitions, and status code definitions are Boolean formulas that determine whether or not an individual meets the criteria for belonging in a particular group.
Understanding Mathematical Statements
When you use the custom statement to create your plan benefit formulas, you set up statements with the type Benefit Calculation. The Benefit Formula component includes a page to describe the normal form of the benefit. General purpose mathematical equations have the type Custom User Statement.
These mathematical equations can incorporate function clauses and Boolean clauses, but the final product of the result is a number or a date.
Mathematical equations require a final clause to assign a name to the result. This name must be the custom statement name.
See Also
Setting Up Mathematical Operations
Understanding Group Statements
When you set up group statements, you must use a single IF statement to state the inclusion criteria. You cannot have more than one IF statement in a custom statement. Group statements do not require a corresponding THEN clause or a final assignment, because the system assigns the value Y (yes) when an employee meets the criteria.
|
Statement Type |
Description |
|
Group Function Definition |
Establishes subsets of the employee population that you can then link to specific plan rules. These group definitions are key to implementing your plan rules, since rules must always be explicitly associated with a group when you set up a function result. |
|
Plan Eligibility |
Defines the criteria which qualify employees for a specific plan. Plan Eligibility Custom statements will look very similar to Group Definitions since the Plan Eligibility groups are a specialized application of the grouping logic. |
|
Spouse Eligibility |
Defines the criteria which employees must meet in order to take advantage of automatic (non-optional) joint and survivor benefits if a plan offers this benefit. |
|
Status Code Definition |
Another specialized application of the grouping logic, this time to determine criteria for pension status assignment. |
See Also
Setting Up a Spouse Eligibility Statement
Setting Up Mathematical Operations
Perhaps the simplest use of the custom statement is for mathematical operations. This section looks at some sample clauses. Here is the Custom Statement page showing a simple mathematical operation:
This very simple case is performing a mathematical operation (addition) using two operands. Notice that the clause type is operation, which indicates that this is a mathematical operation. Also notice that the result of the operation is assigned to the variable SAMPLE, which is the name of the custom statement. This is required of all mathematical equation types in order to associate the name of the custom statement with the final value.
Here is the Custom Statement page showing an extended mathematical operation:
The operation skips the Operand3 field and continues. You can continue as long as you like, using just the first two operand fields and the first two operator fields. The third operand field is reserved for assigning intermediate (temporary) or final results to variable names.
Setting Up Group Definitions
When you use the Custom Statement page to set up groups, you set up IF statements comparing employee data, referenced by aliases, to specified values. You have to enclose a value in single quotation marks to indicate that it is a literal value, rather than an alias.
For example, the following custom statement checks whether the Company is RCB and whether the employee type is S (salaried). If both conditions are true, the employee is in the group; otherwise, the employee is not.
You can enter AND and OR connectors in the Op2 field to string together multiple conditions.
When you reference a database alias, it is important to know the valid values for the field. For example, if you use the FORP_TIME alias, a full-time employee has the value 'F' (not 'FT' or 'FULL'). If you set up a custom statement that checks for FORP_TIME = 'FT' no employees will meet the criteria. If a field has its valid values defined on the Translate table, you can verify its values using Application Designer.
Notice that there is no assignment to the Operand3 field. Group definitions do not require this assignment. When an employee meets the conditions, a Y (yes) value is assumed; otherwise, an N (no) value is assumed.
Assigning Final and Temporary Variables
Custom statements use only the Operand1 and Operand2 fields for the actual operation. The Operand3 field is reserved for assigning variable names to results.
For mathematical equations, the variable name that you assign to the final result must be the custom statement name. For group statements, the final result is always an implied yes or no, so you do not make an explicit final assignment.
You can also assign intermediate values to temporary variables. You might do this, for example, to set up complex clause groupings.
Making Final Assignments
For mathematical equations (custom user statements and benefit formulas) you must explicitly assign the final answer to the custom statement. For group statements (Group Definitions, Plan Eligibility, Spouse Eligibility, and Status Code Definitions), the system takes care of this final assignment automatically.
You make a final assignment by entering the "assign to" operator (=) in the Op2 field and the custom statement name in the Operand3 field. For example, in a custom statement called KUH_BF_D1, the final clause includes the = operator in the Op2 field and KUH_BF_D1 in the Operand3 field:
Making Multiple Final Assignments
You can make multiple assignments within a single custom statement, but you need to be extremely careful, as these assigned values will remain fixed throughout the rest of the calculation.
To make multiple final assignments, simply add the additional assignment clauses. For example, you can set up custom statement XYZ with the following parameters:
If      "A" equals   B

Then   "C" assign to   D

        "E" assign to   F
with the caveats that:
There must be aliases called D and F.
D and F cannot be referenced before custom statement XYZ in the jobstream.
If they were, they would already have values, and this attempt to assign new values would fail.
Any references to D or F later in the calculation will use these values.
You cannot reassign the values, even by processing the D and F custom statements.
Warning! You should generally avoid making multiple assignments within a custom statement. Results may be unpredictable if you have subsequent assignments to the same variable. If you do make multiple assignments, be sure to perform a thorough analysis of your calculation jobstream to look for previous and subsequent references to any secondary variables.
Making Temporary Assignments
You can make temporary assignments in order to help you group your clauses when the default processing is not the desired method. There are predefined temporary variables that you can use in custom statements in order to reference intermediate results later in the same statement.
In the example shown, clause 30 references the temporary variable that you created in clause 20. You can assume that later clauses will reference the temporary variables you created in clauses 10 and 20, since that is the only reason to set them up in the first place.
Notice that the example uses the same temporary variable, TEMP02, in clauses 20 and 30. Once you reuse the name in clause 30, the value that it had in clause 20 can no longer be referenced.
When you set up a temporary assignment, assign one of the following predefined temporary variables:
For characters and dates, use TEMPC00 through TEMPC99.
For numbers, use TEMP00 through TEMP99.
If you select the Temp check box under the Operand3 field, you can press F4 to display a list of the temporary variables when your cursor is in the Operand3 field. You do not, however, have to select the Temp check box in order to use a temporary variable. You can just type it. Because this is just a data entry aid, the mark in the check box is not preserved when you close and open the page.
You can set up separate custom statements for each temporary variable. If you do this, however, the variable is no longer temporary. For example, if a benefit formula is the maximum of Benefit A and Benefit B, you can set up custom statements for each of the component formulas and then reference them from the Benefit Formula statement. This approach can help you shorten some custom statements. In addition, this is the most efficient way to set up aliases when you need the intermediate values for other purposes.
The intermediate results are not shown in the calculation worksheet, regardless of whether you use temporary variables or standalone custom statements. In order for the worksheet to display the values, you have to set up each component as a benefit formula function result.
Using the Three Types of Clauses
This chapter has looked briefly at the three types of clauses:
Operation
Boolean
Function
The following shows the available keywords:
Notice that the description for each keyword includes the associated clause type. The comment is the one keyword that is not associated with a type. The system ignores comment clauses when resolving a custom statement. You can use them for any incidental information that you want displayed online, but ignored in processing.
Note. You do not see comments in the equation at the bottom of the Custom Statement page.
Configuring Operands
The Date and History check boxes underneath the Operand1 and Operand2 fields indicate certain characteristics of the data in the operand field.
Formatting Date Constants
On most PeopleSoft pages, you can enter an unformatted date. For example, you can enter 01012008 for January 1, 2008, and the system automatically reformats your entry to 01/01/2008. There is no need to enter the slashes or any other separator.
However, if you enter an unformatted date into one of the operand fields, the custom statement treats it as a number. In order to indicate that the eight digits actually represent a date and not a number, select the Date check box beneath the operand. This is only necessary when you enter unformatted dates. If you include a separator (a slash, dash, or space) when you enter a date, you do not have to select this check box.
Note. Custom Statement pages require you to enter eight-digit dates—that is, you need to include the century. This is different from most PeopleSoft pages, which accept six-digit dates. For example, on the Custom Statement page, enter January 1, 2005 as 01/01/2005, not as 01/01/05.
When you use a date alias, there is no reason to select the Date check box; the system already knows the value is a date and has formatted it appropriately.
Using History
When you use a custom statement to define groups, the statement can evaluate the eligibility requirements over time and build a timeline of eligible and ineligible periods. This is a very powerful feature, and is key to evaluating plan eligibility and group membership.
To activate this feature, select the History check box underneath all effective-dated variables.
Note. You should always use the History check box for aliases to effective-dated fields. You cannot use it with fields that are not effective-dated because there is no history to reference.
For example, suppose you are setting up a group for full-time employees.
The group function looks at the employee data over time and creates a timeline. For example, Julius Jones worked part-time for three months after his daughter was born and therefore has the following work history:
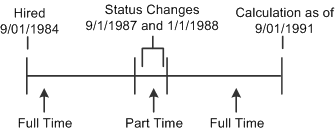
Work history for an employee who worked both part-time and full-time hours over a 7 year period
If you do not select the History check box, there is only one work history segment. In Julius' case, the custom statement would only look at the current information and thus would indicate that he had always been part of the full-time group.
If Julius left the company while he was working part-time, and you do not select the History check box, there is a single result showing that Julius has never been part of the full-time group. This happens because his status at the time of the calculation is part-time. The fact that the he was previously in the group is disregarded.
Using Literal Operands
If you use custom statements to look for a literal value, be sure to put quotation marks (single or double) around the value. The same rule applies to making literal assignments.
If you do not use quotation marks, the system treats a value beginning with a number as a number and a value beginning with a character as an alias.
Note. The system prevents you from creating alias names that begin with numbers so that the custom statement can make this assumption.
Setting Up a Spouse Eligibility Statement
Certain plans, particularly public sector plans, offer spouses an automatic joint and survivor benefit continuation. That is, the spouse gets the benefit continuation without there being any actuarial reduction to the employee's benefit. If you sponsor a plan with this feature, you incorporate the automatic benefit into the normal form of payment parameters in your benefit formula. You must also create a spouse eligibility custom statement.
Some plans that offer automatic benefit continuation have spouse eligibility requirements for the automatic benefit, such as a minimum time span between marriage and benefit commencement. This requirement is entered in a spouse eligibility custom Statement using a Boolean IF clause. When plans that offer automatic benefit continuation do not have such a requirement, a dummy spouse eligibility custom statement must be created.
For example, to set up a requirement that the employee be married for a year, you would first create a duration to measure the time between the marital status date and the event date (both are delivered aliases). The custom statement would then have a single clause evaluating whether this duration is greater than one. To set up a dummy statement that is always true, you can use a simple statement such as this: if 'yes' equals 'yes'
To apply the spouse eligibility statement to a plan, enter the name of the statement in the Surviving Spouse Eligibility field on the Plan Aliases page.
See Also
Creating the Plan Implementation and Plan Aliases