 Printing Paychecks and Direct Deposit Advices
This chapter discusses how to:
Print paychecks and direct deposit advices.
Generate a direct deposit file.
Process online single checks.
Record manual checks.
Process a final check request.
Determine whether to reverse or adjust a check.
Reverse paychecks.
Handle direct deposit reversals.
Adjust paychecks.
Reconcile checks.
Reprint checks.
Printing Paychecks and Direct Deposit Advices
This section provides overviews of checks, advices, and print processes, lists prerequisites, and discusses how to:
Print checks and direct deposit reports by SQR reports.
Print checks and direct deposit reports by RTF template using BI Publisher.
View PDF print files in the Report Manager.
View employees' self-service paychecks online.
 Understanding Paychecks and Advices
This section discusses the content, sequencing, and sorting of paychecks and advices.
Content of Paychecks and Advices
All printed checks and advices contain balance, pay group, and employee data, including the following:
Pay group and pay period information.
Employee home address, job, and personal tax information.
Current period earnings, taxes, and deduction amounts.
Year-to-date balances for noncurrent earnings/taxes/deductions, and leave balances.
Federal taxable gross detail.
Net pay.
Pay distribution between check and direct deposit, including payment type, account number, and deposit amount.
The system suppresses the current hours and rate information from printing when you distribute salaried employees' standard hours to earnings codes other than the regular earnings code that is defined in the Pay Group table.
Garnishment Deduction Display on Checks and Advices
The garnishment description generally appears on three lines, itemized by Amount (net amount), Co. Fee (company fee), and Payee Fee. However, because only a maximum of thirteen lines can display on the check or advice, the total garnishment amount appears on one line with the label Total if the garnishment description starts on the tenth line. The 13th line displayed on the check/advice is reserved for Other.
Bank Microcode
A bank microcode appears at the bottom of the check. This microcode font is provided with your Payroll for North America system. For BI Publisher printing, you can specify the MICR font in the RTF template. The numbers represent the check number and the bank transit and account numbers. The paycheck SQRs get the Bank ID from the Pay Group table, the transit and account numbers from the Source Bank table, the bank information from the Bank table, and the check number from the paysheet (check numbers are assigned during pay confirmation). You must set up the Bank table to make this work.
See Setting Up Banks and Bank Branches.
Electronic Signature
An electronically produced signature appears at the bottom of the check. Here is information about how to include the electronic signature for each printing method:
SQR printing:
One way to have a signature print on paychecks electronically is to purchase a custom font cartridge from Hewlett-Packard. You send an electronic copy of the signature to Hewlett-Packard, and they then load it into a font cartridge that you can use on your HP laser jet printer. Because the signature resides in the font cartridge, it can easily be secured; you can keep it locked up except when processing checks.
BI Publisher printing of PDFs:
Modify the RTF check or cheque printing template and add the URL to your signature image.
Magnetic Ink
For checks to be deemed negotiable legal tender, you must use a special ink when printing them. Banks accept only checks that have been impregnated with magnetically treated ink. The Hewlett-Packard font cartridge MICR provides such ink.
Check Sequencing and Sorting
The Pay Group table pages (Check Distribution and Check Sequencing pages) and employee Payroll Option pages 1 and 2 contain extensive choices for sorting and sequencing employees' paychecks and direct deposit advices. You can also specify which address appears on the check or advice form. The printed information on the check or advice form comes from these pages.
During the Pay Confirmation process, the system sorts the checks according to the options that you've selected on the Pay Group table and the Payroll Options pages and assigns check numbers. The check and advice printing processes format the data from the Paycheck file and print the checks in numerical order, as they exist in the file.
Direct Deposit Advice Suppression
To suppress the printing of an employee's direct deposit advice form, select the Suppress DDP Advice Print (suppress direct deposit advice print) check box on the employees's Request Direct Deposit page.
See Also
Understanding Printing Processes
Payroll for North America enables you to select from two methods of printing checks and advices:
Printing by SQR Reports (PAY003, PAY003CN, DDP003, and DDP003CN).
Printing in PDF by RTF Templates using XML Publisher (PYCHKUSA, PYCHQCAN, PYDDAUSA, and PYDDACAN).
Note. (USF) As a general rule, federal payments that are certified by a Certifying Officer are issued through the Financial Management Service (FMS), Department of the Treasury. Authority has been delegated to specific agencies to issue payments outside of this requirement, and this is documented in the Treasury Financial Manual (TFM).
See (USF) Setting Up and Processing Agency Interfaces.
The Check Print and Cheque Print SQR reports (PAY003 and PAY003CN) and the Direct Deposit Advice Print SQR reports (DDP003 and DDP003CN) extract the payroll data for check and advice printing and format it for printing checks and advices.
These reports are delivered with sample formats that are intended as templates. Your company may have a particular kind of check stock and specific formatting requirements for printed paychecks, so you probably want to modify the SQR to reflect your company's individual in-house style.
Printing in PDF by RTF Template using BI Publisher
Payroll for North America uses BI Publisher (BIP) to print checks and advices in PDF and to display individual checks and advices in self-service.
Note. You must set up the BI Publisher to use this feature.
These PSJob processes prepare the check and advice report files:
Print US Checks PSJob process (PYCHKUSA).
Print Canadian Cheques PSJob process (PYCHQCAN).
Print US Direct Deposit Advice PSJob process (PYDDAUSA).
Print Canadian Direct Deposit Advice PSJob process (PYDDACAN).
Each of these PSJob processes comprises the following:
An SQR that generates the XML data for the check or advice print file and individual check or advice files.
The SQRs are modified versions of PAY003, PAY003CN, DDP003, and DDP003CN.
An Application Engine process (PY_SSP_BUILD) that inserts individual paycheck data XML files into the database.
XML Publisher generates the self-service check from the XML data when the employee views a paycheck in the ePay View Paycheck transaction or when the payroll administrator views paychecks by employee in an online view page.
An Application Engine process (PY_SSP_PRINT) that generates one or more PDF print files containing all of the paychecks in the pay run in batch sizes (optional) that you specify on the print process run control page.
The system posts the print files to the Report Manager. From the Report Manager, open the file in Adobe Acrobat to print the checks.
Payroll for North America delivers RTF templates for printing and displaying checks and advices. If you want to modify the format, you must create a new template file and associate it with the XML Publisher report definition.
See Viewing or Modifying the Delivered Report Template.
Paychecks are available for online viewing by employees in the self-service View Paychecks transaction according to the availability specifications on the Paycheck Options Table page. The paychecks are also available for viewing in the administrator's View Self Service Paychecks page as soon as you run the process. Paycheck availability options do not restrict the administrator's online viewing.
Note. If you have enabled viewing of historical paychecks, the paycheck data from the current pay run is visible to employees in self service as soon as you run pay confirmation. Running the XML PDF creation process triggers the paycheck availability option for the PDF paycheck, after which the checks are not available to employees until the availability date that you specify. For this reason, we recommend that you run the XML PDF creation process immediately after confirming the payroll.
See Also
Setting Up to Print and View Paychecks with BI Publisher (BIP)
PeopleTools: BI Publisher for PeopleSoft PeopleBook
Prerequisites
This section lists required setup steps for each method of printing paychecks and direct deposit advice forms.
Printing by SQR Reports
Before using the PAY003, PAY003CN, DDP003, or DDP003CN SQR processes to print paychecks and direct deposit advices on check stock, you must set up the Form table with the form ID and the last used form number.
If necessary, you can also modify the SQR to suit your organization's check and advice printing requirements.
Printing in PDF by RTF Template using BI Publisher
Before using the PYCHKUSA, PYCHQCAN, PYDDAUSA, or PYDDACAN PSJob processes to print PDF forms and display self-service PDF checks and advices:
Configure Integration Broker and Report Manager.
Update the BI Publisher templates and form definitions with specifics for your implementation.
Specify BI Publisher printing and self-service options.
Set up the Form table with the form ID and the last used form number.
See Also
PeopleTools: Integration Broker PeopleBook
PeopleTools: PeopleSoft Process Scheduler PeopleBook
Setting Up the Form Table for Printing Checks and Direct Deposit Advices
Setting Up to Print and View Paychecks with BI Publisher (BIP)
Pages Used to Print and View Checks and Direct Deposit Reports|
Page Name |
Definition Name |
Navigation |
Usage |
|
PAYGROUP_TABLE5 |
Set Up HRMS, Product Related, Payroll for North America, Payroll Processing Controls, Pay Group Table Click the Pages 4–6 link. Select the Check Distribution page. |
Specify the order in which you want paychecks to be sorted and select address and delivery options. |
|
|
PAYGROUP_TABLE6 |
Set Up HRMS, Product Related, Payroll for North America, Payroll Processing Controls, Pay Group Table Click the Pages 4–6 link. Select the Check Sequencing page. |
Define print sequence options. |
|
|
RUNCTL_CHK_ADV1 |
|
Print U.S. paychecks by the SQR method using the Pay Check Print - US SQR process (PAY003). |
|
|
RUNCTL_CHK_ADV |
Payroll for North America, Payroll Processing CAN, Produce Cheques, Print Pay Cheques, Print Pay Cheques |
Print Canadian paycheques by the SQR method using the Pay Cheque Print - Canada SQR process (PAY003CN). |
|
|
RUNCTL_CHK_ADV1_EP |
|
Create U.S. paychecks in PDF for printing and self-service viewing using the Print US Checks PSJob process (PYCHKUSA). |
|
|
RUNCTL_CHK_ADV_EP |
Payroll for North America, Payroll Processing CAN, Produce Cheques, Create PDF Paycheques, Create PDF Paycheques |
Create Canadian paycheques in PDF for printing and self-service viewing using the Print Canadian Cheques process (PYCHQCAN). |
|
|
RUNCTL_CHK_ADV1 |
|
Print U.S. direct deposit advice forms by the SQR method using the Direct Deposit Advice Print SQR process (DDP003). |
|
|
RUNCTL_CHK_ADV |
Payroll for North America, Payroll Processing CAN, Create Direct Deposits, Print Advice Forms, Print Advice Forms |
Print Canadian direct deposit advice forms by the SQR method using the Direct Deposit Advice Print SQR process (DDP003CN). |
|
|
RUNCTL_CHK_ADV1_EP |
|
Create U.S. direct deposit advice forms in PDF for printing and self-service viewing using the Print US Direct Deposit Advice PSJob process (PYDDAUSA). |
|
|
RUNCTL_CHK_ADV_EP |
Payroll for North America, Payroll Processing CAN, Create Direct Deposits, Create PDF Advice Forms, Create PDF Advice Forms |
Create Canadian direct deposit advice forms in PDF for printing and self-service viewing using the Print Can Direct Deposit Advice PSJob process (PYDDACAN). |
|
|
RUNCTL_PAYINIT2 |
|
Run PAY004, which is a template for generating a report that lists all checks, in check number order, written in the pay period for each company in the organization. |
|
|
RUNCTL_PAYINIT |
Payroll for North America, Payroll Processing CAN, Produce Cheques, Cheque Register, Cheque Register |
Run PAY004, which is a template for generating a report that lists all cheques, in cheque number order, written in the pay period for each company in the organization. |
|
|
RUNCTL_PAYINIT2 |
|
Run DDP002, which generates a report that lists all direct deposits for employees in each company in the organization. |
|
|
RUNCTL_PAYINIT |
Payroll for North America, Payroll Processing CAN, Create Direct Deposits, Direct Deposit Register, Direct Deposit Register |
Run DDP002, which generates a report that lists all direct deposits for employees in each company in the organization. |
|
|
RUNCTL_PAYINIT2 |
|
Run DDP004, which generates a report that lists payroll amounts paid directly into the employee's bank account as direct deposits. This report is similar to the Check Register (PAY004) report. |
|
|
RUNCTL_PAYINIT |
Payroll for North America, Payroll Processing CAN, Create Direct Deposits, Advice Register, Direct Deposit Advice Register |
Run DDP004, which generates a report that lists payroll amounts paid directly into the employee's bank account as direct deposits. This report is similar to the Cheque Register (PAY004) report. |
|
|
PY_SSP_ADMIN_VIEW PY_SSP_VIEW_DATA |
|
View employees' self service paychecks in an online view that replicates the employees' view. Payroll administrators can view all employee paychecks (both PDF and non-PDF), regardless of specifications on the Paycheck Options table. |
|
|
PY_SSP_ADMIN_VIEW PY_SSP_VIEW_DATA |
Payroll for North America, Payroll Processing CAN, Produce Payroll, Review Self Service Paycheque, View Self Service Paycheque |
View employees' self service paycheques in an online view that replicates the employees' view. Payroll administrators can view all employee paycheques (both PDF and non-PDF), regardless of specifications on the Paycheck Options table. |
Printing Checks and Direct Deposit Reports by SQR Reports
Access the Print Pay Checks page (Payroll for North America, Payroll Processing USA, Produce Checks, Print Checks, Print Pay Checks; or Payroll for North America, Payroll Processing USF, Produce Checks, Print Checks, Print Pay Checks) or the Print Paycheques page (Payroll for North America, Payroll Processing CAN, Produce Cheques, Print Pay Cheques, Print Pay Cheques).
Note. The Print Pay Checks page is shown here as an example; all of the run control pages used for printing checks and direct deposit reports by the SQR method use the same parameters.
On-Cycle Run
If you specify only a pay run ID, the system selects checks from that run ID that are based on a payroll cycle of only on-cycle, off-cycle, or both.
If you specify a pay run ID and the check range, the system selects only the checks that are in the check number range and based on a payroll cycle of only on-cycle, off-cycle, or both.
Off-Cycle Pay Calendar
If you use this group box, you must enter:
Company
Pay group
Pay end date
Available fields and completed tasks depend on which option you select in the Payroll Cycle group box:
Payroll Cycle
|
On-Cycle |
The page number fields are unavailable for entry. The system selects only the on-cycle checks for the company and pay group with the pay end date that you specify. If you specify a check number range, the system selects only those checks. |
|
Off-Cycle |
The page number fields are available for entry. The system selects only the off-cycle checks for the company and pay group with the pay end date that you specify. If you specify the page number range, the system selects all checks in that page range. If you specify a check number range, the system selects only those checks. |
|
Both |
The page number fields are available for entry. The system selects both off-cycle and on-cycle checks for the company and pay group with the pay end date that you specify. If you specify the page range, the system selects all checks in that page range. If you specify a check number range, the system selects only those checks. |
Check/Advice Numbers
Specify a check or advice number range to print only the specified checks or advices.
Printing Checks and Advices in PDF by RTF Template Using BI Publisher
Access the Create PDF Paychecks page (Payroll for North America, Payroll Processing USA, Produce Checks, Create PDF Paychecks, Create PDF Paychecks; or Payroll for North America, Payroll Processing USF, Produce Checks, Create PDF Paychecks, Create PDF Paycheck) or the Create PDF Paycheques page (Payroll for North America, Payroll Processing CAN, Produce Cheques, Create PDF Paycheques, Create PDF Paycheques).
Note. The Create PDF Paychecks page is shown here as an example; all of the run control pages used for creating checks and direct deposit reports by the BI Publisher method use the same parameters.
The run parameters for the BI Publisher processes are identical to the parameters for the SQR processes with the addition of these options:
Slf Srvc Availability Override
|
Days From Check Date |
Leave this field blank to retain the default value entered on the Paycheck Options Table page. To override the value on the Paycheck Options Table for this check or advice print run, enter a different number of days from check date. The system issues a confirmation message if you enter an override. If you do not confirm the override, the system does not save the value you entered and the field remains blank. Note. If you have enabled viewing of historical paychecks, the paycheck data from the current pay run is visible in self service as soon as you run pay confirmation. Running the BI Publisher print process triggers the paycheck availability option for the PDF paycheck, after which the checks are not viewable until the availability date that you specify. For this reason, we recommend that you run the BI Publisher print process immediately after confirming the payroll. |
|
Batch Size |
Enter the number of individual paychecks that you want to batch together into one PDF print file. You can determine the optimum file size in your environment. |
Process Scheduler Settings
On the Process Request page, select the type Web and the format PDF.
Viewing PDF Print Files in the Report ManagerIf you ran one of the PDF creation processes to print PDF checks or advice forms through BI Publisher, you must use the Report Manager to view the PDF print files.
To view the paycheck print files after the report has successfully run and posted:
Access the Report Manager (Reporting Tools, Report Manager)..
Locate the file that you want to open.
The BI Publisher reports are the large PDF batch files that contain the number of paychecks for each batch that you specified in run parameters. The description of the report batch files includes the report name with the batch number in brackets.
Example of PDF check print file report description: PRTUSCHK [BATCH0001] PRINT US CHECKS.
To open the PDF file use one of these methods:
From the Report Manager - List page.
Click the Report link in the Report column for the selected batch file.
From the Report Manager - Administration page.
Click the Details link for the selected batch file.
The system displays another page, where you click the *.pdf file link to access the PDF report in Adobe Acrobat.
Viewing Employees' Self-Service Paychecks Online
Access the View Self Service Paycheck page (Payroll for North America, Payroll Processing USA, Produce Payroll, Review Self Service Paycheck, View Self Service Paycheck; or Payroll for North America, Payroll Processing USF, Produce Payroll, Review Self Service Paycheck, View Self Service Paycheck) or the View Self Service Paycheque page (Payroll for North America, Payroll Processing CAN, Produce Payroll, Review Self Service Paycheque, View Self Service Paycheque).
The payroll administrator searches by employee ID on the search page to locate a particular employee's paychecks.
|
Check Date |
Click the check date to access the check. PDF checks open in a new window. The system displays non-PDF checks on another View Self Service Paycheck page (PY_SSP_VIEW_DATA). |
|
PDF File |
The system selects this for checks displayed in PDF. In accessible mode, the system always displays checks on a PeopleSoft page (and not in a PDF file). Therefore, this column is hidden in accessibility mode. |
Generating a Direct Deposit File
This section provides an overview of the Direct Deposit Create File process (DDP001 and DDP001CN) and discusses how to create a direct deposit file.
Understanding the Direct Deposit Create File Process (DDP001 and DDP001CN)
Use the Direct Deposit Create File process to create an electronic transmittal file used to transfer payroll funds directly into an employee's bank account. The file contains direct deposit records for each company and bank/branch combination.
Payroll for North America generates direct deposit transmittals by bank ID and account number. Therefore, regardless of pay run ID and pay group/pay end date, the DDP001 report captures all employees who have a prenotification submitted or a direct deposit to be paid if their pay group has that bank ID and account number assigned.
The report shows the transaction file generated, including the direct payment routing numbers used to direct deposit employee's paychecks, employee name, and all the other information the system needs to complete direct deposits of payroll funds.
Note. (CAN) The program formats direct payment routing numbers according to the routing format that you specify on the Source Bank Accounts – Canadian Bank Additional Data page.
(USA) Prenotification Processing
The prenote process is a test run for direct deposits to verify that bank IDs and employee account numbers are valid. If you're running the Direct Deposit Prenotification report (DDP005) and the Direct Deposit Prenote Memo report (DDP006), you must run them prior to creating the direct deposit transmittal file.
See Also
Setting Up Banks and Direct Deposit
Printing Paychecks and Direct Deposit Advices
Pages Used to Review Pay Calculation Results
Pages Used to Generate a Direct Deposit Create File|
Page Name |
Definition Name |
Navigation |
Usage |
|
RUNCTL_PAYINIT2 |
|
(USA) Run the Direct Deposit Prenotification report (DDP005). The report lists direct deposit information for employees who will have their pay deposited directly into their bank account for the first time. Note. (CAN) The prenotification process does not apply in Canada. |
|
|
RUNCTL_PAYINIT2 |
|
(USA) Run the Direct Deposit Prenote Memo report (DDP006). The report produces a memo to each employee who has added a new direct deposit. The memo lists the direct deposit information for verification. |
|
|
RUNCTL_DDP001 |
|
(USA) Run the Create Direct Deposit Transmit report (DDP001), which creates the direct deposit transmittal file. |
|
|
RUNCTL_DDP001CN |
Payroll for North America, Payroll Processing CAN, Create Direct Deposits, Create Direct Deposit File, Create Direct Deposit File |
(CAN) Run the Create Direct Deposit Transmit report (DDP001CN), which creates the direct deposit transmittal file. |
Creating a Direct Deposit File
Access the Create Direct Deposit File page (Payroll for North America, Payroll Processing USA, Create Direct Deposits, Create Direct Deposit File, Create Direct Deposit File; or Payroll for North America, Payroll Processing USF, Create Direct Deposits, Create Direct Deposit File, Create Direct Deposit File; or Payroll for North America, Payroll Processing CAN, Create Direct Deposits, Create Direct Deposit File, Create Direct Deposit File).
Note. (CAN) Although the Canadian page displays with some differences, all fields have the same functionality as the fields shown on the U.S. page.
Pay Run or Pay Calendar
Enter either a pay run ID or pay calendar information for the desired pay period.
Note. Payroll for North America generates direct deposit transmittals by bank ID and account number. Therefore, regardless of pay run ID and pay group/pay end date, the DDP001 report captures all employees who have a prenotification submitted or a direct deposit to be paid if their pay group has that bank ID and account number assigned. You cannot use these fields to produce a direct deposit transmittal for just a selected pay group unless direct deposits for that pay group are paid from a separate bank and account from all other pay groups.
Additional Process Request Parameters
|
Prenote Date |
(USA) Enter the date that you want the system to use as the starting date of the prenote waiting period. |
|
Text (20 Characters) |
Enter text that you would like to appear on the direct deposit file. The character limits are:
|
|
Create Separate Files for IAT |
Select this check box to report domestic (PPD) and international (IAT) transactions in separate direct deposit files. Some banks cannot process both domestic and international transactions together in a single file. When this check box is selected, the program DDP001.SQR will create separate direct deposit files for domestic versus. international transactions. |
|
Exclude Debit Offset Records |
Select this check box to exclude debit offset records from the direct deposit files created by DDP001.SQR. Some banks require that employers submit unbalanced files. Unbalanced files contain only the credit transactions that are depositing funds to employee accounts without any corresponding offsetting debit transactions against the employer's accounts. Selecting this check box enables employers to create files that contain no debit offset transactions. |
File Header Company
|
Bank ID and Company |
(USA) Enter your bank's transit number and your company. This information appears at the beginning of the transmittal file. |
Processing Online Single Checks
This section provides overviews of online single checks and paysheet options and discusses how to:
Configure the system for online printing.
Enter and calculate an online check.
Confirm, change, or delete online check results.
Reprint an online check.
Reverse an online check.
Understanding Online Checks
With Payroll for North America, you can calculate, view, and print a single employee check interactively, online.
To process online checks:
Configure the system for online check printing.
Assign a pay run ID to the appropriate pay calendar.
This is required to access the Create Online Check page.
Enter data on the Create Online Check page.
Enter the hours or an amount.
If necessary, override Job data, taxes, deductions, or garnishments.
Click Save and Calculate.
The Review/Print Online Check page appears when the process is complete.
View results of the calculation on the Review/Print Online Check page and proceed in one of three ways:
Confirm and print the check.
Select whether to use the BI Publisher or SQR print process.
Note. If you use the BI Publicher process with the View Paycheck transaction in PeopleSoft ePay, the number of days from check date that you specify on the Paycheck Options Table page determines when the employee can view the check online.
If the check is destroyed during printing, you can reassign the check number and reprint.
Click the Change Data button to return to the Create Online Check page to make changes.
Delete the check.
Note. (USF) With few exceptions, federal agencies must issue all certified payment vouchers through the Department of the Treasury.
See (USF) Setting Up and Processing Agency Interfaces.
This diagram illustrates the step involved in online check processing from configuring online check printing to the printing of checks:
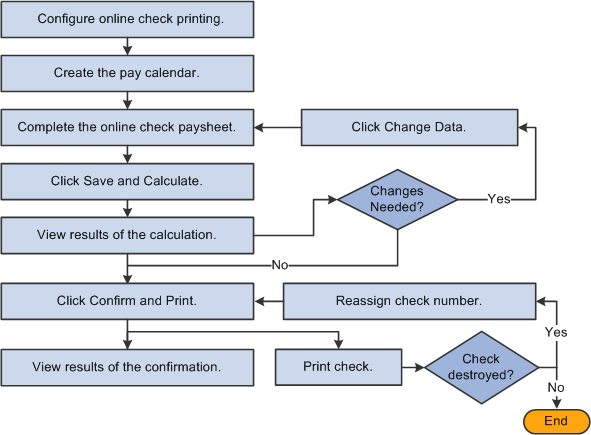
Diagram showing the step involved in online check processing from configuring online check printing to the printing of checks
See (USF) Setting Up and Processing Agency Interfaces.
To use this feature for check modeling:
On the Create Online Check page, enter data and click Save and Calculate.
On the Review/Print Online Check page, either click to change the data or delete the check.
Understanding Online Check Paysheet Options
The system offers several options for using the Paysheet Creation COBOL SQL process (PSPPYBLD) to access the employee's paysheet:
Process a final check online.
If the employee has a final check request, the system displays a message asking if you want to create the final check online. You can copy an off-cycle final check paysheet or unconfirmed final check to create the final check online.
Process an unconfirmed online check.
If the employee has an unconfirmed single check with the same company, pay group, pay end date, and employment record number that you specified, the system displays that paysheet.
Process an unconfirmed off-cycle check.
If the employee has an unconfirmed off-cycle check with the same company, pay group, pay end date, and employment record number that you specified, and this is the only payline on the page, the system displays a message offering you the option of selecting that payline.
Have the system create the online paysheet.
If neither of the previous two conditions exist, the system displays a message asking if you want to use the Paysheet Creation process to create the data for the employee's online check.
If you click Yes for the paysheet creation process, the Create Online Check page displays the employee's paysheet information for the pay period end date that you specified.
If your organization uses PeopleSoft Time and Labor, you can further select whether or not to load available time from Time and Labor. If you select Yes, the system displays the Filter Options page where you can filter available time by earnings code or date range.
Create the paysheet manually on the Create Online Check page.
If you click No for the paysheet creation process, the Create Online Check page displays only default information for adding a new paysheet.
See Also
Pages Used to Process Online Checks|
Page Name |
Definition Name |
Navigation |
Usage |
|
PAY_OL_PRNT |
Set Up HRMS, Product Related, Payroll for North America, Payroll Processing Controls, Configure Online Printing, Configure Online Printing |
Configure the system for online printing. |
|
|
PAY_OL_SHEET_S1 |
|
Create an employee's online check paysheet and check. |
|
|
PY_LDTL_OL_SEC |
|
Select options to filter data from Time and Labor by earnings codes or range of dates. |
|
|
PAY_OL_CHECK_S |
|
When you click Save and Calculate on the Create Online Check page, the system performs the calculation and displays the Review/Print Online Check page. You can confirm and print a check, delete the check, or return to the Create Online Check page to change data. |
|
|
PAY_OL_CHECK_C |
Payroll for North America, Payroll Processing CAN, Create Online Cheques, Review/Print Online Cheque, Review/Print Online Cheque |
When you click Save and Calculate on the Online Cheque Paysheet page, the system performs the calculation and displays the Review/Print Online Check page. You can confirm and print a check, delete the check, or return to the Online Cheque Paysheet page to change data. |
|
|
PAY_OL_RE_ASSGN_S |
Select Reassign Check/Advice Nbr (reassign check or advice number) on the Review/Print Online Check page or Review/Print Online Cheque page and click Confirm and Print again. |
Enter a different check number to reprint an online check that was destroyed in printing. |
|
|
PAY_OL_CHECK_S |
Click the Reverse and Confirm button on the Review/Print Online Check page. |
Reverse a single check and confirm the results of the check reversal. |
|
|
PAY_OL_CHECK_C |
Click the Reverse and Confirm button on the Review/Print Online Cheque page. |
Reverse a single cheque. |
See Also
(USF) Setting Up and Processing Agency Interfaces
Configuring the System for Online Printing
Access the Configure Online Printing page (Set Up HRMS, Product Related, Payroll for North America, Payroll Processing Controls, Configure Online Printing, Configure Online Printing).
|
Type |
Select Printer, File, or None. |
|
Destination |
Enter a printer port or file directory to receive your output. |
|
Format |
Select the format in which you want the report printed. |
Entering and Calculating an Online Check
Access the Create Online Check page (Payroll for North America, Payroll Processing USA, Create Online Checks, Create Online Check, Create Online Check; or Payroll for North America, Payroll Processing CAN, Create Online Cheques, Create Online Cheque, Online Cheque Paysheet; or Payroll for North America, Payroll Processing USF, Create Online Checks, Create Online Check, Create Online Check).
Note. Many of the fields on the Create Online Check page are identical to those on the Paysheet page.
Warning! If you use the Paysheet Creation process for online checks using the same on-cycle pay calendar that's being processed in batch, the employee receives a duplicate check.
|
Check Number |
You can either specify a number or have one assigned by the system. |
Benefit Deductions
|
Benefit Deductions Taken |
The initial value comes from the pay calendar, but you can override it.
|
General Deductions
|
Deductions Taken |
The initial value comes from the pay calendar, but you can override it.
|
Additional Page Elements
|
Save and Calculate |
When you're ready to calculate the check, click this button to start the calculation process. The system then displays the Review/Print Online Check page. |
|
Return to Search |
If you want to set up a single check for another employee, click Return to Search to redisplay the Create Single Check selection page. |
See Also
Viewing and Updating Paysheets and Paylines
Confirming, Changing, or Deleting Online Check Results
Access the Review/Print Online Check page (Payroll for North America, Payroll Processing USA, Create Online Checks, Review/Print Online Check, Review/Print Online Check; or Payroll for North America, Payroll Processing USF, Create Online Checks, View/Print Online Check, Review/Print Online Check) or the Review/Print Online Cheque page (Payroll for North America, Payroll Processing CAN, Create Online Cheques, Review/Print Online Cheque, Review/Print Online Cheque).
You must assign a pay run ID to the appropriate pay calendar. Otherwise, the system cannot find any employee data for online single check processing. The fields on this page are display-only and are based on the data that was entered on the Create Online Check page.
Important! Any uncalculated or unconfirmed online single checks are automatically calculated or confirmed by an off-cycle pay run if the online check page numbers fall within the range entered for the off-cycle pay run.
|
Confirm and Print |
Click to confirm and print the online check. Select whether to use BI Publisher to create a PDF paycheck for this employee for self-service viewing. If you select No, the system creates a non-PDF paycheck for the online check using SQR reports. Note. If you use the BI Publisher process with the View Paycheck transaction in PeopleSoft ePay, the number of days from check date that you specify on the Paycheck Options Table page determines when the employee can view the check online. After confirming, the system returns you to the Review/Print Online Check page. |
|
Delete |
If you fail to confirm and print the online check, you will leave an outstanding paysheet that prevents pay calculation later. Delete the check if you do not complete the process. |
|
Change Data |
Click to return to the Create Online Check page to change data and recalculate. |
Note. (USF) After confirming, you can proceed to the normal pay certification process and then run the ECS Interface SQR Report process (FGPY004) for this payment, as you would an off-cycle check.
See Also
(USF) Setting Up and Processing Agency Interfaces
Reprinting an Online Check
Access the Review/Print Online Check page (Payroll for North America, Payroll Processing USA, Create Online Checks, Review/Print Online Check, Review/Print Online Check; or Payroll for North America, Payroll Processing USF, Create Online Checks, View/Print Online Check, Review/Print Online Check) or the Review/Print Online Cheque page (Payroll for North America, Payroll Processing CAN, Create Online Cheques, Review/Print Online Cheque, Review/Print Online Cheque).
|
Reassign Check/Advice No (reassign check or advice number) |
If the online check was destroyed while printing, select this check box to reprint the check with a different check number. When you select this check box, the Confirm and Print button becomes available. |
|
Confirm and Print |
This button is available if you select Reassign Check/Advice No. Click this button to access the Paycheck Printing/Re-assignment page, where you enter the new check number and click OK to print the check with the new number. |
|
Reverse and Confirm |
Click to access the Check Reversal page and run the Check Reversal process. You cannot reverse a single check until it has been confirmed and printed. Until then, this button is unavailable. |
See Also
Reversing an Online Check
To reverse a confirmed online check:
Click Reverse and Confirm on the Review/Print Online Check page.
Enter a pay group and a pay end date.
The reversal is posted to the company, pay group, and pay end date specified here.
Click OK to run the Check Reversal process.
The system displays the Print Pay Checks page.
Review results of the reversal on the Review/Print Online Check page.
Recording Manual Checks
This section provides an overview of manual checks and discusses how to:
Enter manual check data into the system.
Create a PDF manual check for employee self service viewing.
Understanding Manual ChecksA manual check is a check prepared outside of the Payroll for North America system. You might have a remote office with no access to Payroll for North America that occasionally needs to write a manual check to process a last-minute payroll adjustment. Or you might correct errors in system-produced paychecks by producing manual checks.
Because manual checks are created outside of the system, you must record them manually into Payroll for North America to update your employees' earnings, deductions, garnishments, and tax balances.
For example, employee 8101 was hired in a remote office on January 1. The clerk didn't notify the central office of the new hire. So, when the payroll was produced for the January run, the new employee didn't receive a check. The payroll clerk therefore calculated and produced a manual check to be processed in an off-cycle run. He then forwarded the check information to the central office to be entered into the system.
Although manual checks are normally processed in off-cycle payroll runs, you can record them as part of your on-cycle payroll process if you choose.
If your organization uses the self-service View Paycheck transaction in the PeopleSoft ePay application, you can run a separate process to create the PDF manual check available for self-service viewing by the employee.
Pages Used to Process Manual Checks|
Page Name |
Definition Name |
Navigation |
Usage |
|
PAY_SHEET_ADD_S |
|
Select Manual Check and enter the employee's earnings, taxes, and deductions. |
|
|
RUNCTL_CHK_ADV1_MC |
|
Run a process to create a PDF manual check that the employee can view in the ePay self-service View Paychecks transaction. |
|
|
RUNCTL_CHK_ADV_MC |
Payroll for North America, Payroll Processing CAN, Produce Cheques, Create Slf Srvc Manual Cheques, Create Self Service Manual Cheques |
Run a process to create a PDF manual cheque that the employee can view in the ePay self-service View Paychecks transaction. |
Entering Manual Check Data Into the System
To enter a manual check into the system:
Enter information for a specific paysheet on the Paysheet page.
When you access the page, we recommend that you use the Add mode.
This keeps your manual checks separate from your regular checks and avoids confusion.
You must make a separate payline entry for each manual check.
If you want to enter ten manual checks, for example, you add a paysheet page and then add ten additional paylines to that page.
Select the Manual Check check box on the main Paysheets page.
Enter the employee's earnings, taxes, and deductions into the paysheet on the One-Time Deductions, One-Time Garnishment, and One-Time Taxes pages.
The system calculates employer-paid taxes and benefits.
Run the Pay Calculation COBOL SQL process (PSPPYRUN).
During this process, the system double-checks your entries to ensure that the gross pay minus deductions and taxes equals the net pay for each manual check.
Review the results.
Run the Pay Confirmation process.
During this process, the system updates all balances for earnings, deductions, and taxes.
See Also
Creating a PDF Manual Check for Employee Self-Service Viewing
Access the Create Self Service Manual Checks page (Payroll for North America, Payroll Processing USA, Produce Checks, Create Slf Srvc Manual Checks, Create Self Service Manual Checks; or Payroll for North America, Payroll Processing USF, Produce Checks, Create Slf Srvc Manual Checks, Create Self Service Manual Checks) or the Create Self Service Manual Cheques page (Payroll for North America, Payroll Processing CAN, Produce Cheques, Create Slf Srvc Manual Cheques, Create Self Service Manual Cheques).
Note. The Create Self Service Manual Cheques page for Canada is the same.
To make the PDF manual check available for viewing by the employee in the ePay View Paychecks self-service transaction, use this run control page to run the Print US Checks PSJob process or the Print Canadian Cheques PSJob process.
Note. Manual checks of $0 or negative net pay amounts are available for self-service viewing only if you have selected the $0 or Negative Manual Checks option on the Paycheck Options Table page.
See Specifying BI Publihser Printing and Self-Service Options.
Payroll Runs
The report request parameters are similar to those on the Print Pay Checks page.
Employee IDs
To process a single employee, enter the starting employee ID and leave the ending ID blank.
Check Numbers
To process a single check number, enter the starting number and leave the ending number blank.
See Also
Understanding Printing Processes
Processing a Final Check Request
This section lists prerequisites and discusses how to:
Run the final check request process.
Create an online final check.
Run the final check batch process.
Reprocess final check paysheets.
Generate a final check request report.
See Also
Understanding the Create Final Check Paysheet Process
Creating Final Check Paysheets
Defining the Final Check Process
PrerequisitesBefore you can begin processing final check requests, you must have completed the following setup steps:
Define action and action reason code combinations that trigger a final check.
Establish a final check program.
Define final check earnings.
Define final check leave accrual rules.
Define final check deductions.
See Also
Defining the Final Check Process
Pages Used to Process a Final Check Request|
Page Name |
Definition Name |
Navigation |
Usage |
|
TERM_RQST |
|
Run the online or batch final check request process. |
|
|
RUNCTL_PAY056 |
|
Generate the PAY056 report that lists final check requests for which an employee's final check processing status is either N (not processed) or P (loaded to paysheets). |
|
|
RUNCTL_PAYINIT |
|
Generate the PAY057 report that reconciles employees who have final checks processed, based on pay calendar information that you specify with data from their Employment records. A warning message appears in the report when an employee is not really terminated, but has a final check produced |
Running the Final Check Request Process
Access the Request Final Check page (Payroll for North America, Payroll Processing USA, Create Final Checks, Request Final Check, Request Final Check; or Payroll for North America, Payroll Processing CAN, Create Final Cheques, Request Final Cheque, Request Final Cheque; or Payroll for North America, Payroll Processing USF, Create Final Checks, Request Final Check, Request Final Check).
Note. When you add a final check request for an employee whose status on the Job Data table is not Terminated, Final Check Workflow automatically creates a worklist item for the Personnel Administrator role user.
|
Termination Date |
Enter the date of the last day for which the employee is to be paid. |
|
Status |
The system displays status of Updated to Paysheets or Not Processed, depending on whether you've processed the request. |
|
Final Check Program ID |
Select the final check program ID that identifies the final check rules appropriate to the employee's check. |
|
Reprocess |
Select this option to reprocess. |
|
Created From JOB Record |
The system automatically creates a final check request when you change an employee's job status to Terminated. The system selects this check box if the final check request you've accessed was created this way. |
|
Include TL Payable Time (include time and labor payable time) |
Select this option if you are using data from PeopleSoft Time and Labor. |
|
Create Final Check Online |
To access the Online Check process for the final check request, click this button. |
|
Create Final Check Run Control |
To access the batch payroll process for final check requests, click this button. |
Creating an Online Final Check
The process for creating an online final check is similar to the process for creating an online single check.
To create an online final check:
Click the Create Final Check Online button on the Request Final Check page.
If you want to create a final check for this employee, click the Yes button when prompted.
The Final Check Paysheet Creation process runs and creates an online check paysheet.
Update data on the paysheet and click the Save and Calculate button.
Confirm and print the final check either as an online check or with the regular checks in the pay run.
If you select to print as an online check, you must select whether to use BI Publisher to create a PDF paycheck.
Running the Final Check Batch Process
The batch process for final check requests is designed to run before pay calculation. You can run this process either on-cycle or off-cycle. Then you use the Pay Calculation and Pay Confirmation processes to complete the cycle of generating final paychecks. Click the Create Final Check Run Control button on the Request Final Check page to select this process. The system displays the Create Final Check Paysheets page.
Reprocessing Final Check Paysheets
The system displays the Reprocess option on the Request Final Check page only after the employee's final check paysheet has been created and the status of the final check request is Loaded to Paysheets. Use this option to recreate an employee's final check paysheet.
Warning! Exercise caution when using the Reprocess option, because when the system originally creates the final check paysheets, it marks the preexisting paysheets Not OK to Pay. So, before you recreate the final check paysheet you must manually select the OK to Pay check box on all preexisting paysheets.
Generating a Final Check Request Report
Access the Final Check Requests Report page (Payroll for North America, Payroll Processing USA, Create Final Checks, Final Check Requests Report, Final Check Requests Report; or Payroll for North America, Payroll Processing CAN, Create Final Cheques, Final Cheque Requests Report, Final Cheque Requests Report; or Payroll for North America, Payroll Processing USA, Create Final Checks, Final Check Requests Report, Final Check Requests Report).
|
Final Check Processing Status |
Extracted: All employees whose final check request processing status is Not Processed or Loaded to Paysheets. Loaded to Paysheets: All employees whose final check processing status is Loaded to Paysheets. Not Processed: All employees whose final check processing status is Not Processed. Paysheet Created: All employees whose final check processing status has paysheets created. Note. Leave the field blank to report all statuses. |
Determining Whether to Reverse or Adjust a Check
This section discusses:
Run controls.
Whether to reverse or adjust a check.
Comparison of reversal and adjustment.
Messages on the pay record.
Note. The system does not perform adjustments to online checks or manual checks.
Run Controls
Always process both reversals and adjustments using off-cycle payroll runs against an on-cycle pay calendar or a stand alone off-cycle calendar:
Initiate processing for both by setting up a run control for the check or checks that you want to reverse or adjust.
For a check reversal, select Reversal on the Reverse/Adjust Paychecks page.
For a check reversal and adjustment, select Reversal/Adjustment.
Run the Paycheck Reversal/Adjustment COBOL SQL process (PSPPYREV).
The Paycheck Reversal/Adjustment process produces different results, depending on whether you selected Reversal or Reversal/Adjustment for your run control.
We discuss both of these processes in greater detail in the following sections.
Whether to Reverse or to Adjust a CheckUse this rule for determining which run control to select:
If the check has not been cashed or deposited, run a reversal.
If the check has been cashed or deposited, run an adjustment.
When to Process a Reversal
A reversal is appropriate when you've produced a check that you subsequently realize should not have been produced at all, or should not have been produced how it was, and the check has not been cashed or deposited.
Examples:
An employee is terminated at the end of the last pay period and receives what should be her final paycheck.
However, the Human Resources department fails to enter her termination into the system. So, when paysheets are created and processed for the next pay period, the system produces a paycheck for her. Her supervisor reports to the Payroll department that she has been terminated, and that no check should have been produced. The Payroll department runs a reversal on her check, backing it out of the system.
An employee's check mistakenly didn't include overtime.
An employee's check mistakenly included overtime.
An employee wasn't paid at the right rate.
An employee was taxed in the wrong state.
If the paycheck has not been cashed or deposited in any of these situations, you destroy the check, run a reversal, and issue an on-demand or online check for the correct amount.
When to Process an Adjustment
If the paycheck is not available in any of the previous situations—if it's already been cashed, or if it was a direct deposit—you perform an adjustment.
Example: An employee should have been paid for 20 hours of overtime, but deposited his check before realizing the overtime was not on it. He requests his overtime pay.
The adjustment process calculates the check as it should have been calculated in the first place and compares the new calculation to the calculation for the original check. In the example of unpaid overtime, you issue a single check for the difference. In some cases the employee might owe the company money, in which case you process a negative adjustment.
Note. (CAN) When processing an adjustment, a Canada Pension Plan/Quebec Pension Plan pay period exemption may be applied in error to the adjustment cheque.
Comparison of Reversal and Adjustment
The Paycheck Reversal/Adjustment process produces different results, depending on whether you select Reversal or Reversal/Adjustment for your run control:
|
Reversal |
Produces a negative image of the original pay record, with all the amounts changed from positive to negative. This effectively backs the check out of the system. |
|
Adjustment |
Produces an off-cycle paysheet page with two pay lines: a Reversing Adjustment with a net pay of zero and an Adjustment record where you enter the information for the check as it should have been originally. |
When you reverse a check, you generally either cut a new on-demand check for the correct amount or do nothing after having reversed it (if that check shouldn't have been issued at all).
When you adjust a check, three situations are possible:
No change in net pay.
For example, an employee's pay is incorrectly charged to Department 10100 instead of Department 10010.
The company owes the employee money.
The original check is for too small an amount. For example, you pay an employee for 2 hours of overtime instead of 20 hours.
The employee owes the company money.
The original check was for too large an amount. For example, you pay an employee for 20 hours of overtime instead of 2 hours.
See Also
Messages on the Pay Record
When you reverse or adjust checks, the following messages appear on the payline and paycheck records.
|
Reversal |
Indicates that the check is a reversal. |
|
Reversing Adjustment |
Indicates a pay earnings record that has been adjusted. It appears on the original pay earnings record. |
|
Adjustment |
Indicates a pay earnings record that is created by the Reversal Processing process. It appears on the pay earnings record that is used to recalculate an employee's pay. |
|
Adjustment − Partial Period |
Indicates that the employee with the adjusted pay earnings record has had a job record change, with an effective date that falls between the pay period begin and end dates prior to running the Reversal Processing process. |
|
Adjustment − Pay Data Change |
Indicates that one or more of the employee's adjusted records has been updated since the last time paysheets were created or the pay calculation was run. The system recalculates such records during the next pay calculation if they have not already been recalculated. You may select all employees who have had a pay data change and need to be recalculated by selecting Calculation Required in the Job Pay Data Change field of the By Payline - Payline search page. Entering Yes in the same field selects all employees whose pay has been recalculated due to a change in one of their pay-related records. |
|
Adj − PayChg − Partl Period |
Indicates, for an employee who had an Adjustment − Pay Data Change message, that a change has been made to the job record, with an effective date falling between the pay period begin and end dates and it has already been recalculated. |
Reversing Paychecks
This section provides an overview of paycheck reversal and discusses how to:
Run paycheck reversal.
View the effects of reversal.
Run pay confirmation.
View confirmed reversed checks.
See Also
Determining Whether to Reverse or Adjust a Check
Understanding Paycheck Reversal
Run paycheck reversal when a system-generated check is incorrect and has not been cashed or deposited. The key to reversing checks is running the Paycheck Reversal/Adjustment COBOL SQL process (PSPPYREV), which eliminates the need to enter each check to be reversed as a manual check. This program locates the checks you've specified on a special run control and creates an off-cycle paysheet page for each reversal. The resulting paylines reflect the original paysheet entries, with negatives in the hours and amount fields. These pages are display-only.
During the Paycheck Reversal/Adjustment process, the system makes a copy of the paycheck record and reverses the signs (plus/minus) on the amount fields. The original paycheck record is retained, not deleted. You can view both the original and the reversed paycheck records from the Paycheck pages. On the reversed check, all of the amounts display as negative numbers, and the message "Calculated Check Reversal" appears in the upper-left corner.
To reverse paychecks, you do not need to run the Pay Calculation process. When you run the Paycheck Reversal/Adjustment process, the system finds the check or checks that you've specified and reverses the plus/minus signs. Because the amounts themselves have already been calculated, no additional calculation is necessary.
Deleting a Reversal
You can delete a reversal if you made a mistake. Select Delete Current Reversal/Adjustment on the Reverse/Adjust Paychecks run control page and run the process again. If you need to make a correction after the reversal has been confirmed, you must process a manual check.
Updating Balance Records
To update the balance records with the final reversal information, run the Pay Confirmation process. After confirmation, when you view the paycheck, the message "Confirmed Check Reversal" appears in the upper-left corner. You can then issue an on-demand or online check for the correct amount.
Reversing Time and Labor Payable Time
If the check you're reversing (not adjusting) includes payable time from Time and Labor, you specify the processing option:
Reverse Only: Generates only an offset row for the payable time row being reversed.
Reverse and Generate New Row: Reverses the check and creates a new payable time row to process later.
Note. If you unconfirm a reversal that includes Time and Labor payable time, you must run a process to correct the corresponding payable time rows in Time and Labor.
See Unconfirming Pay.
Pages Used to Reverse Paychecks|
Page Name |
Definition Name |
Navigation |
Usage |
|
RUNCTL_PAY_REV |
|
Define the parameters for the check reversal process. |
|
|
RUNCTL_PAY_REV |
Payroll for North America, Payroll Processing CAN, Reverse/Adjust Paycheques, Reverse/Adjust Paycheques |
Define the parameters for the cheque reversal process. |
|
|
PAY_CHECK_E |
|
View reversed checks. |
Running Paycheck Reversal
Access the Reverse/Adjust Paychecks page (Payroll for North America, Payroll Processing USA, Reverse/Adjust Paychecks, Reverse/Adjust Paychecks; or Payroll for North America, Payroll Processing USF, Reverse/Adjust Paychecks, Reverse/Adjust Paychecks) or the Reverse/Adjust Paycheques page (Payroll for North America, Payroll Processing CAN, Reverse/Adjust Paycheques, Reverse/Adjust Paycheques).
Note. The page is the same for reversals and adjustments.
|
Run Control ID |
For every Reverse/Adjust Paychecks run control you enter, the system sets up a separate off-cycle paysheet page and line. |
|
Company, Pay Group and Pay Period End Date |
The pay period end date corresponds to the on-cycle pay calendar with which you want to process the reversal or reversal/adjustment. Check reversals cannot be run if the pay run ID for the specified pay period end date is blank on the Pay Calendar table. Also, the reversal must be associated with a pay calendar that is not closed for off-cycle processing. |
|
Paycheck Number and Paycheck Issue Date |
If you know the check number and issue date, you can search for the corresponding check to be reversed. |
|
Pay Period End Date, Off Cycle, Page and Line |
If you do not know the check number and issue date, you can locate the check by searching for these values in the fields in the right column. |
|
Separate Check |
If the check to be reversed was issued as a separate check, enter a value here. You can also find the paycheck number and paycheck issue date information either online or off-line: Online: Use the Paycheck Data pages. Off-Line: Refer to your Payroll Register or Payroll Check Register reports. |
|
Reversal |
Select for a check reversal. |
|
Reversal/Adjustment |
Select for a check reversal and an adjustment check. |
|
Delete Reversal/Adjustment |
To delete an unwanted reversal or reversal/adjustment, set up a run control with this option selected and run the Paycheck Reversal/Adjustment process. |
Accounting Period Option
This option applies to commitment accounting only.
|
Original, Current, and Specified |
Select to process the original, current, or a specified accounting period. |
|
Fiscal Year |
This field appears if you select the Specified accounting period option. Select the fiscal year of the specific accounting period that you want to process. |
Time and Labor Option
|
This field becomes visible only if you're processing a reversal without adjustment and the check you're reversing includes payable time from Time and Labor.
See Summary of the Pay Confirmation PSJob Process (PAYCONF). |
Viewing the Effects of Reversal
Access the Paycheck Earnings page (Payroll for North America, Payroll Processing USA, Produce Payroll, Review Paycheck, Paycheck Earnings; or Payroll for North America, Payroll Processing CAN, Produce Payroll, Review Paycheque, Paycheque Earnings; or Payroll for North America, Payroll Processing USF, Produce Payroll, Review Paycheck, Paycheck Earnings).
You can view the effects of the reversal by looking at the original check and the reversed check on the Paycheck Earnings page.
On the reversed check, all of the amounts display as negative numbers, and the message "Calculated Check Reversal" appears in the upper left corner of the first scroll box.
See Pages Used to Review Pay Calculation Results.
If you view the effects of the reversal on any of the Paysheet pages, you will not be able to add or delete any paylines if one of the paylines is a reversal.
If you view the effects of the reversal on any of the Payline pages, you will not be able to add or delete the reversal payline.
See Also
Viewing and Updating Paysheets and Paylines
Running Pay Confirmation
When you're satisfied that the reversal is correct, confirm the reversal by running the Pay Confirmation process.
After confirming the check reversal, you can issue a check for the correct amount.
Warning! When confirming reversals and adjustments, you must use the right side of the Confirm Payroll run control page and select All Reversals/Adjustments. Running reversal and adjustment confirmation from the left side of the Confirm Payroll page results in calculation errors later in the process.
See Also
Viewing Confirmed Reversed Checks
After you run pay confirmation, you can view information, including updated balances, using the Review Paycheck pages in the Payroll Processing menu, and you can run any required reports.
Note. You cannot update paysheet information after pay confirmation has been completed.
Handling Direct Deposit Reversals
Currently, Payroll for North America does not support reversing direct deposit by sending a reverse wire to the bank (with a negative amount to debit the employee's account), even if the reversal was processed in the same payroll run. You must contact the bank directly to stop the payment.
If the Direct Deposit file has not been transmitted to the bank, you could unconfirm the entire payroll, disable the employee's direct deposit data, rerun the payroll calculations, and rerun the confirmation process.
Reissuing the Payment after Stopping Payment at the Bank
If the direct deposit file has been transmitted to the bank, you have already called the bank to stop the payment, and the direct deposit was 100 percent of the employee's funds, you can use one of the following options to reissue the payment to the employee:
Use the Reversal/Adjustment process.
On the adjustment check, disable the direct deposit indicator, then calculate and confirm the check.
Reverse the payment using the Reversal process, and process a manual check or off-cycle check.
Request the Accounts Payable department to reissue the check for the net amount.
Do not process a reversal.
If the direct deposit was a partial direct deposit, you can issue a manual check for the amount of the advice's net pay. Do not process a reversal or process the manual check through payroll. The employees' balances have not changed; you are just giving them the money.
Adjusting Paychecks
This section provides an overview of paycheck adjustment and discusses how to:
Set up the NETPAY deduction code.
Set up to collect negative adjustments.
Run the paycheck reversal process.
Enter adjustment information on the paysheet.
Run pay calculation.
Continue if you owe the employee.
Continue if the employee owes you.
Delete an adjustment payline.
Understanding Paycheck Adjustment
There are two segments to the check adjustment process: a reversal of the incorrectly issued check and an adjustment.
When you adjust a paycheck, there are three possible outcomes:
No change in net pay (such as correction of taxing locality).
The company owes the employee money.
In this situation, the system produces a check for the amount owed.
The employee owes the company money.
In this case, you can put the amount into an arrears balance to be taken out of subsequent paychecks. Or you can attempt to get the money back from the employee by other means.
Use the Reverse/Adjust Paychecks page to both adjust and reverse paychecks.
Note. After being confirmed, adjustment checks cannot be adjusted. The system does not perform adjustments to online checks.
See Also
Determining Whether to Reverse or Adjust a Check
Pages Used to Adjust Paychecks|
Page Name |
Definition Name |
Navigation |
Usage |
|
RUNCTL_PAY_REV |
|
Run the check reversal and adjustment process. |
|
|
RUNCTL_PAY_REV |
Payroll for North America, Payroll Processing CAN, Reverse/Adjust Paycheques, Reverse/Adjust Paycheques |
Run the cheque reversal and adjustment process. |
|
|
PAY_CHECK_E |
|
View adjusted checks. |
Setting Up the NETPAY Deduction Code
To process adjustments, the system uses a special deduction called Net Pay Adjustment with a deduction code of NETPAY. Before processing adjustments, you must set up this deduction code on the Deduction and the General Deduction tables and add it to the Company General Deductions table. You can use the NETPAY deduction that is supplied with the demonstration database as an example.
During the reversal step of the adjustment process, the system reverses the original check, producing a calculated check reversal. It does this by subtracting a NETPAY deduction equal to the employee's net pay on the original check.
See Also
Setting Up to Collect Negative Adjustments
If the adjustment results in the employee owing the organization, you must have set up an adjustment deduction code and a corresponding adjustment earnings code that the system uses to process adjustments of this type.
When you set up the adjustment earnings code, you link it to the corresponding adjustment deduction code through the Payback Deduction Code field on the Earnings Table - Taxes page.
Setting Up an Adjustment Deduction Code
An adjustment deduction code is necessary to process check adjustments for which the employee owes the company money. If you have not already done so, you can set up a generic adjustment deduction code, such as PAYADJ. Alternatively, you can establish several such deduction codes, one for each negative adjustment payback situation you're likely to encounter, but each would require a corresponding adjustment earnings code. For example, if you're adjusting checks that were calculated using the wrong taxing jurisdiction, you could set up a tax adjustment deduction code: TAXADJ.
To set up the adjustment deduction code:
Set up the Deduction table.
On the Deduction Table - Process page, select the Deduction Arrears Allowed check box and enter the appropriate general ledger expense and or liability accounts.
Set up the General Deduction table.
If you use the generic PAYADJ code, the General Deduction table is set by default with the information needed to calculate the payback adjustment deduction.
If you choose to specify your own deduction for this purpose, you must define the code on the General Deduction table with your own calculation routine and specifications.
Set up the Company General Deductions table.
For each company, add each adjustment deduction code in the Deduction Code column.
Setting Up an Adjustment Earnings Code
An adjustment earnings code is necessary to process check adjustments for which the employee owes the company money. Use a suitable code to designate this earnings, such as ADJ.
To set up the adjustment earnings code, use the Earnings and the Earnings Program tables.
Define the earnings code on the Earnings Table - General page:
|
Payment Type |
Select Either Hours or Amount OK. |
|
Effect on FLSA (effect on Fair Labor Standards Act) |
Select None. |
|
Eligible for Retro Pay |
Not used for adjustment earnings. |
Set up the Earnings Table - Taxes Page:
|
Payback Deduction Code |
Enter a deduction code here to link to the earnings code. During the pay calculation process for the paycheck reversal/adjustment, the system creates an arrears balance for this deduction that is equal to the amount of the adjustment. On subsequent payrolls, where the employee is paid, the system attempts to deduct the overpayment from the employee's future check(s) until the entire amount has been collected. |
|
Tax Method |
Select Specified on Paysheet. The system selects the default values from the paysheet. |
|
Earnings |
Select Add to Gross Pay and Maintain Earnings Balances. Deselect all other check boxes. |
|
(USA) U.S. Only |
Clear all fields. This is important, because the adjustment earnings code should not add to any taxable gross fields. |
|
(CAN) Canadian Only |
Clear all fields. This is important, because the adjustment earnings code should not add to any taxable gross fields. |
See Also
Defining Earnings Codes and Earnings Programs
Running the Paycheck Reversal/Adjustment COBOL SQL Process (PSPPYREV)
Access the Reverse/Adjust Paychecks page (Payroll for North America, Payroll Processing USA, Reverse/Adjust Paychecks, Reverse/Adjust Paychecks; or Payroll for North America, Payroll Processing USF, Reverse/Adjust Paychecks, Reverse/Adjust Paychecks) or the Reverse/Adjust Paycheques page (Payroll for North America, Payroll Processing CAN, Reverse/Adjust Paycheques, Reverse/Adjust Paycheques).
It is the same page that you use to run paycheck reversals
If you're adjusting more than one check, add a row for each additional check and then run the process.
See Also
Entering Adjustment Information on the Paysheet
Access the Paysheet page (Payroll for North America, Payroll Processing USA [or CAN], Update Paysheets, By Paysheet, Paysheet ).
When you run the Paycheck Reversal/Adjustment process, the system produces an off-cycle paysheet page. The first paysheet entry appears as a Reversing Adjustment, with all fields unavailable and a net pay of zero (blank).
Use the top scroll area to move to the other system-generated paysheet entry, the Adjustment paysheet. This is where you enter the necessary adjustment information for earnings, deductions, and taxes.
For example, if you forgot to pay the employee for 10 hours of overtime, enter 10 in Overtime Hours; if you taxed her in the wrong taxing jurisdiction, enter the correct state or locality.
Save the paysheet when you finish entering your adjustments.
Running Pay CalculationSet up a run control and run the Pay Calculation process just as you do for your normal payroll calculation.
Your next steps depend on whether you owe the employee or the employee owes you.
See Also
Continuing If You Owe the EmployeeIf you owe the employee money, the system produces a calculated check for the amount that you owe. You can then complete the following steps:
Set up pay confirmation parameters and run the Pay Confirmation process, which updates the employee's balances and assigns a check number.
Print the check.
Continuing If the Employee Owes YouIf the employee owes you money, the following message appears in the Paysheet, Payroll Messages page (assuming there are no other errors):
The net pay calculated for this check is a negative amount.
The Message Data field at the bottom of the page displays a negative amount, which is the amount the system has calculated the employee owes you. The system treats this as an error because it is designed to produce checks for positive or zero amounts. A negative paycheck amount is not valid.
If the employee is still employed, you can get the money back by putting it in an arrears balance and having the system attempt to take it out of the next paycheck. In effect, you "give" the employee the amount she owes by using an adjustment earnings code on the adjustment paysheet. When you run pay calculation, the system converts the earnings to the corresponding payback deduction code.
Here's how you set up the arrears balance to collect the overpayment:
Make sure you have set up the necessary adjustment earnings and adjustment deduction codes.
On the adjustment paysheet, enter the overpayment amount as Other Earnings, using the earnings code you set up for negative adjustments.
Save the paysheet.
Set up off-cycle pay calculation parameters and run the Pay Calculation process.
The system converts the earnings to a deduction (assigning it to the corresponding payback deduction code) and puts the amount the employee owes into an arrears balance to be processed in the next payroll.
Set up off-cycle pay confirmation parameters and run the Pay Confirmation process.
View results on the Review Paycheck pages.
The overpayment is deducted in the next pay cycle.
Deleting an Adjustment PaylineTo delete the adjustment payline of a paysheet that was created with Reversal/Adjustment selected on the Reverse/Adjust Paychecks page:
Run the Pay Unsheet SQR process (PAYUNSHT).
Run the Paycheck Reversal/Adjustment process with Reversal selected.
Reconciling Checks
This section provides overviews of check reconciliation procedures and an example of check reconciliation and lists the pages used to reconcile checks.
Understanding Check Reconciliation Procedures
Payroll for North America has two SQR programs that, together, enable you to reconcile checks. You can see which paychecks employees have cashed and which are outstanding. You're alerted to checks the bank cashed for an amount other than the amount that your records show.
To reconcile checks:
From your bank, get a file on magnetic media showing cashed payroll checks and copy it to C:\TEMP\BANKFILE.TRN.
Run the Check Reconciliation (PAY015A) process.
Run the Check Reconciliation Report (PAY015B).
Review the reports generated by the SQRs.
These steps are further explained in the following sections.
To use the check reconciliation feature, you need to get a magnetic media file from your bank showing which payroll checks they've cashed.
Payroll for North America accepts Bank files in the following format:
|
Bank File |
Number of positions |
|
Transit# |
9 positions |
|
Account# |
15 positions |
|
Check# |
15 positions; numeric |
|
Net Pay |
10 positions; numeric; implied decimal point |
You can adapt the sample PeopleSoft SQR programs to accommodate a Bank file with a different format. The SQR must match the record layout of the Bank file.
Payroll for North America reads this Bank file and attempts to reconcile each check against the check information in your payroll database. In addition, the system verifies its own file of unprocessed manual checks to see if they've been entered into the system since the last time you ran the check reconciliation process.
The two check reconciliation SQR programs are called Check Reconciliation (PAY015A) and Check Reconciliation Report (PAY015B).
Identifying Checks with PAY015A
PAY015A identifies all system-produced and manual checks that are processed for a given pay run ID, attempting to match these checks with the Bank file. It writes entries for each cashed, reversed, or outstanding check into a temporary Check Reconciliation file on the database.
The system assumes that checks for which no match is found on the database are unprocessed manual checks, that is, cashed manual checks that haven't yet been entered into the system. The program places these in an Unprocessed Manual Checks file.
The Error Listing report that is produced by PAY015A shows checks with the wrong net amount, checks flagged as already having been cashed, and checks flagged as having been reversed.
The PAY015A process identifies:
All computer and manual checks, including check reversals, that the system processed during the current payroll periods for a given pay run ID.
All outstanding checks—all checks that are confirmed, are not reversing entries, and are not yet cashed.
All unprocessed manual checks.
It inserts one entry for each check type into the temporary Check Reconciliation file.
Note. (CAN) For Canadian reports, the three-digit bank ID is reported in the Bank Transit Number field.
Note. You must adjust the Process-Bank-File in PAY015A to match the record layout of the file from your bank. Your requirements could be different, and the SQR must be modified.
Producing Check Reconciliation Reports with PAY015B
After you run PAY015A, run PAY015B to produce a Check Reconciliation Report listing the entries in the Check Reconciliation file produced by PAY015A. The report provides totals for item count and net pay, and is divided into sections by the following types:
Issued Checks (Computer).
Checks Reconciled From Bank Checks File.
Outstanding Checks.
Unprocessed Manual Checks.
Reversed Checks.
Understanding an Example of Check Reconciliation
Here's an example to illustrate the check reconciliation procedures.
Paycheck Files (PS_PAY_CHECK)
Suppose your last payroll run contained six checks, which are on the database in the Paycheck file:
|
Check # |
Date |
Amount |
Remarks |
|
1 |
December 31, 2004 |
100 |
Normal |
|
2 |
December 31, 2004 |
150 |
Normal |
|
3 |
December 31, 2004 |
175 |
Normal |
|
4 |
December 31, 2004 |
200 |
Normal |
|
5 |
December 31, 2004 |
250 |
Reversed |
|
99 |
December 25, 2004 |
125 |
Manual |
Checks 1-4 are normal on-cycle paychecks. Number 5 is a check that's been reversed. Check 99 is a manual check that you wrote earlier in the month and decided to process with your on-cycle end-of-month payroll. You've handed these checks (except #5) out to employees, some of whom have cashed them.
Bank File
You subsequently receive the Bank file from your bank listing cashed checks drawn against your payroll account:
|
Check # |
Date |
Amount |
|
|
1 |
December 31, 2004 |
100 USD |
|
|
2 |
December 31, 2004 |
150 USD |
|
|
3 |
December 31, 2004 |
145 USD |
|
|
101 |
December 31, 2004 |
200 USD |
|
Unprocessed Manual Check File (PS_PAY_CHECK_DUE)
Meanwhile, your Unprocessed Manual Check file contains one item:
|
Check # |
Date |
Amount |
|
|
99 |
December 15, 2004 |
125 USD |
|
The last time you ran Check Reconciliation, check #99 was listed in the Bank file, but not in your Paycheck file. The program consequently put it into the Unprocessed Manual Check file.
Run the SQRs
With this information, you can run the SQRs.
Note. Procedures for running these programs might vary, depending on your database platform environment. If in doubt, ask your systems administrator for detailed instructions.
Error Report (from PAY015A)
PAY015A produces an Error Report flagging Check #3, because the amount is different:
|
Check # |
Date |
Amount |
|
|
3 |
December 31, 2004 |
145 USD |
|
Check Reconciliation Files (from PAY015B)
When you print the Check Reconciliation Report with PAY015B, you see that three checks have been cashed, one is outstanding, and one is a reversed check:
|
Check # |
Date |
Amount |
|
|
1 |
December 31, 2004 |
100 USD |
Cashed |
|
2 |
December 31, 2004 |
150 USD |
Cashed |
|
4 |
December 31, 2004 |
200 USD |
Outstanding |
|
5 |
December 31, 2004 |
250 USD |
Reversed |
|
99 |
December 15, 2004 |
125 USD |
Cashed |
Unprocessed Manual Check Files (PS_PAY_CHECK_DUE)
You end up with five reconciled checks, one error, and one check in the Unprocessed Manual Check file:
|
Check # |
Date |
Amount |
|
|
101 |
December 15, 2004 |
200 USD |
|
Here's a summary:
Checks #1 and #2 are put in the Check Reconciliation file, because their Bank file entries match their Paycheck file entries.
Check #3 doesn't match on the Bank file and Paycheck file; the amounts were different, so this check gets put on the Error Listing.
Check #4 in the Paycheck file isn't listed on the Bank file, so presumably the employee hasn't cashed it yet. It goes in the Check Reconciliation file as an outstanding check.
Check #5 is a reversed check that never made it to the bank; the system places it into the Check Reconciliation file as a reversed check.
Check #99, which had been sitting in the Unprocessed Manual Check file, is put in the Check Reconciliation file, because it matches Check #99 in the Paycheck file.
Check #101, the one check in the Bank file that isn't in the Paycheck file, gets put in the Unprocessed Manual Check file. When you enter it into Payroll for North America, it's reconciled against the Paycheck file.
Pages Used to Reconcile Checks|
Page Name |
Definition Name |
Navigation |
Usage |
|
RUNCTL_PAYINIT2 |
|
Use this page to run the PAY015A process that reconciles the checks cleared at your financial institution. |
|
|
RUNCTL_PAYINIT |
Payroll for North America, Periodic Payroll Events CAN, Cheque Reconciliation, Request Reconciliation, Cheque Reconciliation |
Use this page to run the PAY015A process that reconciles the checks cleared at your financial institution. |
|
|
PRCSRUNCNTL |
|
Generate the PAY015B report that lists the entries in the temporary Check Reconciliation file. |
|
|
PRCSRUNCNTL |
Payroll for North America, Periodic Payroll Events CAN, Cheque Reconciliation, Reconciliation Report, Cheque Reconciliation Report |
Generate the PAY015B report that lists the entries in the temporary Check Reconciliation file. |
Reprinting Checks
This section provides overviews of reprinting checks and check numbers in the reprint process and discusses how to:
Run the Check Reprint COBOL SQL process (PSPRPRNT).
Reprint checks.
View reprinted checks.
Understanding Reprinting Checks
Occasionally you may need to reprint one or more checks. Some checks may be damaged. The Check Reprint process reassigns the check numbers that were allocated during the Pay Confirmation process so that you may reprint them if necessary.
Suppose you've confirmed a payroll run and are trying to print a run of 15 checks numbered 100082—100096. The printer prints the first three checks, destroys the next five, and then shuts down. Here are the results of the initial print run:
|
Check Number |
Check Status |
|
100082 |
Printed OK |
|
100083 |
Printed OK |
|
100084 |
Printed OK |
|
100085 |
Destroyed |
|
100086 |
Destroyed |
|
100087 |
Destroyed |
|
100088 |
Destroyed |
|
100089 |
Destroyed |
|
100090 |
Not yet printed |
|
100091 |
Not yet printed |
|
100092 |
Not yet printed |
|
100093 |
Not yet printed |
|
100094 |
Not yet printed |
|
100095 |
Not yet printed |
|
100096 |
Not yet printed |
Here's how you reprint the checks:
Run the Check Reprint process.
In this example, the first check is # 100085 and the last check # is 100096.
The Check Reprint process moves the ruined checks into the Dead Paycheck file.
(Optional) View the ruined checks on the Dead Paychecks page.
Reprint the check.
Select the appropriate U.S. or Canadian print method and process.
When you set up the run control, enter a starting check/advice number on the run parameters page. In this example, you enter 100085, because that's where you want the system to start reassigning check numbers.
View reprinted checks.
Understanding Check Numbers in the Reprint Process
Let's examine how the system processes check numbers in the Check Reprint process. You can compare your original and after-reprint Payroll Check Registers to extract this same information, but let's look at the situation from a different viewpoint. Here are the results of running the Check Reprint process and reprinting the checks.
|
After Confirmation and First Print Run |
|
After Running Reprint Job and Second Print Run |
|
|
Check Number |
Check status |
Check Number |
Check status |
|
100082 |
Printed OK |
100082 |
Already printed |
|
100083 |
Printed OK |
100083 |
Already printed |
|
100084 |
Printed OK |
100084 |
Already printed |
|
100085 |
Destroyed |
100093 |
Dead |
|
100086 |
Destroyed |
100094 |
Dead |
|
100087 |
Destroyed |
100095 |
Dead |
|
100088 |
Destroyed |
100096 |
Dead |
|
100089 |
Destroyed |
100097 |
Dead |
|
100090 |
Not yet printed |
100098 |
Printed OK (Restart printing here) |
|
100091 |
Not yet printed |
100099 |
Printed OK |
|
100092 |
Not yet printed |
100100 |
Printed OK |
|
100093 |
Not yet printed |
100101 |
Printed OK |
|
100094 |
Not yet printed |
100102 |
Printed OK |
|
100095 |
Not yet printed |
100103 |
Printed OK |
|
100096 |
Not yet printed |
100104 |
Printed OK |
|
|
|
100090 |
Dead—Used for Form Alignment |
|
|
|
100091 |
Dead—Used for Form Alignment |
|
|
|
100092 |
Dead—Used for Form Alignment |
This chart shows that the initial print run left checks 100082−100084 printed, checks 100085−100089 destroyed, and checks 100090−100096 unprinted. We then set up a Reprint Checks run control, ran the Check Reprint process, and printed replacements for the destroyed checks, and the checks that hadn't yet been printed.
When we ran the Check Reprint process, the system put the destroyed checks into the Dead Paycheck file. It then continued with the next number, 100090, and assigned numbers through to number 100104. At that point the system took the next available numbers, 100090−100092, and used them for the three form alignment checks we had specified; these were also pronounced dead and put into the Dead Paycheck file. Finally, the system started with the next available number, 100093, and assigned replacement numbers for the five checks that had been destroyed in the initial print run, and the checks that had not yet been printed.
Pages Used to Reprint Checks|
Page Name |
Definition Name |
Navigation |
Usage |
|
RUNCTL_PAY_REPRINT |
|
Set the check ranges and run the Check Reprint process. |
|
|
RUNCTL_PAY_REPRINT |
Payroll for North America, Payroll Processing CAN, Produce Cheques, Reprint Cheques, Reprint Cheques |
Set the check ranges and run the Cheque Reprint process. |
|
|
PAY_CHECKS_DEAD |
|
View dead check numbers and the reasons. |
|
|
Print Pay Checks |
RUNCTL_CHK_ADV1 |
|
Print U.S. paychecks by the SQR method using the Pay Check Print - US SQR process (PAY003). |
|
Print Pay Cheques |
RUNCTL_CHK_ADV |
Payroll for North America, Payroll Processing CAN, Produce Cheques, Print Pay Cheques, Print Pay Cheques |
Print Canadian paycheques by the SQR method using the Pay Cheque Print - Canada SQR process (PAY003CN). |
|
Create PDF Paychecks |
RUNCTL_CHK_ADV1_EP |
|
Create U.S. paychecks in PDF for printing and self-service viewing using the Print US Checks PSJob process (PYCHKUSA). |
|
Create PDF Paycheques |
RUNCTL_CHK_ADV_EP |
Payroll for North America, Payroll Processing CAN, Produce Cheques, Create PDF Paycheques, Create PDF Paycheques |
Create Canadian paycheques in PDF for printing and self-service viewing using the Print Canadian Cheques process (PYCHQCAN). |
|
Paycheck Earnings |
PAY_CHECK_E |
|
View reprinted checks. |
|
Paycheque Earnings |
PAY_CHECK_E |
Payroll for North America, Payroll Processing CAN, Produce Payroll, Review Paycheque, Paycheque Earnings |
View reprinted cheques. |
Running the Check Reprint COBOL SQL Process (PSPRPRNT)
Access the Reprint Checks page (Payroll for North America, Payroll Processing USA, Produce Checks, Reprint Checks, Reprint Checks; or Payroll for North America, Payroll Processing USF, Produce Checks, Reprint Checks, Reprint Checks) or the Reprint Cheques page (Payroll for North America, Payroll Processing CAN, Produce Cheques, Reprint Cheques, Reprint Cheques).
|
Form ID |
Enter the ID for the type of form that you want reprinted, in this case, select the appropriate form ID. |
|
Form Alignment Count |
Indicate how many checks you need for manually aligning the check forms in your printer. These check numbers are inserted into the Dead Paychecks file. |
|
Reprint Range |
Enter the first check number and the last check number in the reprint range of the checks you're reprinting. |
|
Paycheck Issue Date |
This should be the same as the date on the original check run. If you need to reprint checks for different dates, you must run the Check Reprint process separately for each different date. |
Reprint Checks
After running the Check Reprint process, you can reprint the checks as you normally print checks, by running the correct print process for the applicable country and method of printing.
See Understanding Printing Processes.
When you set up the run control, enter a starting check/advice number on the run parameters page.
Note. You also need to reset the check number in the Form table to the number of the first undamaged check form.
See Setting Up the Form Table for Printing Checks and Direct Deposit Advices.
Viewing Reprinted Checks
Access the Paycheck Earnings page (Payroll for North America, Payroll Processing USA, Produce Payroll, Review Paycheck, Paycheck Earnings; or Payroll for North America, Payroll Processing USF, Produce Payroll, Review Paycheck, Paycheck Earnings) or the Paycheque Earnings page (Payroll for North America, Payroll Processing CAN, Produce Payroll, Review Paycheque, Paycheque Earnings).
Note. The system selects the Reprint check box to indicate that the check was issued as a replacement.