| Oracle® Fusion Middleware Tutorials for Oracle WebLogic Portal 10g Release 3 (10.3.4) Part Number E14252-02 |
|
|
View PDF |
| Oracle® Fusion Middleware Tutorials for Oracle WebLogic Portal 10g Release 3 (10.3.4) Part Number E14252-02 |
|
|
View PDF |
This tutorial helps you learn how to create a portal and portlets using WebLogic Portal in the Oracle Enterprise Pack for Eclipse workbench.
For more information about each dialog of the wizards used in this chapter, see the Oracle Fusion Middleware Portal Development Guide for Oracle WebLogic Portal.
The tasks described in this chapter are based on those described in Chapter 2, so it is important that you complete that tutorial before starting the tasks described here.
Using the tutorial, you will create a portal and two portlets, create an additional page for the portal, and then place the portlets onto a page of the portal.
The tutorial includes instructions on how to perform these tasks:
In this task, you will create a portal for the project that you created in Section 2.2.4, "Create a Portal Web Project."
To create a portal:
Start Oracle Enterprise Pack for Eclipse (the IDE). You can run the executable file <MW_HOME>/oepe_11gR1PS1/eclipse/eclipse.exe. On Windows, you can also start the IDE from the Start menu by selecting Start > All Programs > Oracle WebLogic > Eclipse for WebLogic 10.3.4.
In Oracle Enterprise Pack for Eclipse, if the Portal perspective is not already open, select Window > Open Perspective > Portal.
Using the Portal perspective is optional, but the instructions and figures in this tutorial are based on the views that are available in the Portal perspective.
Navigate to the myPortalWebProject/WebContent directory, right-click WebContent, and then select New > Portal.
In the New Portal dialog, in the File name field, enter myPortal. (Figure 3-1)
A file type of .portal is required for portals; you can type the .portal extension to the portal's name if you wish, but WebLogic Portal automatically adds the extension if you don't enter it.
Note:
Because you opened the New Portal dialog by right-clicking theWebContent directory, the parent folder field automatically displays that directory name.
As a best practice, you should locate your portal file in a web content directory that is subordinate to the web project directory. The default web content directory name is WebContent, and is assigned when you use the Portal Web Project Wizard. You can change the name of your web content directory if you wish. For more information, see the Oracle Fusion Middleware Portal Development Guide for Oracle WebLogic Portal.
Click Finish.
The wizard adds myPortal.portal to the WebContent folder in the Portal web project and a view of the portal displays in the Portal editor, as shown in Figure 3-2.
Figure 3-2 Portal Displayed in the Portal Editor
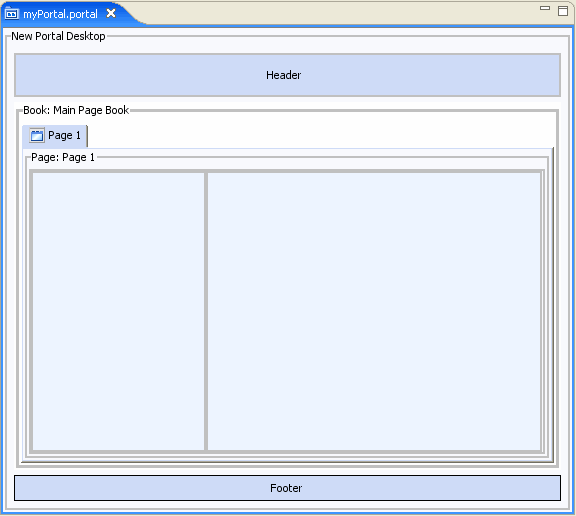
The created portal includes a desktop, header, footer, book, and page. A desktop is a user-specific view of the portal content. A portal can support many desktops. A single portal might support an employee-specific desktop, a customer-specific desktop, and others, where each desktop exposes different kinds of content to different sets of users. Any part of a portal can be included or excluded from a desktop, including a book, a page, a specific application, or an individual link.
Desktops can also define the look and feel attributes of a portal. Desktops can be associated with a particular skin that defines the color scheme, fonts, and images used. Desktops also contain a header and footer—you can place images, text, or any web content in these areas to give consistency to the look and feel of a desktop.
You use books to organize your content and navigation in a hierarchical manner. Books can contain other books or pages. In a browser, a book is rendered as a set of tabs or links. Each portal contains a main book called, by default, "Main Page Book." A page consists of a set of columns and/or windows that organize the actual content of your portal. You navigate to a page by clicking an individual tab or a link.
In this task, you will add a second page to the portal's main book. When the portal is rendered in a browser, the two pages will appear as two clickable tabs. You add a new page by dragging and dropping the new page into the main work area. You will also set properties on the new page using the Properties view.
To add a new portal page:
In the Design Palette view, from the Portal Editor Controls, drag the Page icon to the area directly to the right of the Page 1 tab. Figure 3-3 shows the result when you release the mouse button.
Tip:
If you do not see the Design Palette tab, select Window > Show View > Design Palette.Figure 3-3 Adding a Page to a Portal in the Workbench
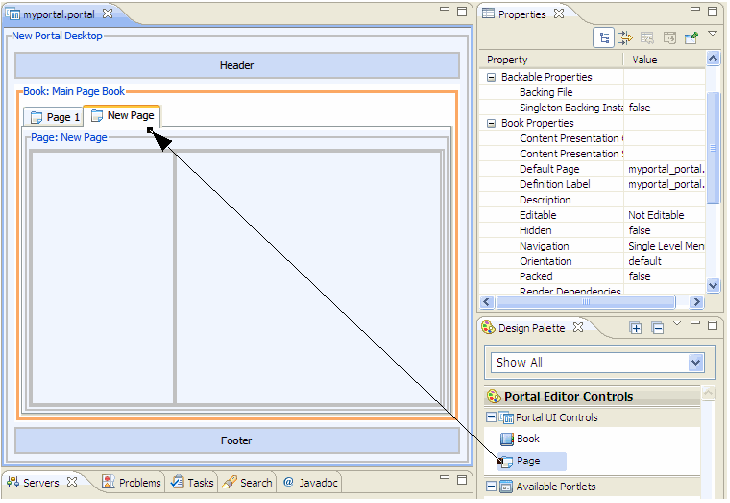
The new page has a default title of New Page. To change the title, click the New Page tab to select it.
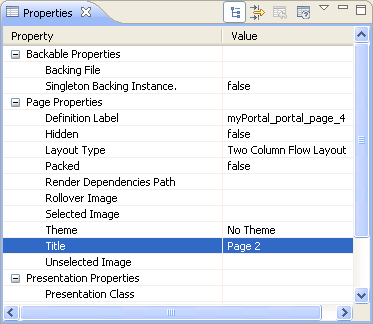
In the Properties view, for the Title property, enter Page 2, as shown in Figure 3-4.
The editor shows that the title has changed from New Page to Page 2.
Figure 3-4 Changing a Page Title in the Portal Properties View
Save your changes.
This portal isn't very interesting yet, but as a quick test, you will deploy your new portal to the server and view it in a browser window that is contained within Oracle Enterprise Pack for Eclipse.
To deploy a portal:
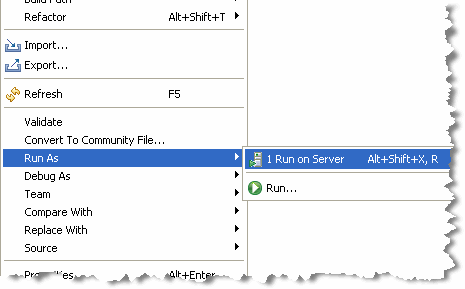
Right-click myPortal.portal in the Package Explorer view and select Run As > Run on Server, as shown in Figure 3-5.
Figure 3-5 Selecting to Run the Portal on the Server
In the Run On Server dialog, make sure the server that you created during the previous WebLogic Portal tutorial task is highlighted.
Tip:
When you select Run On Server, the portal web application is automatically published. Publishing involves copying project files, such as resource and configuration files, to the correct location for the server to locate and use them. Oracle Enterprise Pack for Eclipse detects whenever a file changes that requires republishing. When this happens, the state of the server changes to Republish. (You can see this reflected in the Servers view.) To republish the application, you can right-click the server in the Servers view and select Publish, select the Publish icon, or select the portal in the Project view and pick Run As > Run On Server.Click Finish to begin the deployment process.
Wait while Oracle Enterprise Pack for Eclipse starts the server, deploys files to the server, and runs the application. While deployment is in process, you can view status messages in the status bar at the bottom of the window.
The results appear in a new tab in the editor view, as shown in Figure 3-6.
Figure 3-6 Portal Display in the Workbench Editor View

Leave this new tab open; after you add portlets you will refresh this display to view them.
Tip:
You can choose to always use an external web browser to view your portal if you wish. To do so, select Window > Preferences and select General > Web Browser in the property tree; then select the Use external Web browser radio button and select a browser type from the list. If no browsers appear in the list, you can search for available browsers and add them to the list.In this task, you will create two portlets: a Browser URL portlet and a simple JSP portlet.
To organize your portlets, it's a good idea to store them in a subfolder in your web content directory.
To create a portlet folder:
Under your portal web project directory, right-click the WebContent directory and select New > Folder.
In the New Folder dialog, enter the folder name portlets, as shown in Figure 3-7.
Click Finish.
Browser portlets, also called Content URL portlets, are basically HTML portlets that use URLs to retrieve their content. Unlike other portlet types that are limited to displaying data contained within the portal project, browser portlets can display URL content that is outside the portal project.
To create a browser portlet:
In Package Explorer, under the WebContent directory of your portal web project directory, right-click the newly created portlets folder and select New > Portlet.
In the New Portlet dialog, enter myBrowserPortlet as the name of the portlet. (Figure 3-8)
In the New Portlet dialog, note that the portlets folder is automatically displayed as selected in the parent folder list. The Finish button is initially disabled; the button gets enabled when you select a valid parent folder and type a portlet name. If you select an invalid portal project in the folder tree on this dialog, an error message appears in the status area near the top of the dialog explaining that the project is not a valid portal project.
Click Next.
In the Portlet Wizard, on the Select Portlet Type page, click Browser (URL) Portlet and then click Next.
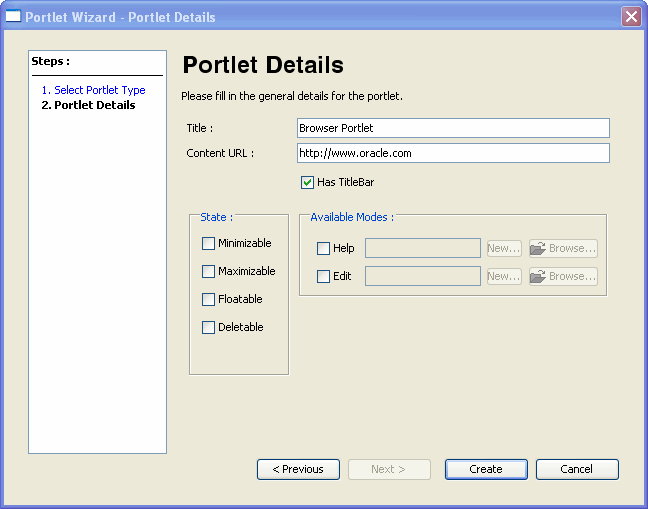
On the Portlet Details page (Figure 3-9), specify the details for your portlet, using Table 3-1 as a guide.
Table 3-1 Portlet Wizard - Browser Portlet Data Entry Fields
| Field | Value/Description |
|---|---|
|
Title |
Browser Portlet This value appears in the title bar of the portlet in the editor view of the Oracle Enterprise Pack for Eclipse workbench. |
|
Content URL |
http://www.oracle.com This is the value for the Content URL (external URL) that the portlet should use to retrieve its information. |
|
Has TitleBar |
Leave the box checked. In order for a portlet to have changeable states or modes, the portlet must have a title bar. |
|
State |
Select all four checkboxes: Minimizable, Maximizable, Floatable, and Deleteable. |
|
Available Modes |
Leave these fields blank. |
Figure 3-9 Creating a Browser URL Portlet - Portlet Details Dialog
Click Create.
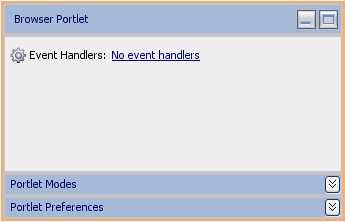
The Oracle Enterprise Pack for Eclipse window updates, adding the myBrowserPortlet.portlet file to the portlets folder and displaying the new portlet in the editor, as shown in Figure 3-10.
Figure 3-10 New Browser Portlet Displayed in Editor
JSP portlets reference JSP files. In most cases you can reuse existing JSP files to build portlets from them. JSP portlets are recommended when the portlet is simple and does not require the implementation of complex business logic.
In this task, you will create a simple JSP file and then use that file to generate a portlet.
To create a JSP portlet:
In Package Explorer, under the WebContent directory of your portal web project directory, right-click the portlets folder and select New > Portlet.
In the New Portlet dialog, ensure the WebContent/portlets folder is selected.
In the File name field, enter jsp_portlet.
Click Next.
In the Portlet Wizard, on the Select Portlet Type page, select JSP/HTML Portlet, and click Next. (Figure 3-11)
On the Portlet Details page (Figure 3-12), enter the values described in Table 3-2.
Table 3-2 Portlet Wizard - JSP Portlet Data Entry Fields
| Field | Value/Description |
|---|---|
|
Title |
Simple JSP Portlet |
|
Content Path |
WebLogic Portal automatically fills in this value. |
|
Has Titlebar |
Leave this box checked. |
|
State |
Select the Minimizable and Maximizable checkboxes. |
Click Create.
Locate the jsp_portlet.jsp file. It will be in the WebContent/portlets/jsp_portlet folder. Double-click the file to open it in the editor.
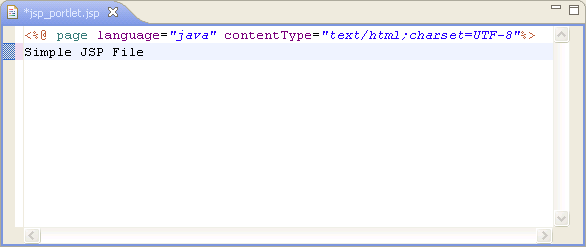
Replace the default text in the file with Simple JSP File, as shown in Figure 3-13.
Figure 3-13 JSP File Showing Edited Body Text
Save the JSP file.
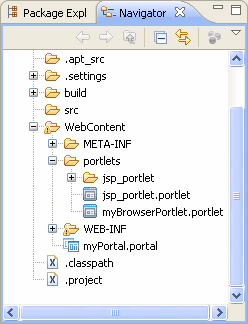
Checkpoint: Your WebContent directory should look like the example shown in Figure 3-14.
Figure 3-14 WebContent Directory Including Portal, Browser Portlet, and JSP Portlet
In this task, you will add your new portlets to the portal and view your changes.
To add portlets to a portal:
In the editor view, click the myPortal.portal tab.
If the tab is not open, double-click myPortal.portal under the WebContent directory of your portal web project directory in the Package Explorer view.
Click the Page 1 tab in the portal to open it.
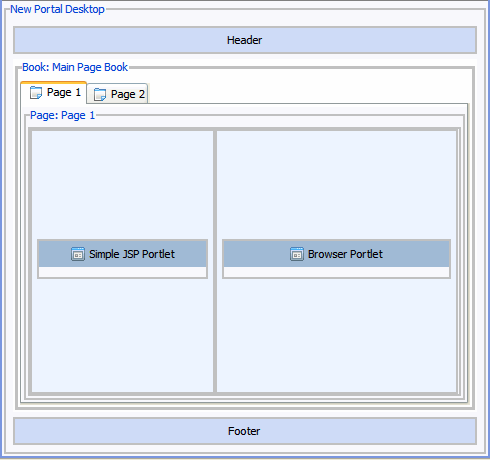
Drag the JSP portlet (with the file name jsp_portlet.portlet) onto the left column (placeholder) of the portal page. The jsp_portlet.portlet file is available in the WebContent/portlets directory.
Drag the Browser URL portlet (with the file name myBrowserPortlet.portlet) onto the right placeholder of the portal page. This portlet file is available in the WebContent/portlets directory.
Your result should look like the example in Figure 3-15.
Figure 3-15 Portal in Editor View with Portlets Added
Save your changes.
To view the new portlets in a browser:
Click the New Portal Desktop tab in the editor view. (This is the tab in which the live portal was displayed according to the instructions in Section 3.2.3, "Deploy and View Your New Portal.")
If the tab is hidden, click the >> button on the toolbar.
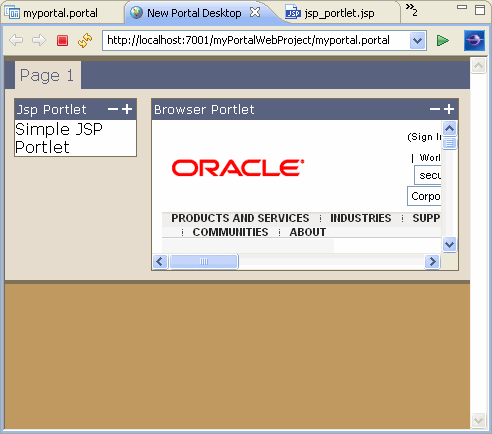
Click the Refresh icon on the browser toolbar to reload the page.
Because your change does not require redeploying the change to the server, you do not need to select the Run on Server option to see the new portlets.
Your updated portal should look like the example shown in Figure 3-16.
Figure 3-16 Running Portal with Browser Portlet and JSP Portlet Added
With the completion of this tutorial, you have created a portal, added a portal page, and created two new portlets that can be displayed in the portal. These components are created on your file system in your current workspace.
To learn about creating desktops using the WebLogic Portal Administration console, continue to Chapter 4.