| Oracle® Argus Insight Installation Guide Release 7.0.1 E28479-01 |
|
|
PDF · Mobi · ePub |
| Oracle® Argus Insight Installation Guide Release 7.0.1 E28479-01 |
|
|
PDF · Mobi · ePub |
This chapter describes how to configure the BusinessObjects XI (BOXI) environment. You must configure the BusinessObjects XI environment in the order specified in this guide.
This chapter includes the following topics:
If you are using Cognos 8 instead of BusinessObjects XI, see Chapter 6 for information about configuring the Cognos 8 environment for Argus Insight.
Before attempting to configure the BusinessObjects environment, verify that you have installed all required hardware and software. For more information, see Section 1.2, "Software and Hardware Requirements."
In addition, if you are using the 64-bit version of Internet Information Services 7 (IIS 7), you must ensure that:
ASP.NET is enabled.
The IIS advanced setting Enable 32-bit Applications is set to True.
The IIS advanced setting .NET Application Pool is set to Classic mode.
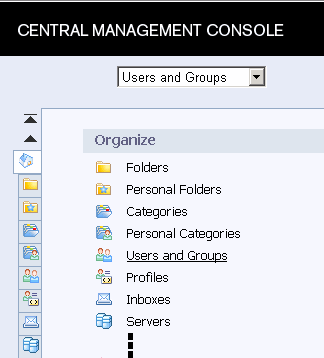
Before importing the repository, you must delete all the objects in the Argus Insight folder and its corresponding universe and groups. To access the Argus Insight folder, log on to the Central Management Console on the BusinessObjects Server and click Folders/All Folders.
To import the repository:
Determine if you need to copy the Repository.biar file:
If BusinessObjects and Argus Insight use the same server, you do not need to copy the Repository.biar file. You can skip this step.
If BusinessObjects and Argus Insight use different servers, copy the Repository.biar file from this location:
Argus_Insight_Web_Server_Location\\OracleArgusInsight\BOXI Repository\
Paste the file on the BusinessObjects Server.
Click Start.
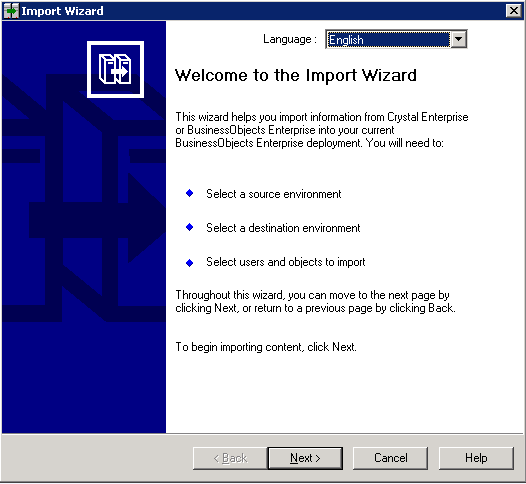
Navigate to All Programs, BusinessObjects XI Release 3.1, BusinessObjects Enterprise, and then select Import Wizard. The Welcome screen for the Import Wizard opens.
Click Next to begin importing content. The Source environment dialog box opens. 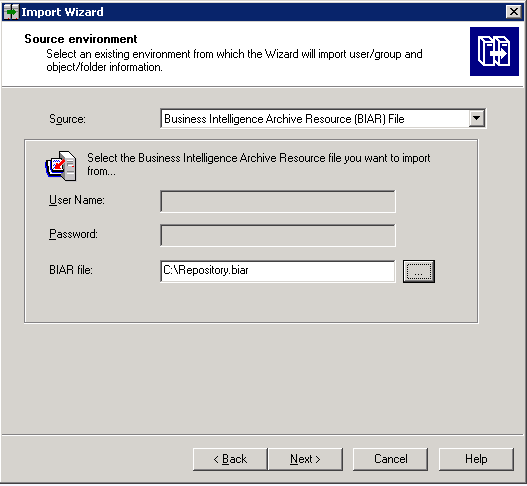
In the Source field, select Business Intelligence Archive Resource (BIAR) File.
In the BIAR file field, browse to the location of the Business Intelligence Archive Resource file that you are using as the source.
Click Next. The Destination environment dialog box opens.
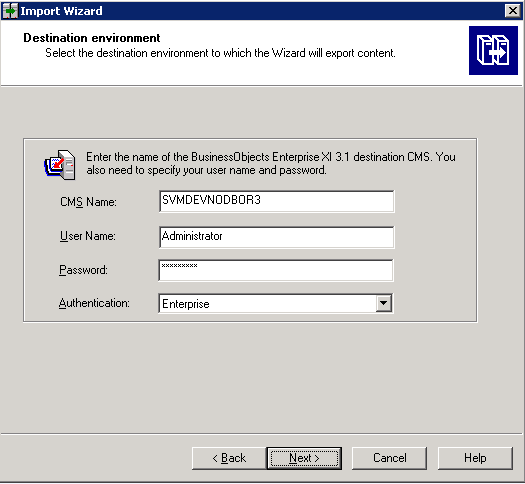
In the CMS Name field, enter the name of the BusinessObjects Server.
In the User Name field, enter Administrator.
In the Password field, enter the corresponding password for the specified user.
Click Next. The Import Wizard begins the load process and displays a progress status bar. When done with this process, the wizard opens the Select objects to import dialog box.
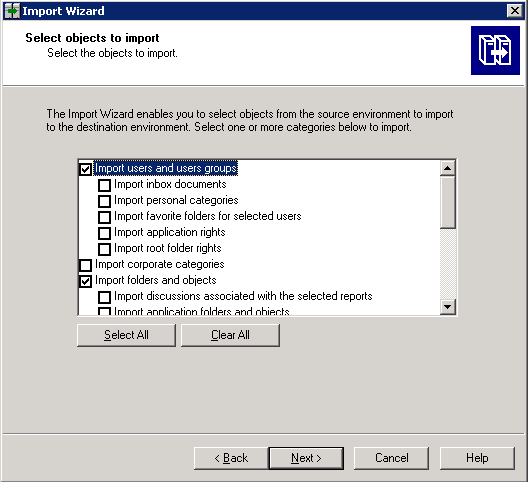
Scroll through the list and select the following check boxes:
Import users and users groups
Import folders and objects
Import universes
Click Next. The Import scenario dialog box opens.
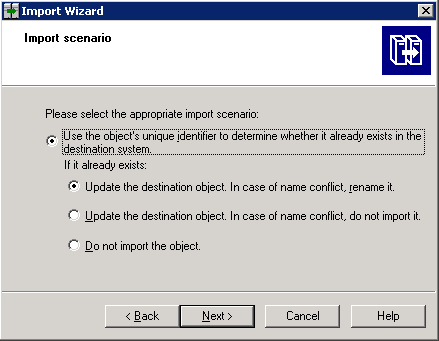
Select how you want the system to process objects that already exist in the destination system.
Click Next. The Incremental import dialog box opens.
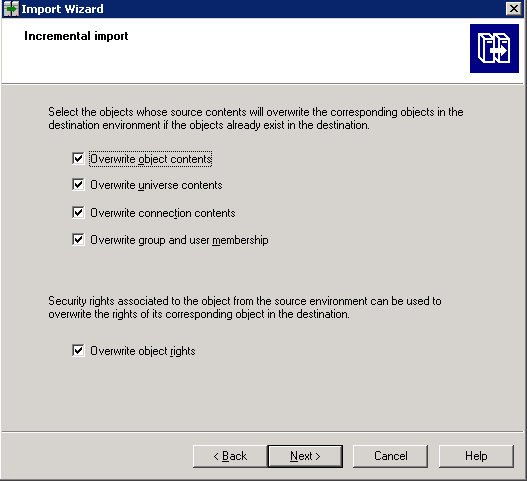
Select all check boxes.
Click Next. The Users and groups dialog box opens.

Note:
The appearance of the preceding dialog box depends on the environment and on the BusinessObjects Server configuration for your system.Select the users and groups you want to import.
Click Next.
Set the custom access levels.
Click Next. The Folders and objects dialog box opens.
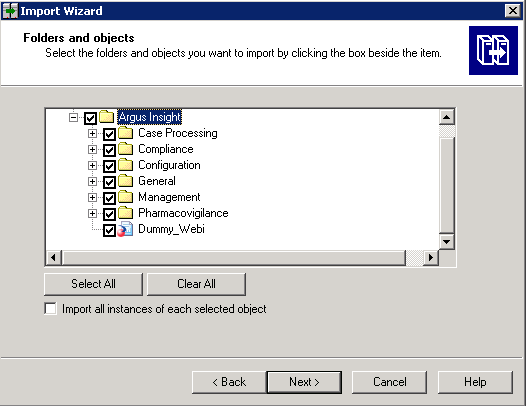
Select the folders and objects you want to import.
Click Next. The Import options for universes and connections dialog box opens.
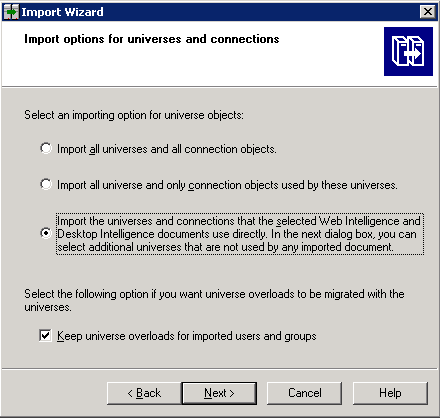
Select the appropriate options as shown in the previous illustration.
Click Next. The Universe folder and universes dialog box opens.
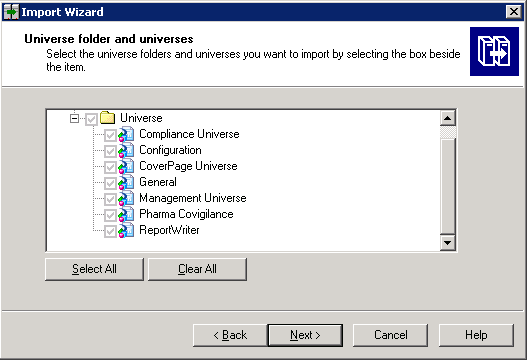
Click Clear All.
Select the check box for the root Universe folder.
Click Next. The Import options for publications dialog box opens.
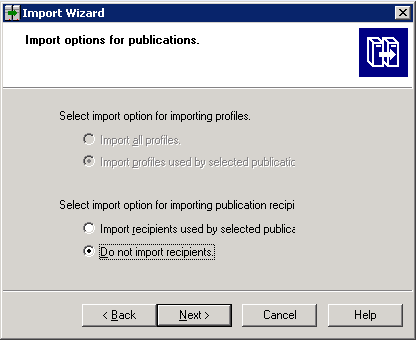
Select Do not import recipients.
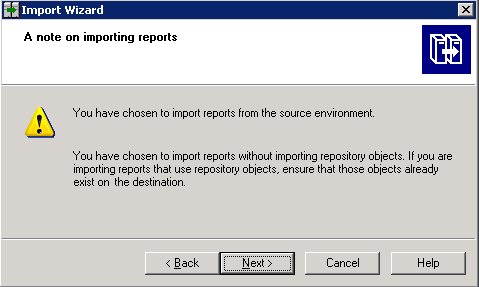
Click Next. The system displays a message that you have chosen to import reports from the source environment without importing the repository objects. If you are importing reports that use repository objects, you must ensure that those objects already exist on the destination.
Click Next. The Ready to import dialog box opens.
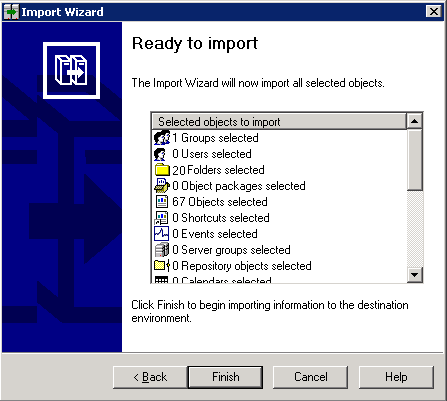
Click Finish to begin importing information to the destination environment. The system opens the Import Progress dialog box and updates the screen with status information during the import process.
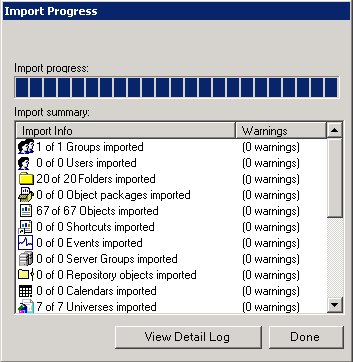
When the import is complete, you can:
Click View Detail Log for more information about the import.
Click Done to close the dialog box.
The sections describes the following tasks that you must complete to configure the BusinessObjects Server:
If the BusinessObjects application uses a different server from the Argus Insight application, you must update the TNSNAMES.ora file as follows:
Copy the PRMART TNS entry from the Argus Insight Web Server.
Paste the entry into the TNSNAMES.ora file on the BusinessObjects Server.
If both applications use the same server and Oracle client, no modifications to the TNSNAMES.ora file are required.
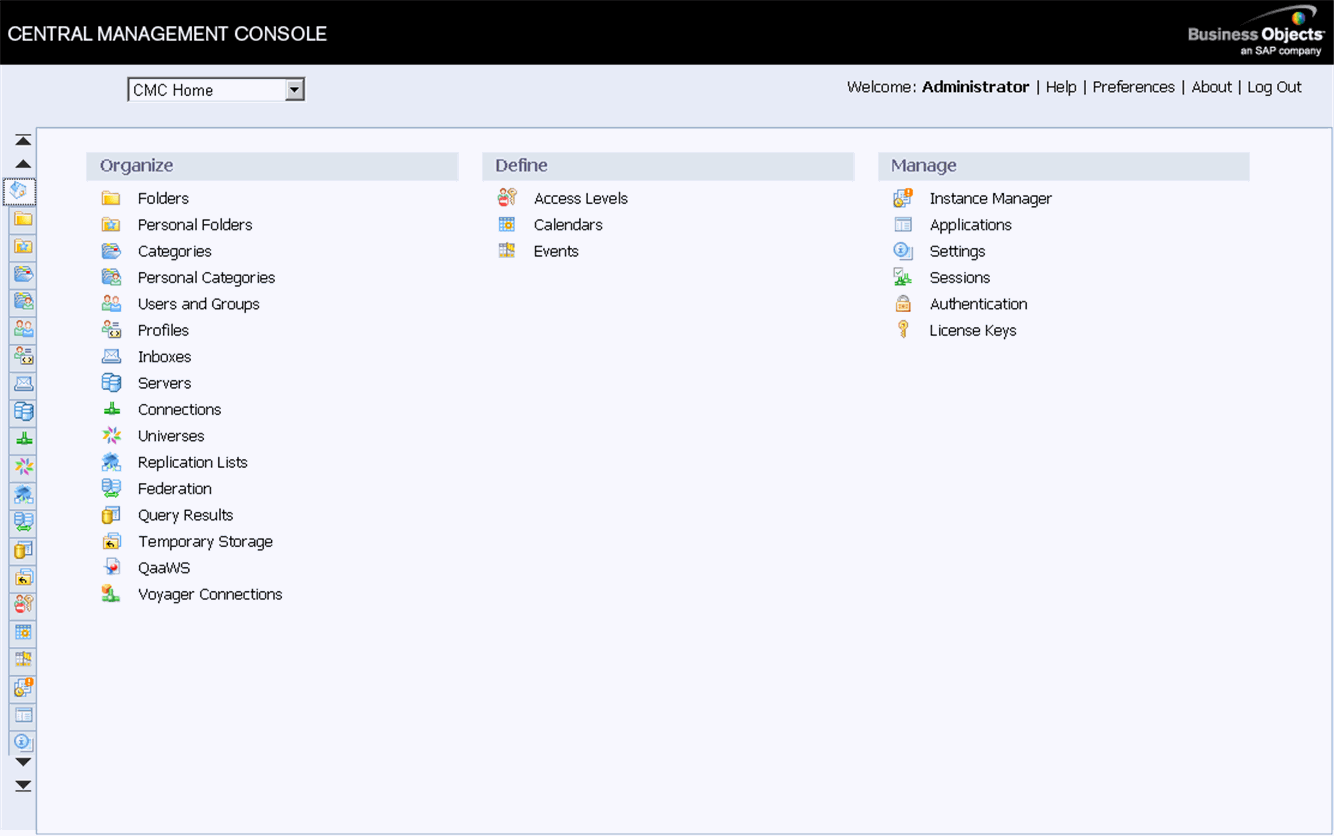
To log on to the Central Management Console on the BusinessObjects Server:
Click Start.
Navigate to All Programs, BusinessObjects XI Release 3.1, BusinessObjects Enterprise, and then select BusinessObjects Enterprise Central Management Console. The Logon page for the Central Management Console opens.
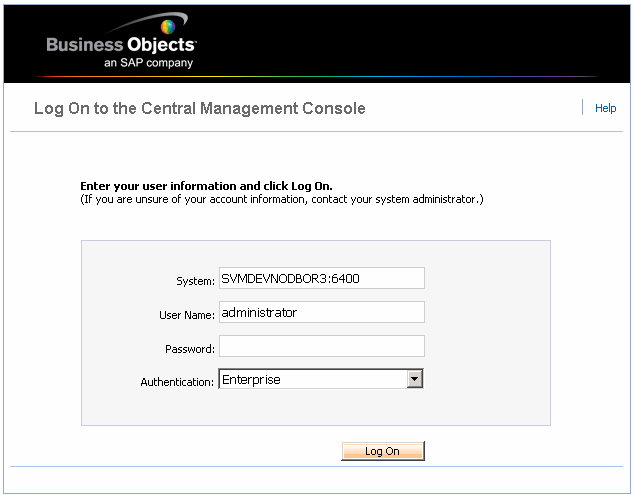
Enter your user name and password.
Click Log On.
Trusted Authentication provides a transparent, single sign-on solution to the problem of how to integrate your BusinessObjects Enterprise authentication solution with third-party authentication solutions.
Once users log on to the system, they do not want to have to provide their password more than once in a session. In this scenario, Trusted Authentication allows applications that have established trust with the Central Management Server to log on users without their password.
To enable Trusted Authentication, you must configure both the BusinessObjects Server and the Argus Insight Web Server.
To configure the server to use Trusted Authentication:
Log on to the Central Management Console as a user with administrator privileges.
Click Authentication from the Home page.
Double-click Enterprise.
Select the Trusted Authentication is enabled check box.
Create a shared secret for your users.
Note:
The Argus Insight Web Server and the Central Management Console use the shared secret to create a trusted authentication password. In other words, the systems use this secret password to establish trust.Enter a timeout value for your trusted authentication requests.
Note:
The timeout value determines how long the Central Management Console waits for the SessionMgr.Logon call from Argus Insight. The recommended timeout value is 0 (zero).Click Update.
When creating a valid configuration file on the Argus Insight Web Server, the following conditions apply to the configuration file:
The name of the file must be TrustedPrincipal.conf.
The file must be placed at this location:
businessobjects_root/win32_x86
The file must contain the line:
SharedSecret=secret_password
where secret_password is the trusted authentication password.
The file must be saved with UTF-8 encoding if it contains non-ASCII characters.
Either Tomcat or WebSphere must be installed on the BusinessObjects Server.
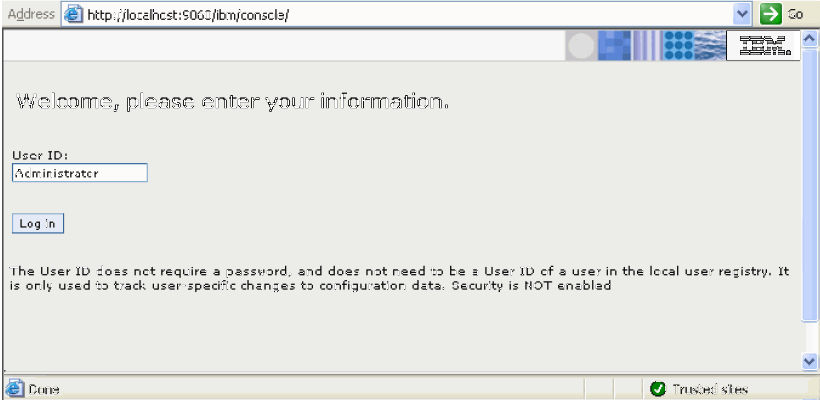
If Tomcat is not installed on the BusinessObjects Server, configure WebSphere as follows:
Verify that WebSphere 6.0 is installed and working correctly. To do so, launch either its default page or administrative console in a web browser. Generally, the default path to WebSphere is as follows:
http://localhost:9060/ibm/console/
Verify and install the latest Java Virtual Machine (JVM) on the WebSphere computer.
Install BusinessObjects. During the installation setup, ensure that you deselect the Tomcat Server installation option.
Configure the WebSphere Server. First, change the class path as follows:
Restart the WebSphere Administrative console.
Expand the Servers group in the navigation pane of the Administrative console.

Click Application Servers, and then click the server1 link. The system opens the settings page for the server.
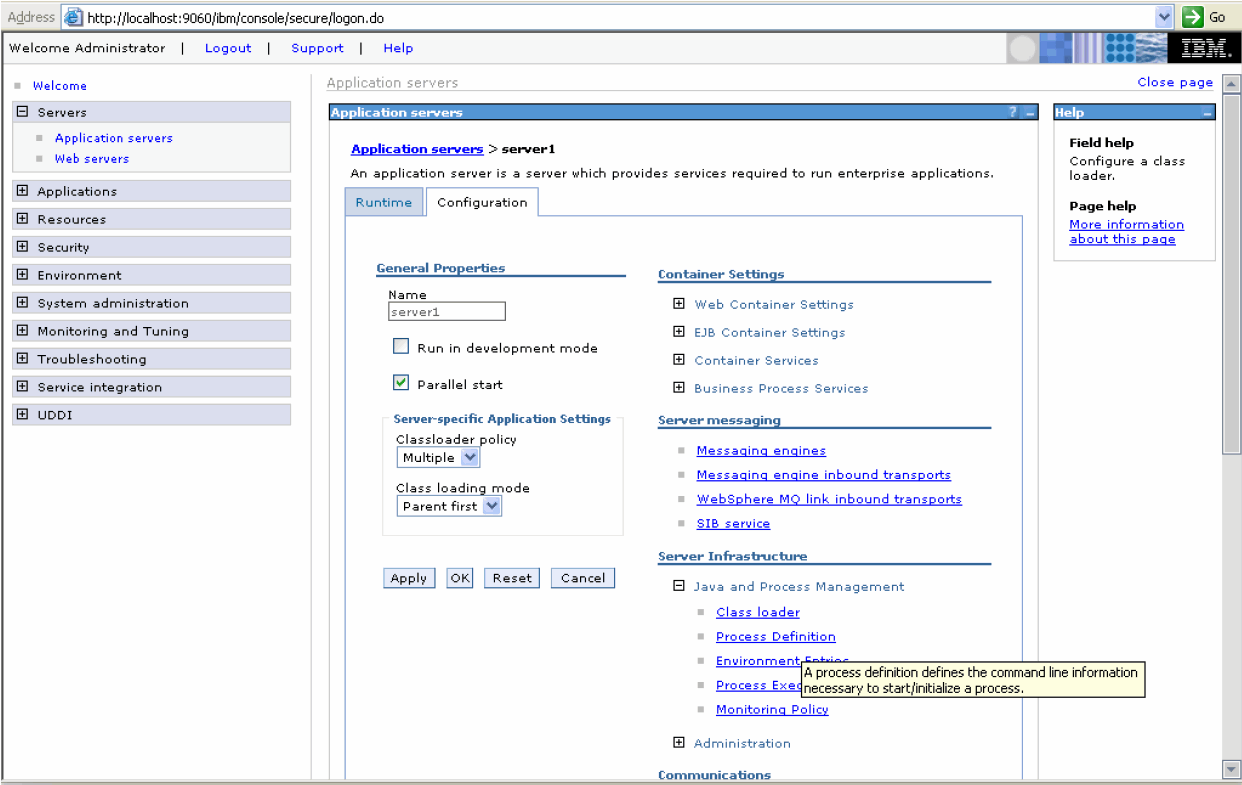
Click the Configuration tab, and then click the Process Definition link in the Server Infrastructure group. The Process Definition page opens. 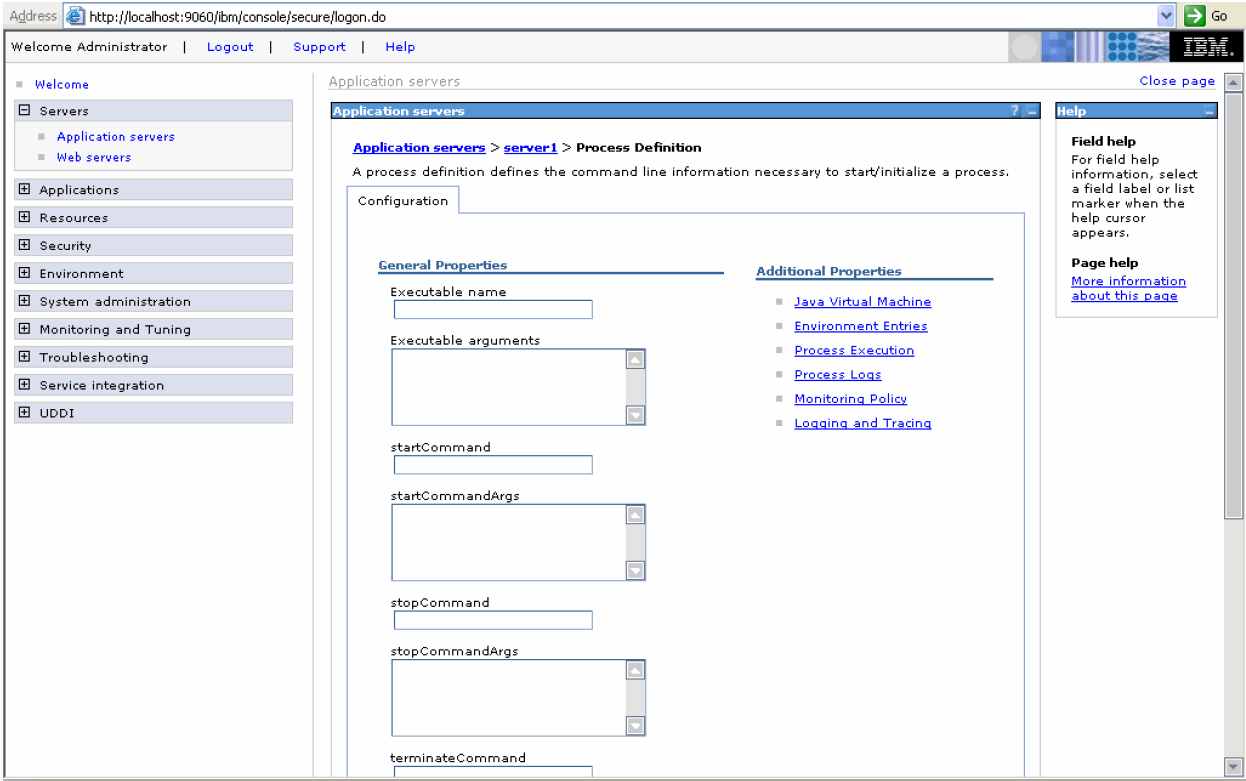
Click the Java Virtual Machine link in the Additional Properties group. The Java Virtual Machine settings page opens.
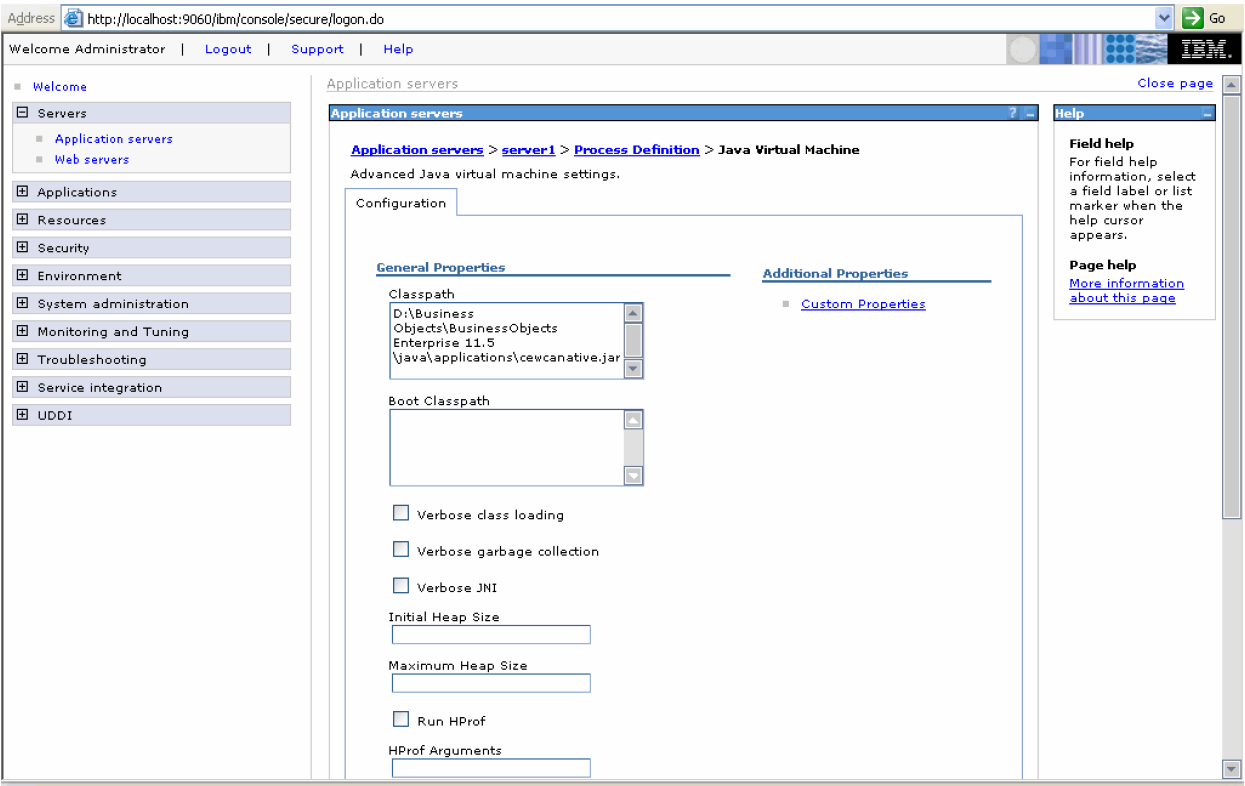
Click the Classpath field in the General Properties section, and enter the complete path to the cewcanative.jar file. The default location is:
drive:\Business Objects\BusinessObjects Enterprise 11.5\java\applications
Save your changes to the master configuration.
Change the Path environmental variable as follows:
Note the location of the win32_X86 folder in the BusinessObjects Enterprise software installation. The default location is:
drive:\Program Files\Business Objects\BusinessObjects Enterprise 11.5\win32_X86
Right-click the My Computer icon on your desktop, and select Properties.
Click the Advanced tab.
Click Environment Variables.
Scroll through the list of system variables until you find the Path variable.
Select the Path variable and then click Edit.
Position the cursor at the end of the information in the Variable value field.
Add a semicolon (;) and then enter the complete path to the location of the win32_X86 folder.
Click OK to save your changes and close the Edit System Variable dialog box.
Click OK to close the Environment Variables dialog box.
Click OK to close the System Properties dialog box.
To deploy the WebSphere Server:
Open the Administrative console.
Expand Applications, and then click Install New Application.
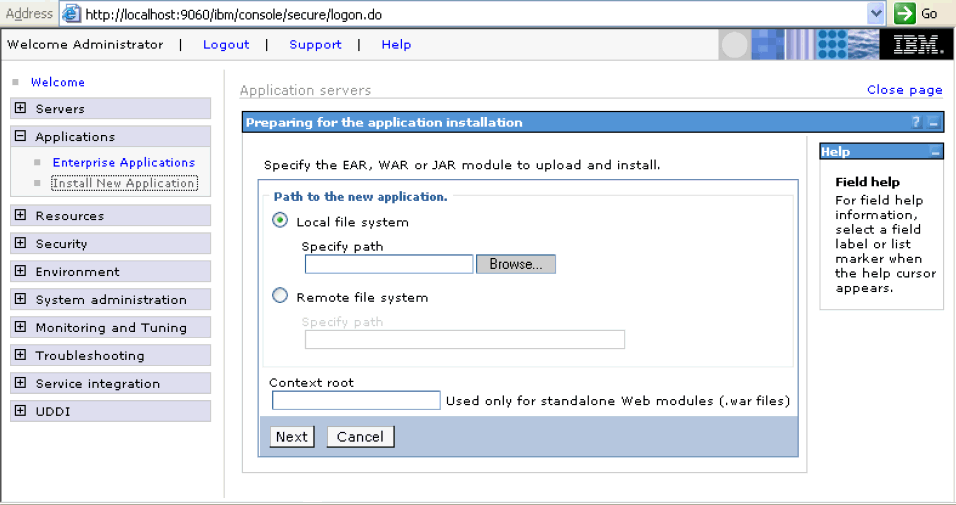
Click Browse to enter the complete path to the location of the styles.war file. The default location is:
drive:\Program Files\business objects\businessobjects enterprise 11.5\java\applications
Type the context root for the WAR file in the Context Root field. See Table 7-1 for the order and the context root of various files to be deployed.
Click Next.
Accept the default values on the subsequent pages and continue to click Next until you get to Step 2: Map modules to servers.
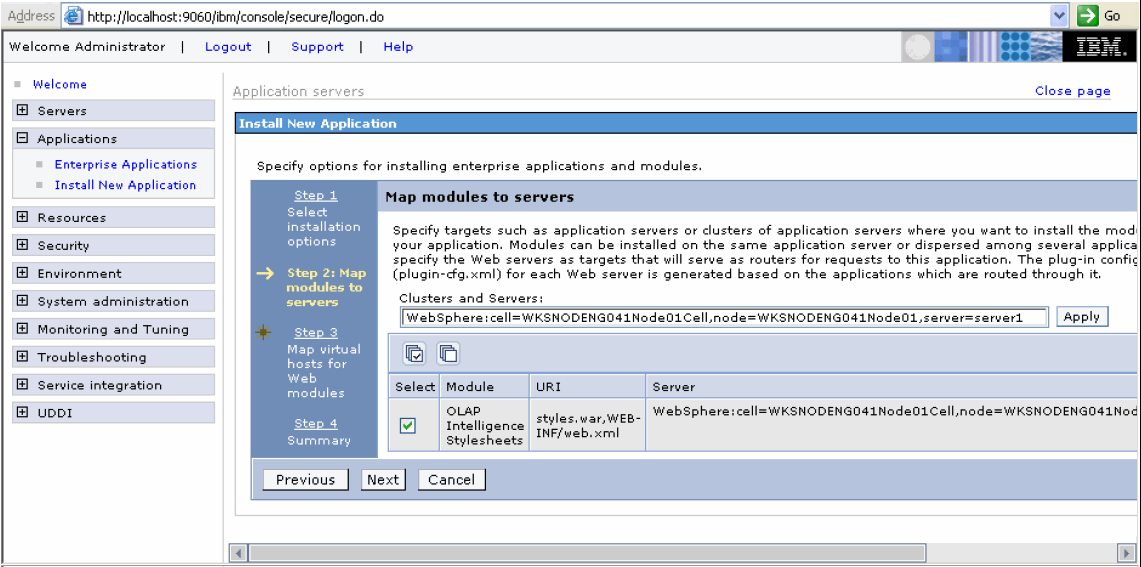
Select the Application Server (that is, server1) and click Next. The system continues to Step 3.
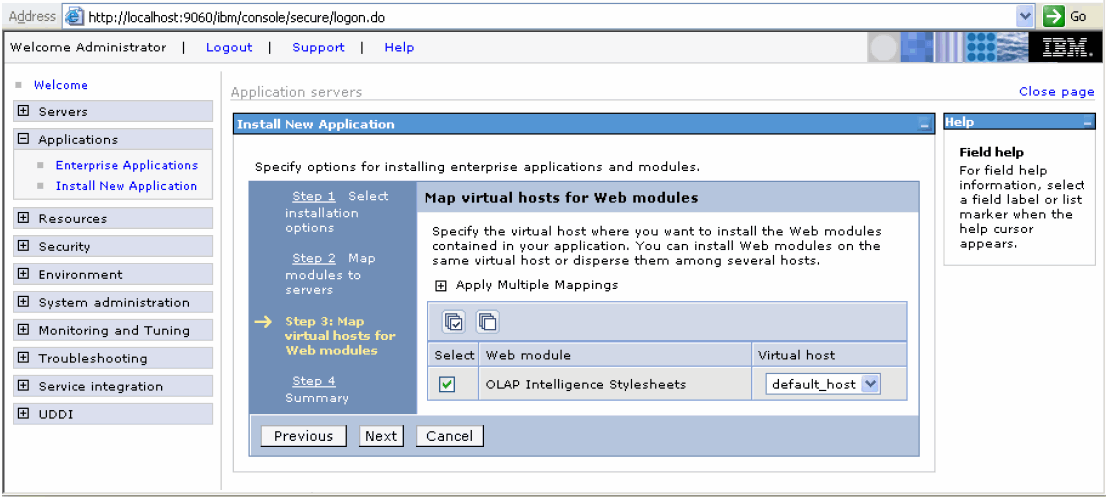
Select the web module in the list and click Next. The system continues to Step 4 and displays the summary of installation options.
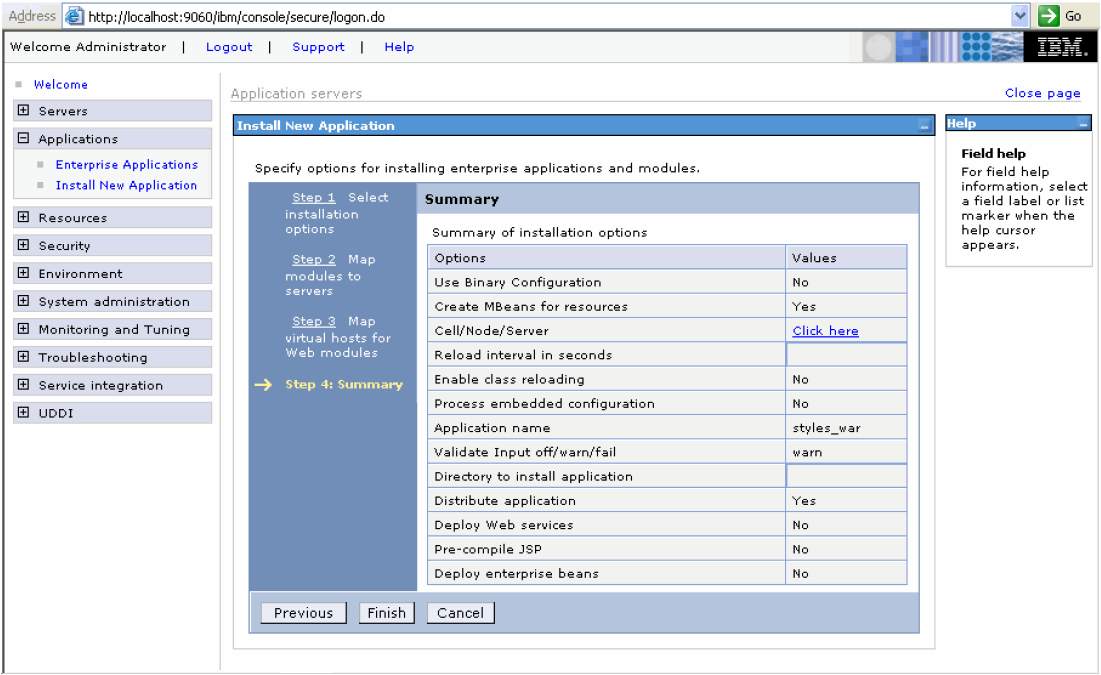
Click Finish. The system displays progress messages and reports when the installation of the application file has been installed successfully.
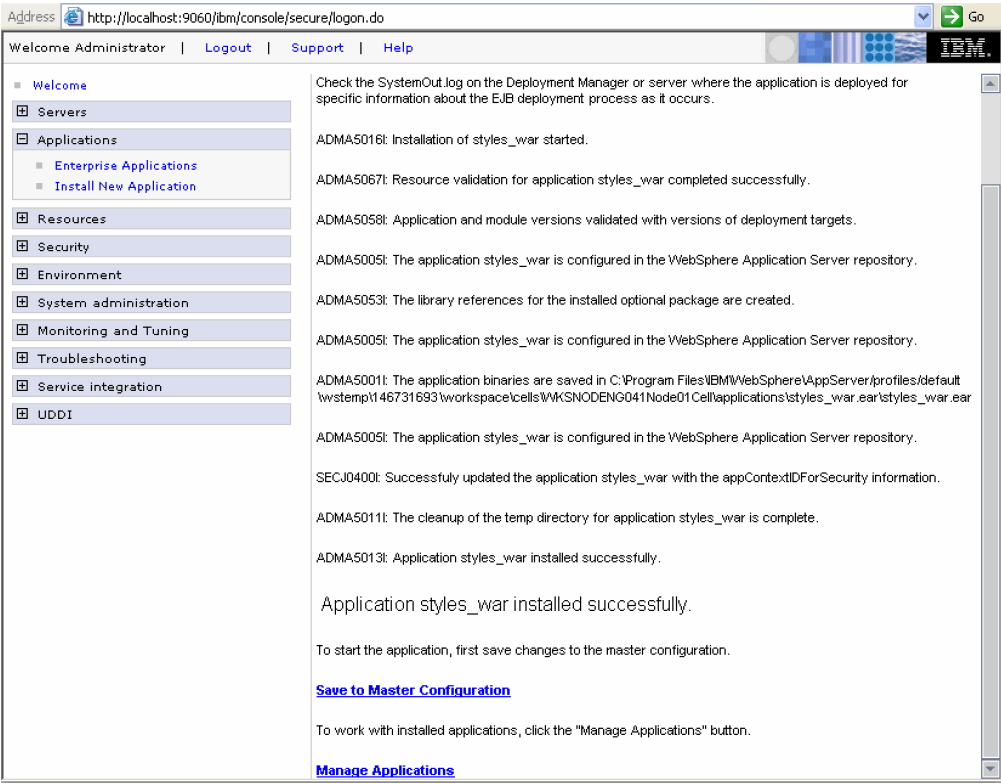
Click Save to Master Configuration to save the installation changes.
Repeat the process for each file listed in Table 7-1, "WAR Files to Be Deployed". Remember to deploy the files in the order listed in Table 7-1, otherwise, the integration will fail because these files have dependencies on each other.
Verify that BusinessObjects has been integrated successfully with WebSphere:
Open a browser window.
Use the following format to enter the URL for the desktop launchpad:
http://host_name:port_number/businessobjects/enterprise115/desktoplaunch
For example:
http://localhost:9080/businessobjects/enterprise115/desktoplaunch
Note:
You cannot use the shortcuts in the BusinessObjects Enterprise program group to access the BusinessObjects Enterprise launchpads deployed on your WebSphere Server. To access them, you must include the port number of the WebSphere Server in your URL.To change the connection string:
Start the BusinessObjects Universe Designer application.
Open the Tools menu and select Connections. The Wizard Connection dialog box opens.
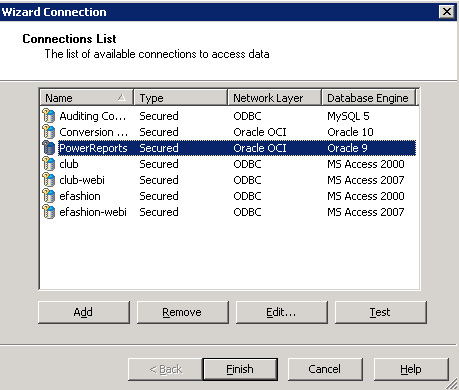
Select PowerReports and click Edit to modify the connection.
If the current PowerReports connection was edited with a previous version, the system prompts for confirmation that you want to edit the connection. Click Yes to continue. The Edit PowerReports connection dialog box opens.
If the current PowerReports connection was not edited with a previous version, the Edit PowerReports connection dialog box opens.
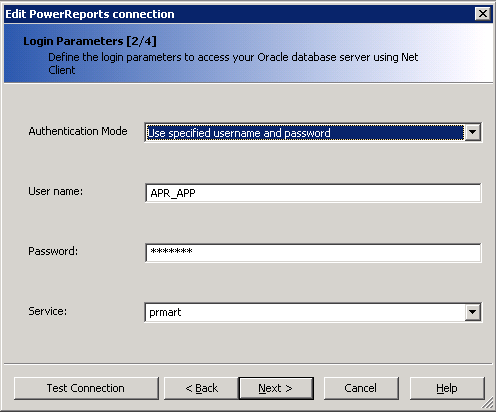
Enter the user name and password for Argus Insight database read-only user / APR_APP user. The read-only user is created during schema creation. For example, APR_MART_DB_LINK_USER.
Note:
APR_APP user has rights to update many of the MART tables. If user wants to use read-only account for BusinessObjects connection they can use APR_MART_DB_LINK_USER account, but Case Series Freezing will not be supported in Reports and Report Writer with the use of read-only account.Click Next. The Configuration Parameters dialog box opens.
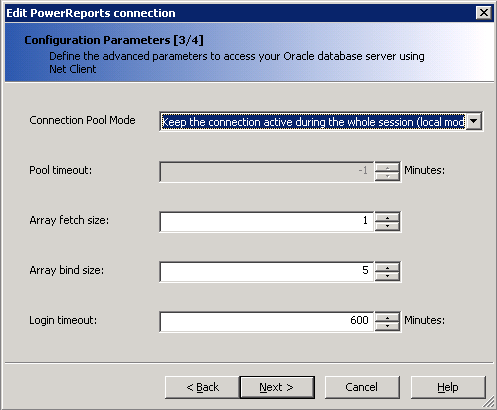
Click Next. The Custom Parameters dialog box opens.
Click Finish. The system returns to the Connections List dialog box.
Select PowerReports and then click Test to verify the connection. If you configured the connection correctly, the system confirms that the server is responding.
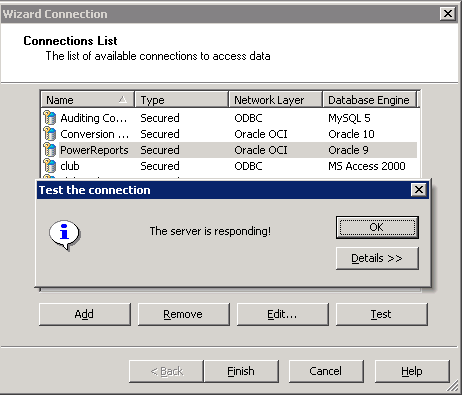
Click OK to close the message box.
Click Finish to exit from the BusinessObjects Designer.
Log on to the Central Management Console on the BusinessObjects Server.
Click the Users and Groups link.
Navigate to Group Hierarchy, and then right-click PRGroup and select Member Of. The Member Of dialog box opens.
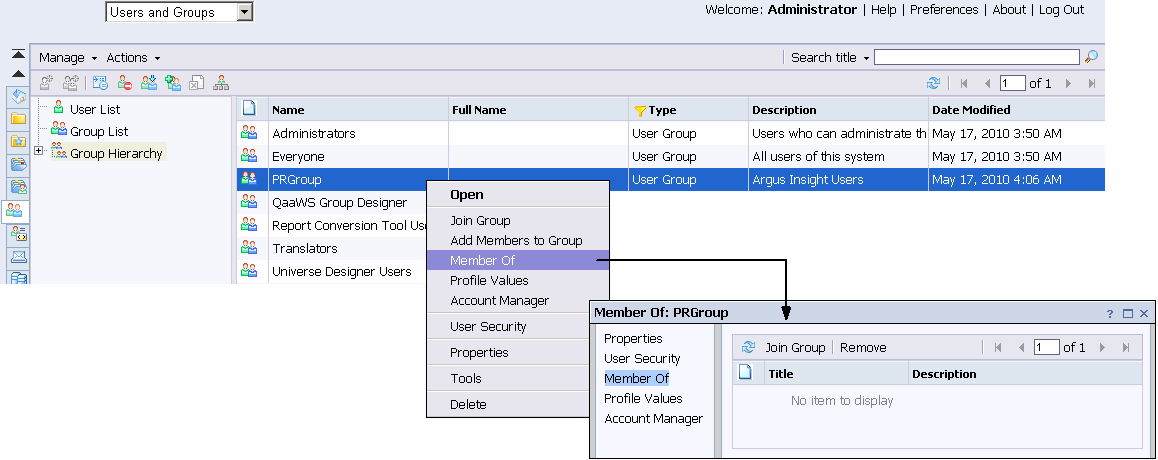
Click Join Group.
Navigate to Group Hierarchy, and move Administrators, Everyone, and Universe Designer Users from Available Groups to Destination Group(s).

Click OK. Note that the system adds PRGroup to your selections.

Click Close.
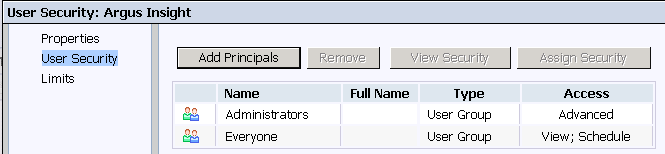
To configure the rights for the Argus Insight folder:
Log on to the Central Management Console on the BusinessObjects Server.
Click Folders.
Right-click Argus Insight and select User Security.
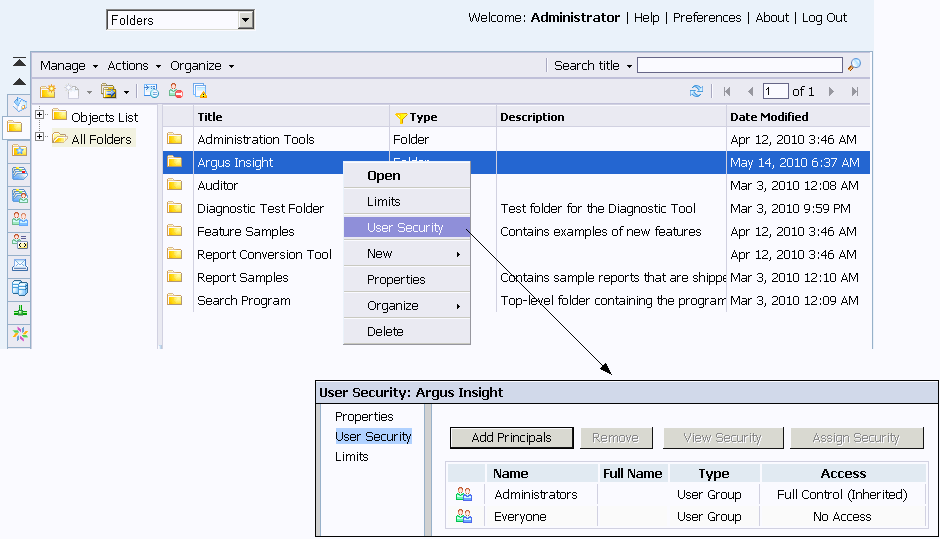
Select Administrators and click Assign Security. The Assign Security dialog box opens.
Uncheck the Inherit From Parent Folder and Inherit From Parent Group check boxes.
Select Full Control from the Available Access Levels section and click the right arrow (>) to assign the Full Control access level.
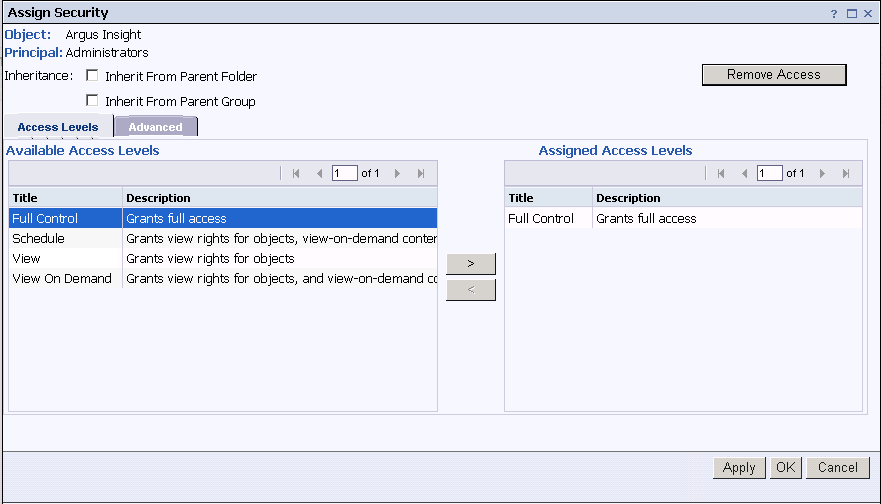
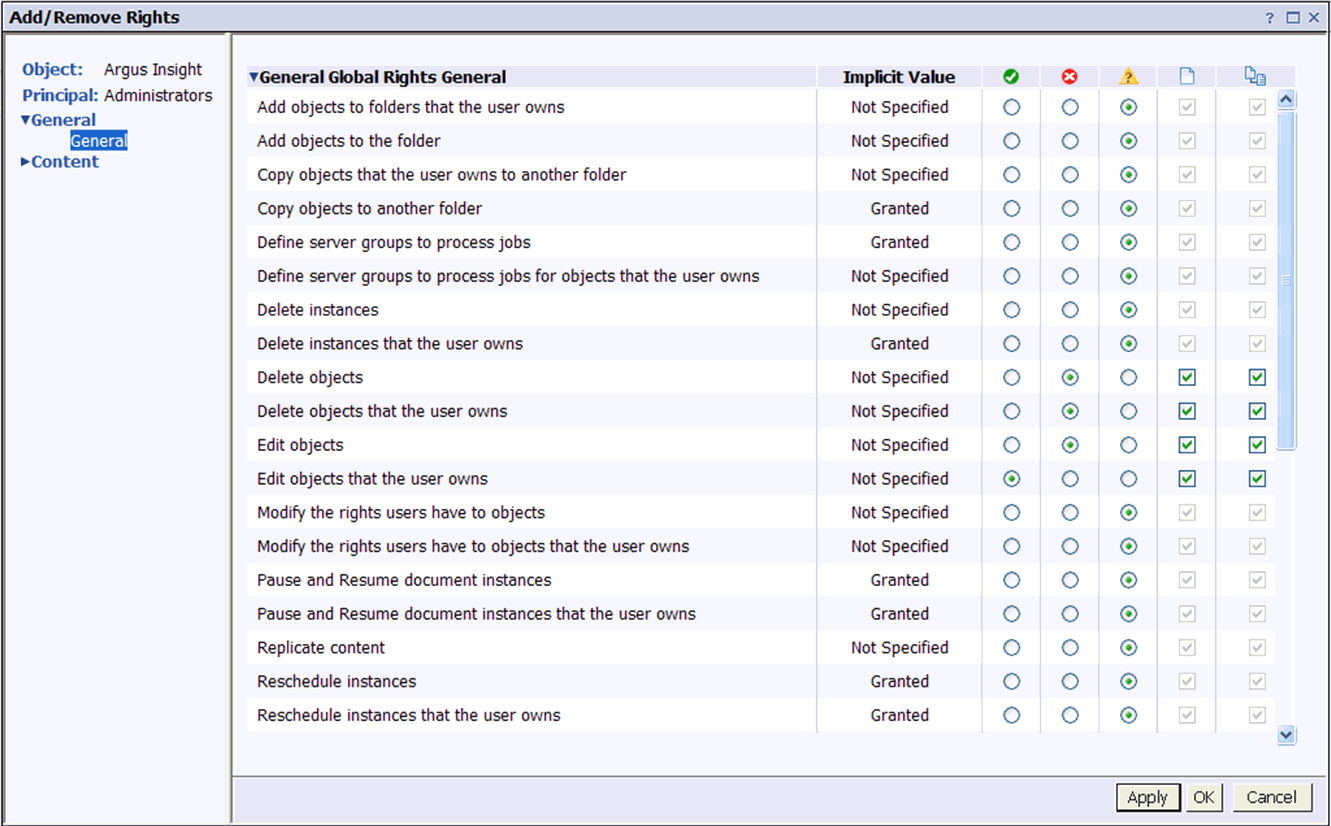
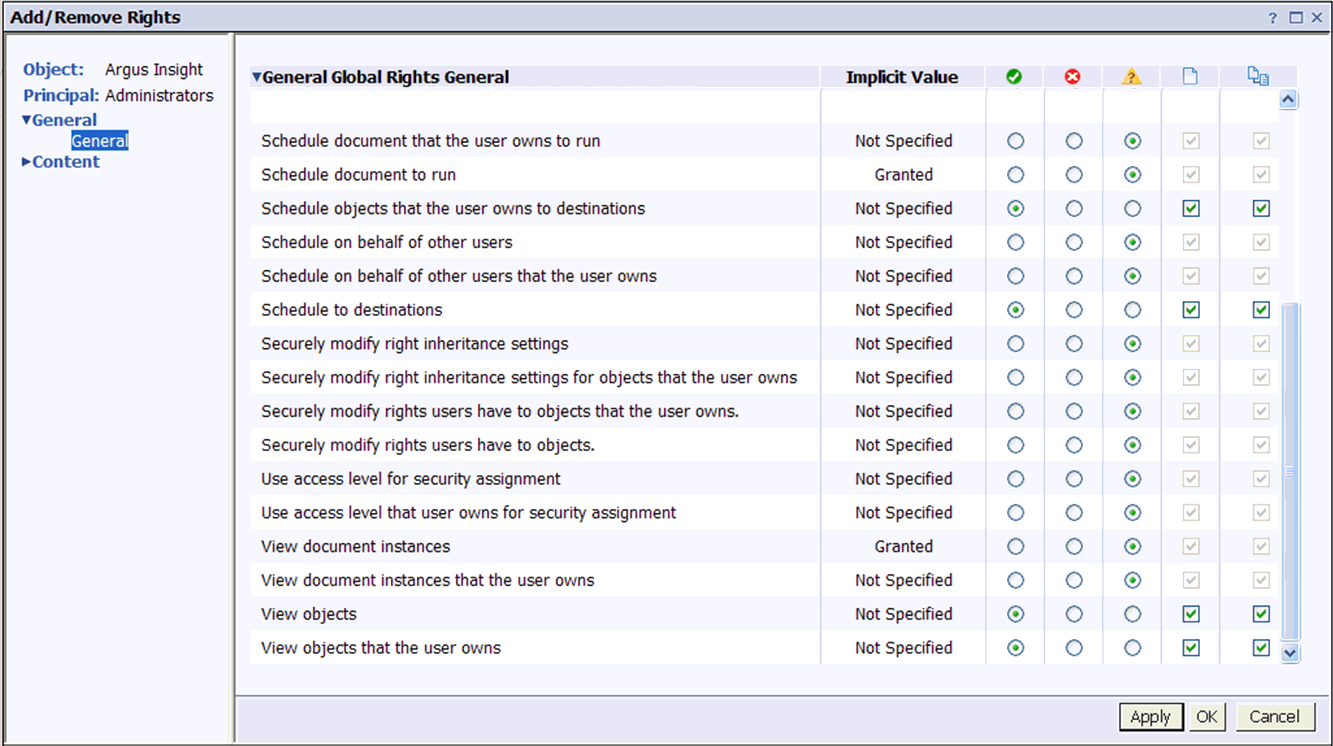
Click the Advanced tab, and then click Add/Remove Rights. Change the access rights to match the settings shown in the following two illustrations:
Click OK. The Assign Security page opens.

Click OK. The User Security: Argus Insight Page opens.
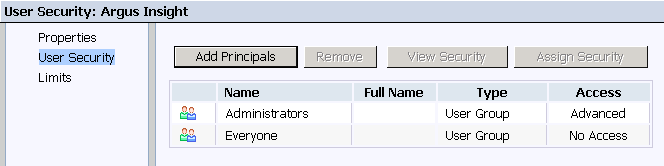
Select Everyone and click Assign Security. The Assign Security dialog box opens.
Uncheck the Inherit From Parent Folder and Inherit From Parent Group check boxes.
Select Schedule and View from the Available Access Levels section and click the right arrow (>) to assign those access levels.
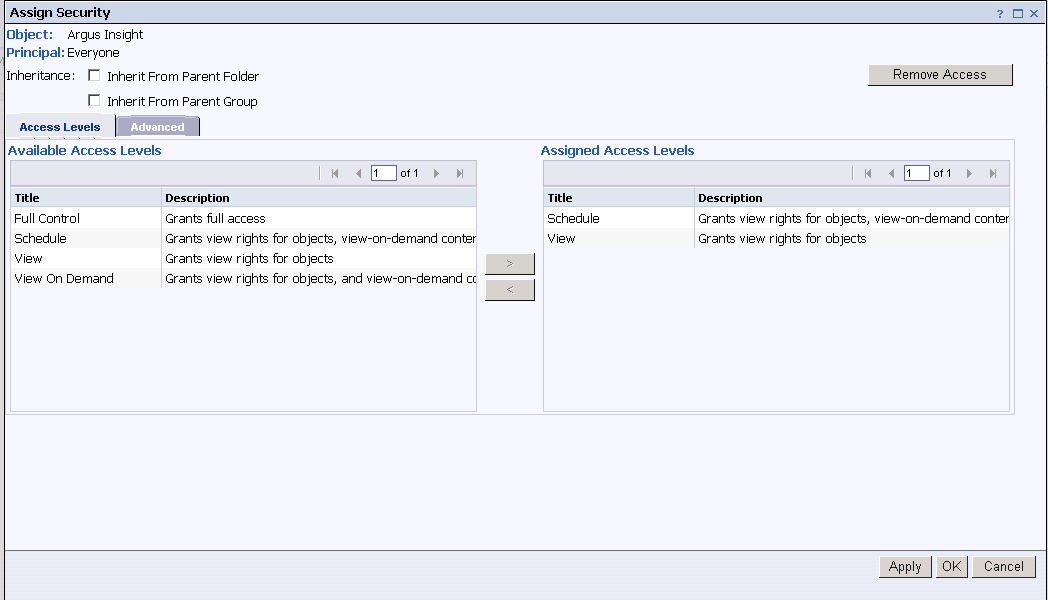
Click OK. The system returns to the User Security: Argus Insight page. Note that the access level for the Everyone user group is set to View and Schedule.
Click Add Principals.
Select PRGroup and click the right arrow (>) to move PRGroup to the Selected users/groups column.
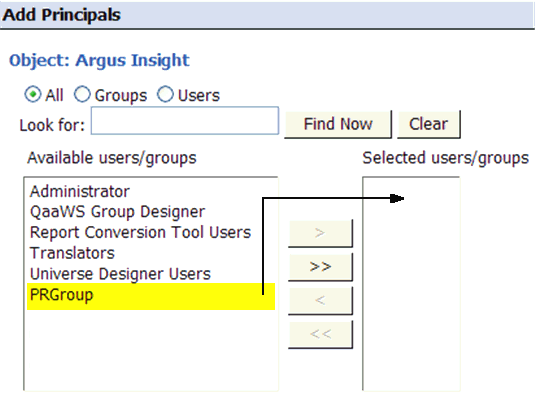
Click Add and Assign Security.
Select Full Control from the Available Access Levels section and click the right arrow (>) to assign the access level.
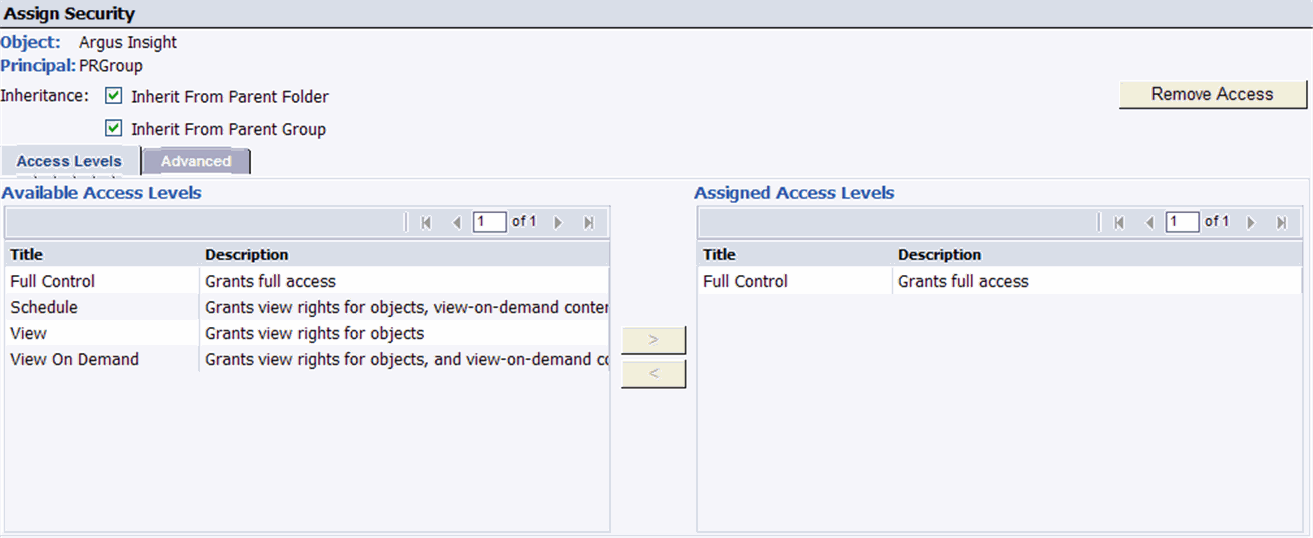
Click OK. The system returns to the User Security: Argus Insight page. Note that the access level for the PRGroup user group is set to Advanced.
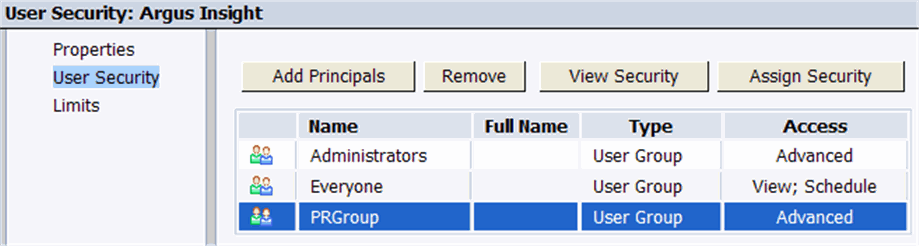
Click Close.
To configure rights for the BusinessObjects Applications:
Log on to Central Management Console on the BusinessObjects Server.
Click Applications. The Applications page opens.
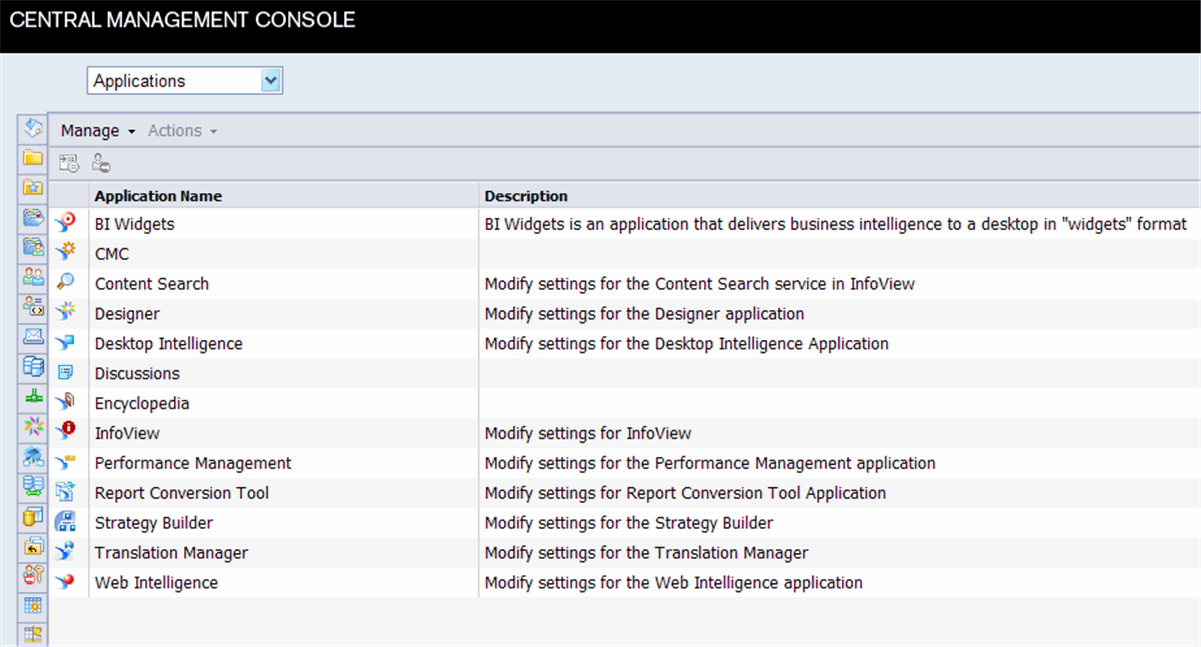
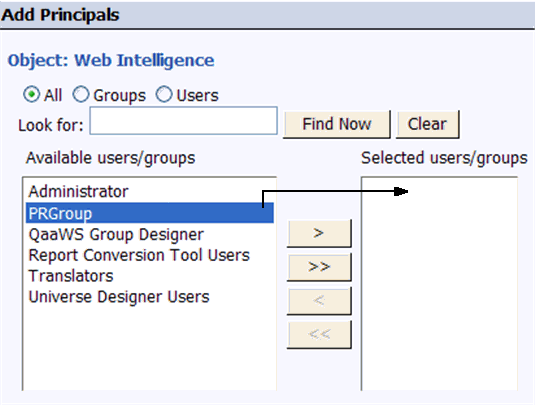
Right-click Web Intelligence and select User Security. The User Security: Web Intelligence page opens.
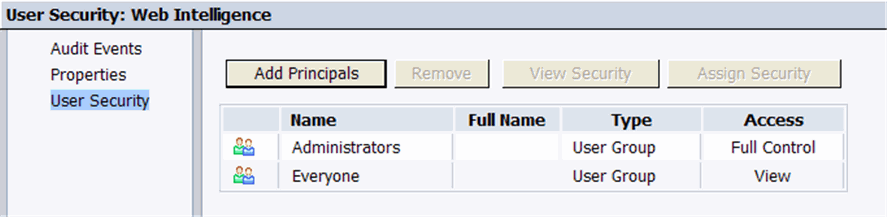
Click Add Principals.
Select PRGroup and click the right arrow (>) to move PRGroup to the Selected users/groups column.
Click Add and Assign Security.
Select Full Control from the Available Access Levels section and click the right arrow (>) to assign the access level.

Click OK.
Repeat this procedure to configure rights for the Designer and Desktop Intelligence applications for BusinessObjects.
This section describes the steps to complete the following tasks:
To configure the holiday schedule:
Log in to the Argus Insight application.
Click the Tools tab in the upper-right corner of the Argus Insight Home page. The ADMINISTRATION TOOLS page opens.
Click the List Maintenance tab.
Select Holiday Schedule Management from the List Maintenance Items group.
Select Company or US Federal from the Attributes group, and click Modify. The Holiday Schedule Management dialog box opens.
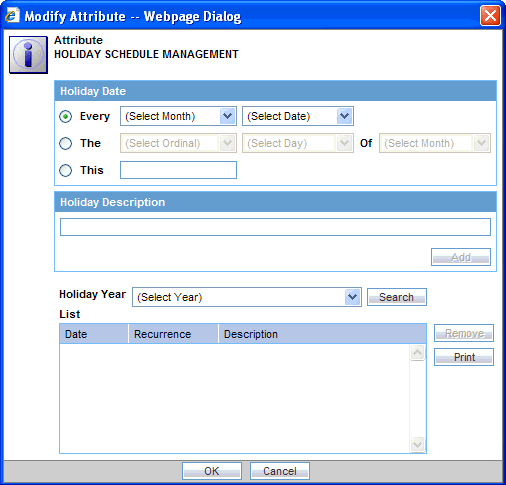
Define the holidays.
Click OK. The system saves your changes and returns to the List Maintenance tab.
To configure product designated medical events:
Select Product Designated Medical Event Configuration from the List Maintenance Items group.
Select All Configurations from the Attributes group, and click Modify. The Product Designated Medical Event Configuration dialog box opens.
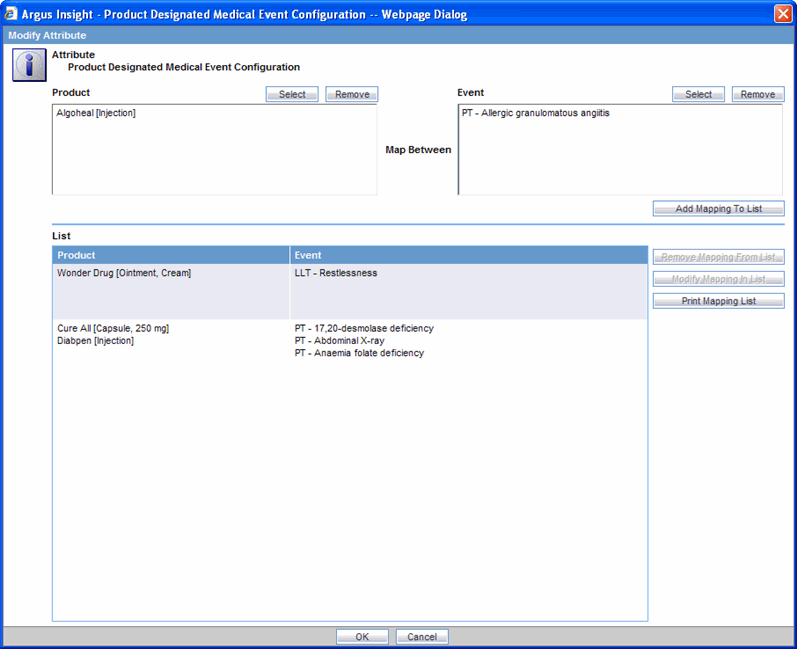
Make the required selections.
Click OK. The system saves your changes and returns to the List Maintenance tab.
To configure measurable suppliers:
Select Measurable Suppliers from the List Maintenance Items group.
Select All Configurations from the Attributes group, and click Modify. The Measurable Suppliers dialog box opens.

Make the required selections.
Click OK. The system saves your changes and returns to the List Maintenance tab.
To configure sites:
Select Site Configuration from the List Maintenance Items group.
Select Non-Core Site Configuration from the Attributes group, and click Modify. The Site Configuration dialog box opens.
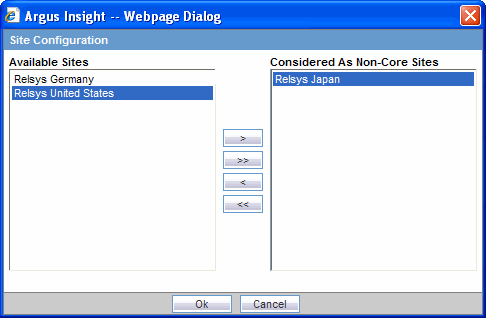
Define your core and non-core sites by using the right and left arrows to move the entries between the Available Sites column (core) and the Considered As Non-Core Sites column.
The system uses this configuration in the DCA-TME Notification Report in Case Processing.
Click OK. The system saves your changes and returns to the List Maintenance tab.
To configure an acceptable delay justification:
Select Acceptable Delay Justification from the List Maintenance Items group.
Select the delay justification that you want to modify. You can select:
Acceptable Routing Delay Justification
Acceptable Submission Delay Justification
Click Modify.
Enter the appropriate justification.
The system uses this configuration in the Regulatory Submission and Distribution Compliance report.
Click OK. The system saves your changes and returns to the List Maintenance tab.
This topic describes how to integrate the LDAP authentication with Argus Insight and BusinessObjects. Follow the installation procedures in the order documented.
Note:
Create a group in the LDAP Server and assign LDAP users to this group. This group should not exist in BusinessObjects.To configure the LDAP Server settings in BusinessObjects:
Log on to BusinessObjects Central Management Console using the administrator name and password.
Click Authentication to access the authentication options in BusinessObjects.
Double-click LDAP.
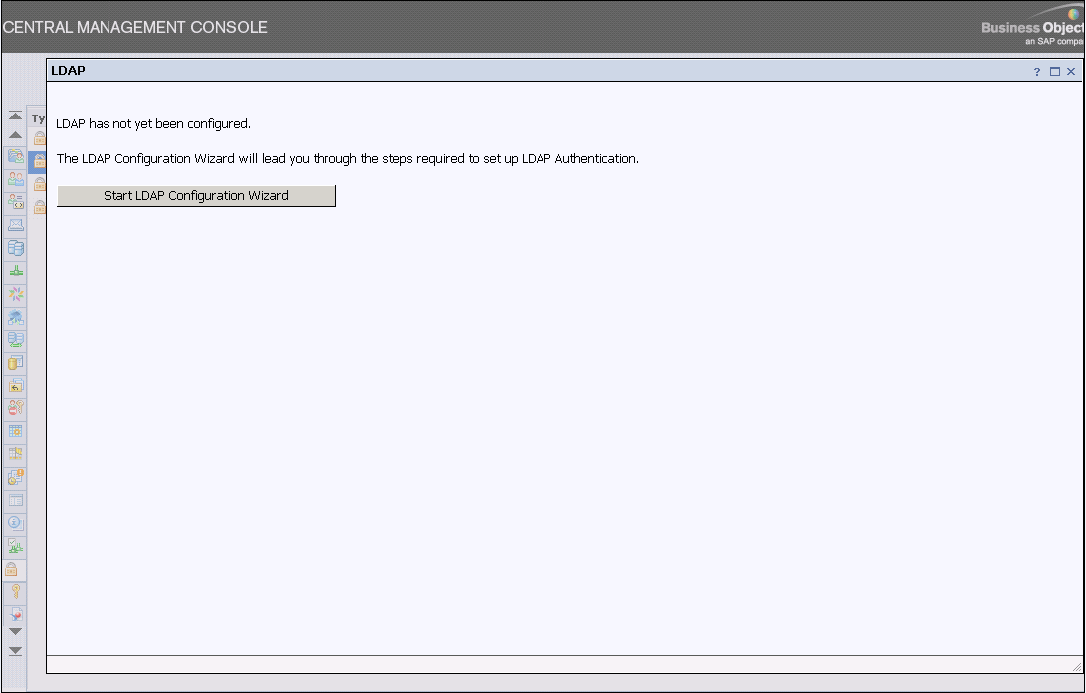
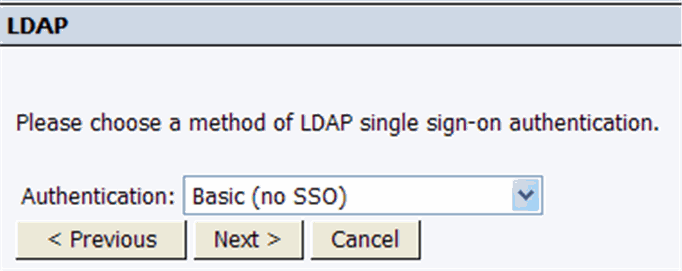
Click Start LDAP Configuration Wizard. The system displays the following screen:
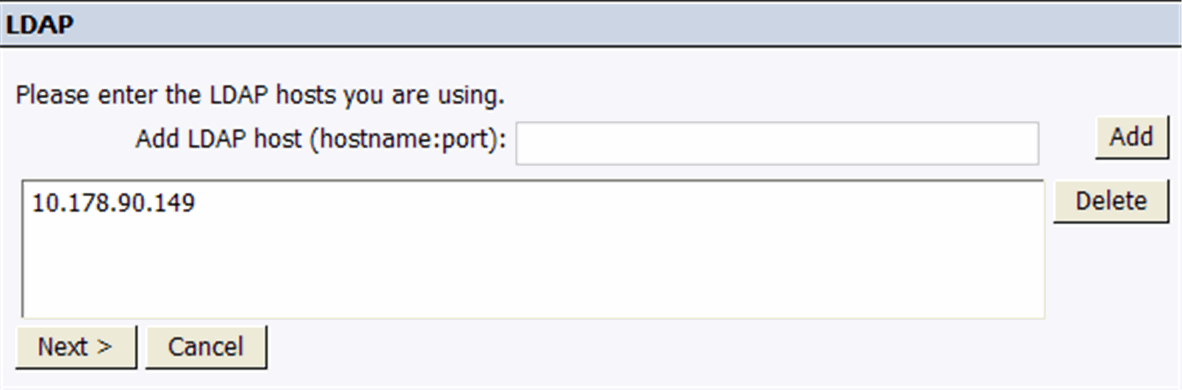
Add the IP address and port number for the LDAP server. Click Next. The system displays the following screen:
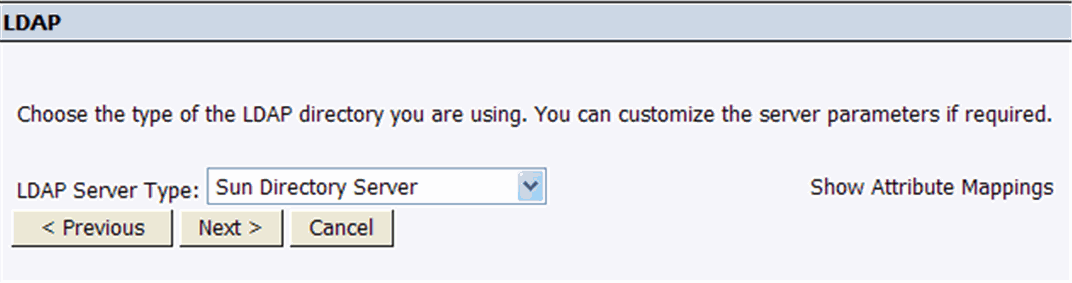
Click Next. The system displays the following screen:

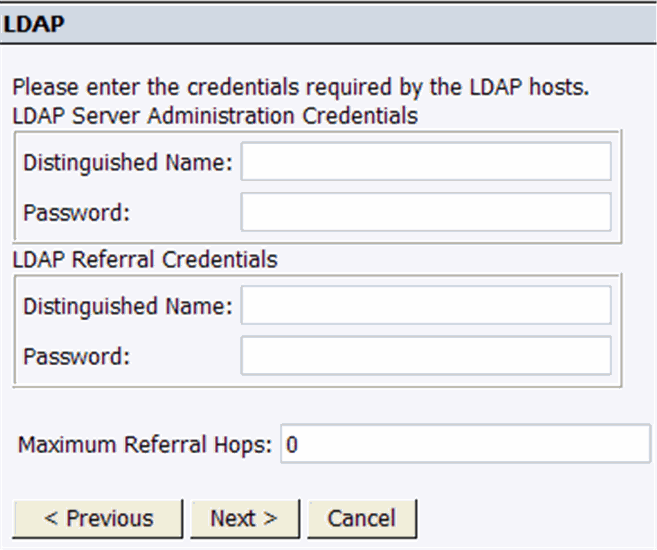
Enter a name for the base LDAP and click Next. The system displays the following screen:
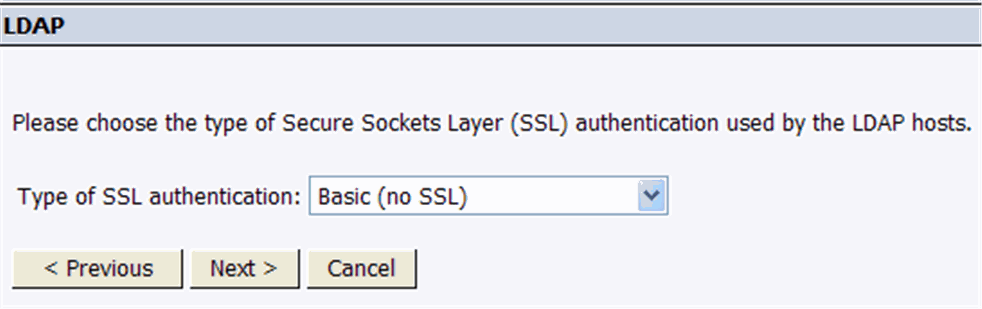
Click Next. The system displays the following screen:
Click Next. The system displays the following screen:
Click Next. The system displays the following screen:
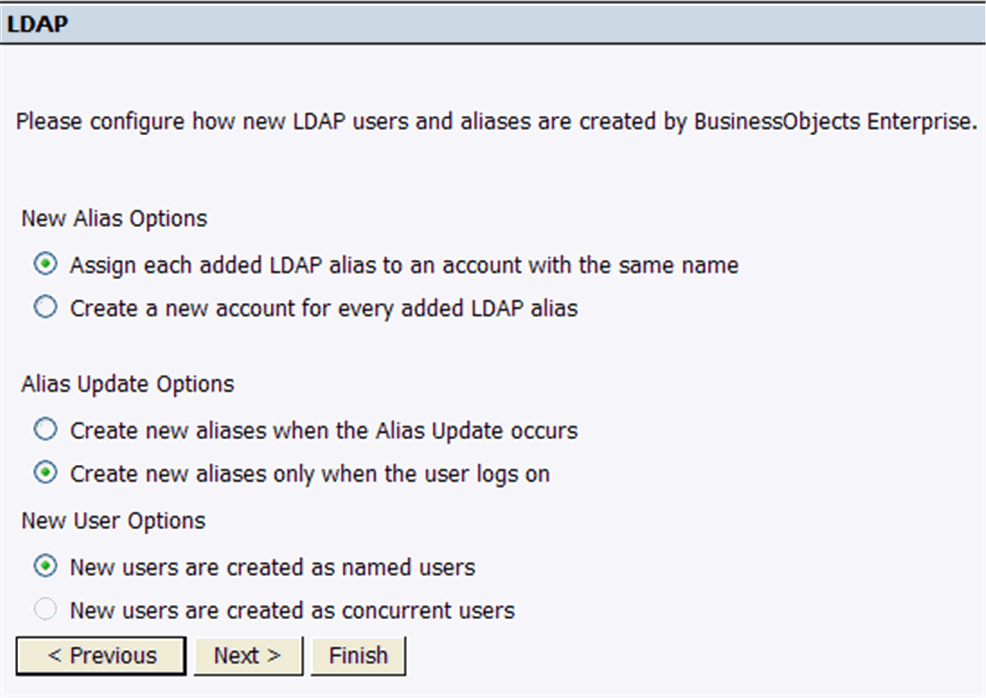
Select one of the New User Options, whichever one is required:
New users are created as named users
New users are created as concurrent users
Click Next. The wizard reports when it has collected all the required information.

Click Finish.
Wait until the system displays the LDAP screen.
Locate the Add LDAP group (by cn or dn) field in the LDAP screen. Type the Group Name configured in LDAP Server, and click Add.
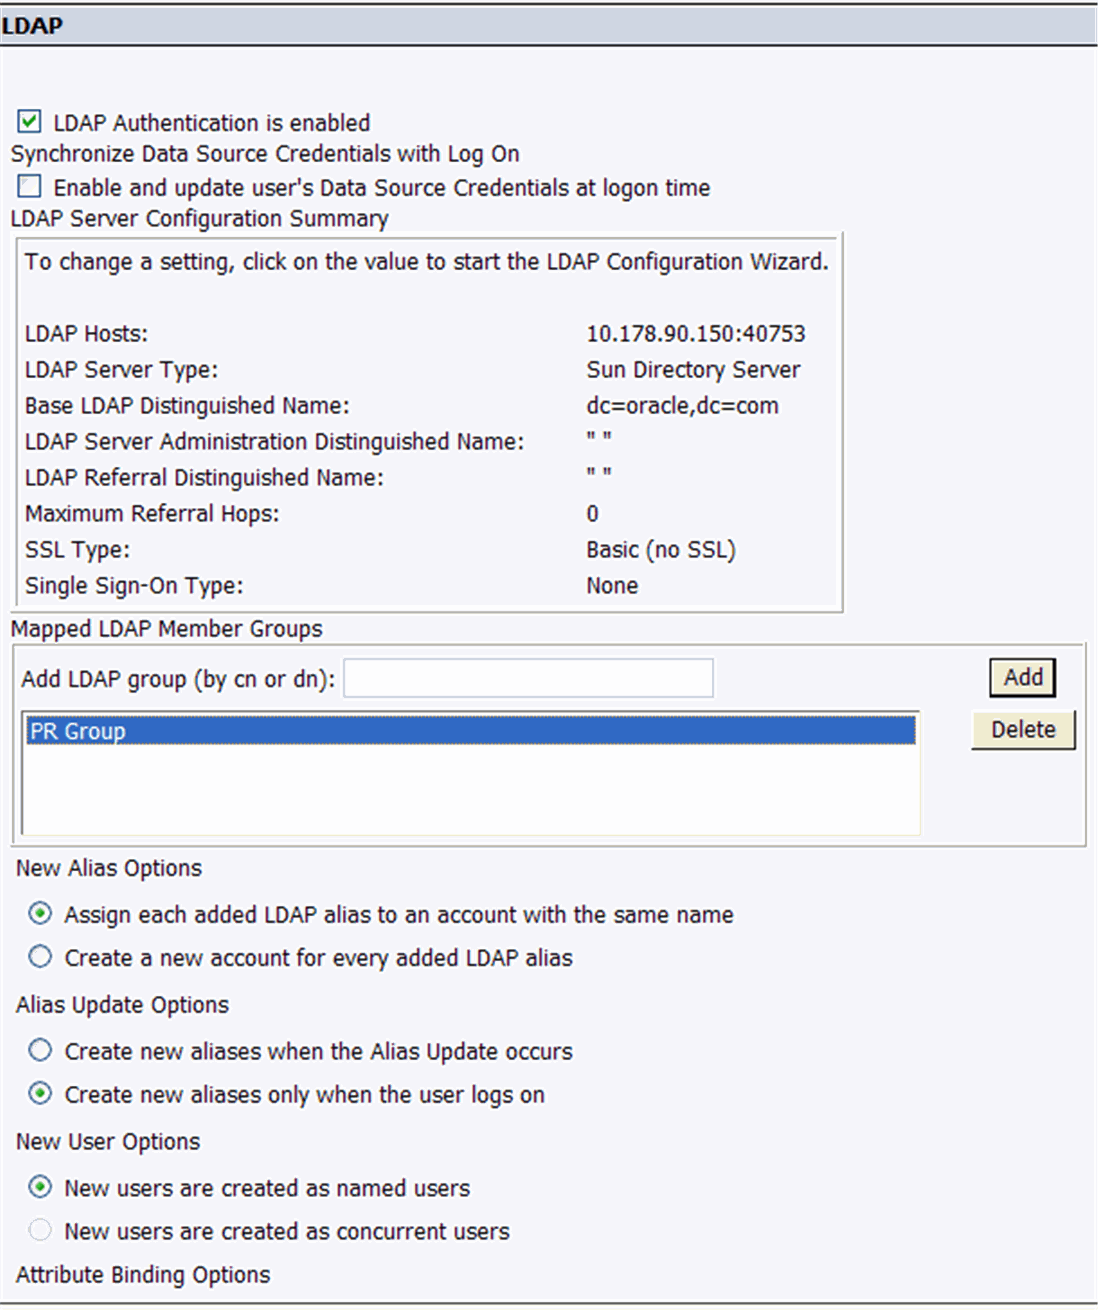
Scroll downwards and click Update.
Map the LDAP member group whose users you want to authenticate through LDAP.
For example, PR Group is the member group whose users are part of Argus Insight and use LDAP authentication for access to BusinessObjects.
Select Create a new account for every added LDAP alias under the New Alias Options on the LDAP window.
Close the window.
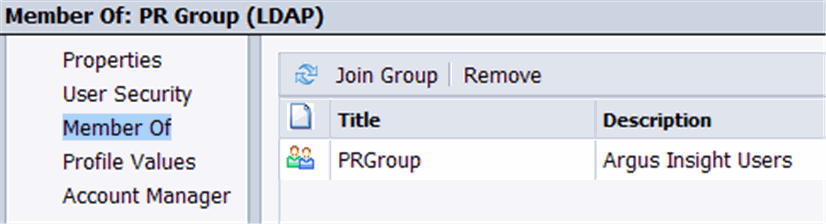
Navigate to Home, Group List, and then right-click PR Group (LDAP) and select Member Of. The Member Of dialog box opens.
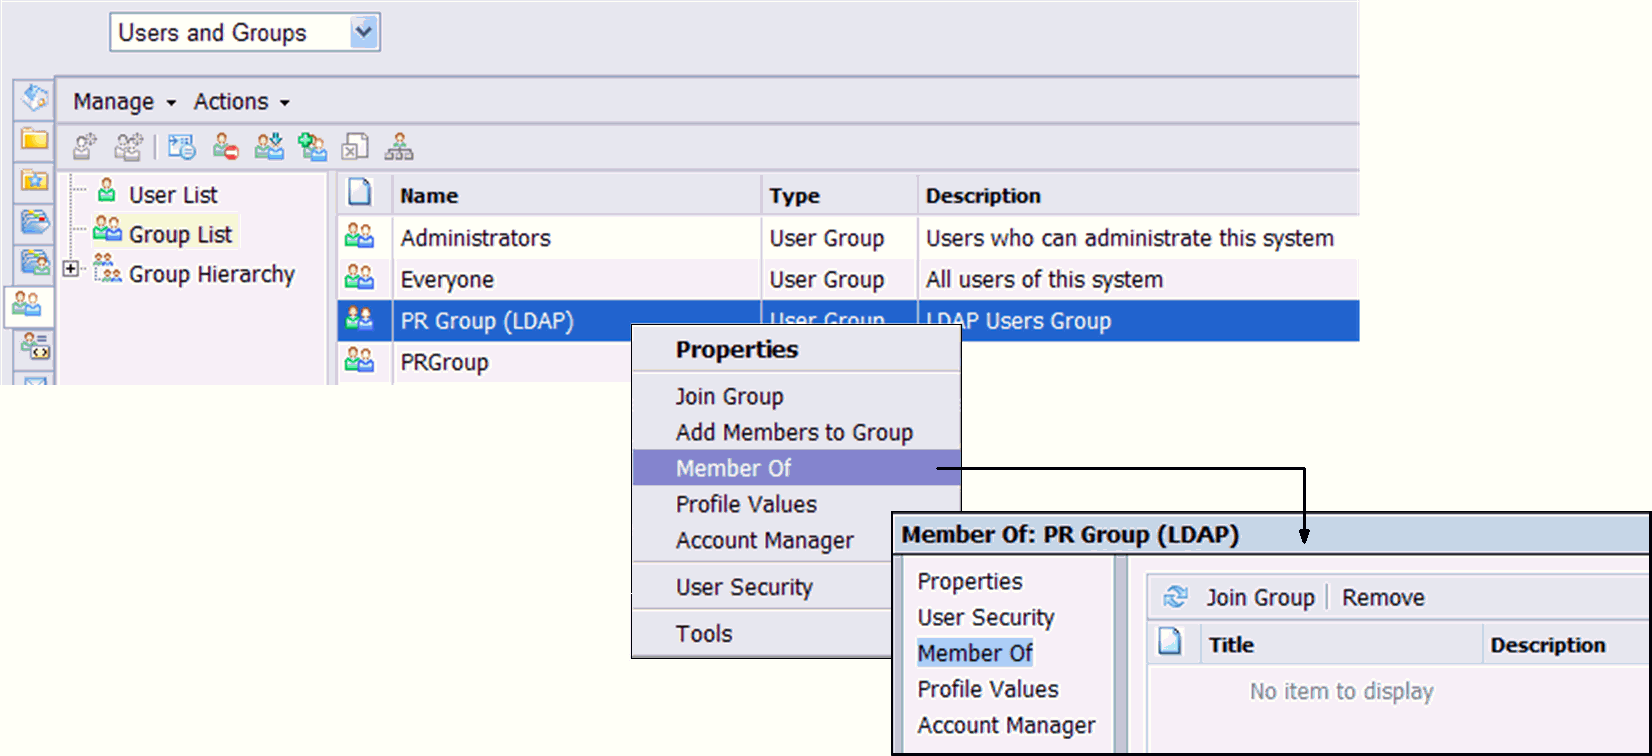
Click Join Group.
Navigate to Group List, select PRGroup, and then click the right arrow (>) to add the PRGroup into the Destination Group.
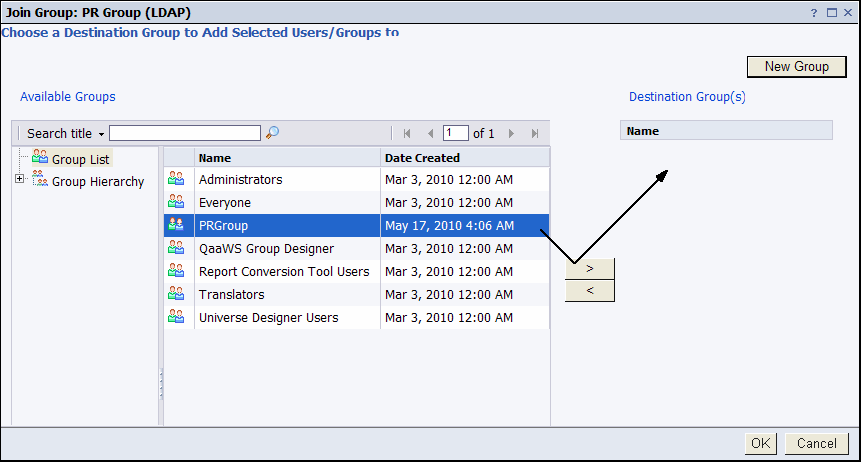
Click OK. Note that PR Group (LDAP) is now a member of the PRGroup.
|
Copyright © 2010, 2012, Oracle and/or its affiliates. All rights reserved. Legal Notices |
|