| Oracle® Argus Insight Installation Guide Release 7.0.1 E28479-01 |
|
|
PDF · Mobi · ePub |
| Oracle® Argus Insight Installation Guide Release 7.0.1 E28479-01 |
|
|
PDF · Mobi · ePub |
This chapter describes how to configure the Cognos 8 environment. You must configure the Cognos 8 environment in the order specified in this guide.
This chapter includes the following topics:
If you are using BusinessObjects XI instead of Cognos 8, see Chapter 7 for information about configuring the BusinessObjects environment for Argus Insight.
Before attempting to configure the environment, verify that you have installed all required hardware and software. For more information, see Section 1.2, "Software and Hardware Requirements."
This section describes the following tasks that you must complete if you are upgrading your Cognos Server for Argus Insight 7.0.1:
To configure custom Java authentication:
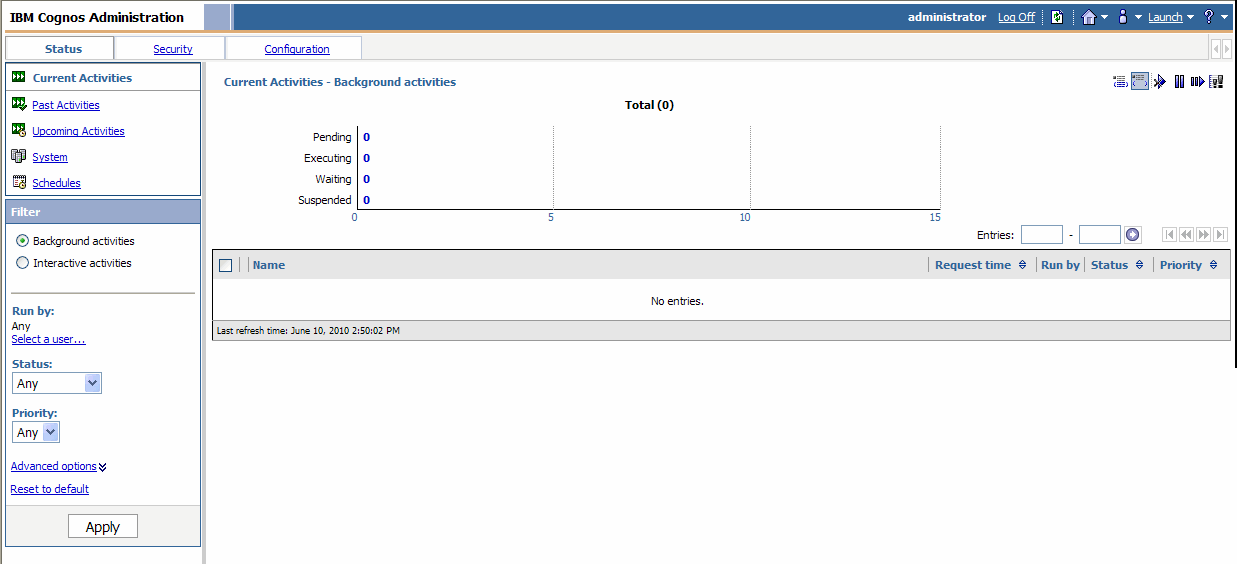
Go to IBM Cognos Administration and stop the Cognos services.
Navigate to the following folder:
\\Cognos_Server\Argus_Insight_Install_Path\Java Authentication\JDBC_PowerReports
Copy the CAM_AAA_JDBC_PowerReports.jar file from that folder to the following location on the Cognos 8 Server:
\\Cognos_8_Install_Path\ c8\webapps\p2pd\WEB-INF\lib
Define the configuration parameters:
Navigate to the following folder:
\\Cognos_8_Install_Path\ c8\Configuration
Open the JDBC_Config_PowerReports.properties file for editing.
Modify the existing values of the following parameters only if the database changed from the 7.0 database:
| Parameter | Value to Enter |
|---|---|
| Server | Enter the IP address or the name of the Database Server. |
| SID | Enter the instance/service name of the Argus Insight data mart. |
| Port | Enter the database port number. |
Save and close the file.
Navigate to the following folder:
Program Files\cognos\c8\bin\jre\1.5.0\lib\security
Backup the following two JAR files:
local_policy.jar
US_export_policy.jar
Go to the following URL:
https://www14.software.ibm.com/webapp/iwm/web /preLogin.do?source=jcesdk
Note:
You will need the user ID and password from IBM Cognos to download the files required in next step.Log in to the IBM site.
Select the Unrestricted JCE Policy files for SDK for all newer versions (1.4.2+) option and click Continue.
Click I agree to agree to the license terms and then check I confirm.
Click the Download Now link.
Download the files and extract into a folder.
Locate the following two JAR files in the extract folder:
local_policy.jar
US_export_policy.jar
Copy those jar files into the following folder:
Program Files\cognos\c8\bin\jre\1.5.0\lib\security
Go to IBM Cognos Administration and restart the Cognos services.
If you are upgrading from Argus Insight 7.0 to Argus Insight 7.0.1, you need to delete the data sources and packages that are no longer supported.
To delete the obsolete data sources and packages:
Go to IBM COGNOS Administration.
Click the Configuration tab and delete the following data sources:
Administration Statistics
Clinical Trial Analysis
Medical Analysis
Submission Statistic
Overdose-Pregnancy-Interaction
Navigate to Public Folders, ArgusInsight, Packages, and then delete the following packages:
Administration Statistics
Clinical Trial Analysis
DrillThrough
Medical Analysis
Overdose-Pregnancy-Interaction
Submission Statistics
If you are upgrading from Argus Insight 7.0 to Argus Insight 7.0.1, you need to delete numerous folders and reports that are no longer supported.
To delete the obsolete folders and reports:
Go to IBM COGNOS Administration.
Navigate to Public Folders, ArgusInsight, and then delete the DrillThrough folder.
Navigate to Public Folders, ArgusInsight, and select Compliance.
Delete the Analysis folder.
Navigate to the Reports subfolder. Delete the Compliance reports listed in Table 6-1.
Table 6-1 Compliance Reports to Delete
|
KPI List Report Country Group 2 |
Outstanding Report Submission by Responsible Group Listing - Detail |
|
KPI Overview Report Group 1 |
Outstanding Report Submission by Responsible Group Listing - Summary |
|
KPI Overview Report Group 2 |
Outstanding Report Submissions by Destination Listing - Detail |
|
Labeling Detail Listing by Case Number |
Outstanding Report Submissions by Destination Listing - Summary |
|
Labeling Detail Listing by Preferred Term |
Reporting Compliance by Destination (Count) |
|
Labeling Summary |
Reporting Compliance by Destination (Percentage) |
|
Outstanding Expedited Reports by Responsible Group |
Reporting Compliance by Responsible Group |
|
Reports Out of Compliance with Delayed Workflow Detail |
Navigate to Public Folders, ArgusInsight, Configuration, and select Reports. Delete the Configuration reports listed in Table 6-2.
Navigate to Public Folders, ArgusInsight, and select General.
Delete the Analysis folder.
Navigate to the Reports subfolder. Delete the General reports listed in Table 6-3.
Table 6-3 General Reports to Delete
|
Case Count by Reporter Type |
Relevant Medical History Listing |
|
Case Narrative Listing - Multilingual |
SAE Clinical Trial Co-Medication |
|
Case Origin Listing |
SAE Clinical Trial Laboratory Test |
|
Clinical Medical Review List |
SAE Clinical Trial Medical Conditions |
|
Detailed Line Listing by SOC |
SAE Clinical Trial Project Overview |
|
Downgraded Reports Listing |
Simple Line Listing by SOC |
|
Literature Listing |
Simple Line Listing by Case Number |
Navigate to Public Folders, ArgusInsight, and select Management.
Delete the Analysis folder.
Navigate to the Reports subfolder. Delete the Management reports listed in Table 6-4.
Table 6-4 Management Reports to Delete
|
Case Load History by Day |
Cases by Reporter Type Tabulation |
|
Case Load History by Month |
Delayed Workflow Listing by Case |
|
Case Load History by Quarter |
Delayed Workflow Listing by Workflow State |
|
Case Load History by Week |
First and Last Reporter Contact |
|
Case Load History by Year |
Listing of Cases Due for Lock |
|
Case Processing Times Listing |
Listing of Cases Late for Lock |
|
Case Seriousness Distribution |
Product Tabulation by Site and Case Source |
|
Case Seriousness Distribution Graphical Summary |
Report Volume History |
|
Case Volume by Reporter Type |
Reports by Causality |
|
Case Volume History (Reporter Type) |
Reports by Month |
|
Case Volume History (Seriousness) |
Reports by Product Family |
|
Case Volume History - Initial and Significant Follow-up |
Reports by Seriousness |
|
Case Volume History split by Initial and Follow-up |
Reports by Year |
Navigate to Public Folders, ArgusInsight, and select Pharmacovigilance.
Delete the Analysis folder.
Navigate to the Reports subfolder. Delete the Pharmacovigilance reports listed in Table 6-5.
Table 6-5 Pharmacovigilance Reports to Delete
|
Age Group vs. Gender |
Event (PT) vs. Duration of Treatment until Event |
|
Aggregate Diagnosis Listing |
Event vs. Duration of Treatment until Event |
|
Annual Product Review |
Event vs. Report Type |
|
Case Listing |
Fatal Case Listing |
|
Case Listing with all Regimens and Events |
Fatal/Life-Threatening Cases Listing |
|
Clinical Case Listing |
Frequency Listing of Events |
|
Clinical Trial Causality |
Gender Group by Age Group |
|
Data Quality Indicator (Alphabetically by Quality Indicator) |
MedDRA SOC-PT Group by Age Group |
|
Data Quality Indicator (Ascending Order of Count) |
MedDRA SOC-PT Group by Daily Dose |
|
Data Quality Indicator Listing |
MedDRA SOC-PT Group by Gender |
|
Dechallenge and Rechallenge Listing |
MedDRA SOC-PT Group Report Type, Event Seriousness, Causality |
|
Dosage Frequency Tabulation |
Product and Disease Listing |
|
Dose Formulation Product Relationship |
Seriousness Case Listing |
|
Duration of Treatment until Event (Time to Onset) per Event |
Temporal Relationships |
|
Event (PT) vs. Daily Dose |
Top 10 Substances |
Delete the Analysis folder from each Enterprise specific folder.
Skip to Section 6.2.6, "Importing the Content Repository" to complete the final steps for the upgrade.
This section describes how to set up Cognos Server and configure your environment for a new installation of Argus Insight.
If you are upgrading from Argus Insight 7.0, see Section 6.1, "Upgrading Cognos Server for Argus Insight 7.0.1" for the installation procedures.
This section describes the following tasks that you must complete to configure Internet Information Services 7.0 (IIS 7.0) on the Cognos 8 Server:
To check that CGI or ISAPI is enabled in IIS:
Click Start.
Navigate to Administrative Tools and select Server Manager. The Server Manager window opens. 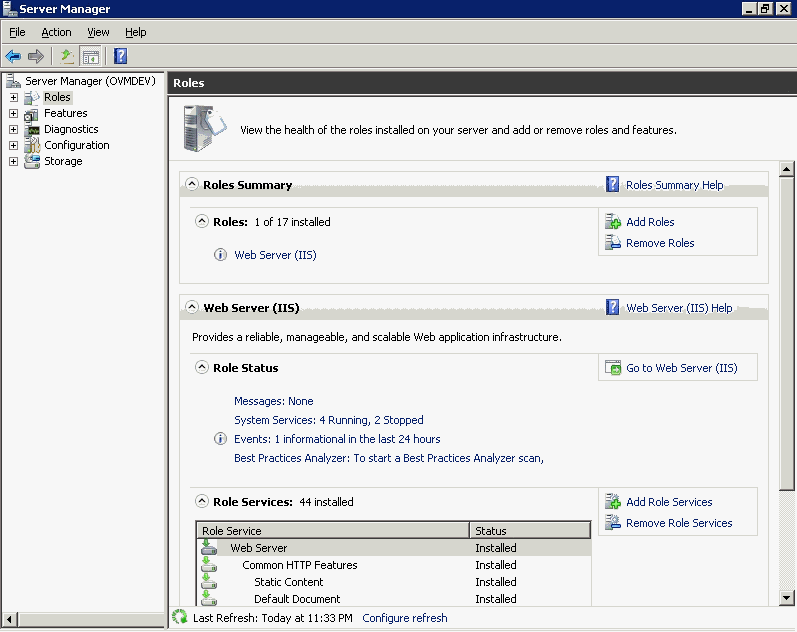
Click the Add Role Services link to the right of the Role Services section. The Add Role Services dialog box opens.
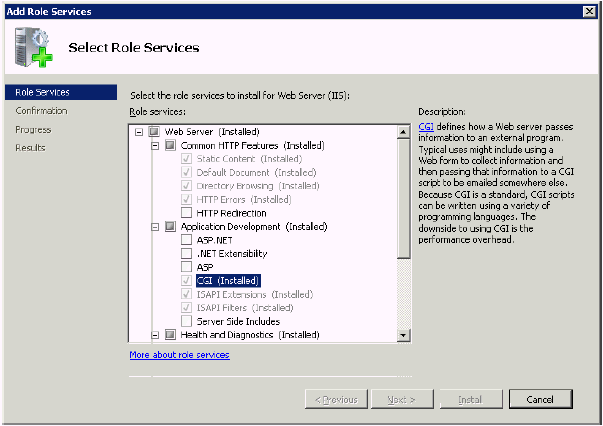
Expand Application Development (Installed).
Verify that the CGI and ISAPI Extensions are listed as (Installed).
If these role services are not installed, select the appropriate check box and then click Install. Follow the instructions on the screen to complete the installation.
If these role services are already installed, click Cancel. The system returns to the Server Manager window.
To create the Cognos 8 virtual directories:
Navigate to Roles, Web Server (IIS), and select Internet Information Services (IIS) Manager.
Expand the server node in the Connections pane.
Expand Sites.
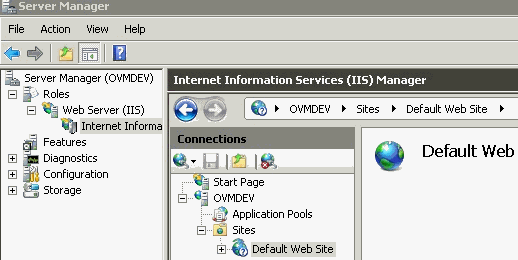
Right-click Default Web Site, and select Add Virtual Directory. The Add Virtual Directory dialog box opens.
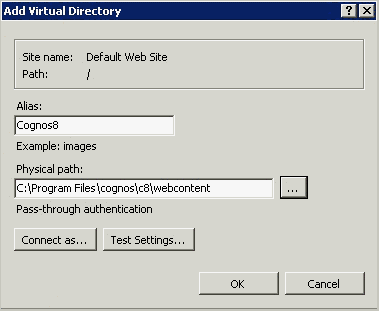
In the Alias field, enter Cognos 8.
In the Physical path field, enter the complete path to the Cognos 8 Web content directory. The default path is:
drive:\Program Files\cognos\c8\webcontent
Click OK.
Right-click your newly-created Cognos 8 virtual directory and select Add Virtual Directory. The Add Virtual Directory dialog box opens.
In the Alias field, enter cgi-bin.
In the Physical path field, enter the complete path to the Cognos 8 cgi-bin directory. The default path is:
drive:\Program Files\cognos\c8\cgi-bin
Click OK.
To edit the ISAPI or CGI extensions:
Select the server node in the Connections pane.

Double-click the ISAPI and CGI Restrictions icon.
Click the Add link in the Actions pane. The Edit ISAPI or CGI Restriction dialog box opens.

In the ISAPI or CGI path field, enter the path to either the cognos.cgi file or the cognosisapi.dll file depending on which one you will use.
Note:
For Argus Insight, Oracle recommends that you use cognos.cgi. In addition, you may need to surround the path in double quotes if it contains any spaces.The default path for each file is as follows:
drive:\Program Files\cognos\c8\cgi-bin\cognosisapi.dll
drive:\Program Files\cognos\c8\cgi-bin\cognos.cgi
Select the Allow extension path to execute check box.
Click OK.
Select the server node in the Connections pane.
Double-click the ISAPI and CGI Restrictions icon.
Click the Edit Feature Settings link in the Actions pane. The Edit ISAPI and CGI Restriction Settings dialog box opens.
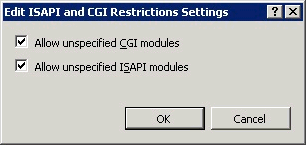
Select the Allow unspecified CGI Modules check box.
Click OK.
To add the module mapping:
Open the Internet Information Services (IIS) Manager.
Expand the virtual directory folder and click the cgi-bin virtual directory.
Double-click the Handler Mappings icon.
Click the Add Module Mapping link in the Actions pane. The Add Module Mapping dialog box opens.
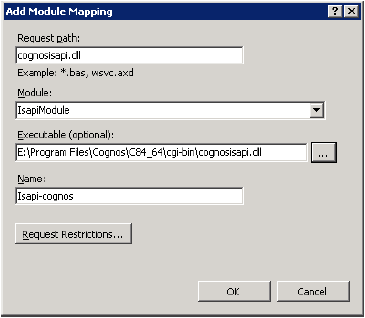
In the Request path field, enter either *.cgi or *.dll depending on which one you need.
In the Module field, select either CGIModule or IsapiModule from the list.
In the Executable field, you enter a value depending on the module you are using.
If you are using an ISAPI Module, you must enter the complete path to the cognosisapi.dll. You can click the ellipsis icon to browse to the file location.
If you are using a CGI Module, you do not need to enter a value into the Executable field.
In the Name field, enter a realistic name for this mapping. For example, ISAPI-Cognos.
Click Request Restrictions.
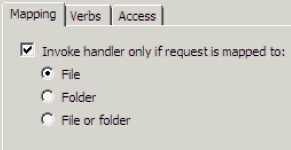
Click the Mapping tab, and select Invoke handler only if request is mapped to: File.
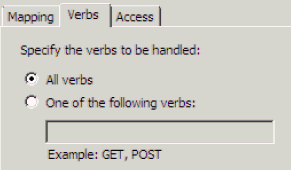
Click the Verbs tab, and select All verbs.
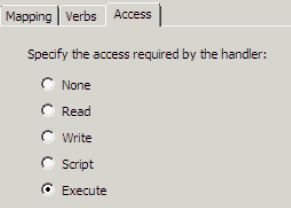
Click the Access tab, and select Specify the access required by the handler: Execute.
Click OK to save your changes. The system returns to the Add Module Mapping dialog box.
Click OK.
Depending on the method used in Section 6.2.1.3, "Editing ISAPI or CGI Extensions," the system may display the following message:
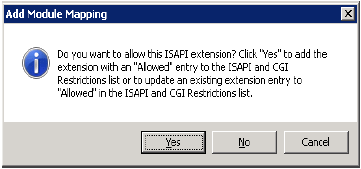
Click Yes. Your new module mapping should be added to the Module Mapping List.
For Cognos Administration to function properly, you must manually edit the directive that you added to the IIS configuration file in the previous step (see Section 6.2.1.4, "Adding the Module Mapping").
To edit the module mapping:
Navigate to the following folder:
COGNOS_HOME/c8/cgi-bin
Note:
Ensure that you have access permissions on the cgi-bin folder so you can save the changes you make to the web.config file.Open the web.config file for editing.
Locate the appropriate add name statement in the web.config file depending on whether you are using CGI or ISAPI.
For CGI, locate this statement:
<add name="CGI-cognos" path="*.cgi" verb="*" modules="CgiModule" resourceType="Unspecified" />
For ISAPI, locate this statement:
<add name="ISAPI-Cognos" path="cognosisapi.dll" verb="*" modules="IsapiModule" scriptProcessor="E:\Program Files\Cognos\C84_64\cgi-bin\cognosisapi.dll" resourceType="Unspecified" requireAccess="Execute" preCondition="bitness32" />
Add allowPathInfo="true" to the end of the statement.
For CGI:
<add name="CGI-cognos" path="*.cgi" verb="*" modules="CgiModule" resourceType="Unspecified" allowPathInfo="true" />
For ISAPI:
<add name="ISAPI-Cognos" path="cognosisapi.dll" verb="*" modules="IsapiModule" scriptProcessor="E:\Program Files\Cognos\C84_64\cgi-bin\cognosisapi.dll" resourceType="Unspecified" requireAccess="Execute" preCondition="bitness32" allowPathInfo="true"/>
Save your changes and close the web.config file.
To allow the CGI application to use execute:
Open the Internet Information Services (IIS) Manager.
Expand the virtual directory folder and click the cgi-bin virtual directory.
Double-click the Handler Mappings icon.
Click the Edit Feature Permissions link in the Actions pane. The Edit Features Permissions dialog box opens.
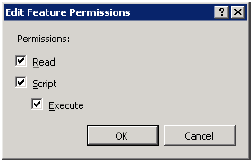
Select the Execute check box.
Click OK.
To configure the Java Database Components (JDBC) in the Cognos 8 environment:
Navigate to the following Oracle installation path:
Oracle_Installation_Path\product\Oracle_Version\client_1\sqldeveloper\jdbc\lib
Copy the ojdbc5.jar file to the following location on the Cognos 8 environment:
Cognos_Installation_Path\c8\webapps\p2pd\web-inf\lib
To copy the authentication settings for Report Writer:
Navigate to the following location on the Argus Insight Web Server:
\\Argus_Insight_Installation_Path\ArgusInsight\ASP\Reports
Copy the PR.asp file to the following location on the Cognos 8 Server:
\\Cognos_8_Installation\cognos\c8\cgi-bin
To configure custom Java authentication:
Copy the CAM_AAA_JDBC_PowerReports.jar file from this location:
\\Cognos_Server\Argus_Insight_Install_Path\Java Authentication\JDBC_PowerReports
To this location on the Cognos 8 Server:
\\Cognos_8_Install_Path\ c8\webapps\p2pd\WEB-INF\lib
Copy the JDBC_Config_PowerReports.properties file from this location:
\\Cognos_Server\Argus_Insight_Install_Path\Java Authentication\JDBC_PowerReports
To this location on the Cognos 8 Server:
\\Cognos_8_Install_Path\ c8\Configuration
Define the configuration parameters:
Go to the Cognos Server.
Open the JDBC_Config_PowerReports.properties file for editing.
Modify the existing values of the following parameters:
| Parameter | Value to Enter |
|---|---|
| Server | Enter the IP address or the name of the Database Server. |
| SID | Enter the instance/service name of the Argus Insight data mart. |
| Port | Enter the database port number. |
Save and close the file.
Copy the ContentStore.zip file from this location:
\\Cognos_ 8_Server_Name\Argus_Insight_Install_Path\Cognos 8\Contentstore
To this location on the Cognos 8 Server:
\\Cognos_8_Install_Path\ c8\Deployment
Navigate to the following folder:
Program Files\cognos\c8\bin\jre\1.5.0\lib\security
Backup the following two JAR files:
local_policy.jar
US_export_policy.jar
Go to the following URL:
https://www14.software.ibm.com/webapp/iwm/web/preLogin.do?source=jcesdk
Note:
You will need the user ID and password from IBM Cognos to download the files required in next step.Log in to the IBM site.
Select the Unrestricted JCE Policy files for SDK for all newer versions (1.4.2+) option and click Continue.
Click I agree to agree to the license terms and then check I confirm.
Click the Download Now link.
Download the files and extract into a folder.
Locate the following two JAR files in the extract folder:
local_policy.jar
US_export_policy.jar
Copy those jar files into the following folder:
Program Files\cognos\c8\bin\jre\1.5.0\lib\security
This section describes the following tasks that you must complete to configure the Cognos 8 environment:
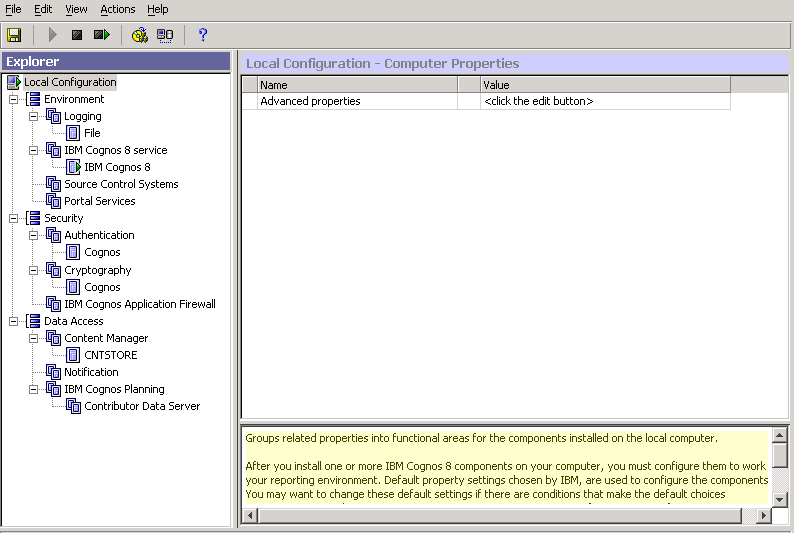
You use the options in the IBM Cognos 8 Configuration window to define environment group and logging properties, security properties, and data access properties.
To open the IBM Cognos 8 Configuration window:
Click Start.
Navigate to All Programs, IBM Cognos 8, and then select IBM Cognos Configuration. The IBM Cognos Configuration window opens.
Note:
The windows displayed during the Cognos 8 configuration are labeled either IBM Cognos 8 or Cognos 8. Both labels refer to the same Cognos configuration.To define the environment group properties and the environment logging properties:
Open the IBM Cognos 8 Configuration window.
Select Environment. The system displays the Environment - Group Properties in the right pane.
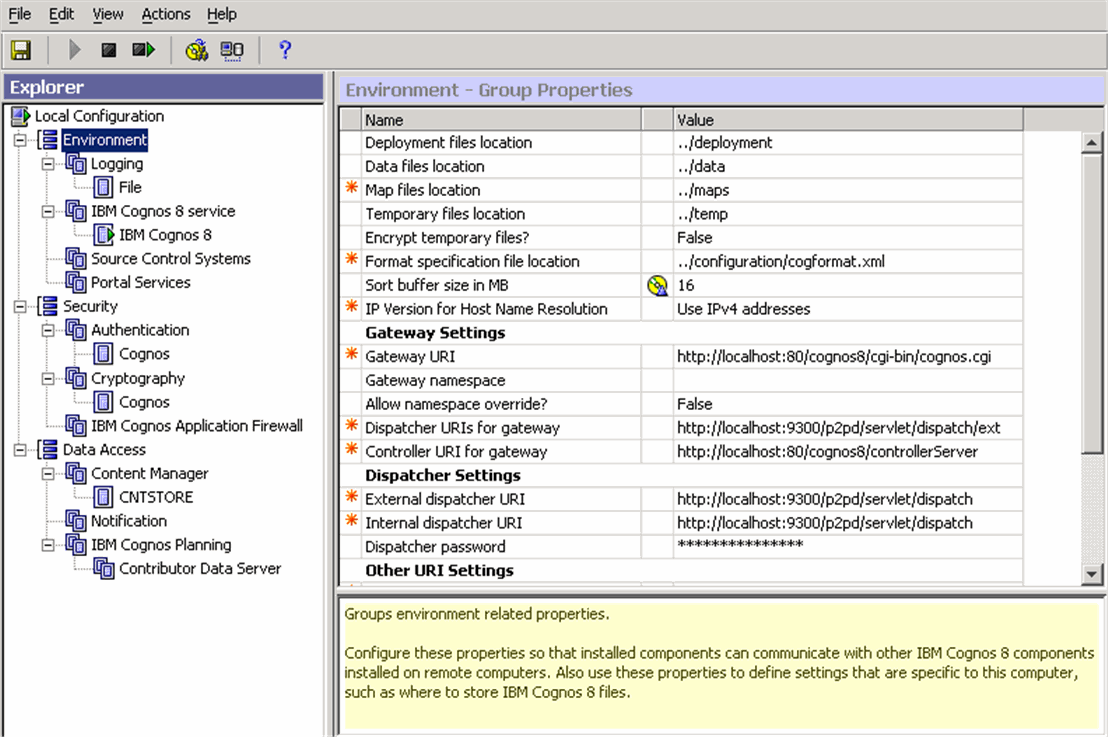
Set the following environment properties to the required value:
| Environment Property | Required Value |
|---|---|
| Sort buffer size in MB | 16 |
| Gateway URI | http://localhost:80/cognos8/cgi-bin/cognos.cgi |
| Dispatcher URIs for gateway | http://localhost:9300/p2pd/servlet/dispatch/ext |
| Controller URI for gateway | http://localhost:80/cognos8/controllerServer |
| External dispatcher URI | http://localhost:9300/p2pd/servlet/dispatch |
| Internal dispatcher URI | http://localhost:9300/p2pd/servlet/dispatch |
| Content Manager URIs | http://localhost:9300/p2pd/servlet |
| Dispatcher URI for external applications | http://localhost:9300/p2pd/servlet/dispatch |
Navigate to Environment and select Logging. The system displays the properties for the Logging component.
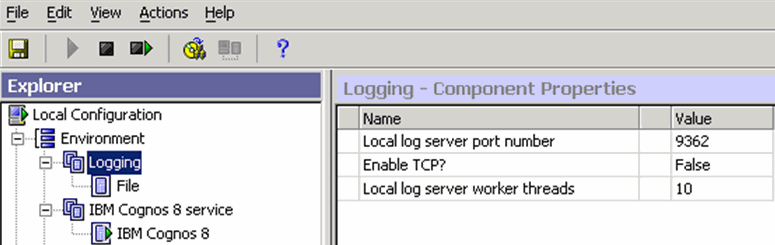
Set the following logging properties to the required value:
| Logging Property | Required Value |
|---|---|
| Local log server port number | 9362 |
| Enable TCP? | False |
| Local log server worker threads | 10 |
To define the security properties:
Open the IBM Cognos 8 Configuration window.
Navigate to Security, Authentication, and select Cognos.

Set the Allow anonymous access? property to True.
Navigate to Security and select IBM Cognos Application Firewall.
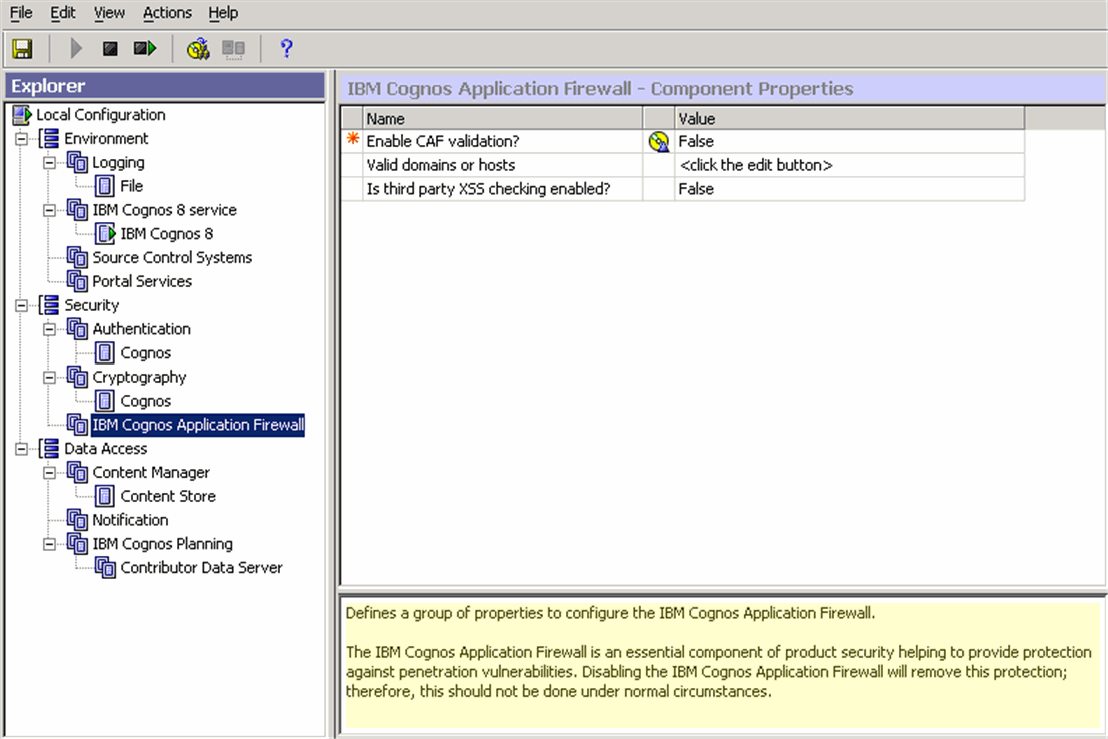
Set the Enable CAF validation? property to False.
To define the data access properties:
Open the IBM Cognos 8 Configuration window.
Navigate to Data Access, Content Manager, right-click Content Store, and then select Delete from the menu.
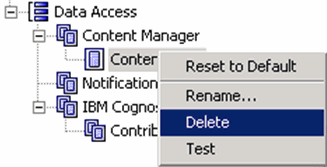
The system prompts for confirmation that you want to delete the Content Store.
Click Yes.
Navigate to Data Access, right-click Content Manager, select New resource, and then select Database.
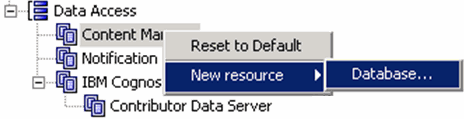
Complete the New Resource - Database dialog box as follows:
In the Name field, type CNTSTORE. This is the name of the database resource.
In the Type field, select Oracle database.
Click OK.
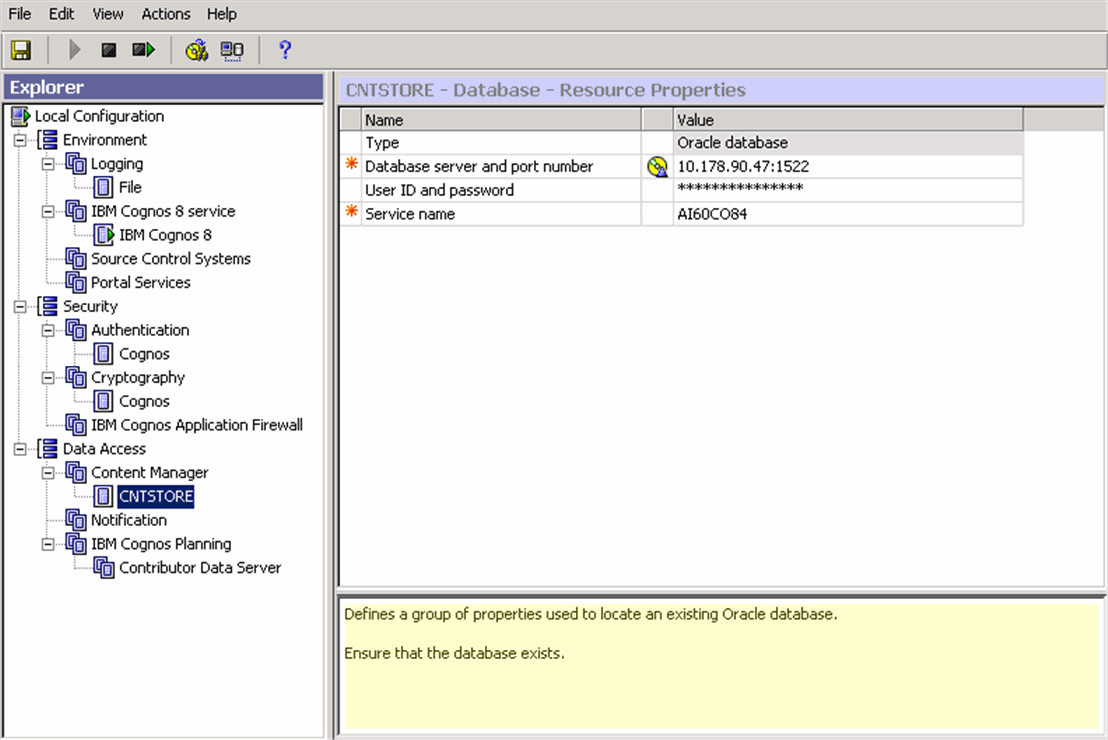
The system returns to the IBM Cognos Configuration window, selects the newly-created CNTSTORE resource database, and displays the resource properties for the database.
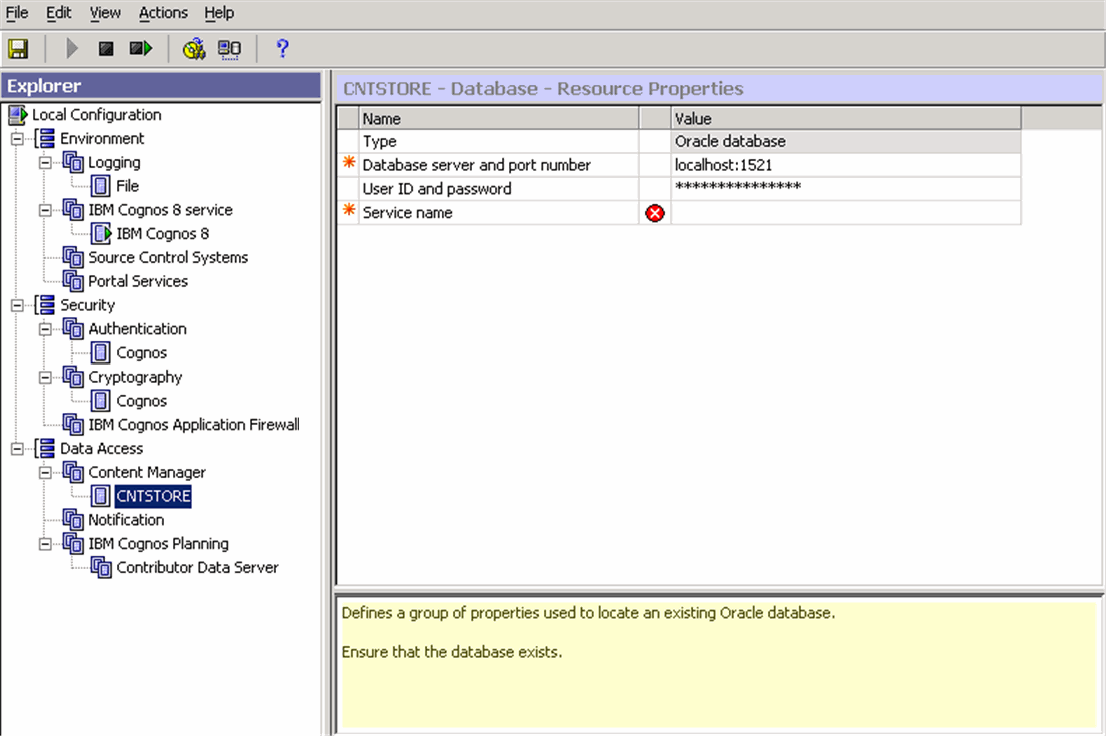
Enter the value for the Database server and port number as:
Database_Server_Name:1521
where:
Database_Server_Name is the name of the server where your content store database is stored.
Select User ID and password, and click the icon next to it. The Value - User ID and password dialog box opens.
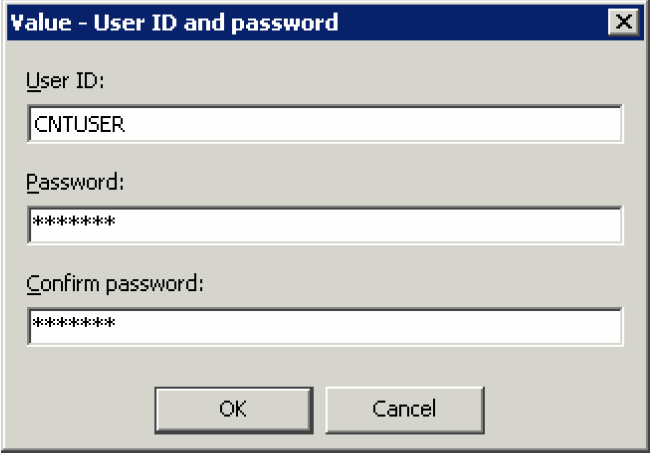
In the User ID field, type the ID for the content store database user.
In the Password field, type the password for the content store database user.
In the Confirm password field, re-enter the password for verification.
Click OK.
Note:
The contents store database user is created in the Cognos content store database. This user is given grants of Connect, Resource, and Create View, along with Unlimited Tablespace Grant.The character set of the Cognos content store database should only be UTF.
Make sure that the content store database entry is added in the TNSNames.ora file on the Cognos 8 server.
Enter the database instance name for the Cognos 8 repository in the Service name field.
To create the namespace for Argus Insight authentication:
Open the IBM Cognos 8 Configuration window.
Navigate to Security, right-click Authentication, click New resource, and then select Namespace.
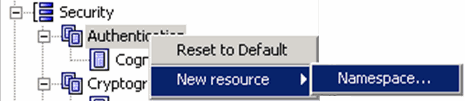
Complete the New Resource – Namespace dialog box as follows:
In the Name field, type PowerReports.
In the Type field, type Custom Java Provider.
Click OK.
The PowerReports - Namespace - Resource Properties window opens.
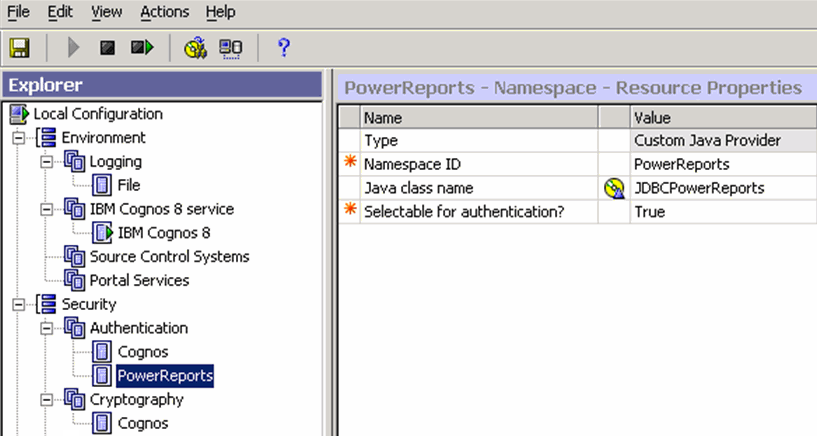
Set the Namespace ID property to PowerReports.
Set the Java class name property to JDBCPowerReports.
To save the configuration and start the Cognos 8 service:
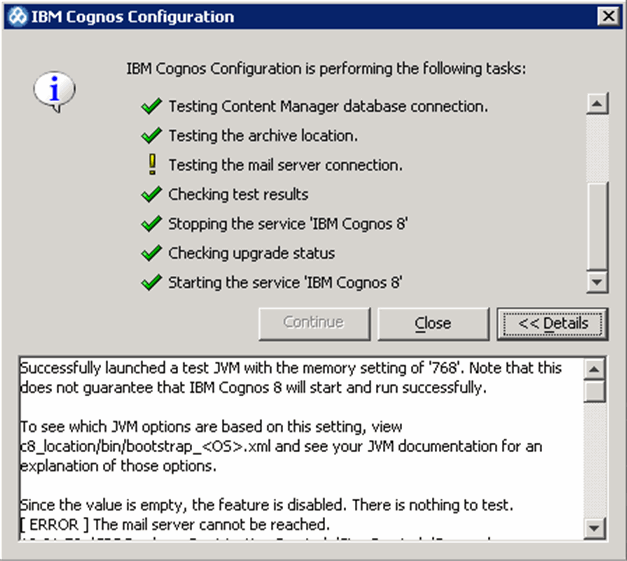
Open the File menu and select Save to save your changes to the configuration settings. The system displays the following dialog box and lists each task as it is performed:
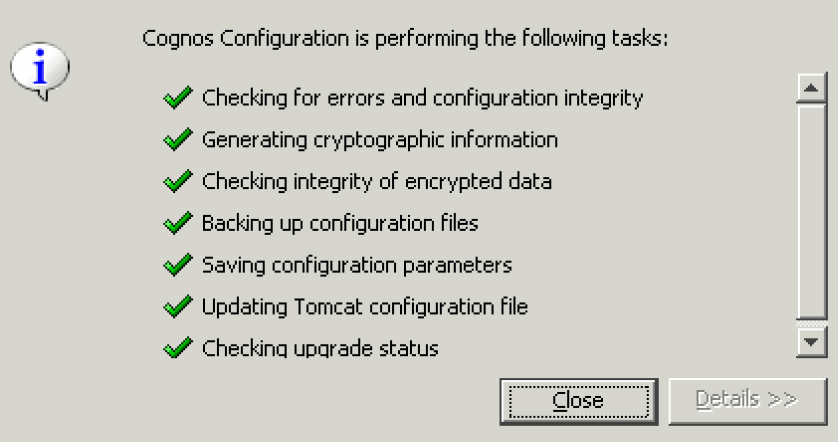
Click Close when the system completes all the configuration tasks.
Click the Start icon in the IBM Cognos Configuration window to run the Cognos 8 service.
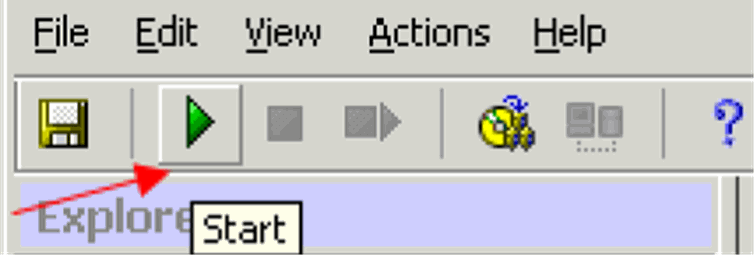
The system begins to run the IBM Cognos 8 service.
If there are no problems with the configuration, the system completes the test phase and starts the IBM Cognos 8 service successfully.
If there are possible problems with the configuration, the system stops running the service and displays a warning message. When you click OK to acknowledge the warning message, the system opens another dialog box with more information. For example:
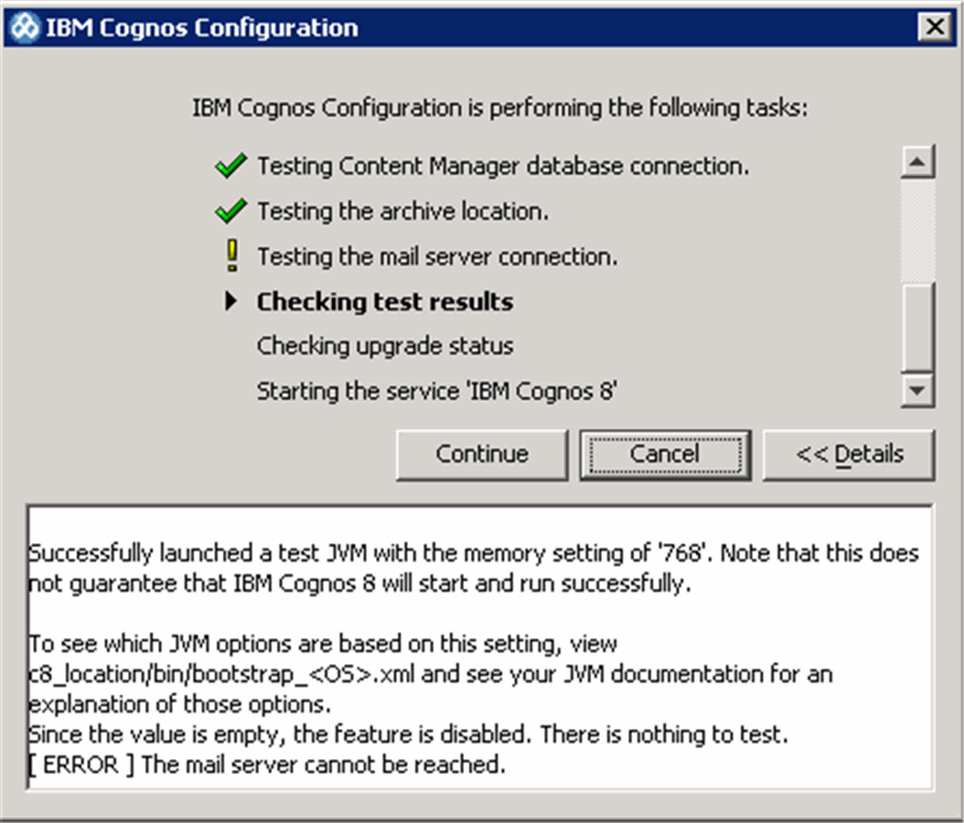
At this point, you can:
Click Details for more information about the warnings and errors.
Click Cancel to stop the process. If the warnings or errors are due to reasons other than mail server connection failure, cancel the process and check your configuration again.
Click Continue to ignore the warnings and errors, and complete the process of starting the IBM Cognos 8 service. For example, you can ignore warnings that the mail server cannot be reached (see the previous illustration).
Click Close to exit.
Open the File menu and select Exit to exit from the IBM Cognos 8 configuration.
Note:
If your security settings on the server do not permit you to view the Cognos connection, add the site URL (http://Cognos_8_Server/cognos8) to the list of local intranet sites.To import the content repository to the database:
Log in to the IBM Cognos 8 Server as a user with administrator privileges.
Start Internet Explorer.
Enter the URL in the following format:
http://Cognos_8_Server/cognos8
The IBM Cognos 8 main window opens.
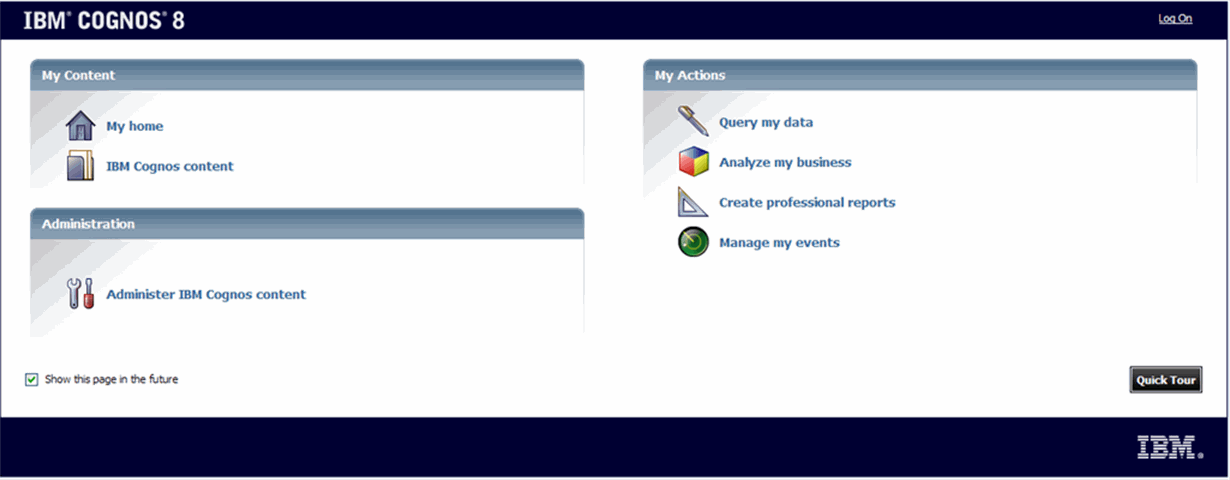
Click Administer IBM Cognos content. The IBM Cognos Administration window opens.
Click the Configuration tab.
Click the Content Administration link. The Content Administration window opens.
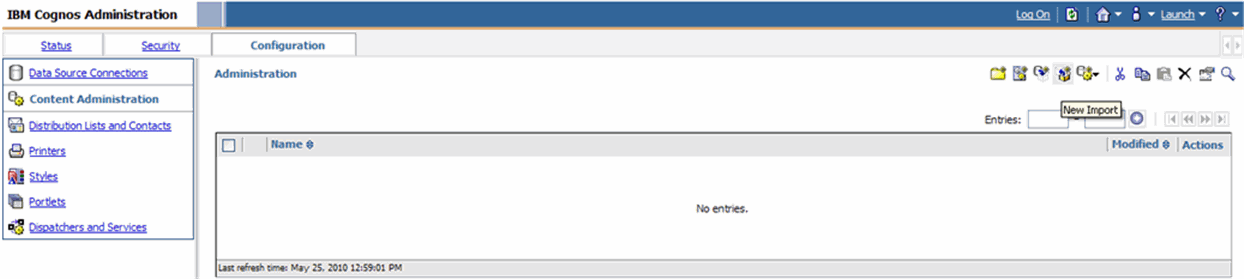
Click the New Import icon. The system starts the New Import wizard.
Click Next to continue. The wizard prompts for the encryption password.
Type the password and click OK. The wizard prompts for the name, description, and location of the Argus Insight deployment.
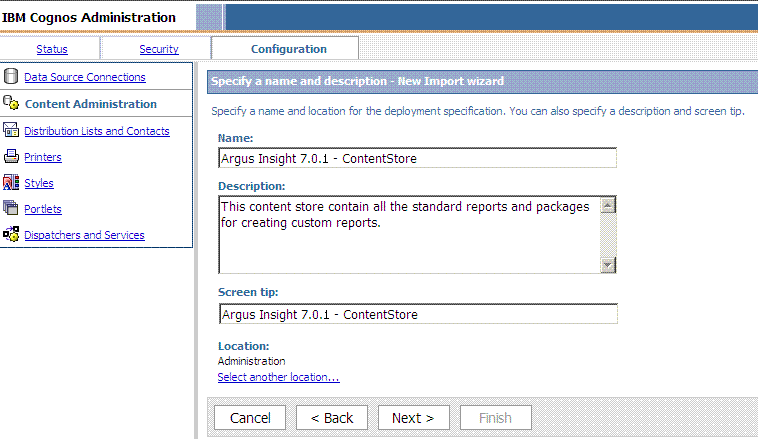
Leave the default values and click Next to continue. The wizard prompts you to select the public folders content.
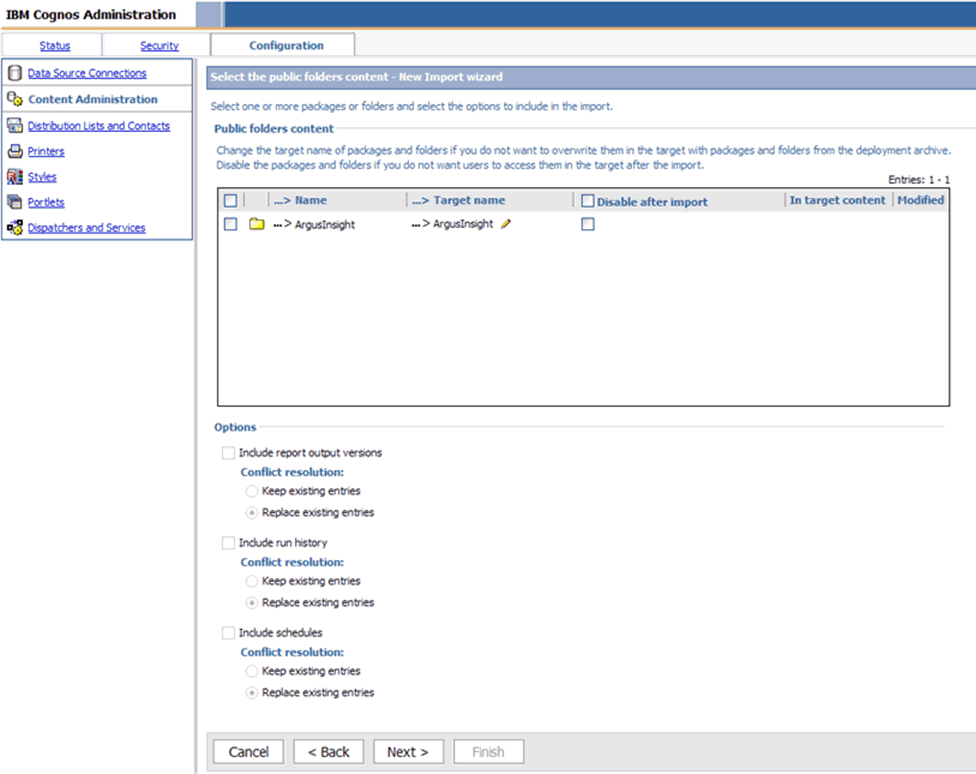
Select the Name check box to choose all the check boxes in this category, and click Next.
The wizard prompts you to select the directory content and options to include in the import.
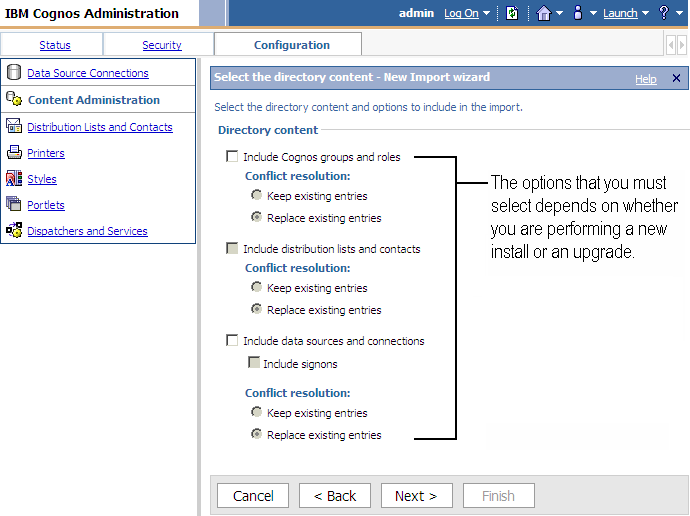
Select the directory content and options to include in the import. The options that you select depends on whether you are performing a new install or an upgrade.
| Directory Content and Options | New Install | Upgrade |
|---|---|---|
| Include Cognos groups and roles | Selected | NOT selected |
| Include distribution lists and contacts | NOT selected | NOT selected |
| Include data sources and connections | Selected | NOT selected |
| Include signons | Selected | NOT selected |
Click Next. The wizard prompts you to specify the general options.
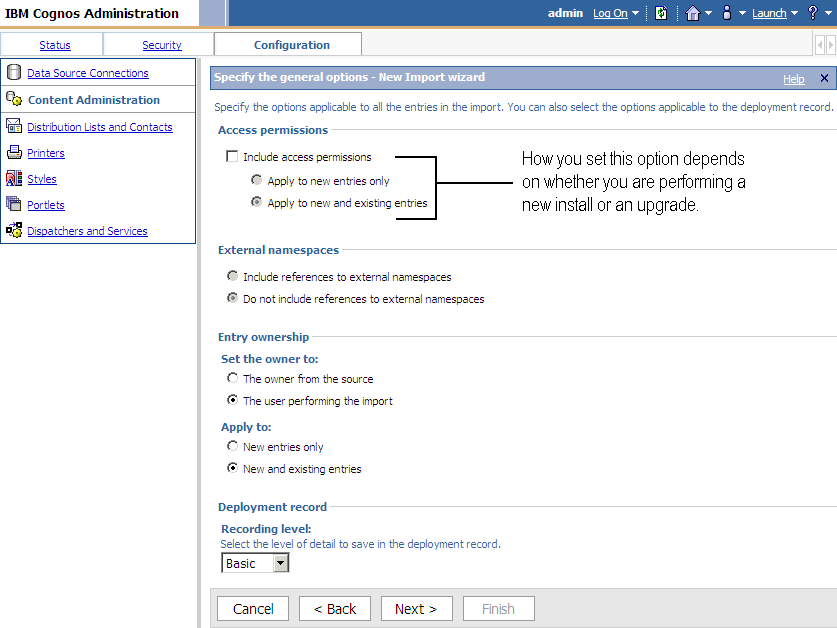
Set the Access permissions depending on whether you are performing a new install or an upgrade:
If you are performing a new install, you MUST select the Include access permissions check box.
If you are performing an upgrade, do NOT select the Include access permissions check box.
Verify that the remaining general options are set as follows:
For External namespaces, verify that Do not include references to external namespaces is selected, but dimmed.
For Entry ownership, set the owner to The user performing the import and apply to New and existing entries.
For the Deployment record, select Basic for the Recording level.
Click Next. The wizard displays the summary screen.
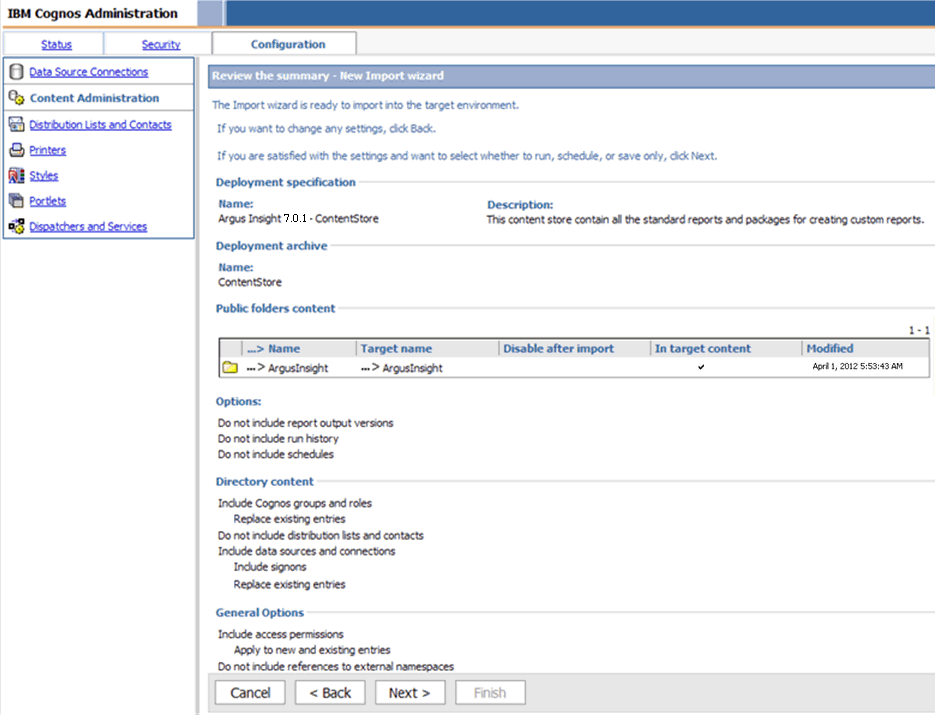
Review the summary information, and click Next. The wizard prompts you to select the type of New Import action.
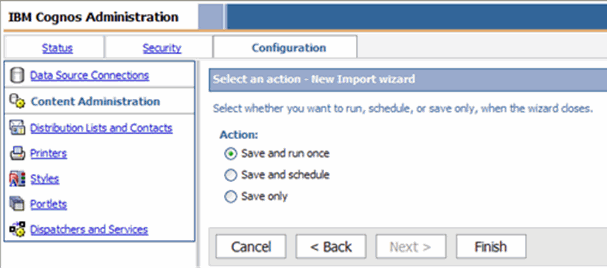
Select the Save and run once option, and click Finish. The wizard prompts you to selection the options for this import.
Select Upgrade all report specifications to the latest version and click Run. The wizard summarizes your selection for this import.
Click OK to run the import.
Verify the import as follows:
Click More corresponding to the newly imported Content Store.
Click View run history to view the deployment history.
Verify that the Status column displays the status as Succeeded.
Click Close to exit.
The repository import is complete.
Note:
If the database changed from the 7.0 database, you must also update the source data information after importing the content repository. Skip to Section 6.2.7.2, "Editing Sign On" for instructions.This section includes the following topics:
To configure Cognos user and roles:
Set up an administrator user in the Cognos environment. An administrator user is an Argus Insight user who is part of the system administrator role.
Log in to Argus Insight as a user with administrator privileges.
Click the Tools tab in the upper-right corner of the Argus Insight Home page to open the ADMINISTRATION TOOLS page.
Click the List Maintenance tab.
Select Profile Switches from the List Maintenance Items group.
Define the COGNOS ADMIN USER attribute.
Select COGNOS ADMIN USER from the Attributes group.
Click Modify. The following Modify Attribute dialog box opens:
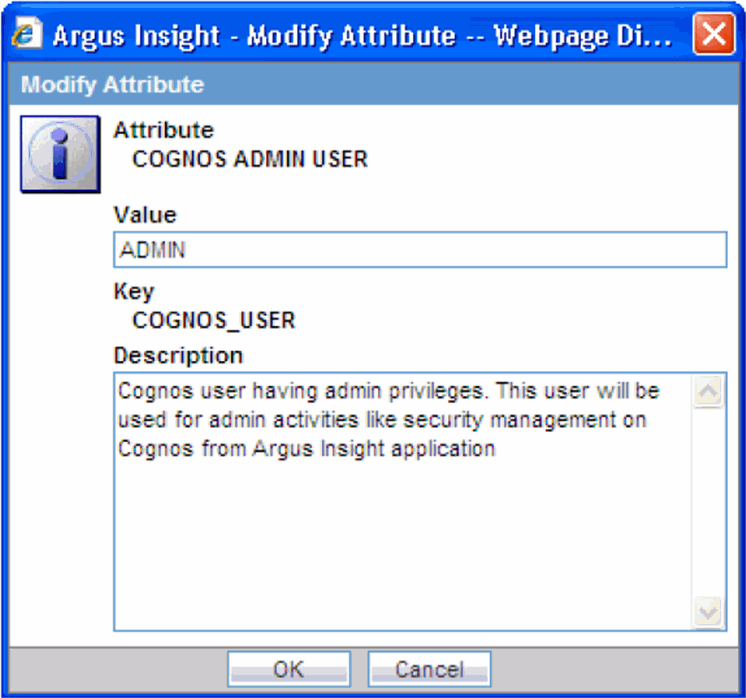
Enter the value for the Cognos administrator user.
Click OK to save your changes and return to the List Maintenance tab.
Define the COGNOS ADMIN PASSWORD attribute.
Select COGNOS ADMIN PASSWORD from the Attributes group.
Click Modify. The following Modify Attribute dialog box opens:

Click the Value field, and type the password for the Cognos administrator.
Re-type the password in the Confirm Password field for verification.
Click OK to save your changes and return to the List Maintenance tab.
Verify that the following List Maintenance entries are configured.
COGNOS SERVER
COGNOS ADMIN USER
COGNOS ADMIN PASSWORD
This role will have all rights required to run various parts of Argus Insight application. All Insight users will become part of this role during their first login.
Define the COGNOS USER ROLE NAME attribute.
Select COGNOS USER ROLE NAME from the Attributes group.
Click Modify. The following Modify Attribute dialog box opens:
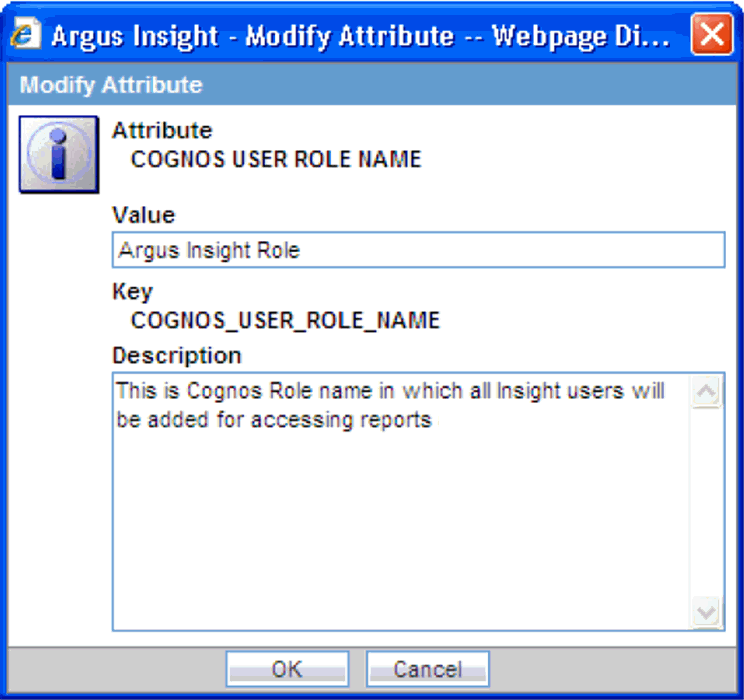
Click the Value field, and type the Cognos User Role Name you want to create in Cognos environment.
Click OK to save your changes and return to the List Maintenance tab.
The system adds the newly configured role to the following roles:
Analysis Users
Query User
Author
To edit your sign-on information:
Log in to the Cognos 8 Server as an administrator user.
Start Internet Explorer.
Type the URL in the following format and press Enter:
http://Cognos_8_Server/cognos8
The IBM Cognos 8 home page opens.
Note:
If your security settings on the server do not permit you to view the Cognos connection, add the site URL (http://Cognos_8_ Server/cognos8) to the list of local intranet sites.Click Administer IBM Cognos content. The IBM Cognos Administration window opens.
Click the Configuration tab.
Click Data Source Connections and click PRMART.
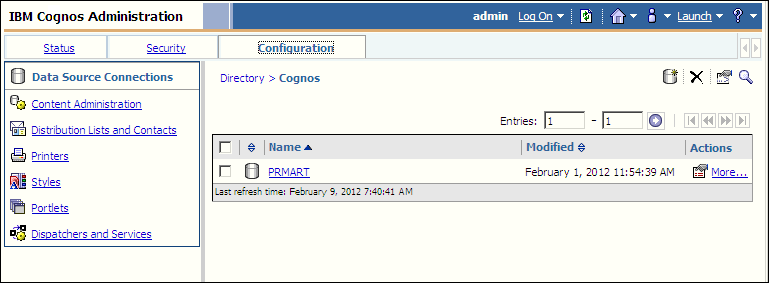
Click PRMART.
Click the More link to the right of the PRMART link. The Perform an action - PRMART pane opens.
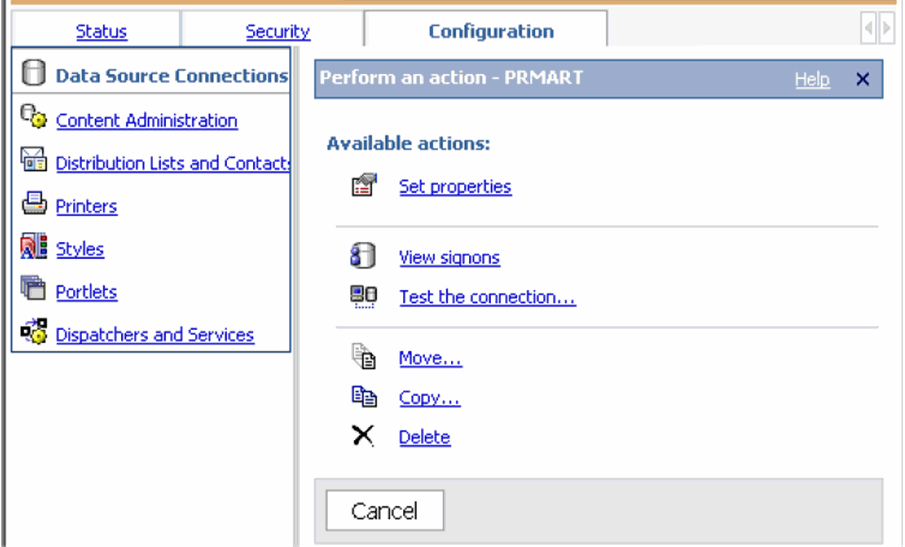
Click Set properties. The Set properties page for PRMART opens.
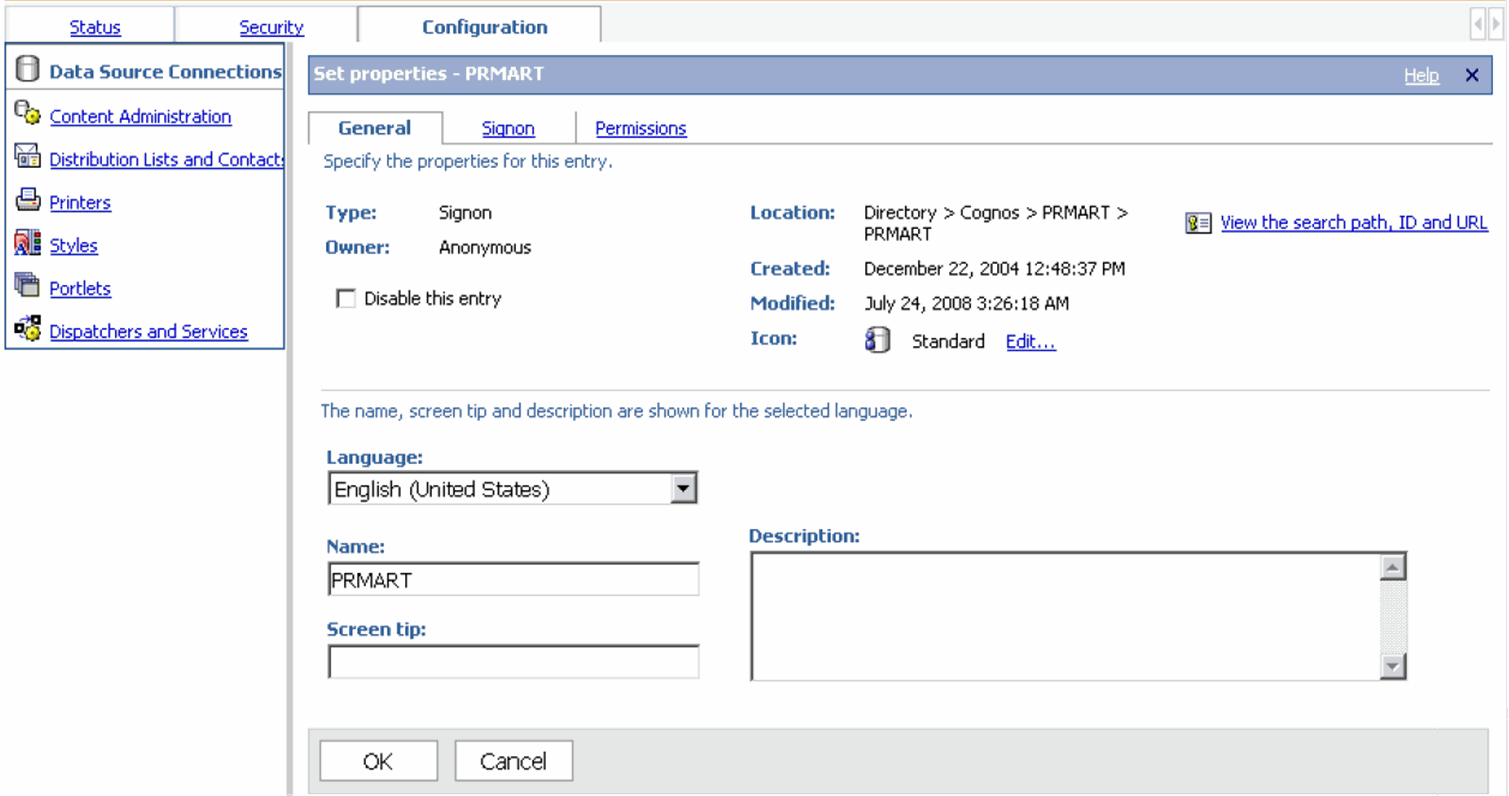
Click the Signon tab.
Click the Edit the signon link. The system opens the following pane:
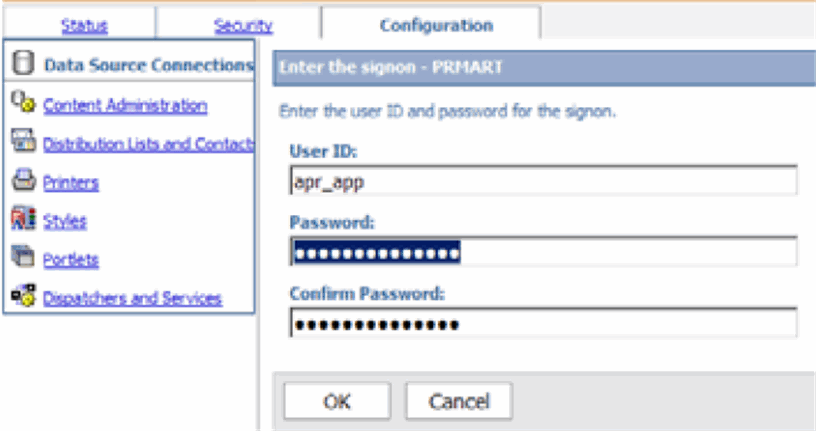
In the User ID field, type the ID for the APR_APP user.
In the Password field, type the password for the APR_APP user.
In the Confirm Password field, re-type the password for verification.
Click OK to set the password.
Click OK again to return to this screen:

Click the PRMART link, click the More link, and then click Set properties.
Click the Connection tab. The system displays the following information:
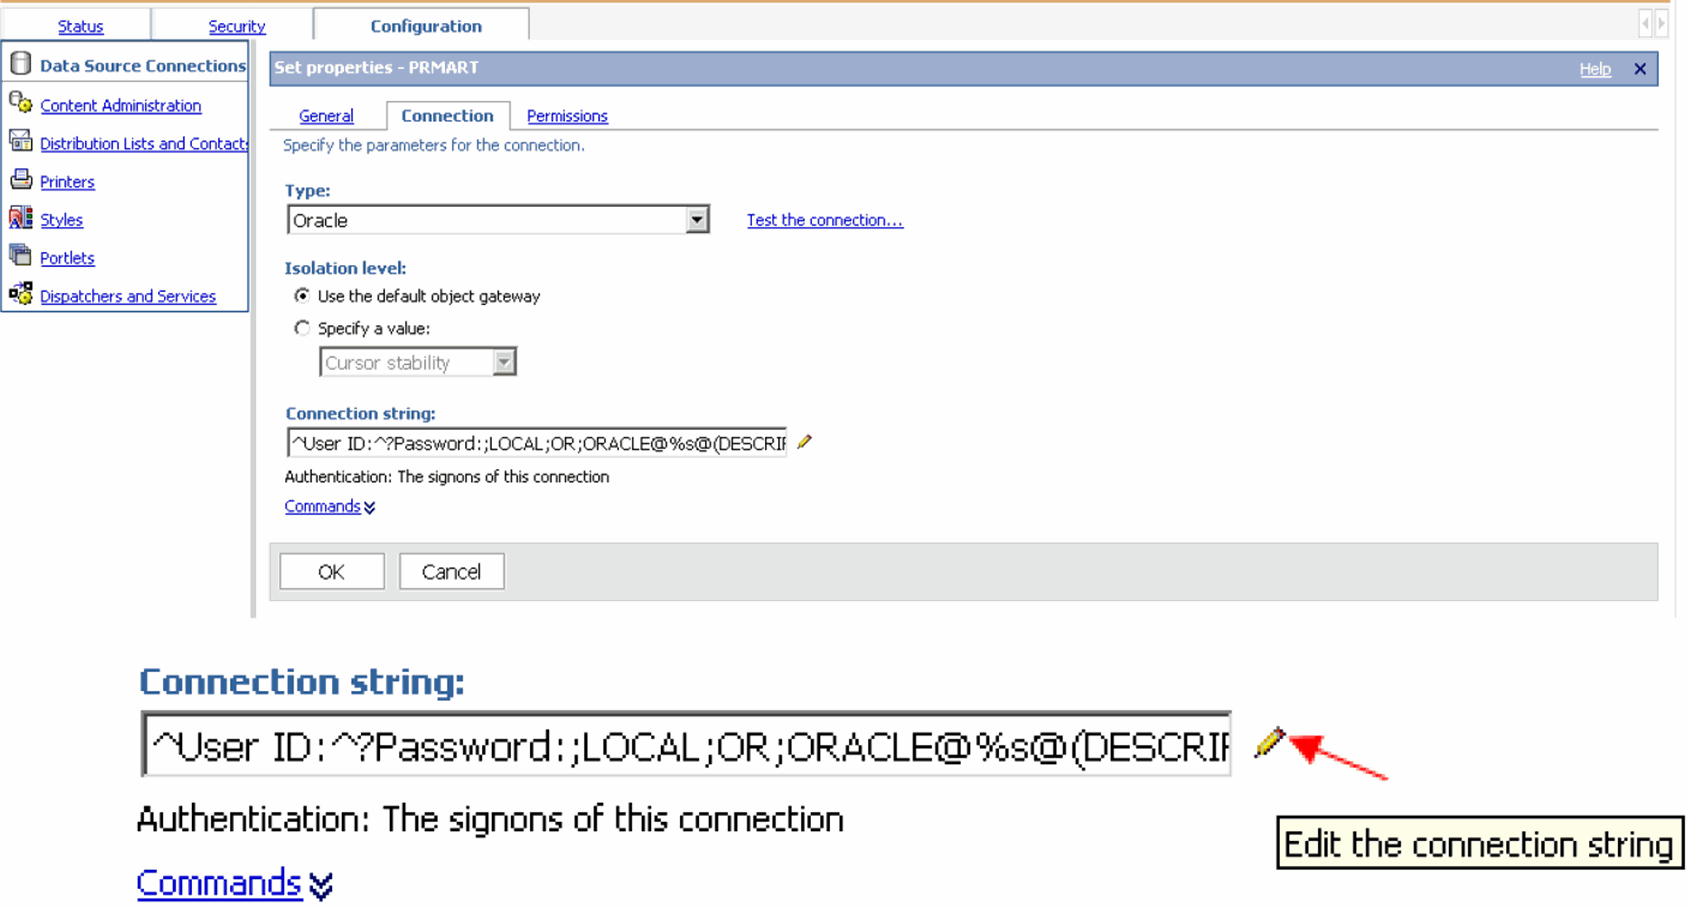
Click the pencil icon to edit the connection string. The system displays the Edit the connection string - Oracle pane.
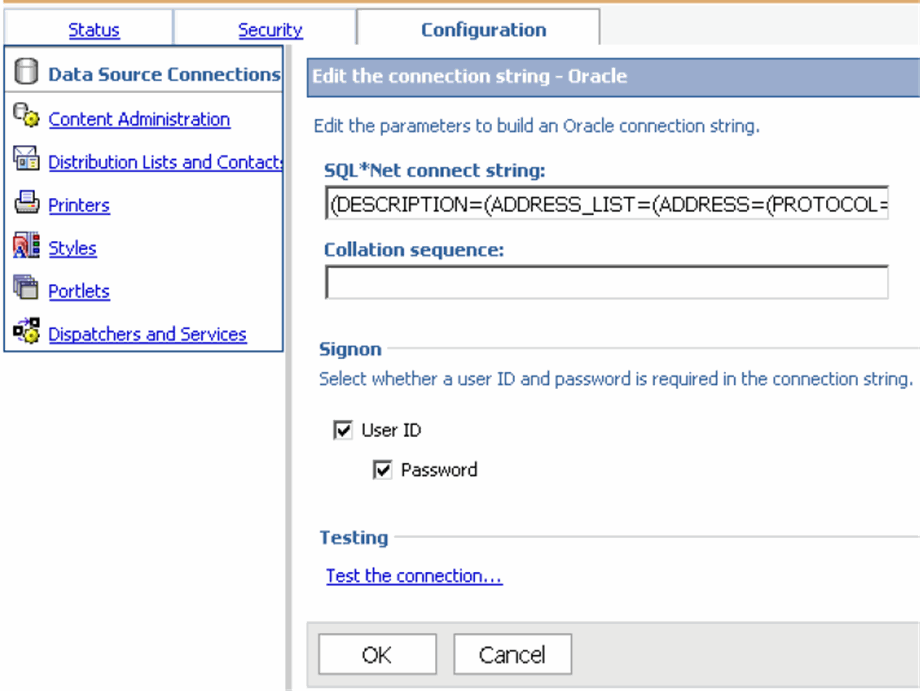
Set the following information in the SQL*Net connect strings field:
Set the HOST as the Argus Insight Database Server Name.
Set the PORT as the Argus Insight Database Port Number.
Set the SERVICE_NAME as the Argus Insight Database Instance Name.
Click the Test the connection link. Wait until the system opens the Test the connection - PRMART pane and then click Test.
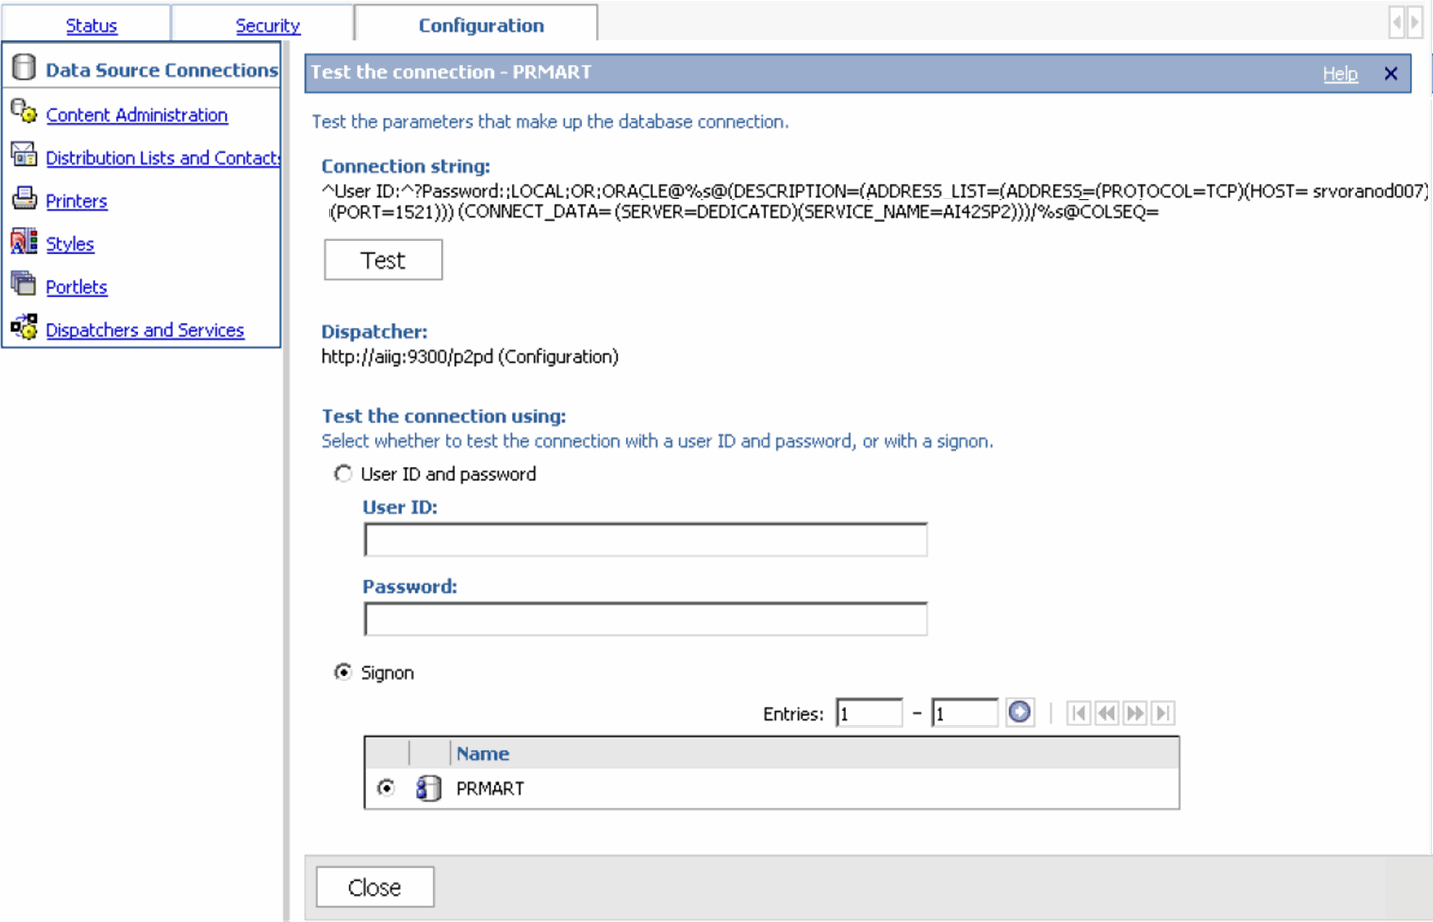
Wait for the testing results and verify that the connection succeeded.
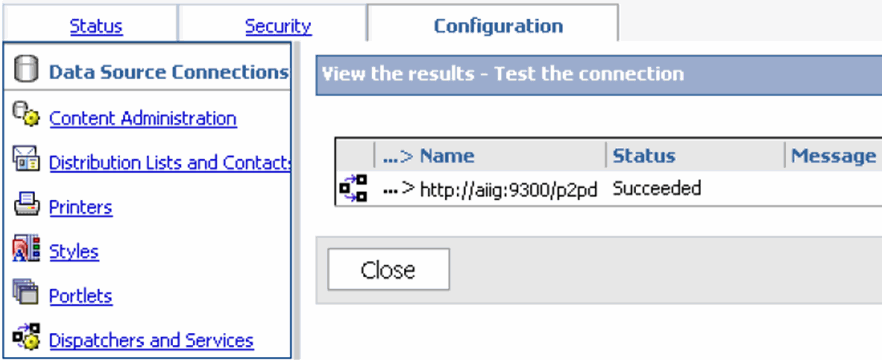
Click Close.
Click Close.
Click OK.
Click OK.
To activate the PowerReports namespace:
Open the Cognos 8 configuration.
Click Start, All Programs, IBM Cognos 8, and then select IBM Cognos Configuration. The IBM Cognos Configuration window opens.
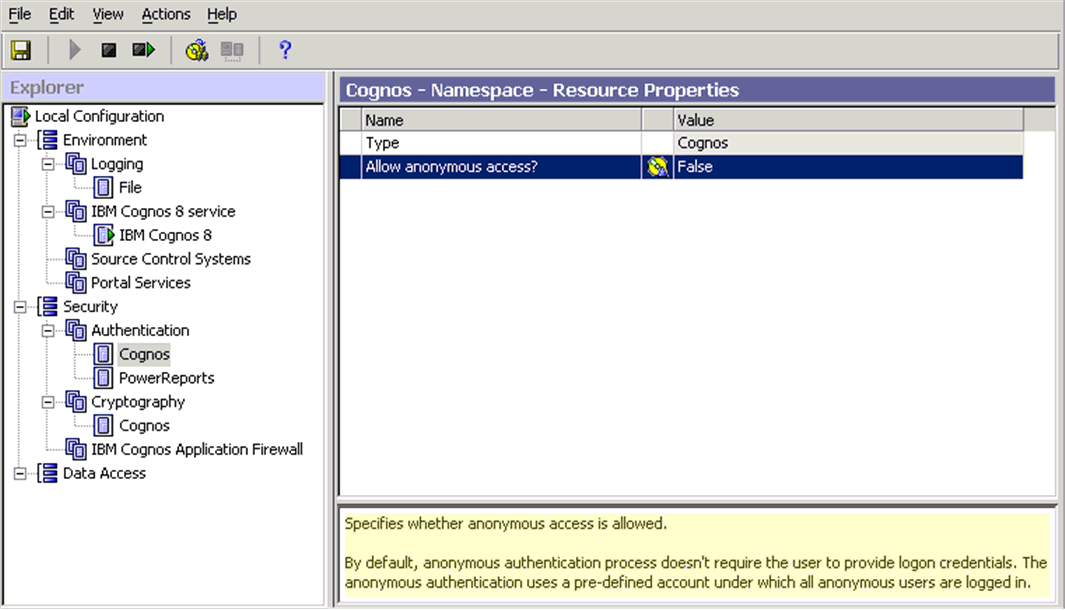
Navigate to Security, Authentication, and then select Cognos. The system displays the Cognos - Namespace - Resource properties pane.
Set the Allow Anonymous access? property to False.
Open the File menu and select Save.
Open the Actions menu and select Restart to restart the Cognos 8 service. The system displays status information about each task being performed during the restart.
During the Cognos service restart, the system may display the following message if there are any warnings:
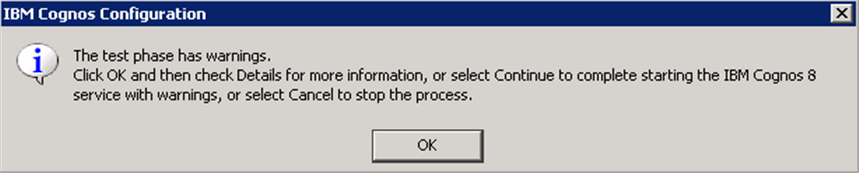
Process any warning message as follows:
Click OK.
Click Details to obtain more information about the warning.
Depending on the type of warning, you can:
— Click Continue to ignore the warning and continue with the process of restarting the IBM Cognos 8 service. For example, you may want to ignore a warning that the connection to the mail server failed.
— Click Cancel to stop the restart process. If the warnings are due to reasons other than a mail server connection failure, you should stop the process, check your configuration, and then restart the IBM Cognos 8 service.
Wait until the system performs all the configuration tasks and displays the status for each task.
Click Close to exit the Cognos configuration.
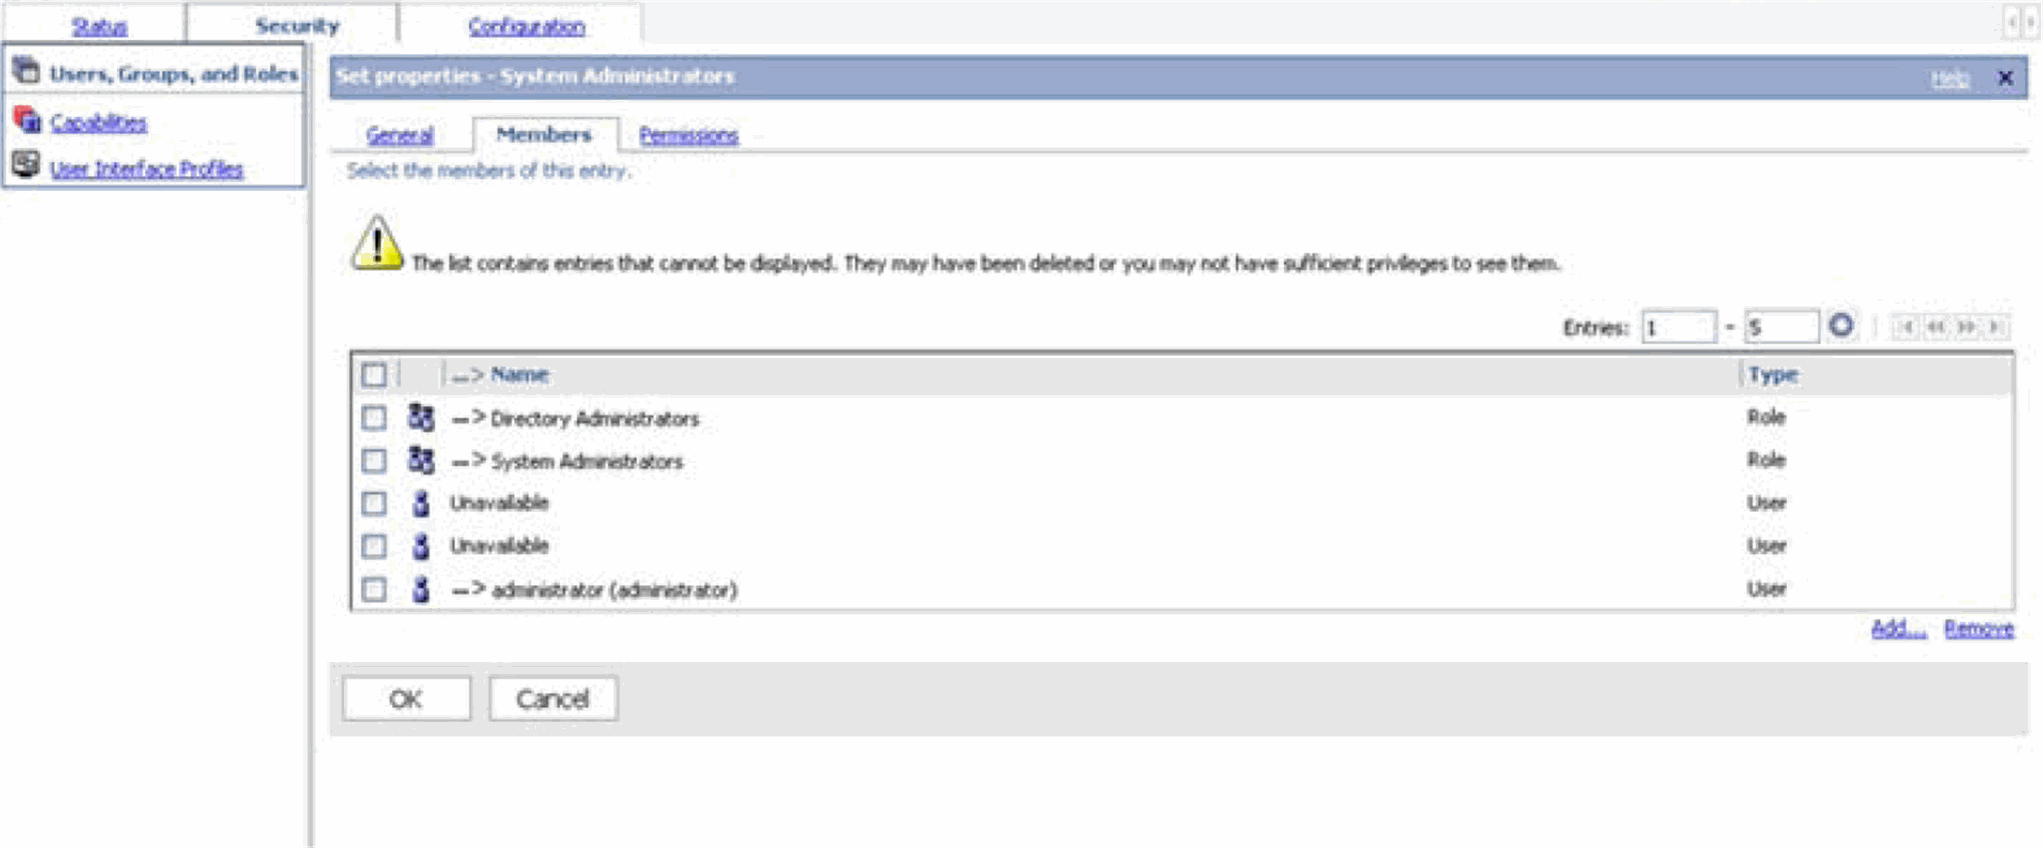
Note:
Make sure that you remove the Everyone user group from the Directory Administrator and System Administrator roles of Cognos. Before doing this, make sure that you have a valid user as part of the System Administrator role in Cognos.If you have not added any user as part of the System Administrator role in Cognos, then you have to add Everyone user group in System Administrator roles of Cognos again.
To add the Everyone user group in the System Administrator role of Cognos:
Connect to the Content Store database as the content store user.
Navigate to the following folder:
Cognos_Installation_Path\c8\configuration\schemas\content
Run the AddSysAdminMember.sql script.
Commit the changes.
This section describes how to integrate the LDAP authentication with Argus Insight and Cognos. Be sure to follow all installation procedures in the specified order:
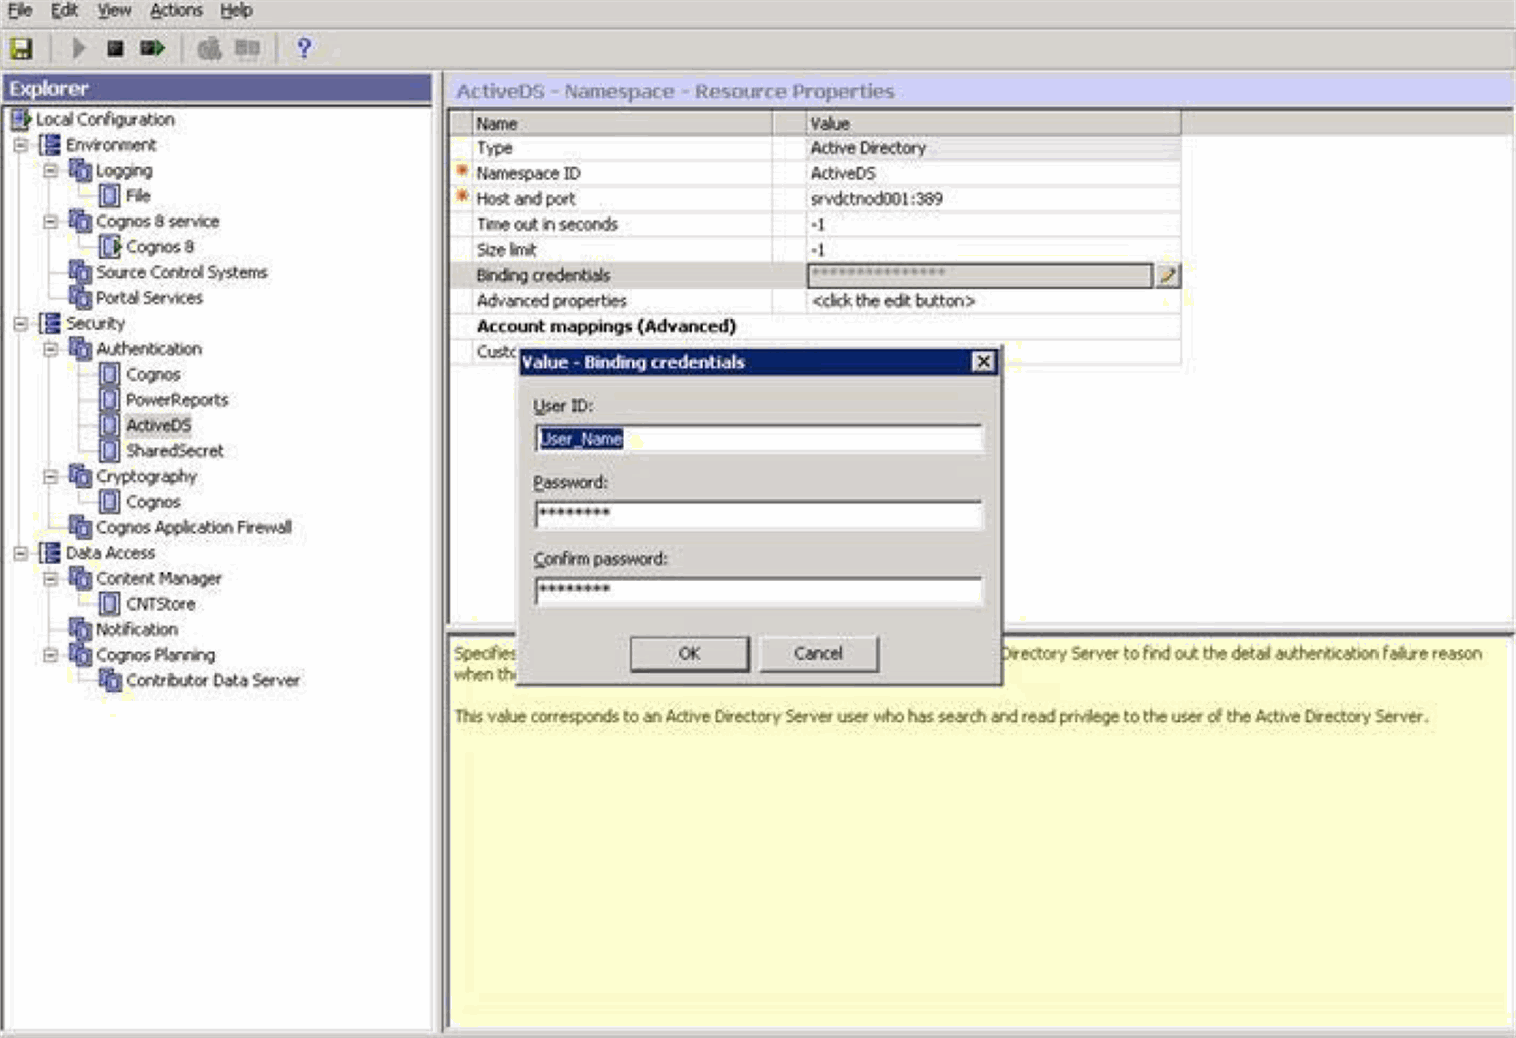
To configure the Active Directory on the Cognos Server:
Go to Cognos Server and open the Cognos configuration.
Navigate to Security, Authentication, and then add a namespace.
Select Active Directory as the Type.
Configure the Active Directory NameSpace.
Provide the Bind credentials, save the configuration, and restart the Cognos service.
Click Modify and set the value to 1.
To configure LDAP for Active Directory:
Configure SunOne on Cognos 8 Server.
Go to Cognos Server and open the Cognos configuration.
Navigate to Security, Authentication, and then add a namespace.
Select LDAP as the Type.
Configure the SunOne NameSpace.
Enter NameSpaceID, Host and Port, Base Distinguish Name, user lookup as "uid=$(user ID)" and unique identifier as "uid." No need to enter any bind credentials.
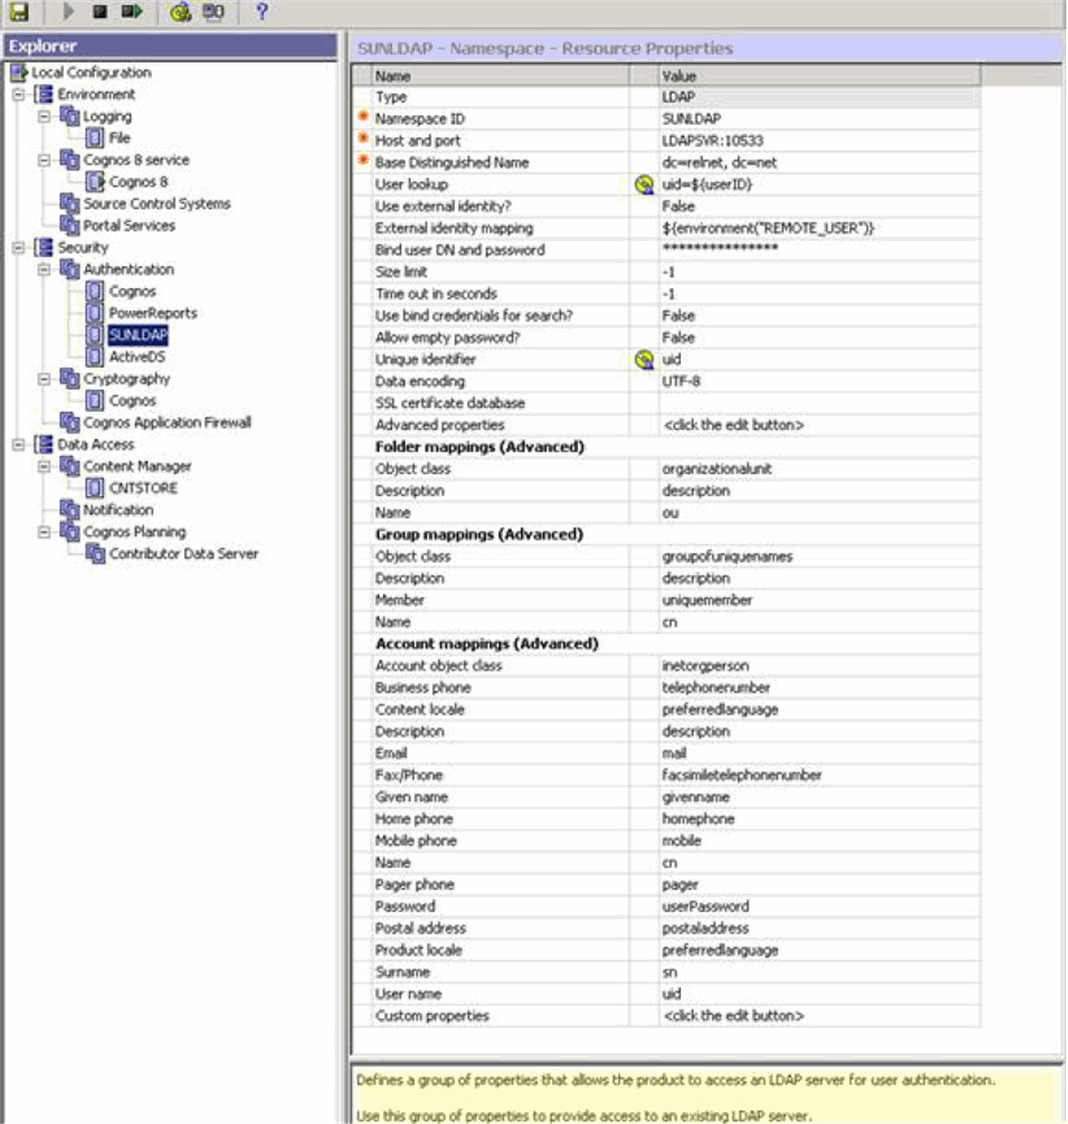
Save the Cognos configuration and restart the Cognos service.
Log in to the Argus Insight application.
Click the Tools tab in the upper-right corner of the Argus Insight Home page to open the ADMINISTRATION TOOLS page.
Click the List Maintenance tab.
Select LDAP from the List Maintenance Items group. The system updates the right panel with the list of attributes that you can configure.
Select the Cognos LDAP Name Space Configuration attribute and click Modify. The Modify Cognos LDAP Namespace Configuration window opens.
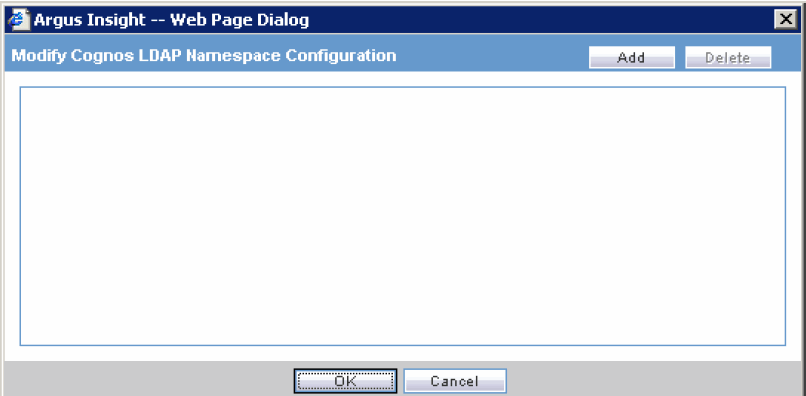
Click Add. The Modify Cognos LDAP Namespace Configuration dialog box opens.
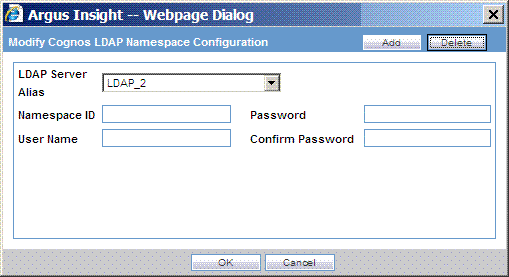
Complete the Modify Cognos LDAP Namespace Configuration dialog box as follows:
In the LDAP Server Alias field, select the LDAP server from the list. This field lists the LDAP servers configured in Argus Safety.
In the Namespace ID field, type the namespace identifier for either Active Directory or SunOne (whichever you have configured in Cognos).
In the User Name field, type the name of the Cognos and Insight user who is part of a configured LDAP namespace in Cognos and is a Cognos administrator.
In the Password field, type the password for the configured Cognos administrator user.
In the Confirm Password field, re-type the password for verification.
Click OK to save the Cognos LDAP Namespace configuration.
When Cognos is configured for LDAP authentication, Argus Insight requires a different set of packages and models for Release 7.0.1.
To publish the report packages required for running reports on Cognos with LDAP:
Go to Cognos Server.
Open the Framework Manager:
Click Start.
Navigate to All Programs, IBM Cognos8, and select Framework Manager.
Open the File menu and select Open.
Navigate to the following location:
Argus_Insight_Installation_Directory\Oracle\ArgusInsight\Cognos8\Models\LDAP Models
Open the Compliance folder.
Select the Compliance.cpf file, and then click Open.
Select the configured LDAP namespace to authenticate user.
Enter the user credentials to log in.
Open the View menu and select Project Viewer.
In the Project Viewer pane, click Packages.
In the project tree, select Packages, right-click Compliance, and then select Publish Packages. The Publish wizard opens.
Click Next to continue through each of the Publish wizard screens until you have the option to publish the package.
Click Publish.
The system displays a message that a package with that name already exists and prompts if you want to overwrite the package.
Complete the publish process as follows:
Click Yes to overwrite the package.
Click Finish.
Click Close to exit from the Publish wizard.
Open the File menu and click Close. When the system prompts if you want to save the changes you made to the project, click No.
Navigate back to the LDAP Models folder (see Step 4), and repeat the process for each package in the LDAP Models folder:
Configuration
Custom Compliance
General
Management
Pharmacovigilance
Report Writer
|
Copyright © 2010, 2012, Oracle and/or its affiliates. All rights reserved. Legal Notices |
|