| Oracle® Argus Insight BusinessObjects Administrator's Guide Release 7.0.1 E28483-01 |
|
|
PDF · Mobi · ePub |
| Oracle® Argus Insight BusinessObjects Administrator's Guide Release 7.0.1 E28483-01 |
|
|
PDF · Mobi · ePub |
Filters let you create queries by specifying multiple values or a range of values (in numeric or date fields) for each field in a set of fields displayed on a single page. Therefore, you may choose filters in situations when your querying criteria is based on multiple values or a range of values in fields.
This chapter, which describes how to work with filters, includes the following topics:
In addition to filters, Argus Insight provides the following query tools:
QBEs (see Chapter 3, "Creating Queries by Example")
Advanced Conditions (see Chapter 5, "Using Advanced Conditions to Create Queries")
Library (see Chapter 6, "Working with Libraries")
Argus Insight provides five predefined filters. Each predefined filter comprises of a set of specific data mart fields called filter elements. Table 4-1 lists the five predefined filters and the elements associated with them.
Note:
The field labels for each filter are displayed as per the field labels configured in Argus Safety.Table 4-1 Argus Insight Predefined Filters and Elements
| Predefined Filter | Associated Filter Elements (Fields) | |
|---|---|---|
|
Compliance |
Advanced Conditions Case Initial Receipt Date Country of Incidence Family Name Product Related to Study Conduct? (As Reported) Report Form Reporting Group |
Case Followup Receipt Date Case Report Type Event Listedness/Lic Country Owned by Site Project/Study/Center Report Agency Report Submission Date |
|
Configuration |
Advanced Conditions Product |
Country of Incidence Project/Study/Center |
|
Management |
Advanced Conditions Case Followup Receipt Date Case Report Type Case Status Has Followup Product Workflow Group |
Case Delayed/Open Case Initial Receipt Date Case Seriousness Country of Incidence Owned by Site Reports Pending |
|
Pharmacovigilance |
Advanced Conditions BMI Case Comment Case Initial Receipt Date Case Outcome Company Comment Dosage Regimen Route of Administration Drug Duration of Administration Event Diagnosis Flag Event Term Onset Latency (minutes) Patient Age (In Years) Patient Ethnicity Patient Relevant Tests Product Type Rechallenge/Dechallenge Reporter Type/HCP Time to Onset from First Dose |
ATC Code Case Abbreviated Narrative Case Followup Receipt Date Case Narrative Case Seriousness Country of Incidence Dose Evaluation in Light of Similar Events Event Seriousness Local Evaluator Comment Outcome of Event Patient Age Group Patient Gender/Pregnancy Product Project/Study/Center Relevant History Condition Study Blinding Status Time to Onset from Last Dose |
|
Workflow |
Advanced Conditions Case Followup Receipt Date Case Report Type Case Status Event Term Has Followup Product Workflow Group |
Case Delayed/Open Case Initial Receipt Date Case Seriousness Event Listedness/Lic Country Family Name Owned by Site Project/Study |
Argus Insight also lets you define custom filters by letting you select a set of elements (data mart fields) and saving the selection as your own filter.
To create a filter using queries, select a predefined or custom filter and specify values (multiple or range) in the desired filter elements associated with the filter. You can then execute this query (value set) to generate a case series.
The set of values you specify in the elements associated with a filter is called a value set. For example, a particular filter may have this value set:
| Filter Element | Values Specified |
|---|---|
| Country of Incidence | United States and Germany |
| Product Name | CureAll Injection and CureAll Capsule |
| Coded Event Description | Injection site rash and aggravated nausea |
| Seriousness Criteria | Hospitalized and intervention required |
| Patient Age | 25 to 65 years
Note that ranges can only be specified for fields that have numeric values. |
Argus Insight lets you save value sets. Therefore, each filter can have multiple value sets. The advantage of saving value sets is that this enables you to execute a value set later without having to select a filter and then entering values in the associated elements.
This section describes the following tasks:
To select a predefined filter:
Navigate to Create Query, Filters, and select New Value Set. The Select Filter for New Value Set dialog box opens:

Note:
The Select Filter for New Value Set dialog box displays a list of all the predefined as well as custom filters and their associated elements. Use the scroll bar to view all the filters in the list.Select one of the predefined filters (Compliance, Configuration, Management, Pharmacovigilance, or Workflow) depending on your reporting needs. If custom filters are saved to the system, you can select a custom filter instead.
Click OK. The FILTER VALUE SET page opens.
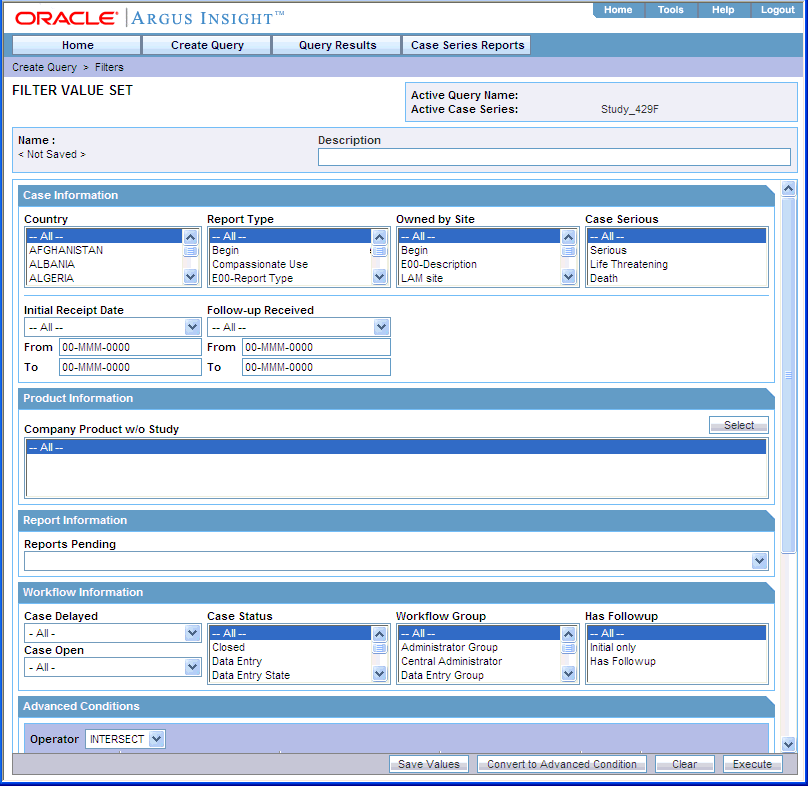
Note:
In the FILTER VALUE SET page, all the elements associated with the filter are organized in sections. You need to scroll the page to view all the sections. All the predefined value sets contain the Advanced Condition section. You can use the options in this section to select an existing advanced condition and integrate your value set with it. See "Integrating a Value Set with an Advanced Condition" for details. To convert the entire value set to an advanced condition, see "Converting a Value Set to an Advanced Condition" for details.To create a value set for the predefined filter:
Specify values for the filter elements in the various sections. Depending on the filter you selected, the FILTER VALUE SET page may contain these sections:
| Sections in the New FILTER VALUE SET Page | Associated Elements (Fields) | |
|---|---|---|
| Case Information | Case Followup Receipt Date Case Report Type Family Name Product |
Case Initial Receipt Date Event Listedness/Lic Country Owned by Site Project/Study |
| Patient Information | BMI Patient Age (In Years) Patient Ethnicity |
Patient Age Group Patient Gender/Pregnancy |
| Product Information | ATC Code Product Regimen Daily Dose Total Regimen Dosage |
Drug Primary Indication Code Rechallenge/Dechallenge Total Drug Dosage |
| Event Information | Event Seriousness Event Listedness/Lic Country Outcome of Event |
Event Term Onset Latency (minutes) Related to Study Conduct? (As Reported) |
| Workflow Information | Case Delayed/Open Has Followup |
Case Status Workflow Group |
| Miscellaneous Information | Lab Results |
Lab Test/Assessment |
| Report Information | Report Agency Report Submission Date Reporting Group |
Report Form Reports Pending |
Note:
To access the MedDRA Browser from the Pharmacovigilance or Workflow filters, navigate to Create Query, Filters, and select New Value Set. The MedDRA Browser for the Pharmacovigilance and Workflow filters support the following options specific to filters:All hierarchy option — Use this option to enable a query search based on all/selected hierarchical terms in MedDRA. The search output captured depends on the check boxes selected in the MedDRA Browser window.
Term only option — Use this option to select multiple terms within a specific AE term. Click on the term(s) you want to include in your search criteria. These terms are highlighted in yellow. The output based on the term(s) selected in the MedDRA Browser is populated in the relevant section of the filter.
Examine the value set results.
Click Execute. While the system searches for matching cases, the following dialog box is displayed:
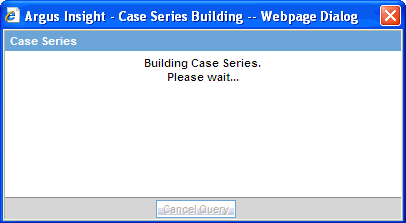
Tip:
To cancel the query execution at this point and return to the FILTER VALUE SET page, click Cancel Query.If the system finds cases that match the query criteria, the ACTIVE CASE SERIES page displays the list of cases.
Examine the case series. If the case series is too large, you may want to modify the value set to narrow down the case series. Alternatively, if you find the case series to be appropriate, you can save the value set to the system.
Click View Query in the ACTIVE CASE SERIES page to return to the FILTER VALUE SET page.

Note:
When you save the modifications to a value set or execute a value set, the system assigns the active status to the value set. Therefore, when you return to the VALUE SET page, the Active Query Name label displays the name of the filter.If required, modify the value set and examine the results again or proceed to save the value set.
Save the value set to the system.
Type a description of the value set in the Description field. For example, you can describe the type of cases the value set retrieves.
Click Save Values. The Save Value Set dialog box opens.
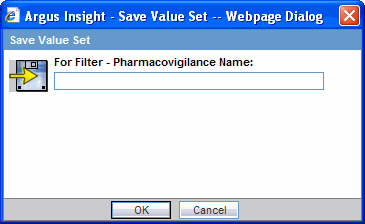
Type the name of the value set in the Name field.
Click OK to close the dialog box and refresh the FILTER VALUE SET page. Note that:
The Name label displays the name of the value set you specified.
The Save Values As button and the Permissions button are now enabled.
Note:
The FILTER LIBRARY page displays all the value sets saved to the system. See "Working with Saved Filters and Value Sets" for more information.Tip:
If you make modifications to the field values after you saved the value set to the system, click Save Values to save the changed field values. To save the value set by another name, click Save Values As. To clear all the field values in the FILTER VALUE SET page, click Clear.Click Permissions to assign group-level permissions on the saved value set. The system opens the Permissions dialog box and displays the names of all the groups (except the Administrator group) that the system administrator has created.
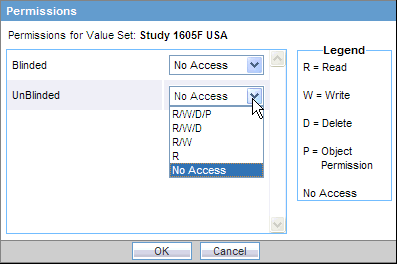
Use the drop-down list next to a group name to assign permissions to the group members on the value set you have created. You can select from these options:
| Permission | Description |
|---|---|
| R/W/D/P | Group members will be able to view, modify, delete, and assign permission on the value set. |
| R/W/D | Group members will be able to view, modify, and delete the Value Set. |
| R/W | Group members will be able to view and modify the value set. |
| R | Group members will be able to only view the value set. |
| No Access (Default) | No group members will be able to access the value set. |
Click OK. The system saves the permission settings.
Note:
The author of the value set always has the highest level of permission (R/W/D/P) on it. For example, suppose you belong to the Data Entry group and you assign the No Access permission level to the Data Entry group on a value set that you create. In this case, you will continue to have the highest level of permission on your value set; other members in your group cannot access your value set.To execute a value set, click Execute.
The system retrieves the cases that match the value set criteria and displays the list in the ACTIVE CASE SERIES page.
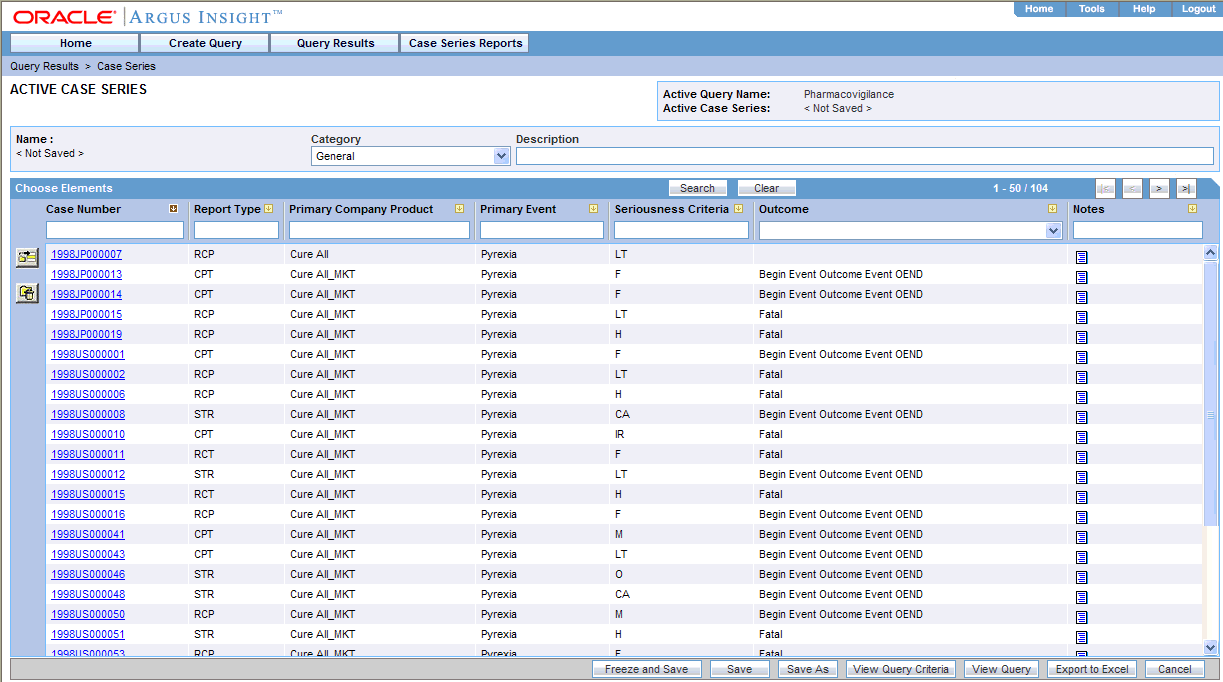
After generating the case series, you can manually modify or save the series. See Chapter 7, "Working with Case Series" for more information.
This section includes the following topics:
To create a custom filter:
Navigate to Create Query, Filters, and select Library. The FILTER LIBRARY page opens. This page lists the predefined as well as custom filters and their value sets in a control tree format.
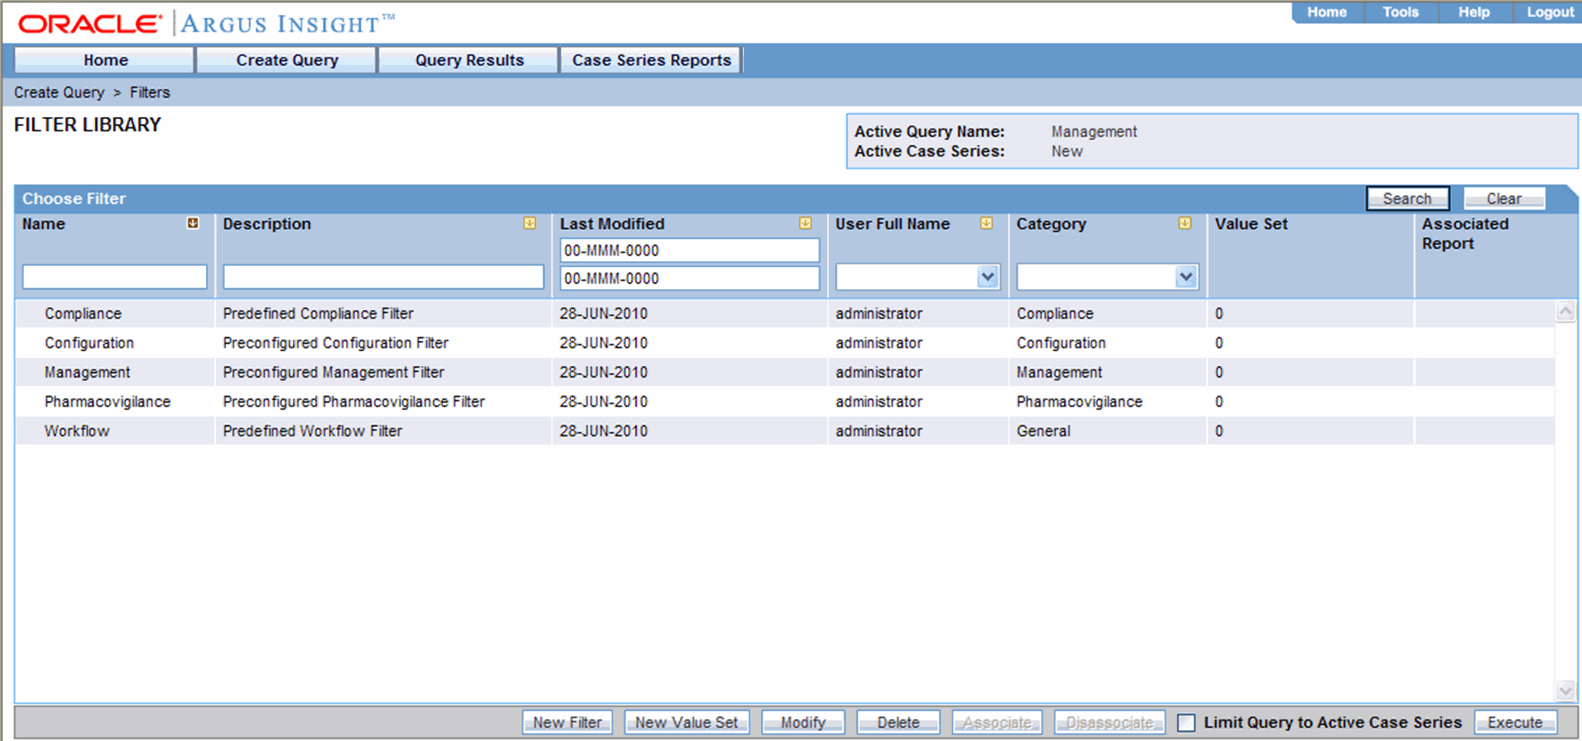
Click New Filter. The FILTER ELEMENTS page opens.
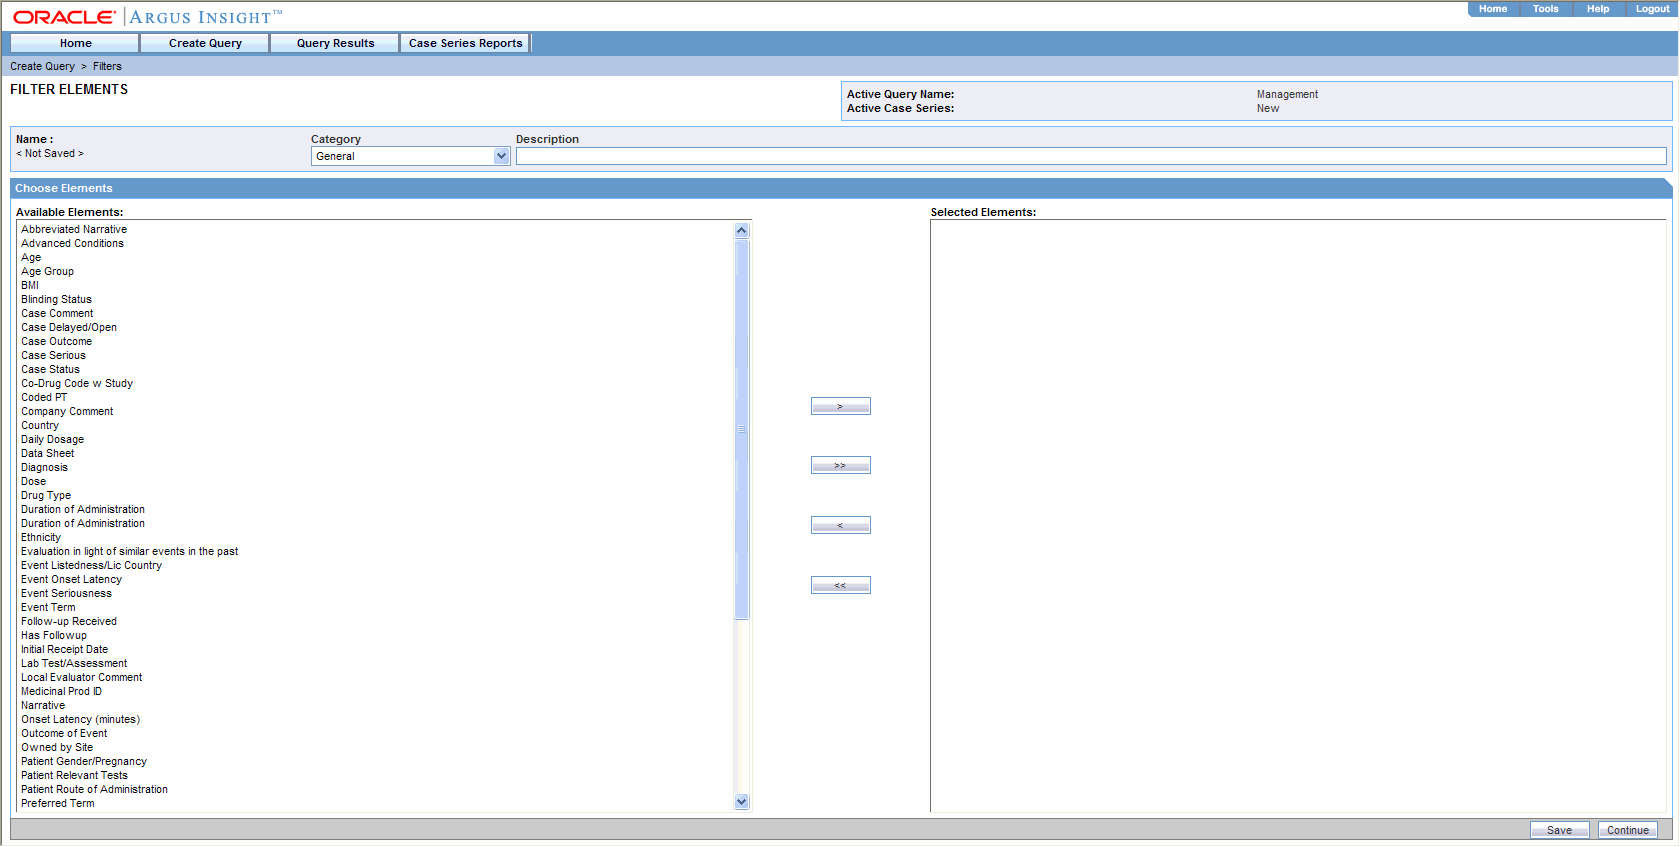
From the Available Elements list, select an element you want to associate with the custom filter.
Click the right arrow ( >) button to associate the selected element with the custom filter. The selected element appears in the Selected Elements list.
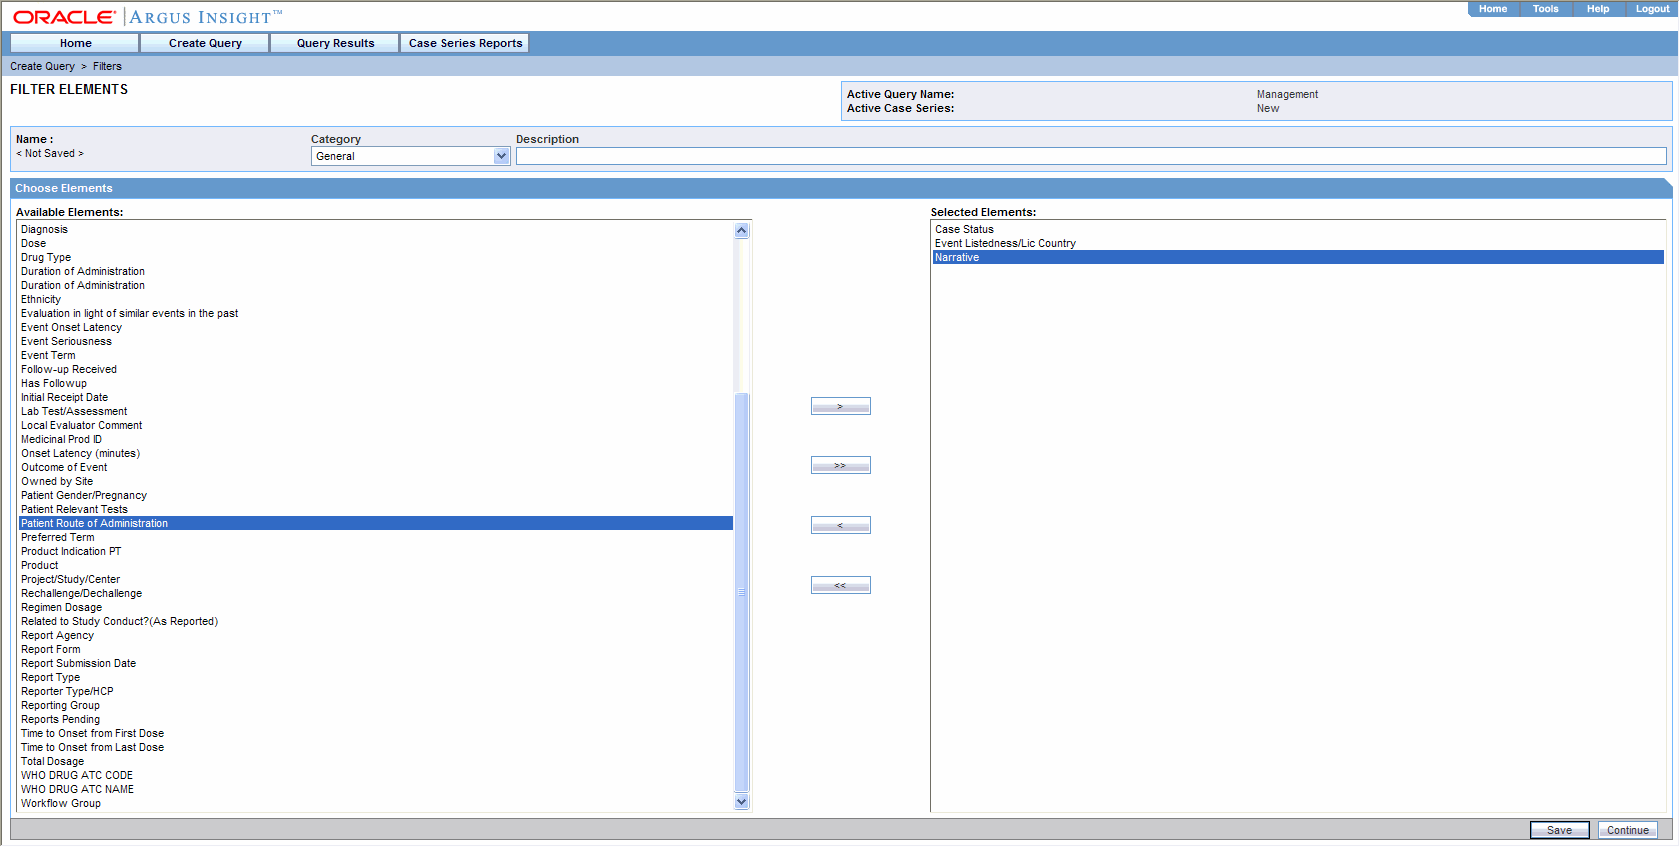
Tip:
To add all the elements in Available Elements list to the Selected Elements list, click the >> button.To remove an element from the Selected Elements list, click the > button.
To remove all the elements from the Selected Elements list, click >> the button.
Save the filter.
Use the Category drop-down list to assign a category to the custom filter. A category indicates the reporting aspect to which your filter pertains: Compliance, Configuration, General, Management, or Pharmacovigilance. Specifying the category also helps you in searching the relevant filters from a list of all the filters saved in the system.
Type a description of the custom filter in the Description field.
Click Save. The Save Filter dialog box opens.
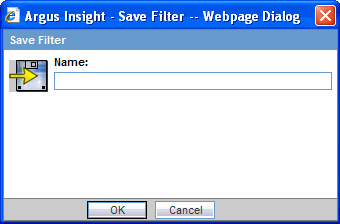
Enter a name for the custom filter.
Click OK to save the custom filter and refresh the FILTER ELEMENTS page. Note that:
The Name label displays the name of the saved filter.
The Active Query Name label in the upper-right corner of the page now displays the name of the filter you specified.
The Save As button and the Permissions button are now enabled.
Note:
If you make modifications to the filter elements after you saved the filter to the system, click Save to save the changes. To save the filter by another name, click Save As.Click Permissions to assign group-level permissions on the filter. The system opens the Permissions dialog box and displays the names of all the groups (except the Administrator group) that the system administrator has created.
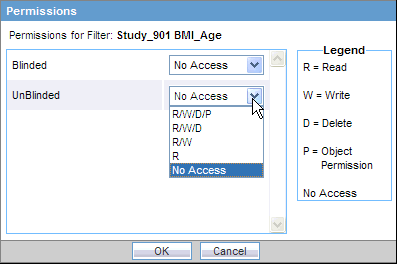
Use the drop-down list next to a group name to assign permissions to the group members on the filter you have created. You can select from these options:
| Permission | Description |
|---|---|
| R/W/D/P | Group members will be able to view, modify, delete, and assign permission on the filter. |
| R/W/D | Group members will be able to view, modify, and delete the filter. |
| R/W | Group members will be able to view and modify the filter. |
| R | Group members will be able to only view the filter. |
| No Access (Default) | No group members will be able to access the filter. |
Note:
The author of the filter always has the highest level of permission (R/W/D/P) on the filter. For example, suppose you belong to the Data Entry group and you assign the No Access permission level to the Data Entry group on a filter that you create. In this case, you will continue to have the highest level of permission on your filter; other members in your group cannot access the filter.Click OK. The system saves the permission settings.
To create a value set for a custom filter:
Click Continue in the FILTER ELEMENTS page. The FILTER VALUE SET page opens.
Note:
In the FILTER VALUE SET page, all the elements associated with the filter are organized in sections. You need to scroll the page to view all the sections. If you included the advanced condition element while creating your filter in Step 2, the FILTER VALUE SET page displays an additional Advanced Conditions section. You can use the options in this section to create an advanced condition and integrate your value set with it. See "Integrating a Value Set with an Advanced Condition" for details. To convert the entire value set to an advanced condition, see "Converting a Value Set to an Advanced Condition" for details.Specify values for the filter elements. See "Using Predefined Filters" for details.
Examine the value set results.
Click Execute. While the system searches for matching cases, the following dialog box is displayed.

Note:
To cancel the query execution at this point and return to the FILTER VALUE SET page, click Cancel Query.If the system does not find any cases that match the querying criteria, the following dialog box is displayed. Click OK in this dialog box to return to the Value Set form, modify the criteria, and execute the value set again.
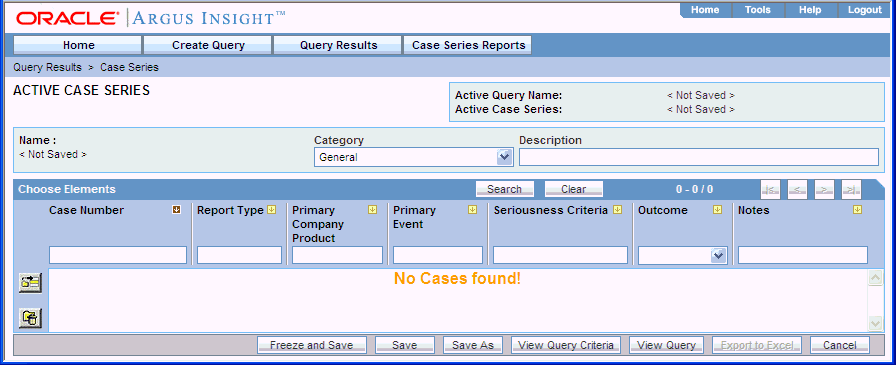
If the system finds cases that match the query criteria, a list of such cases is displayed in the ACTIVE CASE SERIES page.
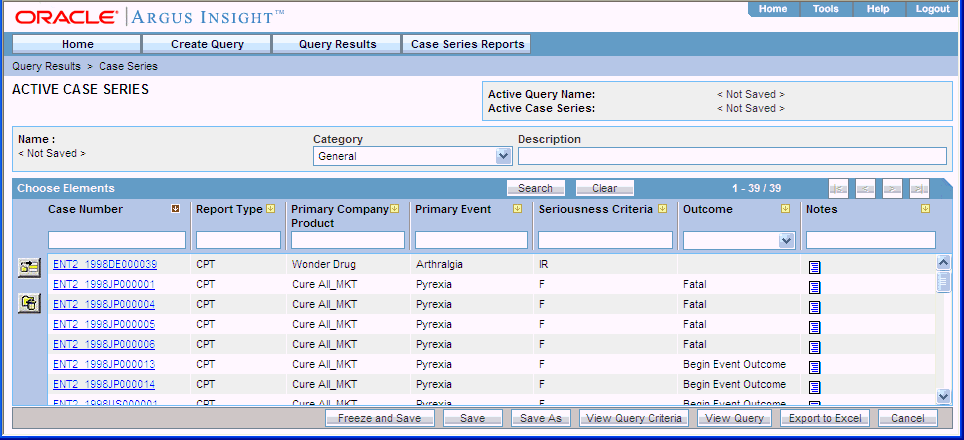
Examine the case series. If the case series is too large, you may want to add additional elements to the filter or modify the value set. Alternatively, if you find the case series to be appropriate, you can save the value set to the system.
Click View Query in the ACTIVE CASE SERIES page to return to the FILTER VALUE SET page.
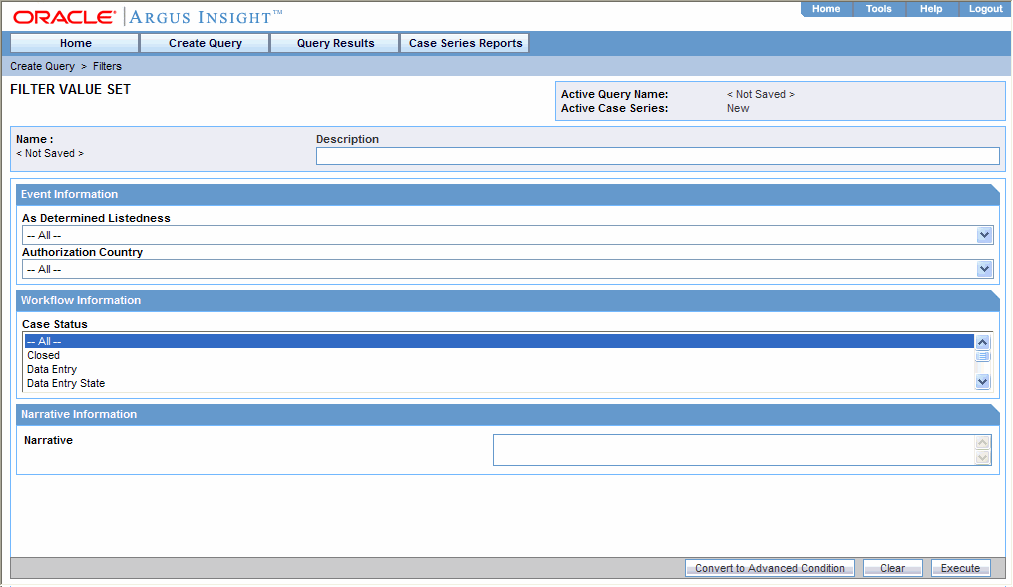
Modify the value set, if required, and examine the results again or proceed to save the value set.
Save the value set to the system.
Type a description of the value set in the Description field. For example, you can describe the type of cases the value set retrieves.
Click Save Values. The Save Value Set dialog box opens.

Enter a name for the value set.
Note:
The name cannot contain following characters: % " ' ^ ~,;|#`Click OK. The FILTER VALUE SET page refreshes.
Note that the Save Values As button and the Permissions button are now enabled.
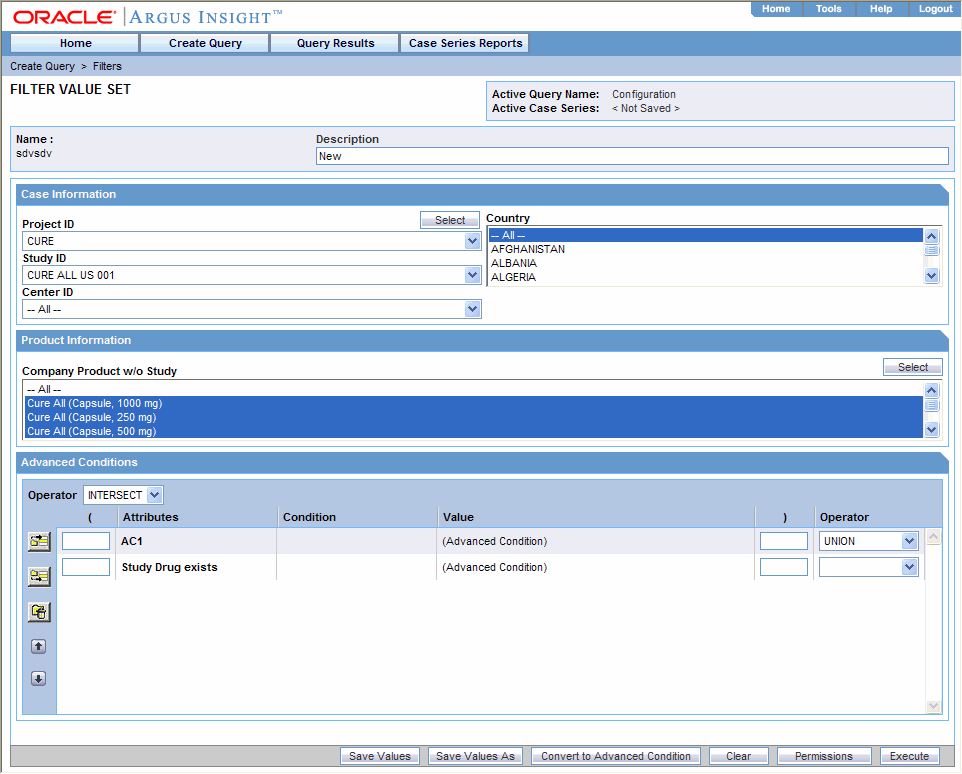
Note:
The FILTER LIBRARY page displays the custom as well as predefined filters and their value sets in a control tree format. From this page, you can select a value set and directly execute it. See "Working with Saved Filters and Value Sets" for more information. The saved filters also appear in the Select Filter for New Value Set dialog box from where you can select the desired filter, enter values in the NEW VALUE SET page and execute. See "Using Predefined Filters" for more information.Tip:
If you make modifications to the field values after you saved the value set to the system, click Save Values to save the changed field values. To save the value set by another name, click Save Values As. To clear all the field values in the FILTER VALUE SET page, click Clear.Click Permissions to assign group-level permissions on the saved value set. The system opens the Permissions dialog box and displays the names of all the groups (except the Administrator group) that the system administrator has created.

Use the drop-down list next to a group name to assign permissions to the group members on the value set you have created. You can select from these options:
| Permission | Description |
|---|---|
| R/W/D/P | Group members will be able to view, modify, delete, and assign permission on the value set. |
| R/W/D | Group members will be able to view, modify, and delete the Value Set. |
| R/W | Group members will be able to view and modify the value set. |
| R | Group members will be able to only view the value set. |
| No Access (Default) | No group members will be able to access the value set. |
Note:
The author of the value set always has the highest level of permission (R/W/D/P) on it. For example, suppose you belong to the Data Entry group and you assign the No Access permission level to the Data Entry group on a value set that you create. In this case, you will continue to have the highest level of permission on your value set; other members in your group cannot access your value set.Click OK. The system saves the permission settings.
Click Execute. The system retrieves the cases that match the value set criteria and displays the list in the ACTIVE CASE SERIES page. After generating the case series, you can manually modify or save the series. See Chapter 7, "Working with Case Series" for more information.
The system assigns the active status to a value set when you save modifications to it or execute it. Unless you save the modifications to another value set or execute it, the last value set you modified or executed remains active. This is helpful in situations when you want to access a frequently used value set.
To view an active value set:
Navigate to Create Query, Filters, and select Active. The FILTER VALUE SET page displays the value set you executed or modified last.

If the value set was saved to the system before executing, the name of the value set appears next to Name label. In addition, the name of the filter appears next to the Active Query Name label.
However, if the value set was not saved to the system before executing, the text <Not Saved> is displayed next to the Name label.
From the ACTIVE FILTER VALUE SET page, you can perform the following tasks:
| Task | Description |
|---|---|
| Modify the Active Value Set | If required, you can modify the value set by changing the field values.
While entering field values, if you want to remove all the values you entered, click Clear. Click Save Values to save the changed field values. This button is only available for a saved value set. |
| Save the Active Value Set by another name | Click Save Values As to save the active value set by a different name.
The FILTER LIBRARY page displays all the value sets you saved to the system. See "Working with Saved Filters and Value Sets" for more information. |
| Convert Active Value Set to Advanced Condition | Click Convert to Advanced Condition to convert the active value set to an advanced condition. See "Converting a Value Set to an Advanced Condition" for more information. |
| Assign Permissions on the Active Value Set | Click Permissions to set the group-level access permissions.
The Permissions button is only available for saved value sets. |
| Change the Description of the Active Value Set | You can change the description of the active value set by modifying the text displayed in the Description field.
Click Save Values to store the changed description. |
| Execute the Active Value Set | Click Execute to generate a case series by using the active value set. |
Note:
When the field values for an active value set are modified or the active value set is saved by a different name, the changes in the active value set reflect the most recent changes. The active value set also changes in case you modify the field values and execute the value set without saving the modifications.The FILTER LIBRARY page lists all the predefined as well as saved custom filters and their value sets in a control tree format.
To access this page, navigate to Create Query, Filters, and select Library.

To view the value sets associated with a filter, expand the control tree for a filter. The saved value sets are displayed below each filter.
The descriptions of the columns in the FILTER LIBRARY page follow.
| Column | Description |
|---|---|
| Name | Displays the name of the filters and value sets. |
| Description | Displays the description of the filters and value sets. |
| Last Modified | Displays the date when the filters/value set was last modified. |
| User Full Name | Displays the name of the user who created the filter/value set. |
| Category | Displays the filter category. |
| Value Set | Displays the number of value sets created for a filter. |
| Report | The report icon indicates that a report is associated with a value set.
See "Associating a Report Group with a Value Set" for more information. |
To search for a saved filter or value set:
Specify the search criteria, as appropriate:
To search for a filter/value set by its name, type the filter/value set name in the Name text box.
To search for a filter/value set by its description, type the first few words of the description in the Description text box. The system searches for the specified search string in all filter/value set descriptions.
To search for a filter/value set by its date of modification, enter the modification date in the first Last Modified date field. You can specify a date range by typing the start and end dates in the first and second date fields, respectively.
To search a filter/value set by its author, select the author name from the User Full Name drop-down list.
To search for a filter by its category, select the category from the Category drop-down list.
Click Search. Based on your search criteria, the system displays the search results in a list.
To sort the search results list, click the sort icon next to the column headers in the list.
Click New Filter in the FILTER LIBRARY page. See "Creating a Custom Filter" for details.
To create a new value set, navigate to Create Query, Filters, and select New Value Set.
Alternatively, click New Value Set on the FILTER LIBRARY page to create a new value set. You can create value sets for predefined as well as custom filters by using this method. See "Using Predefined Filters" for details.
To modify a filter or value set:
Select the value set or the filter from the list in the FILTER LIBRARY page.
Click Modify.
If you selected a filter, the FILTER ELEMENTS page opens.
If you selected a value set, the FILTER VALUE SET page opens.
Make your modifications to the filter or value set, as appropriate.
Click Save to save the modifications you made in the FILTER ELEMENTS page. If you modified a value set, click Save Values in the FILTER VALUE SET page to save the changes.
You can delete the value sets for predefined as well as custom filters. You can also delete custom filters. However, you cannot delete the predefined filters. When you delete a filter, all its associated value sets are also deleted.
To delete a value set or a custom filter:
Navigate to the FILTER LIBRARY page.
Select the value set or custom filter that you want to delete.
Click Delete. The system prompts for confirmation that you want to delete the filter or value set.
Click OK. The system deletes the selected filter/value set, and returns to the FILTER LIBRARY page.
Report packaging is the concept of grouping reports together. You can define multiple reports that are always or often executed at the same time into a group. A set of reports run on a weekly or periodic basis can be scheduled and run as a package.
In Argus Insight, you can associate a report group and the report scheduling to a power query (QBE, Filter Value Set, and Advanced Conditions) or to a case series.
Argus Insight lets you associate the report group, schedule a time to generate the reports, and automatically send the completed reports through email to one or more users that you specify.
Associating a report group with a value set is helpful in situations when you need to generate the latest case series and run a report on it each time the data mart is refreshed. Instead of manually executing the value set to generate the latest case series and then running the report, you can use the report association functionality of Argus Insight to accomplish the task automatically.
For detailed procedures and more information about associating report groups, see "Scheduling and Associating Reports Against a Query or Case Series".
Note:
To be able to schedule reports, you must have an enterprise login configured in the Business Intelligence tool (either BusinessObjects or Cognos) you are using with Argus Insight.To execute a value set:
Navigate to the FILTER LIBRARY page.
Select a value set from the list.
Click Execute. The system executes the value set, and then opens the ACTIVE CASE SERIES page.

If a report is associated with the saved QBE, click Execute. The ACTIVE CASE SERIES page and PRE FILTER page of the associated report is displayed.
Enter the prompts value in the PRE FILTER page.
Click Execute to generate the report.
After generating the case series, you can manually modify it or save it. See Chapter 7, "Working with Case Series" for more information.
Just as the system assigns the active status to a value set when you save modifications to it or execute it, the last saved or generated case series becomes the active case series.
You may want to run a value set on an active case series.
To narrow down the list of cases in the active case series:
Generate the case series on which you want to run another value set:
You can generate the case series by using predefined filters or creating custom filters and executing a value set. This case series automatically becomes the active case series and remains so until you execute another query to generate a different case series.
Alternatively, if the case series on which you want to run another value set is already saved in the system, navigate to Query Results, Case Series, and select Case Series Library. When the CASE SERIES LIBRARY page opens, select the case series and click Make Active.
Navigate to Create Query, Filters, and select Library. The FILTER LIBRARY page opens.
Select the value set you want to run on the active case series you generated in Step 1.
Select the Limit Query to Active Case Series check box.
Click Execute. The system runs the selected value set on the active case series and displays the ACTIVE CASE SERIES page. Note that the case series you just generated becomes the active case series.
Advanced conditions let you create complex queries that involve Boolean and set operations among various fields. To create advanced conditions, you use the Advanced Conditions Editor, which uses a spreadsheet-like approach for adding query conditions (fields and their values) and conditional operators (Boolean or set).
In Argus Insight, filters are integrated with advanced conditions to let you perform the following tasks:
You can use an existing filter value set to start to build an advanced condition that uses Boolean or set operations between elements that have multiple values. When you convert a value set to an advanced condition, all the fields in which you entered values are listed on the ACTIVE ADVANCED CONDITIONS EDITOR page as advanced condition attributes.
To convert a value set to an advanced condition:
Create a new value set by either using predefined filters or creating custom filters. Alternatively, open a saved value set from the FILTER LIBRARY page (see "Working with Saved Filters and Value Sets").
Verify the field values you specified in the various fields in the value set.
Click Convert to Advanced Condition. The ACTIVE ADVANCED CONDITIONS EDITOR page opens.
All the fields in which you specified values are listed as advanced condition attributes. The fields in which you selected multiple values are repeated.
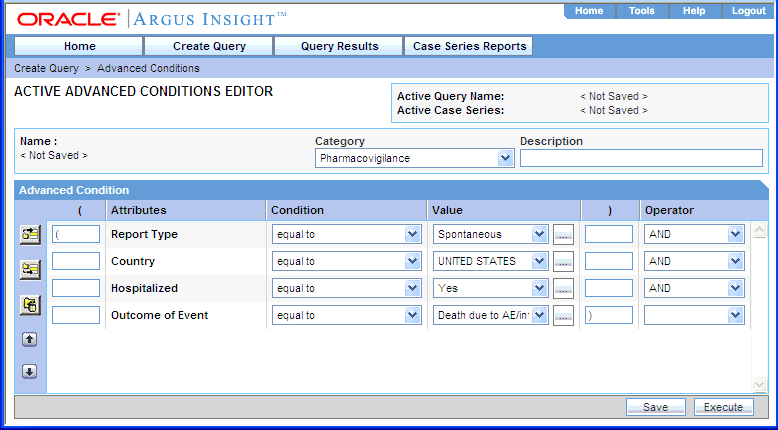
Build your query further by:
Adding additional attributes (fields) and specifying their values
Adding another advanced condition as an attribute
Placing runtime parameters in attributes
Placing parentheses to determine the query execution order
Specifying conditions for attributes values
Specifying Boolean and set operators to join the various attributes
See Chapter 5, "Using Advanced Conditions to Create Queries" for detailed information about using the Advanced Conditions Editor.
You can integrate a value set with an existing advanced condition through these set operators:
INTERSECT
MINUS
UNION
If required, you can integrate your value set with multiple advanced conditions that can have Boolean or set operations between them.
Note:
Only those value sets that have the Advanced Condition element can be integrated with advanced conditions. All value sets that you create for predefined filters contain the Advanced Condition element. If you want to convert a custom filter value set to an advanced condition, make sure you select the Advanced Condition element when creating the custom filter.To integrate a value set with existing advanced conditions:
Create a new value set by either using predefined filters or creating custom filters. Alternatively, open a saved value set from the FILTER LIBRARY page (see "Working with Saved Filters and Value Sets"). If you create a custom value set, make sure you include the Advanced Condition element.
Verify the field values you specified for the value set.
Scroll to the Advanced Condition section on the FILTER VALUE SET page.
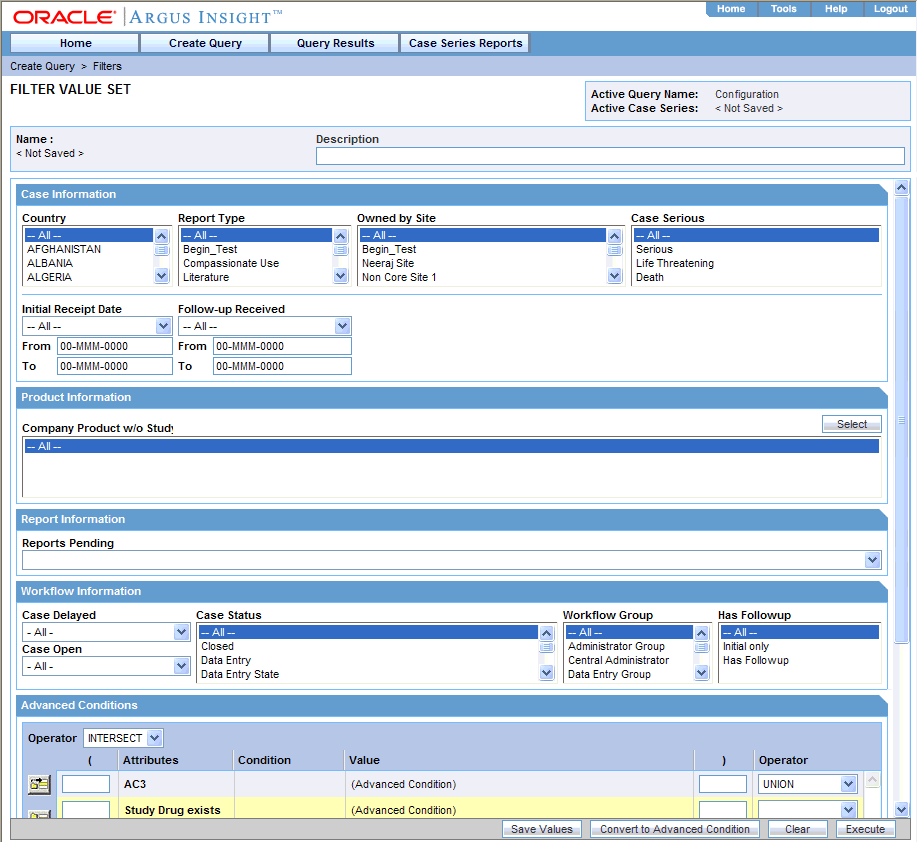
Use the Operator field to enter the operator you want to use to integrate the value set and the advanced condition. You can select INTERSECT, MINUS, or UNION.
Select the advanced condition you want to integrate with the value set as follows:
Click the Add Advanced Condition Above icon on the left bar. The Advanced Conditions menu lists the advanced conditions that are stored in the system and available to you. The conditions are organized by categories.
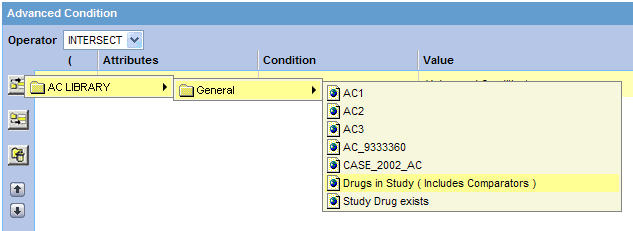
Browse to the appropriate category and select the required advanced condition. The system adds your selection as a row in the Advanced Conditions Editor.
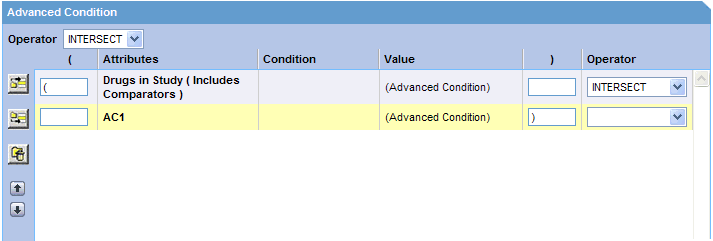
Click the Add Advanced Condition Above icon or the Add Advanced Condition Below icon to insert another advanced condition above or below the existing advanced condition.
Tip:
To change the structure of the query by reordering of the rows, select a row and click the arrow icons to move the row up or down.Type parentheses in the ( and ) columns to determine the order of execution for the selected advanced conditions.
Use the field in the Operator column to specify the set operation to perform between the selected advanced conditions.
Click Save As to save your integrated value set.
To run the integrated value set and generate the case series, click Execute. The ACTIVE CASE SERIES page opens and displays the case series. See Chapter 7, "Working with Case Series" for more information.
To convert the integrated value set and advanced condition into a single advanced condition, click Convert to Advanced Condition. See "Converting a Value Set to an Advanced Condition" for more information.
For detailed information about using the Advanced Conditions Editor, see Chapter 5, "Using Advanced Conditions to Create Queries."