| Oracle® Argus Safety English User's Guide Release 7.0.1 E26223-01 |
|
|
PDF · Mobi · ePub |
| Oracle® Argus Safety English User's Guide Release 7.0.1 E26223-01 |
|
|
PDF · Mobi · ePub |
This chapter contains detailed information about Argus periodic reports and how to create and use them.
This section lists the different Periodic Reports in Argus and discusses about each of them in detail. Place the cursor over the Periodic Reports option in the Reports tab to go to any of the Periodic Reports.
You can create four kinds of periodic reports:
Clinical Trial Periodic Reports
ICH PSUR Reports
US IND Periodic Reports
US NDA Periodic Reports
Argus Safety enables you store your Periodic Reports in Documentum.
When you approve an expedited report from within Argus, the system exports the report as a PDF file and saves it in the Documentum database by Argus Safety Service. From this point, you can perform document reviews within the Documentum system.
When the report is ready to be submitted, mark the report as submitted from within Argus. Argus Safety Service updates the status of the report within Documentum to Submitted.
If the report is to be transmitted via fax or email, Argus Safety Service marks the report as a successful submission in Documentum only after the fax or email transmission has succeeded.
You can select any of the following options in viewing the summary of a periodic regulatory report:
To view the regulatory reports for a particular case (scheduled, generated, and submitted), open the Regulatory Reports tab of the Case Form.
To view all scheduled, generated, and approved reports, as well as other outstanding action items assigned to you or your user group, select Reports in the Worklist menu.
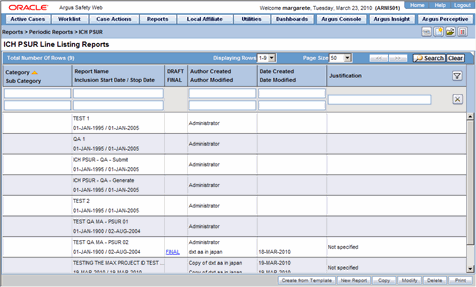
To view a list of all scheduled, generated, and approved periodic reports, select Periodic Reports from the Reports | Compliance menu.
The periodic reports have a library page for the following reports:
PSUR
CTPR
IND
NDA
The following table lists and describes the fields on the Library Page
| Field/Control Name | Purpose |
|---|---|
| Category | Enables the user to view the report Category. |
| Sub Category | Enables the user to view the report Sub Category. |
| Report Name | Enables the user to view the name of the Periodic Report |
| Inclusion Star Date/Stop Date | Enables the user to view the report start and stop dates as defined in the configuration. |
| DRAFT/FINAL | Enables the user to view the draft and/or final report |
| Author Created | Enables the user to view the name of the author who created the report. |
| Date Created | Enables the user to view the date the report was created. |
| Date Modified | Enables the user to view the date the report was last modified. |
| Justification | Enables the user to view the justification for updating the report.
The system displays the standard Justifications dialog that contains the lasts justification entered by the user. |
| Search | When the user clicks Search, the system initiates the search operation. When the system displays the search results, the user can enter search parameters in various fields and click Search to narrow the search results. |
| Clear | Enables the user to clear user-entered data from the fields |
When using the Library Page be aware of the following:
The system places the total number of records displayed on the library page in the Total Number of Row (x) read-only field in the Report header.
The user can select the number of cases to display from the Page Size drop-down list.
The page size drop-down list contains the following values:
50
100 (default)
250
500
1000
2000
The system displays the number of reports currently in view and the system automatically updates the range based on the selected page size. For example, if the user selects a page size of 100, the system displays reports in groups of 100.
The user can go directly to a range of cases from the Displaying Rows drop-down option.
The user can scroll through the reports page-by-page in increments as defined in the Page Size drop-down list.
The user can sort on all columns in the Reports view by clicking the column header. The system displays an up arrow or a down arrow depending on whether the column is sorted in ascending (A-Z, 1-10, etc.) or descending order (Z-A, 10-1, etc.).
Initially, the reports are sorted by Category.
The default sort order is ascending.
When you click the Filter icon, the system displays the filtering row to enable you to filter on any element.
The type ahead feature enables you to filter on any element except Draft/Final.
Click the appropriate icon to minimize the filtering options.
Click the X to close the filtering options.
If filtering criteria is defined, the system displays the filtering elements icon to indicate that filtering elements exist.
If filtering criteria is not defined, the system displays the no filtering elements icon to indicate that no filtering elements are defined.
The system enables you to perform a like search. For example, if the user searches for Cure, the system returns all elements that start with Cure.
The system enables you to perform wildcard searches. For example, if the user searches for %Cure, the system returns all elements that contain Cure.
When you click Clear, the system clears the filtering criteria from the fields.
Clicking the filter icon enables you to filter for reports in the list of reports.
The system saves all user preferences for future use. If the user has already entered filter elements, the system displays the filter details for the last search when it displays the dialog.
If another user is modifying a report, the system displays the following:
The report which is being selected is being used by XXXX and cannot be modified.
where:
XXXX is the full user name of the person using the report.
The Clinical Trial Periodic Reports (CTPR) are created to report the IND Annual reports and EU Clinical Trial Directive line listing reports to FDA. 
To create Clinical Trial Periodic Reports
Select Reports --> Periodic --> CTPR (Clinical Trial Periodic Reports) to open a list of CTPR Reports.
To create a new report from an existing report in the list, click Copy or Modify.
Click New Report to create an entirely new report. The Clinical Trial Periodic Reports dialog opens.
Enter an appropriate name for the report under Report Name.
Use the tabs in this dialog to configure the CTPR.
When using the CTPR, be aware of the following:
The system enables you to group cases by Product Name and Drug Regimen Frequency:
Product Name
This option enables you to group the Product Name - Formulation - Concentration with Units when the elements are separate with a hyphen ( - ).
If an element is missing, the system does not print the hyphen ( - ).
The system groups the cases based on the primary drug in the report.
Dosage Regimen Frequency
This option enables you to group the frequency of the primary dosage regimen for the primary drug in the report.
The system prints Frequency: followed by the frequency as defined above.
You can select datasheets for specific report types similar to the PSUR Report for the Inclusion criteria. If you select any rows in the inclusion criteria, the system disables the Datasheet selection dialog.
Report Type.This portion lists the report types (configured in Code List | Report Type) the report will be run against (LM_REPORT_TYPE). The user must select a report type so the system knows to save the criteria row.
Serious Criteria.This enables you to specify the seriousness of the cases for the selected report type as follows:
Serious.Case Level or Primary Event is Serious.
Non-Serious.Case Level or Primary Event is Non-Serious.
If you select both Serious and Non-Serious, the system ignores the criteria.
Fatal. At least one event has a Fatal event outcome.
Non-Fatal.No events have a Fatal event outcome.
If you select both Fatal and Non-Fatal, the system ignores the criteria.
Listedness.
When using the case level assessment, the system does not consider the datasheet. Cases appear in the PSUR if the case level assessment matches the selected criteria.
When using the primary event assessment in conjunction with a datasheet, the system uses only the As Determined listedness for the primary event when determining whether a case should be included in the PSUR report.
If both Listed and Unlisted are selected, the system ignores the criteria and includes all listedness values (including Unknown).
Datasheet.This enables you to specify which Datasheet to use when looking for Listedness (LM_DATASHEET). The system uses the datasheet criterion only when you select the primary event assessment as the CMN_PROFILE assessment.
When you select the <ALL> datasheet option, the listedness for the primary event on at least one datasheet must match the selected criteria.
Related/Non-Related.
When using case level assessment, cases appear in the PSUR when the case level causality matches the selected criteria.
When using the Primary Event assessment, cases appear only if the causality for the primary event as reported or as determined matches the selected criteria.
When using the All Events assessment, cases appear if any case events with as reported or as determined causality match the selected criteria.
If you select both Related and Non-Related, the system ignores the related/non-related criteria.
HCP/Non-HCP. To have a case included in the PSUR, you must identify at least one case reporter as a HCP or Non-HCP. If this is being used in conjunction with the Primary Reporter Only checkbox, the system evaluates only the primary reporter for this criterion.
Primary Reporter Only. This enables the system to perform the HCP/Non-HCP check against only the primary reporter. This updates the entire configuration whether checked or unchecked.
You can copy an existing template by clicking the Create from Template button on the CTPR reports list.
When you click Create from Template, the system displays the Create from Template dialog.
You can choose the CTPR Group Name (as configured in the Product Name configuration) from a type ahead field.
When you enter the CTPR Group Name in the Select CTPR Group Name field and the From and To dates in the Create from Template dialog and click OK the system does the following:
Saves the CTPR Configuration with the new dates.
Replaces the products in the list of selected products with all products as defined for the selected CTPR name.
Replaces the periodic report name in the newly configured periodic reports with a new name in the following format:
XXXX: YYYY to ZZZZ
where:
XXXX is the selected CTPR Name.
YYYY is the From Date entered by the user.
ZZZZ is the To Date entered by the user.
Replaces the date ranges for the From and To date fields only for the Periodic Report.
Bases the remaining configuration, including the security permissions, on the selected CTPR template.
When you enter the CTPR Group Name in the Select CTPR Group Name field and the From and To dates in the Create from Template dialog and click Print and Save, the system does the following:
Saves the CTPR Configuration with the new dates.
Replaces the products in the list of selected products with all products as defined for the selected CTPR name.
Replaces the periodic report name in the newly configured periodic reports with a new name in the following format:
XXXX: YYYY to ZZZZ
where:
XXXX is the selected CTPR Name.
YYYY is the From Date entered by the user.
ZZZZ is the To Date entered by the user.
Replaces the date ranges for the from and to date fields only for the Periodic Report.
Calls the Report Batch Printing dialog.
Bases the remaining configuration, including the security permissions, on the selected CTPR template.
The Report Name, Report Category and Report Sub-Category fields are common to all tabs of the Reports.
The following table below describes these fields:
| Field | Description |
|---|---|
| Report Name | Enter a name for the Report. The name entered here is displayed in the Reports menu. |
| Report Category | Select a category for the Report. This is displayed in the Reports menu.
Tip: Select New to define a subcategory within the report category. The Periodic Report Category dialog is displayed. Enter a category name in Category and click OK. The category is entered in the Report Category drop-down list. |
| Report Sub Category | Select a subcategory for the report.
Tip: Select New to define a subcategory within the report sub-category. The Periodic Report Category dialog is displayed. Enter a category name in Category and click OK. The category is entered in the Report Sub-Category drop-down list. |
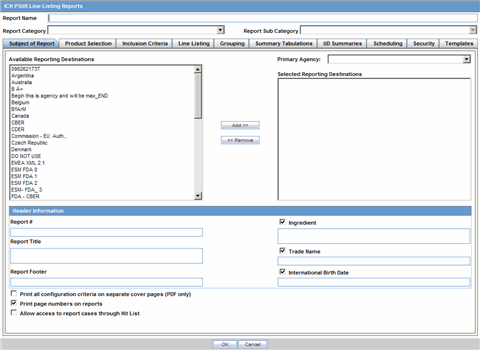
The Subject of Report tab is used to configure the report header and to specify the agency, products, etc. for which the CTPR is applicable.
The following table lists and describes the fields on this tab.
| Field | Description |
|---|---|
| Available Reporting Destination | Displays the list of configured Regulatory Agencies. Select an agency from the list displayed in Reporting Destination and click Add to add the report to the Selected Destination list.
Select multiple agencies by holding the CTRL key when you click them. Likewise, select an agency from the Selected Destination list and click Remove to remove it from the selected destination. |
| Primary Agency | Select the primary agency for the report.
Note: When you submit a Periodic report, it goes to the selected Primary Agency. |
| Selected Reporting Destination | Displays the list of agencies where the report is being sent. Select an agency from the list displayed in Reporting Destination and click Add to add the report to the Selected Destination list.
Select multiple agencies by holding the CTRL key when you click them. Likewise, select an agency from the Selected Destination list and click Remove to prevent it from being sent to the selected destination. |
| Report # | Enter a report number for this report |
| Report Title | Enter a report title for this report |
| Ingredient | Automatically displays the "Ingredient" as provided in the Subject of Report dialog.
Note: You can choose whether to view this field or not. Click the checkbox displayed with this field to hide or view it. |
| Trade Name | Automatically displays the "Trade Name(s)". Multiple trade names are also displayed together, separated by commas.
Note: You can choose whether to view this field or not. Click the checkbox displayed with this field to hide or view it. |
| International Birth Date | Automatically displays the earliest license awarded date, when a user selects an Ingredient and a Product.
Note: You can choose whether to view this field or not. Click the checkbox displayed with this field to hide or view it. |
| Report Footer | Enter the footer for the report |
| Print all configuration criteria on separate cover page | Mark this box to print out the configuration of this report when the report is printed. This is only available when PDF option is selected during printing. |
| Print page numbers on reports | When checked, this option enables the user to print page numbers on a periodic report. This is the default for all report configurations.
If this checkbox is not checked, the following occur.
|
| Allow access to report cases through Hit List | When the report is run as final, it creates a Hit List, which can be retrieved from other areas of the application where advanced conditions can be selected. Click this checkbox to report cases through the Hit List. |
The Product Selection tab enables you to select the products included in the CTPR report.
The following table lists and describes the fields on the Product Selection tab.
| Field | Description |
|---|---|
| Available Ingredients | Displays the list containing the Ingredients used for the product configuration. Select an ingredient from the list displayed in Available Ingredients and click Add/Remove to add/remove the ingredient.
You can select multiple ingredients at a time. |
| Filter | Enter an Ingredient name and click Filter to search for the entered ingredient within the Available list of Ingredients. |
| Selected Ingredients | Displays the list of ingredients selected from the Available Ingredients list. |
| Available Countries | This list is auto-populated and displays only the countries with a license containing the ingredient selected from the Available Ingredients list. |
| Selected Countries | Displays the countries selected from the Available Countries list. |
| Indication | This list contains the Indication configured for the product containing the ingredients in the Available Ingredients section. The selections made from this list get displayed in the Available Products section.
Note: You can select multiple Indications from the list at a time by pressing the CTRL key and clicking the different Indication entities. |
| Formulation | This list contains the Formulation configured for the product containing the ingredients in the Available Ingredients section. The selections made from this list get displayed in the Selected Products section.
Note: You can select multiple Formulations from the list at a time by pressing the CTRL key and clicking the different Indication entities. |
The License/Study tab is used to configure the report header and to specify the agency, products, etc. for which the CTPR will be applicable.
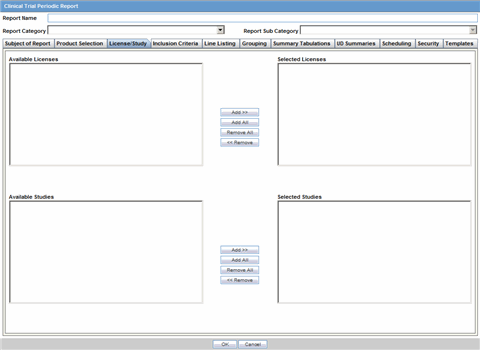
The following tables lists and describes the fields on the License/Study tab.
| Field | Description |
| Available Licenses | Contains licenses that use the ingredient selected in the Ingredient field. This field is automatically populated when an ingredient has been selected. |
| Selected Licenses | Displays the licenses selected from the Available Licenses list by clicking Add/Add All. You can select Licenses that are related to different ingredients for a report. |
| Available Studies | Contains studies that use the ingredient selected in the Ingredient field. This field is automatically populated when an ingredient has been selected. |
| Selected Studies | Displays the studies selected in the Available Studies list by clicking Add/Add All. You can select studies that are related to different ingredients for a report. |
The Inclusion Criteria tab allows you to select search parameters for inclusion of cases in a periodic report.
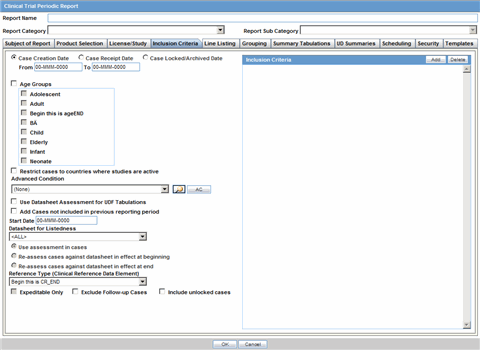
The top section of the dialog allows you to specify the type of cases that will be included in the periodic report.
The following table lists and describes the fields on the Inclusion Criteria tab.
| Field | Description |
|---|---|
| Case Creation Date | Allows you to specify a range of cases by the date when the case was created. |
| Case Receipt Date | Allows you to specify a range of cases by the initial receipt date.
Note: The Date Range is only available when an unscheduled CTPR is being created. You must specify only one date range out of Case Creation Date and Case Receipt Date. |
| Use Current Version | Allows you to use the latest revision to populate the data within the selected reports. |
| Use DLP Version | Allows you to use the case data of the version as of the specified DLP Version. |
| Age Groups | Allows you to include or exclude cases based on the patient's age group. Select all the age group categories that apply. |
| Restrict Cases to countries where studies are active | References study configuration to determine if the case was submitted during the dates the study was active.
Note: This option is available only if a study is selected from the Available Studies section in the License/Study tab. It should not be used for Centrally approved products (CAP), which only have an EU license. |
| Advanced Condition | Allows you to specify an advanced condition that must be satisfied by each case that is included in the report. Ensure that the advanced condition or the advanced condition query set that is specified here does not contradict any other criteria specified in the dialog. |
| Datasheet for Listedness | Select the Datasheet to look against for Listedness when running the report.
Note: Select the ALL datasheet to use the most conservative listedness for the primary event, or the Case Listedness for the tabulation. |
| Use Assessment in Cases | When selected, the CTPR Report will use the Case Event Assessment when performing datasheet listedness calculations. |
| Re-assess cases against datasheet in effect at the beginning | When selected, the CTPR will re-assess the cases in the line listing based on the Active Datasheet on or before the Start Date of the Reporting period. |
| Re-assess cases against datasheet in effect at end | When selected, the CTPR will re-assess the case in the line listing based on the Active Datasheets on or closest to the end date of the CTPR Reporting end date range without exceeding that date. |
| Reference Type (Clinical Reference Data Element) | Select the reference type to be displayed on the Main Listing if Clinical Study Reference is selected as a Data Element in the Available Data Elements section of the Line Listing tab. |
| Expeditable Only | This option is enabled only when an agency has been specified on the Subject of Report tab. Check this option to include only those cases that have submitted expedited reports to the specified Primary Agency. |
| Exclude Follow-up cases | Follow-up cases are cases with a significant follow-up in the Clinical Trial reporting period where the initial receipt date is in a prior period. Check this option to exclude follow-up cases from appearing on the Clinical Trial report. |
| Include Unlocked Cases | Check this option to allow cases that have not been locked for reporting to appear on the report. |
| Use Datasheet Assessment for UDF Tabulations | Allows you to select datasheet for a report to make UDF tabulations.If no datasheet is selected, the most conservative listedness is chosen, i.e. Unlisted followed by Listed. |
| Add Cases not included in previous reporting period | Allows you to add cases which were not included in the previous reporting period.
You can enter the start date of the period in the Start Date field. |
DLP primarily uses two processes:
Next Case Revision
Last Case Revision
Be aware of the following DLP Options.
Last Completed Version -- This option always uses the case version with the last lock that existed prior to the DLP or "As of reporting" date. This option does not enable data cleaning
Note: DLP saves only the last revision when multiple saves are performed in the same job session.
Next Completed Version -- This option uses the current case lock or the next following case lock if the case version was initiated prior to the DLP or the "As of reporting" date with two exceptions:
If there is no case lock for the current version that was received prior to the DLP, the last (current) case revision is used.
If there is a case version after the case lock that was created for the purpose of data cleaning, it is to be used instead of the first locked case revision.
If there are multiple contiguous case versions following the first case lock for the purpose of data cleaning, the last case data cleaning version is used.
Note:
The Data Cleaning option is only available with the DLP option Use Next Completed Version (Includes Data Cleaning).You can perform DLP queries for the following:
Receipt Date -- date entered by the user during case creation
Initial / Follow up Receipt Date
Safety / Safety Follow up Receipt Date
System Date (Case Creation Date) - date the case was physically entered
The as of reporting function returns the same case version results as the DLP Options, with the only difference that the date depends on the "as of date" instead of a DLP date.
The DLP / as of query functionality is available in the following application modules:
Periodic Reports
PSUR including all User defined Tabulations and expedited reports within the Periodic Report
CTPR including all User defined Tabulations and expedited reports within the Periodic Report
IND including all User defined Tabulations
NDA including all User defined Tabulations and expedited reports within the Periodic Report
System Reports
CIOMS II Line Listing
CDA Reports
Case Listing Reports
The Line Listing tab contains the following fields and sections:
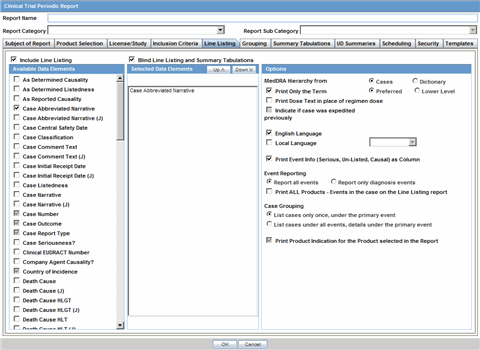
| Field | Description |
|---|---|
| Include Line Listing | Allows you to select whether you want the Line Listing Data Elements printed with the CTPR Report. |
| Blind Line Listing and Summary Tabulations | Hides the selected listings from being displayed |
A number of optional fields are available in the Available Data Elements frame. Select the check box associated with a data element to add the data element to the report. Be aware of the following:
By default, the system print s unavailable fields on the report, and they cannot be changed.
Required data elements are printed as columns in the report. The optional data elements are printed as separate rows below the column data for each case.
Refer to the following table for a list of data elements on this tab.
| Data Element | Notes |
|---|---|
| As Determined Causality | Optional. |
| As Determined Listedness | Optional. |
| As Reported Causality | Optional. |
| Case Abbreviated Narrative | Required and multi-language available. |
| Case Classifications | Multiple classifications are displayed in separate lines. |
| Case Central Safety Date | Optional. |
| Case Comment Text | Optional. |
| Case Initial Receipt Date | Optional. |
| Case Listedness | Optional. |
| Case Narrative | Optional. |
| Case Number | Required. |
| Case Outcome | Required. |
| Case Report Type | Required. |
| Case Seriousness? | Optional. |
| Clinical EUDRACT # Number | Optional. |
| Clinical Study Reference | Optional. |
| Company Agent Causality | Optional. Displays event causality from product name. Multiple causalities are displayed in separate lines. |
| Country of Incidence | Required. |
| Death Cause | Optional. Multi-language available. |
| Death cause as reported | Optional |
| Death Cause HLGT | Optional. |
| Death Cause HLT | Optional. |
| Death Cause LLT | Optional. |
| Death Cause SOC | Optional. |
| Dosage Regimen Batch/Lot # | Optional. |
| Dosage Regimen Daily Dose | Required. |
| Dosage Regimen Duration | Required. |
| Dosage Regimen Frequency | Required. |
| Dosage Regimen Route of Administration | Required. |
| Dosage Regimen Start Date/Time | Required. For the selected product the report is based on. List for all dose regimens. |
| Drug Dechallenge? | Required. |
| Product Indication | Optional. For the selected product the report is based on. |
| Product Indication HLGT | Optional. For the selected product the report is based on. |
| Product Indication HLT | Optional. For the selected product the report is based on. |
| Product Indication LLT | Optional. For the selected product the report is based on. |
| Product Indication SOC | Optional. For the selected product the report is based on. |
| Drug Rechallenge? | Optional. |
| Event Description as Reported | Required. |
| Event Onset Date/Time | Required. |
| Event Preferred Term | Required. |
| Lab Data - Tabular | Optional. |
| Literature Author | Optional. |
| Literature Journal | Optional. |
| Literature Pages | Optional. |
| Literature Title | Optional. |
| Literature Volume | Optional. |
| Literature Year | Optional. |
| Literature reference | Optional. |
| Outcome of Event | Optional. |
| Patient Age | Required. |
| Patient Gender | Required. |
| Patient Initials | Optional. |
| Patient Relevant History | Optional. Multi-language. |
| Patient Subject # | Optional. |
| Product Name | Optional. Displays "product name (generic name) product type, formulation, concentration unit" "daily dose," "dose dose_freq, route" |
| Product Name Report Inclusion | Optional. Prints the Products that were part of the CTPR Report for the case.
Displays "product name (generic name) product type, formulation, concentration unit" "daily dose," "dose dose_freq, route" |
| Report Comment | Optional. |
| Study ID | Optional. |
| Study Other ID | Optional. |
| Study ID Protocol # | Optional. |
This section lists the selected elements and enables you to arrange the order in which these are to be printed. Click the Up or Down buttons to arrange the listed elements above or below in order of priority.
| Field | Description |
|---|---|
| MedDRA Hierarchy from Cases/Dictionary | Select Cases to populate the data from the case data. Select Dictionary to populate the data from the MedDRA dictionary. |
| Print Only the Term (Preferred Term or Lower Level Term) | Prints only the event Preferred Term (PT) or event Lower Level Term (LLT) as per the selected radio button. Select the PT option to print only the preferred term and not the verbatim description. |
| Print Dose Text in place of regimen dose | Prints the dosage and frequency information from Dose Description field instead of Regimen Dose. |
| Indicate if case was expedited previously | This checkbox is selected if a primary agency has been selected in the Subject of Report tab. Cases for which an expedited report was previously submitted to the selected authority are marked with an asterisk. |
| English Language | Provides the option to print the descriptions in English |
| Local Language | Allows a user to specify which Local language for a multi-language field is to be printed i.e. the Abbreviated Narrative field. |
| Print event info (Serious, Un-listed, Related) as Column | Select this check box to print the Seriousness, Listedness and Causality under the Event Verbatim column.
Note: Events having listedness of "Unknown" are considered "Unlisted." If only diagnoses are assessed for event assessment, the events which are associated with a Diagnosis but have been marked with Diagnosis as "Np" display " - " for both listedness and causality. |
| List cases only once, under the primary event | Select this option to view the details of cases in the Main Line Listing only once under the Primary Event |
| List cases under all events, details under the primary event | Select this option to view the details of cases in the Main Line Listing only once under the Primary Event, while non-primary events are listed under their respective event hierarchy with a reference to the primary event body system. Therefore, use this option when grouping on Main Line Listing is by the Event Body System. |
| Print Product Indication for the product selected in the report | Select this option to print Product Indication for the product selected in the report. |
Refer to the following table for a description of items in the Grouping tab.

| Field | Description |
|---|---|
| Available Groupings | Allows a user to group cases together from the given list. Select the desired groupings from the list and click Add to move the grouping to the Selected Groupings list. Up to 10 grouping options can be selected. |
| Selected Groupings | Lists the added groupings made available from the Available Groupings list, and reports the groups in the order they were selected. |
| Ascending | Select this check box to sort the selected entities in ascending order. |
| Page Break | Select this check box to start the cases from a new page, while also keeping the sorting together for every selected page break. |
| Available Sortings | Allows a user to sort cases together from the given list. Select the desired sortings from the list and click Add to move the sorting to the Selected Sortings list. |
| Selected Sortings | Allows a user to further sort cases without a total count for each sorted item. Up to 3 levels of sorting can be selected from the Available Sortings list. |
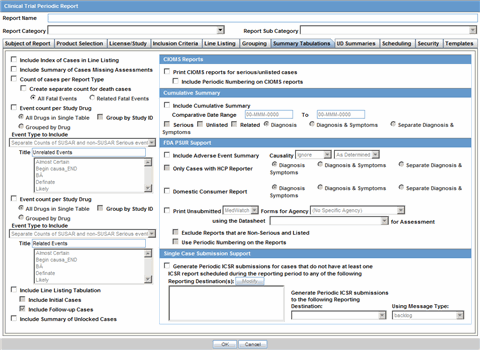
The Summary Tabulations tab enables you to specify which summary tabulations/Listings will appear along with the line listing.
The following table lists and describes the fields on the tab.
| Field | Description |
|---|---|
| Include Index of Cases in CTPR | Create an index page of case numbers, for all cases included in the CTPR. |
| Include Summary of Cases Missing Assessments | This option creates a sub-report of cases missing one of the following items:
Click this checkbox to create one or both of the following sub reports: Cases Missing Assessments - This sub-report displays cases that have been included in the CTPR line listing, but one or more of the following have not been assessed:
Cases Not Included in Report - This sub-report displays cases that have not been included in the CTPR line listing as a result of missing one or more of the following items:
|
| Count of Cases per Report Type | This option prints a Sub Report that counts the number of cases versus the Report Type, based on the cases within the CTPR.
The Cases per Report Type can be either of the following: Count Cases with Initial Expedited Reports: Counts cases with initial Expedited report. Count of cases with "Follow-up" Expedited report: Counts cases with Follow-up Expedited report. Total Count of "Initial" Cases in the Report: Counts any (serious - non-serious) cases received during the reporting period. Total Count of "Follow-up" Cases in the Report: Counts any (serious - non-serious) follow-up cases entered during the reporting period. Cumulative Count: Count of cases received from the start of the trial. |
| Event Count per Study Drug | Creates a sub-report with Event count per Study Drug based on the selected causality. 2 configurations are possible as to allow for a count of related events vs. non-related events. |
| All Study Drugs in Single table | Suppresses '0' current columns (with their cumulative) and print everything in a single cross tab. |
| Grouped by Study Drug | Prints a cross tab report for every product. Prints the cumulative totals even if the current period has no events. |
| Event Type to Include | Prints SUSAR events on the CTPR Report based on the option selected from the drop-down list:
|
| Title | Enables you to select a title. |
| Include Line Listing Tabulation | Select this check box to view a pre-defined summary tabulation of Report type, Seriousness and Listedness of all cases in the CTPR. |
| Include Initial Cases | Select this check box to include initial cases in the CTPR tabulation. |
| Include Follow-up Cases | Select this check box to include follow-up cases in the CTPR tabulation. |
| Include Summary of Unlocked Cases | Enables you to print the list of Case Numbers that are included in the Periodic Reports but are not locked. |
![]()
| Field | Description |
|---|---|
| Print CIOMS reports for serious/unlisted cases | Allows a user to print CIOMS I forms for all Serious/Unlisted (Case Level) cases appearing in the CTPR.
Note: CIOMS contain Internal or Other text printed on them when the CTPR is printed using the Internal or Other option. |
| Include Periodic Numbering on the CIOMS reports | Numbers the requested CIOMS I with a periodic format. (i.e. A-1-1 of 2, A-1-2 of 2, A-2-1 of 1, A-3-1 of 1 etc.). The index is modified to also contain the Periodic paging of each CIOMS report. |

| Field | Description |
|---|---|
| Include Cumulative Summary | Select the checkbox to create a sub-report count of events, grouped by Product and Body System (SOC) and sorted by Preferred Term. The sub-report contains a previous date range count of events (comparative date range), a current date range count (current CTPR date range) and a cumulative count (all dates) of events assessed against the product(s) of the CTPR and matching the inclusion criteria. |
| Comparative Date Range | Allows a user to specify the previous date range as a comparison date for the events counted, and therefore should not overlap with the current date range specified on the CTPR inclusion criteria tab. |
| Serious | Select this check box to include only serious events. |
| Unlisted | Select this check box to include only unlisted events selected in the Datasheet on the "Inclusion Criteria Tab." If no datasheet is selected, then any Unlisted license is included. |
| Related | Select this check box to include only those events that are assessed as Related or Causal. |
| Diagnosis | Select this radio button to include only those events that are marked as diagnosis "Yes" and are without any symptoms associated with diagnosis. |
| Diagnosis & Symptoms | Select this option to include all events in the sub-report. |
| Separate Diagnosis & Symptoms | Select this option to include all SUSAR events in the CTR Report. |
| Field | Description |
|---|---|
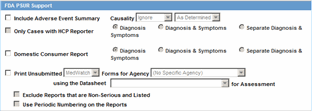
| FDA CTPR Support Section | |
| Include Adverse Event Summary | Select this option to generate a sub-report of events from the line listing. This sub report is grouped by Body System and Preferred Term.
Note: This section can be used if the company has obtained an FDA waiver to submit a CTPR instead of an NDA report. |
| Causality | Select the desired causality from the list.
Ignore - Counts events regardless of causality assessment. Causal - Counts events where the causality is considered reportable in the Causality Category configuration in List Maintenance. Not Causal - Counts events where the causality is considered non-reportable in the Causality Category configuration in List Maintenance. As Determined - Counts events where 'As Determined' causality meets the above selected causality criteria. As Reported - Counts events where 'As Reported' causality meets the above selected causality criteria. Both - Counts events where both 'As Reported' and 'As Determined' causality meet the above causality criteria. Either - Counts events where either the "As Reported" or "As Determined" causality meets the causality criteria. |
| Only Cases with HCP Reporter | Select this check box to include events for only those cases that feature an HCP reporter |
| Diagnosis | Select this radio button to ensure that only events marked as diagnosis are counted. |
| Diagnosis & Symptoms | Select this option to ensure that all events are counted in the sub-report. |
| Separate Diagnosis & Symptoms | Select this option to include all SUSAR events in the CTR Report. |
| Domestic Consumer Report | Enables you to select domestic consumer report. |
| Print Unsubmitted | This option allows a user to print MedWatch or VAERS forms for U.S. cases. The following types of cases will be excluded:
|
| Exclude Reports that are Non-Serious and Listed | Allows a user to suppress MedWatch or VAERS forms from printing for Non-Serious listed cases where all events are non-serious and listed for the datasheet specified. |
| Use Periodic numbering on the Reports | Numbers the requested forms with a periodic format. (i.e. Periodic Page 1 - 1, Periodic Page 1 - 2, Periodic Page 2 - 1, Periodic Page 2 - 2, etc.) An index with the Case Number is also included. |
| Field | Description |
|---|---|
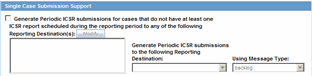
| Single Case Submission Support Section | |
| Generate Periodic ICSR Submissions for any cases in this Periodic Report that does not have at least one scheduled single-case report during the reporting period to the following Reporting Destination(s): Modify | Select this check box to generate the E2B Reports only for the cases, where a Periodic E2B Report for the message type chosen, does not exist.
Select one or more trading partners from the list box. Important: Any case that does not have an expedited or single case periodic submission to a trading partner, must have an E2b report scheduled as a part of the Periodic submission. Click Modify to select a different Reporting Destination. |
| Schedule these single-case Periodic Reports to the following Reporting Destination | Select a single-destination trading partner for Periodic Reports from the drop-down list box. |
| Using the Message Type | Select the required message type from the drop-down list box |
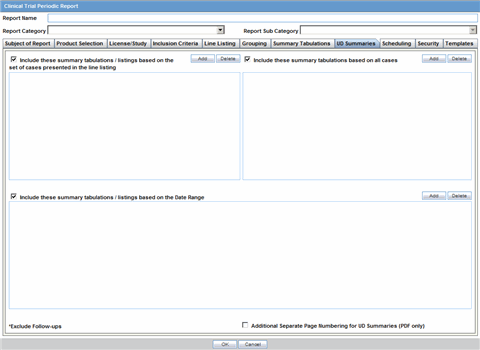
The UD Summaries tab allows you to specify which summary listings will appear along with the line listing.
| Field | Description |
|---|---|
| Include these summary tabulations/listings based on the set of cases presented in the line listing | Allows you to select from pre-configured summary tabulations/listings based on Case Data Analysis, Case listing or CIOMS II line listing reports. These tabulations are based only on the data included in the line listing. Select the Exclude Follow-up Cases check box to filter out follow-up cases from the attached report.
Note: If the Exclude Follow-up Cases option is selected on the Inclusion criteria tab, this option is ignored and follow-up cases are always filtered out. |
| Include these summary tabulations based on all cases | Allows for additional sub-reports based on the 'Case Data Analysis' template, to be included as an output for the all cases in the database that meet the CTPR inclusion criterion for all dates. |
| Include these summary tabulations/listings based on the Date Range | This option allows for additional sub-reports based on Case Data Analysis, Case listing or CIOMS II line listing reports to be included as an output for the cases meeting the CTPR inclusion criterion for the Date Range specified when adding the sub-report.
The dates are based on either the "Case Creation Date" or the "Initial Receipt Date" as entered on the CTPR Inclusion Criteria tab. Click the checkbox to the right of the sub-report to ignore considering follow-up cases for the sub-report. |
| Additional Separate Page Numbering for Summaries | Enables you to include additional separate page numbering for summaries. |
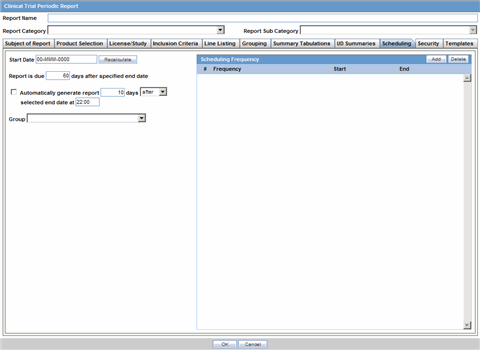
The Scheduling tab allows you to specify details of how often the periodic report will be scheduled.
The following table lists and describes the fields on the Scheduling tab.
| Field | Description |
|---|---|
| Start Date | This is the International Birth Date for the CTPR product. This date is computed as the earliest Awarded date for any license of any type. |
| Recalculate | Allows a user to recompute the International Birth Date of the CTPR Product. This date can be overwritten/manually entered, if needed. |
| Report is due xx days after selected end date (creation or receipt date) | Enter the number of days when the report will be due after the end date specified for the scheduling period. |
| Automatically generate report xx days before/after selected end date at xx:xx | Allows a user to specify the timing of the automatic report generation, by specifying the number of days before/after the selected end date of the report. |
| Group | Allows the user to select the group to which the automatically generated report is to be assigned |
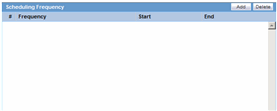
The following table lists and describes the fields in the Scheduling Frequency section.
| Field | Description |
|---|---|
| Frequency | Allows a user to specify the interval required for this scheduling period. |
| Start | Allows the user to specify when the scheduling period starts. |
| End | Allows the user to specify when the scheduling period starts. |
| Add | Allows a user to add another scheduling interval. |
| Delete | Allows a user to delete a scheduling interval. |
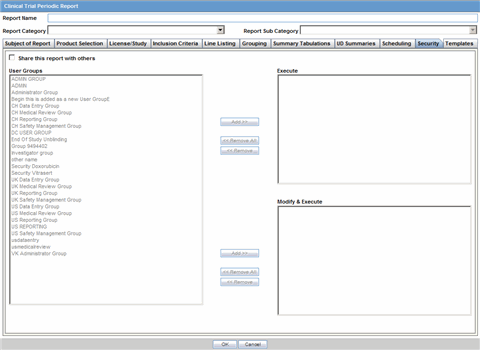
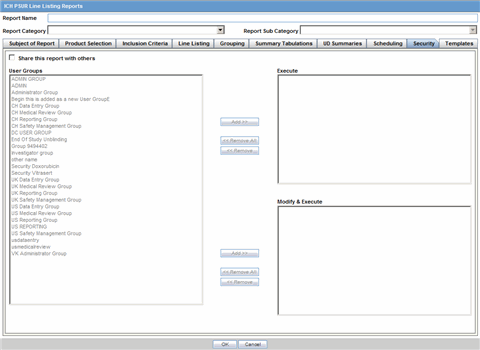
The Security tab is used to configure the security level for the CTPR.
The following table lists and describes the fields on the Security tab.
| Field | Description |
|---|---|
| Share this Report with Other Users | Click this check box to share this report with other users. Specify the privileges to be granted to groups by adding the group name from the Users Groups list to either the "Execute" or "Modify and Execute" list. A user group can exist in only one of these access lists. |
| User Groups | The groups listed here have no access to the CTPR report template. Click Add or Remove to move them to another access list. |
| Execute | The groups listed here have read and execute access to the shared CTPR report template. |
| Modify & Execute | The groups listed here have read, execute and modify access to the shared CTPR report template. |
The Periodic Safety Update Reports (PSURs) are created on a periodic basis to enable regulatory authorities to monitor the safety of a marketed product. This information is used to view new data about the product acquired from appropriate sources. It helps relate this data to the patient exposure and also indicates whether changes should be made to the product information in order to optimize the use of the product. Requirements on the due date of periodic reports may differ for different regulatory authorities.
To create Periodic Safety Update Reports (PSURs)
Select Reports --> Periodic --> ICH PSUR Reports. A list of PSUR Reports opens in the right frame.
Click Copy or Modify to create a new reports from an existing report.
OR
Click New Report to create an entirely new report.
When the system opens the ICH PSUR Line Listing Reports dialog box, enter an appropriate report name in the Report Name field.
Use the tabs to configure the PSUR.
You can group cases for the PSUR Report by Product Name and Dosage Regimen Frequency as follows:
Product Name
This option enables you to group the Product Name - Formulation - Concentration concatenated with Units separated by a hyphen ( -).
If any elements are missing, the system does not print the hyphen ( -).
The groups the cases based on the Primary Drug in the report.
Dosage Regimen Frequency
This option enables you to group the frequency of the primary dosage regimen for the primary drug in the report.
The system prints Frequency: followed by the frequency as defined.
You can copy an existing template by clicking the Create from Template button.
When you click Create from Template, the system displays the Create from Template dialog.
You can choose the PSUR Group Name (as configured in the Product Name configuration) from a type ahead field.
When you enter the PSUR Group Name in the Select PSUR Group Name field and the From and To dates in the Create from Template dialog, and click OK the system does the following:
Saves the PSUR Configuration with the new dates.
Replaces the products in the list of selected products with all products as defined for the selected PSUR name.
Replaces the periodic report name in the newly configured periodic reports with a new name in the following format:
XXXX: YYYY to ZZZZ
where:
XXXX is the selected PSUR Name.
YYYY is the From Date entered by the user.
ZZZZ is the To Date entered by the user.
Replaces the From and To date ranges only for the periodic report.
Bases the remaining configuration, including the security permissions, on the selected PSUR template.
When you enter the PSUR Group Name in the Select PSUR Group Name field and the From and To dates in the Create from Template dialog and click Print and Save, the system does the following:
Saves the PSUR Configuration with the new dates.
Replaces the products in the list of selected products with all products as defined for the selected PSUR name.
Replaces the periodic report name in the newly configured periodic reports with a new name in the following format:
XXXX: YYYY to ZZZZ
where:
XXXX is the selected PSUR Name.
YYYY is the From Date entered by the user.
ZZZZ is the To Date entered by the user.
Replaces the From and To date ranges only for the Periodic Report.
Calls the Report Batch Printing dialog.
Bases the remaining configuration, including the security permissions, on the selected PSUR template.
The Report Name, Report Category and Report Sub-Category fields are common to all tabs of the Reports.
The following table below describes these fields:
| Field | Description |
|---|---|
| Report Name | Enter a name for the Report. The name entered here is displayed in the Reports menu. |
| Report Category | Select a category for the Report. This is displayed in the Reports menu.
Tip: Select New to define a subcategory within the report category. The Periodic Report Category dialog is displayed. Enter a category name in Category and click OK. The category is entered in the Report Category drop-down list. |
| Report Sub Category | Select a subcategory for the report.
Tip: Select New to define a subcategory within the report sub-category. The Periodic Report Category dialog is displayed. Enter a category name in Category and click OK. The category is entered in the Report Sub-Category drop-down list. |
The Subject of Report tab is used to configure the report header and to specify the agency, products, etc. for which the PSUR will be applicable.
| Field | Description |
|---|---|
| Primary Agency | Select the Primary Agency. |
| Reporting Destination | Displays the list of agencies from where the report is being sent. Select an agency from the list displayed in Reporting Destination and click Add to add the report to the Selected Destination list.
You can select multiple agencies from the list of agencies such that the report can be submitted to multiple agencies at the same time. Likewise, select a report from the Selected Destination list and click Remove to prevent it from being sent to the selected destination. |
| Selected Destination | Displays the list of agencies where the report is being sent. Select an agency from the list displayed in Reporting Destination and click Add to add the report to the Selected Destination list.
You can select multiple agencies from the list of agencies such that the report can be submitted to multiple agencies at the same time. Likewise, select a report from the Selected Destination list and click Remove to prevent it from being sent to the selected destination. |
| Report # | Enter a report number for this report. |
| Report Title | Enter a report title for this report. |
| Ingredient | Automatically displays the "Ingredient" as provided in the Subject of Report dialog.
Note: You can choose whether to view these field or not. Click the checkbox displayed with this field to hide or view it. |
| Trade Name | Automatically displays the "Trade Name(s)" as provided in the Subject of Report dialog. Multiple trade names are also displayed together, separated by commas.
Note: You can choose whether to view this field or not. Click the checkbox displayed with this field to hide or view it. |
| International Birth Date | Automatically displays the earliest license awarded date, when a user selects an Ingredient and a Product.
Note: You can choose whether to view this field or not. Click the checkbox displayed with this field to hide or view it. |
| Report Footer | Enter the footer for the report. |
| Print all configuration criteria on separate cover page | Mark this box to print out the configuration of this report when the report is printed. This is only available when PDF option is selected during printing. |
| Print page numbers on reports | When checked, this option enables the user to print page numbers on a periodic report. This is the default for all report configurations.
If this checkbox is not checked, the following occur.
|
| Allow access to report cases through Hit List | When the report is run as final, it creates a Hit List, which can be retrieved from other areas of the application where advanced conditions can be selected. Click this checkbox to report cases through the Hit List. |
Refer to the table below for a description of fields in the Product Selection tab.
| Field | Description |
|---|---|
| Available Ingredients | Displays the list containing the Ingredients used for the product configuration. Select an ingredient from the list displayed in Available Ingredients and click Add/Remove to add/remove the ingredient.
You can select multiple ingredients at a time. |
| Filter | Enter an Ingredient name and click Filter to search for the entered ingredient within the Available list of Ingredients. |
| Selected Ingredients | Displays the list of ingredients selected from the Available Ingredients list. |
| Indication | This list contains the Indication configured for the product containing the ingredients in the Available Ingredients section. The selections made from this list get displayed in the Available Products section.
Note: You can select multiple Indications from the list at a time by pressing the CTRL key and clicking the different Indication entities. |
| Formulation | This list contains the Formulation configured for the product containing the ingredients in the Available Ingredients section. The selections made from this list get displayed in the Selected Products section.
Note: You can select multiple Indications from the list at a time by pressing the CTRL key and clicking the different Indication entities. |
| Available Products | This list is automatically populated with the selections made in the Indication section. |
| Selected Products | This list contains products selected by the user from the Available Products list. When a product is selected, the Trade Name field and International Birth Date fields are auto-populated with the license trade name ("formulation", "concentration") and earliest License Award Date for the product. |
The Inclusion Criteria tab allows you to select search parameters for inclusion of cases in a periodic report. The top section of the dialog allows you to specify the type of cases that are to be included in the periodic report.

Click Add to add a criterion. Select appropriate items from the list of items that appear.
| Field | Description |
|---|---|
| Case Creation Date | Allows you to specify a range of cases by the date when the case was created. |
| Case Receipt Date | Allows you to specify a range of cases by the initial receipt date. |
| Use Current Version | Allows you to use the latest revision to populate the data within the selected reports. |
| Use DLP Version | Allows you to use the case data of the version as of the specified DLP Version. |
| Age Groups | Allows you to include or exclude cases based on the patient's age group. Select Age Groups and then select all the age group categories that apply. |
| Use Assessments in Cases | When selected, the PSUR Report will use the Case Event Assessment when performing datasheet listedness calculations. |
| Re-assess cases against datasheet in effect at the beginning | When selected, the PSUR will re-assess the cases in the line listing based on the Active Datasheet on or before the Start Date of the Reporting period. |
| Re-assess cases against datasheet in effect at end | When selected, the PSUR will re-assess the case in the line listing based on the Active Datasheets on or closest to the end date of the PSUR Reporting end date range without exceeding that date. |
| Expeditable Only | This checkbox is available only when an agency is selected in the Subject of Report tab. If you select this check box, only the cases classified as submitted expedited reports to the specified agency are used. |
| Exclude Follow-up Cases | Filters out follow-up Reports from the PSUR Line Listing Report. |
| Include Unlocked Cases | Allows you to include unlocked cases in the periodic report. |
| Advanced Condition | Allows you to specify an advanced condition that must be satisfied by each case that is included in the report. Ensure that the advanced condition or the advanced condition query set that is specified here does not contradict any other criteria specified in the dialog. |
| Use Datasheet Assessment for UDF Tabulations | Allows you to select datasheet for a report to make UDF tabulations.
If no datasheet is selected, the most conservative listedness is chosen, i.e. Unlisted followed by Listed. |
| Add Cases not included in previous reporting period | Allows you to add cases which were not included in the previous reporting period.
You can enter the start date of the period in the Start Date field. |
When using the Inclusion Criteria tab, the system enables you to exclude blinded cases from the Inclusion criteria section of the report. It also enables you to select All from the Inclusion criteria for the report type. This would include all configure report types in the report.
| Field | Description |
|---|---|
| Dropdown list | Select the appropriate report type from the drop-down list. |
| Datasheet | This list allows you to specify which datasheet is to be checked to determine the listedness (listed or unlisted) of the case. |
| Serious / Non-Serious | If you select Serious and clear Non-serious, only cases having a "serious" event are included and vice-versa. If you select both Serious and Non-Serious the seriousness criteria is ignored. |
| Fatal / Non-Fatal | Select Fatal when at least one event has an event outcome of 'Fatal". If not, select Non-Fatal. If you select both Fatal and Non-Fatal, both types of cases are included. |
| Listed / Unlisted | Select Listed to view only Listedness values. If you select both Listed and Unlisted, all Listedness values (including Unknown) are included. |
| Related / Non-Related | Relatedness refers to the more conservative of reported or company causality. Select Related for any reportable causality type, and Non-Related for any non-reportable causality type. |
| HCP / Non-HCP | HCP refers to cases that identify a Health Care Professional in the Reporter section within the General tab of the Case Form. |
| Primary Reporter Only | This check box displays whether the Primary Reporter has been selected to determine the HCP status. |
The Line Listing tab contains the following fields and sections:
| Field | Description |
|---|---|
| Include Line Listing | |
| Allows you to select whether you want the Line Listing Data Elements printed with the PSUR Report. |
The following illustration shows the optional fields under Available Data Elements.
Select the check box displayed against each data element to add it to the report.
The unavailable fields are printed on the report by default and cannot be changed.
Refer to the table below for a list of the data elements that are included in this tab.
The mandatory data elements are printed as columns in the report.
| Data Element | Notes |
|---|---|
| As Determined Causality | Optional. |
| As Determined Listedness | Optional. |
| As Reported Causality | Optional. |
| Case Abbreviated Narrative | Required and multi-language available. |
| Case Classifications | Required. Multiple classifications are displayed in separate lines. |
| Case Central Safety Date | Optional. |
| Case Comment Text | Optional. |
| Case Initial Receipt Date | Optional. |
| Case Listedness | Optional. |
| Case Narrative | Optional. |
| Case Number | Required. |
| Case Outcome | Required. |
| Case Report Type | Required. |
| Case Seriousness? | Optional. |
| Company Agent Causality | Displays event causality from product name. Multiple causalities are displayed in separate lines. |
| Country of Incidence | Required. |
| Death Cause | Multi-language available. |
| Death Cause HLGT | Optional. |
| Death Cause HLT | Optional. |
| Death Cause LLT | Optional. |
| Death Cause SOC | Optional. |
| Dosage Regimen Batch/Lot # | Optional. |
| Dosage Regimen Daily Dose | Optional. |
| Dosage Regimen Duration | Optional. |
| Dosage Regimen Frequency | Optional. |
| Dosage Regimen Route of Administration | Optional. |
| Dosage Regimen Start Date/Time | Required. For the selected product the report is based on. List for all dose regimens. |
| Drug Dechallenge? | Optional. |
| Drug Primary Indication | Optional. For the selected product the report is based on. |
| Drug Primary Indication HLGT | Optional. For the selected product the report is based on. |
| Drug Primary Indication HLT | Optional. For the selected product the report is based on. |
| Drug Primary Indication LLT | Optional. For the selected product the report is based on. |
| Drug Primary Indication SOC | Optional. For the selected product the report is based on. |
| Drug Rechallenge? | Optional. |
| Event Description as Reported | Required. |
| Event Lack of Efficacy | Optional. |
| Event Onset Date/Time | Required. |
| Event Preferred Term | Required. |
| Lab Data - Tabular | Optional. |
| Literature Author | Optional. |
| Literature Journal | Optional. |
| Literature Pages | Optional. |
| Literature Title | Optional. |
| Literature Volume | Optional. |
| Literature Year | Optional. |
| Indication | Displays indication for product name. |
| Listedness | Displays datasheet, product and listedness event preferred term |
| Literature reference | Optional. |
| Outcome of Event | Optional. |
| Patient Age | Required. |
| Patient Gender | Required. |
| Patient Initials | Optional. |
| Patient Relevant History | Multi-language. |
| Patient Subject # | Optional. |
| Product Name | Displays "product name (generic name) product type, formulation, concentration unit" "daily dose," "dose dose_freq, route" |
| Product Name Report Inclusion | Prints the Products that were part of the CTPR Report for the case.
Displays "product name (generic name) product type, formulation, concentration unit" "daily dose," "dose dose_freq, route" |
| Report Comment | Optional. |
| Reporter Reference Number | Optional. If you select this value the report includes the reporter reference number as specified in the cases included in the Periodic report of All reporters within the case.
If the case does not have values, then label is not printed in the Line Listing for the report. |
| Reporter Type | Optional. |
| Study Blinded Status | Optional. The system enables you to exclude blinded cases from the inclusion criteria. |
| Study Center ID | Optional. |
| Study Drug | Optional. |
| Study ID | Optional. |
| Study ID Protocol # | Optional. |
This section lists the selected elements and enables you to arrange the order in which these are to be printed.
Click the Up or Down buttons to arrange the listed elements above or below in order of priority.
| Field | Description |
|---|---|
| MedDRA Hierarchy from Cases/Dictionary | Select Cases to populate the data from the case data. Select Dictionary to populate the data from the MedDRA dictionary. |
| Print Only the Term (Preferred Term or Lower Level Term) | Prints only the event Preferred Term (PT) or event Lower Level Term (LLT) as per the selected radio button. Select the PT option to print only the preferred term and not the verbatim description. |
| Print Dose Text in place of regimen dose | Prints the dosage and frequency information from Dose Description field instead of Regimen Dose. |
| Indicate if case was expedited previously | This checkbox is selected if an agency has been selected in the Subject of Report tab. Cases for which an expedited report was previously submitted to the selected authority are marked with an asterisk and the date of submission appears in the line listing.
Any case that has been previously expedited to a selected agency, is listed in the list of Agencies in the Subject of Reports tab. |
| English Language | Provides the option to print the descriptions in English |
| Local Language | Allows a user to specify which Local language for a multi-language field is to be printed i.e. the Abbreviated Narrative field. |
| Print event info (Serious, Un-listed, Related) as Column | Select this checkbox to print the Seriousness, Listedness and Causality under the Event Verbatim column.
Note: Events having listedness of 'Unknown' are considered 'Unlisted'. If only diagnoses are assessed for event assessment, the events which are associated with a Diagnosis but have been marked with Diagnosis as 'No' display '-' for both listedness and causality. |
| List cases only once, under the primary event | Select this option to view the details of cases in the Main Line Listing only once under the Primary Event |
| List cases under all events, details under the primary event | Select this option to view the details of cases in the Main Line Listing only once under the Primary Event, while non-primary events are listed under their respective event hierarchy with a reference to the primary event body system. Therefore, use this option when grouping on Main Line Listing is by the Event Body System. |
| Print Product Indication for the Product selected in the Report | Enables you to print the product indication for the product selected in the report. |
Refer to the following table for a description of items in the Grouping tab.
| Field | Description |
|---|---|
| Available Groupings | Allows a user to group cases together from the given list. Select the desired groupings from the list and click Add to move the grouping to the Selected Groupings list. |
| Selected Groupings | Lists the added groupings, and reports the groups in the order they were selected. Up to 5 grouping options can be selected from the Available Groupings list. |
| Ascending | Select this checkbox to sort the selected entities in ascending order |
| Page Break | Select this checkbox to start the cases from a new page, while also keeping the sorting together for every selected page break. |
| Available Sortings | Allows a user to sort cases together from the given list. Select the desired sortings from the list and click Add to move the sorting to the Selected Sortings list. |
| Selected Sortings | Allows a user to further sort cases without a total count for each sorted item. Up to 3 sorting options can be selected from the Available Sortings list. This list is populated with the Mandatory Line Listing entities plus any optional data elements chosen for this configuration. |
The Summary Tabulations tab enables you to specify which summary tabulations/listings will appear along with the line listing.The system enables you to separate the cumulative summary by seriousness, relatedness, and listedness. If you choose this option, the system separates the product event detail into the following categories: Serious/Non-Serious, Related/Non-Related, and Unlisted/Listed events.
It contains the following fields and sections:
| Field | Description |
|---|---|
| Include Index of Cases in PSUR | Create an index page of case numbers, for all cases included in the PSUR. |
| Include Summary of Cases Missing Assessments | This option creates a sub-report of cases missing one of the following items:
Click this checkbox to create one or both of the following sub reports: Cases Missing Assessments - This sub-report displays cases that have been included in the PSUR line listing, but one or more of the following have not been assessed:
Cases Not Included in Report - This sub-report displays cases that have not been included in the PSUR line listing as a result of missing one or more of the following items:
|
| Include Line Listing Tabulation | Select this check box to view a pre-defined summary tabulation of Report type, Seriousness and Listedness of all cases in the PSUR. |
| Include Initial Cases | Select this checkbox to include initial cases in the PSUR tabulation. |
| Include Follow-up Cases | Select this checkbox to include follow-up cases in the PSUR tabulation. |
| Include Summary of Unlocked Cases | Enables you to print the list of Case Numbers that are included in the Periodic Reports but are not locked. |
![]()
| Field | Description |
|---|---|
| Print CIOMS reports for serious/unlisted cases | Allows a user to print CIOMS I forms for all Serious/Unlisted (Case Level) cases appearing in the PSUR.
Note: CIOMS contain Internal or Other text printed on them when the PSUR is printed using the Internal or Other option. |
| Include Periodic Numbering on the CIOMS reports | Numbers the requested CIOMS I with a periodic format. (i.e. A-1-1 of 2, A-1-2 of 2, A-2-1 of 1, A-3-1 of 1 etc.). The index is modified to also contain the Periodic paging of each CIOMS report. |
| Field | Description |
|---|---|
| Include Cumulative Summary | Select the check box to create a sub-report count of events, grouped by Product and Body System (SOC) and sorted by Preferred Term. The sub-report contains a previous date range count of events (comparative date range), a current date range count (current PSUR date range) and a cumulative count (all dates) of events assessed against the product(s) of the PSUR and matching the inclusion criteria. |
| Comparative Date Range | Allows a user to specify the previous date range as a comparison date for the events counted, and therefore should not overlap with the current date range specified on the PSUR inclusion criteria tab. |
| Serious | Select this check box to include only serious events. |
| Unlisted | Select this check box to include only unlisted events selected in the Datasheet on the "Inclusion Criteria Tab." If no datasheet is selected, then any Unlisted license is included. |
| Related | Select this check box to include only those events that are assessed as Related or Causal. |
| Diagnosis | Select this radio button to include only those events that are marked as diagnosis "Yes" and are without any symptoms associated with diagnosis. |
| Diagnosis & Symptoms | Select this radio button to include diagnosis and symptoms together in the sub-report. |
| Separate Diagnosis & Symptoms | Select this radio button to include diagnosis and symptoms separately in the sub-report. Selecting this option means that the case numbers are separated by Diagnosis and Symptoms respectively. |
| Field | Description |
|---|---|
| FDA PSUR Support Section
Note: This section can be used if the company has obtained an FDA waiver to submit a PSUR instead of an NDA report. |
|
| Include Adverse Event Summary | Select this option to generate a sub-report of events from the line listing. This sub report is grouped by Body System and Preferred Term. |
| Causality | Select the desired causality from the list.
Ignore - Counts events regardless of causality assessment. Causal - Counts events where the causality is considered reportable in the Causality Category configuration in List Maintenance. Not Causal - Counts events where the causality is considered non-reportable in the Causality Category configuration in List Maintenance. As Determined - Counts events where 'As Determined' causality meets the above selected causality criteria. As Reported - Counts events where 'As Reported' causality meets the above selected causality criteria. Both - Counts events where both 'As Reported' and 'As Determined' causality meet the above causality criteria. Either - Counts events where either the 'As Reported' or 'As Determined' causality meets the causality criteria. |
| Only Cases with HCP Reporter | Select this checkbox to include events for only those cases that feature an HCP reporter |
| Diagnosis | Select this radio button to ensure that only events marked as diagnosis are counted. |
| Diagnosis & Symptoms | Select this radio button to ensure that all events are counted in the sub-report. |
| Separate Diagnosis & Symptoms | Select this radio button to include diagnosis and symptoms separately in the sub-report. Selecting this option means that the case numbers are separated by Diagnosis and Symptoms respectively. |
| Domestic Consumer Support | Select this radio button to enable domestic consumer support. |
| Print Unsubmitted | This option allows a user to print MedWatch or VAERS forms for U.S. cases |
| Exclude Reports that are Non-Serious and Listed | Allows a user to suppress MedWatch or VAERS forms from printing for Non-Serious listed cases where all events are non-serious and listed for the datasheet specified. |
| Use Periodic numbering on the Reports | Numbers the requested forms with a periodic format. (i.e. Periodic Page 1 - 1, Periodic Page 1 - 2, Periodic Page 2 - 1, Periodic Page 2 - 2, etc.) An index with the Case Number is also included. |
| Field | Description |
|---|---|
| Single Case Submission Support Section | |
| Generate Periodic ICSR Submissions for any cases in this Periodic Report that does not have at least one scheduled single-case report during the reporting period to the following Reporting Destination(s): Modify | Select this checkbox to generate the E2B Reports only for the cases, where a Periodic E2B Report for the message type chosen, does not exist.
Select one or more trading partners from the list box. Important: Any case that does not have an expedited or single case periodic submission to a trading partner, must have an E2B report scheduled as a part of the Periodic submission. Click Modify to select a different Reporting Destination. |
| Schedule these single-case Periodic Reports to the following Reporting Destination | Select a single-destination trading partner for Periodic Reports from the drop-down list box. |
| Using the Message Type | Select the required message type from the drop-down list box |
The UD Summaries tab allows you to specify which summary listings will appear along with the line listing.

The following lists and describes the fields on the UD Summaries tab.
| Field | Description |
|---|---|
| Include these summary tabulations/listings based on the set of cases presented in the line listing | Allows you to select from pre-configured summary tabulations/listings. These tabulations are based only on the data included in the line listing. Selecting the Exclude Follow-up Cases check box filters out follow-up cases from the attached report.
Note: If the Exclude Follow-up Cases option is selected on the Inclusion criteria tab, this option is ignored and follow-up cases are always filtered out. |
| Include these summary tabulations based on all cases | Allows for additional sub-reports based on the 'Case Data Analysis' template, to be included as an output for the all cases in the database that meet the PSUR inclusion criterion for all dates. |
| Include these summary tabulations/listings based on the Date Range | This option allows for additional sub-reports based on Case Data Analysis, Case listing or CIOMS II line listing reports to be included as an output for the cases meeting the PSUR inclusion criterion for the Date Range specified when adding the sub-report.
The dates are based on either the "Case Creation Date" or the "Initial Receipt Date" as entered on the PSUR Inclusion Criteria tab. Click the checkbox to the right of the sub-report to ignore considering follow-up cases for the sub-report. |
| Additional Separate Page Numbering for Summaries | Enables you to include additional separate page numbering for summaries. |
The Scheduling tab enables you to specify details of how often the periodic report will be scheduled.
| Field | Description |
|---|---|
| Start Date | This is the International Birth Date for the PSUR product. This date is computed as the earliest Awarded date for any license of any type. |
| Recalculate | Allows a user to recompute the International Birth Date of the PSUR Product. This date can be overwritten/manually entered, if needed. |
| Report is due xx days after selected end date (creation or receipt date) | Enter the number of days when the report will be due after the end date specified for the scheduling period. |
| Automatically generate report xx days before/after selected end date at xx:xx | Allows a user to specify the timing of the automatic report generation, by specifying the number of days before/after the selected end date of the report. |
| Group | Allows the user to select the group to which the automatically generated report is to be assigned |
The following table lists and describes the fields in the Scheduling Frequency section.
| Field | Description |
|---|---|
| Frequency | Allows a user to specify the interval required for this scheduling period. |
| Start | Allows the user to specify when the scheduling period starts. |
| End | Allows the user to specify when the scheduling period starts. |
| Add | Allows a user to add another scheduling interval. |
| Delete | Allows a user to delete a scheduling interval. |
The Security tab is used to configure the security level for the PSUR.
| Field | Description |
|---|---|
| Share this Report with Other Users | Click this check box to share this report with other users. Specify the privileges to be granted to groups by adding the group name from the Users Groups list to either the "Execute" or "Modify and Execute" list. A user group can exist in only one of these access lists. |
| User Groups | The groups listed here have no access to the PSUR report template. Click Add or Remove to move them to another access list. |
| Execute | The groups listed here have read and execute access to the shared PSUR report template. |
| Modify & Execute | The groups listed here have read, execute and modify access to the shared PSUR report template. |
The system enables you to define an IND summary report. You can add a new report as well as copy, modify and delete existing reports.
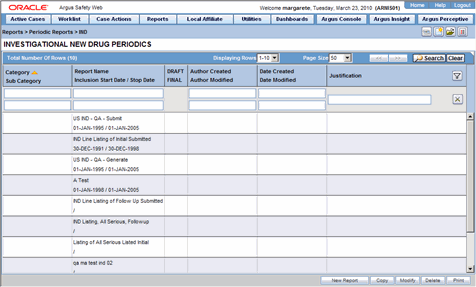
Use the following procedure to create and IND Summary Report
Select Reports --> IND Reports to open IND Subject of Report view.
Click New Report.
OR
Select an existing report from the list and click Copy or Modify.
When you click New Report, the IND Line Listing Reports dialog opens.
Enter an appropriate name for the report under Report Name.
Use the tabs in this dialog to configure the IND Report.
From each tab in the IND Summary Report, you can choose to Print all configuration criteria on separate cover pages (PDF Only).
The Report Name, Report Category and Report Sub-Category fields are common to all tabs of the Reports. The following table describes these fields.
| Field | Description |
|---|---|
| Report Name | Enter a name for the Report. The name entered here is displayed in the Reports menu. |
| Report Category | Select a category for the Report. This is displayed in the Reports menu.
Tip: Select New to define a subcategory within the report category. The Periodic Report Category dialog is displayed. Enter a category name in Category and click OK. The category is entered in the Report Category drop-down list. |
| Report Sub Category | Select a subcategory for the report.
Tip: Select New to define a subcategory within the report sub-category. The Periodic Report Category dialog is displayed. Enter a category name in Category and click OK. The category is entered in the Report Sub-Category drop-down list. |
The Subject of Report tab is used to configure the report header and to specify the agency, products, and other elements. Select multiple ingredients for a configured IND Report to view the multiple licenses to be selected for the report.
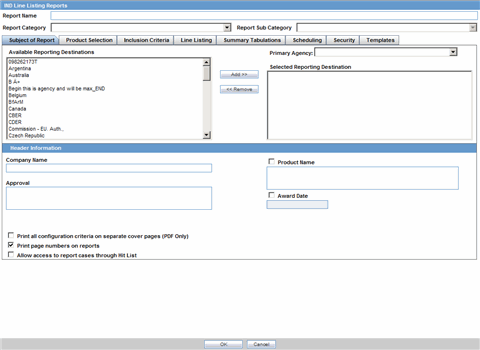
| Field | Description |
|---|---|
| Primary Agency | Select the Primary Agency. |
| Reporting Destination | Displays the list of configured Regulatory Agencies. Select an agency from the list displayed in Reporting Destination and click Add to add the report to the Selected Destination list.
Select multiple agencies by holding the CTRL key when you click them. |
| Selected Destination | Displays the list of agencies where the report is being sent. Select an agency from the list displayed in Reporting Destination and click Add to add the report to the Selected Destination list.
Select multiple agencies by holding the CTRL key when you click them. Likewise, select an agency from the Selected Destination list and click Remove to prevent it from being sent to the selected destination. |
| Company Name | If a regulatory agency is selected in the Subject of Report tab, then the company name associated with the regulatory agency (this association is created by the Administrator) is automatically entered in this field. |
| Product Name | This field is automatically filled as per the Ingredient field.
Note: Click the checkbox corresponding to this field to choose whether you want this field to appear on the report. |
| Approval | This field is automatically filled with License numbers, separated by commas. This is an editable field. |
| Award Date | This field is populated with the earliest awarded Investigational License for US amongst the licenses selected. This field cannot be edited.
Note: Click the checkbox corresponding to this field to choose whether you want this field to appear on the report. |
| Print all configuration criteria on separate cover page | Click this checkbox to print out the configuration of this report when the report is printed. This is only available when the PDF option is selected during printing. |
| Print page numbers on reports | When checked, this option enables the user to print page numbers on a periodic report. This is the default for all report configurations.
If this checkbox is not checked, the following occur.
|
| Allow access to report cases through Hit List | When the report is run as final, it creates a Hit List, which can be retrieved from other areas of the application where advanced conditions can be selected. Click this checkbox to report cases through the Hit List. |
Use the Product Selection tab to select product information to include in the report.

| Field | Description |
|---|---|
| Available Ingredients | Displays the list containing the Ingredients used for the product configuration. Select an ingredient from the list displayed in Available Ingredients and click Add/Remove to add/remove the ingredient.
You can select multiple ingredients at a time. |
| Filter | Enter an Ingredient name and click Filter to search for the entered ingredient within the Available list of Ingredients. |
| Selected Ingredients | Displays the list of ingredients selected from the Available Ingredients list. |
| Indication | This list contains a list of all the indications for the products containing the selected ingredient. The selections made from this list are displayed in the Available Products section.
Note: You can select multiple Indications from the list at a time by pressing the CTRL key and clicking the different Indication entities. |
| Formulation | This list contains the Formulations configured for the product containing the selected ingredient and indication. The selections made from this list get displayed in the Selected Products section.
Note: You can select multiple Formulations from the list at a time by pressing the CTRL key and clicking the different Indication entities. |
| Available Licenses | This list is automatically populated with the licenses from the Indication section. |
| Selected Licenses | This list contains licenses selected by the user from the Available Licenses list. When a product is selected, the Trade Name and International Birth Date fields are auto-populated with the license trade name ("formulation", "concentration") and earliest License Award Date for the product. |
The Inclusion Criteria tab allows you to select search parameters for inclusion of cases in a periodic report.
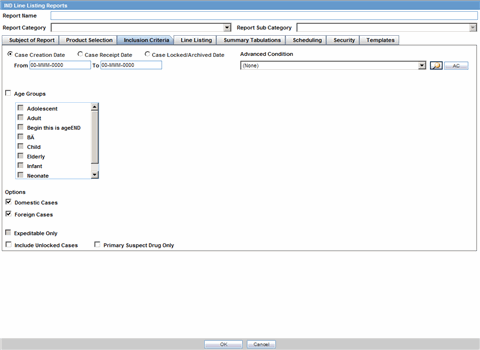
| Field | Description |
|---|---|
| Case Creation Date | Allows you to specify a range of cases by the date when the case was created. |
| Case Receipt Date | Allows you to specify a range of cases by the initial receipt date. |
| Use Current Version | Allows you to use the latest revision to populate the data within the selected reports. |
| Use DLP Version | Allows you to use the case data of the version as of the specified DLP Version. |
| Age Groups | Allows you to include or exclude cases based on the patient's age group. Select the Age Groups checkbox to activate the age groups and select all the age group categories that apply. |
| Options - Domestic/Foreign Cases | This option allows the user to include domestic and foreign cases within the periodic report. Select Domestic if Country of Incidence is USA and Foreign if Country of Incidence is not USA. |
| Expeditable Only | This checkbox is available only when an agency is selected in the Subject of Report tab. If you select this check box, only the cases classified as submitted expedited reports to the primary agency are used. |
| Include Unlocked Cases | Allows you to include unlocked cases in the periodic report. |
| Advanced Condition | Allows you to specify an advanced condition that must be satisfied by each case that is included in the report. Ensure that the advanced condition or the advanced condition query set that is specified here does not contradict any other criteria specified in the dialog. |
The following table describes the fields in the Line Listing tab.
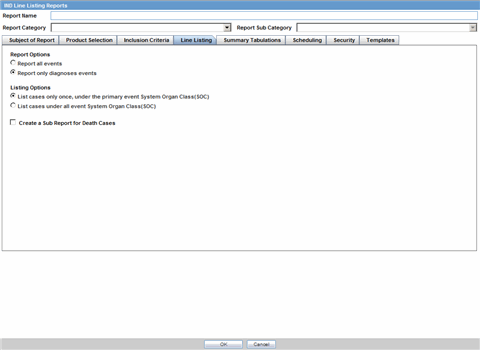
| Field | Description |
|---|---|
| Report All Events | Select this option to report all events. |
| Report only Diagnosis Events | Select this option to report only diagnosis events (only the diagnosis events that are either explicitly marked as diagnosis or are non-related symptoms). |
| List cases only once, under the primary event | Select this option to view the details of cases in the Main Line Listing only once under the Primary Event |
| List cases under all events, details under the primary event | Select this option to view the details of cases in the Main Line Listing only once under the Primary Event, while non-primary events are listed under their respective event hierarchy with a reference to the primary event body system. Therefore, use this option when grouping on Main Line Listing is by the Event Body System. |
| Create a Sub Report for Death Cases | Select this check box to separate death cases from the main IND listing. If the check box is checked, all death cases (Identified by any event marked as death in Seriousness Criteria or any event having a Event Outcome as Death) are filtered out from the IND Line Listing. All death case show up in a sub report, called "IND Line Listing (Death Cases)." |
The Summary Tabulations tab enables you to specify which summary tabulations will appear along with the line listing.
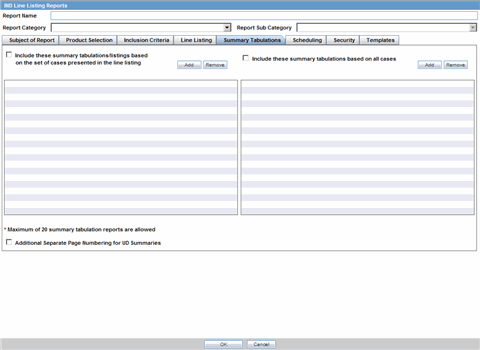
| Field | Description |
|---|---|
| Include these summary tabulations/listings based on the set of cases presented in the line listing | Allows you to select from pre-configured summary tabulations/listings. These tabulations are based only on the data included in the line listing. Select the Exclude Follow-up Cases check box to filter out follow-up cases from the attached report.
Note: If the Exclude Follow-up Cases option is selected on the Inclusion criteria tab, this option is ignored and follow-up cases are always filtered out. |
| Include these summary tabulations based on all cases | Allows for additional sub-reports based on the 'Case Data Analysis' template, to be included as an output for the all cases in the database that meet the IND Report inclusion criterion for all dates. |
| Add | Displays a list of memorized Case Data Analysis Reports that have been marked for availability in a periodic report. |
| Remove | Click this button to remove a selected report. |
| Additional Separate Page Numbering for Summaries | Enables you to include additional separate page numbering for summaries. |
| Include Summary of Unlocked Cases | Enables you to print the list of Case Numbers that are included in the Periodic Reports but are not locked. |
The Scheduling tab allows you to specify details of how often the periodic report will be scheduled.
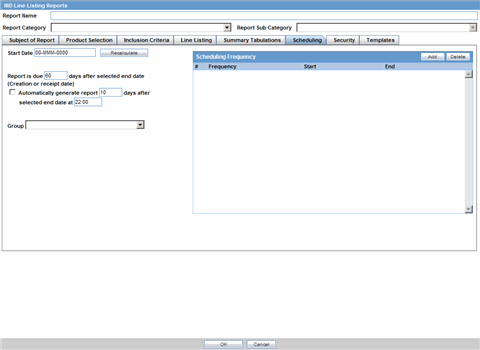
The following table lists and describes the fields on the Scheduling tab.
| Field | Description |
|---|---|
| Start Date | This is the International Birth Date for the IND Report product. This date is computed as the earliest Awarded date for any license of any type. |
| Recalculate | Allows a user to recompute the International Birth Date of the IND Report Product. This date can be overwritten/manually entered, if needed. |
| Report is due xx days after selected end date (creation or receipt date) | Enter the number of days when the report will be due after the end date specified for the scheduling period. |
| Automatically generate report xx days before/after selected end date at xx:xx | Allows a user to specify the timing of the automatic report generation, by specifying the number of days before/after the selected end date of the report. |
| Group | Allows the user to select the group to which the automatically generated report is to be assigned. |
Description of fields in Scheduling Frequency:
| Field | Description |
|---|---|
| Frequency | Allows a user to specify the interval required for this scheduling period. |
| Start | Allows the user to specify when the scheduling period starts. |
| End | Allows the user to specify when the scheduling period starts. |
| Add | Allows a user to add another scheduling interval. |
| Delete | Allows a user to delete a scheduling interval. |
The Security tab is used to configure the security level for the IND Reports.
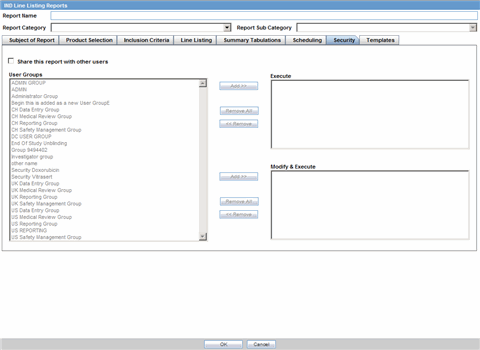
The following table lists and describes the fields on the Security tab.
| Field | Description |
|---|---|
| Share this Report with Other Users | Click this check box to share this report with other users. Specify the privileges to be granted to groups by adding the group name from the Users Groups list to either the "Execute" or "Modify and Execute" list. A user group can exist in only one of these access lists. |
| User Groups | The groups listed here have no access to the IND Report template. Click Add or Remove to move them to another access list. |
| Execute | The groups listed here have read and execute access to the shared IND Report template. |
| Modify & Execute | The groups listed here have read, execute and modify access to the shared IND Report template. |
The NDA Periodic Reports enable you to define an NDA Periodic report. You can add a new report as well as copy, modify and delete existing reports.
Use the following procedure to create an NDA Periodic report
To create NDA Summary Reports:
Select Reports --> Periodic Reports --> NDA Reports to open the NDA Subject of Report view.
Click New Report to create an entirely new report,
OR
Select an existing report from the list and click Copy or Modify.
When you click New Report, the NDA Line Listing Reports dialog opens.
Enter an appropriate report name in the Report Name field
Use the tabs in this dialog to configure the NDA Report.
From each tab in the NDA Report, you can choose to Print all configuration criteria on separate cover pages (PDF Only).
When using NDA Reports be aware of the following:
You can print an Index of Cases included in the NDA report.
If you select this option, the system lists the cases from the following sections once at the end of the configuration pages:
Sequential List of cases
Serious Listed Initial/Follow up
Non Serious Listed Initial/Follow up
Non Serious Unlisted Initial/Follow up
15 Day Submission
The page numbering for this sub-report continues from the configuration pages.
You can separate initial case events from follow-up case events in the Summary Tabulation tab of the NDA Report.
If you select this option, the system counts events in the Initial section if the case is in the Serious Listed, Non-Serious Listed, or Non-Serious Listed/Unlisted sections.
If you select this option, the system counts events in the Follow-up section if the case is in the Serious Listed or Non-Serious Listed/Unlisted follow-up sections of the NDA report.
For the 15 Day events, if the case has not been previously reported in a NDA, the system counts it in the Initial section then the Follow-up section.
If you select List cases once under the Primary Event System Organ Class (SOC), the system displays a footnote with an asterisk ( * ) printed across all the System Organ Classes on the report and the following statement: Primary Event System Organ Class.
If you select the Print FDA-3500A/VAERS form at the end option, the system prints the report sections in the following order:
Configuration (Including Case Indices (e.g. Sequential Case Listing, Listing by Seriousness/Listedness, Listing of Cases Missing Analysis)
Line Listing
Summary Tabulations
MedWatch/VAERS reports at the end of the report
Page numbering for the MedWatches reports continue from the last page of the NDA report.
The configuration pages have been updated to reflect the updates made to the NDA Reports
The configuration pages are printed at the beginning of the NDA report.
By default, these are unchecked on all the existing configured reports.
The Report Name, Report Category and Report Sub-Category fields are common to all tabs of the Reports. The following table describes these fields:
| Field | Description |
| Report Name | Enter a name for the Report. The name entered here is displayed in the Reports menu. |
| Report Category | Select a category for the Report. This is displayed in the Reports menu.
Tip: Select New to define a subcategory within the report category. The Periodic Report Category dialog is displayed. Enter a category name in Category and click OK. The category is entered in the Report Category drop-down list. |
| Report Sub Category | Select a subcategory for the report.
Tip: Select New to define a subcategory within the report sub-category. The Periodic Report Category dialog is displayed. Enter a category name in Category and click OK. The category is entered in the Report Sub-Category drop-down list. |
On the Subject of Report tab you can select multiple Ingredients for a configured NDA Report per allowable variations of product and license configuration and periodic reporting requirements for the FDA. Select multiple ingredients to view the multiple licenses to be selected for the report.
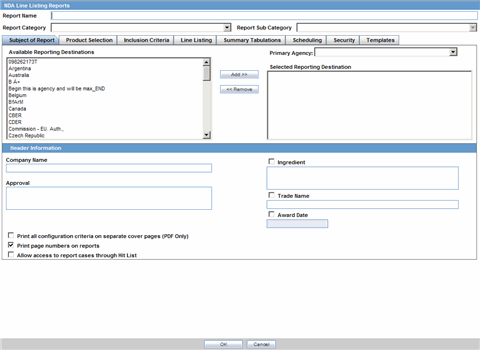
The following table describes the items in the Subject of Report tab.
| Field | Description |
|---|---|
| Primary Agency | Select the Primary Agency. |
| Reporting Destination | Displays the list of configured Regulatory Agencies. Select an agency from the list displayed in Reporting Destination and click Add to add the report to the Selected Destination list.
Select multiple agencies by holding the CTRL key when you click them. |
| Selected Destination | Displays the list of agencies where the report is being sent. Select an agency from the list displayed in Reporting Destination and click Add to add the report to the Selected Destination list.
Select multiple agencies by holding the CTRL key when you click them. Likewise, select an agency from the Selected Destination list and click Remove to prevent it from being sent to the selected destination. |
| Company Name | If a regulatory agency is selected, the company name associated with the regulatory agency (this association is created by the Administrator) is automatically entered in this field. |
| Ingredient | This field is populated with ingredient selected in the Subject of Report tab.
Note: Click the checkbox corresponding to this field to choose whether you want this field to appear on the report. |
| Approval | This field is automatically filled with License numbers, separated by commas. This is an editable field. |
| Trade Name | Automatically displays the Trade Name.
Multiple trade names are also populated from license trade name (formulation, concentration) of selected licenses, separated by commas. Note: Click the checkbox corresponding to this field to choose whether you want this field to appear on the report. |
| Award Date | Automatically displays the earliest license awarded date, when a user selects an Ingredient and a Product.
Note: Click the checkbox corresponding to this field to choose whether you want this field to appear on the report. |
| Print all configuration criteria on separate cover page | Click this checkbox to print out the configuration of this report when the report is printed. This is only available when the PDF option is selected during printing. |
| Print page numbers on reports | When checked, this option enables the user to print page numbers on a periodic report. This is the default for all report configurations.
If this checkbox is not checked, the following occur.
|
| Allow access to report cases through Hit List | When the report is run as final, it creates a Hit List, which can be retrieved from other areas of the application where advanced conditions can be selected. Click this checkbox to report cases through the Hit List. |
The Product Selection tab enables you to select product information to include on the report.
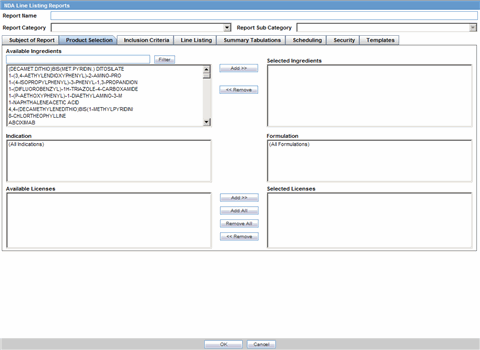
The following table lists and describes the fields on the tab.
| Field | Description |
|---|---|
| Available Ingredients | Displays the list containing the Ingredients used for the product configuration. Select an ingredient from the list displayed in Available Ingredients and click Add/Remove to add/remove the ingredient.
You can select multiple ingredients at a time. |
| Filter | Enter an Ingredient name and click Filter to search for the entered ingredient within the Available list of Ingredients. |
| Selected Ingredients | Displays the list of ingredients selected from the Available Ingredients list. |
| Indication | This list contains a list of all the indications for the products containing the selected ingredient. The selections made from this list are displayed in the Available Products section.
Note: You can select multiple Indications from the list at a time by pressing the CTRL key and clicking the different Indication entities. |
| Formulation | This list contains the Formulations configured for the product containing the selected ingredient and indication. The selections made from this list get displayed in the Selected Products section.
Note: You can select multiple Formulations from the list at a time by pressing the CTRL key and clicking the different Indication entities. |
| Available Licenses | This list is automatically populated with the licenses from the Indication section. |
| Selected Licenses | This list contains licenses selected by the user from the Available Licenses list. When a product is selected, the Trade Name and Award Date fields are auto-populated with the license trade name ("formulation", "concentration") and earliest License Award Date for the product. |
The following table describes the items in the Inclusion Criteria tab.
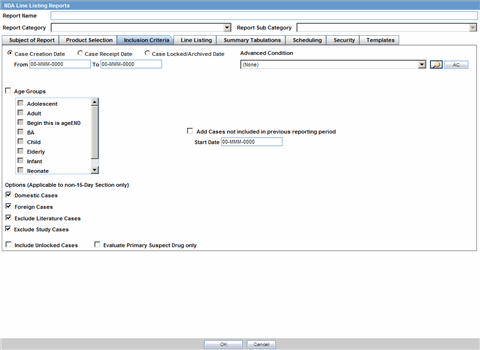
| Field | Description |
|---|---|
| Case Creation Date | Allows you to specify a range of cases by the date when the case was created. |
| Case Receipt Date | Allows you to specify a range of cases by the initial receipt date. |
| Use Current Version | Allows you to use the latest revision to populate the data within the selected reports. |
| Use DLP Version | Allows you to use the case data of the version as of the specified DLP Version. |
| Age Groups | Allows you to include or exclude cases based on the patient's age group. Select the Age Groups checkbox to activate the age groups and select all the age group categories that apply. |
| Option (Applicable to Non-15-Day Selection Only)- Domestic/Foreign Cases | This option allows the user to include domestic and foreign cases within the periodic report. Select Domestic if Country of Incidence is USA and Foreign if Country of Incidence is not USA. |
| Option (Applicable to Non-15-Day Selection Only)-
Exclude Literature Cases/Study Cases |
This option allows the user to exclude Literature and Study Cases from being considered for the NDA Report. Select Exclude Literature Cases to exclude literature cases and select Exclude Study Cases to exclude study cases. |
| Advanced Condition | Allows you to specify an advanced condition that must be satisfied by each case that is included in the report. Ensure that the advanced condition or the advanced condition query set that is specified here does not contradict any other criteria specified in the dialog. |
| Add Cases not Included in a previous reporting period Start Date | Enter the start date. This adds cases not included in a previous reporting period with the specified start date. |
| Include Unlocked Cases | Allows you to include unlocked cases in the periodic report. |
| Evaluate Primary Suspect Drug Only | Allows you to select only the Primary Suspect Drug. |
The NDA report comprises of three tabs. The options for these tabs can be configured in the Line Listing tab.
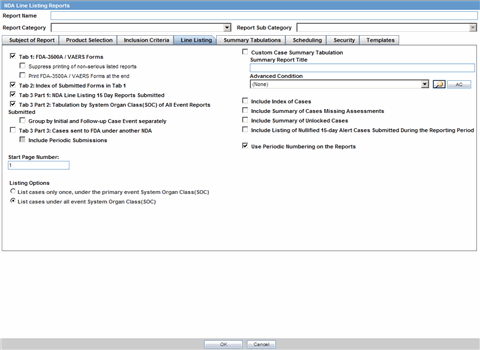
The following tables lists and describes the fields on the tab.
| Field | Description |
|---|---|
| Tab 1: FDA - 3500/VAERS Forms | Select this checkbox to generate the MedWatch 3500A (Drug) or VAERS reports which are serious listed or non-serious |
| Suppress printing of non-serious listed reports | Select this checkbox to prevent printing the non-serious listed reports but print their case numbers in the main NDA report indices
Note: Tab 1 of the NDA Line Listing report cannot be generated without Tab 2. However, Tab 2 can be generated without Tab 1 |
| Tab 2: Index of Submitted Forms in Tab 1 | Select this checkbox to generate an index of the forms from Tab 1 It prints all MedWatch/VAERS forms for the following cases:
Note: Previously expedited 15-day reports that are Serious and Unlisted that have already been submitted to the FDA do not need to be re-submitted with this periodic report |
| Tab 3 Part 1: NDA Line Listing of 15 Day Reports Submitted | Select this checkbox to generate a list of all serious unlisted expedited reports within the specified time period.
Note: The dates in these reports are in GMT. |
| TAB 3 Part 2: Tabulation by System Organ Class (SOC) of All Event Reports Submitted | Select this checkbox to generate a tabulation by System Organ Class (SOC) of all events reported during the specified time period. This includes the cases for which expedited reports were previously generated, as well as the cases that are submitted as part of the current report |
| TAB 3 Part 3: Cases sent to FDA under another NDA | Select this checkbox to print a list of all the serious unlisted events for which reports were submitted to the FDA previously
Note: If you select to print out the Tab 3 Part 3 section, the NDA report looks for other submissions (E2B, MW, MW Drug, or VAERS) to the same agency for the same case against other (not included in selection criteria for this report) marketed licenses. Any submission matching this criterion is listed on the Tab 3 Part 3 section of the NDA report. If there are multiple submissions against different licenses, then each one is listed. Each license is listed only once |
| Include Periodic Submissions | Select this checkbox to include all cases that have been sent under another NDA |
| Start Page Number | Select the page number for the first page of the report |
| Listing Options | These options for "List cases only once, under the primary event body system" and "List cases under all events body systems" only apply to the NDA Line Listing of Expedited Reports Submitted report |
| List cases only once, under the primary event System Organ Class | Select this option to list cases only once |
| List cases under all events System Organ Classes | Select this option to list cases under each SOC for each event |
| Include Summary of Cases Missing Assessments | Select this checkbox to include a Summary of Cases missing Assessments at the end of the report |
| Include Summary of Unlocked Cases | Select this option to include a summary of unlocked cases |
| Include Listing of Nullified 15-day Alert Cases Submitted During the Reporting Period | Select this option to include cancelled 15-day alert cases during the reporting period
Note: The dates in these reports are in GMT. |
| Use Periodic numbering on the Reports | Select this option to use periodic numbering on reports |
| Custom Case Summary Tabulation | Enter the Summary Report Title |
| Advanced Condition | Select the Advanced Condition from the drop-down list |
The Summary Tabulations tab allows you to specify which summary tabulations will appear along with the line listing.
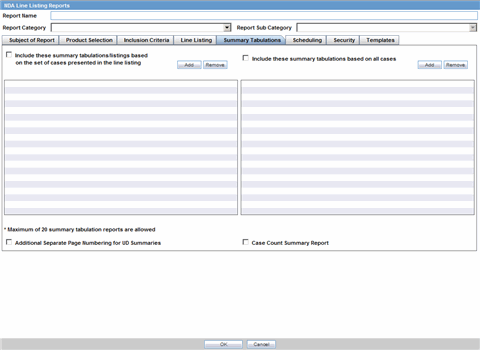
The following table lists and describes the fields on the tab.
| Field | Description |
|---|---|
| Include these summary tabulations/listings based on the set of cases presented in the line listing | Allows you to select from pre-configured summary tabulations/listings. These tabulations are based only on the data included in the line listing. Select the Exclude Follow-up Cases check box to filter out follow-up cases from the attached report.
Note: If the Exclude Follow-up Cases option is selected on the Inclusion criteria tab, this option is ignored and follow-up cases are always filtered out. |
| Include these summary tabulations based on all cases | Allows for additional sub-reports based on the 'Case Data Analysis' template, to be included as an output for the all cases in the database that meet the NDA Report inclusion criterion for all dates. |
| Add | Displays a list of memorized Case Data Analysis Reports that have been marked for availability in a periodic report. |
| Remove | Click this button to remove a selected report. |
| Additional Separate Page Numbering for Summaries | Enables you to include additional separate page numbering for summaries. |
| Case Count Summary Report | Enables you to print the list of Case Numbers that are included in the Periodic Reports but are not locked. |
The Scheduling tab allows you to specify details of how often the periodic report will be scheduled.

The following table lists and describes the fields on the tab.
| Field | Description |
|---|---|
| Start Date | This is the International Birth Date for the NDA Report product. This date is computed as the earliest Awarded date for any license of any type. |
| Recalculate | Allows a user to recompute the International Birth Date of the NDA Report Product. This date can be overwritten/manually entered, if needed. |
| Report is due xx days after selected end date (creation or receipt date) | Enter the number of days when the report will be due after the end date specified for the scheduling period. |
| Automatically generate report xx days before/after selected end date at xx:xx | Allows a user to specify the timing of the automatic report generation, by specifying the number of days before/after the selected end date of the report. |
| Group | Allows the user to select the group to which the automatically generated report is to be assigned. |
The following is an illustration of the Scheduling Frequency section.
The following table lists and describes the Scheduling Frequency fields.
| Field | Description |
|---|---|
| Frequency | Allows a user to specify the interval required for this scheduling period. |
| Start | Allows the user to specify when the scheduling period starts. |
| End | Allows the user to specify when the scheduling period starts. |
| Add | Allows a user to add another scheduling interval. |
| Delete | Allows a user to delete a scheduling interval. |
The Security tab is used to configure the security level for the NDA Reports.

| Field | Description |
|---|---|
| Share this Report with Other Users | Click this checkbox to share this report with other users. Specify the privileges to be granted to groups by adding the group name from the Users Groups list to either the 'Execute' or 'Modify and Execute' list. A user group can exist in only one of these access lists. |
| User Groups | The groups listed here have no access to the NDA Report template. Click Add or Remove to move them to another access list. |
| Execute | The groups listed here have read and execute access to the shared NDA Report template. |
| Modify & Execute | The groups listed here have read, execute and modify access to the shared NDA Report template. |
Bulk Reporting enables you to print, transmit and/or submit reports in bulk.
Select Reports --> Bulk Reporting to view the Bulk Report screen.
The system displays the screen.
The Bulk Reporting Filter sections enables you to filter reports.
The following table lists and describes the fields in this section
| Field | Description |
|---|---|
| Destination | Select an Agency to filter reports by that particular agency. Only the agencies that have reports in the Scheduled, Approved and Generated states are displayed. Click Filter to select multiple agencies from the Reporting Destinations dialog. The previous filtering criteria is saved and retained when the user invokes this dialog. By default, all agencies are assumed. |
| Report Form | Select any of the listed report forms to view reports belonging to the selected report form only. |
| Report Status | Choose either Scheduled/Generated, Pending, Failed, or Printed/Transmitted from the drop-down list. |
| Print Regulatory Report | Prints the report as Draft or Final. The Draft option is disabled when the printing option is set to Transmit. Select Medical Summary to view the list of only medical summaries of distinct cases in a PDF. |
| Approved Reports Only | Filters reports for only approved reports. |
| View All | Displays the bulk reports applicable to your filter selections. |
| Product Family | Enter a Product family to view all cases where the scheduled reports belong to the searched Product family. |
| Specific Case # | Searches a specific case. To do so, enter the Case Number of the case you wish to search and click the Retrieve button. This stores the agency selections last made. |
The system displays the search results in the Total Number of Rows section.

Description of the illustration bulkreportingtotalrows.gif
The following table lists and describes the fields and columns in this section.
| Field | Description |
|---|---|
| Selected | Allows the user to select the report. |
| Lock State | Displays the Case status of the case to depict if the case is locked or un-locked. |
| Status | Displays the Report Status e.g. Scheduled or Generated etc.
Click the status to view the report details. |
| Case Number | Displays the Case number.
Click the Case Number link to open the case. |
| Country of Incidence | Displays the view Country of Incidence. |
| Report Type | Displays the Case Report Type |
| Suspect Product | Displays the Trade Name for which the report has been scheduled. If more than one Suspect Company Product exists for the case, an "(+)" is placed at the end of the product name.
For Reports which were scheduled for the Device, the Device name is displayed. |
| Diagnosis | Displays the Primary Event Diagnoses PT |
| (Event Verbatim) | Displays the (Verbatim as reported) of the Primary Event. |
| S/U/R |
|
| F or LT | Fatal / Life Threatening
|
| 7/15 | Displays 7 if the report is due within 7 days
Displays 15 if the report is due in more than 7 days |
| Report Form | 1. Displays the Description of the report
2. Click the Report form link to view the DRAFT Report as a PDF. |
| Destination | Displays the report destination (agency) for which the report is scheduled. |
| Initial / Follow-up (#) | Initial or Follow-up
If Follow-up, the follow-up number is printed |
| Due Date | Displays the due date. |
| Days Past Due | Displays the number of days the report is past due date. |
| Downgrade | Allows the user to view if the report is downgrade.
Displays Yes if the report is a downgrade report else. |
| View All | Allows administrator and workflow manager to see all items in the system. |
Tip:
The icon (displayed in the lock state) in the Reports-> Bulk Reporting screen denotes a SUSAR (Suspected Unexpected Serious Adverse Reaction) case.Several printing options are available to you.
The following table lists and describes the available printing options
| Field | Description |
|---|---|
| Blind Study Product | Select this check box to print study cases with blinded information. |
| Mark as Submitted | Select this check box to mark reports as Submitted when the transmission/e-mail has been sent.
A dialog is displayed is this check box is not selected. This dialog prompts you to confirm if the report is to marked as submitted or not. Select Yes or No, as required. This selection is remembered for the next time when you print a report. |
| Print Medical Summary | Allows the user to print the Medical Summaries. |
| Allows you to choose the printer for the selected report from the Select Site Printer dialog.
Select the Site and Printer Name where you wish to print the report and click OK. |
|
| Print List | Allows the user to print the current view of the Bulk Reporting. |
The following options are available to you.
Lock State Header Options
Lock State Icon Options
To sort the cases based on the following case status, click the Lock State header row. A pop-up appears listing the following sorting options:
Lock State
SUSAR
Exp/Per
These options enable you to sort cases based on the case categorization.
Tip:
The icon (displayed in the lock state) in the Reports-> Bulk Reporting screen denotes a SUSAR (Suspected Unexpected Serious Adverse Reaction) case.Click the Lock State icon to view the list of options. The following table describes these options:
| Field | Description |
|---|---|
| View Report | Displays the Draft report. |
| Report Details | Displays specific information about the report as entered in the Regulatory Reports section. |
| Case Summary | Displays the Case Summary dialog |
| Remove Report | Deletes the report from the case on being asked for a justification |
| Mark for Non-Submission | Displays the Submission tab in the Report Details dialog.
Select No for Mark for Non-Submission and enter the reason for the non-submission. |
| Remove Multiple Reports | Deletes multiple reports from the case on being asked a justification. |
| Mark Multiple for Non-Submission | Deletes multiple reports from the case on being asked a justification. The notes and date entered for the selected report are applicable for all the reports selected for Non Submission. |
|
Copyright © 2012, Oracle and/or its affiliates. All rights reserved. Legal Notices |
|