 Understanding PeopleSoft NSI Processing
This chapter provides overviews of National Student Index (NSI) processing and NSI fields and discusses how to:
Request National Student Numbers (NSNs).
Receive NSI data.
Purge suspense data.
Process change notifications.
Review additional NSI data.
See Also
(NZL) Setting Up for NSI Processing
(NZL) Reviewing or Defining Default Installation Settings for National Student Index Processing
Understanding PeopleSoft NSI Processing
The NSI for New Zealand is a database system maintained by the Ministry of Education. The system allocates a unique identifier, an NSN, to every tertiary student and every National Certificate of Education Achievement (NCEA) candidate. The NSN must be included for every student reported to the Ministry of Education in a Single Data Return (SDR) as of April 2003. Including this number in a database allows information about each student to be linked together even if different institutions report the information in different years. The NSI database is a repository of verified student details. You can use verified NSI records as evidence of students' identities rather than having to ask all students to provide documentary evidence such as birth certificates.
Interaction with the NSI is a two-way flow of information. PeopleSoft provides several processes that enable you to collect and pass data back and forth between your PeopleSoft database and the NSI as data is changed, updated, or added.
Note. It is important that you request an NSI website login ID and password from the New Zealand Ministry of Education to access the NSI database, and that you clearly understand the Ministry of Education NSI process before you begin using PeopleSoft NSI functionality. Consult the Guide to Integrating with National Student Index (GINS) on the Ministry of Education website www.minedu.govt.nz. You must manually log onto the NSI website to upload and download NSI files. Your institution must monitor the Ministry of Education website and determine when files are ready to load. PeopleSoft does not offer an automated process. The PeopleSoft solution is based on Version 2.0 – May 2002 of the GINS document.
PeopleSoft processes, described in this section, enable you to prepare and exchange data between your PeopleSoft database and the Ministry of Education database. The processes are:
Request NSN process (CCNSIRQN), which executes a mass change to identify students, prospects, or applicants who do not have assigned NSNs.
Extract NSI process (CCNSIEXT), which extracts data into a file to send to the Ministry of Education.
Load NSI Data process (CCNSILOD), which loads data from that extract file into the NSI Suspense Table so you can review it.
Post NSI Data process (CCNSIPST), which posts data from the NSI Suspense Table to your PeopleSoft database.
Purge NSI Suspense Table process (CCNSIPRG), which purges posted and corrected rows from the NSI Suspense Table.
NSI Change Notification process (CCNSICHG), which posts the Ministry of Education changes to NSI records for individuals who are active at your school.
PeopleSoft temporarily stores NSI data in the NSI Suspense Table. Use the suspense table as a central point to monitor data to send to NSI and the results data that NSI sends back to you. Outgoing Data and Incoming Data pages in the suspense table enable you to view data according to direction and to compare the data to make sure that the correct data is loaded for the right person.
A status assigned to each record in the suspense table enables you to determine where the record is in the process. For outgoing data, the status indicates if the data is ready to extract and send to the Ministry of Education or if it has been posted and is ready to purge from the suspense table. For incoming data, the status indicates if the data has been posted to your database or if an error occurred during processing.
The Outgoing Data page is populated with data from the Biographical Details and Regional pages when the Request NSN process (CCNSIRQN) runs or when a change is made to an NSI field for any individual who is NSI processing enabled (the NSI Processing Enabled check box is selected on the Regional page). If the individual record already exists on the Outgoing Data page awaiting assignment of an NSN, the existing data is updated. If the individual already has an NSN, the updated record is added to the Outgoing data page so that the changes can be reported to NSI. The Incoming Data page is populated when you run the Load NSI Data process to load data from the result files that you receive from NSI.
See Viewing Outgoing Suspense Data.
See Reviewing Incoming Suspense Data.
The first step in the overall process is to identify students, prospects, or applicants who do not have an assigned NSN and for which, based on certain criteria, you want to request an NSN from the Ministry of Education. Run the Request NSN process (CCNSIRQN) to execute a mass change to identify these individuals according to criteria that you specify. Modify the sample mass change definitions to reflect the criteria that your institution uses to define prospects, applicants, and students. Do not attempt to rename the mass change definitions. Then, run the process to execute the mass change.
When the request process runs, it copies data for the individuals identified in the mass change from the Add/Update a Person component (specifically from the Biographical Details and Regional pages) to the Outgoing Data page of the suspense table. The process inserts records with the most current file numbers on the Campus Community Installation component, and displays a status of Ready for Extraction. You can view the Outgoing Data page to see the results of the request process.
See (NZL) Reviewing or Defining Default Installation Settings for National Student Index Processing.
Also, as the request process adds the record to the Outgoing Data page of the suspense table, it sets that record to NSI processing enabled (by selecting the NSI Processing Enabled check box on the Regional page of the Add/Update a Person component). As long the record remains NSI processing enabled, the system will update the outgoing suspense data whenever a change is made to any NSI field. This automatic update ensures that the extract process captures the most up-to-date data to send to the Ministry of Education.
Note. The Ministry of Education requires that you notify them if changes are made to any NSI field. If you make a change to an NSI field when the NSI Processing Enabled check box is not selected, you will need to send the NSI an Update Insert Request to notify the NSI database that the data was changed and verified.
See Identifying Individuals Without NSNs.
To extract outgoing data from the suspense table into a delimited file to send to the Ministry of Education, run the NSI Extraction process (CCNSIEXT). The process extracts data for IDs with a status of Ready for Extraction on the Outgoing Data page and changes the status toExtracted when the extract file is created. You must manually upload this file to the NSI website. The Ministry of Education then processes the IDs and posts the results on their website in a similar format, ready for you to download manually.
See Extracting Data to Send to NSI.
To receive data from the Ministry of Education, you must download the appropriate NSI Result file from the Ministry of Education website and then run the Load NSI Data process (CCNSILOD) to load data from that file. You can view results of the upload process on the Incoming Data page of the suspense table. The upload process displays a status of Ready to Post if it finds a perfect match between the Ministry of Education data and the record sent from your PeopleSoft database, or displays a status of Select a Match if it finds one or multiple possible matches between the Ministry of Education data and records in your database. In the latter case, it is your responsibility to evaluate the potential match and determine if one matches your data or if a new NSN should be created. If an error occurred (for example, the date of birth and gender information was not sent), the Error status appears.
See Loading Results Data.
To post incoming data from the suspense table to your PeopleSoft database, run the Post NSI Data process (CCNSIPST). The process posts only the rows on the NSI Suspense component with a status of Ready to Post and changes the status to Posted.
See Posting NSI Data.
To purge processed rows from the suspense table, run the Purge NSI Suspense Table process (CCNSIPRG). The purge process deletes rows with a status of Posted from the NSI Suspense component and deletes rows with a status of Error Corrected.
Note. You can run the purge process at any time. However, you must run the extract, load, and post processes in just that order for each file number that you upload from NSI.
To receive the Ministry of Education changes to NSI records for individuals who are active at your school, run the NSI Change Notification process (CCNSICHG).
See Uploading and Posting NSI Change Notifications.
Here is an example of NSI data management:
On Monday, you run the request NSN process (CCNSIRQN). The process executes the mass change for students and retrieves a record for ID 1234, Mary Smith, birthdate 01/01/1980. The request NSN process adds Mary's information to the NSI Suspense table Outgoing Data page with a file number of 0007. Mary's record is NSI processing enabled. The extract process runs at the end of the day, extracting all IDs associated with file number 0007 to send to NSI. You have requested an NSN for Mary and are waiting for the results from NSI.
On Tuesday, you realize that Mary's birthdate is actually 01/01/1982. You access the Biographical Details page and change Mary's birthdate from 01/01/1980 to 01/01/1982. Because Mary's record is NSI processing enabled and birthdate is a field included in NSI records, the system automatically adds a new row to the NSI Suspense table for Mary with a file number 0008. The extract process runs at the end of the day, extracting file number 0008 to send to NSI.
On Wednesday, you download the NSI Result file for file number 0007 (REU0007a.txt) and upload data from that result file into your database. Mary now has an NSN but her birthdate is 01/01/1980.
On Thursday, you download the NSI Result file for file number 0008 and upload data from that result file into your database. Mary now has an NSN and her correct birthdate of 01/01/1982. The upload process overrode the data with the latest change to the birthdate field. The suspense table helps you maintain the most current data while you wait for data to be processed by the NSI database.
This diagram provides an overview of the flow of the NSI processes. It shows the cause and effect of the status of a change in the NSI Suspense Table and the appropriate SQR action.
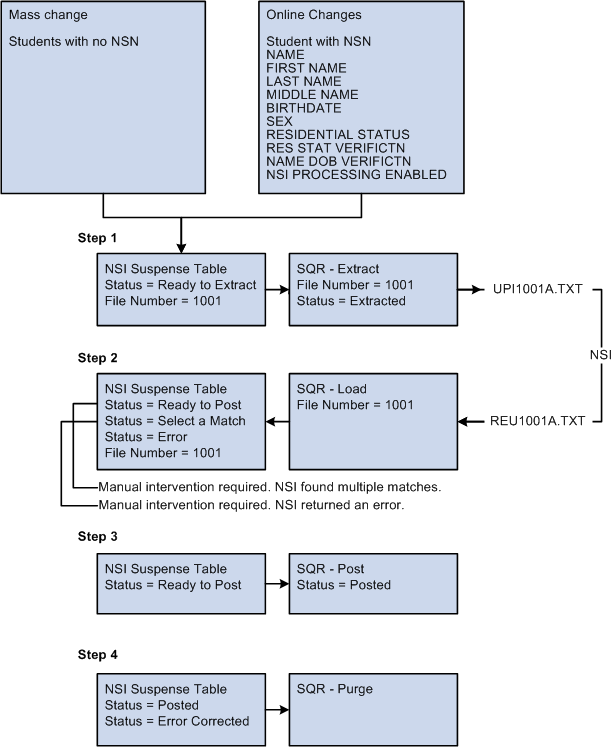
Overview of PeopleSoft NSI business process
See Also
(NZL) Setting Up for NSI Processing
Understanding NSI Fields
An NSI record includes the following fields. Fields marked as required are necessary to create an active NSI record for students. Name and date of birth are necessary to create a partial record:
|
NSI Field Name |
PeopleSoft Field Name |
Status/Description |
|
NSN |
SCC_NSN |
Required. |
|
Surname |
LAST_NAME |
Required. Name Type: Primary |
|
Forename1 |
FIRST_NAME |
Required. Name Type: Primary |
|
Forename2 |
MIDDLE_NAME |
Required. Name Type: Primary, first middle name. |
|
Forename3 |
N/A |
N/A |
|
Preferred name indicator |
SCC_PREF_NAME_IND |
N/A |
|
DoB (date of birth) |
BIRTHDATE |
Required. |
|
Gender |
SEX |
N/A |
|
NZQA paid (New Zealand Qualifications Authority paid) |
SSR_NZQA_PAID |
N/A |
|
Residential Status |
SCC_RESIDENTL_STAT |
Required. |
|
Record Status |
SCC_STDNT_STAT_NSI |
N/A |
|
DoD (date of death) |
DT_OF_DEATH |
N/A |
|
Alternate Surname |
N/A |
N/A |
|
Alternate forename1 |
N/A |
N/A |
|
Alternate forename2 |
N/A |
N/A |
|
Alternate forename3 |
N/A |
N/A |
|
Alternate preferred name indicator |
N/A |
N/A |
|
Name dob verification |
SCC_NM_DOB_VERFCTN |
N/A |
|
Residential status verification |
SCC_RES_ST_VERFCTN |
N/A |
Requesting NSNs
This section discusses how to:
Identify individuals without NSNs.
View outgoing suspense data.
Extract data to send to NSI.
Send the extract file.
 Pages Used to Request NSNs
|
Page Name |
Definition Name |
Navigation |
Usage |
|
SCC_REQUEST_NSN |
Campus Community, National Student Index NZL, Process NSI, Request NSN |
Run the Request NSN process (CCNSIRQN) to identify prospects, applicants, and students who need an NSN or to purge results from a previous run. |
|
|
SCC_SUSPENSE_NSI |
Campus Community, National Student Index NZL, NSI Suspense |
Review outgoing data before extracting it to send to the Ministry of Education. |
|
|
SCC_RUN_EXTRCT_NSI |
Campus Community, National Student Index NZL, Process NSI, Extract NSI Data |
Run the NSI Extraction process (CCNSIEXT) process to extract outgoing data to send to NSI. |
Identifying Individuals Without NSNs
Access the Request NSN page (Campus Community, National Student Index NZL, Process NSI, Request NSN).
The Request NSN process (CCNSIRQN) executes a mass change to identify individuals in your database that need NSNs or to purge results of a previous run of the process. The process writes (or in the case of a purge, deletes) data for the resulting individuals on the Outgoing Data page of the NSI Suspense Table, giving them a status of Ready for Extraction. The process inserts records with the most current file number into the suspense table and selects the Inserted by Mass Change check box.
As the process copies the information from your database, it also selects (or in the case of a purge, clears) the NSI Processing Enabled check box on the individual's Regional page of the Add/Update a Person component. The NSI Processing Enabled check box sets the system to automatically report online changes made to an individual's NSI fields so that you can extract the most up-to-date data to send to the Ministry of Education.
Note. The NSI Processing Enabled check box on the Regional page of the Add/Update a Person component becomes unavailable once it is selected. The only time that a selected, unavailable check box becomes cleared and available is when the Request NSN process is run with the Purge Mass Change Results option selected to purge results of a mass change.
See Adding or Updating Biographical Details Data.
|
Applicant, Prospect, and Student |
Select the types of individuals for which you want to request NSNs from the NSI database. You can select one or more check boxes at the same time. When you run the process, the system copies appropriate biographical and regional data for each individual onto the Outgoing Data page of the Suspense NSI component in preparation for extracting and sending the data to NSI. |
|
Purge Mass Change Results |
Select to purge results of the Request NSN process (CCNSIRQN). When the process runs with the check box selected, the system removes all of the records added to the suspense table for the most current file number where Insert by Mass Change is selected and the suspense status is still Ready for Extraction. It also clears the NSI Processing Enabled check box on the Regional page for those records. If you ran mass change by mistake or with the wrong criteria set, you can use this to purge those records. Note. To purge processed records from the suspense table, run the NSI Purge process (CCNSIPRG). |
|
Edit |
Click to modify the mass change criteria and regenerate the mass change. Warning! We recommend that you generate mass changes prior to running the request process to ensure that the mass change process uses data as of the current date. |
Viewing Outgoing Suspense Data
Access the Outgoing Data page (Campus Community, National Student Index NZL, NSI Suspense).
This page is for viewing purposes only. You cannot enter data here.
The Outgoing Data page is populated with data from the Biographical Details and Regional pages when the Request NSN process (CCNSIRQN) runs.
When the NSI Processing Enabled check box is selected on the Regional page of the Add/Update a Person component and online changes are made to any NSI field for an individual, the system also automatically updates the Outgoing Data page. If the individual record is already included in the Outgoing Data page awaiting assignment of an NSN and a change to an NSI field is made, the system automatically updates the record with the changed data. If not, the system adds the record to the Outgoing Data page.
See Entering Regional Specific Data.
|
File Number |
Displays the file number that was current when the student, applicant, or prospect's ID was added to the suspense table. See (NZL) Reviewing or Defining Default Installation Settings for National Student Index Processing. |
|
Status |
Indicates where the record is in the process. The status of Ready for Extraction is the initial status, and it is given when an ID is added to the NSI Suspense Table. The subsequent extract, load, post, and purge processes display the current status to indicate where the record is in the process. Values include: Ready for Extraction: File is ready for extraction process. The Extract NSI Data process (CCNSIEXT) only extracts these records and data is included in the extract file to send to the Ministry of Education as part of the Update Insert Request (UPI Request). Extracted: The extraction process has run and the UPI Request file is ready to send to the NSI or your institution is waiting to receive the result file Ready to Post: The Result file is received from NSI and data is loaded in the suspense table by the Load NSI Data process (CCNSILOD). Only one match is found in the NSI database and the individual record is now ready to post in the school database. Select a Match: The Result file is received from NSI and data is loaded in the suspense table by the Load NSI Data process (CCNSILOD). NSI returned multiple matches for the record sent in the UPI Request. You must manually select which match to use. Error: The Result file is received from NSI and data is loaded in the suspense table by the Load NSI Data process (CCNSILOD). An error occurred while NSI was processing the individual record. You must find the error and correct it. Error Corrected: The Load NSI Data process (CCNSILOD) returned an error, you corrected it, and selected the Error Corrected check box on the Incoming Data tab.
Note. The rows with the status Error Corrected are
deleted from the suspense table the next time the Purge NSI Suspense Table
process (CCNSIPRG) runs. |
|
Inserted by Mass Change |
The process selects this if the record was added to the suspense table through the mass change executed in the Request NSN process. |
See Also
Reviewing Incoming Suspense Data
Extracting Data to Send to NSI
Access the Extract NSI Data page (Campus Community, National Student Index NZL, Process NSI, Extract NSI Data).
The NSI Extraction process (CCNSIEXT) extracts data with a status of Ready for Extraction from the Outgoing Data page of the NSI Suspense Table into a file ready to send to NSI. When the process completes, extracted records have a status of Extracted.
|
Extract To |
Enter the path to the directory where you want the process to place the extract file. |
|
Generate New File |
Select to generate an extract file for the first time. The process extracts the data in the NSI suspense table with the most current file number assigned on the Extensions page of the Campus Community Installation component. The Extract NSI Data process (CCNSIEXT) uses the file number to create the file name. When the Extract NSI Data process (CCNSIEXT) finishes running, it increments by one, the file number on the Extensions page. See Page Used to Review or Define Campus Community Installation Settings. |
|
Regenerate Old File |
Select to regenerate a file. Once selected, the File Number field appears. Select the file number that you want to regenerate. You can only regenerate the files for which the data in the suspense table is in Extracted status. Files with data that has loaded or posted cannot be regenerated. |
Example: How the Extract NSI Data Process Works
If the current file number in the Extension page of the Installation Default CC component is 0001, the NSI Extraction process (CCNSIEXT) creates a file name of UPI0001a.txt where UPI is the code for the NSI process Update Insert Request. 0001 is the unique file number, "a" represents an alphabetic character used to split a file into more than one part if it includes more than 2,000 rows. The maximum number of rows per file recommended by the Ministry of Education is 2,000. A file with 5,500 rows is identified as follows:
UPI0001a.txt – 2,000 rows
UPI0001b.txt – 2,000 rows
UPI0001c.txt – 1,500 rows
Note. If your file includes more than 52,000 characters rows (26 alphabetic letters times 2000 rows), you must manually give the remaining files a different name. The NSI Extraction process (CCNSIEXT) will create 26 files and will save the rest of the data into a file call UPIEXTRa.txt. Manually split this file to have no more than 2,000 rows in each of them. You can name the files using the same concept as the NSI Extraction process (CCNSIEXT) used. For example, UPIEXTRa.txt, UPIEXTRb.txt, etc. You will need to make sure you add the proper header and footer to the files you create.
Also, each time you must send a student's record to the Ministry of Education, the current file number is assigned to it. The next time the extract process runs, it extracts all the data for the students tied to the current file number. In the example above, the NSI Extraction process (CCNSIEXT) process creates a file named UPI0001a.txt and extracts data for all records with the assigned file number of 0001.
Every time the NSI Extraction process (CCNSIEXT) runs, the file number in the Installation CC Table increases by an increments of one. The next changes made to student, applicant, or prospect's record is associated with the next file number (0002) and the next extract file to run will create the UPI0002a.txt file.
Once the data is extracted, you can login to the Ministry of Education website and upload the extract file(s). Make sure you upload all the extract files created for a same file number. For example, if the NSI Extraction process (CCNSIEXT) created UP1000a.txt, UP1000b.txt and UP1000c.txt, it is your responsibility to verify if more than one file got created and to upload all of them to the NSI website. You must then monitor the site for the results file(s) that NSI will provide for you. Based on NSI requirements, if you sent a file called UPI0001a.text, NSI will send the results file with a corresponding name: In this case it will be REU0001a.txt. REU means Result for UPI request, 0001a is the file identifier you used in your extract file, and txt is the delimited file format. In the case mentioned above, NSI will return the files called REU0001a.txt, REU0001b.txt and REU0001c.txt. It is again your responsibility to download all the result files for a same file number.
When you download result files from the NSI website, download them into one of your directories, for example c:\temp\.
If the extract process created only one file, for example UPI0001a.txt, after you download the results file for it (REU0001a.txt), you are able to load the results file (REU0001a.txt) directly into the NSI Suspense table by using the NSI UPI Load Process (CCNSILOD).
If the extract process created more than one file, for example UPI1000a.txt, UP1000b.txt and UP1000c.txt, then you must merge the files before you can load them to the NSI Suspense table.
Warning! You should merge the files only if they have the same file number. For example UP1000a.txt, UP1000b.txt and UP1000c.txt have all the same file number, which is 1000. Merging files with different file numbers causes errors when you run the NSI UPI Load process (CCNSILOD).
Once you process the command, you can review that the new file has been created.
Use the name of the merged file to load data onto the Incoming Data page of the NSI Suspense table.
Sending the Extract FileUpload the UPI extract file (for example: UPI0001a.txt) to NSI from your server.
Consult the Ministry of Education website for instructions on how to upload files to NSI.
Receiving NSI Data
This section discusses how to:
Download data from the NSI database.
Loading results data.
Review incoming suspense data.
Post NSI data.
Pages Used to Receive NSI Data
|
Page Name |
Definition Name |
Navigation |
Usage |
|
SCC_RUN_LOAD_NSI |
Campus Community, National Student Index NZL, Process NSI, Load NSI Data |
Run the Load NSI Data process (CCNSILOD) to upload data from the NSI database onto the Incoming Data page of the NSI Suspense Table to review before posting it to your Campus Solutions database. |
|
|
SCC_UPDATES_NSI |
Campus Community, National Student Index NZL, NSI Suspense, Incoming Data |
Review NSI data received and temporarily stored data in the NSI Suspense Table before posting it to your database. |
|
|
SCC_UPDTES_NSI_SEC |
Click the Details button on the Incoming Data page. |
View additional details of information received from NSI. |
|
|
SCC_RUN_POST_NSI |
Campus Community, National Student Index NZL, Process NSI, Post NSI Data |
Run the Post NSI Data process (CCNSIPST) to post data received from NSI. |
Downloading Data from the NSI DatabaseAfter the Ministry of Education has processed your extract file, download the REU result file (for example: REU1001a.txt) from the NSI to your server.
Consult the Ministry of Education website for NSI result file instructions.
Loading Results Data
Access the Load NSI Data page (Campus Community, National Student Index NZL, Process NSI, Load NSI Data).
The Load NSI Data process (CCNSILOD) loads data from an NSI result file to the NSI Suspense Table. The load process writes the data to the Incoming Data page, giving each impacted record a status of Ready to Post, Select a Match, or Error.
|
Import From |
Enter the path to the directory where you downloaded the file from the NSI website. |
|
File Name |
Enter the name of the file to load. |
You can load a file only after all rows in of the previous files have a status of Posted, Error Corrected, or Error.
Warning! The load process will not run if it finds previous files with rows marked Extracted, Ready to Post, or Select a Match. In the latter case, you must select a match and run the Post NSI Data process (CCNSIPST) before you can run the Load NSI Data process (CCNSILOD). This protects the load data that has not yet been processed.
You cannot load a file with a number out of sequence. You can load NSI results only for the oldest file number in the NSI Suspense Table with the status of Extracted. This prevents you from loading data for extract files that you sent to NSI more recently. Files that you send to NSI must be processed in sequential order. Use the file number in the NSI Suspense Table to identify which result file to load first.
For example, if files numbered 0008 and 0009 have a status of Extracted in the NSI Suspense Table, and you try to load file 0009 before 0008, the Load NSI Data process returns an error. You can extract multiple files with different numbers, but you must load them in numerical order. You must complete the process of loading a file before you can load the next file. That file must have only rows with the status of Extracted, Loaded, or Posted before you can load the next file.
If a file number exists with status rows of Extracted, Ready to Post, or Select a Match, and you try to load a file with a higher number, the SQR aborts and displays the error "You are trying to load File Nbr XXXX, but you have older file(s) that have not been POSTED yet." This prevents you from posting data from the file with the higher number before posting the file with a lower number.
Reviewing Incoming Suspense Data
Access the Incoming Data page (Campus Community, National Student Index NZL, NSI Suspense, Incoming Data).
The Incoming Data page is populated with data from NSI when the Load NSI Data process (CCNSILOD) runs.
|
Status |
Indicates where the record is in the process. Status values here are the same as status values on the Outgoing Data page of the NSI Suspense Table component. |
|
Row Type |
Indicates the type of row returned by NSI. The system displays different fields based on the row types returned. Row types include: M (match): When only an M row is returned, the NSI did not find a match in its database, so it created a record and assigned an NSN. In this case the system selects the Match check box and sets the status to Ready to Post. S (select a match): When an M row and one or more S rows are returned, NSI found possible matches. The system calculates and displays Match Indicator and Score values to help you determine which match to use. Click the Details button to view details of each row. If you determine that one of the S rows data is a match, select the Match check box for that row. The system changes the status to Ready to Post. When the Post NSI Data process runs, the process copies the information from this row to the Biographical Data component for the ID. If you determine that none of the S rows is a match for the individual, select the Match check box for the M row to confirm that this is the student who needs an NSN. The system changes the status to Ready to Post. When the Post NSI Data process runs, the process reinserts the record in the NSI Suspense Table with a status of Ready for Extraction. The record is reinserted and sent to NSI the second time because an M row, when accompanied by one or multiple S rows, has no NSN is associated. Instead, the NSI assigned an override code. The override code "reserves" an NSN. When NSI receives the individual's record a second time, it uses the override code to create the NSN. The override code is among the details displayed on the NSI Returned Data Details page. E (error): When an M row and an E row are returned, the NSI database encountered an error. Click Details for a description of the error. (A list of possible errors is provided at the end of this section.) You must correct the error and then select the Corrected check box to change the status to Error Corrected. |
|
Match Indicator |
Appears only when NSI returns a record with an M row and one or more S rows. Displays the name type on which the NSI system found a match in the NSI database. The values are Main, Alternate, Merged, and Alt Merged. These values are translate values and should not be modified. Always select a row that has a Main name. If not, you will load into your database as the Primary name, a name that NSI considers an alternate name in their database. |
|
Surname, Forename1, Forename2, Forename3, and Birthdate |
Displays the name data and the date of birth with which NSI created the record. |
|
Score |
Appears only when NSI returns a record with an M row and one or more S rows. Indicates the accuracy of the returned record. The NSI search software determines this score and it is based on how close the returned record is to the original search criteria. The closer the files are, the closer the score is to 100. However, a score of 100 doesn't guarantee that the data you sent has been perfectly matched in the NSI database. In the sample page, the name Jim Taylor was found and shows a score of 100. The birthdate is different. Therefore, it might be two different individuals. |
|
Details |
Click to access the NSI Returned Data Details page where you can review more details about that row. |
|
Match |
The system automatically selects this if the record is a perfect match, or if among multiple possible matches, one and only one S row is returned with a score of 100. If multiple S rows are returned with a score of 100, you must select this check box for the row that you want to post. When selected, the status changes to Ready to Post. The Post NSI Data process (CCNSIPST) posts the rows in the suspense table that have a Ready to Post status. |
|
Corrected |
Appears only when NSI returns a record with one or more E (error) rows. A description of the error appears on the NSI Returned Data Details page. After you correct an error, select this check box to change the status to Error Corrected so that you can identify which errors you have corrected and which still need to be corrected. The Purge NSI Suspense Table process (CCNSIPRG) deletes rows in the suspense table with a status of Error Corrected. Also, by correcting an error in an NSI field on a record with the NSI Processing Enabled check box selected on the Regional page of the Add/Update a Person component, the system automatically inserts a new row in the NSI Suspense Table with the correct data and a status of Ready for Extraction so that the corrected data will be extracted to send to NSI the next time the extract process runs. Note. In the case of a corrected error, the individual record appears in the suspense table twice—once with the status of Error Corrected and once with the status of Ready for Extraction. The file numbers, however, are different. |
This page is for viewing purposes only. You cannot enter data here.
|
Override Code |
An override code is returned only when NSI returns an M row with one or more S rows. If you select the M row to use, the individual needs to be sent a second time to the NSI to request the NSN. When the row is submitted again, NSI uses the override code to create the NSN. When the information is sent back to you, NSI will not include any S rows because you already confirmed the row to use for the NSN assignment. |
|
Record Type |
Indicates the type of row that was returned by NSI. M row details include the data that you sent to NSI and additional data received from NSI for that record. If an M row does not include an NSN, it could be because NSI found more than one individual who may be the same as the one requested. S row details include data for a person who the NSI system has determined could be a match for the original data that you sent. E row details include the error code. For example, the error code might indicate that the date of birth was not supplied to the NSI database. A common error is "Cannot replace verified data with unverified data." To correct this error, you must manually access the NSI website and copy the student name to your database and ensure that the correct NSN is entered. All other NSI data can be overwritten in your database (gender, date of birth, residential data, and verification fields). Note. If the NSI database contains verified data for an individual, update your database with the NSI data. Because NSI is a central place to store student information, rely on the validity of the NSI data. |
This table lists the NSI decimal error codes and their descriptions. Consult the Ministry of Education and the GINS document if further information is required:
|
Value (Decimal) |
Description |
|
256 |
%1 is invalid. |
|
257 |
Mandatory field(s) %1 were not supplied. Please enter values for the following fields: %1 |
|
258 |
Please supply an NSN(s). |
|
272 |
Invalid character in name field. |
|
273 |
Verification flag set without corresponding data. |
|
274 |
Cannot replace verified data with unverified data. |
|
275 |
Invalid Verification Flag. |
|
276 |
Verification Flag cannot be set to BDM. |
|
277 |
Cannot update BDM data without changing Verification Flag. |
|
278 |
Hyphen and Apostrophe cannot be used without another character. |
|
279 |
Cannot replace verified flag with unverified. |
|
288 |
Invalid gender. |
|
304 |
Invalid date format. |
|
305 |
Date of Death must be later than Date of Birth. |
|
306 |
Residential status is invalid. |
|
309 |
Preferred name indicator is invalid. |
|
320 |
Preferred name indicator is invalid. |
|
321 |
Preferred name indicator set for more than one name. |
|
336 |
Invalid NSN. |
|
337 |
NSN does not exist. |
|
339 |
Invalid Provider Code. |
|
369 |
BDM Verified fields cannot be changed. |
|
370 |
Cannot update an inactive student record. |
|
409 |
Unexpected validation Error. |
|
416 |
Incorrect File Format. |
|
417 |
Incorrect Format for file footer record. |
|
418 |
Incorrect Record Format. |
|
421 |
Records in footer don't match the records in file. |
|
512 |
Security Error: %1. |
|
515 |
Organization is not valid for user. |
|
516 |
First time access, please go to website to change password. |
|
529 |
Access Denied. |
|
640 |
General Security Failure. |
|
665 |
SIA Failure: %1. |
|
768 |
Unexpected Error %1. |
|
817 |
Manual intervention required. |
|
822 |
NSN records %1 have got NZQA paid flag set to Y or N. |
|
848 |
Rollback denied - no slaves exist. |
|
849 |
Failed to rollback the master record. |
|
865 |
Missing User ID and/or Provider Code. |
|
1282 |
NSN record has not been modified. |
See Also
Viewing Outgoing Suspense Data
Posting NSI Data
Access the Post NSI Data page (Campus Community, National Student Index NZL, Process NSI, Post NSI Data).
The Post NSI Data process (CCNSIPST) posts data with the status of Ready to Post, from the NSI Suspense Table to your PeopleSoft database. The process posts data on the Biographical, Regional, and Additional NSI Data pages. The process also changes the status to Posted for each record it successfully posted.
Warning! Before posting, for each record with a status of Select a Match, you must select a match to use by checking the Match check box for that row on the Incoming Data page of the suspense table.
Purging Suspense DataThis section discusses how to purge data from the NSI Suspense Table.
Page Used to Purge Suspense Data
|
Page Name |
Definition Name |
Navigation |
Usage |
|
SCC_RUN_PURGE_NSI |
Campus Community, National Student Index NZL, Process NSI, Purge NSI Suspense Table |
Run the Purge NSI Suspense Table process (CCNSIPRG) to purge data from NSI Suspense Table. |
Purging Data from the NSI Suspense Table
Access the Purge NSI Suspense Table page (Campus Community, National Student Index NZL, Process NSI, Purge NSI Suspense Table).
The Purge NSI Suspense Table process (CCNSIPRG) purges NSI data from the NSI Suspense Table. The process purges rows with a status of Posted and Error Corrected on the NSI Suspense Table component.
Processing Change Notifications
This section discusses how to:
Download change notifications from NSI.
Upload and post NSI change notifications.
Page Used to Process Change Notifications
|
Page Name |
Definition Name |
Navigation |
Usage |
|
SCC_RUN_CHANGE_NSI |
Campus Community, National Student Index NZL, Process NSI, NSI Change Notification |
Run the NSI Change Notification process (CCNSICHG) to receive changes from NSI. |
Downloading Change Notifications from NSIDownload the NSI Change Notification file (for example: REC12345.txt) from NSI to your server. You can then upload the file and post the changes from the change file to your database.
Note. You can manually download the NSI Change Notification file from the NSI website or have the NSI system automatically send the file directly to your institution.
Warning! NSI can provide two different formats for change notification result files: delimited text file and XML. The PeopleSoft batch process accepts only delimited text files. Contact NSI to let them know that you use delimited text files – .txt. If you do not notify them, NSI might send you result files in XML format and you will not be able to load the data in your PeopleSoft database.
Consult the Ministry of Education website for NSI Change Notification instructions.
Every four months, the Ministry of Education performs an update of the active at links from data reported in Single Data Returns (SDRs) and produces an NSI Change Notification file.
The Ministry of Education reports changes made to the following fields: First Name, Middle Name, Last Name, Date of Birth, Gender, Data of Death, NSI Record Status, Residential Status, Residential Status Verification, Name/DOB Verification, NZQA Paid, Preferred Name Indicator, Last Modified by Provider Code, Last Modified Date, or Changed Field Indicator.
The NSI uses the Change Notification process to send your institution any changes made to NSI student records that are marked as active at your school. When a school adds or updates an NSI student record, that student becomes active at that school. The Change Notification process notifies any active at schools when changes are made to an NSI record. Change notifications applicable to your school are available for viewing on the NSI website. For example, if NZQA advises that a student has paid his ROL registration fee, all the schools at which the student is recorded as active at are notified.
If an individual dies, the change notification process is used to inform all schools that are recorded in the NSI system as having an association with that student.
Uploading and Posting NSI Change Notifications
Access the NSI Change Notification page (Campus Community, National Student Index NZL, Process NSI, NSI Change Notification).
The NSI Change Notification process (CCNSICHG) uploads data from an NSI Change Notification file and posts the changes directly to records and fields in your database. The data is not written to the suspense table.
Warning! If the NSI Change Notification process (CCNSICHG) encounters any problems loading the data, it will not abort. You must always review the process log to see what errors the process may have encountered.
|
Import From |
Enter the path to the directory where you downloaded the RECxxxxx.txt file from the NSI website. |
|
File Name |
Enter the file name that contains the data to post. NSI uses the following naming convention for change notifications: REC12345.txt, where RE means results, C means change notification and 12345 are 5 numbers to differentiate the files sent to schools. The extension .txt indicates that the file is a delimited text file. |
This table lists the PeopleSoft records and fields that can be updated from a delimited NSI Change Notification file:
|
Record Name |
Field Name |
|
NAMES |
FIRST_NAME |
|
NAMES |
MIDDLE_NAME |
|
NAMES |
LAST_NAME |
|
PERSON |
BIRTHDATE |
|
PERS_DATA_EFFDT |
SEX |
|
PERSON |
DT_OF_DEATH |
|
SCC_PERSONL_NZL |
SCC_STDNT_STAT_NSI |
|
SCC_PERSONL_NZL |
SCC_RESIDENTL_STAT |
|
SCC_PERSONL_NZL |
SCC_RES_ST_VERFCTN |
|
SCC_PERSONL_NZL |
SCC_NM_DOB_VERFCTN |
|
SCC_PERSONL_NZL |
SSR_NZQA_PAID |
|
SCC_NSI_ADLCHG |
SCC_PREF_NAME_IND |
|
SCC_NSI_ADLCHG |
SCC_MODIFIED_DATE |
|
SCC_NSI_ADLCHG |
SCC_CHGD_FIELD_IND |
|
SCC_NSI_ADLCHG |
SCC_PROVIDER_CODE |
Reviewing Additional NSI DataThis section discusses how to review additional NSI data.
Page Used to Review Additional NSI Data
|
Page Name |
Definition Name |
Navigation |
Usage |
|
SCC_ADDL_DATA_NSI |
Campus Community, National Student Index NZL, NSI Additional Data |
View additional data sent by NSI. |
Reviewing Additional NSI Data
Access the NSI Additional Data page (Campus Community, National Student Index NZL, NSI Additional Data).
Additional data received from NSI appears on the NSI Additional Data page. Different data appears depending on whether the Post NSI Data process or the NSI Change Notification process was run.
|
Last Modified Date |
Displays the date when another school (or provider) updated the NSI database for this individual. Because PeopleSoft does not maintain history of the changes made through the Change Notification process, the system displays only the last date on which a change was made. |
|
Last Modified by Provider Code |
Displays the name of the school (or provider) that made the changes. |
|
Master NSN |
Displays the main NSN for this individual. Because merges can be made in the NSI database, NSI always keeps track of the main NSN assigned to a student. |
|
Changed Field Indicator |
Indicates what data has been changed. |