| Oracle® Fusion Middleware Developer's Guide for Oracle SOA Suite 11g Release 1 (11.1.1.6.3) Part Number E10224-15 |
|
|
PDF · Mobi · ePub |
| Oracle® Fusion Middleware Developer's Guide for Oracle SOA Suite 11g Release 1 (11.1.1.6.3) Part Number E10224-15 |
|
|
PDF · Mobi · ePub |
This chapter describes how to design your first workflow from start to finish.
This chapter includes the following sections:
Section 31.3, "Creating an Application and a Project with a BPEL Process"
Section 31.6, "Associating the Human Task and BPEL Process Service Components"
The application developed in this tutorial is based on the following use-case:
an employee submits a vacation request
the manager approves or rejects the vacation request
the employee receives a notification that approves or rejects their request
This tutorial describes how to create a new application and SOA project and how to design a human task to send a vacation request to a manager for approval or rejection.
The resulting SOA composite application contains the following components:
A BPEL process
A human task, for approving a vacation request submitted by an employee
It also describes how to create an Oracle ADF-based task form that enables the end user to act upon the vacation request once the application is deployed and running. To create an Oracle ADF-based task form you must create a new application and a new project.
This tutorial guides you through the following tasks:
Using the SOA Composite Editor
Using the Human Task Editor
Modeling a single approval workflow using Oracle BPEL Designer
Creating an Oracle ADF-based Oracle BPM Worklist
Using Oracle BPM Worklist to view and respond to the task
This tutorial makes the following assumptions:
Oracle SOA Suite is installed on a host on which the SOA Infrastructure is configured.
You are familiar with basic BPEL constructs, including BPEL activities and partner links, and basic XPath functions. Familiarity with the SOA Composite Editor and Oracle BPEL Designer, the environment for designing and deploying BPEL processes, is also assumed.
Create a file named VacationRequest.xsd with the following syntax. This file includes the schema for the vacation request and subsequent response.
<schema attributeFormDefault="qualified" elementFormDefault="qualified"
        targetNamespace="http://xmlns.oracle.com/VacationRequest"
        xmlns="http://www.w3.org/2001/XMLSchema">
 <element name="VacationRequestProcessRequest">
  <complexType>
   <sequence>
    <element name="creator" type="string"/>
    <element name="fromDate" type="date"/>
    <element name="toDate" type="date"/>
    <element name="reason" type="string"/>
   </sequence>
  </complexType>
 </element>
 <element name="VacationRequestProcessResponse">
  <complexType>
   <sequence>
    <element name="result" type="string"/>
   </sequence>
  </complexType>
 </element>
</schema>
Note:
The VacationRequest.xsd file is also available for download as part of tutorial workflow-100-VacationRequest. See Section 31.13, "Additional Tutorials" for information on downloading this and other tutorials.
To create an application and a project with a BPEL process:
Start Oracle JDeveloper.
From the File main menu, select New > Applications > SOA Application.
Click OK.
In the Application Name field, enter VacationRequest, and click Next.
In the Project Name field, enter VacationRequest, and click Next.
In the Composite Template list, select Composite with BPEL Process, and click Finish.
The Create BPEL Process dialog appears.
In the Name field, enter VacationRequestProcess.
Go to the bottom of the Create BPEL Process dialog.
To the right of the Input field, click the Search icon.
The Type Chooser dialog appears.
In the upper right corner, click the Import Schema File icon.
The Import Schema File dialog appears.
Browse for and select the VacationRequest.xsd file you created in Section 31.2, "Prerequisites."
Click OK until you are returned to the Type Chooser dialog, as shown in Figure 31-1.
Figure 31-1 Type Chooser Dialog with the Request and Response Elements
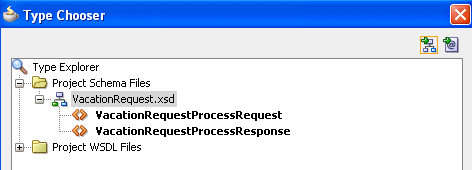
Select the input element VacationRequestProcessRequest, and click OK.
You are returned to the Create BPEL Process dialog.
To the right of the Output field, click the Search icon.
Select the output element VacationRequestProcessResponse, and click OK.
You are returned to the Create BPEL Process dialog, as shown in Figure 31-2.
Accept the default values for all other settings, and click OK.
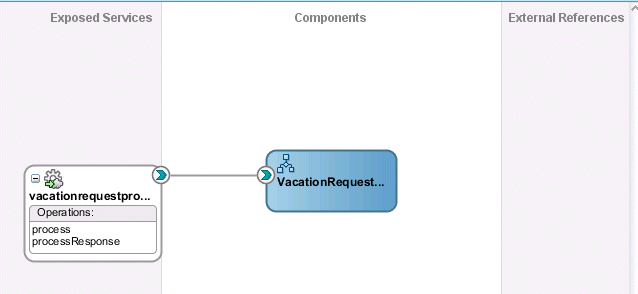
A BPEL process service component is created in the SOA Composite Editor, as shown in Figure 31-3. Because Expose as a SOAP service was selected in the Create BPEL Process dialog, the BPEL process is automatically connected with a service binding component. The service exposes the SOA composite application to external customers.
Figure 31-3 BPEL Process in SOA Composite Editor
For more information about service components and the SOA Composite Editor, see Chapter 2, "Developing SOA Composite Applications with Oracle SOA Suite."
You are now ready to create the human task service component in which you design your human task.
To create the human task service component:
From the Service Components section of the Component Palette, drag a Human Task into the SOA Composite Editor.
The Create Human Task dialog appears.
Enter the details described in Table 31-1.
Table 31-1 Create Human Task Dialog Fields and Values
| Field | Value |
|---|---|
|
Name |
Enter |
|
Namespace |
Accept the default value. |
|
Create Composite Service with SOAP Bindings |
Do not select the checkbox. Instead, you create a human task that you later associate with the BPEL process you created in Section 31.3, "Creating an Application and a Project with a BPEL Process." The BPEL process was created with an automatically-bound web service. |
Click OK.
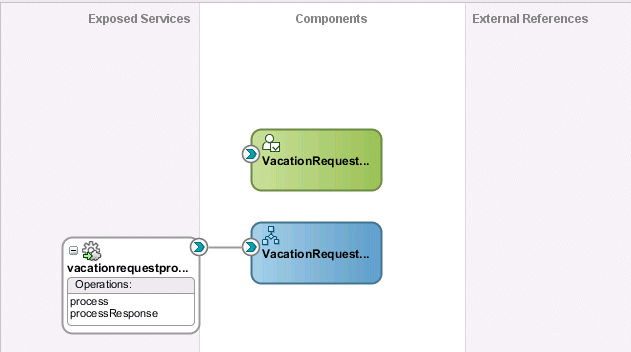
The Human Task icon appears in the SOA Composite Editor above the BPEL process, as shown in Figure 31-4.
Figure 31-4 Human Task Icon in SOA Composite Editor
Double-click the Human Task icon.
The Human Task Editor appears. You are now ready to begin design of your human task.
To design the human task:
In the Task Title field, enter Request for Vacation.
Accept the default values for outcomes (APPROVE and REJECT). For this task, these outcomes represent the two choices the manager has for acting on the vacation request.
Click the Data tab on the left side of the editor.
Click the Add icon to specify the task payload.
Select Add string parameter.
The Add Task Parameter dialog is displayed. You now create parameters to represent the elements in your XSD file. This makes the payload data available to the workflow task.
Select Element.
To the right of the Element field, click the Search icon.
The Type Chooser dialog appears.
Expand and select Project Schema Files > VacationRequest.xsd > VacationRequestProcessRequest, and click OK. Figure 31-5 provides details.
Ensure that the Editable via worklist checkbox is selected. This provides you with the option to modify this parameter during runtime from Oracle BPM Worklist.
Click OK on the Add Task Parameter dialog.
Click the Assignment tab on the left side of the editor.
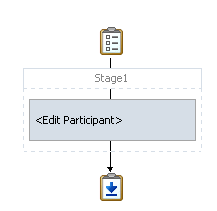
Highlight the <Edit participant> box below Stage1, as shown in Figure 31-6.
Figure 31-6 Assignment and Routing Policy
At the top of the Human Task Editor, click the Edit icon.
The Edit Participant Type dialog appears. You now add participants to this task. As described in Section 27.2.1.1.2, "Participant Type," Oracle SOA Suite provides several out-of-the-box patterns known as participant types for addressing specific business needs.
Accept the default participant type of Single that displays in the Type list. You select this type because a single assignee, the manager, acts on the vacation request task.
In the Participant Names table, click the Add icon, and select Add User.
This participant type acts alone on the task.
Click the Data Type column, and select By Expression from the list that is displayed. Figure 31-7 provides details.
This action enables the task to be assigned dynamically by the contents of the task. The employee filing the vacation request comes from the parameter passed to the task (the creator element in the XSD file you imported in Section 31.3, "Creating an Application and a Project with a BPEL Process"). The task is automatically routed to the employee's manager.
Figure 31-7 Selection of By Expression from the Data Type Column

In the Value column, click the Browse icon (the dots) to invoke the Expression Builder dialog.
In the dropdown list in the Functions section, select Identity Service Functions.
Select getManager. This function gets the manager of the user who created the vacation request task.
Above the Functions section, click Insert into Expression.
Place the cursor between the parentheses of the function.
In the Schema section, expand task:task > task:payload > ns1:VacationRequestProcessRequest > ns1:creator.
where ns1 is the namespace for this example; your namespace may be different.
Click Insert into Expression.
The Expression Builder dialog displays the XPath expression in the Expression section. Figure 31-8 provides details.
Click OK to exit the Expression Builder dialog.
Click OK to exit the Add Participant Type dialog.
From the File menu, select Save All.
You are now ready to associate your human task with the BPEL process you created in Section 31.3, "Creating an Application and a Project with a BPEL Process."
To associate the human task and BPEL process service component:
In the Application Navigator, double-click composite.xml.
Double-click the VacationRequestProcess BPEL process service component in the SOA Composite Editor.
The BPEL process displays in Oracle BPEL Designer.
In the Component Palette, expand SOA Components.
Drag a Human Task beneath the receiveInput receive activity.
Double-click the activity.
The Human Task dialog appears.
From the Task Definition list, select the VacationRequestTask task you created (if it is not currently displaying).
The dialog refreshes as shown in Figure 31-9 to display additional fields.
In the BPEL Variable column, click the Browse icon (dots) shown in Figure 31-10.
The Task Parameters dialog appears.
From the Type list, select Variable.
Expand Process > Variables > inputVariable > payload > ns1:VacationRequestProcessRequest. Figure 31-11 provides details.
Click OK.
When complete, the dialog looks as shown in Figure 31-12:
Click OK to close the Human Task dialog.
The human task activity appears as shown in Figure 31-13.
Figure 31-13 Human Task and Partner Links in Oracle BPEL Designer
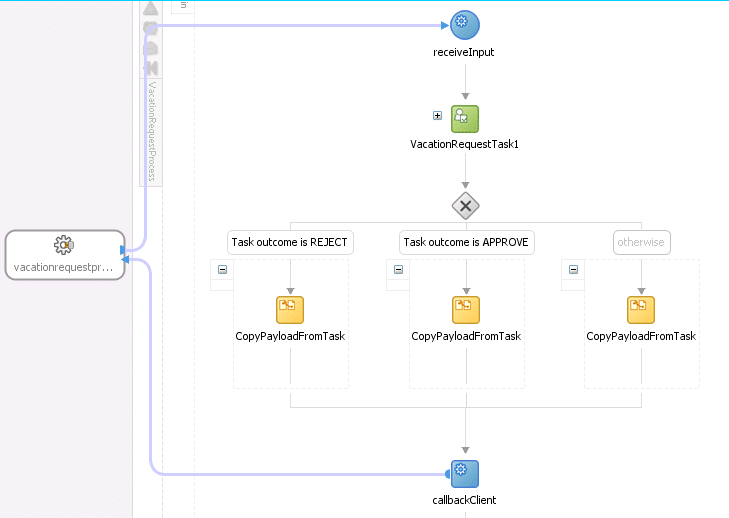
Return to the SOA Composite Editor and note that the BPEL process and human task service components have been automatically connected. Figure 31-14 provides details.
From the File menu, select Save All.
You are now ready to create a connection to the application server on which Oracle SOA Suite is installed and configured with the SOA Infrastructure. These instructions describe how to create a connection to Oracle WebLogic Server. For information about creating a connection to other application servers such as IBM WebSphere Server, see Oracle Fusion Middleware Third-Party Application Server Guide.
To create an application server connection
From the File main menu, select New > Connections > Application Server Connection.
Click OK.
In the Connection Name field, enter a connection name.
From the Connection Type list, select WebLogic 10.3.
Click Next.
In the Username field, enter weblogic.
In the Password field, enter the password for connecting to the application server.
Click Next.
Enter the hostname for the application server that is configured with the SOA Infrastructure.
In the Weblogic Domain field, enter the Oracle WebLogic Server domain.
Click Next.
Click Test Connection.
If successful, the message shown in Figure 31-15 is displayed.
Click Finish.
From the File menu, select Save All.
You are now ready to deploy to the application server on which you created the connection.
To deploy the SOA composite application
In the Application Navigator, right-click the VacationRequest project and select Deploy > VacationRequest.
Follow the pages of the deployment wizard to deploy the project.
The project is deployed.
For more information about deployment, see Section 43.7, "Deploying SOA Composite Applications."
To initiate the process instance:
See Oracle Fusion Middleware Administrator's Guide for Oracle SOA Suite and Oracle Business Process Management Suite for instructions on accessing the Test Web Service page for initiating the process instance.
You are now ready to create a project for the task form. This is a separate project from the one in which you created the human task.
To create a task form project:
Double-click the VacationRequestTask human task.
The Human Task Editor is displayed.
From the Create Form menu at the top, select Auto-Generate Task Form. Figure 31-16 provides details.
The Create Project dialog appears.
In the Project Name field, enter VacationRequestTaskFlow, and click OK.
From the File main menu, select Save All.
To resolve the task in Oracle BPM Worklist:
Go to Oracle BPM Worklist:
http://hostname:7001/integration/worklistapp
Log in to Oracle BPM Worklist.
Resolve the task.
To deploy the task form:
In the Application Navigator, right-click the VacationRequestTaskFlow project and select Deploy > VacationRequestTaskFlow.
Follow the pages of the deployment wizard to deploy the task form.
The task form is deployed.
For more information about deployment, see Section 43.7, "Deploying SOA Composite Applications."
Return to Oracle BPM Worklist.
Note that the task form now appears at the bottom of Oracle BPM Worklist.
In addition to the vacation request use case, other tutorials are available from the Oracle SOA Suite samples.
Table 31-2 provides an overview of some samples. All samples show the use of worklist applications and workflow notifications. For the complete list of samples, visit the URL.
Table 31-2 End-to-End Examples
| Sample | Description | Name |
|---|---|---|
|
Demo Community Seed Application |
Performs demo community seeding. This is a prerequisite for all other workflow samples. |
workflow-001-DemoCommunitySeedApp |
|
Vacation Request |
Provides a sample in which a user submits a vacation request that gets assigned to their manager for approval or rejection. This sample also describes how to create Oracle ADF task forms for the vacation request to act on the task. |
workflow-100-VacationRequest |
|
Sales Quote Request |
Provides a complex workflow sample with chaining of multiple tasks. |
workflow-102-SalesQuote |
|
Contract Approval |
Provides a sample of approving a contract. This sample uses digital signatures for tasks. |
workflow-104-ContractApproval |
|
Iterative Design |
Provides a sample in which a workflow task can be passed multiple times between assignees during the design process. Advanced routing rules implement the routing behavior. |
workflow-106-IterativeDesign |
|
Workflow Customizations |
Demonstrates how to deploy customizations to workflow service APIs, such as custom resource strings for task attributes, view names, and so on. |
workflow-110-workflowCustomizations |
|
MLS Sample |
Demonstrates the setting up of a task with multiple translations for the task title. |
workflow-114-MLSSample |
|
Workflow Event Callback |
Demonstrates the use of the workflow event callback. Workflow events generated by task lifecycle events are consumed by an Oracle Mediator. |
workflow-116-WorkflowEventCallback |
|
User Config Data Migrator |
Moves user configurations (views, mapped attributes, and so on) from one instance to another through an intermediate export file. |
workflow-117-UserConfigDataMigrator |
|
Java Samples |
Provides an assortment of samples that use Java to interact with human workflow. |
workflow-118-JavaSamples |