| Oracle® Fusion Middleware Developer's Guide for Oracle SOA Suite 11g Release 1 (11.1.1.6.3) Part Number E10224-15 |
|
|
PDF · Mobi · ePub |
| Oracle® Fusion Middleware Developer's Guide for Oracle SOA Suite 11g Release 1 (11.1.1.6.3) Part Number E10224-15 |
|
|
PDF · Mobi · ePub |
This chapter describes how to use the cross referencing feature of Oracle SOA Suite to associate identifiers for equivalent entities created in different applications. It includes a reference of the XRef functions you can use to populate, view, and maintain entries in the cross reference tables.
This chapter includes the following sections:
Section 49.4, "Creating and Modifying Cross Reference Tables"
Section 49.8, "Creating and Running the Cross Reference Use Case"
Section 49.9, "Creating and Running Cross Reference for 1M Functions"
Cross references enable you to dynamically map values for equivalent entities created in different applications.
Note:
The cross referencing feature enables you to dynamically integrate values between applications, whereas domain value maps enable you to specify values at design time and edit values at runtime. For more information about domain value maps, see Chapter 47, "Working with Domain Value Maps" and Chapter 48, "Using Oracle SOA Composer with Domain Value Maps."
When you create or update objects in one application, you may also want to propagate the changes to other applications. For example, when a new customer is created in an SAP application, you may want to create an entry for the same customer in your Oracle E-Business Suite application named EBS. However, the applications that you are integrating may be using different entities to represent the same information. For example, for each new customer in an SAP application, a new row is inserted in its Customer database with a unique identifier such as SAP_001. When the same information is propagated to an Oracle E-Business Suite application and a Siebel application, the new row should be inserted with different identifiers such as EBS_1001 and SBL001. In such cases, you need some type of functionality to map these identifiers with each other so that they can be interpreted by different applications to be referring to the same entity. This can be done by using cross references.
Cross references are stored in the form of tables. Table 49-1 shows a cross reference table containing information about customer identifiers in different applications.
The identifier mapping is also required when information about a customer is updated in one application and the changes must be propagated to other applications. You can integrate different identifiers by using a common value integration pattern, which maps to all identifiers in a cross reference table. For example, you can add one more column named Common to the cross reference table shown in Table 49-1. The updated cross reference table then appears, as shown in Table 49-2.
Table 49-2 Cross Reference Table with Common Column
| SAP | EBS | SBL | Common |
|---|---|---|---|
|
|
|
|
|
|
|
|
|
|
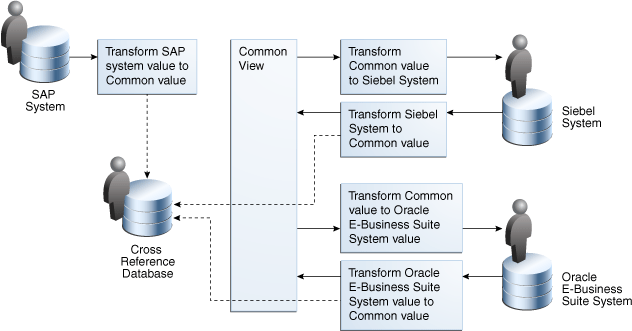
Figure 49-1 shows how you can use common value integration patterns to map identifiers in different applications.
Figure 49-1 Common Value Integration Pattern Example
A cross reference table consists of two parts: metadata and actual data. The metadata is saved as the .xref file created in Oracle JDeveloper, and is stored in the Metadata Services (MDS) repository as an XML file. By default, the actual data is stored in the XREF_DATA table of the database in the SOA Infrastructure database schema. You can also generate a custom database table for each cross reference entity. The database table depends on the metadata of the cross reference entity.
Consider the following two cross reference entities:
ORDER with cross reference columns SIEBEL, COMMON, and EBS, as shown in Table 49-3
CUSTOMER with cross reference columns EBS, COMMON, and PORTAL, as shown in Table 49-4
Table 49-3 ORDER Table
| Column Name | SIEBEL | COMMON | EBS |
|---|---|---|---|
|
|
|
|
|
|
|
|
|
If you chose to save all the runtime data in one generic table, then the data is stored in the XREF_DATA table, as shown in Table 49-5.
Table 49-5 XREF_DATA Table
| XREF_TABLE_NAME | XREF_COLUMN_NAME | ROW_NUMBER | VALUE | IS_DELETED |
|---|---|---|---|---|
|
|
|
|
|
|
|
|
|
|
|
|
|
|
|
|
|
|
|
|
|
|
|
|
|
|
|
|
|
|
|
|
|
|
|
|
|
|
|
|
|
|
|
|
|
|
|
|
This approach has the following advantages:
The process of adding, removing, and modifying the columns of the cross reference entities is simple.
The process of creating and deleting cross reference entities from an application is straightforward.
However, this approach has the following disadvantages:
A large number of rows are generated in the database because each cross reference cell is mapped to a different row in the database. This reduces the performance of the queries.
In the generic table, the data for the columns XREF_TABLE_NAME and XREF_COLUMN_NAME is repeated across a large number of rows.
To overcome these problems, you can generate a custom database table for each cross reference entity. The custom database tables depend on the metadata of the cross reference entities. For example, for the XREF_ORDER table and XREF_CUSTOMER table, you can generate the custom database tables shown in Table 49-6 and Table 49-7.
Table 49-6 XREF_ORDER Table
| ROW_ID | SIEBEL | COMMON | EBS |
|---|---|---|---|
|
|
|
|
|
|
|
|
|
This approach requires you to execute Data Definition Language (DDL) scripts to generate the custom database tables. For more information about custom database tables, see Section 49.4.3, "How to Create Custom Database Tables."
Oracle Data Integrator (ODI) achieves data integration through an E-LT (extract, load, transform) model. You can use ODI to help with your cross-referencing needs. ODI provides three Knowledge Modules for handling SOA cross references that perform the following functions: Populate the cross-reference table, create a common ID for the target table, push the common ID and the source primary key to the cross-reference table, and create and push a unique row number that creates the cross reference between the source primary key and the common ID. With the modules, you can create an integration interface that both loads a target table from several source tables and handles cross-references between one of the sources and the target.
For more information about ODI and cross referencing, see "Oracle SOA Suite Cross References" in Oracle Fusion Middleware Connectivity and Knowledge Modules Guide for Oracle Data Integrator.
You can create cross references tables in a SOA composite application and then use it with a BPEL process service component or an Oracle Mediator service component during transformations.
To create cross reference metadata:
In Oracle JDeveloper, select the SOA project in which you want to create the cross reference.
Right-click the project and select New.
The New Gallery dialog is displayed.
Select SOA Tier from the Categories section, and then select Transformations.
Select Cross Reference(XREF) from the Items section.
Click OK.
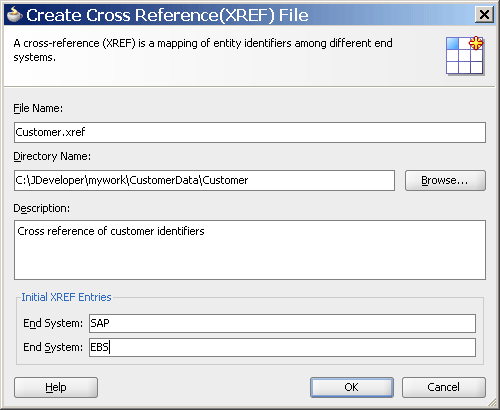
The Create Cross Reference(XREF) File dialog is displayed.
In the File Name field, specify the name of the cross reference file. For example, specify Customer.
A cross reference name is used to uniquely identify a cross reference table. Two cross reference tables cannot have same name in the cross reference repository. The cross reference file name is the name of the cross reference table with an extension of .xref.
In the Description field, enter a description for the cross reference. For example:
Cross reference of Customer identifiers.
In the End System fields, enter the end system names.
The end systems map to the cross reference columns in a cross reference table. For example, you can change the first end system name to SAP and the second end system name to EBS. Each end system name must be unique within a cross reference
A sample Create Cross Reference(XREF) File dialog is displayed in Figure 49-2.
Figure 49-2 Create Cross Reference(XREF) File Dialog
Click OK.
The Cross Reference Editor is displayed, as shown in Figure 49-3. You can use this editor to modify the cross reference.
A file with extension .xref gets created and appears in the Application Navigator. All .xref files are based on the schema definition (XSD) file shown in Example 49-1.
Example 49-1 Cross Reference XSD File
<?xml version="1.0" encoding="UTF-8" ?>
<schema xmlns="http://www.w3.org/2001/XMLSchema"
        targetNamespace="http://xmlns.oracle.com/xref"
        xmlns:tns="http://xmlns.oracle.com/xref" elementFormDefault="qualified">
  <element name="xref" type="tns:xrefType"/>
  <complexType name="xrefType">
    <sequence>
      <element name="table">
        <complexType>
          <sequence>
            <element name="description" type="string" minOccurs="0"
                     maxOccurs="1"/>
            <element name="columns" type="tns:columnsType" minOccurs="0"
                     maxOccurs="1"/>
            <element name="rows" type="tns:rowsType" maxOccurs="1"
                     minOccurs="0"/>
          </sequence>
          <attribute name="name" type="string" use="required"/>
        </complexType>
      </element>
    </sequence>
  </complexType>

  <complexType name="columnsType">
    <sequence>
      <element name="column" minOccurs="1" maxOccurs="unbounded">
        <complexType>
          <attribute name="name" type="string" use="required"/>
        </complexType>
      </element>
    </sequence>
  </complexType>

  <complexType name="rowsType">
    <sequence>
      <element name="row" minOccurs="1" maxOccurs="unbounded">
        <complexType>
          <sequence>
            <element name="cell" minOccurs="1" maxOccurs="unbounded">
              <complexType>
                <attribute name="colName" type="string" use="required"/>
              </complexType>
            </element>
          </sequence>
        </complexType>
      </element>
    </sequence>
  </complexType>
</schema>
As mentioned previously, all the runtime data by default gets stored in the XREF_DATA table. If you want to create custom database tables, then perform the following steps.
To create custom database tables:
From the Optimize list, select Yes in the Cross Reference Editor.
The name of the custom database table to be generated is displayed in the Table Name field, as shown in Figure 49-4.
Figure 49-4 Generating Custom Database Tables
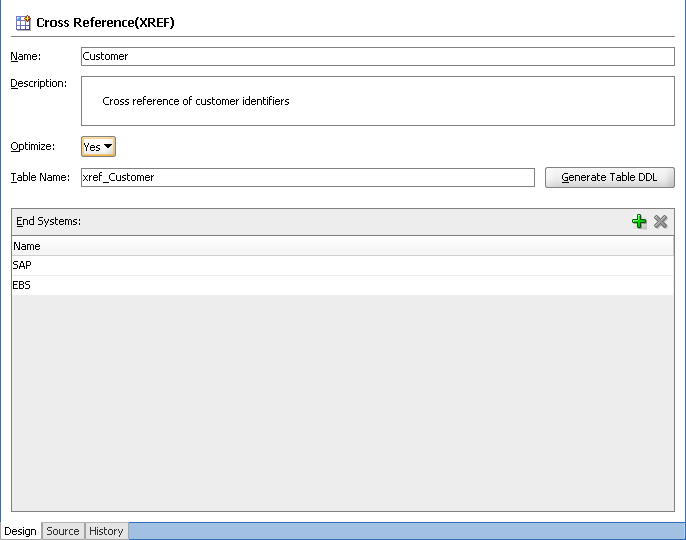
The Table Name field is editable and you can change the name of the custom table. The custom database table name should be prefixed with xref_. If you do not prefix your table name with xref_, then while generating the table, you receive the following error message:
Table name should begin with 'xref_' and cannot be 'xref_data' or
'xref_deleted_data' which are reserved table names for XREF runtime.
Click Generate Table DDL. The Optimize XREF dialog is displayed.
Select the Generate Drop DDL checkbox to drop the table and associated indexes, if a table with the same name already exists. If you select this option and click Run, then the Running Drop DDL Warning dialog is displayed with the following message:
Running the Drop DDL will remove the table and indexes, do you want to
continue?
Click Run. The Run Table DDL dialog is displayed.
From the Connection list, select the database connection to use.
If there is no available connection, then click Create a new database connection to open the Create Database Connection dialog, as shown in Figure 49-5. If you want to edit an existing connection, then select the connection and click Edit selected database connection to open the Edit Database Connection dialog.
Figure 49-5 Create Database Connection Dialog
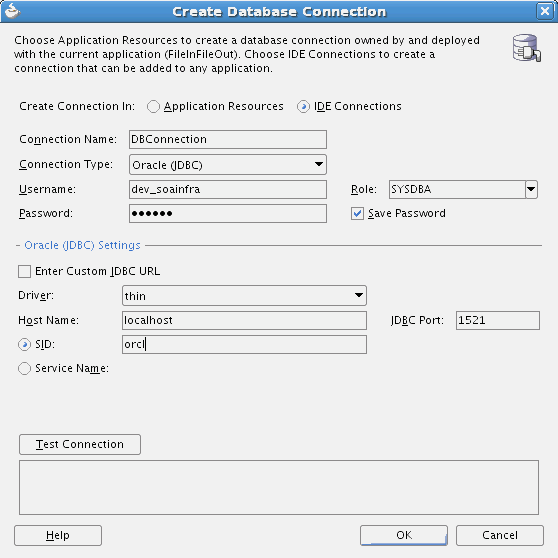
Enter all the required details and click OK. The Connection list of the Run Table DDL dialog is now populated.
Note:
Create the database table in the soainfra schema of the database.
Click OK on the Run Table DDL dialog to run the DDL script.
The Table DDL Run Results dialog displays the execution status of your DDL scripts.
For custom database tables, two additional attributes, namely mode and dbtable, are added to the schema definition mentioned in Section 49.4.2, "What Happens When You Create a Cross Reference." They are added for the table element in the following way:
<attribute name="mode" type="string" default="generic" />
 <attribute name="dbtable" type="string" default="xref_data"/>
You can create a cross reference table in a SOA composite application in Oracle JDeveloper and then use it to look up column values at runtime. However, before using a cross reference to look up a particular value, you must populate it at runtime. You can use the cross reference XPath functions to populate the cross-reference tables. The XPath functions enable you to populate a cross reference column, perform lookups, and delete a column value. These XPath functions can be used in the Expression Builder dialog to create an expression or in the XSLT Mapper to create transformations. For example, you can use the xref:populateXRefRow function to populate a cross reference column with a single value and the xref:populateXRefRow1M function to populate a cross reference column with multiple values.
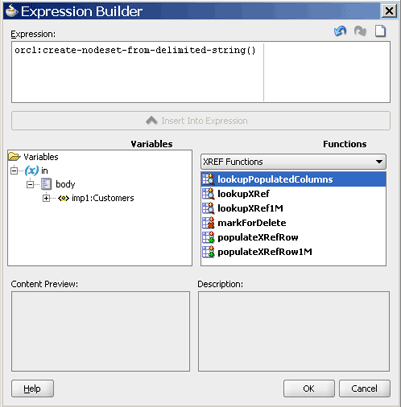
You can access the Expression Builder dialog through an assign activity, an XSL transformation, or the filtering functionality of a BPEL process service component or an Oracle Mediator service component. Figure 49-6 shows how you can select the cross reference functions in the Expression Builder dialog.
Figure 49-6 Expression Builder Dialog with Cross Reference Functions
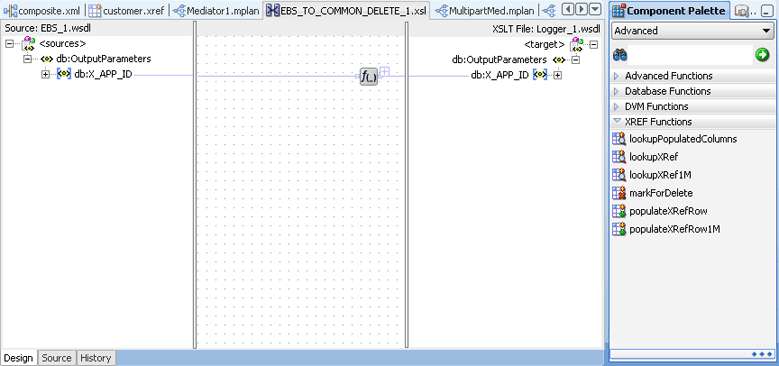
The XSLT Mapper is displayed when you create an XSL file to transform data from one XML schema to another. Figure 49-7 shows how you can select the cross reference functions in the XSLT Mapper.
Figure 49-7 XSLT Mapper Dialog with Cross Reference Functions
A cross reference table must be populated at runtime before using it. By default, the data is stored in the XREF_DATA table under the SOA Infrastructure database schema. You can use the xref:populateXRefRow function to populate a cross reference column with a single value and the xref:populateXRefRow1M function to populate a cross reference column with multiple values.
Note:
You can also store the data in a different database schema by configuring a data source in the following way:
The JNDI name of the data source should be jdbc/xref.
The ORACLE_HOME/rcu/integration/soainfra/sql/xref/createschema_xref_oracle.sql file should be loaded to create the XREF_DATA table in this data source.
The xref:populateXRefRow function populates a cross reference column with a single value. The xref:populateXRefRow function returns a string value, which is the cross reference value being populated. For example, as shown in Table 49-8, the Order table has the following columns: EBS, Common, and SBL with values E100, 100, and SBL_001 respectively.
Note:
If you find you have concurrency issues when using this function, you can also use the populateLookupXRefRow function. The populateLookupXRefRow function should only be used in cases where simultaneous updates are being made, resulting in unique constraint violations. This function is described under Section 49.5.2, "About the xref:populateLookupXRefRow Function."
The syntax of the xref:populateXRefRow function is shown in Example 49-2.
Example 49-2 xref:populateXRefRow Function
xref:populateXRefRow(xrefLocation as string, xrefReferenceColumnName as string,
 xrefReferenceValue as string, xrefColumnName as string, xrefValue as string, mode
 as string) as string
xrefLocation: The cross reference table URI.
xrefReferenceColumnName: The name of the reference column.
xrefReferenceValue: The value corresponding to the reference column name.
xrefColumnName: The name of the column to be populated.
xrefValue: The value to be populated in the column.
mode: The mode in which the xref:populateXRefRow function populates the column. You can specify any of the following values: ADD, LINK, or UPDATE. Table 49-9 describes these modes.
Table 49-9 xref:populateXRefRow Function Modes
| Mode | Description | Exception Reasons |
|---|---|---|
|
|
Adds the reference value and the value to be added. For example, the following mode: xref:populateXRefRow("customers.xref"
,"EBS","EBS100", "Common","CM001",
"ADD")
Adds the reference value |
Exceptions can occur for the following reasons:
|
|
|
Adds the cross reference value corresponding to the existing reference value. For example, the following mode: xref:populateXRefRow("customers.xref"
,"Common","CM001","SBL","SBL_
001","LINK")
Links the value |
Exceptions can occur for the following reasons:
|
|
|
Updates the cross reference value corresponding to an existing reference column-value pair. For example, the following mode: xref:populateXRefRow("customers.xref"
,"SBL","SBL_001", "SBL","SBL_
1001","UPDATE")
Updates the value |
Exceptions can occur for the following reasons:
|
Note:
The mode parameter values are case-sensitive and should be specified in upper case only, as shown in Table 49-9.
Table 49-10 describes the xref:populateXRefRow function modes and exception conditions for these modes.
Table 49-10 xref:populateXRefRow Function Results with Different Modes
| Mode | Reference Value | Value to be Added | Result |
|---|---|---|---|
|
|
|
|
Success Exception Exception |
|
|
|
|
Exception Success Exception |
|
|
|
|
Exception Exception Success |
Like the xref:populateXRefRow function, the xref:populateLookupXRefRow function populates a cross reference column with a single value. Unlike the xref:populateXRefRow function, the xref:populateLookupXRefRow function does not throw a unique constraint violation error when records with the same ID are added simultaneously. Instead, it behaves as a lookup and returns the existing source value that caused the error and does not stop the processing flow. Use this function to resolve any concurrency issues that could arise when using the xref:populateXRefRow function.
The xref:populateLookupXRefRow function returns a string value, which is the cross reference value being populated or, with a unique constraint violation, the cross reference value that was already populated by the first committed thread. For example, as shown in Table 49-8, the XREF_CUSTOMER_DATA table has the following columns: EBS, Common, and SBL. The xref:populateLookupXRefRow function is invoked by two threads in parallel with following values:
Thread One: xref: populateLookupXRefRow ("default/xref/example.xref", "EBS", "EBS100", "Common" "CM001", "ADD")
Thread Two: xref: populateLookupXRefRow ("default/xref/example.xref", "EBS", "EBS100", "Common" "CM002", "ADD")
The table is populated as shown in Table 49-11. Since thread one is committed first, thread two returns "CM001" to the caller.
Table 49-11 Cross Reference Table Populated by xref:populateLookupXRefRow
| EBS | Common | SBL |
|---|---|---|
|
|
|
The syntax of the xref:populateLookupXRefRow function is shown in Example 49-3.
Example 49-3 xref:populateLookupXRefRow Function
xref:populateLookupXRefRow(xrefMetadataURI as string, xrefReferenceColumnName as
 string, xrefReferenceValue as string, xrefColumnName as string, xrefValue as
 string, mode as string) as string
xrefMetadataURI: The cross reference table URI.
xrefReferenceColumnName: The name of the reference column.
xrefReferenceValue: The value corresponding to the reference column name.
xrefColumnName: The name of the column to be populated.
xrefValue: The value to be populated in the column.
mode: The mode in which the xref:populateXRefRow function populates the column. You can specify ADD or LINK. Table 49-10 describes these modes and exception conditions for the modes.
Note:
The mode parameter values are case-sensitive and should be specified in upper case only.
Table 49-12 xref:populateLookupXRefRow Function Results with Different Modes
| Mode | Reference Value | Value to be Added | Result |
|---|---|---|---|
|
|
|
|
Success Exception Exception |
|
|
|
|
Exception Success Exception |
Usage Notes
When using a custom table approach, you must add the primary constraint on the columns that must be unique in the cross-reference table. Using Table 49-11 as an example, the SQL statement would be similar to the following:
alter table xref_customer_data add constraint xref_vnx_data_pk
 primary key (common, ebs);
Populate the primary constraint columns first and then populate the remaining columns in subsequent calls.
This function should not be used for inserting cross references for primary objects, since this could mask data inconsistency issues. Only use the function for secondary objects to a main dependent object. For example, do not use the function to determine whether an account already exists when creating customer accounts; but do use it if the addresses in those customer accounts are being synchronized.
Two values in an end system can correspond to a single value in another system. In such a scenario, you should use the xref:populateXRefRow1M function to populate a cross reference column with a value. For example, as shown in Table 49-13, the SAP_001 and SAP_0011 values refer to one value of the EBS and SBL applications. To populate columns such as SAP, you can use the xref:populateXRefRow1M function.
Table 49-13 Cross Reference Table with Multiple Column Values
| SAP | EBS | SBL |
|---|---|---|
|
|
|
|
|
|
|
|
The syntax of the xref:populateXRefRow1M function is shown in Example 49-4.
Example 49-4 xref:populateXRefRow1M Function
xref:populateXRefRow1M(xrefLocation as string, xrefReferenceColumnName as string,
 xrefReferenceValue as string, xrefColumnName as string, xrefValue as string, mode
 as string) as string
xrefLocation: The cross reference URI.
xrefReferenceColumnName: The name of the reference column.
xrefReferenceValue: The value corresponding to the reference column name.
xrefColumnName: The name of the column to be populated.
xrefValue: The value to be populated in the column.
mode: The mode in which the xref:populateXRefRow function populates the column. You can specify either of the following values: ADD or LINK. Table 49-14 describes these modes:
Table 49-14 xref:populateXRefRow1M Function Modes
| Mode | Description | Exception Reasons |
|---|---|---|
|
|
Adds the reference value and the value to be added. For example, the following mode: xref:populateXRefRow1M("customers.xref","
EBS","EBS_1002", "SAP","SAP_0011","ADD")
Adds the reference value |
Exceptions can occur for the following reasons:
|
|
|
Adds the cross reference value corresponding to the existing reference value. For example, the following mode: xref:populateXRefRow1M("customers.xref","
EBS","EBS_1002", "SAP","SAP_002","LINK")
Links the value |
Exceptions can occur for the following reasons:
|
Table 49-15 describes the xref:populateXRefRow1M function modes and exception conditions for these modes.
To populate a column of a cross reference table:
In the XSLT Mapper, expand the trees in the Source and Target panes.
Drag and drop a source element to a target element.
In the Component Palette, select Advanced.
Select XREF Functions.
Drag and drop the populateXRefRow function to the line that connects the source object to the target object.
A populateXRefRow icon appears on the connecting line.
Double-click the populateXRefRow icon.
The Edit Function – populateXRefRow dialog is displayed, as shown in Figure 49-8.
Figure 49-8 Edit Function – populateXRefRow Dialog
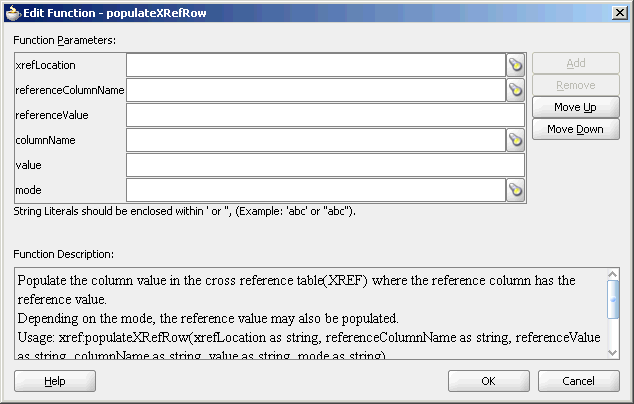
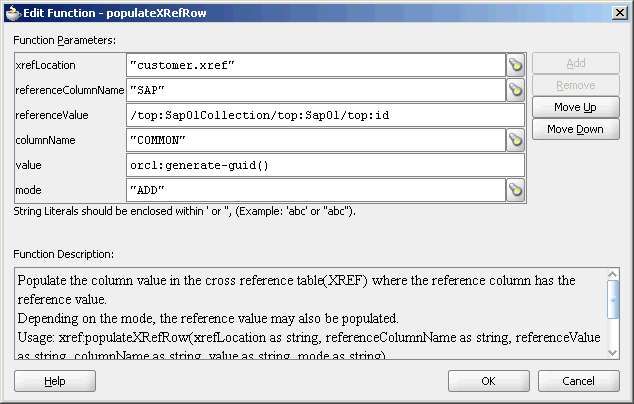
Specify the following values for the fields in the Edit Function – populateXRefRow dialog:
In the xrefLocation field, enter the location URI of the cross reference file.
Click Browse to the right of the xrefLocation field to select the cross reference file. You can select an already-deployed cross reference from MDS and also from a shared location in MDS using the Resource Palette.
In the referenceColumnName field, enter the name of the cross reference column.
Click Browse to the right of the referenceColumnName field to select a column name from the columns defined for the cross reference you previously selected.
In the referenceValue field, you can manually enter a value or press Ctrl-Space to launch the XPath Building Assistant. Press the up and down keys to locate an object in the list and press Enter to select that object.
In the columnName field, enter the name of the cross reference column.
Click the Browse icon to the right of the columnName field to select a column name from the columns defined for the cross reference you previously selected.
In the value field, you can manually enter a value or press Ctrl-Space to launch the XPath Building Assistant.
In the mode field, enter a mode in which you want to populate the cross reference table column. For example, enter ADD.
You can also click Browse to select a mode. The Select Populate Mode dialog is displayed from which you can select a mode.
Click OK.
A populated Edit Function – populateXRefRow dialog is shown in Figure 49-9.
Figure 49-9 Populated Edit Function – populateXRefRow Dialog
After populating the cross reference table, you can use it to look up a value. The xref:lookupXRef and xref:lookupXRef1M functions enable you to look up a cross reference for single and multiple values, respectively.
You can use the xref:lookupXRef function to look up a cross reference column for a value that corresponds to a value in a reference column. For example, the following function looks up the Common column of the cross reference tables described in Table 49-2 for a value corresponding to the SAP_001 value in the SAP column.
xref:lookupXRef("customers.xref","SAP","SAP_001","Common",true())
The syntax of the xref:lookupXRef function is shown in Example 49-5.
Example 49-5 xref:lookupXRef Function
xref:lookupXRef(xrefLocation as string, xrefReferenceColumnName as string,
xrefReferenceValue as string, xrefColumnName as string, needAnException as
boolean) as string
xrefLocation: The cross reference URI.
xrefReferenceColumnName: The name of the reference column.
xrefReferenceValue: The value corresponding to the reference column name.
xrefColumnName: The name of the column to be looked up for the value.
needAnException: When the value is set to true, an exception is thrown if the value is not found. Otherwise, an empty value is returned.
At runtime, an exception can occur for the following reasons:
The cross reference table with the given name is not found.
The specified column names are not found.
The specified reference value is empty.
Multiple values are found.
You can use the xref:lookupXRef1M function to look up a cross reference column for multiple values corresponding to a value in a reference column. The xref:lookupXRef1M function returns a node-set containing multiple nodes. Each node in the node-set contains a value.
For example, the following function looks up the SAP column of Table 49-13 for multiple values corresponding to the EBS_1001 value in the EBS column:
xref:lookupXRef1M("customers.xref","EBS","EBS_1001","SAP",true())
The syntax of the xref:lookupXRefRow1M function is shown in Example 49-6.
Example 49-6 xref:lookupXRefRow1M Function
xref:lookupXRef1M(xrefLocation as String, xrefReferenceColumnName as String,
 xrefReferenceValue as String, xrefColumnName as String, needAnException as
 boolean) as node-set
xrefLocation: The cross reference URI.
xrefReferenceColumnName: The name of the reference column.
xrefReferenceValue: The value corresponding to the reference column name.
xrefColumnName: The name of the column to be looked up for the value.
needAnException: If this value is set to true, an exception is thrown when the referenced value is not found. Otherwise, an empty node-set is returned.
Example of the xref:lookupXRefRow1M Function
Consider the Order table shown in Table 49-16 with the following three columns: Siebel, Billing1, and Billing2.
For 1:1 mapping, the xref:lookupPopulatedColumns("Order","Siebel","100","false") method returns the values shown in Example 49-7.
Example 49-7 xref:lookupPopulatedColumns Method
<column name="BILLING1">101</column>
<column name="BILLING2">102</column>
In this case, both the columns, Billing1 and Billing2, are populated.
For 1:M mapping, the xref:lookupPopulatedColumns("Order","Siebel","110","false") method returns the values shown in Example 49-8.
Example 49-8 xref:lookupPopulatedColumns
<column name="BILLING2">111</column>
<column name="BILLING2">112</column>
In this case, Billing1 is not populated.
An exception can occur for the following reasons:
The cross reference table with the given name is not found.
The specified column names are not found.
The specified reference value is empty.
You can use the xref:lookupPopulatedColumns function to look up all the populated columns for a given cross reference table, a cross reference column, and a value. The xref:lookupPopulatedColumns function returns a node-set with each node containing a column name and the corresponding value.
The syntax of the xref:LookupPopulatedColumns function is shown in Example 49-9.
Example 49-9 xref:LookupPopulatedColumns Function
xref:LookupPopulatedColumns(xrefTableName as String,xrefColumnName as
 String,xrefValue as String,needAnException as boolean)as node-set
xrefTableName: The name of the reference table.
xrefColumnName: The name of the reference column.
xrefValue: The value corresponding to the reference column name.
needAnException: If this value is set to true, then an exception is thrown when no value is found in the referenced column. Otherwise, an empty node-set is returned.
An exception can occur for the following reasons:
The cross reference table with the given name is not found.
The specified column names are not found.
The specified reference value is empty.
To look up a cross reference table column:
In the XSLT Mapper, expand the trees in the Source and Target panes.
Drag and drop the source element to the target element.
In the Component Palette, select Advanced.
Select XREF Functions.
Drag and drop the lookupXRef function to the line that connects the source object to the target object.
A lookupXRef icon appears on the connecting line.
Double-click the lookupXRef icon.
The Edit Function – lookupXRef dialog is displayed, as shown in Figure 49-10.
Figure 49-10 Edit Function – lookupXRef Dialog
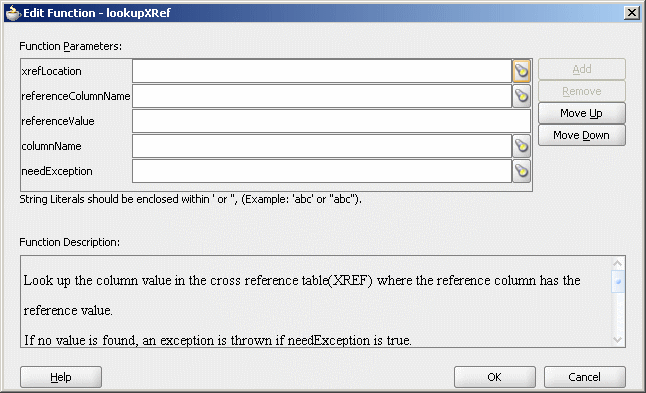
Specify the following values for the fields in the Edit Function – lookupXRef dialog:
In the xrefLocation field, enter the location URI of the cross reference file.
Click Browse to the right of the xrefLocation field to select the cross reference file. You can select an already deployed cross reference from MDS and also from a shared location in MDS by using the Resource Palette.
In the referenceColumnName field, enter the name of the cross reference column.
Click Browse to the right of the referenceColumnName field to select a column name from the columns defined for the cross reference you previously selected.
In the referenceValue field, you can manually enter a value or press Ctrl-Space to use the XPath Building Assistant. Press the up and down keys to locate an object in the list and press Enter to select that object.
In the columnName field, enter the name of the cross reference column.
Click Browse to the right of the columnName field to select a column name from the columns defined for the cross reference you previously selected.
Click Browse to the right of needException field. The Need Exception dialog is displayed. Select Yes to raise an exception if no value is found. Otherwise, select No.
Click OK.
A populated Edit Function – lookupXRef dialog is shown in Figure 49-11.
Figure 49-11 Populated Edit Function – lookupXRef Dialog
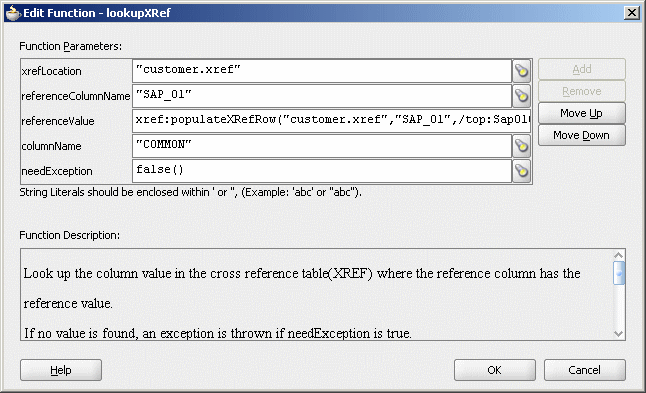
You can use the xref:markForDelete function to delete a value in a cross reference table. The value in the column is marked as deleted. This function returns true if the deletion is successful. Otherwise, it returns false.
Any column value marked for deletion is treated as if the value does not exist. Therefore, you can populate the same column with the xref:populateXRefRow function in ADD mode.
Note:
Using a column value marked for deletion as a reference value in LINK mode of the xref:populateXRefRow function raises an error.
A cross reference table row should have at least two mappings. If you have only two mappings in a row and you mark one value for deletion, then the value in another column is also deleted.
The syntax for the xref:markForDelete function is shown in Example 49-10.
Example 49-10 xref:markForDelete Function
xref:markForDelete(xrefTableName as string, xrefColumnName as string,
xrefValueToDelete as string) return as boolean
xrefTableName: The cross reference table name.
xrefColumnName: The name of the column from which you want to delete a value.
xrefValueToDelete: The value to be deleted.
An exception can occur for the following reasons:
The cross reference table with the given name is not found.
The specified column name is not found.
The specified value is empty.
The specified value is not found in the column.
Multiple values are found.
To delete a cross reference table value:
In the XSLT Mapper, expand the trees in the Source and Target panes.
Drag and drop the source element to the target element.
In the Component Palette, select Advanced.
Select XREF Functions.
Drag and drop the markForDelete function to the line that connects the source object to the target object.
A markForDelete icon appears on the connecting line.
Double-click the markForDelete icon.
The Edit Function – markForDelete dialog is displayed, as shown in Figure 49-12.
Figure 49-12 Edit Function – markForDelete Dialog
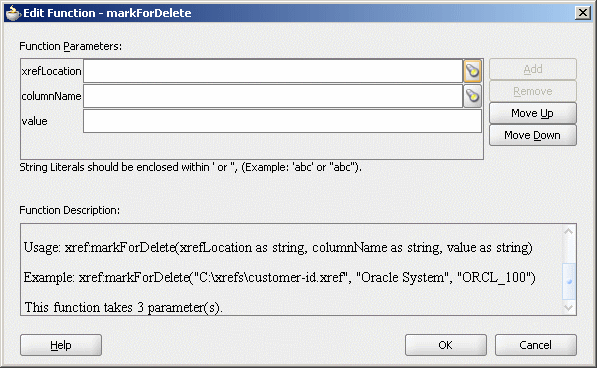
Specify the following values for the fields in the Edit Function – markForDelete dialog:
In the xrefLocation field, enter the location URI of the cross reference file.
Click the Search icon to the right of the xrefLocation field to select the cross reference file. You can select an already deployed cross reference from MDS and also from a shared location in MDS by using the Resource Palette.
In the columnName field, enter the name of cross reference table column.
Click the Search icon to the right of the columnName field to select a column name from the columns defined for the cross reference you previously selected.
In the Value field, manually enter a value or press Ctrl-Space to launch the XPath Building Assistant. Press the up and down keys to locate an object in the list and press Enter to select that object.
A populated Edit Function – markForDelete dialog is shown in Figure 49-13.
Figure 49-13 Populated Edit Function – markForDelete Dialog
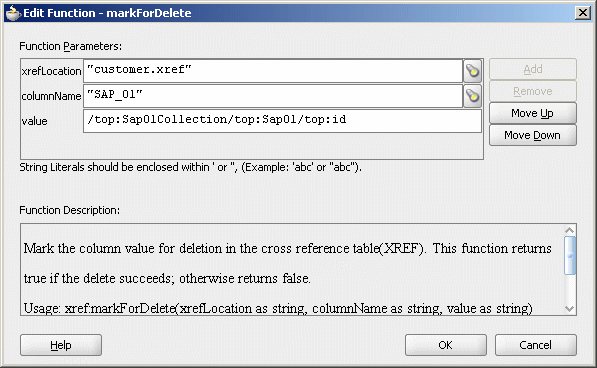
Click OK.
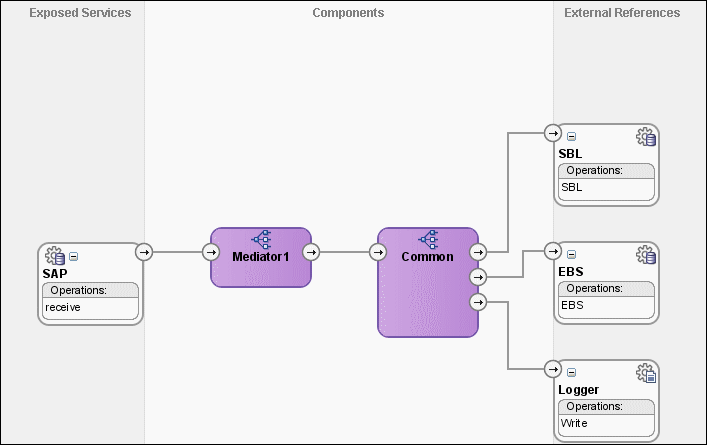
This cross reference use case implements an integration scenario between Oracle EBS, SAP, and Siebel instances. In this use case, when an insert, update, or delete operation is performed on the SAP_01 table, the corresponding data is inserted or updated in the EBS and SBL tables. Figure 49-14 provides an overview of this use case.
Figure 49-14 XrefCustApp Use Case in SOA Composite Editor
To download the sample files mentioned in this section, see the Oracle SOA Suite samples page.
This section provides the design-time tasks for creating, building, and deploying your SOA Composite application. These tasks should be performed in the order in which they are presented.
To configure the Oracle database and database adapter:
You need the SCOTT database account with password TIGER for this use case. You must ensure that the SCOTT account is unlocked.
You can log in as SYSDBA and then run the setup_user.sql script available in the XrefOrderApp1M/sql directory to unlock the account.
Run the create_schema.sql script available in the XrefOrderApp1M/sql directory to create the tables required for this use case.
Run the create_app_procedure.sql script available in the XrefOrderApp1M/sql directory to create a procedure that simulates the various applications participating in this integration.
Run the createschema_xref_oracle.sql script available in the OH/rcu/integration/soainfra/sql/xref/ directory to create a cross reference table to store runtime cross reference data.
Copy the ra.xml and weblogic-ra.xml files from $BEAHOME/META-INF to the newly created directory called META-INF on your computer.
Edit the weblogic-ra.xml file available in the $BEAHOME/META-INF directory as follows:
Modify the property to xADataSourceName as follows:
<property>
 <name>xADataSourceName</name>
 <value>jdbc/DBConnection1</value>
</property>
Modify the jndi-name as follows:
<jndi-name> eis/DB/DBConnection1</jndi-name>
This sample uses eis/DB/DBConnection1 to poll the SAP table for new messages and to connect to the procedure that simulates Oracle EBS and Siebel instances.
Package the ra.xml and weblogic-ra.xml files as a RAR file and deploy the RAR file by using Oracle WebLogic Server Administration Console.
Create a data source using the Oracle WebLogic Server Administration Console with the following values:
jndi-name=jdbc/DBConnection1
user=scott
password=tiger
url=jdbc:oracle:thin:@host:port:service
connection-factory factory-class=oracle.jdbc.pool.OracleDataSource
Create a data source using the Oracle WebLogic Server Administration Console with the following values:
jndi-name=jdbc/xref
user=scott
password=tiger
url=jdbc:oracle:thin:@host:port:service
connection-factory factory-class=oracle.jdbc.pool.OracleDataSource
To create an Oracle JDeveloper application and a project:
In Oracle JDeveloper, click File and select New.
The New Gallery dialog appears.
In the New Gallery, expand the General node, and select the Applications category.
In the Items list, select SOA Application and click OK.
The Create SOA Application wizard appears.
In the Application Name field, enter XrefCustApp, and then click Next.
The Name your SOA project page appears.
In the Project Name field, enter XrefCustApp and click Next.
The Configure SOA settings page appears.
From the Composite Template list, select Empty Composite and then click Finish.
The Application Navigator of Oracle JDeveloper is updated with the new application and project and the SOA Composite Editor contains a blank composite.
From the File menu, select Save All.
After creating an application and a project for the use case, you must create a cross reference table.
To create a cross reference table:
In the Application Navigator, right-click the XrefCustApp project and select New.
In the New Gallery dialog, expand the SOA Tier node, and then select the Transformations category.
In the Items list, select Cross Reference(XREF) and click OK.
The Create Cross Reference(XREF) File dialog is displayed.
In the File Name field, enter customer.xref.
In the End System fields, enter SAP_01 and EBS_i76.
Click OK.
The Cross Reference Editor is displayed.
Click Add.
A new row is added.
Enter SBL_78 as the end system name in the newly added row.
Click Add and enter Common as the end system name.
The Cross Reference Editor appears, as shown in Figure 49-15.
From the File menu, select Save All and close the Cross Reference Editor.
To create a database adapter service:
In the Component Palette, select SOA.
Select Database Adapter and drag it to the Exposed Services swimlane.
The Adapter Configuration wizard Welcome page is displayed.
Click Next.
The Service Name page is displayed.
In the Service Name field, enter SAP.
Click Next.
The Service Connection page is displayed.
In the Application Connection field, select DBConnection1.
In the JNDI Name field, enter eis/DB/DBConnection1.
Click Next.
The Operation Type page is displayed.
Select Poll for New or Changed Records in a Table and click Next.
The Select Table page is displayed.
Click Import Tables.
The Import Tables dialog is displayed.
Select Scott from Schema.
In the Name Filter field, enter %SAP% and click Query.
The Available field is populated with SAP_01 table name.
Double-click SAP_01.
The selected field is populated with SAP_01.
Click OK.
The Select Table page now contains the SAP_01 table.
Select SAP_01 and click Next.
The Define Primary Key page is displayed.
Select ID as the primary key and click Next.
The Relationships page is displayed.
Click Next.
The Attribute Filtering page is displayed.
Click Next.
The After Read page is displayed.
Select Update a Field in the [SAP_01] Table (Logical Delete) and click Next.
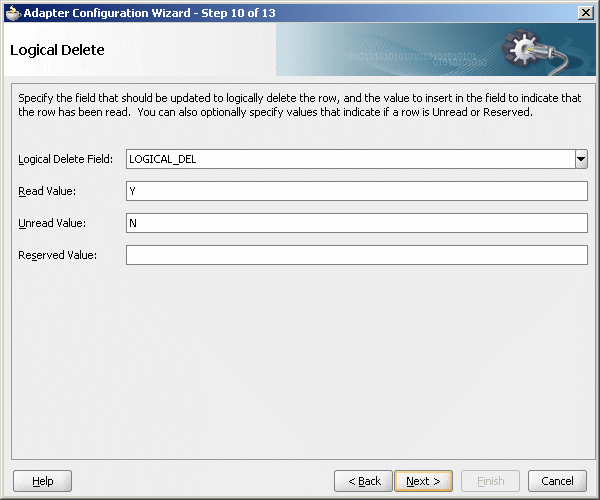
The Logical Delete page is displayed.
In the Logical Delete field, select LOGICAL_DEL.
In the Read Value field, enter Y.
In the Unread Value field, enter N.
Figure 49-16 shows the Logical Delete page of the Adapter Configuration wizard.
Figure 49-16 Logical Delete Page: Adapter Configuration Wizard
Click Next.
The Polling Options page is displayed.
Click Next.
The Define Selection Criteria page is displayed.
Click Next.
The Finish page is displayed.
Click Finish.
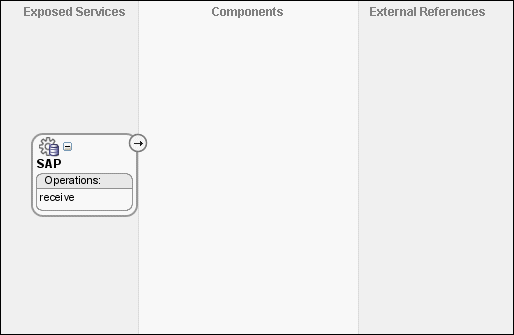
A database adapter service named SAP is created, as shown in Figure 49-17.
Figure 49-17 SAP Database Adapter Service in SOA Composite Editor
From the File menu, select Save All.
To create EBS and SBL external references:
In the Component Palette, select SOA.
Select Database Adapter and drag it to the External References swimlane.
The Adapter Configuration wizard Welcome page is displayed.
Click Next.
The Service Name page is displayed.
In the Service Name field, enter EBS.
Click Next.
The Service Connection page is displayed.
In the Application Connection field, select DBConnection1.
In the JNDI Name field, enter eis/DB/DBConnection1.
Click Next.
The Operation Type page is displayed.
Select Call a Stored Procedure or Function and click Next.
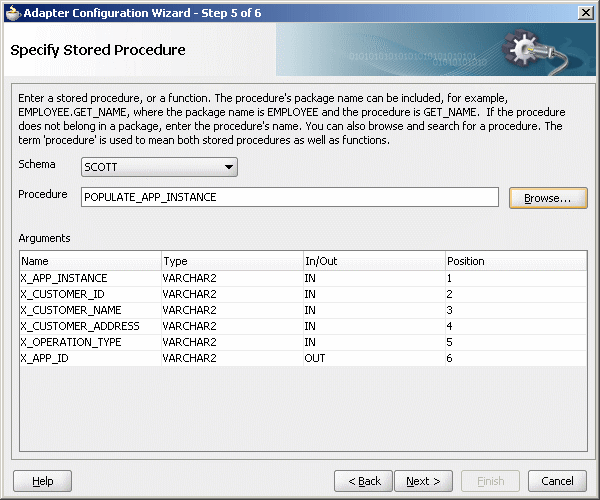
The Specify Stored Procedure page is displayed.
Select Scott from Schema.
Click Browse.
The Stored Procedures dialog is displayed.
Select POPULATE_APP_INSTANCE, as shown in Figure 49-18.
Click OK.
The Specify Stored Procedure page appears, as shown in Figure 49-19.
Figure 49-19 Specify Stored Procedure Page of Adapter Configuration Wizard
Click Next.
The Finish page is displayed.
Click Finish.
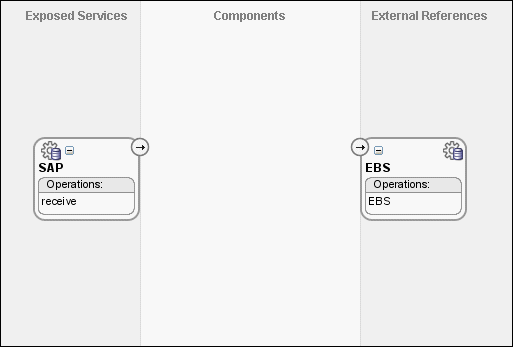
Figure 49-20 shows the EBS reference in the SOA Composite Editor.
Figure 49-20 EBS Reference in SOA Composite Editor
From the File menu, select Save All.
Repeat Step 2 through Step 16 to create another external reference named SBL.
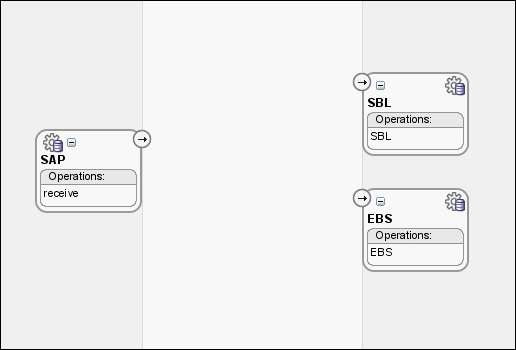
After completing this task, the SOA Composite Editor appears, as shown in Figure 49-21.
Figure 49-21 SBL Reference in SOA Composite Editor
To create the Logger file adapter external reference:
From the Component Palette, select SOA.
Select File Adapter and drag it to the External References swimlane.
The Adapter Configuration wizard Welcome page is displayed.
Click Next.
The Service Name page is displayed.
In the Service Name field, enter Logger.
Click Next.
The Operation page is displayed.
In the Operation Type field, select Write File.
Click Next.
The File Configuration page is displayed.
In the Directory for Outgoing Files (physical path) field, enter the name of the directory in which you want to write the files.
In the File Naming Convention field, enter output.xml and click Next.
The Messages page is displayed.
Click Search.
The Type Chooser dialog is displayed.
Navigate to Type Explorer > Project Schema Files > SCOTT_POPULATE_APP_INSTANCE.xsd, and then select OutputParameters.
Click OK.
Click Next.
The Finish page is displayed.
Click Finish.
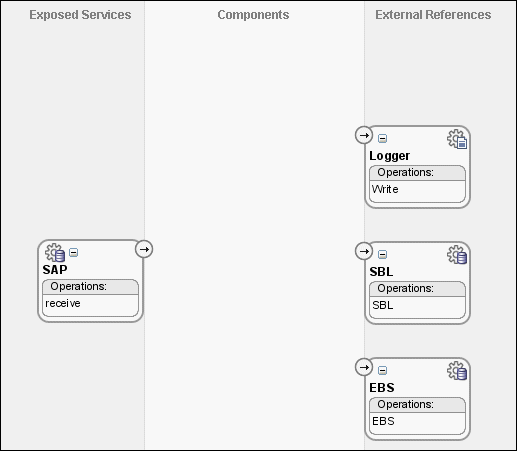
Figure 49-22 shows the Logger reference in the SOA Composite Editor.
Figure 49-22 Logger Reference in SOA Composite Editor
From the File menu. select Save All.
To create an Oracle Mediator service component:
Drag and drop a Mediator icon from the Component Palette to the Components section of the SOA Composite Editor.
The Create Mediator dialog is displayed.
From the Template list, select Define Interface Later.
Click OK.
An Oracle Mediator with name Mediator1 is created.
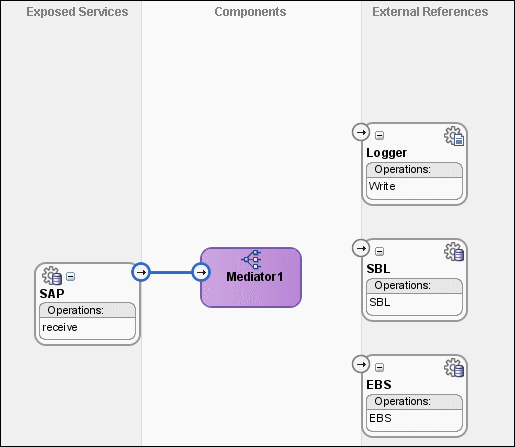
Connect the SAP service to the Mediator1, as shown in Figure 49-23.
Figure 49-23 SAP Service Connected to Mediator1
From the File menu, select Save All.
Drag and drop another Mediator icon from the Component Palette to the Components section of the SOA Composite Editor.
The Create Mediator dialog is displayed.
From the Template list, select Interface Definition From WSDL.
Deselect Create Composite Service with SOAP Bindings.
To the right of the WSDL File field, click Find Existing WSDLs.
Navigate to and then select the Common.wsdl file. The Common.wsdl file is available in the Samples folder.
Click OK.
Click OK.
An Oracle Mediator with name Common is created.
You must specify routing rules for the following operations:
Insert
Update
UpdateID
Delete
To create routing rules for an insert operation:
Double-click the Mediator1 Oracle Mediator.
The Mediator Editor is displayed.
In the Routing Rules section, click the Create a new Routing Rule icon.
The Target Type dialog is displayed.
Select Service.
The Target Services dialog is displayed.
Navigate to XrefCustApp > Mediators > Common, Services > Common.
Select Insert and click OK.
Click the Filter icon.
The Expression Builder dialog is displayed.
In the Expression field, enter the following expression:
$in.Sap01Collection/top:Sap01Collection/top:Sap01/top:operation='INSERT'
Click OK.
Next to the Transform Using field, click the Transformation icon.
The Request Transformation map dialog is displayed.
Select Create New Mapper File and enter SAP_TO_COMMON_INSERT.xsl.
Click OK.
An SAP_TO_COMMON_INSERT.xsl file is displayed in the XSLT Mapper.
Drag and drop the top:SAP01 source element to the inp1:Customer target element.
The Auto Map Preferences dialog is displayed.
From the During Auto Map options, deselect Match Elements Considering their Ancestor Names.
Click OK.
The transformation is created, as shown in Figure 49-24.
Figure 49-24 SAP_TO_COMMON_INSERT.xsl Transformation

From the Component Palette, select Advanced.
Select XREF Functions.
Drag and drop the populateXRefRow function from the Component Palette to the line connecting the top:id and inp1:id elements.
Double-click the populateXRefRow icon.
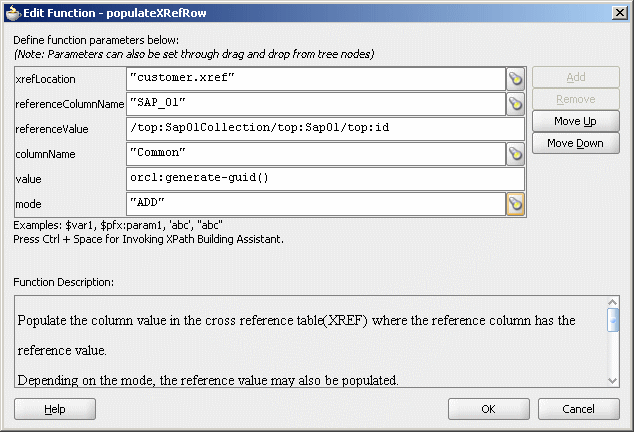
The Edit Function-populateXRefRow dialog is displayed.
Click Search to the right of the xrefLocation field.
The SOA Resource Lookup dialog is displayed.
Select customer.xref and click OK.
In the referenceColumnName field, enter "SAP_01" or click Search to select the column name.
In the referenceValue column, enter /top:Sap01Collection/top:Sap01/top:id.
In the columnName field, enter "Common" or click Search to select the column name.
In the value field, enter oraext:generate-guid().
In the mode field, enter "Add" or click Search to select this mode.
Figure 49-25 shows the populated Edit Function – populateXRefRow dialog.
Figure 49-25 Edit Function – populateXRefRow Dialog: XrefCustApp Use Case
Click OK.
From the File menu, select Save All and close the SAP_TO_COMMON_INSERT.xsl file.
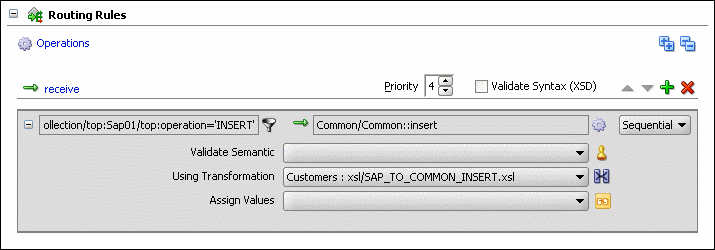
The Routing Rules section appears, as shown in Figure 49-26.
Figure 49-26 Routing Rules Section with Insert Operation
To create routing rules for an update operation:
In the Routing Rules section, click the Create a new Routing Rule icon.
The Target Type dialog is displayed.
Select Service.
The Target Services dialog is displayed.
Navigate to XrefCustApp > Mediators > Common, Services > Common.
Select Update and click OK.
Click the Filter icon.
The Expression Builder dialog is displayed.
In the Expression field, enter the following expression:
$in.Sap01Collection/top:Sap01Collection/top:Sap01/top:operation='UPDATE'
Click OK.
Next to the Transform Using field, click the Transformation icon.
The Request Transformation map dialog is displayed.
Select Create New Mapper File and enter SAP_TO_COMMON_UPDATE.xsl.
Click OK.
An SAP_TO_COMMON_UPDATE.xsl file is displayed.
Drag and drop the top:Sap01 source element to the inp1:Customer target element.
The Auto Map Preferences dialog is displayed.
Click OK.
From the Component Palette, select Advanced.
Select XREF Functions.
Drag and drop the lookupXRef function from the Component Palette to the line connecting the top:id and inp1:id elements.
Double-click the lookupXRef icon.
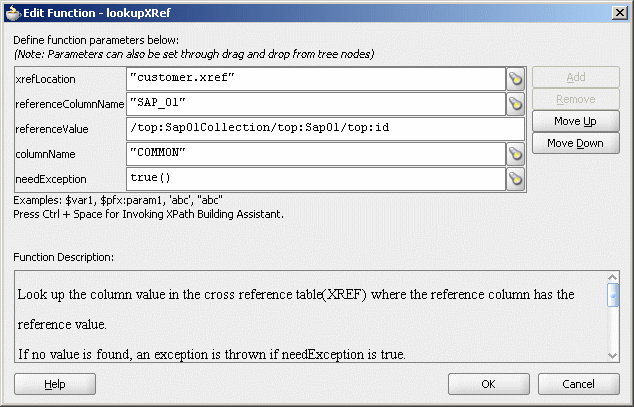
The Edit Function-lookupXRef dialog is displayed.
To the right of the xrefLocation field, click Search.
The SOA Resource Lookup dialog is displayed.
Select customer.xref and click OK.
In the referenceColumnName field, enter "SAP_01" or click Search to select the column name.
In the referenceValue column, enter /top:Sap01Collection/top:Sap01/top:id.
In the columnName field, enter "COMMON" or click Search to select the column name.
In the needException field, enter true() or click Search to select this mode.
Figure 49-27 shows the populated Edit Function – looupXRef dialog.
Figure 49-27 Edit Function – lookupXRef Dialog: XrefCustApp Use Case
Click OK.
From the File menu, select Save All and close the SAP_TO_COMMON_UPDATE.xsl file.
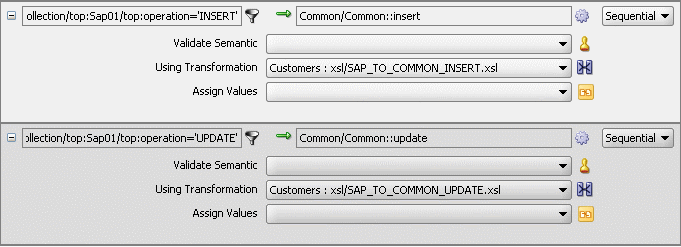
The Routing Rules section appears, as shown in Figure 49-28.
Figure 49-28 Insert Operation and Update Operation
To create routing rules for an updateID operation:
Perform the following tasks to create routing rules for an updateID operation:
In the Routing Rules section, click the Create a new Routing Rule icon.
The Target Type dialog is displayed.
Select Service.
The Target Services dialog is displayed.
Navigate to XrefCustApp > Mediators > Common, Services > Common.
Select updateid and click OK.
Click the Filter icon.
The Expression Builder dialog is displayed.
In the Expression field, enter the following expression:
$in.Sap01Collection/top:Sap01Collection/top:Sap01/top:operation = 'UPDATEID'
Click OK.
Next to the Transform Using field, click the Transformation icon.
The Request Transformation map dialog is displayed.
Select Create New Mapper File and enter SAP_TO_COMMON_UPDATEID.xsl.
Click OK.
An SAP_TO_COMMON_UPDATEID.xsl file is displayed.
Drag and drop the top:Sap01 source element to the inp1:Customer target element.
The Auto Map Preferences dialog is displayed.
Click OK.
From the Component Palette, select Advanced.
Select XREF Functions.
Drag and drop the populateXRefRow function from the Component Palette to the line connecting the top:id and inp1:id elements.
Double-click the populateXRefRow icon.
The Edit Function-populateXRefRow dialog is displayed.
To the right of the xrefLocation field, click Search.
The SOA Resource Lookup dialog is displayed.
Select customer.xref and click OK.
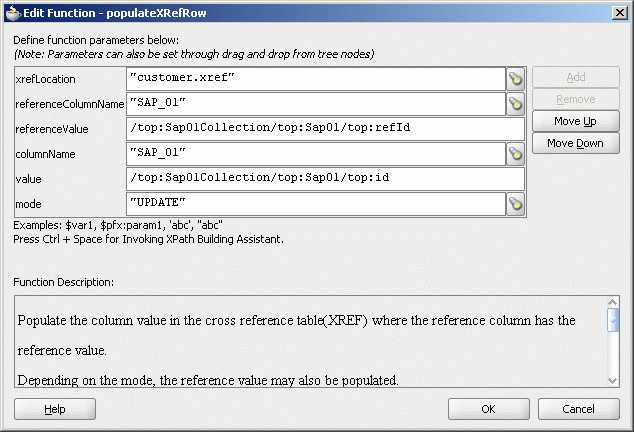
In the referenceColumnName field, enter "SAP_01" or click Search to select the column name.
In the referenceValue column, enter /top:Sap01Collection/top:Sap01/top:refId.
In the columnName field, enter "SAP_01" or click Search to select the column name.
In the value field, enter /top:Sap01Collection/top:Sap01/top:Id.
In the mode field, enter "UPDATE" or click Search to select this mode.
Figure 49-29 shows a populated Edit Function – populateXRefRow dialog.
Figure 49-29 Edit Function – populateXRefRow Dialog: XrefCustApp Use Case
Drag and drop the lookupXRef function from the Component Palette to the line connecting the top:id and inp1:id elements.
Double-click the lookupXRef icon.
The Edit Function-lookupXRef dialog is displayed.
To the right of the xrefLocation field, click Search.
The SOA Resource Lookup dialog is displayed.
Select customer.xref and click OK.
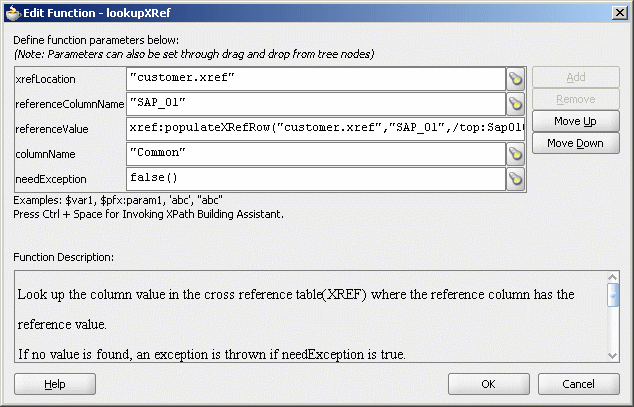
In the referenceColumnName field, enter "SAP_01" or click Search to select the column name.
In the referenceValue column, enter the following:
xref:populateXRefRow("customer.xref","SAP_
01",/top:Sap01Collection/top:Sap01/top:refId,"SAP_
01",/top:Sap01Collection/top:Sap01/top:id,"UPDATE").
In the columnName field, enter "COMMON" or click Search to select the column name.
In the needException field, enter false() or click Search to select this mode.
Figure 49-30 shows a populated Edit Function – lookupXRef dialog.
Figure 49-30 Edit Function – lookupXRef Dialog: XrefCustApp Use Case
Click OK.
From the File menu, select Save All and close the SAP_TO_COMMON_UPDATEID.xsl file.
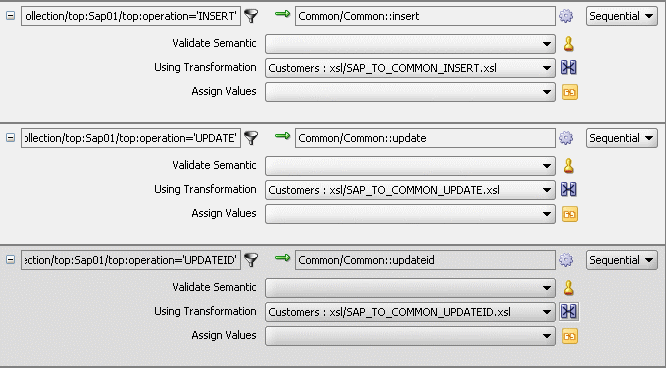
The Routing Rules section appears, as shown in Figure 49-31.
Figure 49-31 Insert, Update, and UpdateID Operations
To create routing rules for a delete operation:
In the Routing Rules section, click the Create a new Routing Rule icon.
The Target Type dialog is displayed.
Select Service.
The Target Services dialog is displayed.
Navigate to XrefCustApp > Mediators > Common, Services > Common.
Select delete and click OK.
Click the Filter icon.
The Expression Builder dialog is displayed.
In the Expression field, enter the following expression:
$in.Sap01Collection/top:Sap01Collection/top:Sap01/top:operation = 'DELETE'
Click OK.
Next to the Transform Using field, click the Transformation icon.
The Request Transformation map dialog is displayed.
Select Create New Mapper File and enter SAP_TO_COMMON_DELETE.xsl.
Click OK.
A SAP_TO_COMMON_DELETE.xsl file is displayed.
Right-click <sources> and select Add Parameter.
The Add Parameter dialog is displayed.
In the Local Name field, enter COMMONID.
Select Set Default Value.
Select Expression.
In the XPath Expression field, enter
xref:lookupXRef("customer.xref","SAP_
01",/top:Sap01Collection/top:Sap01/top:id,"COMMON",false()).
Click OK.
Drag and drop the top:Sap01 source element to the inp1:Customer target element.
The Auto Map Preferences dialog is displayed.
Click OK.
Delete the line connecting top:id and inp1:id.
Connect COMMONID to inp1:id.
Right-click inp1:id and select Add XSL node and then if.
A new node if is inserted between inp1:customer and inp1:id.
Connect top:id to the if node.
From the Component Palette, select Advanced.
Select XREF Functions.
Drag and drop the markForDelete function from the Component Palette to the line connecting top:id and the if node.
Double-click the markForDelete icon.
The Edit Function-markForDelete dialog is displayed.
Click Search to the right of the xrefLocation field.
The SOA Resource Lookup dialog is displayed.
Select customer.xref and click OK.
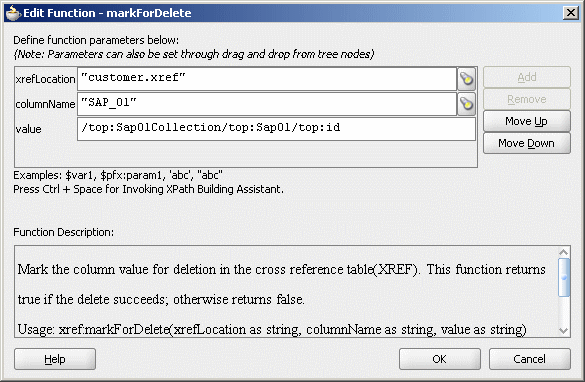
In the columnName field, enter "SAP_01" or click Search to select the column name.
In the value field, enter /top:Sap01Collection/top:Sap01/top:Id.
Figure 49-32 shows a populated Edit Function – markForDelete dialog.
Figure 49-32 Edit Function – markForDelete Dialog: XrefCustApp Use Case
Click OK.
The SAP_TO_COMMON_DELETE.xsl file appears, as shown in Figure 49-33.
From the File menu, select Save All and close the SAP_TO_COMMON_DELETE.xsl file.
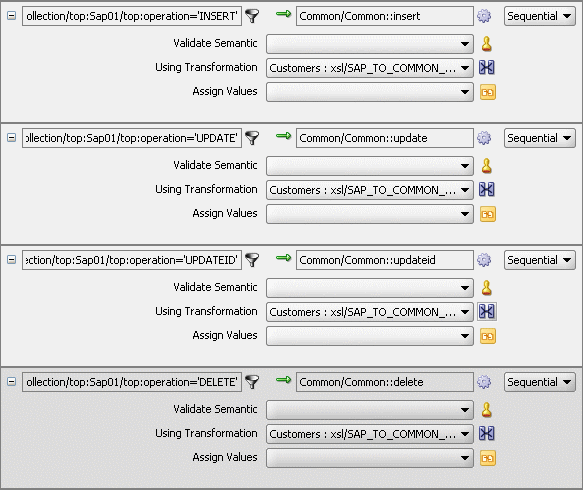
The Routing Rules section appears, as shown in Figure 49-34.
Figure 49-34 Insert, Update, UpdateID, and Delete Operations
You must specify routing rules for the following operations of the Common Oracle Mediator:
Insert
Delete
Update
UpdateID
To create routing rules for the insert operation:
Double-click the Common Oracle Mediator.
The Mediator Editor is displayed.
In the Routing Rules section, click the Create a new Routing Rule icon.
The Target Type dialog is displayed.
Select Service.
The Target Services dialog is displayed.
Navigate to XrefCustApp > References > SBL.
Select SBL and click OK.
Next to the Transform Using field, click the Transformation icon.
The Request Transformation map dialog is displayed.
Select Create New Mapper File and enter COMMON_TO_SBL_INSERT.xsl.
Click OK.
A COMMON_TO_SBL_INSERT.xsl file is displayed.
Drag and drop the inp1:Customers source element to the db:InputParameters target element.
The Auto Map Preferences dialog is displayed.
Click OK.
The transformation is created, as shown in Figure 49-35.
Figure 49-35 COMMON_TO_SBL_INSERT.xsl Transformation

From the File menu, select Save All and close the COMMON_TO_SBL_INSERT.xsl file.
In the Synchronous Reply section, click Browse for target service operations.
The Target Type dialog is displayed.
Select Service.
The Target Services dialog is displayed.
Navigate to XrefCustApp > References > Logger.
Select Write and click OK.
Next to the Transform Using field, click the Transformation icon.
The Reply Transformation map dialog is displayed.
Select Create New Mapper File and enter SBL_TO_COMMON_INSERT.xsl.
Select Include Request in the Reply Payload.
Click OK.
A SBL_TO_COMMON_INSERT.xsl file is displayed.
Connect the inp1:Customers source element to db:X:APP_ID.
Drag and drop the populateXRefRow function from the Component Palette to the connecting line.
Double-click the populateXRefRow icon.
The Edit Function-populateXRefRow dialog is displayed.
Enter this information in the following fields:
xrefLocation: "customer.xref"
referenceColumnName: "Common"
referenceValue: $initial.Customers/inp1:Customers/inp1:Customer/inp1:Id
columnName: "SBL_78"
value: /db:OutputParameters/db:X_APP_ID
mode: "LINK"
Click OK.
The SBL_TO_COMMON_INSERT.xsl file appears, as shown in Figure 49-36.
Figure 49-36 SBL_TO_COMMON_INSERT.xsl Transformation

From the File menu, select Save All and close the SBL_TO_COMMON_INSERT.xsl file.
In the Synchronous Reply section, click the Assign Values icon.
The Assign Values dialog is displayed.
Click Add.
The Assign Value dialog is displayed.
In the From section, select Expression.
Click the Invoke Expression Builder icon.
The Expression Builder dialog is displayed.
In the Expression field, enter the following expression and click OK.
concat('INSERT-',$in.OutputParameters/db:OutputParameters/db:X_APP_ID,'.xml')
In the To section, select Property.
Select the jca.file.FileName property and click OK.
Click OK.
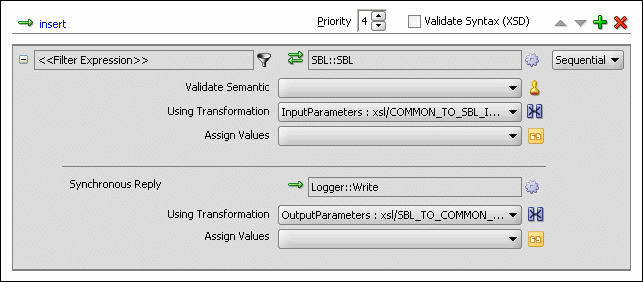
The insert operation section appears, as shown in Figure 49-37.
Figure 49-37 Insert Operation with SBL Target Service
From the File menu, select Save All.
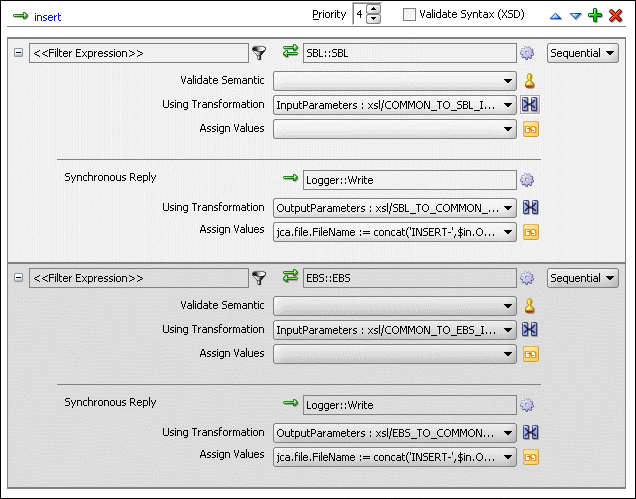
Repeat Step 2 through Step 34 to specify another target service named EBS and its routing rules.
Figure 49-38 shows the insert operation section with SBL and EBS target services.
Figure 49-38 Insert Operation with SBL and EBS Target Services
To create routing rules for a delete operation:
Perform the following tasks to create the routing rules for a delete operation.
In the Routing Rules section, click the Create a new Routing Rule icon.
The Target Type dialog is displayed.
Select Service.
The Target Services dialog is displayed.
Navigate to XrefCustApp > References > SBL.
Select SBL and click OK.
Next to the Transform Using field, click the Transformation icon.
The Request Transformation map dialog is displayed.
Select Create New Mapper File and enter COMMON_TO_SBL_DELETE.xsl.
Click OK.
A COMMON_TO_SBL_DELETE.xsl file is displayed.
Drag and drop the inp1:Customers source element to the db:InputParameters target element.
The Auto Map Preferences dialog is displayed.
Click OK.
The transformation is created, as shown in Figure 49-39.
Figure 49-39 COMMON_TO_SBL_DELETE.xsl Transformation

Drag and drop the lookupXRef function from the Component Palette to the line connecting inp1:id and db:XCUSTOMER_ID.
Double-click the lookupXRef icon.
The Edit Function: lookupXRef dialog is displayed.
Enter this information in the following fields:
xrefLocation: "customer.xref"
referenceColumnName: "Common"
referenceValue: /inp1:Customers/inp1:Customer/inp1:Id
columnName: "SBL_78"
needException: false()
Click OK.
From the File menu, select Save All and close the COMMON_TO_SBL_DELETE.xsl file.
In the Synchronous Reply section, click Browse for target service operations.
The Target Type dialog is displayed.
Select Service.
The Target Services dialog is displayed.
Navigate to XrefCustApp > References > Logger.
Select Write and click OK.
Next to the Transform Using field, click the Transformation icon.
The Reply Transformation map dialog is displayed.
Select Create New Mapper File and enter SBL_TO_COMMON_DELETE.xsl.
Click OK.
The SBL_TO_COMMON_DELETE.xsl file is displayed.
Connect the db:X_APP_ID source element to the db:X:APP_ID target.
Drag and drop the markForDelete function from the Component Palette to the connecting line.
Double-click the markForDelete icon.
The Edit Function-markForDelete dialog is displayed.
Enter this information in the following fields:
xrefLocation: "customer.xref"
columnName: "SBL_78"
value: /db:OutputParameters/db:X_APP_ID
Click OK.
From the File menu, select Save All and close the SBL_TO_COMMON_DELETE.xsl file.
In the Synchronous Reply section, click the Assign Values icon.
The Assign Values dialog is displayed.
Click Add.
The Assign Value dialog is displayed.
In the From section, select Expression.
Click the Invoke Expression Builder icon.
The Expression Builder dialog is displayed.
In the Expression field, enter the following expression, and click OK.
concat('DELETE-',$in.OutputParameters/db:OutputParameters/db:X_APP_ID,'.xml')
In the To section, select Property.
Select the jca.file.FileName property and click OK.
Click OK.
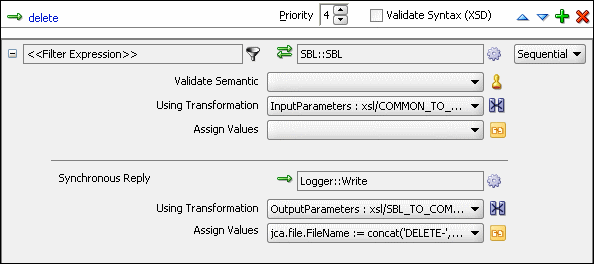
The delete operation section appears, as shown in Figure 49-40.
Figure 49-40 Delete Operation with SBL Target Service
From the File menu, select Save All.
Repeat Step 1 through Step 36 to specify another target service named EBS and specify the routing rules.
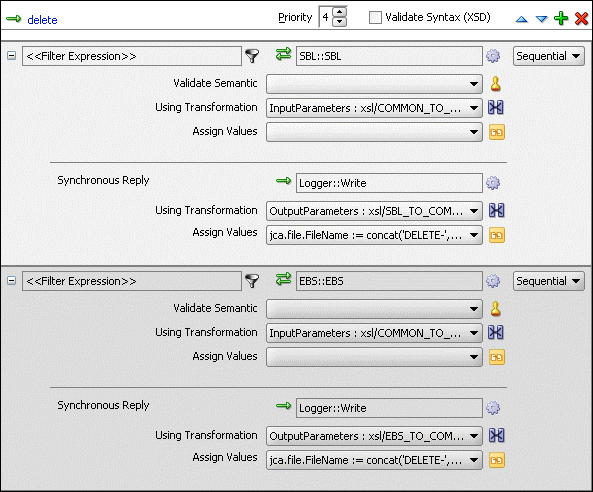
Figure 49-41 shows the delete operation section with SBL and EBS target services.
Figure 49-41 Delete Operation with SBL and EBS Target Service
To create routing rules for the update operation:
Perform the following tasks to create routing rules for the update operation.
In the Routing Rules section, click the Create a new Routing Rule icon.
The Target Type dialog is displayed.
Select Service.
The Target Services dialog is displayed.
Navigate to XrefCustApp, References > SBL.
Select SBL and click OK.
Click the Transformation icon next to the Transform Using field.
The Request Transformation map dialog is displayed.
Select Create New Mapper File and enter COMMON_TO_SBL_UPDATE.xsl.
Click OK.
A COMMON_TO_SBL_UPDATE.xsl file is displayed.
Drag and drop the inp1:Customers source element to the db:InputParameters target element.
The Auto Map Preferences dialog is displayed.
Click OK.
The transformation is created, as shown in Figure 49-39.
Drag and drop the lookupXRef function from the Component Palette to the line connecting inp1:id and db:XCUSTOMER_ID.
Double-click the lookupXRef icon.
The Edit Function: lookupXRef dialog is displayed.
Enter this information in the following fields:
xrefLocation: "customer.xref"
referenceColumnName: "Common"
referenceValue: /inp1:Customers/inp1:Customer/inp1:Id
columnName: "SBL_78"
needException: true()
Click OK.
From the File menu, select Save All and close the COMMON_TO_SBL_UPDATE.xsl file.
In the Synchronous Reply section, click Browse for target service operations.
The Target Type dialog is displayed.
Select Service.
The Target Services dialog is displayed.
Navigate to XrefCustApp > References > Logger.
Select Write and click OK.
Next to the Transform Using field, click the Transformation icon.
The Reply Transformation map dialog is displayed.
Select Create New Mapper File and enter SBL_TO_COMMON_UPDATE.xsl.
Click OK.
A SBL_TO_COMMON_UPDATE.xsl file is displayed.
Connect the db:X:APP_ID source element to db:X:APP_ID.
From the File menu, select Save All and close the SBL_TO_COMMON_UPDATE.xsl file.
In the Synchronous Reply section, click the Assign Values icon.
The Assign Values dialog is displayed.
Click Add.
The Assign Value dialog is displayed.
In the From section, select Expression.
Click the Invoke Expression Builder icon.
The Expression Builder dialog is displayed.
In the Expression field, enter the following expression and click OK.
concat('UPDATE-',$in.OutputParameters/db:OutputParameters/db:X_APP_ID,'.xml')
In the To section, select Property.
Select the jca.file.FileName property and click OK.
Click OK.
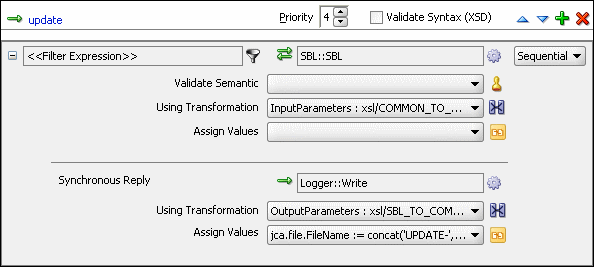
The update operation section appears, as shown in Figure 49-42.
Figure 49-42 Update Operation with SBL Target Service
From the File menu, select Save All.
Repeat Step 1 through Step 32 to specify another target service named EBS and its routing rules.
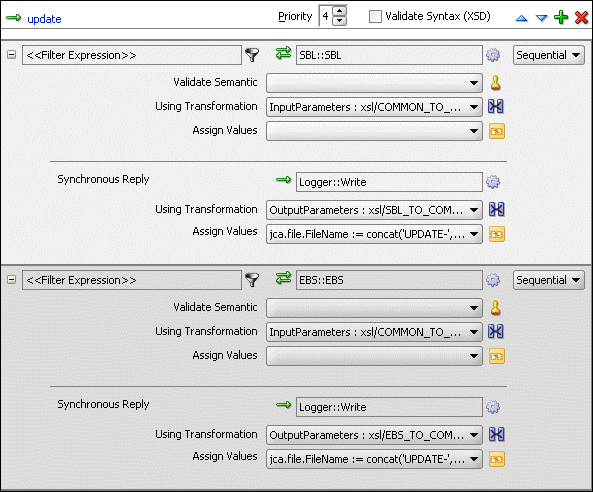
Figure 49-43 shows the update operation section with SBL and EBS target services.
Figure 49-43 Update Operation with SBL and EBS Target Service
To create routing rules for the UpdateID operation:
Perform the following tasks to create routing rules for the UpdateID operation.
In the Routing Rules section, click the Create a new Routing Rule icon.
The Target Type dialog is displayed.
Select Service.
The Target Services dialog is displayed.
Navigate to XrefCustApp > References > SBL.
Select SBL and click OK.
Next to the Transform Using field, click the Transformation icon.
The Request Transformation map dialog is displayed.
Select Create New Mapper File and enter COMMON_TO_SBL_UPDATEID.xsl.
Click OK.
The COMMON_TO_SBL_UPDATEID.xsl file is displayed.
Drag and drop the inp1:Customers source element to the db:InputParameters target element.
The Auto Map Preferences dialog is displayed.
Click OK.
The transformation is created, as shown in Figure 49-39.
Drag and drop the lookupXRef function from the Component Palette to the line connecting inp1:id and db:X_CUSTOMER_ID.
Double-click the lookupXRef icon.
The Edit Function: lookupXRef dialog is displayed.
Enter this information in the following fields:
xrefLocation: customer.xref
referenceColumnName: Common
referenceValue: /inp1:Customers/inp1:Customer/inp1:Id
columnName: SBL_78
needException: false()
Click OK.
From the File menu, select Save All and close the COMMON_TO_SBL_UPDATEID.xsl file.
In the Synchronous Reply section, click Browse for target service operations.
The Target Type dialog is displayed.
Select Service.
The Target Services dialog is displayed.
Navigate to XrefCustApp > References > Logger.
Select Write and click OK.
Next to the Transform Using field, click the Transformation icon.
The Reply Transformation map dialog is displayed.
Select Include Request in the Reply Payload.
Click OK.
The SBL_TO_COMMON_UPDATEID.xsl file is displayed.
Connect inp1:Customers source element to the db:X:APP_ID.
Drag and drop the populateXRefRow function from the Component Palette to the connecting line.
Double-click the populateXRefRow icon.
The Edit Function-populateXRefRow dialog is displayed.
Enter this information in the following fields:
xrefLocation: customer.xref
referenceColumnName: Common
referenceValue: $initial.Customers/inp1:Customers/inp1:Customer/inp1:Id
columnName: SBL_78
value: /db:OutputParameters/db:X_APP_ID
mode: UPDATE
Click OK.
From the File menu, select Save All and close the SBL_TO_COMMON_UPDATEID.xsl file.
In the Synchronous Reply section, click the Assign Values icon.
The Assign Values dialog is displayed.
Click Add.
The Assign Value dialog is displayed.
In the From section, select Expression.
Click the Invoke Expression Builder icon.
The Expression Builder dialog is displayed.
In the Expression field, enter the following expression and click OK.
concat('UPDATEID-',$in.OutputParameters/db:OutputParameters/db:X_APP_ID,'.xml')
In the To section, select Property.
Select the jca.file.FileName property and click OK.
Click OK.
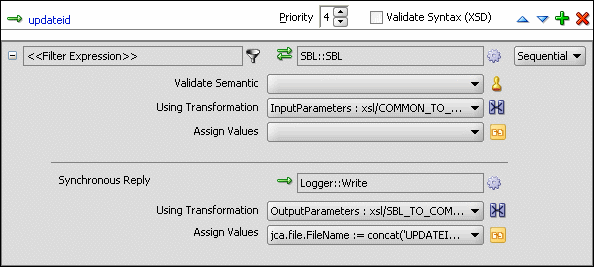
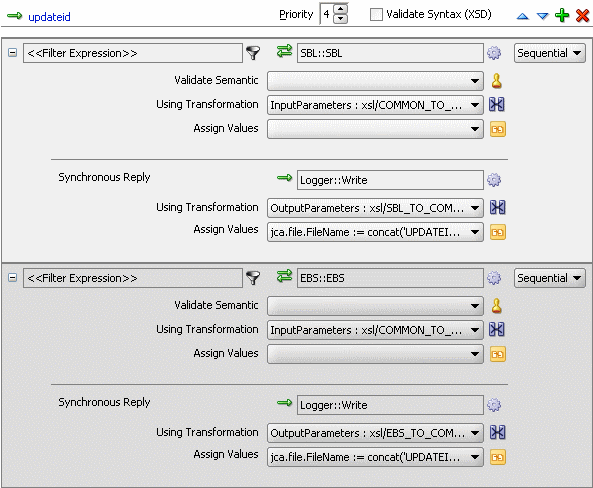
The updateid operation section appears, as shown in Figure 49-44.
Figure 49-44 Updateid Operation with SBL Target Service
From the File menu, select Save All.
Repeat Step 1 through Step 36 to specify another target service named EBS and specify the routing rules.
Figure 49-45 shows the updateid operation section with the SBL and EBS target services.
Figure 49-45 Updateid Operation with SBL and EBS Target Service
An application server connection is required for deploying your SOA composite application. For information on creating an application server connection, see Section 43.7.1.1.1, "Creating an Application Server Connection."
Deploying the XrefCustApp composite application consists of the following steps:
Creating an application deployment profile
Deploying the application to the application server
For detailed information about these steps, see Section 43.7.1, "Deploying a Single SOA Composite in Oracle JDeveloper."
After deploying the XrefCustApp application, you can run it by using any command from the insert_sap_record.sql file present in the XrefCustApp/sql folder. On successful completion, the records are inserted or updated in the EBS and SBL tables and the Logger reference writes the output to the output.xml file.
For monitoring the running instance, you can use the Oracle Enterprise Manager Fusion Middleware Control at the following URL:
http://hostname:port_number/em
where hostname is the host on which you installed the Oracle SOA Suite infrastructure and port_number is the port running the service.
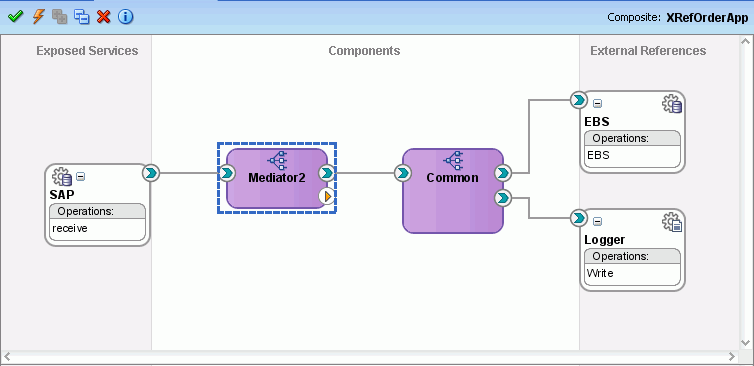
The cross reference use case implements an integration scenario between two end-system Oracle EBS and SAP instances. In this use case, the order passes from SAP to EBS. SAP represents the orders with a unique ID, whereas EBS splits the order into two orders: ID1 and ID2. This scenario is created using database adapters. When you poll the SAP table for updated or created records, an SAP instance is created. In EBS, the instance is simulated by a procedure and the table is populated. Figure 49-46 provides an overview of this use case.
Figure 49-46 XrefOrderApp Use Case in SOA Composite Editor
To download the sample files mentioned in this section, see the Oracle SOA Suite samples page.
This section provides the design-time tasks for creating, building, and deploying your SOA composite application. These tasks should be performed in the order in which they are presented.
To configure the Oracle database and database adapter:
You need the SCOTT database account with password TIGER for this use case. You must ensure that the SCOTT account is unlocked.
You can log in as SYSDBA and then run the setup_user.sql script available in the XrefOrderApp1M/sql folder to unlock the account.
Run the create_schema.sql script available in the XrefOrderApp1M/sql folder to create the tables required for this use case.
Run the create_app_procedure.sql script available in the XrefOrderApp1M/sql folder to create a procedure that simulates the various applications participating in this integration.
Run the createschema_xref_oracle.sql script available in the Oracle_Home/rcu/integration/soainfra/sql/xref/ folder to create a cross reference table to store runtime cross reference data.
Copy the ra.xml and weblogic-ra.xml files from $BEAHOME/META-INF to the newly created directory called META-INF on your computer.
Edit the weblogic-ra.xml file, which is available in the $BEAHOME/src/oracle/tip/adapter/db/test/deploy/weblogic/META-INF folder for your SOA application, as follows:
Modify the property to xADataSourceName as follows:
<property>
 <name>xADataSourceName</name>
 <value>jdbc/DBConnection1</value>
</property>
Modify the jndi-name as follows:
<jndi-name> eis/DB/DBConnection1</jndi-name>
This sample uses eis/DB/DBConnection1 to poll the SAP table for new messages and to connect to the procedure that simulates Oracle EBS and Siebel instances.
Package the ra.xml and weblogic-ra.xml files as a RAR file and deploy the RAR file by using Oracle WebLogic Server Administration Console.
Create a data source using the Oracle WebLogic Server Administration Console with the following values:
jndi-name=jdbc/DBConnection1
user=scott
password=tiger
url=jdbc:oracle:thin:@host:port:service
connection-factory factory-class=oracle.jdbc.pool.OracleDataSource
Create a data source using the Oracle WebLogic Server Administration Console with the following values:
jndi-name=jdbc/xref
user=scott
password=tiger
url=jdbc:oracle:thin:@host:port:service
connection-factory factory-class=oracle.jdbc.pool.OracleDataSource
To create an Oracle JDeveloper application and a project:
In Oracle JDeveloper, click File and select New.
The New Gallery dialog appears.
In the New Gallery, expand the General node, and select the Applications category.
In the Items list, select SOA Application and click OK.
The Create SOA Application wizard appears.
In the Application Name field, enter XRefOrderApp, and then click Next.
The Name your project page appears.
In the Project Name field, enter XRefOrderApp and click Next.
The Configure SOA Settings page appears.
In the Composite Template list, select Empty Composite and then click Finish.
The Application Navigator of Oracle JDeveloper is updated with the new application and project and the SOA Composite Editor contains a blank project.
From the File menu, select Save All.
After creating an application and a project for the use case, you must create a cross reference table.
To create a cross reference table:
In the Application Navigator, right-click the XRefOrderApp project and select New.
In the New Gallery dialog, expand the SOA Tier node, and then select the Transformations category.
In the Items list, select Cross Reference(XREF) and click OK.
The Create Cross Reference(XREF) File dialog is displayed.
In the File Name field, enter order.xref.
In the End System fields, enter SAP_05 and EBS_i75.
Click OK.
The Cross Reference Editor is displayed.
Click Add.
A new row is added.
Enter COMMON as the End System name.
The Cross Reference Editor appears, as shown in Figure 49-47.
From the File menu, select Save All and close the Cross Reference Editor.
To create a database adapter service:
In the Component Palette, select SOA.
Select Database Adapter and drag it to the Exposed Services swimlane.
The Adapter Configuration wizard Welcome page is displayed.
Click Next.
The Service Name page is displayed.
In the Service Name field, enter SAP.
Click Next.
The Service Connection page is displayed.
In the Connection field, select DBConnection1.
In the JNDI Name field, enter eis/DB/DBConnection1.
Click Next.
The Operation Type page is displayed.
Select Poll for New or Changed Records in a Table and click Next.
The Select Table page is displayed.
Click Import Tables.
The Import Tables dialog is displayed.
Select Scott from the Schema.
In the Name Filter field, enter %SAP% and click Query.
The Available field is populated with the SAP_05 table name.
Double-click SAP_05.
The selected field is populated with SAP_05.
Click OK.
The Select Table page now contains the SAP_05 table.
Select SAP_05 and click Next.
The Define Primary Key page is displayed.
Select ID as the primary key and click Next.
The Relationships page is displayed.
Click Next.
The Attribute Filtering page is displayed.
Click Next.
The After Read page is displayed.
Select Update a Field in the [SAP_05] Table (Logical Delete) and click Next.
The Logical Delete page is displayed.
In the Logical Delete field, select LOGICAL_DEL.
In the Read Value field, enter Y.
In the Unread Value field, enter N.
Figure 49-16 shows the Logical Delete page of the Adapter Configuration wizard.
Click Next.
The Polling Options page is displayed.
Click Next.
The Define Selection Criteria page is displayed.
Click Next.
The Advanced Options page is displayed.
Click Next.
The Finish page is displayed.
Click Finish.
A database adapter service named SAP is created, as shown in Figure 49-48.
Figure 49-48 SAP Database Adapter Service in SOA Composite Editor

From the File menu, select Save All.
To create an EBS external reference:
In the Component Palette, select SOA.
Select Database Adapter and drag it to the External References swimlane.
The Adapter Configuration wizard Welcome page is displayed.
Click Next.
The Service Name page is displayed.
In the Service Name field, enter EBS.
Click Next.
The Service Connection page is displayed.
In the Connection field, select DBConnection1.
In the JNDI Name field, enter eis/DB/DBConnection1.
Click Next.
The Operation Type page is displayed.
Select Call a Stored Procedure or Function and click Next.
The Specify Stored Procedure page is displayed.
Select Scott from the Schema.
Click Browse.
The Stored Procedures dialog is displayed.
Select POPULATE_APP_INSTANCE_IM, as shown in Figure 49-49.
Click OK.
The Specify Stored Procedure page appears, as shown in Figure 49-50.
Figure 49-50 Specify Stored Procedure Page of Adapter Configuration Wizard
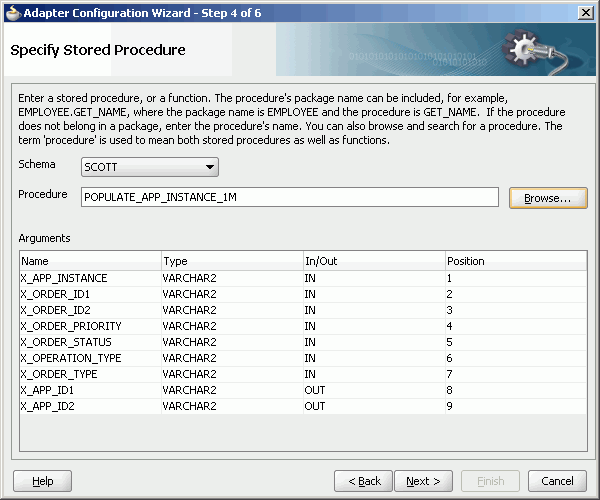
Click Next.
The Advanced Options page is displayed.
Click Next.The Finish page is displayed.
Click Finish.
Figure 49-51 shows the EBS reference in the SOA Composite Editor.
Figure 49-51 EBS Reference in SOA Composite Editor

From the File menu, select Save All.
To create a Logger file adapter external reference:
From the Component Palette, select SOA.
Select File Adapter and drag it to the External References swimlane.
The Adapter Configuration wizard Welcome page is displayed.
Click Next.
The Service Name page is displayed.
In the Service Name field, enter Logger.
Click Next.
The Adapter Interface page is displayed.
Click Define from operation and schema (specified later).
The Operation page is displayed.
In the Operation Type field, select Write File.
Click Next.
The File Configuration page is displayed.
In the Directory for Outgoing Files (physical path) field, enter the name of the directory in which you want to write the files.
In the File Naming Convention field, enter output.xml and click Next.
The Messages page is displayed.
Click Search.
The Type Chooser dialog is displayed.
Navigate to Type Explorer > Project Schema Files > SCOTT_POPULATE_APP_INSTANCE_1M.xsd, and then select OutputParameters.
Click OK.
Click Next.
The Finish page is displayed.
Click Finish.
Figure 49-52 shows the Logger reference in the SOA Composite Editor.
Figure 49-52 Logger Reference in SOA Composite Editor
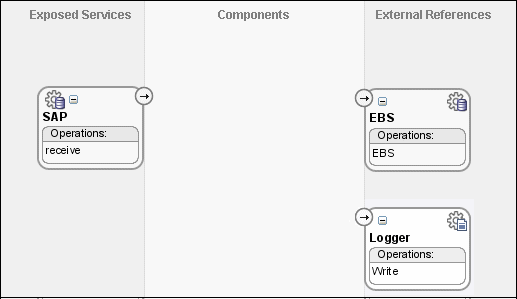
From the File menu. select Save All.
To create an Oracle Mediator service component:
Drag and drop a Mediator icon from the Component Palette to the Components swimlane.
The Create Mediator dialog is displayed.
From the Template list, select Define Interface Later.
Click OK.
An Oracle Mediator with name Mediator2 is created.
Connect the SAP service to Mediator2, as shown in Figure 49-53.
Figure 49-53 SAP Service Connected to Mediator2
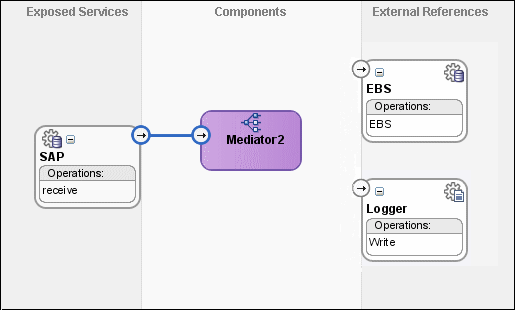
From the File menu. select Save All.
Drag and drop a Mediator icon from the Component Palette to the Components section of the SOA Composite Editor.
The Create Mediator dialog is displayed.
From the Template list, select Interface Definition From WSDL.
Deselect Create Composite Service with SOAP Bindings.
To the right of the WSDL File field, click Find Existing WSDLs.
Navigate to and then select the Common.wsdl file. The Common.wsdl file is available in the Samples folder.
Click OK.
Click OK.
An Oracle Mediator named Common is created.
You must specify routing rules for following operations:
Insert
Update
To create routing rules for the insert operation:
Double-click the Mediator2 Oracle Mediator.
The Mediator Editor is displayed.
In the Routing Rules section, click the Create a new Routing Rule icon.
The Target Type dialog is displayed.
Select Service.
The Target Services dialog is displayed.
Navigate to XrefOrderApp > Mediators > Common, Services > Common.
Select Insert and click OK.
Click the Filter icon.
The Expression Builder dialog is displayed.
In the Expression field, enter the following expression:
$in.Sap05Collection/top:Sap05Collection/top:Sap05/top:operation='INSERT'
Click OK.
Next to the Using Transformation field, click the Transformation icon.
The Request Transformation map dialog is displayed.
Select Create New Mapper File and enter SAP_TO_COMMON_INSERT.xsl.
Click OK.
An SAP_TO_COMMON_INSERT.xsl file is displayed.
Drag and drop the top:SAP05 source element to the inp1:Order target element.
The Auto Map Preferences dialog is displayed.
From the During Auto Map options list, deselect Match Elements Considering their Ancestor Names.
Click OK.
The transformation is created, as shown in Figure 49-54.
Figure 49-54 SAP_TO_COMMON_INSERT.xsl Transformation

From the Component Palette, select Advanced.
Select XREF Functions.
Drag and drop the populateXRefRow1M function from the Component Palette to the line connecting the top:id and inp1:id elements.
Double-click the populateXRefRow1M icon.
The Edit Function-populateXRefRow dialog is displayed.
To the right of the xrefLocation field, click Search.
The SOA Resource Lookup dialog is displayed.
Select Order.xref and click OK.
In the referenceColumnName field, enter "SAP_05" or click Search to select the column name.
In the referenceValue column, enter /top:Sap05Collection/top:Sap05/top:id.
In the columnName field, enter "Common" or click Search to select the column name.
In the value field, enter orcl:generate-guid().
In the mode field, enter "Add" or click Search to select this mode.
Figure 49-55 shows the populated Edit Function – populateXRefRow1M dialog.
Figure 49-55 Edit Function – populateXRefRow1M Dialog: XrefOrderApp Use Case
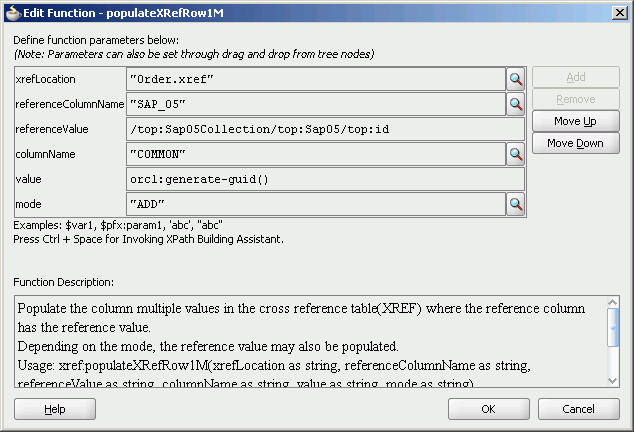
Click OK.
From the File menu, select Save All and close the SAP_TO_COMMON_INSERT.xsl file.
The Routing Rules section appears, as shown in Figure 49-56.
Figure 49-56 Routing Rules Section with Insert Operation
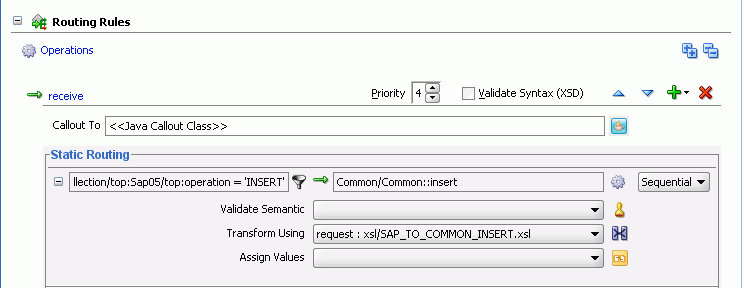
To create routing rules for the update operation:
Perform the following tasks to create routing rules for the update operation.
In the Routing Rules section, click the Create a new Routing Rule icon.
The Target Type dialog is displayed.
Select Service.
The Target Services dialog is displayed.
Navigate to XrefOrderApp > Mediators > Common, Services > Common.
Select Update and click OK.
Click the Filter icon.
The Expression Builder dialog is displayed.
In the Expression field, enter the following expression:
$in.Sap05Collection/top:Sap05Collection/top:Sap05/top:operation='UPDATE'
Click OK.
Next to the Transform Using field, click the Transformation icon.
The Request Transformation map dialog is displayed.
Select Create New Mapper File and enter SAP_TO_COMMON_UPDATE.xsl.
Click OK.
An SAP_TO_COMMON_UPDATE.xsl file is displayed.
Drag and drop the top:Sap05 source element to the inp1:Order target element.
The Auto Map Preferences dialog is displayed.
Click OK.
From the Component Palette, select Advanced.
Select XREF Functions.
Drag and drop the lookupXRef function from the Component Palette to the line connecting the top:id and inp1:id elements.
Double-click the lookupXRef icon.
The Edit Function-lookupXRef dialog is displayed.
To the right of the xrefLocation field, click Search.
The SOA Resource Lookup dialog is displayed.
Select customer.xref and click OK.
In the referenceColumnName field, enter "SAP_05" or click Search to select the column name.
In the referenceValue column, enter /top:Sap05Collection/top:Sap05/top:id.
In the columnName field, enter "COMMON" or click Search to select the column name.
In the needException field, enter true() or click Search to select this mode.
Figure 49-57 shows the populated Edit Function – looupXRef dialog.
Figure 49-57 Edit Function – looupXRef Dialog: XRefOrderApp Use Case
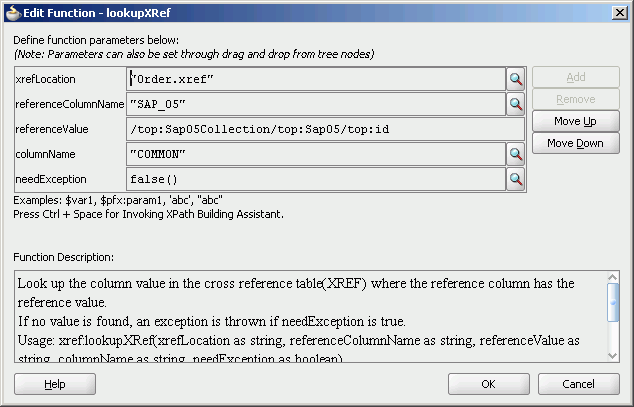
Click OK.
From the File menu, select Save All and close the SAP_TO_COMMON_UPDATE.xsl file.
The Routing Rules section appears, as shown in Figure 49-58.
Figure 49-58 Insert Operation and Update Operation
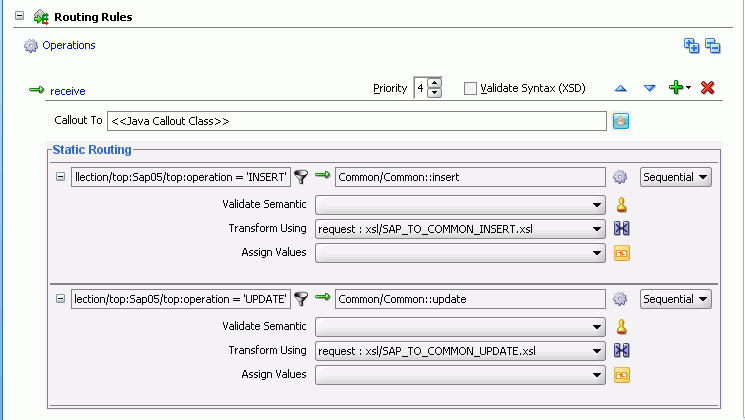
You must specify routing rules for the following operations of the Common Oracle Mediator:
Insert
Update
To create routing rules for the insert operation:
Double-click the Common Oracle Mediator.
The Mediator Editor is displayed.
In the Routing Rules section, click the Create a new Routing Rule icon.
The Target Type dialog is displayed.
Select Service.
The Target Services dialog is displayed.
Navigate to XrefOrderApp > References > EBS.
Select EBS and click OK.
Next to the Transform Using field, click the Transformation icon.
The Request Transformation map dialog is displayed.
Select Create New Mapper File and enter COMMON_TO_EBS_INSERT.xsl.
Click OK.
A COMMON_TO_EBS_INSERT.xsl file is displayed.
Drag and drop the inp1:Order source element to the db:InputParameters target element.
The Auto Map Preferences dialog is displayed.
Set the value of the db:X_APP_INSTANCE node on the right side to EBS_i75.
Click OK.
The transformation is created, as shown in Figure 49-59.
Figure 49-59 COMMON_TO_EBS_INSERT.xsl Transformation

From the File menu, select Save All and close the COMMON_TO_EBS_INSERT.xsl file.
In the Synchronous Reply section, click Browse for target service operations.
The Target Type dialog is displayed.
Select Service.
The Target Services dialog is displayed.
Navigate to XrefOrderApp > References > Logger.
Select Write and click OK.
Next to the Transform Using field, click the Transformation icon.
The Reply Transformation map dialog is displayed.
Select Create New Mapper File and enter EBS_TO_COMMON_INSERT.xsl.
Select Include Request in the Reply Payload.
Click OK.
An EBS_TO_COMMON_INSERT.xsl file is displayed.
Connect the inp1:Order source element to db:X:APP_ID.
Drag and drop the populateXRefRow function from the Component Palette to the connecting line.
Double-click the populateXRefRow icon.
The Edit Function-populateXRefRow dialog is displayed.
Enter this information in the following fields:
xrefLocation: order.xref
referenceColumnName: Common
referenceValue: $initial.Customers/inp1:Customers/inp1:Order/inp1:Id
columnName: EBS_75
value: /db:OutputParameters/db:X_APP_ID
mode: LINK
Click OK.
The EBS_TO_COMMON_INSERT.xsl file appears, as shown in Figure 49-60.
Figure 49-60 EBS_TO_COMMON_INSERT.xsl Transformation

From the File menu, select Save All and close the EBS_TO_COMMON_INSERT.xsl file.
In the Synchronous Reply section, click the Assign Values icon.
The Assign Values dialog is displayed.
Click Add.
The Assign Value dialog is displayed.
In the From section, select Expression.
Click the Invoke Expression Builder icon.
The Expression Builder dialog is displayed.
In the Expression field, enter the following expression and click OK.
concat('INSERT-',$in.OutputParameters/db:OutputParameters/db:X_APP_ID,'.xml')
In the To section, select Property.
Select the jca.file.FileName property and click OK.
Click OK.
The insert operation section appears, as shown in Figure 49-61.
Figure 49-61 Insert Operation with EBS Target Service
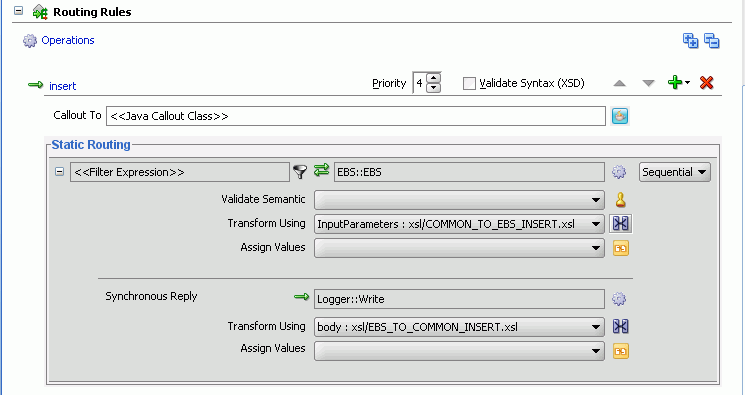
From the File menu, select Save All.
To create routing rules for the update operation:
Perform the following tasks to create routing rules for the update operation.
In the Routing Rules section, click the Create a new Routing Rule icon.
The Target Type dialog is displayed.
Select Service.
The Target Services dialog is displayed.
Navigate to XrefOrderApp > References > EBS.
Select EBS and click OK.
Click the Transformation icon next to the Transform Using field.
The Request Transformation map dialog is displayed.
Select Create New Mapper File and enter COMMON_TO_EBS_UPDATE.xsl.
Click OK.
The COMMON_TO_EBS_UPDATE.xsl file is displayed.
Drag and drop the inp1:Orders source element to the db:InputParameters target element.
The Auto Map Preferences dialog is displayed.
Click OK.
The transformation is created, as shown in Figure 49-39.
Drag and drop the lookupXRef function from the Component Palette to the line connecting inp1:id and db:X_APP_ID.
Double-click the lookupXRef icon.
The Edit Function: lookupXRef dialog is displayed.
Enter this information in the following fields:
xrefLocation: order.xref
referenceColumnName: Common
referenceValue: /inp1:Customers/inp1:Order/inp1:Id
columnName: EBS_i75
needException: true()
Click OK.
From the File menu, select Save All and close the COMMON_TO_EBS_UPDATE.xsl file.
In the Synchronous Reply section, click Browse for target service operations.
The Target Type dialog is displayed.
Select Service.
The Target Services dialog is displayed.
Navigate to XrefOrderApp > References > Logger.
Select Write and click OK.
Next to the Transform Using field, click the Transformation icon.
The Reply Transformation map dialog is displayed.
Select Create New Mapper File and enter EBS_TO_COMMON_UPDATE.xsl.
Click OK.
The EBS_TO_COMMON_UPDATE.xsl file is displayed.
Connect the db:X:APP_ID source element to db:X:APP_ID.
From the File menu, select Save All and close the EBS_TO_COMMON_UPDATE.xsl file.
In the Synchronous Reply section, click the Assign Values icon.
The Assign Values dialog is displayed.
Click Add.
The Assign Value dialog is displayed.
In the From section, select Expression.
Click the Invoke Expression Builder icon.
The Expression Builder dialog is displayed.
In the Expression field, enter the following expression, and click OK.
concat('UPDATE-',$in.OutputParameters/db:OutputParameters/db:X_APP_ID,'.xml')
In the To section, select Property.
Select the jca.file.FileName property and click OK.
Click OK.
The update operation section appears, as shown in Figure 49-62.
Figure 49-62 Update Operation with EBS Target Service
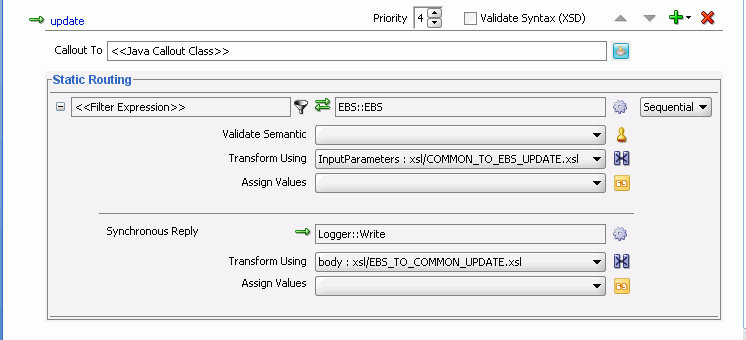
From the File menu, select Save All.
An application server connection is required for deploying your SOA composite application. For information about creating an application server connection, see Section 43.7.1.1.1, "Creating an Application Server Connection."
Deploying the XrefOrderApp composite application to the application server consists of the following steps:
Creating an application deployment profile
Deploying the application to the application server
For detailed information about these steps, see Section 43.7.1, "Deploying a Single SOA Composite in Oracle JDeveloper."