| Oracle® Enterprise Manager Cloud Control Basic Installation Guide 12c Release 2 (12.1.0.2) Part Number E22624-13 |
|
|
PDF · Mobi · ePub |
| Oracle® Enterprise Manager Cloud Control Basic Installation Guide 12c Release 2 (12.1.0.2) Part Number E22624-13 |
|
|
PDF · Mobi · ePub |
While installing Enterprise Manager Cloud Control, you must provide the details of a database where Oracle Management Repository (Management Repository) can be configured to store all Enterprise Manager-related data. Although the Enterprise Manager Cloud Control Installation Wizard is capable of configuring the Management Repository in the specified database, you can optionally choose to preconfigure the Management Repository in your database beforehand. This saves installation time.
To preconfigure the Management Repository in your database, use the database templates offered by Oracle. These database templates first create a database instance, and then preconfigure the Management Repository in it.
Caution:
You can use such a database instance for simple as well as advanced installation. However, note that the database templates are essentially designed for simple installation, although they can be used for advanced installation. The templates preconfigure the Management Repository with database parameters that are primarily required for simple installation.Therefore, while performing an advanced installation (possibly with small, medium, or large deployment size selection), when you provide the details of such a database, you will be prompted that the database parameters need to be modified to suit the deployment size you selected for advanced installation. You can confirm the message to proceed further. The installation wizard will automatically modify the database parameters to the required values.
To create a database instance with a preconfigured Oracle Management Repository using the database templates offered by Oracle, follow these steps:
Install Oracle Database 11g Release 2 (11.2.0.3) software on the host where you want to create the database.
Ensure that this is a software-only installation. That is, while using the Oracle Database Installation Wizard to install the database, on the Select Installation Option screen, select Install database software only.
For instructions, refer to the Oracle Database Installation Guide available at:
http://www.oracle.com/technetwork/database/enterprise-edition/documentation/index.html
From the following Oracle Technology Network (OTN) URL, download the DB11.2.0.3_EM_seed_database_<platform>.zip file specific to the platform on which you have installed Oracle Database 11g Release 2 (11.2.0.3).
http://content.oracle.com/technetwork/oem/enterprise-manager/downloads/index.html
Extract the DB11.2.0.3_EM_seed_database_<platform>.zip file to the following location on the database host.
<DB_HOME>/assistants/dbca/templates
Note:
Here,<DB_HOME> is the database home location you provided while performing the software-only installation of the database.The DB11.2.0.3_EM_seed_database_<platform>.zip file contains the following files:
DB11.2.0.3_EM_seed_database.dbc
DB11.2.0.3_EM_Seed_database.ctl
DB11.2.0.3_EM_Seed_database.dfb
Configure the listener by running Oracle Net Manager from <DB_HOME>/bin/netca.
Create the database by running Oracle Database Configuration Assistant from <DB_HOME>/bin/dbca and selecting DB11.2.0.3_EM_seed_database as the template.
WARNING:
When you run Oracle Database Configuration Assistant to create the database, on the Management Options screen, do NOT select Configure Enterprise Manager (EM) Database Express.
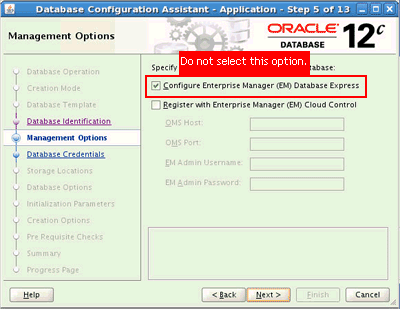
This option creates DB Control objects in the database. If you select this option, then you will not be able to use the database because it will contain both DB Control objects and Cloud Control objects. The only way to overcome this issue is to re-create the database, and then proceed.
|
Copyright © 2012, Oracle and/or its affiliates. All rights reserved. Legal Notices |
|