20 Creating and Managing Entities
A transaction is a process such as bill pay, wire transfer, address change, and so on. The core elements of an Oracle Adaptive Access Manager transaction are entities and transaction data. Entities can be defined and associated as an instance of a transaction.
This chapter provides information on creating, editing, activating and deactivating, and importing and exporting entities.
20.1 Introduction and Concepts
This section introduces you to the concept of entities.
20.1.1 Entities
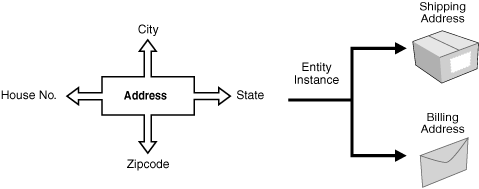
An Entity is a user-defined data structure, which comprises of a set of attributes. The entity can be re-used across different transactions. An example of an entity is an address. When associating the entity with a transaction you can create a shipping address and billing address from the address entity.
20.1.2 Data Elements
Data elements are used to describe the attributes that make up an entity. For example, the credit card entity has attributes such as address line 1, address line 2, city, zip, and state. Data elements, such as description, length, type, and so on, are used to describe each attribute.
20.1.3 Display Element
Display elements are the elements you want to present and the order in which you want to present the value of an entity in a user interface. For example, if you want to display an address, you would want to show address line 1 as the first item, address line 2 as the second item, city as the third item, state as the fourth item, and zipcode as the fifth item.
20.1.4 ID Scheme
An ID scheme consists of the data elements that can uniquely identify an entity, in other words, you are defining the unique combination that identifies the entity. For example, the credit card entity has many attributes, but the way to uniquely identify a credit card is by using the 16-digit credit card number. In that case, the ID scheme is just the credit card number.
Another example, the address entity has address line 1, address line 2, city, state, and zipcode as attributes. Address line 1, address line 2, and zipcode, without the state and city attributes, can still be used to identify the address uniquely.
20.1.5 Internal ID
The internal identifier used to identify a data element in the entity. It is created based on the display name. For example, if Address Line 1 is the display name, spaces between words are replaced by decimals to create an internal ID.
Examples of internal IDs are Address.Line.1, Address.Line.2, or Zip.Code.
The IDs are automatically created for you.
20.2 Navigating to the Entities Search Page
To navigate to the Entities Search page, double-click Entities in the Navigation tree.
Alternatively, you can:
-
Right-click Entities in the Navigation tree and select List Entities from the context menu.
-
Select Entities in the Navigation tree and then choose List Entities from the Actions menu.
-
Click the List Entities button in the Navigation tree toolbar.
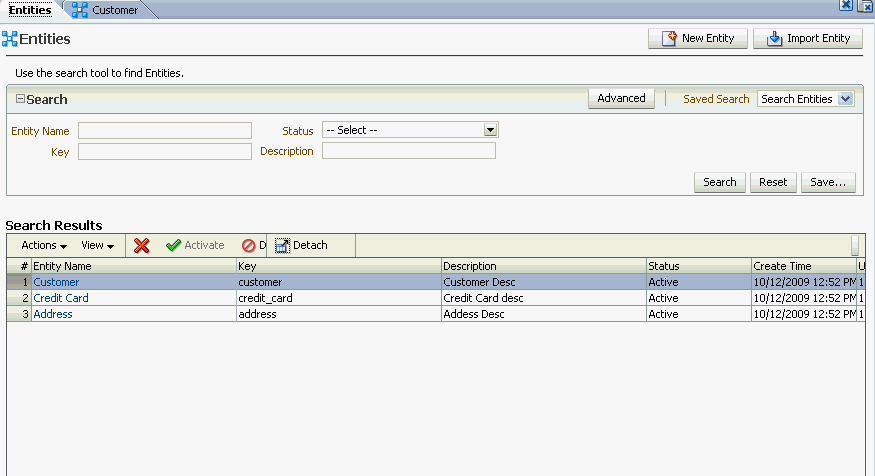
The Entities Search page is the starting place for managing entities. From the Entities Search page, you can:
-
Search for entities
-
Create new entities
-
Import/export entities
-
Activate/deactivate entities
-
Delete entities
-
Open the Entity Details page
An example of an Entities Search page is shown in Figure 20-2.
20.3 Searching for Entities
To search for entities:
-
Navigate to the Entities Search page, as described in Section 20.2, "Navigating to the Entities Search Page."
-
Specify criteria in the Search Filter to locate the entity.
The search filter criteria are described in Table 20-1.
-
Click Search.
The Search Results table displays a summary of entities that match the criteria specified in the Name, Description Keyword, and Status fields.
There is a link on the entity name. To view the entity details, click the link.
20.4 Creating an Entity
Follow the steps in this section to create a new entity. You will have to provide the required information for all tabs of the Entities Details page before you can activate the entity.
Note:
After creating an entity, you must activate it if you want to use it in a transaction. Only active entities can be used in a transaction. By default an entity is disabled when it is created. For information on activating an entity, refer to Section 20.9, "Activating Entities."
20.4.1 Initial Steps
To create an entity, follow these steps.
-
Navigate to the Entities Search page, as described in Section 20.2, "Navigating to the Entities Search Page."
-
In the Entities Search page, click the New Entity button.
Alternative methods to open create pages are listed in Section 3.9, "Search, Create, and Import."
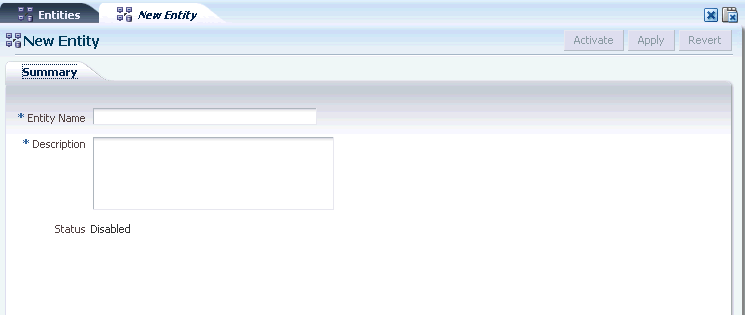
An example of a New Entity page is shown in Figure 20-3.
-
In the New Entity page, enter a unique entity name.
-
Enter a description about the data element. For example, you can enter "Credit card number of customer" or "Account number of customer."
-
Click Apply.
A confirmation dialog appears with a message that the entity was created successfully.
-
Click OK to dismiss the dialog.
The Entity Details page appears for the entity that you have just created.
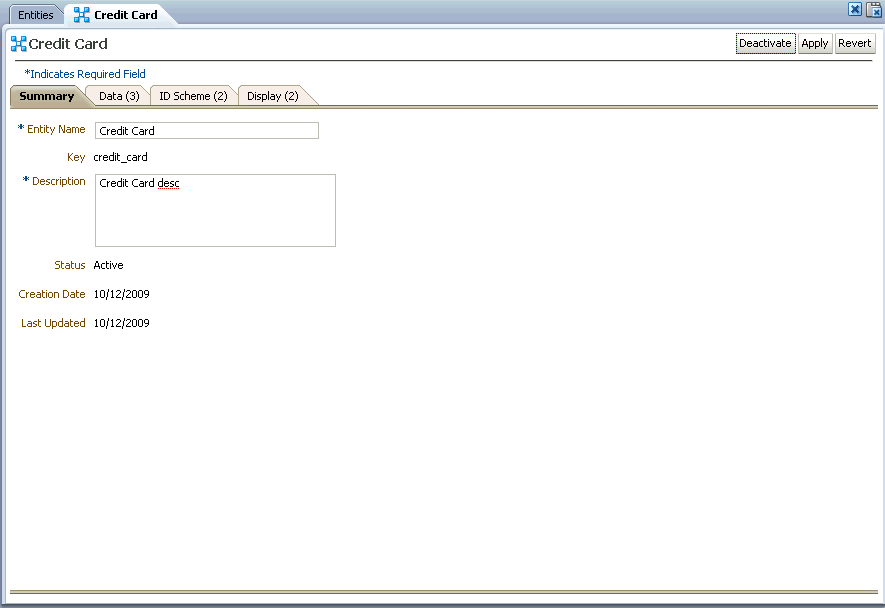
The page contains four tabs:
-
Summary - General Details
-
Data - Data Elements (Used for adding and editing data elements of entity)
-
ID Scheme - Data Elements (Used for adding and editing data elements of an entity)
-
Display - Display Elements (Used for adding and editing display elements of the entity based on the Identification Scheme)
The tab titles for Data, ID Scheme, and Display will show the number of data elements present, in parenthesis, when you have added your elements.
-
20.4.2 Adding and Editing Data Elements
The Data tab is used for adding and editing data elements of an entity.
In the Data tab, specify the data elements that are part of that entity.
For example, for an entity like Address, the elements are Address Line 1, Address Line 2, City, State and Zip code. Metadata elements, such as a label, description, data type, and so on, describe these elements of the entity.
Define the data elements for each element by following these instructions:
-
Enter a label.
For example, Address Line 1, Address Line 2, City, or Zip code.
-
Enter a description about the data element.
Data elements are the attributes of an entity.
For example, the address of the customer logging in.
-
Specify whether the element is required.
Some data elements are not populated all the time because the entity can function without this data. Those elements are marked as "not required." For example "Address Line 2" in an address is not required since many addresses do not have "Address Line 2."
-
Specify whether the element should be encrypted.
If Is Encrypted? is set to True, data is encrypted so that it can be stored securely in the database; thereby protecting sensitive data.
Encrypted fields have the following constraints:
-
These fields should not be used in rules. If they are used, you cannot specify regular values for comparing against these fields; the values will have to be encrypted values.
-
These fields cannot be used in the search criteria while querying for transactions through the query screen.
Numeric fields cannot be encrypted.
Encrypted fields can be displayed in OAAM Admin.
-
-
Specify the data element Data Type.
For example, String.
-
If you want to add another element, click the Add button on the toolbar and repeat Steps 1 through 7.
-
Click Save.
You can use the Delete button to delete the data elements within the entity.
Note:
The Row and Column values are automatically assigned based on the data type and should not be changed unless you want to rearrange values in the database.
20.4.3 Selecting Elements for the ID Scheme
In the ID Scheme tab, select the elements that you want to use to uniquely identify an entity.
For example, the credit card entity has many attributes, but the way to uniquely identify a credit card is by using the 16-digit credit card number. In that case, the ID scheme is just the credit card number.
Another example, the address entity has Address Line 1, Address Line 2, City, State, and Zip code as attributes. The Address Line 1, Address Line 2, and Zip code attributes can be used to identify the address uniquely. The State and City attributes are not necessary.
Address Line 1 alone would not uniquely identify an address. For example, 150 Main Street can exist in more than one location.
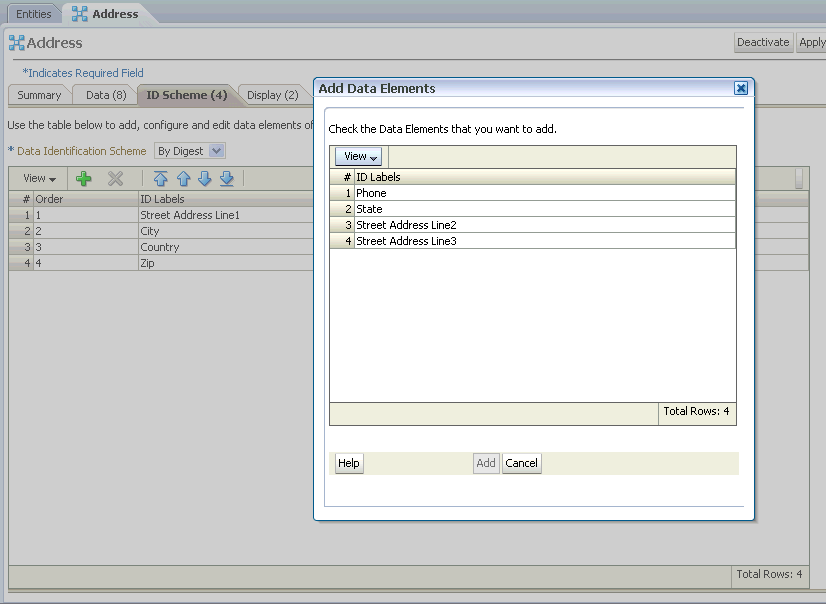
An example of a ID Scheme tab is shown in Figure 20-4.
-
Select the Data Identification Scheme.
Identification Scheme determines how an entity is uniquely identified using the elements that are part of the entity. The elements that are selected should be stored as plain text (key) or encrypted (digest).
-
By Key: This scheme creates a unique identifier by simply concatenating the selected elements of the entity.
-
By Digest: This scheme creates a unique identifier by hashing the values of the selected elements of the entity. The resultant key is usually cryptic. Use this scheme when the data values are large or if they need to be secured.
-
-
Click the Add button on the toolbar to add a data element.
-
In the Add Data Elements screen, select the data elements to add to the ID Scheme and click Add.
You can select one or several data elements to add to the identification scheme.
For example, you only need the 16-digit credit card number to identify the credit card.
After the data elements are added, they are not available in the list for further selection.
-
Select the order of the elements
The order determines how the data is concatenated while forming the data that identifies the entity. Order is not required and is automatically pre-filled if you do not fill in that information.
You can use the Delete button to delete the data elements within the entity.
20.4.4 Specifying Data for the Display Scheme
In the Display tab, define the display scheme. The display scheme specifies the data elements to present and their order when you display the value of the entity in reports:
-
The data elements form the entity data that can be displayed.
-
The order determines how the data is concatenated while forming the data to be displayed for the entity
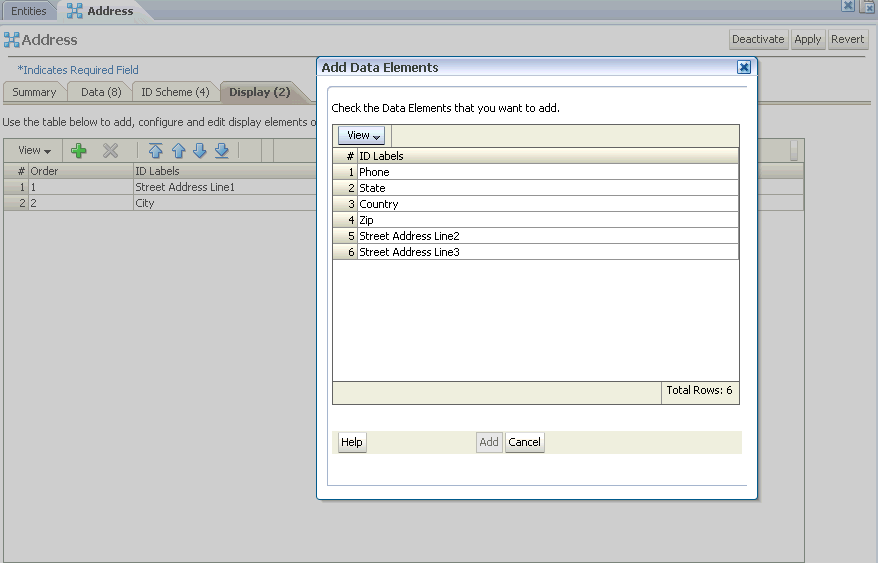
An example of a Display tab is shown in Figure 20-5.
The Data elements that you have selected to present are shown in the Transaction Details page.
To select the data elements, follow these steps.
-
Click the Add button to add a data element.
-
In the Add Data Elements screen, select the data elements to add for displaying and click Add.
For example, for an address, you can choose to present Address Line 1, City, State, and Zip code.
-
Select the order of the elements
The order determines what is shown first, second, third, and so on when the data is displayed for the entity. Order is not required and is automatically pre-filled if you do not fill in that information.
For example, if you want to display an address, you would want to show address line 1 as the first item, address line 2 as the second item, city as the third item, state as the fourth item, and Zip code as the fifth item.
You can use the Delete button to delete the display elements.
20.4.5 Activating the Entity
After creating an entity, you must activate it if you want to use it in a transaction. Only active entities can be used in a transaction. By default an entity is disabled when it is created. For information on activating an entity, refer to Section 20.9, "Activating Entities."
20.5 Viewing Details of a Specific Entity
To view the details of a specific entity:
-
Navigate to the Entities Search page, as described in Section 20.2, "Navigating to the Entities Search Page."
-
From the Entities Search page, search for the entity you want.
The filters are described in Table 20-1.
-
In the Results table, click the entity name.
An example of an Entity Details page is shown in Figure 20-6.
20.6 Editing the Entity
To edit the details of a specific entity:
Note:
Be cautious when editing entities. If you edit an entity and it is in several transactions, then the edits are applied to all instances of the entity in the different transactions.
-
If you are not on the Entity Details page of the entity you want to edit, follow the instructions in Section 20.5, "Viewing Details of a Specific Entity."
-
From the Summary tab, you can modify the name and description of the entity; and activate or deactivate the entity.
-
From Data and ID Schemes tabs, you can modify the data elements of the entity.
If you delete a data element from the scheme, it is added to the Add list and available the next time you select Add Data Elements.
-
From the Display tab, you can edit the way the entity is displayed.
-
Click Apply.
20.7 Exporting Entities
-
Navigate to the Entities Search page, as described in Section 20.2, "Navigating to the Entities Search Page."
-
In the Entities Search page, enter the search criteria you want and click Search. Refer to Section 20.3, "Searching for Entities."
-
Select the row for each entity you want to export.
-
Click the Export button or select Export Selected from the Actions menu.
-
In the Export Entities screen, click Export.
-
In the Save screen, click OK.
20.8 Importing Entities
-
Navigate to the Entities Search page, as described in Section 20.2, "Navigating to the Entities Search Page."
-
In the Entities Search page, click Import.
-
In the Entities Import screen, click Browse and locate the entity file you want to import.
-
Click OK.
20.9 Activating Entities
-
Navigate to the Entities Search page, as described in Section 20.2, "Navigating to the Entities Search Page."
-
In the Entities Search page, enter the search criteria you want and click Search. Refer to Section 20.3, "Searching for Entities."
-
Select the row for each entity you want to activate.
-
Press the Activate button.
When you press Activate, the entity is validated for errors (if data elements are present). If there are any errors, they must be fixed before the entity is activated.
Only active entities can be used in a transaction. Make sure to activate an entity definition if you want to use it in a transaction.
20.10 Deactivating Entities
-
Navigate to the Entities Search page, as described in Section 20.2, "Navigating to the Entities Search Page."
-
In the Entities Search page, enter the search criteria you want and click Search. Refer to Section 20.3, "Searching for Entities."
-
Select the row for each entity you want to deactivate.
-
Press the Deactivate button.
20.11 Deleting Entities
-
Navigate to the Entities Search page, as described in Section 20.2, "Navigating to the Entities Search Page."
-
In the Entities Search page, enter the search criteria you want and click Search. Refer to Section 20.3, "Searching for Entities."
-
Select the row for each entity you want to delete and select the Delete button from the toolbar.
If the entities selected for deletion are not used or linked to a transaction, a warning message is shown asking for confirmation.
If an entity is used, you will not be allowed to delete it.
-
Click Delete to delete the entities.
-
In the confirmation dialog, click Yes.
When multiple entities are selected for deletion and if there are transactions that contain the instances of some of the entities selected, a warning message is provided, stating "The following instances are linked to transactions and cannot be deleted. Do you want to delete the other entities?" If you click Delete, the unlinked entities are deleted.
If you deactivate an entity, it will not be available for you to use in transactions.
20.12 Re-ordering the Rows in the ID Scheme and Display tabs
After adding all the elements, you can reorder the columns by dragging and dropping the rows for the ID scheme and Display tabs. Both in ID Scheme and Display tabs, order is important.
The order of the rows in the ID scheme tab determines how information is stored in database and used uniquely identify.
The order of the rows in the Display tab determines the order in which information is presented.
For example, in the display, you may want "City, State, Zip code" for addresses in the UK and USA.
20.13 Best Practices
This section outlines some best practices for entity creation.
-
Any sensitive data, such as credit card and social security numbers, should be encrypted in the database.
-
Do not change the external ID. The external ID references how data is identified in the application.
-
In order for Oracle Adaptive Access Manager to perform analysis on transactions, you must determine how to represent the transactions in Oracle Adaptive Access Manager, how to process the data coming in, how to use the data, and how to display the data. For example, in an eCommerce transaction, the data involved are credit card numbers, shipping and billing addresses, names, dollar amounts and so on; for a wire transfer, the data involved are Amount, Name, To account, From account, Routing Number, Bank Address, Bank Phone, and so on. Determining which items in a transaction are entities and creating the entities saves time, improves performance in the system, decreases the amount of data created, and enables rules using the entity to run faster than if they had used transactional data.
An entity can be used and reused in multiple places, which makes creating transaction definitions much easier. An example of an entity that can be reused is an address. A shipping address and billing address can be created for different transactions from the address entity. If you had defined address as transactional data, you would have to define it twice.
-
If you want to rearrange the fields in the database for performance purposes, you can modify the row and column values. Only the first 3 columns out of the ten are indexed by default. Rearranging the fields impacts performance.
