14 Adding Translations for the BI Publisher Catalog and Reports
This chapter describes how to export and import translation files both for the catalog and for individual report layouts.
It covers the following topics:
14.1 Introduction
BI Publisher supports two types of translation:
-
Catalog Translation
-
Template (or layout) Translation
Catalog translation enables the extraction of translatable strings from all objects contained in a selected catalog folder into a single translation file; this file can then be translated and uploaded back to BI Publisher and assigned the appropriate language code.
Catalog translation extracts not only translatable strings from the report layouts, but also the user interface strings that are displayed to users, such as catalog object descriptions, report parameter names, and data display names.
Users viewing the catalog see the item translations appropriate for the UI Language they selected in their My Account preferences. Users see report translations appropriate for the Report Locale that they selected in their My Account preferences.
Template translation enables the extraction of the translatable strings from a single RTF-based template (including sub templates and style templates) or a single BI Publisher layout template (.xpt file). Use this option when you only need the final report documents translated. For example, your enterprise requires translated invoices to send to German and Japanese customers.
This chapter describes the process of downloading and uploading translation files. For more information on the concepts and processes of translating the files see the part "Translating Reports and Catalog Objects" in Oracle Fusion Middleware Report Designer's Guide for Oracle Business Intelligence Publisher.
14.2 Exporting and Importing a Catalog Translation File
This procedure describes the process of exporting an XLIFF file from the catalog, importing the translated file back to the catalog, and testing the translation. Importing and exporting XLIFF files can only be performed by an Administrator.
To import and export an XLIFF file:
-
Select the folder in the catalog, click the Translation toolbar button, and then click Export XLIFF.
-
Save the XLIFF file to a local directory.
-
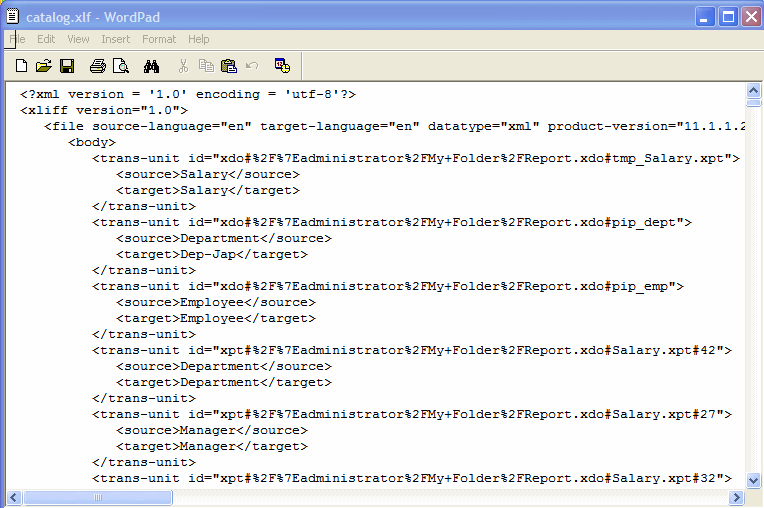
Open the Translation file (catalog.xlf) and apply translations to the Boilerplate text, as shown in Figure 14-1.
See the "What Is an XLIFF?" section in Oracle Fusion Middleware Report Designer's Guide for Oracle Business Intelligence Publisher for details on how to translate an XLIFF file.
-
After the file is translated, upload the XLIFF file to the BI Publisher server: Click the Translation toolbar button, then click Import XLIFF. Upload the translated XLIFF to the server.
-
To test the translation, select My Account from Signed In As in the global header.
-
On the General tab of the My Account dialog, change the Report Locale and the UI Language preferences to the appropriate language and click OK.
-
View the objects in the translated folder.
14.3 Template Translation
Template translation includes:
-
RTF templates
-
RTF sub templates
-
Style templates
-
BI Publisher templates (.xpt)
RTF and BI Publisher (.xpt) templates can be translated from the Properties page. To access the Properties page, click the Properties link for the layout in the Report Editor, as shown in Figure 14-2.
Figure 14-2 Accessing the Properties Page

Description of "Figure 14-2 Accessing the Properties Page"
From the Properties page you can generate an XLIFF file for a single template. Click Extract Translation to generate the XLIFF file.
14.3.1 Generating the XLIFF File from the Layout Properties Page
To generate the XLIFF file for report layout templates:
-
Navigate to the report in the catalog and click Edit to open it for editing.
-
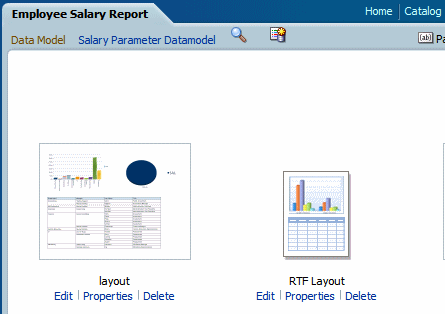
From the thumbnail view of the report layouts, click the Properties link of the layout (RTF or XPT) to open the Layout Properties page.
-
In the Translations region, click Extract Translation.
BI Publisher extracts the translatable strings from the template and exports them to an XLIFF (.xlf file).
-
Save the XLIFF to a local directory.
To generate the XLIFF file for style templates and sub templates:
-
Navigate to the style template or sub template in the catalog and click Edit to open the Template Manager.
-
In the Translations region, click Extract Translation.
BI Publisher extracts the translatable strings from the template and exports them to an XLIFF (.xlf file).
-
Save the XLIFF to a local directory.
14.3.2 Translating the XLIFF File
When you have downloaded the XLIFF file, it can be sent to a translation provider, or using a text editor, you can enter the translation for each string. See Structure of the XLIFF File, Oracle Fusion Middleware Report Designer's Guide for Oracle Business Intelligence Publisher for instructions on how to edit the XLIFF file.
A "translatable string" is any text in the template that is intended for display in the published report, such as table headers and field labels. Text supplied at runtime from the data is not translatable, nor is any text that you supply in the Microsoft Word form fields.
You can translate the template XLIFF file into as many languages as desired and then associate these translations to the original template.
14.3.3 Uploading the Translated XLIFF File to BI Publisher
To upload the translated XLIFF file:
-
Navigate to the report, sub template, or style template in the catalog and click Edit to open it for editing.
For reports only:
From the thumbnail view of the report layouts, click the Properties link of the layout to open the Template Manager.
-
In the Translations region, click the Upload toolbar button.
-
In the Upload Translation File dialog, locate the file in the local directory and select the Locale for this translation.
-
Click OK to upload the file and view it in the Translations table.
14.4 Using the Localized Template Option
If you need to design a different layout for the reports that you present for different localizations, then you can create new RTF file that is designed and translated for the locale and upload this file to the Template Manager.
Note:
The localized template option is not supported for XPT templates.
The process overview for using the localized template option is described in the following sections:
14.4.1 Designing the Localized Template File
Use the same tools that you used to create the base template file, translating the strings and customizing the layout as desired for the locale.
14.4.2 Uploading the Localized Template to BI Publisher
To upload the localized template:
-
Navigate to the report, subtemplate, or style template in the catalog and click Edit to open it for editing.
For reports only:
From the thumbnail view of the report layouts, click the Properties link of the layout to open the Template Manager.
-
In the Templates region, click the Upload toolbar button.
-
In the Upload Template File dialog, locate the file in the local directory, select rtf as the Template Type and select the Locale for this template file.
-
Click OK to upload the file and view it in the Templates table.
