3 Preparing to Install WebCenter Sites on Oracle WebLogic Application Server
This chapter contains information about configuring WebLogic Server to support your WebCenter Sites web application.This document contains the following sections:
-
Section 3.1, "Quick Reference for Setting Up WebLogic Application Server"
-
Section 3.2, "Step 1: Configuring WebLogic Application Server"
-
Section 3.3, "Step 2: Integrating Oracle WebLogic Server with a Supported Web Server"
Note:
Before starting the procedures in this chapter, ensure you have completed the prerequisite steps described in Chapter 2, "Prerequisites for Installing WebCenter Sites."3.1 Quick Reference for Setting Up WebLogic Application Server
This section contains the following topics:
3.1.1 Summary of Steps
Complete the steps below for each development, content management, and delivery environment on which you have installed the application server.
Step 1: Configuring WebLogic Application Server
-
Create a WebLogic domain, as shown in Section 3.2.1, "Creating a WebLogic Domain." This step requires you to create a domain with an admin server.
-
Configure the WebLogic domain as shown in Section 3.2.2, "Configuring the WebLogic Domain." This step requires you to:
-
Create a machine for each physical server that will be running a WebLogic server. For instructions, see Section 3.2.2.1, "Creating Machines."
-
If you are configuring a cluster environment, create and configure a cluster as described in Section 3.2.2.2, "Creating and Configuring a Cluster."
-
Create and configure one or more WebLogic managed servers. For instructions, see Section 3.2.2.3, "Creating and Configuring Managed Servers."
-
Create and configure a data source as described in Section 3.2.2.4, "Creating and Configuring a Data Source."
-
Set Java options, as described in Section 3.2.2.5, "Setting Java Options."
-
Set classpath, as described in Section 3.2.2.6, "Setting the Classpath."
-
If you are configuring a multi-server environment, transfer any remote managed servers to their remote physical servers, as described in Section 3.2.2.7, "Transfer Remote Managed Servers."
-
Step 2: Integrating WebLogic Application Server with a Supported Web Server
If your environment requires a web server, you have the option to integrate WebLogic application servers with an Oracle, Apache, or IIS web server, as described in:
3.1.2 Paths and Directories Used in This Chapter
Table 3-1 lists paths and directories used in this chapter.
Table 3-1 Paths and Directories Used in Configuring WebLogic Application Server
| Name | Description |
|---|---|
|
|
Path to the directory where WebCenter Sites is installed; the path does not include the name of the WebCenter Sites application. |
|
|
Path to the shared folder on the given system; the path includes the name of the shared folder. |
|
|
The projected path of the exploded WebCenter Sites web application. The WebCenter Sites installer uses a specified deployment directory ( |
|
|
Path to the directory where WebLogic is installed. The path includes the name of the directory. |
|
|
Path to the WebLogic domain. The path includes the domain name. |
|
|
Path to the directory where the Apache web server is installed. The path includes the name of the directory. |
3.1.3 Start/Stop Commands for WebLogic Server
This section lists commands that are used in this guide for managing WebLogic Server.
Note:
We assume that you are using a UNIX-based system. For Windows-based installations, the commands end in either.cmd or .bat extensions.-
Start the admin server:
<domain_home>/bin/startWebLogic.sh -
Stop the admin server:
<domain_home>/bin/stopWebLogic.sh -
Start the node manager:
<weblogic_home>/wlserver_10.3/server/bin/startNodeManager.sh -
Start a managed server:
<domain_home>/bin/startManagedWebLogic.sh <managed_server_name> http://<admin_server_host>:<admin_port> -
Stop a managed server:
<domain_home>/bin/stopManagedWebLogic.sh <managed_server_name> http://<admin_server_host>:<admin_port>
3.2 Step 1: Configuring WebLogic Application Server
To configure the WebLogic application server, you will complete the following steps:
3.2.1 Creating a WebLogic Domain
In the steps below, you will be creating a WebLogic domain and configuring an admin server. In a multi-server non-clustered environment, you may create a single domain and administer all local and remote servers from a single administration console, or create a domain for each standalone server. In a clustered environment, create the domain on the primary cluster member.
To create and configure a WebLogic Server domain
-
Change directories to
<weblogic_home>/wlserver_10.3/common/binand runconfig.sh(.cmdfor Windows). -
Create a domain:
-
In the Welcome screen, select Create a new WebLogic domain and click Next.
-
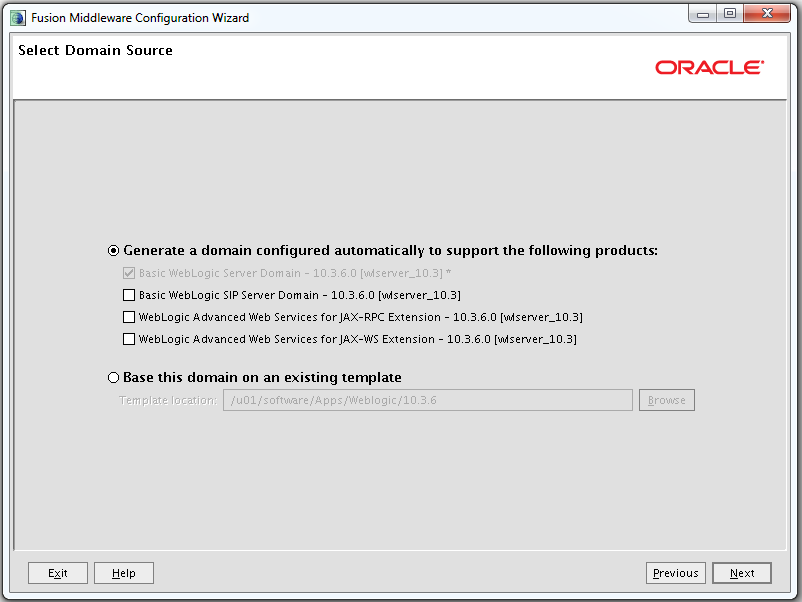
In the Select Domain Source screen, select Generate a domain configured automatically to support Basic WebLogic Server Domain (Figure 3-1) and click Next.
-
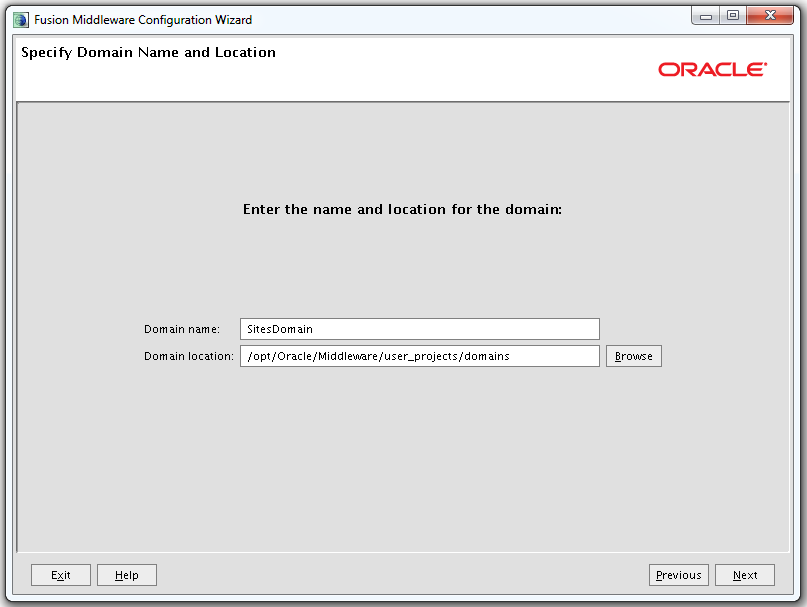
In the Specify Domain Name and Location screen, enter the name and path of the WebLogic domain (Figure 3-2). Click Next.
Note:
The path to the domain will be referred to throughout this guide as<domain_home>. -
In the Configure Administrator Username and Password screen, enter a user name and password for the WebLogic domain (Figure 3-3). Click Next.
Figure 3-3 Administrator User Name and Password
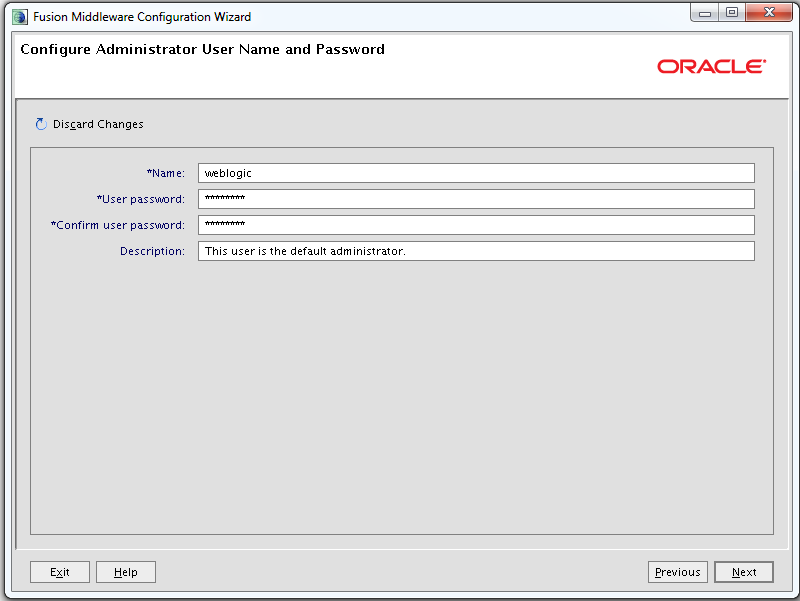
Description of ''Figure 3-3 Administrator User Name and Password''
-
In the Configure Server Start Mode and JDK screen, select Development Mode and the preferred SDK (in the WebLogic Supplied JDKs list box). See Figure 3-4. For production environments, the domain will be changed to Production Mode later in this guide in Section 6.7, "Switching WebLogic Application Server to Production Mode (Delivery Systems Only)." Click Next.
Note:
If a JRockit JDK is used, then you must create an optimization file containing the following:{ match: [ "net/sf/ehcache/Cache.get*","com/fatwire/cache/ehcache/EhCacheObjectCache._get*","com/fatwire/cache/ehcache/EhCacheObjectCache.get*","net/sf/ehcache/Cache.isExpired*" ], hotspot : { enable : false },}This file needs to be copied to each physical server where a WebLogic server is run.
Figure 3-4 Server Start Mode and JDK Configuration
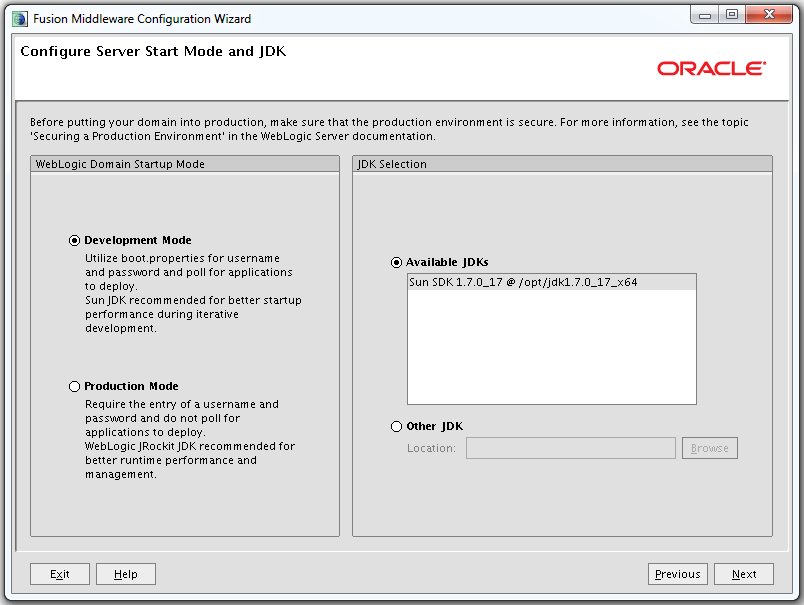
Description of ''Figure 3-4 Server Start Mode and JDK Configuration''
-
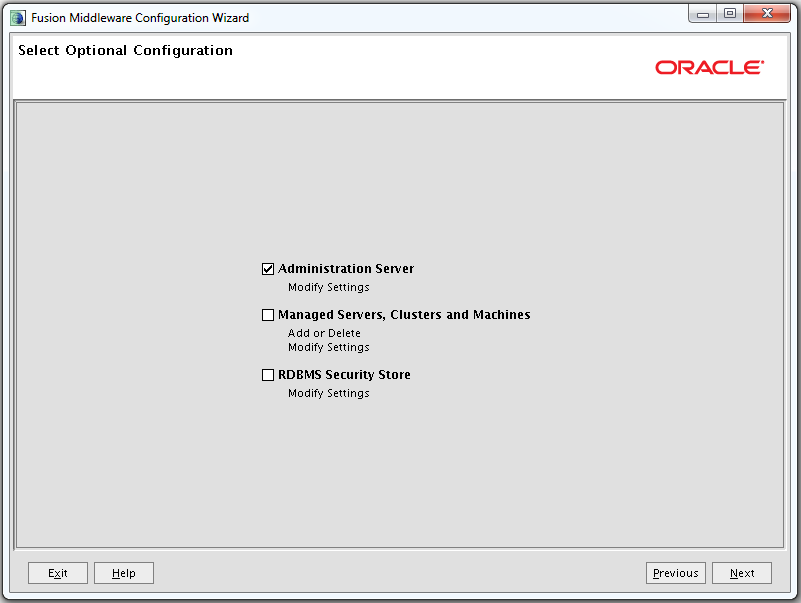
In the Select Optional Configuration screen, select Administration Server (Figure 3-5). Managed Servers, Clusters, and Machines will be created and configured later in the guide. Click Next.
-
-
Configure the admin server (Figure 3-6):
-
Enter the admin server's name, address, and port.
-
If you want to use SSL, select SSL enabled and include the port for it to run on (recommended for Delivery).
-
Click Next.
Figure 3-6 Administration Server Configuration
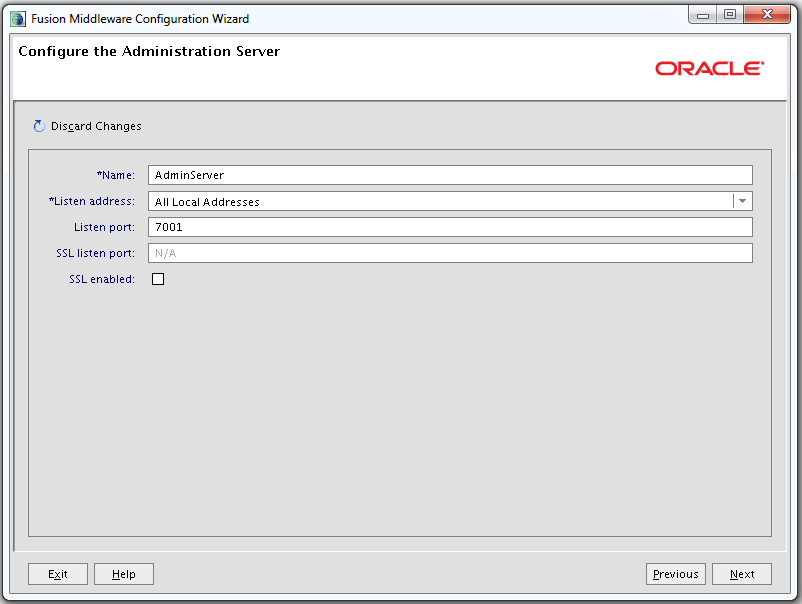
Description of ''Figure 3-6 Administration Server Configuration''
Note:
Throughout this guide, the values that you entered will be referred to as<admin_server_host>and<admin_port>.
-
-
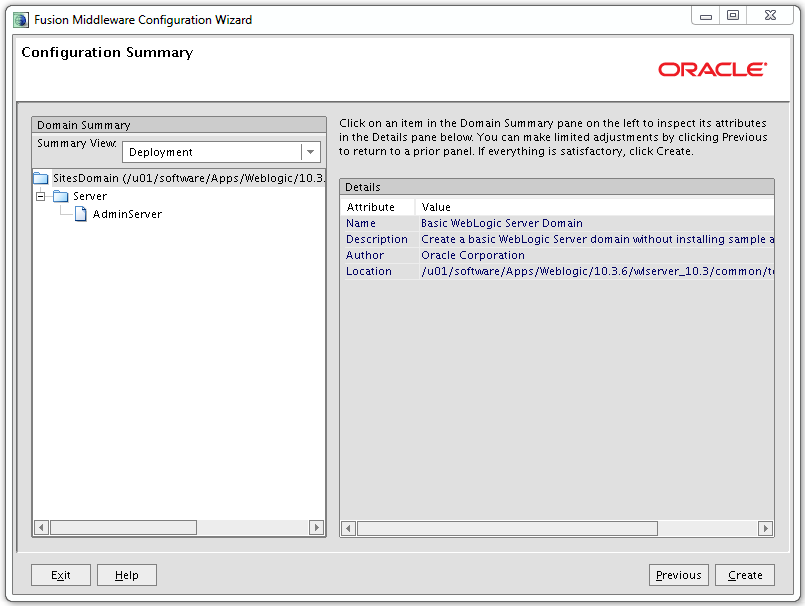
Review the domain configuration (Figure 3-7) and click Create.
-
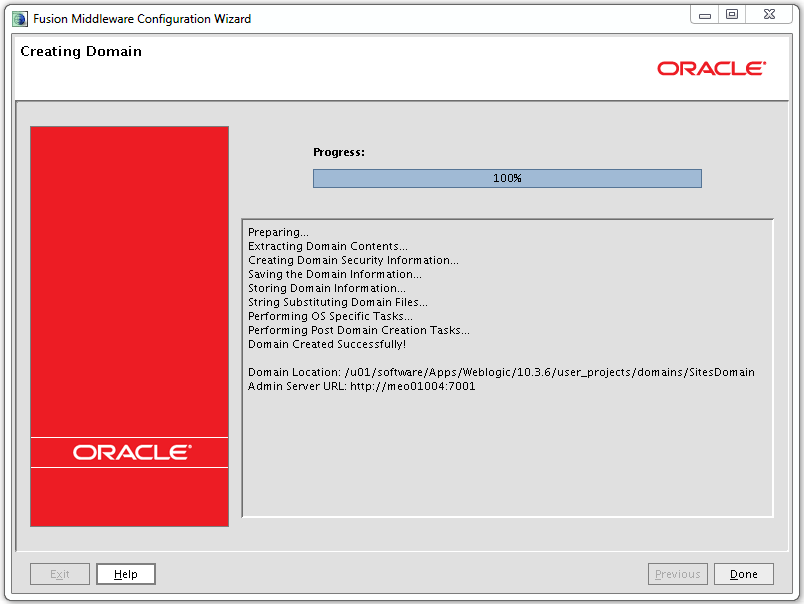
The domain installation begins (Figure 3-8). When the installation is complete, click Done.
3.2.2 Configuring the WebLogic Domain
In this section, you will complete the steps listed below:
3.2.2.1 Creating Machines
A machine is a logical representation of a physical server that hosts one or more WebLogic servers. The Administration Server uses a machine definition with Node Manager to start remote servers.
To create machines:
-
Start the administration server.
<domain_home>/bin/startWebLogic.sh
-
Log in to the WebLogic Server Administration Console:
http://<admin_server_host>:<admin_port>/console
-
In the tree on the left, expand Environment and click Machines.
-
For each physical server that will have a WebLogic server running complete the following steps:
-
Click New.
-
Enter a Name.
-
Select an OS.
-
Click Next.
-
If you want to use a secure listener, select SSL, otherwise select Plain.
-
Enter a Listen Address.
-
Modify the port as needed.
-
Click Finish.
-
3.2.2.2 Creating and Configuring a Cluster
In a cluster environment, all WebLogic servers belong to a cluster, and communication between the servers is managed by the application server.
-
From the Administration Console, expand Environment and click Clusters.
-
Create a cluster:
-
Click New.
-
Enter a cluster name.
-
Select Multicast.
-
Modify the Multicast Address as needed.
-
Enter an unused port for Multicast Port.
-
Click OK.
-
-
(Optional) Enable Session Persistence:
-
Click the newly created cluster and select the Replication tab.
-
For Cross-cluster Replication Type, select MAN (Synchronous) HTTP Session State Replication.
-
Leave Remote Cluster Address blank.
-
For Replication Channel, enter a name for the channel to be used for replication traffic. This name should be unique for each cluster in the domain. Later in the guide, a network channel with this name will be created for every server in the cluster.
-
Click Save.
-
-
Continue to Section 3.2.2.3, "Creating and Configuring Managed Servers."
3.2.2.3 Creating and Configuring Managed Servers
For each server that will be managed by this Administration Console (all servers in a cluster environment), complete the steps below:
To create and configure managed servers:
-
From the Administration Console, expand Environment and click Servers.
-
Create a Managed Server:
-
Click New.
-
Enter a Server Name, Server Listen Address, and Server Listen Port.
-
If the server is part of a single-server or multi-server load balanced environment, select No, this is a stand-alone server. If the server is part of a cluster environment, select Yes, make this server a member of an existing cluster and select the name of the cluster created in Section 3.2.2.2, "Creating and Configuring a Cluster."
-
Click Next.
-
Click Finish.
-
-
Associate the server with a Machine:
-
Click the newly created server.
-
For Machine, select the machine corresponding to the physical server this WebLogic server will be running on.
-
Click Save.
-
-
In order to manipulate a server and its deployments using the
weblogic. Deployerandweblogic.Adminutilities, tunneling must be enabled.Enable Tunneling:
-
Click the Protocols tab.
-
Select the Enable Tunneling checkbox.
-
Click Save.
-
-
Create the Replication Channel:
Note:
If this is not a cluster environment or session persistence will not be used, skip this step.-
From the Protocols tab, click the Channels tab.
-
Click New.
-
Enter the name of the replication channel specified in step 3 in Section 3.2.2.2, "Creating and Configuring a Cluster."
-
For Protocol, select http.
-
Click Next.
-
Leave the addresses blank and the default ports.
-
Click Finish.
-
3.2.2.4 Creating and Configuring a Data Source
This section explains how to create a data source for any of the supported databases using the Administration Console.
-
(DB2 Only) Add the IBM DB2 Driver jar files to the domain classpath.
-
Stop the administration server.
<domain_home>/bin/stopWebLogic.sh
Note:
db2jcc4.jaris not supported. -
Copy the
db2jcc.jaranddb2jcc_license_cu.jarfrom DB2 to a location that can be added to the domain classpath. -
Open
<domain_home>/bin/setDomainEnv.shin a text editor and search for the following line:# ADD EXTENSIONS TO CLASSPATHS
-
Add the following line after it:
PRE_CLASSPATH="<path_to_db2jcc.jar>:<path_to_db2jcc_license_cu.jar>:${PRE_CLASSPATH}" -
Save the changes.
Note:
In order to create a DB2 data source, you must first download and apply WebLogic Patches 13536596 and 13870996. -
Start the administration server.
-
-
From the Administration Console, expand Services and click Data Sources.
-
Create a Data Source:
-
Click New and select Generic Data Source.
-
For JNDI name, enter a name. Throughout this guide, the value entered will be referred to as
<jndi_name>. -
For Database Type, select one of the supported databases: Oracle, MS SQL Server, or DB2.
-
Click Next.
Figure 3-9 New JDBC Data Source - JNDI Name and Database Type
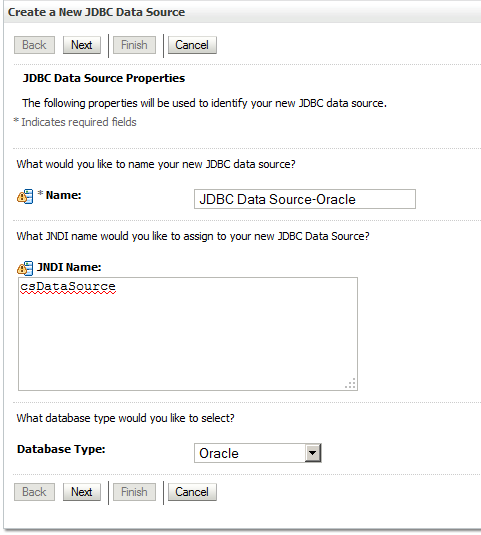
Description of ''Figure 3-9 New JDBC Data Source - JNDI Name and Database Type''
-
For Database Driver, select the option below that corresponds to the type chosen for step c:
Oracle - Oracle's Driver (Thin) for Instance connections;  Versions:9.0.1 and later
MS SQL Server - Oracle's MS SQL Server Driver (Type 4) Versions:7.0 and later
DB2 - Other (IBM DB2 Universal JDBC Type 4 Driver will be used)
Note:
XA Data Sources are not supported by WebCenter Sites. -
Click Next.
-
Check that Supports Global Transactions and One-Phase Commit are selected, and click Next.
-
For Connection properties, enter values for Database Name, Host Name, Port, Database User Name, and Password.
For DB2, only User Name and Password can be entered.
Figure 3-10 New JDBC Data Source - Connection Properties
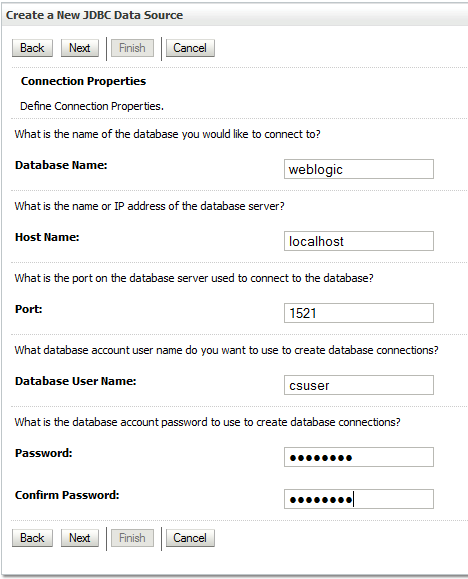
Description of ''Figure 3-10 New JDBC Data Source - Connection Properties''
-
Click Next.
-
(DB2 Only) For Driver Class Name, enter com.ibm.db2.jcc.DB2Driver. For URL, enter the following:
jdbc:db2://<db_host>:<db_port>/<db_name>. For Properties, enter user=<db_user_name>
-
Verify that the data source information is correct, and click Test Configuration. If the test fails, review your data source information and try again. When the test succeeds, click Next.
Figure 3-11 Data Source Information Verification
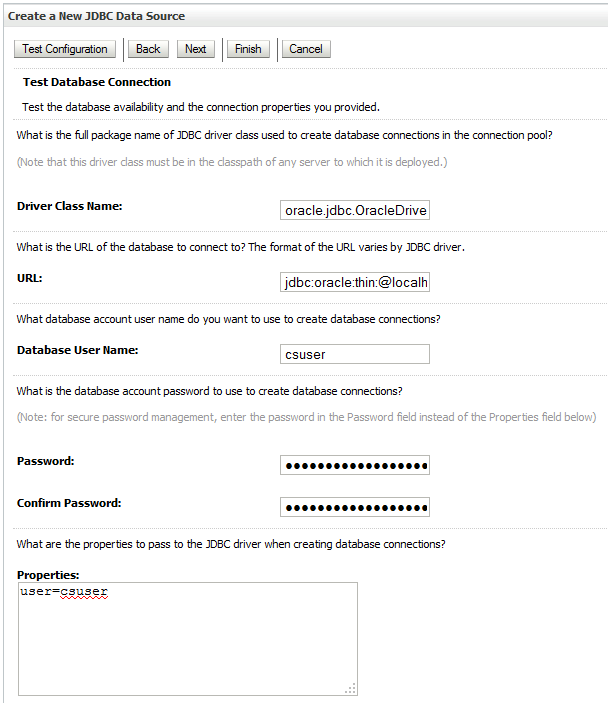
Description of ''Figure 3-11 Data Source Information Verification''
-
Select the administration server as well as all managed servers that require access to the data source. In a cluster environment, select the cluster instead of selecting individual managed servers.
-
Click Finish.
-
-
Configure the Connection Pool Size:
-
Click the newly created data source.
-
Click the Connection Pool tab.
-
For Initial Capacity, enter
10and for Maximum Capacity, enter100.Note:
These are recommended values that may be changed as your environment requires.Figure 3-12 Configuration - Connection Pool
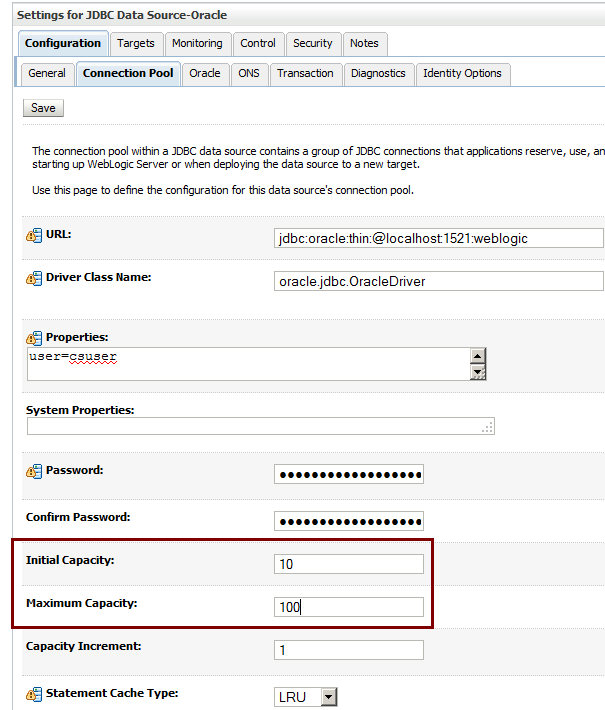
Description of ''Figure 3-12 Configuration - Connection Pool''
-
Click Save.
-
3.2.2.5 Setting Java Options
This section explains how to set memory arguments as well as add Java options required by WebCenter Sites.
Note:
If a JRockit JDK will be used, you must create an optimization file containing the following:
{ match: [ "net/sf/ehcache/Cache.get*",
"com/fatwire/cache/ehcache/EhCacheObjectCache._
get*","com/fatwire/cache/ehcache/EhCacheObjectCache.get*",
"net/sf/ehcache/Cache.isExpired*" ],
hotspot : { enable : false },}
-
Stop the administration server.
-
Set Memory Arguments
-
Open
<domain_home>/bin/setDomainEnv.shin a text editor and search for the following:WLS_MEM_ARGS
-
Set the value for
WLS_MEM_ARGS_64BITorWLS_MEM_ARGS_32BITfor both Sun and JRockit. The recommended value is-Xms2048m -Xmx16834m. -
Save the changes.
-
-
Add the required Java options to WebCenter Sites:
-
Open
<domain_home>/bin/startWebLogic.shin a text editor and search for the following line (located below the Start Derby section):JAVA_OPTIONS="${SAVE_JAVA_OPTIONS}" -
Modify the line by adding the following Java options:
-
-Dfile.encoding=UTF-8This option specifies UTF-8 file encoding.
-
-Dnet.sf.ehcache.enableShutdownHook=trueThis option enables the Ehcache shutdown hook.
-
-Djava.net.preferIPv4Stack=trueThis option specifies the use of IPv4 addresses.
-
-
Duser.timezone=UTCThis option is used to set the time zone for the JVM. It is recommended to set the value to
UTCacross all WebCenter Sites installations. However, you can set any preferable time zone as long as this value is the same for all WebCenter Sites installations. -
-Djava.io.tmpdir=<path_to_sites_tmpdir>This option specifies which temporary directory the JVM uses. The value should be the path to the directory created in Section 2.1, "Before You Begin."
-
(JRockit JDK only) -XX:+UnlockDiagnosticVMOptions -XX:OptFile=<path_to_optimization_file>These options are required when using a JRockit JDK. They signal the JVM to use the optimization file that was created in Section 3.2.1, "Creating a WebLogic Domain."
Note:
IfShift-JIScharacters will be used, add the following option:-Dcs.useJavaURLDecoder=false
After making the above changes, the modified line should look as follows:
JAVA_OPTIONS="-Dfile.encoding=UTF-8 -Dnet.sf.ehcache.enableShutdownHook=true -Djava.net.preferIPv4Stack=true -Duser.timezone=UTC -Djava.io.tmpdir=<path_to_sites_tmpdir> ${SAVE_JAVA_OPTIONS}" -
-
Save the changes.
-
3.2.2.6 Setting the Classpath
This section explains how to add paths required for WebCenter Sites to the application server classpath. To ensure a class is loaded first, it is added to the PRE_CLASSPATH variable.
-
Add the required paths to
CLASSPATHfor WebCenter Sites.-
Open
<domain_home>/bin/startWebLogic.shin a text editor and search for the following line (located below the Start Derby section):CLASSPATH="${SAVE_CLASSPATH}" -
Modify the line by adding the following path:
<sites_install_dir>/bin
This path contains the required WebCenter Sites and CAS configuration files. Without this path, the CAS web application will not start and the System Tools node in the Admin tab of the WebCenter Sites Admin interface will have reduced functionality.
-
Save the changes.
-
-
Add the required paths to
PRE_CLASSPATHfor WebCenter Sites.-
Open
wlserver_10.3/server/bin/startNodeManager.shin a text editor and search for the following line:# Get PRE and POST environment if [ ! -z "${PRE_CLASSPATH}" ]; then CLASSPATH="PRE_CLASSPATH="<sites_deploy_home>/WEB-INF/lib/commons-lang-2.4.jar:${PRE_CLASSPATH}"${CLASSPATHSEP}${CLASSPATH}" -
Add the following line after it:
PRE_CLASSPATH="<sites_deploy_home>/WEB-INF/lib/commons-lang-2.4.jar:${PRE_CLASSPATH}"This JAR is located in the
libdirectory of the exploded WebCenter Sites web application. For the WebCenter Sites Contributor interface to load properly, this JAR must be loaded to the classpath prior to the other versions of its classes.Note:
This changes affects all domains. -
Save the changes.
-
3.2.2.7 Transfer Remote Managed Servers
This section explains how to transfer any remote managed servers that were created using the administration console, to the physical servers they will be running on.
-
Make sure that all servers in the domain are shutdown.
-
Create a template from the domain that was created on the primary server. Run the following command from
<weblogic_home>/wlserver10.3/common/bin:./pack.sh -managed=true -domain=<domain_home> -template=<template_creation_location>/<template_name>.jar -template_name="<template_name>" For example: ./pack.sh -managed=true -domain=/opt/Oracle/Middleware/user_projects/domains/SitesDomain -template=/opt/Downloads/SitesDomainTemplate.jar -template_name="SitesDomainTemplate"
-
For each remote server, complete the following steps:
-
Copy the newly created template to the remote server.
Note:
The remote server should already have WebLogic server installed. -
Unpack the managed server and required domain files from the copied template.
The domain will be created in the same location as the primary server.
-
Run the following command from
<weblogic_home>/wlserver10.3/common/bindirectory:./unpack.sh -domain=<domain_home> -template=<template_location>/<template name>.jar
For example:
./unpack.sh -domain=/opt/Oracle/Middleware/user_projects/domains/SitesDomain -template=/opt/Downloads/SitesDomain.jar
-
Copy the
<domain_home>/bin/startWebLogic.shand<domain_home>/bin/setDomainEnv.shfiles from the primary server to the<domain_home>/bindirectory of the remote server. The modified files are not included in the template. -
Modify the files and make any changes to reflect differences in the paths or options added in Section 3.2.2.5, "Setting Java Options" and Section 3.2.2.6, "Setting the Classpath."
-
Save the changes.
-
3.3 Step 2: Integrating Oracle WebLogic Server with a Supported Web Server
This chapter provides guidelines for integrating WebLogic Server with your choice of supported web servers.
This chapter contains the following sections:
3.3.1 Configuring the Oracle HTTP Server
Follow these steps to configure Oracle HTTP Server with the mod_wl_ohs plugin for use with WebLogic.
-
Open
<ohs_instance>/config/OHS/<server_name>/mod_wl_ohs.confin a text editor and add the following before the commented Location tag:Single Server Environment
<IfModule mod_weblogic.c>
   WebLogicHost {weblogic_host}
   WebLogicPort {weblogic_port}
</IfModule>

<Location /{sites_context_root}>
  SetHandler weblogic-handler
</Location>

<Location /cas>
  SetHandler weblogic-handler
</Location>
Multi Server Environment
<IfModule mod_weblogic.c> WebLogicCluster {weblogic_host1}:{weblogic_port1},{weblogic_host2}:{weblogic_port2} </IfModule> <Location /{sites_context_root}> SetHandler weblogic-handler</Location> <Location /cas> SetHandler weblogic-handler </Location> -
Save the changes.
-
Restart the web server.
3.3.2 Configuring the Apache HTTP Server
This section explains how to configure Apache 2.2.x HTTP server with the mod_wl plugin to use this plugin with WebLogic.
To configure the mod_wl plug-in
-
Ensure that
mod_so.cis enabled. Run<apache_home>/bin/apachectl –l. Ifmod_so.cis not in the list that is printed, you must rebuild your Apache with the–enable-module=sooption. -
Copy the
mod_wl_22.sofile from<weblogic_home>/wlserver_10.3/server/plugin/<os_type>/<os_version>to<apache_home>/modules. -
Open
<apache_home>/config/httpd.confin a text editor and add the following at the end of the file:Single Server Environment
<IfModule mod_weblogic.c>
  WebLogicHost {weblogic_host}
  WebLogicPort {weblogic_port}
</IfModule>

<Location /{sites_context_root}>
  SetHandler weblogic-handler
</Location>

<Location /cas>
  SetHandler weblogic-handler
</Location>
Multi Server Environment
LoadModule weblogic_module modules/mod_wl_22.so<IfModule mod_weblogic.c> WebLogicCluster {weblogic_host1}:{weblogic_port1},{weblogic_host2}:{weblogic_port2} </IfModule> <Location /{sites_context_root}> SetHandler weblogic-handler </Location> <Location /cas> SetHandler weblogic-handler </Location> -
Save the changes.
-
Verify the syntax of the
httpd.conffile with the following command:<apache_home>/bin/apachectl -t
-
Restart the web server.
3.3.3 Configuring the IIS Web Server
This section explains how to configure IIS versions 7.0 and later with the IIS plugin to use this plugin with the WebLogic server.
To configure the IIS plug-in for IIS 7.0 and later versions
-
Go to the
<wl_home>/wlserver_10.3/server/plugin/directory and copy the correct OS version and type plugin folder to the server where you installed IIS (referred to as the<IIS_plugin_dir>directory). For example:C:\inetpub\win\x64. -
Access the IIS Manager. In the Connections navigation pane, expand root server, then expand Sites.
-
Right-click the Default Web Site node and select Manage Web Site then select Advanced Settings (Figure 3-13).
Figure 3-13 Connections - Manage Web Site

Description of ''Figure 3-13 Connections - Manage Web Site''
-
In the Advanced Settings window, change the value of the Physical Path field to the
<IIS_plugin_dir>directory (from step 1). For example,C:\inetpub\win\x64. Then, click OK.
-
-
In the Default Web Site Home screen, double-click ISAPI Filters.
-
Right-click anywhere in the ISAPI Filters screen and click Add from the context menu.
The Add ISAPI Filter window opens.
-
Populate the following fields with the appropriate information for your system. For example:
-
Filter name:
wlforward -
Executable:
C:\inetpub\win\x64\iisforward.dll
-
-
Click OK.
-
-
Click Default Web Site to return to the Default Web Site Home screen. In the Default Web Site Home screen, double-click Handler Mappings.
-
In the Handler Mappings screen, right-click anywhere and select Add Script Map from the context menu.
The Add Script Map window opens.
-
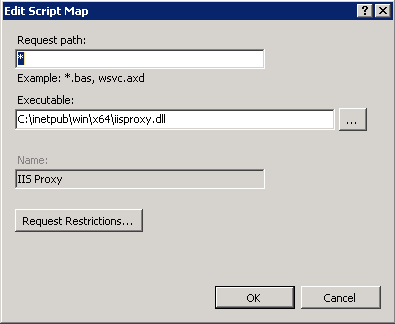
Fill in the following fields with the appropriate information for your system (Figure 3-14). For example:
-
Requested Path:
* -
Executable:
C:\inetpub\win\x64\iisproxy.dll -
Name:
IISProxy
-
-
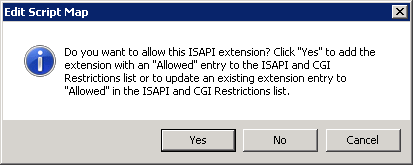
Click Requested Restrictions. In the Request Restrictions window, deselect the Invoker handler mapping option (if checked), as shown in Figure 3-15.
Figure 3-15 Request Restrictions Dialog Box
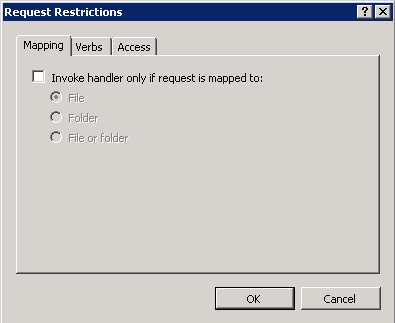
Description of ''Figure 3-15 Request Restrictions Dialog Box''
-
Click Yes (Figure 3-16).
-
-
Click the root server node to access the IIS Home screen, then double-click ISAPI and CGI Restrictions.
-
In the ISAPI and CGI Restrictions screen, right-click anywhere and select Edit Feature Settings from the context menu.
-
In the Edit ISAPI and CGI Restrictions Settings window, check both the Allow unspecified CGI modules option and the Allow unspecified ISAPI modules option (Figure 3-17).
Figure 3-17 Edit ISAPI and CGI Restrictions Settings Dialog Box

Description of ''Figure 3-17 Edit ISAPI and CGI Restrictions Settings Dialog Box''
-
Click OK.
-
-
In the Physical Path folder (
<IIS_plugin_dir>directory, from step 1 ), create a file namediisproxy.iniand populate it with the appropriate information for your system.-
For a non-clustered environment, use the following example:
WebLogicHost=<hostname>
WebLogicPort=<port>
ConnectRetrySecs=5
WLForwardPath=/<cs_context_root>,/<cas_context_root>
-
For a clustered environment, use the following example:
WebLogicCluster=<member1_hostname>:<member1_port>,
<member2_hostname>:<member2_port>,<membern_hostname>:
<membern_port>
ConnectRetrySecs=5
ConnectTimeoutSecs=25
WLForwardPath=/<cs_context_root>,/<cas_context_root>
For detailed information about these parameters, refer to the vendor documentation.
Note:
Only include/casif both Sites and CAS are running on the same server, if CAS is located on a separate server then you will need new entries for it that are unique to that environment.
-
-
Start your IIS Server and Default Web Site.
-
You are now ready to install WebCenter Sites. For instructions, continue to Chapter 6, "Procedures for Installing WebCenter Sites."