6 Procedures for Installing WebCenter Sites
This chapter provides guidelines for installing WebCenter Sites, deploying on your application server, and connecting to your database.
This chapter contains the following sections:
-
Section 6.1, "Overview of the WebCenter Sites Installation Process"
-
Section 6.5, "Deploying the WebCenter Sites and CAS Web Applications"
-
Section 6.7, "Switching WebLogic Application Server to Production Mode (Delivery Systems Only)"
Note:
Before starting the procedures in this chapter, ensure you have both completed pre-requisite steps described in Chapter 2, "Prerequisites for Installing WebCenter Sites," and you have configured your application server, as described in one of the following chapters:6.1 Overview of the WebCenter Sites Installation Process
After configuring all application servers and if required, integrating with a web server, you are ready to install WebCenter Sites. In a multi-server environment, one server is designated the primary server, while all other servers are designated as secondary. The installer is required to be copied and run on each server and different installation actions are required depending on the server type. Running the installer consists of two stages:
-
In the first stage, the installer gathers necessary configuration information and installs the file structure. At the end of the first stage, the installer displays the Installation Actions window prompting you to deploy WebCenter Sites. In a silent installation, these steps are displayed on the command-line. These steps include the deployment of the WebCenter Sites application.
If the first stage fails, the installer allows you to go back and modify your configuration options (except the database type), and retry the installation.
Note:
If you need to change the type of database you have specified during the installation, you must delete the installed WebCenter Sites file structure and restart the WebCenter Sites installation. -
In the second stage, the installer populates the database with the tables and data required for WebCenter Sites to function. If the second stage fails, you must drop the database tables, undeploy the WebCenter Sites application, delete the WebCenter Sites file structure, and re-install WebCenter Sites.
6.2 Installation Options
This section explains the ways you can run the WebCenter Sites installer. This step should be completed on the primary server as well as any secondary servers.
-
Running the GUI installer
When you run the GUI installer, a graphical interface guides you through the installation process, prompting you to enter information and select options as required. It also provides access to online help.
-
Installing Silently
To install silently, first generate an
omii.inifile by running the GUI installer until the Settings Summary screen and then exiting. The silent installer uses this file to install WebCenter Sites.
For instructions on installing WebCenter Sites as a web application, see Section 6.3, "Installing the WebCenter Sites Application."
6.3 Installing the WebCenter Sites Application
Note:
Before starting the steps in this section, ensure you have completed the following steps:-
You configured the application server for WebCenter Sites, as described in the chapter for your application server: Section 3.2, "Step 1: Configuring WebLogic Application Server," Section 4.2, "Step 1: Configuring Tomcat Application Server," or Section 5.2, "Step 1: Configuring WebSphere Application Server."
-
If necessary, you integrated the application server with a supported web server, as described in Section 3.3, "Step 2: Integrating Oracle WebLogic Server with a Supported Web Server," Section 4.3, "Step 2: Integrating Tomcat Application Server with a Supported Web Server," or Section 5.3, "Step 2: Integrating WebSphere Application Server with a Supported Web Server."
The WebCenter Sites installer includes the installation of CAS. By default, CAS will be installed on the primary server.
This section includes the following topics:
6.3.1 Running the GUI Installer
To install WebCenter Sites using the GUI installer
-
Extract the WebCenter Sites installer archive into a temporary directory.
-
Change to the temporary directory containing the installer files.
-
Execute the installer script:
-
On Windows:
csInstall.bat -
On UNIX:
csInstall.sh
The installer provides online help at each screen. Read the online help for detailed explanations of the options that are presented in each screen. If you encounter problems during the installation process, consult the online help for possible causes and solutions.
-
-
On the Clustering screen, if you are installing in a single server environment or on the primary server of a multi-server environment, select Single Server. If you are installing on a secondary server of a multi-server environment, select Cluster Member.
Note:
Unless all CAS instances are in the same cluster, the CAS clustering settings (mcast_addr, mcast_port, ClusterName, and so on) must be unique, that is, these settings must not be similar to any other CAS instances running on the same machine. -
On the Enter CAS Deployment information screen, do one of the following:
-
For networks with firewalls, fill in the fields as follows:
-
Enter Server HostName – Enter the hostname/IP address of the CAS server, as referred to by the external network. If you are clustering CAS, enter the hostname/IP address of the externally facing load balancer.
-
Enter Server PortNumber – Enter the port number of the CAS server, as referred to by the external network. If you are clustering CAS, enter the port number of the externally facing load balancer.
-
Enter Server HostName of internally accessible CAS – Enter the hostname/IP address of the CAS server, as referred to by the internal network. If you are clustering CAS, enter the hostname/IP address of the load balancer, as referred to by the internal network.
-
Enter Server PortNumber of internally accessible CAS – Enter the port number of the CAS server, as referred to by the internal network. If you are clustering CAS, enter the hostname/IP address of the load balancer, as referred to by the internal network.
-
Enter Server HostName where CAS is actually deployed – Enter the hostname of the machine where CAS will be deployed.
-
-
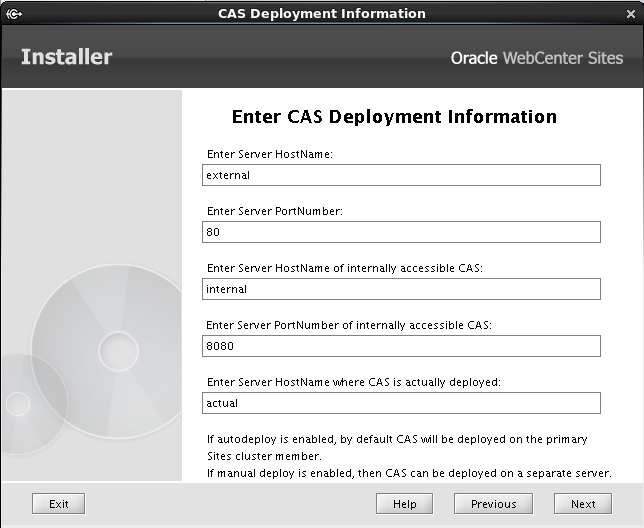
For networks without firewalls (Figure 6-1), fill in the fields as follows:
-
Enter Server HostName – Enter the hostname/IP address of the CAS server. If you are clustering CAS, enter the hostname/IP address of the load balancer.
-
Enter Server PortNumber – Enter the port number of the CAS server. If you are clustering CAS, enter the post number of the load balancer.
-
Enter Server HostName of internally accessible CAS – Enter the hostname/IP address of the CAS server. If you are clustering CAS, enter the hostname/IP address of the load balancer.
-
Enter Server PortNumber of internally accessible CAS – Enter the port number of the CAS server. If you are clustering CAS, enter the port number of the load balancer.
-
Enter Server HostName where CAS is actually installed – Enter the hostname of the machine where CAS will be deployed.
-
-
-
On the Settings Summary screen, if you are using the GUI installer to generate an
omii.inifile, click Exit, otherwise click Next. -
Halfway through the installation, the installer displays the Installation Actions window, which lists the steps you must perform to complete the installation. Do the following:
-
Complete the required configuration changes as described in Section 6.4, "Midpoint Configuration Changes."
-
Deploy the WebCenter Sites and CAS web applications. For instructions, see one of the following sections, depending on your application server:
-
Start the application server.
Note:
In a multi-server environment, only the application server on which the installer was run should be running, while all other server should be shutdown. -
Click Test, if all tests succeed, click OK to continue the installation.
-
-
When the installation process completes successfully, do the following:
-
For all installations, continue to Section 6.6, "Restarting WebCenter Sites."
Note:
If you deployed WebCenter Sites on WebLogic Server, also complete the steps in Section 6.7, "Switching WebLogic Application Server to Production Mode (Delivery Systems Only)." -
For all installations, follow up by completing the post-installation steps in Chapter 7, "WebCenter Sites Post-Installation Steps."
-
6.3.2 Installing Silently
-
Generate an
omii.inifile using the GUI installer by following steps 1 through 6 of Section 6.3.1, "Running the GUI Installer."Note:
This only needs to be done once per environment. For each additional server beyond the first, you may use the sameomii.inifile after any necessary port and path changes. For installing silently on a secondary server, make sure the following properties are set:-
- CSInstallType=cluster -
- IsPrimaryClusterMember=false
-
-
Copy the
omii.inifile to a folder outside of<sites_install_dir>and clear out any files created by the GUI installer. -
If you are installing a delivery system, you must set unique passwords for the
fwadminandContentServer/SatelliteServerusers:-
Open the
cscore.xmlfile in the ContentServer folder of the temporary directory. -
Set passwords in the following section:
<IF COND="Variables.bShowInstallTypeDialog=false"> <THEN> <DIALOGACTION> <SETVARIABLE NAME="passwordVar" VALUE=" "/> <SETVARIABLE NAME="passwordAdminVar" VALUE=" "/> </DIALOGACTION> </THEN> </IF>-
Set the password for the fwadmin user in the VALUE field following
NAME="passwordVar". -
Set the password for the
ContentServer/SatteliteServeruser in theVALUEfield followingNAME="passwordAdminVar".
-
-
Save and close the file.
-
-
Edit the
install.inifile in the root folder of the temporary directory:-
Set the
nodisplayproperty totrue. -
Uncomment the
loadfileproperty and set it to the path and name of theomii.inifile from step 2.Note:
Verify that you have correctly specified the file system path. For example, for Windows:CSInstallDirectory=C\:/csinstall - or - c\:\\install
-
Save and close the file.
-
-
Change to the temporary directory containing the installer files.
-
Execute the installer script:
-
On Windows:
csInstall.bat -silent -
On UNIX:
csInstall.sh -silent
-
-
Halfway through the installation, the installer will print a prompt with steps you must perform to complete the installation. Do the following:
-
Complete required configuration changes as described in Section 6.4, "Midpoint Configuration Changes."
-
Deploy the WebCenter Sites and CAS web applications. For instructions, see one of the following sections, depending on your application server:
-
Start the application server.
Note:
In a multi-server environment, only the application server on which the installer was run, should be running, while all other server should be shutdown. -
Open the following URLs in a browser, using the hostname, context root, and port specified for the WebCenter Sites web application in the installer:
-
http://<hostname>:<port>/<context_root>/HelloCS -
http://<hostname>:<port>/<context_root>/CatalogManager?ftcmd=pingdb
If the tests succeed, press Enter in the window where the installer was run to continue the installation.
-
-
6.4 Midpoint Configuration Changes
This section explains the steps required at the midpoint of the WebCenter Sites installer, prior to deployment.
Note:
When setting a time to live value to control the propagation of multicast packets, use one of the following values based on the distance between communicating servers:-
0(multicast packets restricted to the local server) -
1(multicast packets restricted to the same subnet) -
32(multicast packets restricted to the same region) -
64(multicast packets restricted to the same continent) -
255(multicast packets are unrestricted)
This section includes the following:
6.4.1 Copy CAS Files
If you selected Single Server in step 4 of Section 6.3.1, "Running the GUI Installer", and you will be deploying the CAS web application on physical servers other than those on which the WebCenter Sites web application is installed, copy the files below from the <sites_install_dir>/bin directory to a location on those servers. This location must be in the path of the application servers where CAS will be deployed.
If you selected Cluster Member in step 4 of Section 6.3.1, "Running the GUI Installer", copy the following files from the <sites_install_dir>/bin directory of the primary server, to the <sites_install_dir>/bin directory of the secondary server.
-
host.properties -
cas.properties -
jbossTicketCacheReplicationConfig.xml -
customBeans.xml
6.4.2 Modify CAS Files
If you selected Single Server in step 4 of Section 6.3.1, "Running the GUI Installer", modify the following files (located in the sitesinstall/bin folder) on the primary server, and if necessary, any other physical servers on which the files were copied.
If you selected Cluster Member in step 4 of Section 6.3.1, "Running the GUI Installer", modify the following files (located in the sitesinstall/bin folder) on the secondary server:
-
host.propertiesThe
host.nameproperty is used to identify which server a ticket was generated from. By default it uses the formatcas-<local_hostname>-<cluster_id>. While you may change the format of this value, it must be unique for all servers. -
jbossTicketCacheReplicationConfig.xmlIn the ClusterConfig section of the file, modify the following attributes of the UDP tag:
-
mcast_addrIn a multi-CAS server environment, the
mcast_addrandmcast_portcombination must be the same for all members, but it must also be unique from other CAS environments. -
mcast_portIn a multi-CAS server environment the
mcast_addrandmcast_portcombination must be the same for all members, but it must also be unique from other CAS environments. -
bind_addrSet the value to the hostname or IP address (required if multi-homed server) of the physical server on which the CAS server will be running.
-
ip_ttlSet this time to live value based on the note above.
-
-
customBeans.xmlThe
customBeans.xmlfile contains a list of trusted URLS that CAS can redirect a visitor to upon successful login. By default, the URL to the WebCenter Sites web application is specified in this file.If you installed WebCenter Sites with other WebCenter Sites web applications (such as Community-Gadgets), you must list the URLs of those web applications in this file.
For example:
<bean id="customServiceValidator"
class="com.fatwire.cas.web.ServiceValidator">
<property name="validUrls">
<list>
.
<value>http://hostname:port/cs/wem/fatwire/wem/Welcome</value>
<value>http://hostIP:port/SitesWebapp/*</value>
<value>http://hostname:port/Community-GadgetsWebapp/*</value>
.
</list>
</property>
You can list URLs in the following formats:
-
List complete URLs for exact comparison. For example:
http://hostname:port/cs/wem/fatwire/wem/Welcome
allows access to only the specified URL (the WebCenter Sites Welcome page in this example). This format does not allow access to sub-resources.
-
List group URLs by entering
/*at the end. For example:http://hostIP:port/SitesWebapp/*allows access to all resources under the WebCenter Sites web application (
SitesWebapp) including access tohttp://hostIP:port/SitesWebapp, which is the exact URL to the WebCenter Sites web application.
If you intend to access WebCenter Sites and its web applications using
hostname:portandhostIP:portinterchangeably, both URLs must be specified in thecustomBeans.xmlfile.Note:
If you are working in a clustered WebCenter Sites environment, the host name (or host IP address) and port number must point to the load balancer. -
6.4.3 Modify Web Application Files
Modify the following web application files below for a multi-server environment.
Note:
For a WebSphere environment, you will need to explode the WebCenter Sites.ear file located in <sites_install_dir>/ominstallinfo/app to a temporary directory prior to making changes. After the changes have been made, re-compress the .ear file and replace the original file.
For Tomcat and WebLogic, the WebCenter Sites and CAS .war files are already exploded by the installer for deployment.
-
Cache files (
cs-cache.xml,cas-cache.xml,ss-cache.xml,linked-cache.xml)Modify these cache files in the
WEB-INF/classesdirectory of WebCenter Sites web application. Changes are required for the following attributes of thecacheManagerPeerProviderFactorytag:-
multicastGroupAddressThe
multicastGroupAddressandmulticastGroupPortcombination must be the same for all members, but must also be unique from other WebCenter Sites environments. -
multicastGroupPortThe
multicastGroupAddressandmulticastGroupPortcombination must be the same for all members, but it must also be unique from other WebCenter Sites environments. -
timeToLiveSet this time to live value based on the following note:
Note:
ThemulticastGroupPortproperty must be set identically across cluster members. For example, if CS1 specifiesmulticastGroupPort=4444in itscs-cache.xmlfile, then CS2 and CS3 must specify the same setting in their files.The
timeToLiveproperty specifies the number of hops allowed to a packet, which determines how far the packet propagates. Valid values range between0and255with the following restrictions:-
0- same host -
1- same subnet -
32- same site -
64- same region -
128- same continent -
255- unrestricted
-
-
Bootstrapping (for
cas-cache.xmlonly)When a node is restarted when using clustered CAS, there is an option to pre-populate the cache with existing session and ticket information from the neighboring nodes on server startup. This may be helpful in a very small percentage of cases when the session is replicated onto the restated node. However, this may increase the application server startup time. This feature is turned off by default.Enable this feature by uncommenting the lines in
cas-cache.xmlafter the commented line<!-- Uncomment following lines to enable bootstrapping -->In all the three sections, set
replicateAsynchronously=trueto pre-populate the CAS cache asynchronously. Otherwise setreplicateAsynchronously=falseas there is a possibility of a race condition when settingreplicateAsynchronously=true.
-
-
(WebLogic Only)
weblogic.xmlTo set the URI encoding character set on WebLogic, in the
weblogic.xmlfile in theWEB-INFdirectory of the WebCenter Sites web application, add the following lines inside theweblogic-web-appelement:<charset-params> <input-charset> <resource-path>*</resource-path> <java-charset-name>UTF-8</java-charset-name> </input-charset> </charset-params>If you are configuring a WebLogic cluster environment with session persistence enabled, modify the
weblogic.xmlfile in theWEB-INFdirectory of the WebCenter Sites and CAS web applications by adding the following line inside the session-descriptor element:<persistent-store-type>replicated</persistent-store-type> -
(Tomcat Only)
web.xmlIf you are configuring a Tomcat cluster environment, modify the
web.xmlfile in theWEB-INFdirectory of the WebCenter Sites web application by adding the following tag as the first line after theweb-apptag:<distributable/>
6.5 Deploying the WebCenter Sites and CAS Web Applications
This section contains the following topics:
-
Section 6.5.1, "Deploying WebCenter Sites and CAS on WebLogic Server"
-
Section 6.5.2, "Deploying WebCenter Sites and CAS on WebSphere"
-
Section 6.5.3, "Deploying WebCenter Sites and CAS on Tomcat"
6.5.1 Deploying WebCenter Sites and CAS on WebLogic Server
This section describes how to deploy the WebCenter Sites and CAS web applications on WebLogic application server using either the WebLogic Scripting Tool or the Administration Console.
This section includes the following topics:
-
Section 6.5.1.1, "Deploying using the WebLogic Scripting Tool"
-
Section 6.5.1.2, "Deploying from the WebLogic Administration Console"
6.5.1.1 Deploying using the WebLogic Scripting Tool
The WebLogic Scripting Tool is a command-line scripting environment used to managed WebLogic domains. It requires the administration server be running. You can use the tool to deploy the WebCenter Sites and CAS web applications by following the steps below.
Note:
In a cluster environment, deployment of the WebCenter Sites and CAS applications only needs to be done once at the midpoint of the primary server installation.-
Create a Jython script.
The WLST will run the commands contained in this script to deploy the applications. Create a new
.pyfile containing the commands below:Note:
For theconnectcommand, enter the information for the WebLogic admin server.For the
deploycommand, use the application name specified in the installer, the path to the exploded web application, and the name of the target server or cluster. In a cluster environment, use the name of the cluster as the target.connect('<admin_user>', '<admin_password>', 't3://<admin_host>:<admin_port>') deploy('<sites_application_name>', '<sites_deploy_home>', '<target>', 'nostage') deploy('cas', '<cas_deploy_home>', '<target>', 'nostage') disconnect() exit() -
Run the WebLogic Scripting Tool.
To deploy the applications, run the following command:
<weblogic_home>/common/bin/wlst.sh <path_to_jython_script>
6.5.1.2 Deploying from the WebLogic Administration Console
This section shows you how to deploy the Sites and CAS web applications on WebLogic application server from the WebLogic administration console. Complete the steps below for each application.
Note:
In a cluster environment, deployment of the WebCenter Sites and CAS applications only needs to be done once at the midpoint of the primary server installation.-
Log in to the WebLogic Server Administration Console.
-
Deploy the web application (Figure 6-2):
-
In the Domain Structure panel, click Deployments.
-
Click the Install button. If necessary, change the current location to the path that is specified in the Manual Deployment screen of the WebCenter Sites installer.
-
Select the directory with the specified name of the WebCenter Sites web application, marked open directory, then click Next.
Figure 6-2 Install Application Assistant - CS (open directory)
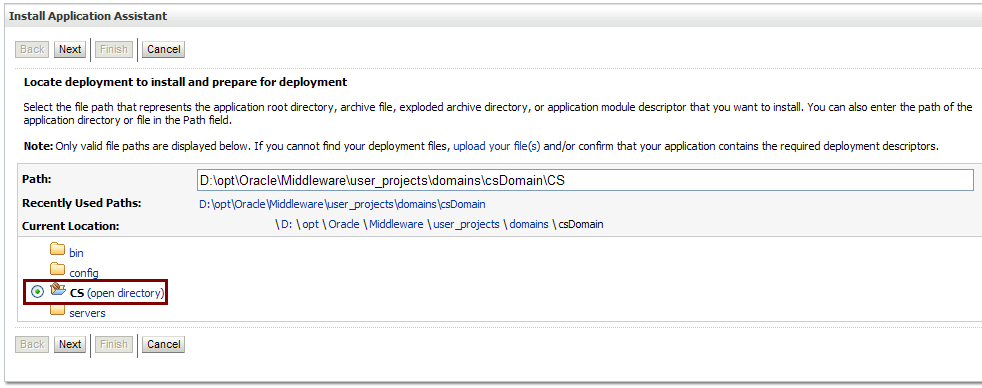
Description of ''Figure 6-2 Install Application Assistant - CS (open directory)''
-
Select the Install this deployment as an application option (Figure 6-3), then click Next.
Figure 6-3 Installation of This Deployment as an Application
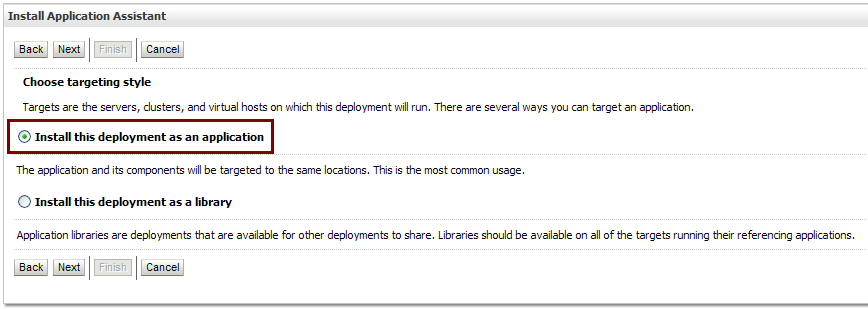
Description of ''Figure 6-3 Installation of This Deployment as an Application''
-
In the Source accessibility section, select I will make the deployment accessible from the following location (Figure 6-4).
Figure 6-4 Location to Access Deployment
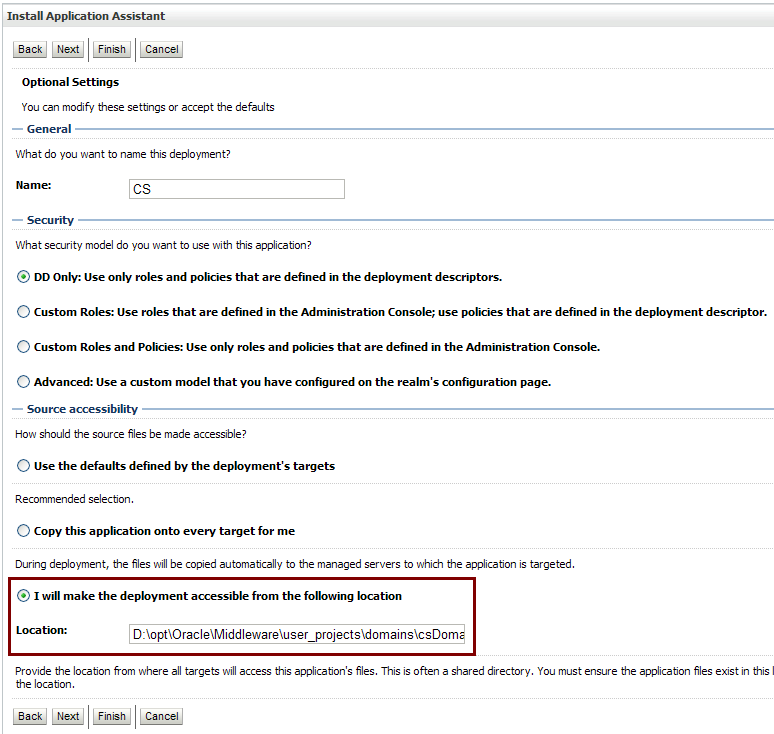
Description of ''Figure 6-4 Location to Access Deployment''
-
Click Next, then click Finish.
-
6.5.2 Deploying WebCenter Sites and CAS on WebSphere
This section describes how to deploy the WebCenter Sites and CAS web applications on WebSphere application server from the WebSphere Integrated Solutions administration console. Complete the following steps for each application.
Note:
In a cluster environment, deployment of the WebCenter Sites and CAS applications only needs to be done once at the midpoint of the primary server installation.-
Log in to the WebSphere Integrated Solutions administration console.
-
In the tree on the left, expand Applications, then Application Types, and click WebSphere enterprise applications (Figure 6-5).
Figure 6-5 WebSphere Enterprise Applications
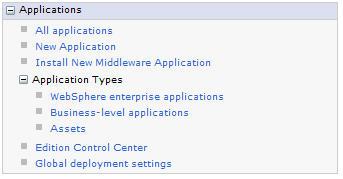
Description of ''Figure 6-5 WebSphere Enterprise Applications''
-
Click Install.
-
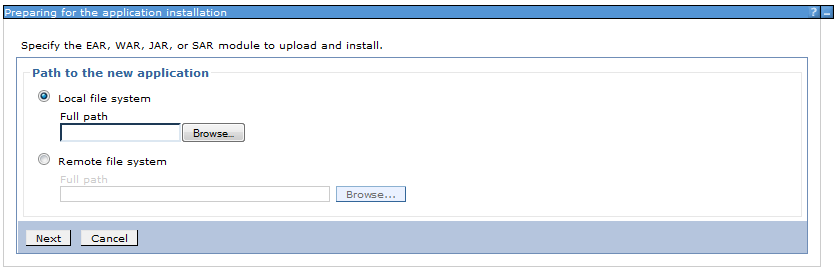
On the Preparing for the application installation screen select Remote file system and click Browse (Figure 6-6).
-
On the Browse Remote Filesystems screen, do the following:
-
Click the application server node where the
.earfile is located. -
For WebCenter Sites:
Browse to the
<sites_install_dir>/ominstallinfo/appdirectory.For CAS:
Browse to the
<sites_install_dir>/ominstallinfodirectory. -
For WebCenter Sites:
Select the
ContentServer.earfile.For CAS:
Select the
cas.earfile. -
Click OK.
-
Click Next.
-
-
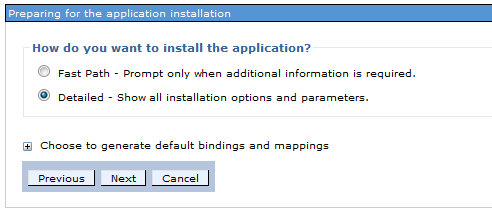
On the Preparing for the application installation screen, select Detailed and click Next (Figure 6-7).
-
On the Application Security Warnings screen, click Continue.
-
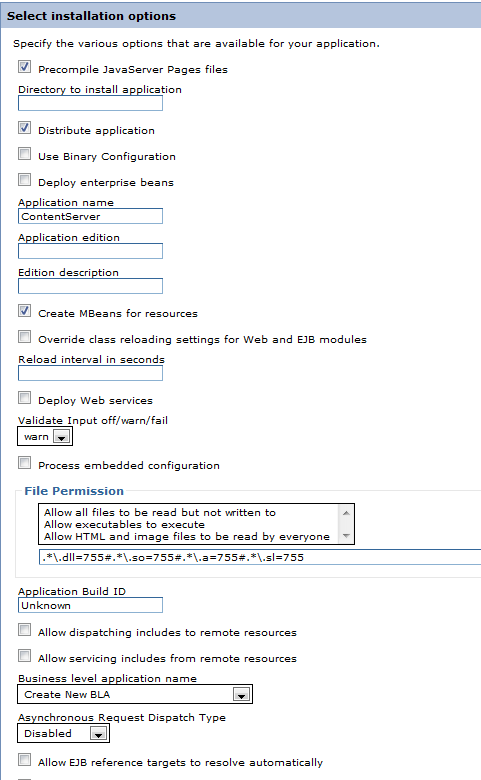
On the Select installation options screen, select Precompile JavaServer Pages files and click Next (Figure 6-8).
-
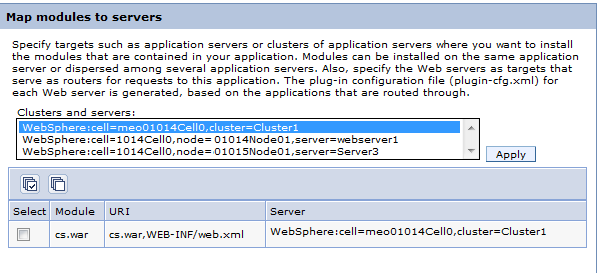
On the Map modules to servers screen (Figure 6-9), do the following:
-
Select the checkbox for the
.warfile module. -
Select the deployment target under Clusters and servers.
In a cluster environment, select the cluster.
-
Click Apply.
-
Click Next.
-
-
On the Provide options to compile JSPs screen (Figure 6-10), change the value of the JDK Source Level field to
16, then click Next.Figure 6-10 Provide Options to Compile JSPs
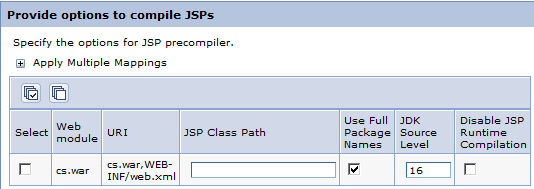
Description of ''Figure 6-10 Provide Options to Compile JSPs''
-
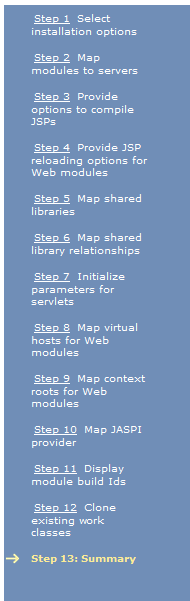
On the Provide JSP reloading options for Web modules screen, on the left side, click the link for Step 13: Summary (Figure 6-11).
-
On the Summary screen (Figure 6-12), review the options you have chosen and click Finish.
Figure 6-12 Summary of Installation Options
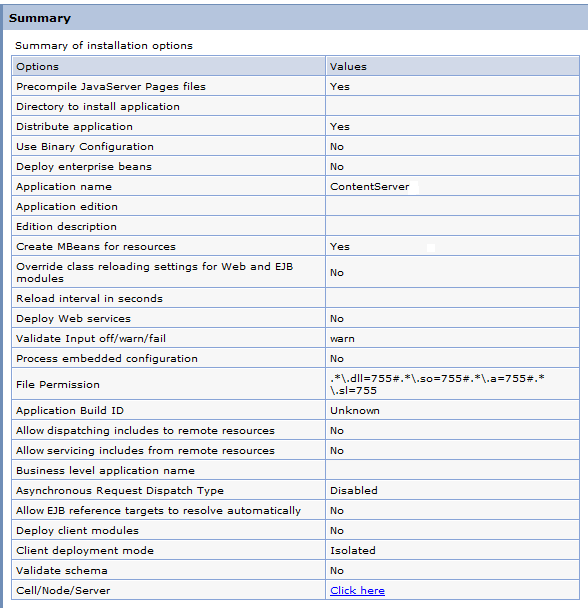
Description of ''Figure 6-12 Summary of Installation Options''
-
On the Enterprise Applications screen, click the newly deployed application.
-
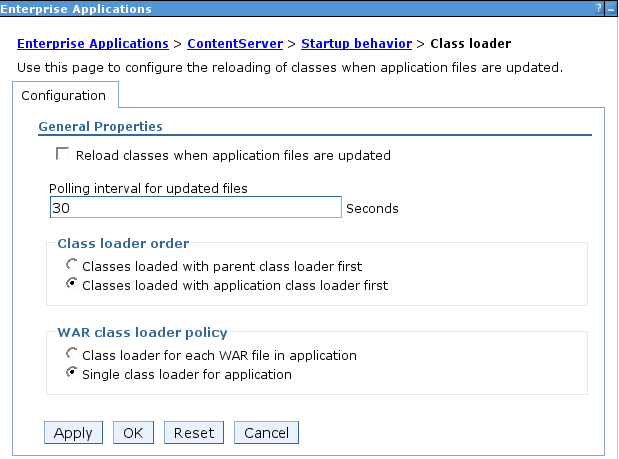
On the screen that follows, click Class loading and update detection (Figure 6-13).
Figure 6-13 Class Uploading and Update Detection
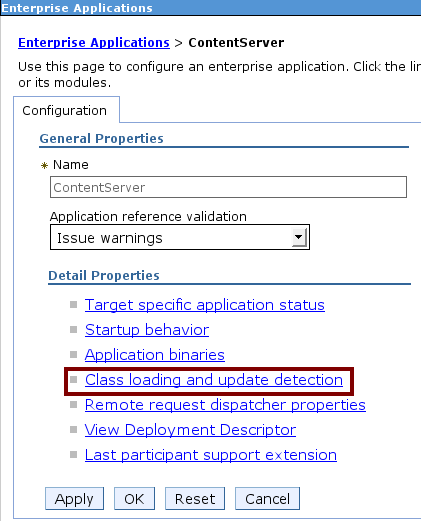
Description of ''Figure 6-13 Class Uploading and Update Detection''
-
On the screen that opens (Figure 6-14), do the following:
-
In the Polling interval for updated files field, enter
30. -
In the Class load order section, select Classes loaded with application class loader first.
-
In the WAR class loader policy section, select Single class loader for application.
-
Click OK.
-
-
Save the changes.
6.5.3 Deploying WebCenter Sites and CAS on Tomcat
The WebCenter Sites installer automatically explodes the WebCenter Sites web application to the webapps directory of the Tomcat server during the primary and secondary server installations.
The WebCenter Sites installer automatically explodes the CAS web application to the webapps directory of the primary Tomcat server during the primary server installation. The CAS web application should be copied to any other servers and their respective webapps directories by this point.
6.6 Restarting WebCenter Sites
After the installation for an application server has completed, restart the server before verifying it.
6.7 Switching WebLogic Application Server to Production Mode (Delivery Systems Only)
If you have installed a delivery system, switch WebLogic to production mode:
-
Log in to the WebLogic Administration Console.
-
Click the domain name in the tree
-
Click the General tab.
-
Select the check box next to Production Mode.
-
Click Save.
-
Click Accept Changes.
-
Restart all servers.
-
You are now ready to verify your WebCenter Sites installation and complete various post-installation steps, if necessary. Continue with Chapter 7, "WebCenter Sites Post-Installation Steps."