17 Flex Filters
This chapter provides information about flex filters. It also contains instructions on defining a flex filter class and creating a flex filter asset.
This chapter contains the following sections:
-
Section 17.1, "Understanding Flex Filter Classes and Assets"
-
Section 17.2, "Defining a Flex Filter Class and Creating a Flex Filter Asset"
17.1 Understanding Flex Filter Classes and Assets
A flex filter performs post-processing operations on flex assets to which that filter is assigned. The filter is called when its associated asset is saved. The filter is not called if the asset's edit operation is canceled.
Multiple flex filters can be assigned to a flex asset. When the asset is saved, its filters perform their designated tasks in the order in which they are defined in the "Filters" section of the asset's definition. The task a flex filter performs is determined by the flex filter class that defines the filter. For example, flex filters that are defined by the Doc-Type filter class are enabled by that class to determine an asset's MIME-type and to extract a file type from a URL path.
Each flex filter is associated with the attributes that it updates with the data it processes for an asset. These attributes are called derived attributes. Derived attributes must be created in the same flex family to which the filter is assigned. However, derived attributes must not be specified in an asset definition because they are strictly a flex filter's output; they are added to an asset only when the asset is saved. When multiple filters are assigned to an asset, none of the filters must be dependent on attributes that are output by any other filters associated with that asset.
When a filter is defined (in the Filters table in the WebCenter Sites database) it can be applied to any asset type's child definition. (Filters cannot be applied to an asset type's parent definition.) If a filter is created for a specific purpose that is related to a specific asset type, the filter should be associated with only that asset type's child definition. For example, if a filter is designed to process an image type for "Media" assets, it cannot function when applied to text-based assets.
This section contains the following topics:
17.1.1 Flex Filter Classes
Flex filter classes implement the functionality of flex filter assets. These classes are listed in the Filters table in the WebCenter Sites database. When you create a flex filter asset, you select a flex filter class for it.
WebCenter Sites delivers the following flex filter classes:
-
Doc-Type: Extracts components from an asset containing one or more MIME file types and maps each file type to an individually named attribute.
-
Thumbnail Creator: Converts an image to a thumbnail.
-
Field Copier: Copies the contents of a system-defined attribute into a user-defined attribute.
-
Document Transformation: Converts a document from one file type into another by invoking a registered transformation engine (an engine that is specified in the
SystemTransformstable). The transformation engine functions as a wrapper that forwards calls to a document transformer, which then performs document conversion.
You can create a custom flex filter class by defining it in the WebCenter Sites Filters database table. For instructions on creating a custom flex filter class, see Section 17.2.2, "Defining a Custom Flex Filter Class."
A Doc-Type filter takes a document and extracts the MIME-type data associated with the file into its individual components. For example, an uploaded file containing text and a GIF photo would be filtered into two generated attributes, one containing TXT formatted data and one containing GIF formatted data.
The Doc-Type class is defined by the following arguments:
-
Attribute to Hold Derived File Name: (Optional) Enter the flex attribute that stores the output file name.
-
Attribute to Hold Derived File Type: The file extension is stored in this attribute.
-
Attribute to Hold Derived MIME Type: (Optional) MIME files can have several types such as plain text, attachment, media file, and so on.
-
Input Attribute Name: The attribute name stored by WebCenter Sites corresponds to the uploaded file name.
Thumbnail Creator Filter Class
With the thumbnail creator filter, a content provider can upload an original graphic and WebCenter Sites will create a new thumbnail sized GIF graphic file.
The Thumbnail Creator class is defined by the following arguments:
-
Input Attribute Name: The name of the uploaded file.
-
Display values for the large version of the thumbnail graphic "Output Attribute for Main Height," "Output Attribute for Main Width," and "Enter Maximum Pixel Size."
-
Attributes that define the thumbnail to be created "Output Attribute Name," "Output Attribute for Thumb Height," "Output Attribute for Image Aspect," and "Output Attribute for Thumb Width."
The field copier filter copies the contents of a system-defined attribute into a user defined flex attribute.
The Field Copier class is defined by the following arguments:
-
Name: The name of the system-defined attribute you wish to copy.
-
Value: The name of the flex attribute into which you are copying the system-defined attribute's value.
Figure 19-2 illustrates an advanced example of how to implement a field copier filter, using the "Media" flex family of the FirstSiteII sample site. The purpose of the field copier filter in this example is to categorize image assets by the names of their parent assets.
Document Transformation Filter Class
The Document Transformation filter class is defined by the following arguments:
-
Document Transformer Name: The name of a registered transformation engine exactly as it is listed in the
SystemTransformstable. By default, four values are listed in theSystemTransformstable:-
CS: Convert to HTMLInitiates the conversion of binary files to HTML.
-
CS: Convert to HTML fragmentInitiates the conversion of binary files into files with HTML coding but without the header tags.
-
CS: Convert to XMLInitiates the conversion of binary files to XML.
-
CS: Convert to Raw TextInitiates the conversion of a binary file to TXT format.
Note:
The following document transformer is available with WebCenter Sites:
com.fatwire.transformer.tika.DocumentTransformerImplThe document transformer is coded to convert documents to raw text files when it is invoked by the CS: Convert to Raw Text engine. Converting to any other file type requires writing a document transformer for that file type, registering the corresponding transformation engine (unless it is already registered), and registering the document transformer with WebCenter Sites. For information about implementing default and document transformation solutions, see Section 17.3, "Document Transformation."
-
-
Input Attribute Name: The name of the flex attribute whose contents are to be converted by the flex filter. For the Document Transformation filter, the input attribute must be of type
blobbecause it expects to find a file in that attribute. -
Fail on Transform Error: Choose whether the system will display an error message if the transformation does not complete properly.
-
Output Attribute Name: The name of the flex attribute that stores the results of the document transformation. For the Document Transformation filter, the output attribute must be of type
blobbecause it stores the results of the transformation as a file.The data stored in the output attribute (field) is read-only because it is derived from the data in the input attribute. This data is regenerated from the source data in the input attribute each time the asset is saved.
-
Output Document Extension: The file extension to be assigned to the resulting file. Enter a document extension appropriate to the selected Document Transformer Name. For example, when you specify that the document transformation engine is CS: Convert to HTML, the document extension must be either htm or html.
17.1.2 Flex Filter Assets
Flex filter assets are defined by all of the following criteria:
-
A flex filter class registered in the
Filterstable -
The information that is passed to that filter class (through arguments). These arguments specify which data to use, any constraints on the filter's action, and where to store the results of the filtering process when the asset is saved.
When you create a flex filter asset, you select the flex filter class to be used, then enter values for the arguments that the filter class needs in order to perform its action.
After you create a flex filter asset, you assign it to the appropriate flex definition assets. Then, whenever content providers save a flex asset of that definition, the filter automatically performs its assigned action. For detailed instructions, see Section 17.2.3, "Creating Flex Filter Assets."
17.2 Defining a Flex Filter Class and Creating a Flex Filter Asset
To use a flex filter you must first define a custom flex filter class in the WebCenter Sites database. You then activate the custom flex filter class by creating a flex filter asset whose functionality is defined by that class.
These are your basic steps:
-
Create the Java class that provides the implementation code for the custom flex filter class. For instructions, see Section 17.2.1, "Implementing a Flex Filter Class."
-
Define the new flex filter class in the
Filterstable in the WebCenter Sites database. For instructions, see Section 17.2.2, "Defining a Custom Flex Filter Class." -
Create a flex filter asset that is defined by the custom flex filter class:
-
Create the attributes that will be referenced in the filter's arguments.
-
Create the flex filter asset and assign it to the desired flex filter class.
-
Add the new filter asset to a child definition.
-
Re-save all related assets associated with the definition to which you added the filter asset.
For instructions, see Section 17.2.3, "Creating Flex Filter Assets."
-
This section contains the following topics:
17.2.1 Implementing a Flex Filter Class
To implement a custom flex filter, create a new Java class for it by extending the AbstractFlexFilter class. This filter class contains all default functionality required to handle filter requests. A working example of a custom flex filter class that extends the AbstractFlexFilter class, and whose purpose is to access a flex attribute and set a derived attribute value, is provided by the source file SampleFlexFilter.java.
A flex filter's functionality is implemented by parameters called abstraction interfaces. Since flex filters only need to know about certain aspects of the assets they are filtering, abstraction interfaces provide filters with access to only the asset information necessary for them to perform their function on a given flex asset. Table 17-1 lists the abstraction interfaces required to implement a flex filter, and the asset information each abstraction interface passes to the filter. For detailed information about the various abstraction interfaces used to implement a custom flex filter class, see the Oracle Fusion Middleware WebCenter Sites Java API Reference.
Table 17-1 Abstraction Interfaces (com.openmarket.gator.interfaces Package)
| Abstraction Interface | Description |
|---|---|
|
|
Provides methods to obtain information about the environment that is supporting the filter. |
|
|
Provides methods to manipulate the asset that is being filtered. |
|
|
Provides methods to describe all the potential derived attributes that will be modified by the filter during its execution. |
|
|
Provides methods to log the dependencies against the asset instance to be filtered. A dependency refers to another asset by type and identifier that shares a relationship with the asset to be filtered. When a dependency is declared, it is either exact or exists. |
Note:
Standard asset attributes can be obtained by the IFilterableAssetInstance.get method. For example, to get the standard asset description, you would add the line:
String description = instance.get(description);
When building the Java code for the new flex filter class, define a constructor with a single FTValList parameter (located in the COM.FutureTense.Interfaces package). This parameter provides a list of arguments obtained from the filter's definition in the Filters database table. These arguments are passed to the filter in the form of key/value pairs. If there are no predefined arguments for the filter class in the Filters database table, the FTValList is null.
17.2.1.1 Extending the 'AbstractFlexFilter' Class
The AbstractFlexFilter class can be extended to build your implementation of a flex filter class. This class is located in the com.openmarket.gator.flexfilters package. When you create the new flex filter's Java class, you can call the required methods necessary for your filter's functionality from the AbstractFlexFilter class' java code. This simplifies the amount of code necessary to create a custom implementation.
When a method is called, it is provided with the argument String filterIdentifier, which is the asset identifier for the filter. When you associate the same filter with different flex asset families, the filter identifier reflects the filter definition for the associated family. This argument is useful when you are implementing a filter that will be used by different asset families in order for the filter to know which flex family association is being used at the moment the filter is invoked.
For detailed information about the various abstract methods used to implement a flex filter class, see the Oracle Fusion Middleware WebCenter Sites Java API Reference.
The following abstract methods are required by all flex filter implementations:
public void filterAsset(IFilterEnvironment env,
      String filterIdentifier,
      FTValList filterArguments,
      IFilterableAssetInstance instance)
      throws AssetException;
These lines are the main method to process asset post processing when a new or pre-existing asset is saved. This method is not called if the edit is canceled. It does the work that represents the filter's purpose. A list of arguments (FTValList) is provided so the filter can obtain input and/or output attribute definitions, and any other information valid to the filter. The filterArguments list is defined when the filter is created in the WebCenter Sites interface.
public FTValList getLegalArguments(IFilterEnvironment env,
      String filterIdentifier)
      throws AssetException;
These lines are the method that is called to return a list of legal filter arguments. The WebCenter Sites interface will call this during filter creation or editing to populate the drop-down list after selecting the filter and pressing the Get Arguments button.
The following abstract methods can be used to override those within the AbstractFlexFilter class. These methods are optional because the default implementations provided by the AbstractFlexFilter class are usually sufficient for most filters:
public void describeDerivedAttributes(IFilterEnvironment env,
      String filterIdentifier, FTValList filterArguments,
      String defTypeName, String parentDefTypeName,
      IFilterDescription descriptionObject) throws AssetException
This method describes all the potential derived attributes, group affinities, and recommendations that the filter might set. When the filter plans to output to attributes this method must identify the attributes that will be modified. This is called whenever the flex asset is viewed, to anticipate the editing of the asset.
public void getDependencies(IFilterEnvironment env,String filterIdentifier,
   FTValList filterArguments, String assetTypeName, String parentTypeName,
   IFilterDependencies filterdeps) throws AssetException
This method is called to describe the filter's asset dependencies. Filter dependencies are set to either exists or exact.
public String[] getArgumentLegalValues(IFilterEnvironment env,
   String filterIdentifier, String argumentName) throws AssetException
This method is called to return a list of acceptable values for a specified argument. If the return list is null then any value is accepted. This method is called by the WebCenter Sites Admin interface when a filter asset is being created or edited to validate the argument values that are specified for the filter asset.
17.2.2 Defining a Custom Flex Filter Class
This section provides instructions for defining a custom flex filter class in the Filters table in the WebCenter Sites database. In this example, we create a flex filter class named CustomFilter.
To define a custom flex filter class
-
Copy the
.jarorclassfile containing the implementation code for the custom flex filter class into the directory that holds the WebCenter Sites productjars:Note:
For information about creating a Java class that provides the implementation code for your custom flex filter class, see Section 17.2.1, "Implementing a Flex Filter Class."
-
For WebLogic:
app-server-install-dir/bea/path-to-domain/domain-name/applications/WEB-INF/lib -
For WebSphere:
WebSphere-Installation-Directory/InstalledApps/WEB-INF/lib
-
-
Open Sites Explorer and add a row to the
Filterstable for the new filter class:-
In the tree, expand the Tables node, and then select the
Filterstable. -
Select File, then New, and then Record.
-
Define the filter in the database by filling in the following columns:
-
name: Enter the name of the filter as it will be displayed in the WebCenter Sites interfaces.
-
description: (Optional) Enter a short summary about the purpose of the filter class.
-
classname: Enter the exact classname of the filter class' implementation (for example,
com.fatwire.firstsite.filter.SampleFlexFilter). This name must be available for loading in the WebCenter Sites classpath. -
args: (Optional) Enter the input and output arguments for the filter. Argument key/value pairs are delimited by an ampersand (&) character. (for example,
arg1=argument1&arg2=argument2). These arguments are passed to the filter constructor and their use is left up to the filter's developer.Note:
If you do not define the flex filter class' input and output arguments in the
Filterstable, you can define the arguments in the flex filter class' code. For information, see Section 17.2.1, "Implementing a Flex Filter Class."
-
-
Select File and then Save.
Your new filter entry will look similar to the following:

Description of the illustration n_csdatabase.png
The filter class is now displayed as an option in the Filter drop-down list in the New and Edit forms of filter assets.
-
17.2.3 Creating Flex Filter Assets
This section provides instructions for creating a flex filter asset. In this example, we create a flex filter asset named FSII_CustomFlexFilter for the "Media" flex family of the FirstSiteII sample site.
Before you can create a filter asset, the flex attributes that you want to use as the input and output attributes must exist. To ensure that the values of preexisting attributes are not overwritten, you can create new attributes to be referenced by the arguments for your custom flex filter. For this example, we created two "Media" attributes of type string; FSII_CustomInput to be used as the input attribute and FSII_CustomOutput to be used as the output attribute.
-
Log in to the Admin interface as a general administrator, and select the site for which you wish to create a flex filter asset (FirstSiteII sample site in this example).
-
Create the attributes (if not already defined) that will be referenced by the filter's input and output arguments. Note the following requirements:
-
For flex filters that use the Document Transformation filter class, the input and output attributes must be of type blob.
-
For any flex filter, the input attribute, output attribute, and flex filter must all belong to the same flex family.
For instructions on creating flex attributes, see Section 16.3.6, "Step 4: Create Flex Attributes."
-
-
Create a flex filter asset for the associated flex family ("Media" flex family in this example):
-
From the start menu items, click New.
-
In the list of asset types, select the type of filter you wish to create. In this example, New Media Filter.
The New filter form is displayed.
-
Fill in the following fields:
-
In the Name field, enter a unique name for this filter (in this example, we use FSII_CustomFlexFilter).
-
In the Description field, enter a brief description summarizing the filter's function.
-
In the Filters drop-down list, select the filter definition that matches the name you assigned to the custom filter (in this example, we select CustomFilter). Then click Get Arguments.
-
In the Arguments field, specify the input and output arguments for the flex filter asset. Click Add to add the argument(s) to the filter.
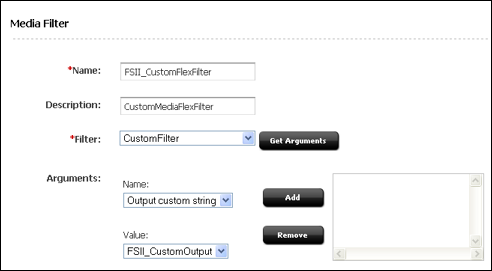
Description of the illustration l_newflexasset_small.png
-
-
Click Save to save the filter.
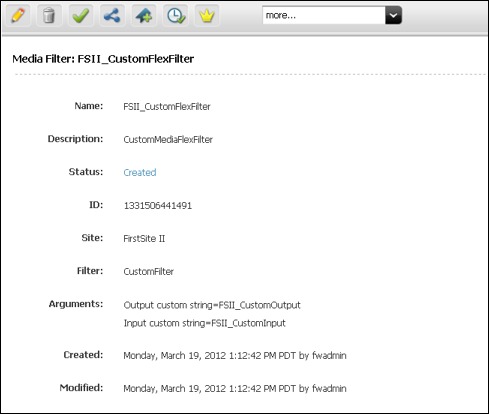
Description of the illustration l_confirm_small.png
-
-
Find the desired child definition to which you wish to add the new filter asset (in this example, we add the filter to the "Media" child definition FSII_Image).
-
From the start menu items, click Search.
-
In the list of asset types, select the desired type of asset definition to which you wish to add the filter (Find Media Definition in this example).
-
In the search field, enter the name of the definition to which you wish to add the filter (FSII_Image in this example).
-
Click Search.
-
In the list of search results, navigate to the desired definition and click its Edit icon (FSII_Image in this example).
The Edit form of the definition opens:
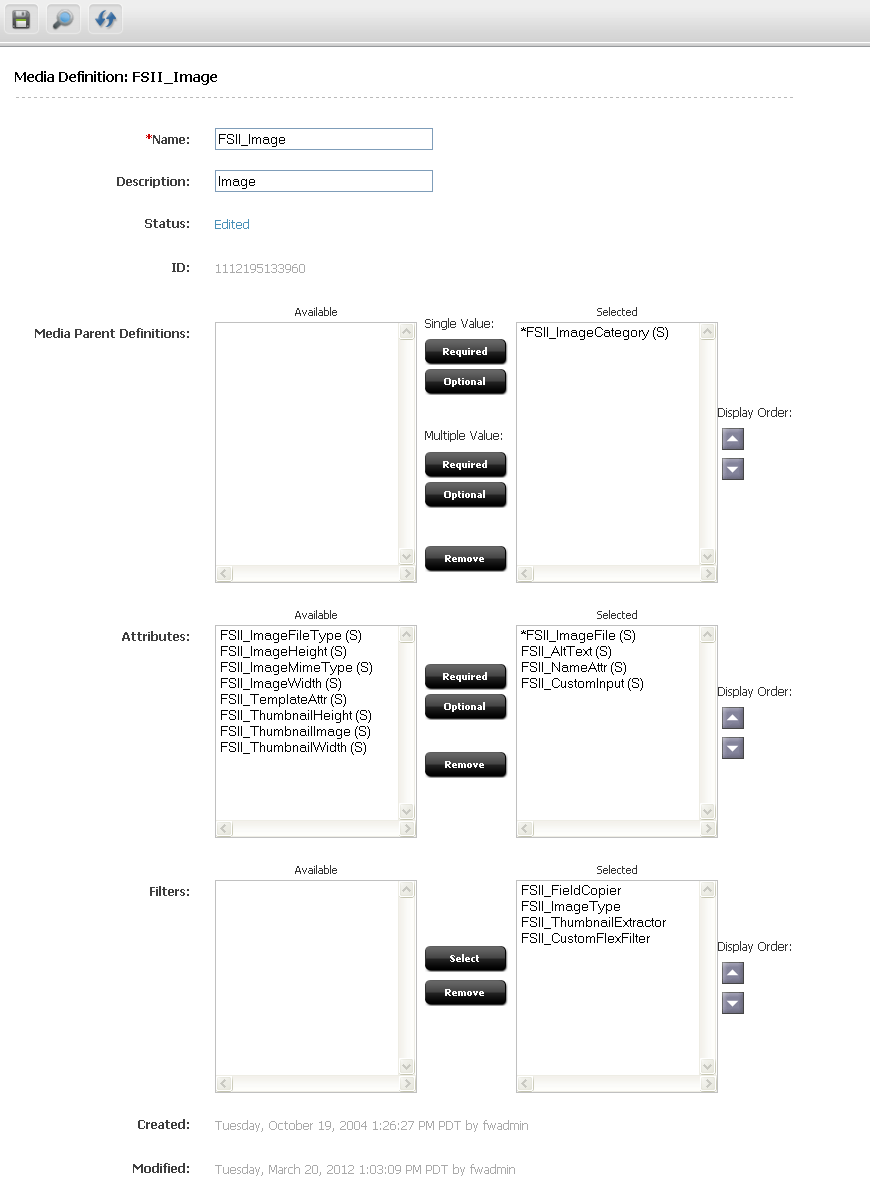
Description of the illustration l_editassetdef.png
-
-
In the Edit form, add the filter and input argument to the definition:
-
In the Attributes field, highlight the input attribute in the Available list and move it to the Selected list (FSII_CustomInput in this example).
-
In the Filters field, highlight the desired flex filter in the Available list and move it to the Selected list (FSII_CustomFlexFilter in this example).
Note:
Add the new filter after any other filters that will create or modify attributes which the filter you are adding depends on or shares in common.
-
Click Save.
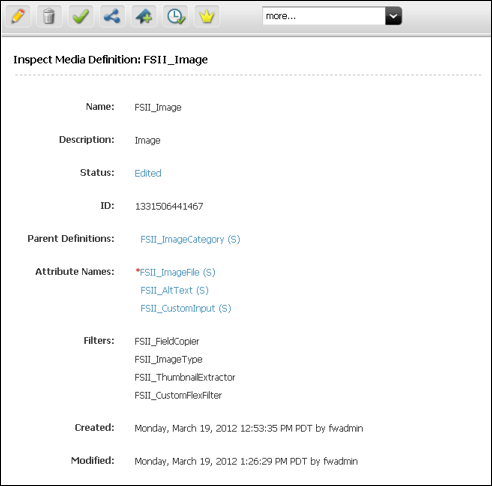
Description of the illustration n_mediadef_small.png
-
-
Find and re-save all preexisting assets associated with the definition to which you added the filter. This enables the filter to populate the output attribute (FSII_CustomOutput) with the derived value from the input attribute (FSII_CustomInput). For example:
-
In the applications bar, click the Contributor icon to switch to the WebCenter Sites Contributor interface.
-
In the Search field, click the down-arrow to open the "Search Type" menu. In the "Search Type" menu, select the type of asset associated with the definition you modified in step 5 (Find Media in this example). Then click the magnifying glass button.
A "Search" tab opens displaying the results of your search.
-
Re-save the asset. In the asset's toolbar, click the Save icon.
-
Inspect the asset. In the asset's toolbar, click the Inspect icon.
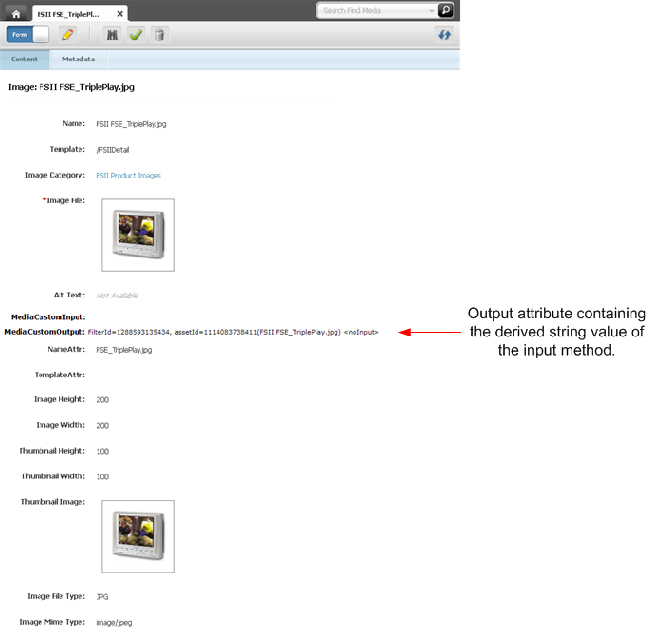
Description of the illustration e_flexfiltermediaasset.png
The above image is the result of editing a flex asset that invokes several filters, including the filter you created in this section. By default, "Media" assets call the "FSII_FieldCopier," "FSII_ImageType," and "FSII_ThumbnailExtractor" filters. In this example, the "Media" asset also calls the FSII_CustomFlexFilter filter, which takes the value of the input attribute (MediaCustomInput) and inserts a derived string value into the output attribute (MediaCustomOutput).
-
17.3 Document Transformation
Implementing a Document Transformation flex filter requires the following components:
-
A transformation engine that is registered in the
SystemTransformstable and named to indicate the target file type; for example,CS:Convert to Raw Text. -
A document transformer, which is a custom class that performs document conversion (for example, converting binary files to raw text files). The document transformer class implements the following interface:
com.fatwire.transformer.common.DocumentTransformerinterface -
The
transformer-formats.xmlfile, which is used to associate the transformation engine with the document transformer. The file, located in WebCenter Sites'sWEB-INF/classesfolder, specifies the target file type and the document transformer.
When the Document Transformation flex filter is invoked, the transformation engine functions as a wrapper. The engine forwards calls (via the transformer-formats.xml file) to the document transformer, which then performs file conversion.
This section contains the following topics:
17.3.1 Default Solution
WebCenter Sites provides a default solution that can be used to convert documents to raw text files. The default components are:
-
The
CS:Convert to Raw Texttransformation engine, registered in theSystemTransformstable. -
A document transformer named
com.fatwire.transformer.tika.DocumentTransformerImpl, which is coded to output raw text files once it is invoked by theCS:Convert to Raw Textengine. -
The
transformer-formats.xmlfile, which is configured to associate theCS:Convert to Raw Textengine with the document transformer class named above.
Using the default solution requires you to implement a corresponding Document Transformation flex filter, which makes the transformation engine accessible from WebCenter Sites's interface as a document transformation option.
17.3.2 Custom Solutions
If you need a document transformation solution other than the default solution described above, you will have to create and customize the following components:
-
Write and deploy a document transformer for the target file type.
-
Register the transformation engine for the target file type.
-
Configure the
transformer-formats.xmlfile to specify the document transformer and the target file type. (The xml file supports multiple document transformers.) -
Implement the Document Transformation flex filter as described in this chapter.
For detailed steps, see Section 17.3.3, "Customizing Document Transformation."
17.3.3 Customizing Document Transformation
WebCenter Sites provides a default document transformer, com.fatwire.transformer.tika.DocumentTransformerImpl, which is coded to output raw text files once it is invoked by the CS:Convert to Raw Text engine. If the target file type must be other than raw text, you will have to complete the following steps to create and register the flex filter's supporting components.
Before implementing a Document Transformer flex filter:
17.3.3.1 Writing and Deploying a Document Transformer
-
Write an implementation of the
com.fatwire.transformer.common.DocumentTransformerinterface. You will implement the following methods:public String getOutputDocument(String filename, TransformerFormat outputformat);
and
public String getOutputDocument(String filename,String inputFileExt,
   TransformerFormat outputformat);
You can return
nullin the following method, as this method has been deprecated:public InputStream getBytesAsStream(String filename, TransformerFormat outputformat);
-
Copy the document transformer's
jarorclassfile to the WebCenter Sites web applicationlibfolder orclassesfolder.-
For WebLogic:
app-server-install-dir/bea/path-to-domain/domain-name/applications/WEB-INF/lib
-
For WebSphere:
WebSphere-Installation-Directory/InstalledApps/WEB-INF/lib
-
-
Continue to Section 17.3.3.2, "Registering the Transformation Engine."
17.3.3.2 Registering the Transformation Engine
Note:
If your document transformer is written to output files other than HTML, HTML fragment, or XML, skip to step 1 below this note. Otherwise, continue reading this note.
Using a Default Transformation Engine
WebCenter Sites provides the following transformation engines, in addition to CS:Convert to Raw Text:
-
CS: Convert to HTML
-
CS: Convert to HTML fragment
-
CS: Convert to XML
All of the engines are registered by default in the SystemTransforms table. If your document transformer is written to output files of type HTML, or HTML fragment, or XML, use the corresponding engine. Do the following:
-
Open Sites Explorer.
-
Select the
SystemTransformstable. -
Locate the required engine. For example:
CS:Convert to HTMLNote the value of the engine's
targetfield. You will enter this value for<mime-type>in thetransformer-formats.xmlfile, in Section 17.3.3.3, "Registering the Document Transformer." In theargsfield, set the arguments that are appropriate for this transformation engine. For example:exporttype=HTML -
Continue to Section 17.3.3.3, "Registering the Document Transformer."
To register a transformation engine
-
Open Sites Explorer and add a row to the
SystemTransformstable for the new transformation engine, as follows:-
Select the
SystemTransformstable and click in the table's workspace. -
Select File, then New, and then Record and fill in the new row as follows:
-
In the
namecolumn, enter the name of the transformation engine. For example: ConvertToPDF -
In the
descriptioncolumn, enter a description of the engine. For example: Convert to PDF -
In the
targetcolumn, entertext/<filetype>. For example: text/PDFNote:
You will use the target value for the
<mime-type>in the next section, Section 17.3.3.3, "Registering the Document Transformer." -
In the
classnamecolumn, enter the engine's default class name: com.fatwire.transformer.common.FWTransformer -
In the
argscolumn, set any arguments that are appropriate for this transformation engine. For example: exporttype=PDF
-
-
Save your changes.
-
-
Continue to the next step, Section 17.3.3.3, "Registering the Document Transformer."
17.3.3.3 Registering the Document Transformer
Register your document transformer in the transformer-formats.xml file, located in WebCenter Sites's WEB-INF/classes folder. The default file is shown below for reference.
Note:
Set the <mime-type> to the value of the target field for the transformation engine. (the value for target was set in Section 17.3.3.2, "Registering the Transformation Engine").
Specify the class name of your document transformer (created in Section 17.3.3.1, "Writing and Deploying a Document Transformer").
If you wish to specify multiple document transformers, repeat the entries for each transformer. The value for <mime-type> determines which document transformer will be invoked by the transformation engine.
Example 17-1 Default transformer-formats.xml
<transformer-format>
<name>Text Format</name>
<!-- name of the output format supported by this repository -->
<mime-type>text/plain</mime-type>

<file-extension>txt</file-extension>
<transformer-options>
<!-- number of possible transformers available for this transformation -->
  <transformer>
     <name>TIKA</name>
       <properties>
         <property>
           <name>ClassName</name>
<!-- name of the transformer class that gets loaded by transformer factory -->
          <value>com.fatwire.transformer.tika.DocumentTransformerImpl</value>
        </property>
        <property>
           <name>InputFile_Exts</name>
<!-- allowed input file extensions..* means all file types supported by tika -->
           <value>*</value>
        </property>
       </properties>
  </transformer>
</transformer-options>
</transformer-format>
17.3.4 Next Steps
Once you have created and registered the document transformation components as shown in Section 17.3.3, "Customizing Document Transformation," you can implement the corresponding Document Transform flex filters. Use the procedures provided in this chapter.