72 WEM Framework: Developing Applications
The "Articles" sample application is used throughout this chapter to illustrate the basic architecture of an application that makes REST calls.
This chapter contains the following sections:
72.1 Application Structure
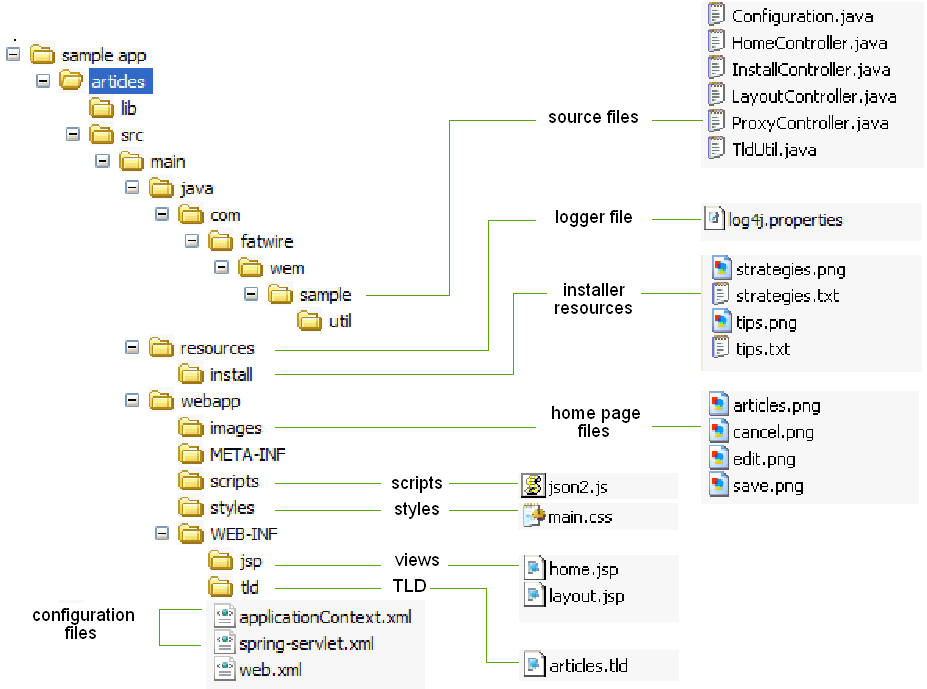
Figure 72-1 shows the source structure of the "Articles" sample application. On deployment, the following directories are copied from source to target: The contents of the lib directory are copied to /WEB-INF/lib/. The contents of the resources directory are copied to /WEB-INF/classes/.
Figure 72-1 'Articles' Sample Application Source Structure

Description of "Figure 72-1 'Articles' Sample Application Source Structure"
"Articles" is a Java Web application developed on Spring MVC. The following pages are available:
-
/install.appis the "Articles" installation page, which also displays a confirmation message when the application is successfully installed -
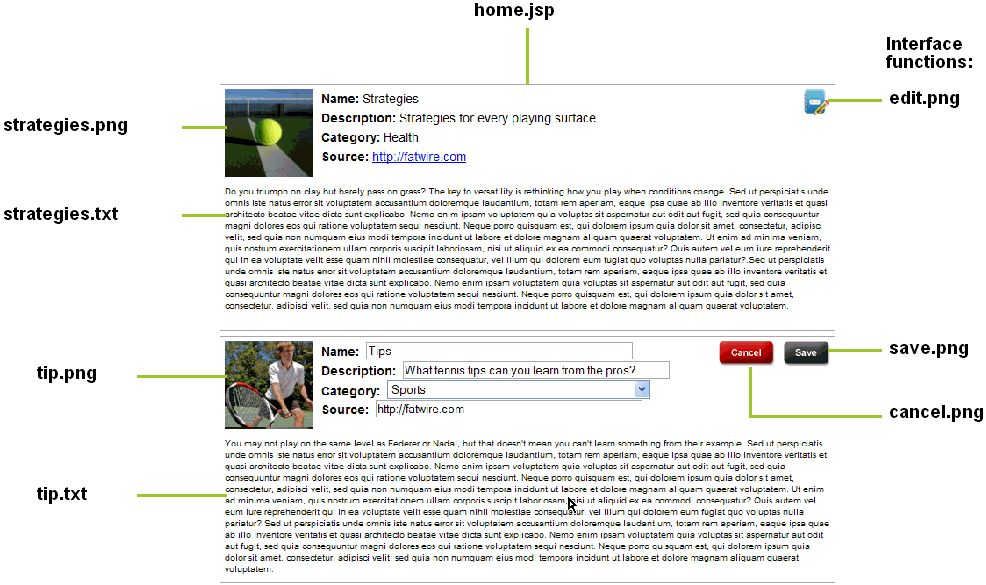
/home.appis the home page of the "Articles" application (Figure 72-3).
72.2 Configuration Files
-
applicationContext.xml(in/WEB-INF/) holds SSO and application-specific configurations (such as a predefined user and the site on which to enable the data model and assets). -
spring-servlet.xml(in/WEB-INF/) is the default Spring configuration file. This file stores the Spring configuration and references the following controllers (described in the "Source Files" section):-
HomeController -
InstallController -
LayoutController -
ProxyController -
log4j.properties(in/resources/) is the logging configuration file. On application deployment, it is copied from/resources/to/WEB-INF/classes/.
-
/sample app/articles/src/main/java/
The /sample/ folder contains the source files listed below:
-
Configuration.javais populated (by the Spring framework) from theapplicationContext.xmlfile (described in Section 72.2, "Configuration Files"). -
HomeController.javais the home page controller, which renders a single home page. This controller reads the list of sample articles from the WebCenter Sites platform using the REST API and displays them on the home page.The sample articles consist of images and text, stored in
/sample app/articles/src/main/resources/install. The sample articles are installed in the WebCenter Sites database byInstallController.java. -
InstallController.javaregisters the "Articles" application, and writes the application's asset model and sample assets to the database -
LayoutController.javadisplays the application's layout page (layout.app) used by the WEM UI framework.LayoutController.javais also used during the application registration procedure. -
ProxyController.javadelegates AJAX requests to the WebCenter Sites REST servlet. -
TldUtil.javautility class contains TLD function implementations.
/sample app/articles/src/main/resources/install
The /install/ folder contains the following resources, used by the InstallController to construct the home page (Figure 72-3):
-
strategies.png -
strategies.txt -
tips.png -
tips.txt
/sample app/articles/src/main/webapp/images
The /images/ folder contains:
-
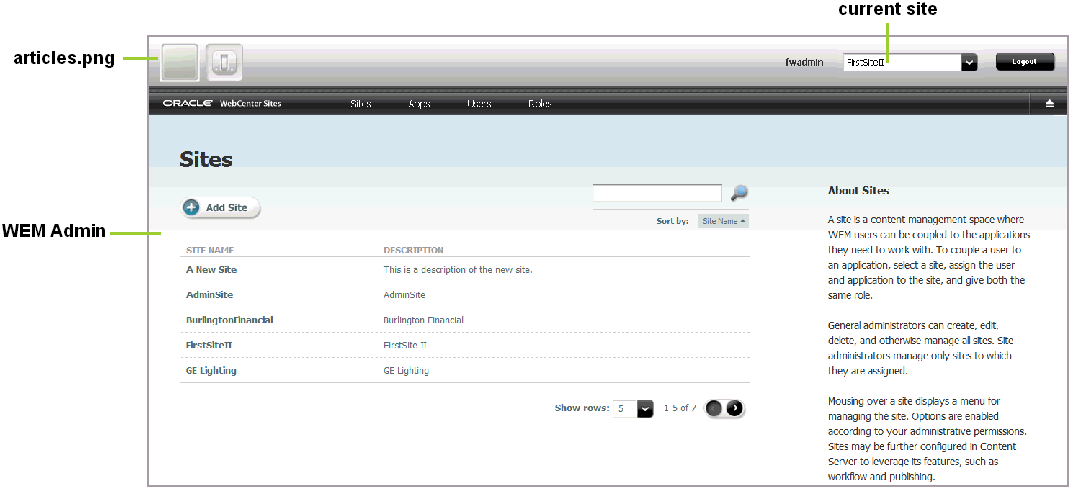
articles.pngicon (Figure 72-2), which represents the 'Articles" application in the applications bar -
In Figure 72-3:
-
edit.pngis the icon for the Edit function -
save.pngis the icon for the Save function -
cancel.pngis the icon for the Cancel function
-
/sample app/articles/src/main/webapp/scripts
The /scripts/ folder contains the json2.js utility script, used to convert strings to and from JSON objects.
/sample app/articles/src/main/webapp/styles
The /styles/ folder contains main.css, which specifies CSS styles used by this Web application.
/sample app/articles/src/main/WEB-INF/jsp
The /jsp/ folder contains:
-
home.jsp, which is used to render the home page view of the "Articles" application (Figure 72-3) -
layout.jsp, which defines the application layout
/sample app/articles/src/main/WEB-INF
The /WEB-INF/ folder contains:
-
articles.tld, the TLD declaration file -
spring-servlet.xml, the Spring configuration file -
web.xml, the Web application deployment descriptorFigure 72-2 'Articles' Icon (
articles.png)
Description of "Figure 72-2 'Articles' Icon (articles.png) "
72.3 Making REST Calls
WebCenter Sites REST resources support two types of input and output formats: XML and JSON. To get the desired return formats, you will need to set HTTP headers that specify the MIME type application/xml or application/json.
For example, when specifying input format to be XML, set Content-Type to application/xml. When specifying the output format, set Accept (the expected format) to application/xml. If other output formats are specified, they will be ignored. The default is XML, if not specified in Content-Type or Accept (for sample code, see lines 64 and 66 in Section 72.3.1, "Making REST Calls from JavaScript").
For more detailed information about REST calls, see the following topics in this section:
72.3.1 Making REST Calls from JavaScript
The following code (in home.jsp) performs AJAX calls to the asset REST services to save asset data. Note that the request is actually performed to the proxy controller which redirects the request to the destination REST service.
Note:
We use the JSON stringify library (http://json.org/js.html) to serialize a JavaScript object as a string. It is much more convenient to write JSON objects instead of strings.
-
// Form the URL pointing to the asset service
-
// to the proxy controller, which will redirect this request to the CS REST servlet.
-
var idarr = assetId.split(":");
-
var assetUrl = "${pageContext.request.contextPath}/REST/sites/${config.csSiteName}/types/" + idarr[0] + "/assets/" + idarr[1];
-
// For the data object to be posted.
-
var data =
-
{
-
"attribute" :
-
[
-
{
-
"name" : "source",
-
"data" :
-
{
-
"stringValue" : document.getElementById("source_e_" + assetId).value
-
}
-
},
-
{
-
"name" : "cat",
-
"data" :
-
{
-
"stringValue" : document.getElementById("cat_e_" + assetId).value
-
}
-
}
-
],
-
"name" : document.getElementById("name_e_" + assetId).value,
-
"description" : document.getElementById("desc_e_" + assetId).value,
-
// This should be removed.
-
"publist" : "${config.csSiteName}"
-
};
-
// Convert JSON data to string.
-
var strdata = JSON.stringify(data);
-
// Perform AJAX request.
-
var req = getXmlHttpObject();
-
req.onreadystatechange = function ()
-
{
-
if (req.readyState == 4)
-
{
-
if (req.status == 200)
-
{
-
// On successful result
-
// update the view controls with new values and switch the mode to 'view'.
-
for (c in controls)
-
{
-
document.getElementById(controls[c] + "_v_" + assetId).innerHTML =
-
document.getElementById(controls[c] + "_e_" + assetId).value;
-
}
-
switchMode(assetId, false);
-
}
-
else
-
{
-
// Error happened or the session timed out,
-
// reload the current page to re-acquire the session.
-
alert("Failed to call " + assetUrl + ", " + req.status + " " + req.statusText);
-
window.location.reload( false );
-
}
-
}
-
};
-
// We put Content-Type and Accept headers
-
// to tell CS REST API which format we are posting
-
// and which one we are expecting to get.
-
req.open("POST", assetUrl, true);
-
req.setRequestHeader("Content-Type", "application/json;charset=utf-8");
-
req.setRequestHeader("Content-Length", strdata.length);
-
req.send(strdata);
-
}
72.3.2 Making REST Calls from Java
The code below (in HomeController.java) calls the assets search service to list all assets of type FW_Article. The code uses the Jersey Client library passing objects from the rest-api-<version>.jar library provided by the WEM Framework. This way we leverage strong typing in Java.
It is important to note that a token must be acquired from Java code by calling the SSOAssertion.get().createToken() method. It is unnecessary to do so in JavaScript as that side is already authenticated against WEM SSO.
// Use Jersey client to query CS assets.
Client client = Client.create();
String url = config.getRestUrl() + "/types/FW_Article/search";
WebResource res = client.resource( url );

// Construct URL and add token (for authentication purposes)
// and fields (specify which fields to retrieve back) parameters.
res = res.queryParam("fields", URLEncoder.encode("name,description,content,cat,source", "UTF-8"));
res = res.queryParam("ticket", SSO.getSSOSession().getTicket(res.getURI().toString(), config.getCsUsername(), config.getCsPassword()));
// Put Pragma: auth-redirect=false to avoid redirects to the CAS login page.
Builder bld = res.header("Pragma", "auth-redirect=false");

// Make a network call.
AssetsBean assets = bld.get(AssetsBean.class);
Note:
The custom Pragma: auth-redirect=false header instructs the CAS SSO filter not to redirect to the CAS sign-in page, but to return a 403 error instead, when no ticket is supplied or the supplied ticket is invalid.
72.4 Constructing URLs to Serve Binary Data
The "Articles" application leverages the Blob server in WebCenter Sites to serve BLOB data. The following utility function could be used to construct the URL pointing to the binary data for a given attribute in a given asset, where blobUrl points to the Blob server (http://localhost:8080/cs/BlobServer by default).
public String getBlobUrl(String assetType, String assetId, String attrName, String contentType)
throws Exception
{
String contentTypeEnc = URLEncoder.encode(contentType, "UTF-8");

return blobUrl + "?" +
"blobkey=id" +
"&blobnocache=true" +
"&blobcol=thumbnail" +
"&blobwhere=" + assetId +
"&blobtable=" + assetType +
"&blobheader=" + contentTypeEnc +
"&blobheadername1=content-type" +
"&blobheadervalue1=" + contentTypeEnc;
    }
An alternative way to get binary data is to load an asset using the resource /sites/{sitename}/types/{assettype}/assets/{id}. When loaded, the asset will contain the URL pointing to the BLOB server.
72.5 Context Object: Accessing Parameters from the WEM Framework
The UI container provides a JavaScript Context object (WemContext) to all applications inside the container. The Context object is used by the applications to get details from the WEM Framework about the logged-in user and site (typically, to get the current site's name from the UI container). The Context object also provides various utility methods that the applications will use to share data. The Context Object can be used by applications running in the same domain as WebCenter Sites or in different domains.
Note:
The wemcontext.html file lists the exposed methods, summarized in Section 72.5.3, "Methods Available in Context Object."
This section contains the following topics:
72.5.1 Same Domain Implementations
To initialize and use Context Object for applications in the WebCenter Sites domain:
72.5.2 Cross-Domain Implementations
To initialize and use Context Object for cross-domain applications:
-
Copy
wemxdm.js,json2.js, and hash.html(from theMisc/Samplesfolder) to your application. -
Open the
sample.htmlfile and make the following changes to perform cross-domain calls:-
Change the paths of
wemxdm.jsandjson.jsandhash.htmlto their paths in the application (see lines 1 through 4 in the code below). -
Change the path of
wemcontext.htmlto its location in WebCenter Sites (wemcontext.htmlis located under/wemresources/wemcontext.html. Use the WebCenter Sites host name and context path. See line 14.) -
In the interface declaration, specify methods that will be used in the framework (line 15).
-
Implement those methods in the local scope and invoke the remote method (line 30).
-
Example 72-2 sample.html for Cross-Domain Calls
-
<script type="text/javascript" src="../js/wemxdm.js"></script>
-
<script type="text/javascript">
-
// Request the use of the JSON object
-
var remote;
-
window.onload = function() {
-
// When the window is finished loading start setting up the interface
-
remote = WemXDM.Interface(/** The channel configuration */
-
{
-
// Register the url to hash.html.
-
local: "../hash.html",
-
// Register the url to the remote interface
-
remote: "http://localhost:8080/cs/wemresources/wemcontext.html"
-
{
-
remote: {
-
getSiteName :{},
-
...
-
}
-
},/**The onReady handler*/ function(){
-
// This function will be loaded as soon as the page is loaded
-
populateAttributes();
-
});
-
}
-
</script>
-
<script type="text/javascript">
-
function getSiteName(){
-
remote.getSiteName(function(result){
-
alert("result = " + result);
-
});
-
}
-
...
-
</script>
72.5.3 Methods Available in Context Object
Table 72-1 Methods Available in Context Object
| Return Type | Method name and Description |
|---|---|
|
|
Returns attribute value for the given attribute name. |
|
|
Returns all the attribute names. |
|
|
Returns cookie value for the given name. Has all restrictions of the normal browser cookie. |
|
|
Returns all the cookies. |
|
|
Returns locale. |
|
|
Returns the site id. |
|
|
Returns the site name. |
|
|
Returns user object. |
|
|
Returns user name. |
|
|
Removes cookie. |
|
|
Sets attribute. These attributes can be accessed in other applications. |
|
|
Sets the cookie. |
72.6 Registration Code
Registration exposes applications in the WEM Framework, as explained in Section 70.5, "Authorization Model." Registering an application creates an asset of type FW_Application and an asset of type FW_View for each view associated with the application. The asset types are enabled on AdminSite. Their attributes are defined in the Oracle Fusion Middleware WebCenter Sites REST API Bean Reference. Programmatic registration is the preferred method. For an example of manual registration, see Chapter 78, "WEM Framework: Registering Applications Manually."
This section contains the following topics:
-
Section 72.6.1, "Registering Applications with an iframe View"
-
Section 72.6.2, "Registering Applications with JavaScript and HTML Views"
72.6.1 Registering Applications with an iframe View
The section uses code from the "Articles" sample application to illustrate the registration process. "Articles" has a single view of type iframe. The same steps apply to JavaScript and HTML views.
-
Create or get an icon to represent your application. (The icon will be displayed in the applications bar.)
(The "Articles" sample application uses the
articles.pngimage file located in:/sample app/articles/src/main/webapp/images/) -
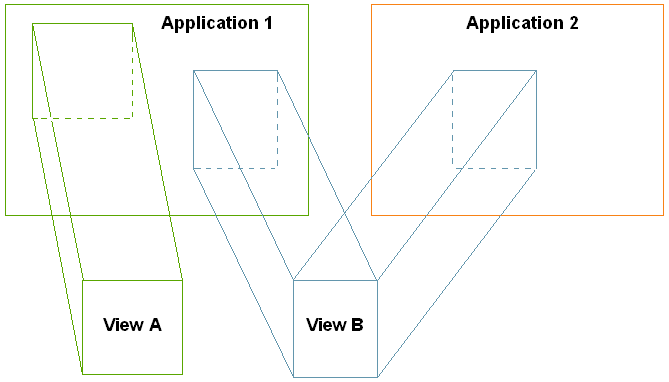
Create a file that specifies the layout of the application in HTML, that is, for each view, create a placeholder element to hold the content rendered by the view. Applications and views are related as shown in Figure 72-4.
For example,
layout.jspfor the "Articles" sample application contains the following line:
<div id="articles" style="float:left;height:100%;width:100%" class="wemholder"></div>
The view's content will be rendered within the placeholder element when the application is displayed (layout.app renders the application's layout; home.app renders the view).
Note:
When creating the layout file, specify a unique id for the placeholder element. You will specify the same id for the parentnode attribute when coding the view object. Use class="wemholder" for the placeholder elements.
The relationship between applications and views is many-to-many (Figure 72-4). One application can have multiple views and each view can be used by many applications. Only registered views can be shared (through their asset IDs). If the asset ID is omitted, the view will be created within the context of its application. In the basic case, an application has only one view associated with it.
-
Invoke the
PUTwem/applications/{applicationid}REST service and specify your application bean. Populate the bean with the view asset and application asset.For an iframe view, use the code of the "Articles" sample application, i.e.,
InstallController.java (locate the comment lines// Create a new view objectand// Create a new application object). Set thelayouturlattribute to specify the URL of the application's layout page.In the "Articles" application, the
layouturlattribute points to the URL oflayout.app(implemented byLayoutController.java):app.setLayouturl(config.getArticlesUrl() + "/layout.app");
You can test the results of your registration process by logging in to the WEM Admin interface as a general administrator and selecting Apps on the menu bar. Your application should be listed on that page.
72.6.2 Registering Applications with JavaScript and HTML Views
For applications that use HTML and JavaScript views, follow the steps in the previous section, but use the sample code and attributes listed below:
72.6.2.1 JavaScript View
Note:
JavaScript specified in the view will be rendered (executed) when the application is rendered. Make sure that the JavaScript does not conflict with other views.
Sample code:
   window.onload = function () {
      if (GBrowserIsCompatible()) {
        var map = new GMap2(document.getElementById("map_canvas"));
        map.setCenter(new GLatLng(37.4419, -122.1419), 13);
        map.setUIToDefault();
      }
   }
-
Rendering the JavaScript view from a source URL
Set the following attributes:
-
name: Name of the view -
parentnode: ID of the placeholder element (from step 2 in Section 72.6.1, "Registering Applications with an iframe View") . -
viewtype:fw.wem.framework.ScriptRenderer, which renders JavaScript into the placeholder element. -
sourceurl: Path of the.jsfile, which provides content for the view. For example:http://example.com:8080/js/drawTree.js
-
-
Rendering the JavaScript view from source code
Set the following attributes:
-
name: Name of the view -
parentnode: ID of the placeholder element (from step 2 in Section 72.6.1, "Registering Applications with an iframe View"). -
viewtype:fw.wem.framework.ScriptRenderer, which renders JavaScript into the placeholder element -
javascriptcontent: JavaScript code (sample provided above. The code must not contain<script>tags.)
-
72.6.2.2 HTML View
Note:
HTML specified in the view will be rendered (executed) when the application is rendered.
Sample code:
<object width="480" height="385">
 <param name="movie" value="http://www.localhost:8080/jspx/flash_slider_main.swf"></param>
 <param name="allowFullScreen" value="true"></param>
 <embed src=" http://www.localhost:8080/jspx/flash_slider_main.swf"
  type="application/x-shockwave-flash" allowscriptaccess="always" allowfullscreen="true"
  width="480" height="385">
 </embed>
</object>
-
Rendering the HTML view from a source URL
Set the following attributes:
-
name: Name of the view -
parentnode: ID of the placeholder element (from step 2 in Section 72.6.1, "Registering Applications with an iframe View"). -
viewtype:fw.wem.framework.IncludeRenderer, which renders JavaScript into the placeholder element -
sourceurl: Path to the HTML file that provides content for the view. For example:http://example.com:8080/js/drawTree.jsp
-
-
Rendering the HTML view from source code
Set the following attributes:
-
view: Name of the view -
parentnode: ID of the placeholder element (from step 2 in Section 72.6.1, "Registering Applications with an iframe View"). -
viewtype:fw.wem.framework.IncludeRenderer, which renders JavaScript into the placeholder element -
includecontent: HTML content (sample provided above. The code must not contain<html> or<body>tags.
-

