Oracle® Fusion Middleware
Integrating the Eloqua Marketing Cloud Service with Oracle WebCenter Sites
Release 11g R1 (11.1.1.8)
E62003-01
April 2015
This guide describes how to perform the integration of the Eloqua Cloud Marketing Service (Eloqua) with Oracle WebCenter Sites.
Note:
To obtain the functionality described in this guide, you must apply WebCenter Sites 11.1.1.8 Patch 10; for installation instructions, see thereadme.txt file included with the patch.This guide covers the following topics:
1 Overview
Integrating Eloqua with WebCenter Sites provides marketers with the ability to converge the visitor's online experience with their marketing campaigns, as well as more effectively manage the visitor journey. The integration eliminates content duplication and streamlines content targeting across channels. This is achieved through the following functionality enabled by the integration:
-
Embedding WebCenter Sites content into Eloqua forms and landing pages. Drag-and-drop placement of existing WebCenter Sites content ensures consistency of the marketing message and a seamless visitor experience across channels. Specific content can be targeted at specific visitors or campaign contacts.
-
Embedding Eloqua forms into WebCenter Sites pages. Drag-and-drop placement of Eloqua forms into WebCenter Sites pages eliminates the involvement of the site administrator or developer in the lead generation process.
Existing visitor segment and contact data can be automatically passed from Eloqua to WebCenter Sites for targeted content delivery.
1.1 How the Integration Works
Eloqua uses its AppCloud framework to communicate with the WebCenter Sites content service running on the target WebCenter Sites instance over secure HTTP authenticated via Oauth 1.0. Supported operations include get, search, list, copy, modify, and delete. The secure HTTP calls passed between the WebCenter Sites content service and the Eloqua AppCloud framework can be logged for troubleshooting purposes.
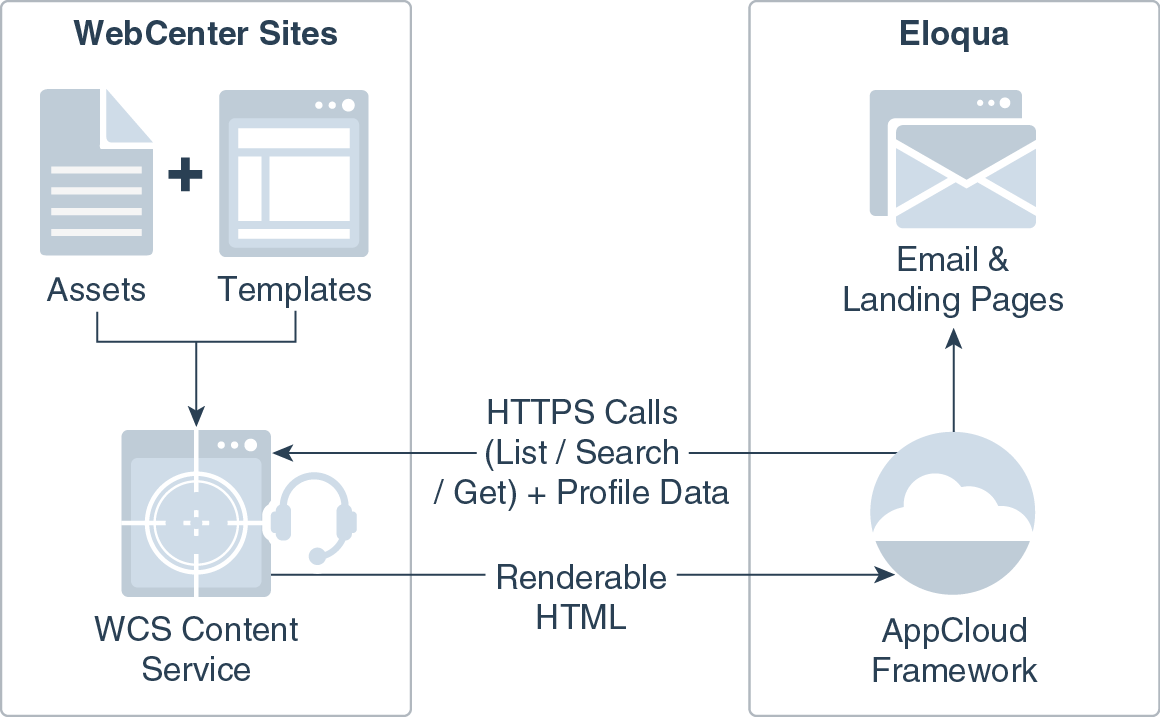
The WebCenter Sites administrator decides which asset types are available to Eloqua marketers. Content from WebCenter Sites is delivered to Eloqua as renderable HTML code embedded directly into the target e-mail or landing page.
To target specific content at specific visitors or campaign contacts, the template that renders the desired WebCenter Sites content can include placeholder tags that automatically accept visitor segment and contact field data from Eloqua and substitute it during rendering.
Eloqua forms are placed into WebCenter Sites pages by reference as proxy assets and rendered by WebCenter Sites templates. The Eloqua administrator decides which Eloqua forms are available to the WebCenter Sites instance.
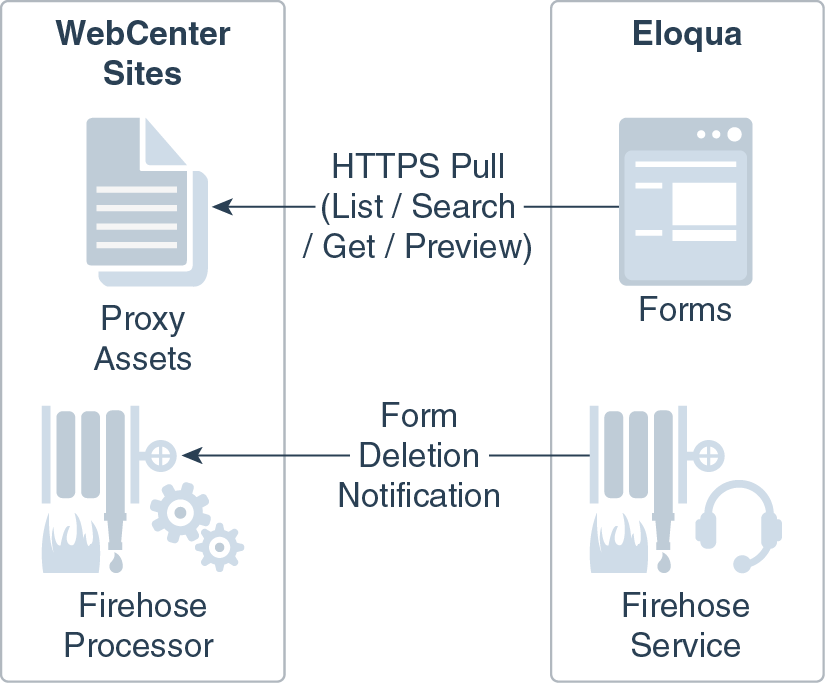
If a form that has been embedded into a WebCenter Sites page is deleted, Eloqua's Firehose service notifies the WebCenter Sites administrator, or another individual or group, via e-mail so that the affected page(s) can be updated accordingly. The notification message lists the affected pages.
WebCenter Sites ships with sample rendering templates to get you started with the integration process.
1.2 Accessing Eloqua Documentation
Some procedures in this guide call for completing pre-requisite steps. For information on completing these steps, consult the Eloqua documentation available at:
http://docs.oracle.com/cloud/latest/marketingcs_gs/OMCAA/index.html
2 Accessing WebCenter Sites Content in Eloqua
This section describes how to accomplish the embedding of WebCenter Sites content in Eloqua e-mails and landing pages.
The required steps are:
2.1 Configuring Eloqua for Access to the WebCenter Sites Content Service
Before marketers can embed existing WebCenter Sites content into Eloqua e-mails and landing pages, you must configure your Eloqua instance to communicate with the WebCenter Sites content service. The example URLs below assume the default servlet path of /cs/ContentServer - adjust your URLs as appropriate for your environment. Also, if you have not already done so, create a new provider in Eloqua to separate the WebCenter Sites content service from other services and applications.
Note:
Your WebCenter Sites instance must be configured to accept HTTPS connections. Only ports 443 and 8443 are supported.All URLs, property names, and their values are case-sensitive.
-
Log into the target Eloqua site as its administrator.
-
In the top bar, click Settings and select AppCloud Developer.
-
Click Create New App and fill in the form that appears as follows:
Field Value Icon URL https://wcs-instance.company.com/cs/images/eloqua/AppIcon.pngEnable URL https://wcs-instance.company.com/cs/ContentServer?pagename=
EloquaIntegration/Enable&installId={InstallId}&appId={AppId}&
callbackUrl={CallbackUrl}Status URL https://wcs-instance.company.com/cs/ContentServer?pagename=
EloquaIntegration/SitesStatusCallback URL https://wcs-instance.company.com/cs/ContentServer?pagename=
EloquaIntegration/Enable -
Click Save App to save your changes.
-
In the App Details page that appears, click Show Secret in the OAuth section, copy the client secret value displayed in the pop-up and save it to a text file.
(You need this value to configure the authentication of Eloqua requests
within WebCenter Sites later in this guide.) -
In the Services section click Add Service, then click Content in the pop-up that appears.
-
Fill in the fields in the Content Service Details form as follows:
Field Value Icon URL https://wcs-instance.company.com/cs/images/eloqua/
ContentServiceIcon.pngCreate URL https://wcs-instance.company.com/cs/ContentServer?pagename=
EloquaIntegration/Instances/Add&instanceId={InstanceId}Configure URL https://wcs-instance.company.com/cs/ContentServer?pagename=
EloquaIntegration/ContentSearch&instanceId={InstanceId}&
installId={InstallId}Delete URL https://wcs-instance.company.com/cs/ContentServer?pagename=
EloquaIntegration/Instances/Delete&instanceId={InstanceId}Copy URL https://wcs-instance.company.com/cs/ContentServer?pagename=
EloquaIntegration/Instances/Copy&instanceId={InstanceId}&
originalInstanceId={OriginalInstanceId}Layout Flow Flow layout mode allows the embedded content to be dynamically resized.
Max-records The maximum number of rendered assets passed from WebCenter Sites to Eloqua in a single call. Oracle recommends a value below 5000; however, if you experience issues with passing very large pieces of content, lower this value. For more information, consult Eloqua documentation. Content-type application/json Landing Page Notification URL (Optional) To make WebCenter Sites content available in Eloqua landing pages: https://wcs-instance.company.com/cs/ContentServer?pagename=
EloquaIntegration/Processor/LandingPageNotification&instanceId=
{InstanceId}&installId={InstallId}&executionId={ExecutionId}E-mail Page Notification URL (Optional) To make WebCenter Sites content available in Eloqua e-mails: https://wcs-instance.company.com/cs/ContentServer?pagename=
EloquaIntegration/Processor/EmailNotification&instanceId=
{InstanceId}Fill in the remaining fields as appropriate for your environment, then click Save to commit your changes.
-
Save your changes and return to the WebCenter Sites content service properties page.
-
Click the link in the Catalog section to add the WebCenter Sites content service to your cloud service catalog. When prompted, click Accept.
-
Install the WebCenter Sites cloud service into your Eloqua instance. This makes it available within the Eloqua marketer interface for the target Eloqua instance only.
-
In the Eloqua interface, click Settings, then select Setup.
-
Click AppCloud Catalog.
-
Select the Catalog tab to display the list of available (but not installed) services.
-
Locate your target application and click Install.
-
Note:
To maintain security within your Eloqua instance, do not publish the WebCenter Sites content service.2.2 Configuring OAuth Authentication
Secure HTTP calls from Eloqua to the WebCenter Sites content service are authenticated via OAuth 1.0 to ensure that only the authorized Eloqua instance can access content within the target WebCenter Sites instance.
To facilitate this authentication process, you must provide the Eloqua client secret value to the WebCenter Sites content service as follows:
-
Open the
eloquaIntegration.iniproperty file (located in the WebCenter Sites instance root directory) in the WebCenter Sites Property Editor. -
Using the Property Editor, set the value of the eloquacloudapp.clientsecret property to the client secret value from step 5 in "Configuring Eloqua for Access to the WebCenter Sites Content Service".
-
Save and close the
eloquaIntegration.iniproperty file.
2.3 Making WebCenter Sites Assets Available within Eloqua
As the administrator, you must choose which WebCenter Sites asset types and associated templates are available to Eloqua marketers. Rendering templates must be created specifically for rendering WebCenter Sites content within Eloqua e-mails and landing pages according to the best practices listed in the next section.
2.3.1 Creating Asset Rendering Templates for Eloqua
WebCenter Sites content is embedded into Eloqua e-mails and landing pages not by reference, but as fully renderable HTML code. Because of this, keep in mind the following guidelines when creating templates for rendering WebCenter Sites assets within Eloqua e-mails and landing pages:
-
Use absolute URLs and paths,
Note:
Therender:getbloburltag does not generate an absolute URL to the target blob unless you explicitly pass theschemeandauthorityvalues. For more information on these values, see the WebCenter Sites Property Files Reference. -
Embed all styling (CSS) within the template,
-
The element used in the template must be configured as follows:
-
Type: Layout
-
Usage: Element defines a whole HTML page and can be called externally.
-
When coding a template to render assets containing custom contact data pulled from Eloqua contact fields, you must add a {{C_fieldname}} placeholder within the template code for each custom field (where C_fieldname is the database record name of the target Eloqua field), then complete the steps in the next section. Once configured, the contact field values are string-substituted in the returned HTML content.
When rendering customized content, WebCenter Sites returns a JSON array containing the customized rendered HTML code, one object per each customized asset. The number of rendered assets passed within this array for each call is governed by the max-records setting (configured when setting up the WebCenter Sites content service within Eloqua).
2.3.2 Configuring Asset Type Visibility in Eloqua
To make assets of the desired types visible to Eloqua marketers, you must do the following:
-
Decide which asset types you want to make visible to the Eloqua marketers.
-
Decide on a friendly name for each asset type so that Eloqua marketers can easily identify the type of content it represents and add them as a comma-separated list to the value of the
eloquacloudapp.assettype.friendlynameproperty
in theeloquaIntegration.iniproperties file. For example:eloquacloudapp.assettype.friendlyname=Business Article,Sports Article,
Travel Brochure -
Associate the friendly names with their corresponding WebCenter Sites asset type names. For each consecutive friendly name, add the following property to the
eloquaIntegration.iniproperties file:eloquacloudapp.assettype.N=AssetTypeName:AssetSubTypeNamewhere:
Variable Description N Consecutive position of the corresponding friendly name
in the comma-separated list in the propertyeloquacloudapp.assettype.friendlyname, starting with0.AssetTypeName Name of the target WebCenter Sites asset type. AssetSubTypeName (Optional) Name of the target asset sub-type. For example:
eloquacloudapp.assettype.0=Article:BusinessArticleeloquacloudapp.assettype.1=Article:SportsArticleeloquacloudapp.assettype.2=TravelBrochure -
Specify the template(s) that you have developed to render assets of each exposed type and sub-type. For each consecutive friendly name (and thus the corresponding asset type and sub-type), add the following property to the
eloquaIntegration.iniproperties file:eloquacloudapp.templates.N=TemplateName:SiteNamewhere:
Variable Value N Consecutive position of the corresponding friendly name in the comma-separated list in the property eloquacloudapp.assettype.friendlyname, starting with0.TemplateName Name of the corresponding template for the target asset type and sub-type. When using a typeless template, you must precede its name with a /(forward slash).SiteName Name of the WebCenter Sites site in which both the assets of the target asset type and sub-type, as well as the corresponding templates reside. Do not specify a template that resides in a site other than that the site holding the assets of the target type and sub-type, as this results in missing content.
To specify multiple templates for each target asset type, append additional TemplateName
:SiteName values to the property, separated by commas.For example:
eloquacloudapp.templates.0=BusinessArticleLayout1:mySite,

BusinessArticleLayout2:mySite
eloquacloudapp.templates.1=SportsArticleLayout1:mySite,
SportsArticleLayout2:mySiteeloquacloudapp.templates.2=TravelBrochureLayout:mySite -
(Optional) Specify the Eloqua contact fields used by the templates configured in step 4 using their database record names. For each corresponding
eloquacloudapp.templates.N entry, add the following entry to the eloquaIntegration.ini property file:eloquacloudapp.templatefields.N=C_Field1|C_Field2,C_Field3|C_Field4where:
Variable Value N Consecutive position of the corresponding friendly name in the comma-separated list in the property eloquacloudapp.assettype.friendlyname, starting with0.Field1...Field4 Database record names of the target contact fields. For each template specified in the corresponding
eloquacloudapp.templates.N entry, add a comma-separated entry consisting of pipe-separated field names.For example:
eloquacloudapp.templatefields.0=C_FirstName|C_LastName,

C_EmailAddress|C_PhoneNumber
Note:
You can determine the database record names for the target fields by navigating to Settings > Setup > Fields & Views > Contact Fields within the Eloqua interface. The names begin withC_.The placeholder in the template is
{{C_fieldname}}and the fields are string-substituted in the returned HTML content. -
Assign images that represent the type of content stored by assets of the exposed asset types and sub-types so that Eloqua marketers can more easily identify the content they want to use. The image is displayed in the asset selection dialog along with the asset's name and modification date.
For each consecutive friendly name (and thus the corresponding asset type and sub-type), add the following image attribute definition entry to the
eloquaIntegration.iniproperties file:eloquacloudapp.attributename.N=AttributeName1:AttributeName2where:
Variable Value N Consecutive position of the corresponding friendly name in the comma-separated list in the property eloquacloudapp.assettype.friendlyname, starting with0.AttributeName Name of the target attribute. Note:
The complexity of your attribute hierarchy might dictate specifying several levels of attributes.For example:
eloqua.CloudApp.attributename.0=articleImage:largeImageeloqua.CloudApp.attributename.1=sportsImage:smallImageeloqua.CloudApp.attributename.2=travelImage:color:thumbnail
2.4 Placing WebCenter Sites Content into Eloqua E-Mails and Landing Pages
The Eloqua marketer places WebCenter Sites content into an Eloqua e-mail or landing page as follows:
-
In the target Eloqua instance, create a new, or edit an existing e-mail or landing page.
-
In the content bar on the left, click Cloud Content.
-
In the Cloud Content pop-up dialog that appears, locate the WebCenter Sites content service and drag it into the e-mail or page; position and size the resulting content frame as necessary.
Note:
Note that if the page layout is set toflow, the width of this content frame defines the width of the content it holds. -
Double-click the content frame you just placed to display the asset selection dialog and locate the content you want to embed; the drop-down menus allow you to browse through available asset types and sub-types.
-
Once you have located the desired asset, select it from the list, then do one of the following:
-
To preview the asset before embedding it, click Preview and select the desired rendering template from the drop-down list,
-
To embed the asset, click Embed and select the desired rendering template from the drop-down list,
-
To use another asset, locate and select it in the content selection dialog,
Note:
The content does not immediately appear in the e-mail or page you are editing - you must preview the e-mail or page, or finalize it in order to view the embedded content. -
-
Complete editing your e-mail or page and save your changes.
3 Accessing Eloqua Forms in WebCenter Sites
This section describes how to accomplish the embedding of Eloqua forms within WebCenter Sites pages to enable embedding of Eloqua forms within WebCenter Sites pages and how to place Eloqua forms into WebCenter Sites pages.
Note:
This section assumes you have successfully completed the steps in Accessing WebCenter Sites Content in Eloqua.Your WebCenter Sites instance must be configured to accept HTTPS connections. Only ports 443 and 8443 are supported.
All URLs, property names, and their values are case-sensitive.
The required steps are:
3.1 Specifying the Eloqua Instance Connection Parameters
To allow WebCenter Sites to connect to the target Eloqua instance, add the following properties to the eloquaIntegration.ini property file:
| Property | Value |
|---|---|
eloqua.company |
Name of the company for which the target Eloqua account has been established. |
eloqua.username |
Name of target Eloqua account. |
eloqua.password |
Password for the target Eloqua account. |
eloqua.baseurl |
Full base URL of the target Eloqua instance.
Use the default URL, |
eloqua.proxyHost |
(Optional) If your organization uses an Internet proxy, specify the full host name of the proxy server. |
eloqua.proxyPort |
(Optional) If your organization uses an Internet proxy, specify the port on which the proxy server listens for connections. |
3.2 Enabling the EloquaForm Proxy Asset Type
You must enable the EloquaForm asset type (installed with the patch) for the target WebCenter Sites site. For instructions, see the WebCenter Sites documentation.
3.3 Registering the Eloqua Firehose Service
The Eloqua Firehose service notifies you whenever a form that has been embedded into a WebCenter Sites page has been deleted from Eloqua. This minimizes the chance of delivering pages that are missing content.
-
Log in to the target Eloqua instance as the administrator.
-
In the top bar, click Settings, then select AppCloud Developer.
-
In the list of services, click the WebCenter Sites content service you have created in Configuring Eloqua for Access to the WebCenter Sites Content Service.
-
In the Services section click Add Service, then select Firehose from the pop-up dialog.
-
In the form that appears, fill in the fields as follows:
Field Value Icon URL https://wcs-instance.company.com/cs/images/eloqua/AppIcon.pngName WebCenter Sites Firehose Description WebCenter Sites Firehose Notification Service Pattern Form.DeletedNotification URL https://wcs-instance.company.com/cs/ContentServer?pagename=
EloquaIntegration/Processor/FirehoseNotification -
Click Save to store your changes.
-
Add the following line to the
protectedPageslist in theweb.xmlfile on your WebCenter Sites instance:EloquaIntegration/Processor/FirehoseNotification
Once an Eloqua form has been embedded into a WebCenter Sites page, a rendered copy of that page, including the Eloqua form, is stored in the WebCenter Sites cache.
If an Eloqua marketer deletes the embedded form within Eloqua, that cached page copy is no longer valid.
When notified by the Firehose service, the WebCenter Sites contributor responsible for the affected page must manually remove the deleted Eloqua form from the page and republish it; otherwise, the page is delivered to the visitor's browser incomplete.
3.4 Configuring the Form Deletion Notification
To define the body, content, recipient address, and other parameters of the form deletion notification message sent by the Firehose service, add the following properties to the eloquaIntegration.ini property file:
| Property | Value |
|---|---|
eloquanotification.email.address |
E-mail address that receives the notification message. |
eloquanotification.email.subject |
Subject of the notification message. |
eloquanotification.email.body |
Body of the notification message. |
eloquanotification.email.replyto |
E-mail address that receives replies to the notification message. |
eloquanotification.email.contenttype |
MIME content type of the notification message body. |
3.5 Creating the Rendering Template for the EloquaForm Assets
To create the template that renders the EloquaForm proxy assets within WebCenter Sites pages, do the following:
-
Log in to the Admin interface on target WebCenter Sites site as the administrator.
-
Create a new template with the following parameters:
Field Value Name DetailFor AssetType EloquaFormUsage Element is used within an HTML page Create Template Element JSP Element Logic paste the contents of the EloquaForm/Detail.jspelement -
Save the new template.
3.6 Placing Eloqua Forms on WebCenter Sites Pages
To place an Eloqua form into a WebCenter Sites page, the page developer must have configured the page template to include one or more slots that accept EloquaForm proxy assets. Once the target pages have been configured in this manner, a WebCenter Sites contributor can place Eloqua forms into them as follows:
-
In the Contributor interface, create a new or open an existing page for editing.
-
In the tree on the left, select the Content Tree tab and expand the Eloqua node. (You may also perform a search for assets of type
EloquaForm.) -
Locate the desired
EloquaFormasset and drag it into the designated slot on the page. -
Make any further desired changes to the page, then save the page to commit them.
4 Documentation Accessibility
For information about Oracle's commitment to accessibility, visit the Oracle Accessibility Program website at http://www.oracle.com/pls/topic/lookup?ctx=acc&id=docacc.
Oracle customers that have purchased support have access to electronic support through My Oracle Support. For information, visit http://www.oracle.com/pls/topic/lookup?ctx=acc&id=info or visit http://www.oracle.com/pls/topic/lookup?ctx=acc&id=trs if you are hearing impaired.
Integrating the Eloqua Marketing Cloud Service with Oracle WebCenter Sites, Release 11g R1 (11.1.1.8)
E62003-01
Copyright © 2011, 2015, Oracle and/or its affiliates. All rights reserved.
This software and related documentation are provided under a license agreement containing restrictions on use and disclosure and are protected by intellectual property laws. Except as expressly permitted in your license agreement or allowed by law, you may not use, copy, reproduce, translate, broadcast, modify, license, transmit, distribute, exhibit, perform, publish, or display any part, in any form, or by any means. Reverse engineering, disassembly, or decompilation of this software, unless required by law for interoperability, is prohibited.
The information contained herein is subject to change without notice and is not warranted to be error-free. If you find any errors, please report them to us in writing.
If this is software or related documentation that is delivered to the U.S. Government or anyone licensing it on behalf of the U.S. Government, then the following notice is applicable:
U.S. GOVERNMENT END USERS: Oracle programs, including any operating system, integrated software, any programs installed on the hardware, and/or documentation, delivered to U.S. Government end users are "commercial computer software" pursuant to the applicable Federal Acquisition Regulation and agency-specific supplemental regulations. As such, use, duplication, disclosure, modification, and adaptation of the programs, including any operating system, integrated software, any programs installed on the hardware, and/or documentation, shall be subject to license terms and license restrictions applicable to the programs. No other rights are granted to the U.S. Government.
This software or hardware is developed for general use in a variety of information management applications. It is not developed or intended for use in any inherently dangerous applications, including applications that may create a risk of personal injury. If you use this software or hardware in dangerous applications, then you shall be responsible to take all appropriate fail-safe, backup, redundancy, and other measures to ensure its safe use. Oracle Corporation and its affiliates disclaim any liability for any damages caused by use of this software or hardware in dangerous applications.
Oracle and Java are registered trademarks of Oracle and/or its affiliates. Other names may be trademarks of their respective owners.
Intel and Intel Xeon are trademarks or registered trademarks of Intel Corporation. All SPARC trademarks are used under license and are trademarks or registered trademarks of SPARC International, Inc. AMD, Opteron, the AMD logo, and the AMD Opteron logo are trademarks or registered trademarks of Advanced Micro Devices. UNIX is a registered trademark of The Open Group.
This software or hardware and documentation may provide access to or information about content, products, and services from third parties. Oracle Corporation and its affiliates are not responsible for and expressly disclaim all warranties of any kind with respect to third-party content, products, and services unless otherwise set forth in an applicable agreement between you and Oracle. Oracle Corporation and its affiliates will not be responsible for any loss, costs, or damages incurred due to your access to or use of third-party content, products, or services, except as set forth in an applicable agreement between you and Oracle.
The information contained in this document is for informational sharing purposes only and should be considered in your capacity as a customer advisory board member or pursuant to your beta trial agreement only. It is not a commitment to deliver any material, code, or functionality, and should not be relied upon in making purchasing decisions. The development, release, and timing of any features or functionality described in this document remains at the sole discretion of Oracle.
This document in any form, software or printed matter, contains proprietary information that is the exclusive property of Oracle. Your access to and use of this confidential material is subject to the terms and conditions of your Oracle Master Agreement, Oracle License and Services Agreement, Oracle PartnerNetwork Agreement, Oracle distribution agreement, or other license agreement which has been executed by you and Oracle and with which you agree to comply. This document and information contained herein may not be disclosed, copied, reproduced, or distributed to anyone outside Oracle without prior written consent of Oracle. This document is not part of your license agreement nor can it be incorporated into any contractual agreement with Oracle or its subsidiaries or affiliates.