12 Working with Feedback and the Message Board
This chapter describes the Feedback viewers and Message Board, which enable you to post, view, and manage feedback and messages to and from your connections.
This chapter includes the following topics:
Permissions:
To perform the tasks in this chapter, you need the application-level permission People Connections: Update People Connections Data.
12.1 About Feedback
Feedback provides a means of viewing, posting, and managing feedback between you and other users. When you connect with other users, you potentially give them access to your Feedback and gain access to theirs. Access to other users' Feedback views must be specifically granted through each user's personal Feedback preferences.
See Also:
You can grant access to your view of Feedback through People Connections preferences. For more information, see Section 12.2, "Setting Feedback Preferences."
A Feedback viewer in your view of the Home portal, enables you to view feedback from users to whom you have granted access. Feedback views in other users' views of the Home portal enable you to view feedback they have received and to post feedback for them, provided they have granted you access.
Feedback posts are also streamed to the Activity Stream, unless your system administrator has configured the Activity Stream not to show Feedback activity. Additionally, you can elect not to show Feedback activity in your own view of the Activity Stream through your personal Feedback preferences.
Note:
The feedback you mark private is shown only to you and the recipient in your views of Feedback. However, private Feedback is shared with all of your connections and with all of the recipient's connections in their views of Activity Stream, unless your system administrator configures Activity Stream to omit showing actions from Feedback or you do so through your personal Activity Stream preferences. For more information, see Section 22.3, "Setting Activity Stream Preferences."
Before you access your view of Feedback or your Feedback preferences, your system administrator can set global application defaults that affect what all users may see and do with their own and other users' Feedback.
WebCenter Portal provides the following Feedback views:
-
Feedback for viewing, posting, and managing Feedback (Figure 12-1)
-
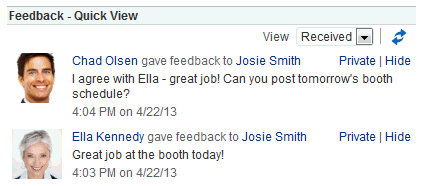
Feedback - Quick View for viewing and posting Feedback (Figure 12-2)
12.2 Setting Feedback Preferences
Use Feedback preferences to specify who can view the Feedback you have given and received and who can post Feedback in your Feedback views.
To set Feedback Preferences:
-
Open the Preferences page.
-
Click People Connections to display People Connections Preferences.
-
Click the Feedback tab to bring it forward (Figure 12-3).
-
Set your Preferences for Feedback.
Table 12-1 lists and describes each option.
Table 12-1 Feedback Preference Options
Option Description Grant View Access to
Select who can view Feedback given to you.
-
Everyone—All users, including users who are not logged in, can view the Feedback you have given.
-
Authenticated Users—Only users who are logged in can view the Feedback you have given.
-
User's Connections—Only you and your Connections can view the Feedback you have given.
-
User Only—Only you and the user for whom you have provided Feedback can view the Feedback you have given.
Grant Post Access to
Select who can provide Feedback to you.
-
Everyone—All users, including users who are not logged in, can post Feedback messages to you.
-
Authenticated Users—Only users who are logged in can post Feedback messages to you.
-
User's Connections—Only you and your Connections can post Feedback messages to you.
-
User Only—No one can post Feedback messages to you.
Grant View Feedback Given Access to
Select who can view Feedback you have received.
-
Everyone—All users, including users who are not logged in, can view Feedback you have received.
-
Authenticated Users—Only users who are logged in can view Feedback you have received.
-
User's Connections—Only you and your Connections can view Feedback you have received.
-
User Only—No one can view Feedback you have received.
-
-
Click Save.
12.3 Viewing Feedback
This section provides information about accessing the Feedback you have posted or received and hiding and unhiding posted Feedback. It includes the following sections:
12.3.1 Viewing Feedback You Have Posted or Received
A View menu on Feedback viewers provides a means of accessing the Feedback you have posted for others and the Feedback you have received from others.
To view Feedback you have posted or received:
-
Go to the Feedback viewer in your Home portal.
-
Select an option from the View menu (Figure 12-4):
-
Given—To view the Feedback you have posted for others
-
Received—To view the Feedback others have left for you
-
12.3.2 Sorting and Filtering Feedback Posts
The Feedback viewer includes sorting and filtering features for controlling what is shown in your view. Use the sorting feature to sort your Feedback by date or by person—that is, the user name of the person who left the Feedback. Use the filtering feature to display Feedback posted on a particular date or within a given date range.
To sort and filter your Feedback:
-
Go to the Feedback viewer.
-
Select an option from the Sort By menu (Figure 12-5):
Figure 12-5 Sort By Menu on Feedback Viewer

Description of "Figure 12-5 Sort By Menu on Feedback Viewer"
-
Date—To sort Feedback posts from the most recent to the oldest.
-
Person Name—To sort Feedback posts by the name of the user who left it for you (View is set to Received) or by the name of the user you left it for (View is set to Given).
-
-
To specify a date range, enter a start date in the field that follows From and enter an end date in the field that follows To (Figure 12-6).
Figure 12-6 Sort By Date Range Fields on Feedback Viewer

Description of "Figure 12-6 Sort By Date Range Fields on Feedback Viewer"
Tip:
You must enter both a start and end date, even when you want to view Feedback posts from a given day. In such a case, enter the same date in both fields.
Instead of entering dates, you can click the Select Date icon next to a field to select a date from a calendar.
Accessibility Note:
In WebCenter Portal, you cannot use the keyboard to select a date from the calendar that pops up when you click the Select Date icon. Instead, manually enter the date into the field.
-
Click the Search icon.
All of the Feedback posts (either received or given) that fall within the specified date range appear in the Feedback viewer.
Tip:
To remove the date filtering criteria from your Feedback view, click the Clear Date icon.
12.3.3 Hiding Feedback in Your Own View
You can hide any Feedback in your own Feedback view. Hiding provides a means of removing Feedback posts from your own view without actually deleting them. Users to whom you have given access to your Feedback can still see the posts you have hidden.
See Also:
For information about undoing this action, see Section 12.3.4, "Showing Hidden Feedback."
To hide Feedback in your own view:
-
Go to the Feedback viewer in your Home portal.
-
Click the Hide link next to the Feedback message you want to hide (Figure 12-7).
Figure 12-7 Hide Link on a Feedback Message

Description of "Figure 12-7 Hide Link on a Feedback Message"
12.3.4 Showing Hidden Feedback
Use the Hidden check box on the Feedback viewer to show all the Feedback you have hidden. The Hidden check box provides a means of showing all hidden Feedback in one operation, making it available to be unhidden or deleted.
To show hidden Feedback posts:
-
Go to the Feedback viewer in your Home portal.
-
Select the Hidden check box (Figure 12-8).
Figure 12-8 Hidden Check Box on a Feedback Viewer

Description of "Figure 12-8 Hidden Check Box on a Feedback Viewer"
-
All the Feedback posts you have hidden are shown.
-
Click the Unhide link to the right of the Feedback you want to show (Figure 12-9).
Figure 12-9 Unhide Link on a Feedback Viewer

Description of "Figure 12-9 Unhide Link on a Feedback Viewer"
-
To remove hidden Feedback posts from your view, deselect the Hidden check box.
12.3.5 Marking Feedback Received as Private
When you view Feedback you have received, you typically have the option of clicking a Private link to shield the Feedback from other viewers (Figure 12-10).
Figure 12-10 Private Link on a Feedback Message

Description of "Figure 12-10 Private Link on a Feedback Message"
Your portal moderator can hide the Private link. Also, unless Activity Stream is configured at the application level or the personal level (through Preferences) to omit Feedback activity, your connections and the poster's connections can see even private Feedback in their Activity Streams.
See Also:
For more information, see Section 22.3, "Setting Activity Stream Preferences."
12.4 Posting Feedback
Use Feedback to pass along remarks to your connections about their efforts and results. Keep in mind that a wider audience than just your connections may see your Feedback message.
To post a Feedback message:
-
Go to the page the user has set up to receive Feedback.
See Also:
For more information, see Section 12.12, "Enabling Other Users to Post Feedback and Messages for You."
-
Click Add Feedback (Figure 12-11).
Figure 12-11 Add Feedback Button on a Feedback Viewer

Description of "Figure 12-11 Add Feedback Button on a Feedback Viewer"
-
In the resulting Add Feedback dialog, enter your Feedback in the text area (Figure 12-12).
Tip:
The Add Feedback dialog provides an integrated rich text editor that enables you to add styles, links, and other HTML encoding to your Feedback.
Figure 12-12 Add Feedback Dialog with Rich Text Editor
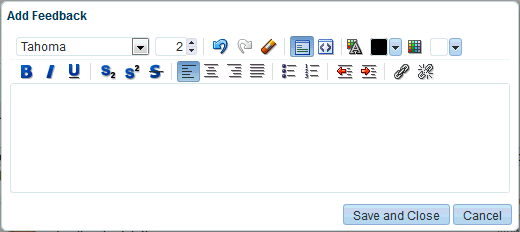
Description of "Figure 12-12 Add Feedback Dialog with Rich Text Editor"
-
When you finish entering text, click Save and Close.
Your Feedback appears in the selected user's Feedback view.
12.5 Deleting Feedback
You can delete Feedback you have posted to other users, provided your system administrator has enabled you to do so.
If Activity Stream is configured to show Feedback activity, deleted Feedback posts nonetheless continue to show in the Activity Stream of the recipient and all of your connections.
See Also:
For information about configuring your personal Activity Stream Preferences, see Section 22.3, "Setting Activity Stream Preferences."
To delete Feedback you have posted:
-
Go to the Feedback viewer in your Home portal.
-
From the View menu, select Given.
-
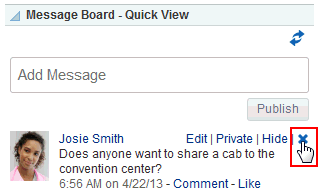
Click the Delete icon next to the post you want to delete (Figure 12-13).
Figure 12-13 Delete Icon on a Feedback Message

Description of "Figure 12-13 Delete Icon on a Feedback Message"
-
Click Delete in the resulting confirmation dialog.
The Feedback is deleted from your view and from the view of the user for whom you left it.
12.6 About Messages
Message Board provides a means of viewing and posting messages to and from you and other users. When you connect with other users, you potentially give them access to your Message Board and gain access to theirs. Access to other users' Message Board views must be specifically granted through each user's personal Message Board preferences.
See Also:
You can grant access to your Message Board through People Connections Preferences. For more information, see Section 12.7, "Setting Message Preferences."
A Message Board viewer in your view of the Home portal, enables you to view messages and attachments from users to whom you have granted access. Message Board views in other users' views of the Home portal enable you to view messages and attachments they have received and to post messages and attachments to their Message Boards, provided they have granted you access.
In portals other than the Home portal, a Message Board viewer provides a means of viewing and posting messages within the scope of the portal. In a portal, every instance of a Message Board shows the same content: messages left by authorized users who are members of the portal. If you cannot perform actions in a portal Message Board, contact the portal moderator.
Messages are also streamed to the Activity Stream, unless your system administrator has configured the Activity Stream not to show Feedback activity. Additionally, you can elect not to show Message Board activity in your own view of the Activity Stream through your personal Message Board preferences.
Note:
The messages you mark private are shown only to you and the recipient in your views of Message Board. However, private messages are shared with all of your connections and with all of the recipient's connections in their views of Activity Stream, unless your system administrator configures Activity Stream to omit showing actions from Message Board or you do so through your personal Activity Stream preferences. For more information, see Section 22.3, "Setting Activity Stream Preferences."
Before you access your Message Board or Message Board Preferences, your system administrator can set global application defaults that affect what all users may see and do with their own and other users' Message Boards.
WebCenter Portal provides the following Message Board views:
-
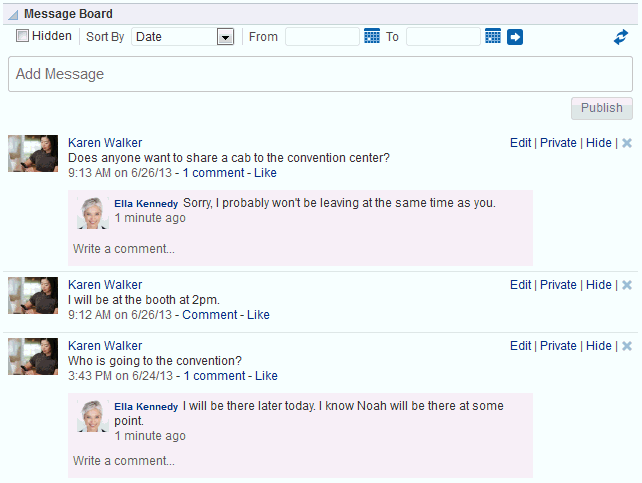
Message Board for adding, viewing, updating, hiding, deleting, and managing your view of messages, and for marking messages as private and sharing private messages (Figure 12-14)
-
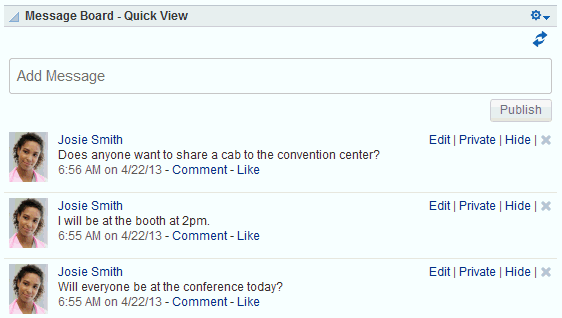
Message Board - Quick View for adding, viewing, updating, hiding, and deleting messages, and for marking messages as private and sharing private messages (Figure 12-15)
See Also:
Publisher has many qualities in common with Message Board, but is a separate feature. For more information about Publisher, see Chapter 13, "Liking, Commenting On, and Sharing Items in WebCenter Portal."
12.7 Setting Message Preferences
Use Message Board preferences to specify who can view and post to your Message Board.
To set Message Board Preferences:
-
Open the Preferences page.
-
Click People Connections to display People Connections Preferences.
-
Click the Message Board tab to bring it forward (Figure 12-16).
-
Set your Preferences for the Message Board.
Table 12-2 lists and describes each option.
Table 12-2 Message Board Preference Options
Option Description Grant View Access to
Select who can view your Message Board:
-
Everyone—All users, including users who are not logged in, can view your Message Board messages.
-
Authenticated Users—Only users who are logged in can view your Message Board messages.
-
User's Connections—Only you and the users you your Connections can view your Message Board messages.
-
User Only—Only you can view your Message Board messages.
Grant Post Access to
Select who can post messages to your Message Board:
-
Everyone—All users, including users who are not logged in, can post messages to your Message Board.
-
Authenticated Users—Only users who are logged in can post messages to your Message Board.
-
User's Connections—Only you and your Connections can post messages to your Message Board.
-
User Only—Only you can post messages to your Message Board.
-
-
Click Save.
12.8 Viewing Messages
Once you and your connections have set up your own Message Boards, you can see your own and, potentially, each other's messages. This section provides information about how to view each other's messages post-set-up. It includes the following subsections:
Tip:
For information about setting up your view of Message Board, see Section 12.12, "Enabling Other Users to Post Feedback and Messages for You."
12.8.1 Viewing Messages Others Have Left for You
To view Message Board messages other users have left for you, go to the personal page in the Home portal that you have set up to receive Message Board messages (Figure 12-14).
12.8.2 Viewing Messages Others Have Received
To view Message Board messages other users have received (including those you have left for them), go to the page the user has made available to you in your view of the Home portal. You can access this page through the Personalize Pages page. For more information, see Section 5.4, "Opening a Page in the Home Portal."
12.8.3 Viewing Messages Sent to a Selected Portal
Message Boards placed in a portal provide a means of viewing and posting messages within the portal context. All default Message Board views within a given portal display the same content: messages left by authorized users who are members of the portal. All users with access to the portal can see the posted messages.
12.8.4 Sorting and Filtering Message Board Messages
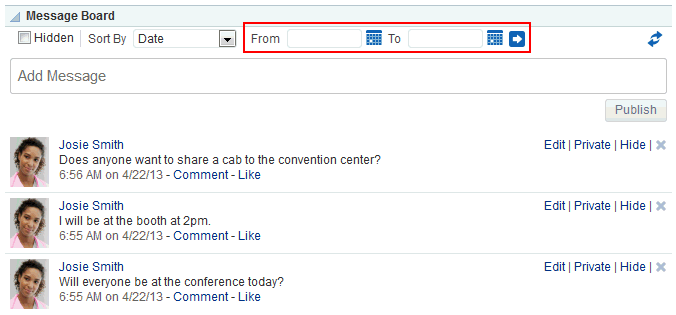
Your full view of the Message Board includes sorting and filtering features for managing your view of your messages. Use the sorting feature to sort your messages by date or by the person who left the message. Use the filtering feature to show messages posted on a particular date or within a given date range.
To sort and filter your Message Board messages:
-
Go to the Message Board viewer.
-
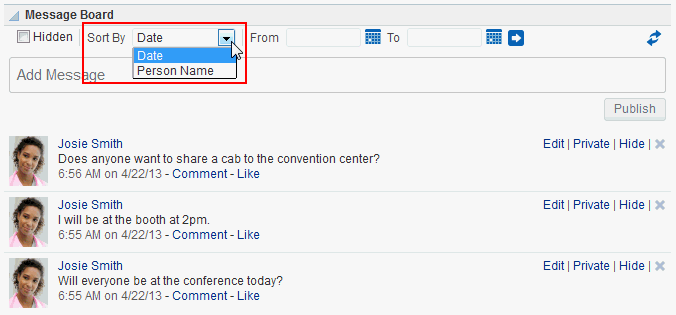
From the Sort By menu, select a sorting option (Figure 12-17):
-
Date—Sort your messages by the date they were posted, from most recent to oldest.
-
Person Name—Sort your messages by the user name of the person who posted them, from A to Z.
-
-
To show messages between a particular range of dates, enter the beginning and end of the range respectively in the fields after From and To (Figure 12-18).
Tip:
Instead of entering dates, you can click the Select Date icon next to a field to select a date from a calendar.
Accessibility Note:
In WebCenter Portal, you cannot use the keyboard to select a date from the calendar that pops up when you click the Select Date icon. Instead, manually enter the date into the field.
-
Click the button to the right of the fields to apply the filter.
The Message Board refreshes, showing only those messages that fit your sorting and filtering criteria.
Tip:
To remove the date filtering criteria from your Message Board view, click the Clear Date icon that appears to the right of the date range fields after you filter by date.
12.8.5 Hiding Messages in Your View of Message Board
You can hide messages in your Message Board in one of two ways: you can hide a specific message or hide public or private messages. Hiding provides a means of removing messages from your own view without actually deleting them. It is a non-permanent way to reduce the visual clutter of your Message Board view.
Note:
Users to whom you have given access to your messages can still see the messages that you have hidden.
To hide a specific message in your view of the Message Board:
-
Go to the message you want to hide in your view of the Message Board.
-
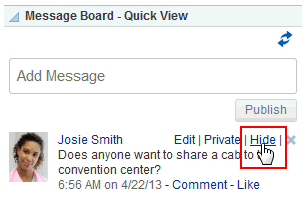
Click the Hide link next to the message you want to hide (Figure 12-20).
The message is hidden in your view of the Message Board. Other users you have permitted to view your Message Board can see this message when they visit your view.
To hide messages of a particular type (private or public) in your view of the Message Board:
-
Open the page editor (Composer) for the personal page in the Home portal that includes the Message Board.
See Also:
For more information, see Section 5.9, "Editing a Personal Page."
-
In Design view (the default view when you edit a page), click the Edit icon (
 ) on the Message Board viewer to open the Component Properties dialog.
See Also:
For more information on editing component properties, see the "Setting Properties on a Component" section in Oracle Fusion Middleware Building Portals with Oracle WebCenter Portal. Editing component properties is an advanced task
-
In the Component Properties dialog, on the Parameters tab, from the Message Type drop-down list, select the type of messages you want to see in your view of the Message Board:
-
All - (default) Displays both public and private messages.
-
Public - Displays only public messages.
-
Private - Displays only private messages.
-
-
Click Save to save the page.
-
Click Close to exit page edit mode.
Messages of the selected type appear in your view of the Message Board; all other messages are hidden in your view of the Message Board. Other users you have permitted to view your Message Board can see all messages when they visit your view.
12.8.6 Showing Hidden Messages
Use the Hidden check box on the Message Board to show all of the messages you have hidden. The Hidden check box provides a means of showing all hidden messages in one operation, making it available to be unhidden or deleted.
To show hidden Message Board messages:
-
In your view of the Message Board, select the Hidden check box to show the messages you have hidden (Figure 12-21).
Figure 12-21 Hidden Check Box on a Message Board Viewer

Description of "Figure 12-21 Hidden Check Box on a Message Board Viewer"
-
Click the Unhide link next to the message you want to show (Figure 12-22).
Figure 12-22 Unhide Link on a Message Board Viewer

Description of "Figure 12-22 Unhide Link on a Message Board Viewer"
-
Optionally, deselect the Hidden check box to hide the messages that are still marked as hidden.
12.9 Posting Messages
This section describes the various ways you can post messages and attachments. It includes the following subsections:
12.9.1 Posting a Message Through Message Board
This section describes how to post a message to all of your connections through Message Board.
See Also:
For information about Connections, see Chapter 9, "Managing Your Contacts."
To post a Message Board message:
-
Go to a Message Board view.
-
In the text box, enter a message.
-
Click Publish (Figure 12-23).
Figure 12-23 Publish Button on a Message Board View
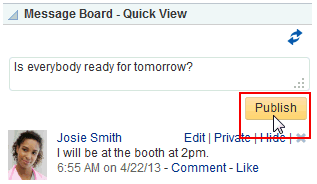
Description of "Figure 12-23 Publish Button on a Message Board View"
The message appears in all of your connections' views of Message Board and Activity Stream.
12.9.2 Posting a Private Message
Provided you are authorized to do so, you can post a private message to any of your connections. When you mark a message as private, only you and the recipient can see the message in your views of Message Board; however, all of your connections and all of the recipient's connections can see private messages in Activity Stream, unless the application is configured to omit Message Board activity from the Activity Stream or you have configured your Activity Stream preferences to do so.
See Also:
For more information, see Section 22.3, "Setting Activity Stream Preferences."
To post a private message:
-
Go to your My Profile page and click Connections to bring it forward.
Tip:
If necessary, set the Show menu to All Connections.
-
Click the name of the user to whom you want to send a private message. In the Profile popup, click Add Message (Figure 12-24).
Figure 12-24 Add Message Link in Profile Popup
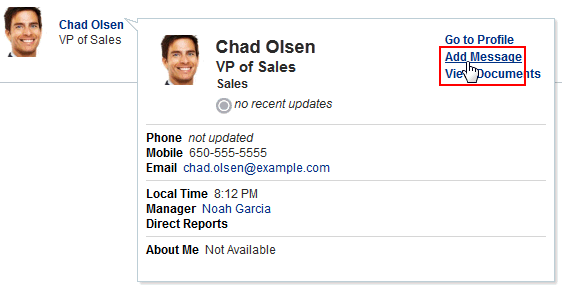
Description of "Figure 12-24 Add Message Link in Profile Popup"
-
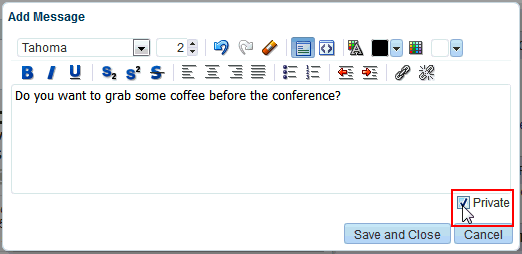
Enter your message in the Add Message dialog (Figure 12-25).
-
Select the Private check box to allow only the recipient to see the message.
-
Click Save and Close when you have finished.
The message appears in the recipient's views of Message Board and Activity Stream.
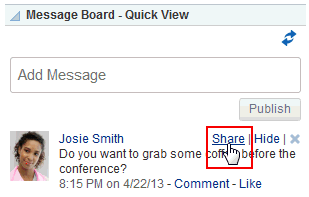
12.9.3 Sharing a Private Message
When you receive a private message, you can opt to share that message with all users who have access to your Message Board by marking it as shared. When someone sends you a message marked private, only you and the sender can see it in the Message Board (though all of your connections and the sender's connections can see the message in their Activity Streams, unless the Activity Stream in configured to omit Message Board activity).
See Also:
For information about omitting certain types of activities from Activity Stream at the application and personal levels, see Section 22.3, "Setting Activity Stream Preferences."
When you mark a private message as shared, you open it up to those permitted to see your view of the Message Board.
To mark a message as shared:
-
Go to the message you want to mark as shared in your view of the Message Board.
-
Click the Share link next to the relevant message (Figure 12-26).
Figure 12-26 Share Link on a Private Message
Description of "Figure 12-26 Share Link on a Private Message"
The message can be viewed by everyone who can access your Message Board.
12.10 Editing Messages
Your system administrator can configure the Message Board feature to enable users to revise the messages they leave. Provided this permission is in place, you can edit any message you post.
To edit a Message Board message:
-
Go to the message you want to edit.
-
Click the Edit link associated with the message (Figure 12-27).
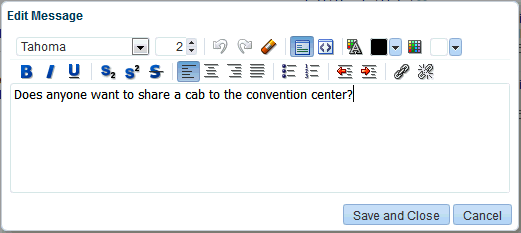
The Edit Message dialog opens with a rich text editor pre-populated with your message text (Figure 12-28).
-
Revise your message, and click Save and Close.
12.11 Deleting Messages
Your system administrator can configure the Message Board to allow users to delete the messages they send. Provided this permission is in place, you can delete any message you send.
To delete a message you sent:
-
Go to your view of the Message Board, and click the Delete icon next to the message you want to delete (Figure 12-29).
-
In the resulting confirmation dialog, click the Delete button.
12.12 Enabling Other Users to Post Feedback and Messages for You
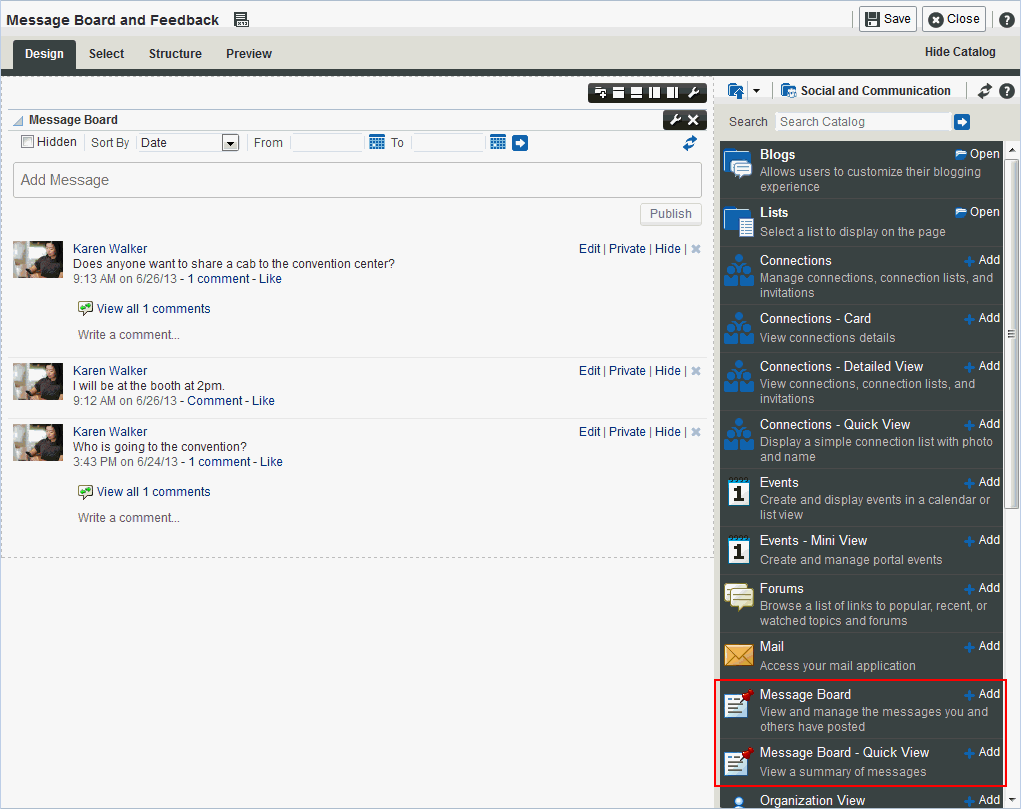
To set up your Feedback and Message Board viewers so that users can post feedback and messages specifically for you, you must add a Feedback or Message Board viewer to a page in your view of the Home portal, and share that page with your connections. Additionally, you must set a parameter on the Feedback or Message Board viewer to identify yourself as the viewer owner. After this is set up, your connections can access this page and post messages and feedback for you. This section steps you through this process.
To enable other users to post feedback and messages for you:
-
Create a new personal page or edit an existing personal page in the Home portal to which to grant access to your connections.
See Also:
For more information, see Section 5.7, "Creating a Personal Page in the Home Portal" or Section 5.9, "Editing a Personal Page."
-
Set page access to enable your connections to view and personalize the page.
See Also:
For more information, see Section 5.12, "Controlling User Access to Your Personal Pages."
Tip:
When you share one of your personal pages in the Home portal with other users, the shared page appears on their Personalize Pages page. Such users can use controls on the Personalize Pages page to show the page in their own view of the Home portal.
-
In Design view (the default view when you edit a page), find the Feedback or Message Board viewer you want to add to the page, and click Add.
Figure 12-30 Message Board Viewers in Composer
Description of "Figure 12-30 Message Board Viewers in Composer"
Note:
The Message Board viewers are stored in the Social and Communication folder by default. Your system administrator must add the Feedback viewers to a resource catalog to make them available to you.
See Also:
For more information on adding a viewer, see the "Editing a Page" section in Oracle Fusion Middleware Building Portals with Oracle WebCenter Portal. Editing a personal page is no different than editing a page in a portal, but this is an advanced task.
-
Click the Edit icon (
 ) on the viewer to open the Component Properties dialog.
See Also:
For more information on editing component properties, see the "Setting Properties on a Component" section in Oracle Fusion Middleware Building Portals with Oracle WebCenter Portal. Editing component properties is an advanced task
-
In the Component Properties dialog, on the Parameters tab, enter your user name in the required field:
-
For Feedback, enter your user name in the Resource Id text box.
-
For Feedback - Quick View, enter your user name in the User Id text box.
-
For Message Board and Message Board - Quick View, enter your user name in the User Name text box.
-
-
Click Save to save the page.
-
Click Close to exit page edit mode.
If you want to, you can send a link to this page to your connections, inviting them to leave you feedback or messages whenever they are moved to do so. For more information, see Section 5.14, "Sending Mail with a Link to a Personal Page."
All users who have access to the page see the Feedback or Message Board viewers that you place there, but only the users to whom you have granted access, through preferences, see any content in the components.
See Also:
For information about setting Feedback and Message Board preferences, see Section 12.2, "Setting Feedback Preferences" and Section 12.7, "Setting Message Preferences."

