11 Developing Page Templates
This chapter describes how to use Oracle JDeveloper to create and manage the page templates for your WebCenter Portal Framework applications.
This chapter includes the following topics:
11.1 Introduction to Page Templates
Page templates define how individual pages and groups of pages display on a user's screen. When you use page templates to display pages, the pages are always consistent in structure and layout across the application.
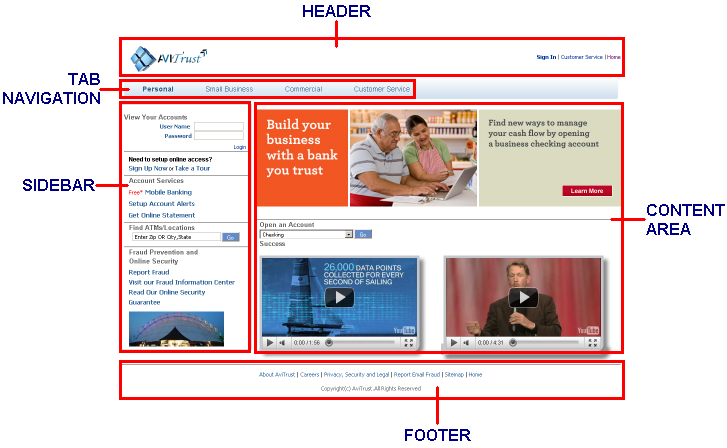
A page template typically defines the layout and navigation for pages in an application. It provides a uniform look and feel. Figure 11-1 shows a sample application based on a page template, which provides the following:
-
Header with the company logo and the Sign In, Customer Service, and Home links.
-
Default tab navigation to access different resources in the portal.
-
Sidebar with a login task flow and some useful links.
-
Footer with a copyright statement and a few disclaimer statements.
-
A central area for adding content.
Figure 11-1 Sample Portal that Uses a Page Template
Description of "Figure 11-1 Sample Portal that Uses a Page Template"
Page templates are reference-based and use inheritance. That is, if you change the page template, then all pages that reference that template automatically inherit the change. You can create and publish page templates as JSPX pages in JDeveloper, and they can be used to create pages both at design time and runtime.
For more information about page templates, see the "Using Page Templates" section in the Oracle Fusion Middleware Web User Interface Developer's Guide for Oracle Application Development Framework.
When you create a Portal Framework application, and select the Configure the application with standard Portal features option, two seeded templates are added to your application: pageTemplate_globe.jspx and pageTemplate_swooshy.jspx.
These seeded page templates both offer essentially the same functionality but with different graphics. They include the following:
-
Link to the portal home page
-
Tag line
-
Welcome message
-
Link to the runtime administration console
-
Login area that converts to a logout link when users are logged in
-
Navigation bar
-
Area for adding content to pages based on the template
-
Copyright notice
Figure 11-2 shows the pageTemplate_globe.jspx page template with each of the above features called out.
Figure 11-2 The pageTemplate_globe.jspx Seeded Page Template
Description of "Figure 11-2 The pageTemplate_globe.jspx Seeded Page Template"
You can edit these seeded page templates to meet your particular requirements, or, more typically, you can create your own. If you choose to create your own page template, the seeded page templates are still a useful tool for you to discover the different things you can achieve in your own templates.
Portal Framework applications support the runtime administration of page templates to help users continue developing a portal even after it has been deployed. With runtime administration, authorized users can manage an application's page templates, and create new ones, in a browser-based environment, with no requirement to install or understand JDeveloper. For more information, see Section 9.5, "Working with Portal Resources at Runtime."
You can bring page templates that have been created or modified at runtime back into JDeveloper, to ensure that any changes are not lost if the portal is redeployed. You can also edit these page templates to further enhance them if necessary, and upload them back into the deployed portal. For more information, see Section 9.6, "Working with Round-Trip Development."
11.2 Creating a Page Template
The following section focuses on the aspects of page templates that are specific to WebCenter Portal applications. For general information about creating JSF page templates, see the "How to Create a Page Template" section in the Oracle Fusion Middleware Web User Interface Developer's Guide for Oracle Application Development Framework.
Note:
Your page template must include at least one facet definition, and that facet definition must be calledcontent.To create a page template:
-
In the Application Navigator, right-click the node where you want to create the page template (for example,
/oracle/webcenter/portalapp/pagetemplates) and choose New. -
In the New Gallery, expand Web Tier, select JSF and then JSF Page Template, and click OK.
-
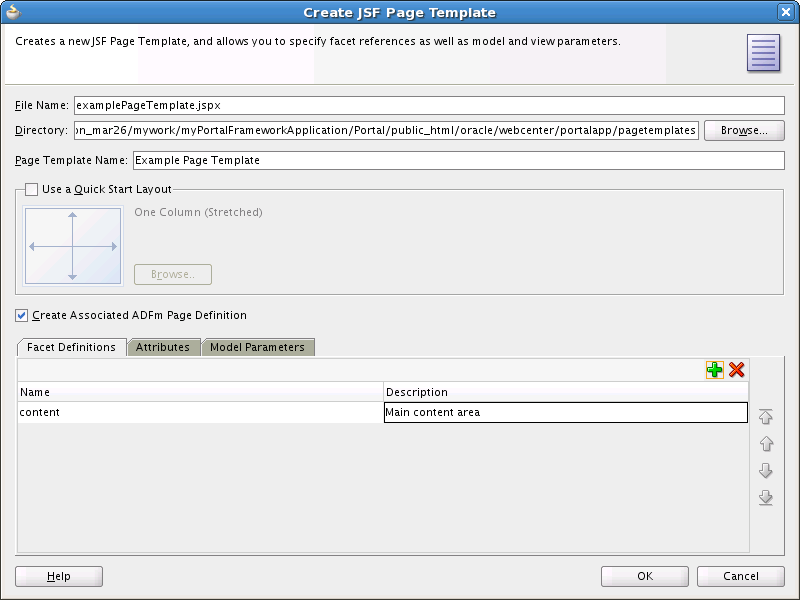
In the Create JSF Page Template dialog (Figure 11-3), in the File Name field, enter a name for the JSPX file that represents the page template, for example
myCompanyPageTemplate.jspx.The file name identifies the page template in the Application Navigator.
Figure 11-3 The Create JSF Page Template Dialog
Description of "Figure 11-3 The Create JSF Page Template Dialog"
-
In the Directory field, enter the full directory path of the location under which to create the page template.
Note:
In a Portal Framework application, to expose the new page template in the Assets page of the runtime administration console, you must create the page template under theApplication_Root/Portal/public_html/oracle/webcenter/portalappdirectory. By default, Portal Framework applications include a separatepagetemplatesdirectory. -
In the Page Template Name field, enter a display name for the page template.
The display name is shown in the Page Template drop-down list of the Create JSF Page wizard to enable users to select this template to use for a newly created page. For this reason, you should make the page template name something that helps users quickly identify which type of pages this template should be used for.
-
Select Use a Quick Start Layout if you want to use one of the predefined layouts for your page template.
-
Select Create Associated ADFm Page Definition to use ADFm Model data bindings in the page template.
Associating a page definition with the page template enables you to include objects that have model elements to them (for example, task flows and portlets) in the page template.
It also enables users to switch to a different page template at runtime. For runtime page template switching to work, one of the following conditions must be met:
-
All page templates in the application have associated page definitions.
-
None of the page templates in the application have associated page definitions.
Therefore, because the seeded page templates provided with Portal Framework applications have associated page definitions, for page template switching to work, any other page templates created within the application must also have associated page definitions.
After selecting this option, you can click the Model Parameters tab and click the New icon to define the model parameters for data bound components set with the ADFm declarative data binding layer. The values for these parameters can be set at runtime by the calling page.
Note:
By default, the page template definition name is based on the page template name. Do not create the page definition with a different name. -
-
Click the Facet Definitions tab to define the areas in the page template where content can be inserted to pages built using the template.
A page template that is intended for use in a WebCenter Portal application must contain at least one facet definition that must be called
content. To create this facet definition:-
Click the New icon to add a new row to the Facet Definitions tab.
-
In the Name field for the new facet definition, enter
content. -
In the Description field, enter a brief description for the facet definition, for example
Main content area. -
Create additional facet definitions as required.
-
For information about how to add the facets to the required location in the page template, see step Section 11.3, "Editing a Page Template."
Example 11-1 shows the
contentfacet definition in the<af:xmlContent>section of thepageTemplate_globe.jspxPortal Framework application seeded page template.Example 11-1 Content Facet in the Globe Seeded Page Template
<af:xmlContent> <component xmlns="http://xmlns.oracle.com/adf/faces/rich/component"> <display-name>Globe Page Template</display-name> <facet> <description>Facet for content</description> <facet-name>content</facet-name> <facet> ... </component> </af:xmlContent> -
-
Click the Attributes tab and click the New icon to define attributes for passing values from pages that use the template to the template itself. These values can be used by the page template to drive what is actually displayed on individual pages that use the template.
For example, the
pageTemplate_globe.jspxPortal Framework application seeded page template includes a link to the seeded Administration page. If the current page is the Administration page, then this link does not need to be displayed. The template uses an attribute, calledisAdminPage, to identify whether the current page is the seeded Administration page. The value of this attribute, set by pages that use the template, determines whether or not to display the link to the Administration page.Example 11-2 shows the
isAdminPageattribute definition in the page template.Example 11-2 Attribute Definition in the Globe Seeded Page Template
<af:xmlContent>
  ...
    <attribute>
      <attribute-name>isAdminPage</attribute-name>
      <attribute-class>java.lang.Boolean</attribute-class>
      <default-value>#{false}</default-value>    </attribute>
  ...
</af:xmlContent>
Example 11-3 shows how the page template uses the value of the
isAdminPageattribute to determine whether or not to render the link to the seeded Administration page.Example 11-3 Conditional Value for Rendering the Administration Page Link
<af:pageTemplateDef var="attrs">
  ...
  <af:goLink id="pt_glnk1" text="Administration"
             destination="/admin"
             rendered="#{attrs.showAdmin !attrs.isAdminPage}"
             inlineStyle="font-size:small; color:White;"/>
Example 11-4 shows how the seeded Administration page sets the
isAdminPageattribute totrue, ensuring that the page template does not render the link when users are viewing the Administration page.Example 11-4 Setting the Value of a Page Template Attribute
<af:pageTemplate value="#{bindings.pageTemplateBinding.templateModel}" id="pt1">
  <f:attribute name="isAdminPage" value="#{true}"/>
The seeded page templates include the following additional attributes:
<attribute>
  <attribute-name>contentWidth</attribute-name>
  <attribute-class>java.lang.String</attribute-class>
  <default-value>960px</default-value>
</attribute>
<attribute>
  <attribute-name>showNavigation</attribute-name>
  <attribute-class>java.lang.Boolean</attribute-class>
  <default-value>#{true}</default-value>
</attribute>
<attribute> <attribute-name>showGreetings</attribute-name> <attribute-class>java.lang.Boolean</attribute-class> <default-value>#{securityContext.authenticated}</default-value> </attribute><attribute> <attribute-name>showLogin</attribute-name> <attribute-class>java.lang.Boolean</attribute-class> <default-value>#{true}</default-value> </attribute><attribute> <attribute-name>showAdmin</attribute-name> <attribute-class>java.lang.Boolean</attribute-class> <default-value> #{WCSecurityContext.userInAppRole['Administrator']} </default-value> </attribute> -
Click OK.
The page template is created and opened in the visual editor. The next step is to edit the page template to define its layout and content.
11.3 Editing a Page Template
You can edit your page template after its initial creation. You can also edit one of the seeded page templates to alter it to meet your specific requirements. Any changes you make are automatically rolled out to any pages that use the page template.
Tip:
The seeded page templates are a valuable source of examples of features that you can include in your own page templates. Even if you do not intend to base your page templates on the seeded ones at all, it is still worth studying them for ideas. For example, the seeded page templates include a login form that you might want to reuse. The seeded templates also include a good example of navigation visualization.To edit a page template:
-
In the Application Navigator, right-click the page template that you want to edit, and choose Open.
-
In the visual editor make any changes to the layout and content of the page template.
-
Drag components from the Component Palette and drop them onto the page template in the visual editor.
Navigation visualization is a very important aspect of a page template. For information about adding navigation visualization to your page template, see Section 10.12, "Visualizing Portal Navigation."
For information about adding other resources to your page template, for example, portlets, task flows, or content, see Chapter 15, "Creating Pages and Adding Resources."
Other features you might want to provide in your page template include a login/logout area or a search field. The seeded page templates include an example of a login form.
Throughout your page templates, you can use expression language (EL) expressions to specify a variable value instead of a constant value. For descriptions of common EL expressions, see Appendix F, "Expression Language Expressions."
-
For areas on the page template where users can place their own content in pages based on the template:
-
Drag the FacetRef component from the Component Palette and drop it onto the appropriate location on the page template.
-
In the Insert Facet Ref dialog, from the Facet Name drop-down list, select the facet that you want to use for this area of the page template. If you enter a new facet name, JDeveloper creates a new facet definition in the page template definition file.
Example 11-5 shows how the content facet is included in the
pageTemplate_globe.jspxseeded WebCenter Portal application page template.Example 11-5 The content Facet in the Globe Seeded Page Template
<af:pageTemplateDef var="attrs"> <af:panelGroupLayout id="pt_root" layout="scroll"> <af:panelGroupLayout id="pt_pg12" layout="vertical"> ... <af:facetRef facetName="content"/> ... </af:panelGroupLayout> </af:panelGroupLayout> ... <af:pageTemplateDef> -
-
To add new facet definitions or attributes, select the
af:pageTemplateDeftag in the Structure window and use the Property Inspector. -
For general information about JSF page templates, see the "Using Page Templates" section in the Oracle Fusion Middleware Web User Interface Developer's Guide for Oracle Application Development Framework.
-
-
Save the page template definition file.
If iterative development is enabled, any changes that you make to page templates can be seen immediately in the running application. For more information about iterative development, see Section 2.3.1, "Preparing for Iterative Development in a Portal Framework Application."
Note:
If your page template includes a Content Presenter task flow to display a content item, you must manually modify the task flow properties to display the content, as follows:-
datasource:connection_name#dDocName:content_ID -
datasourceType:dsTypeSingleNode -
taskFlowInstId: A unique identifier
For more information about Content Presenter task flow properties, see Section 29.7.1, "Content Presenter Task Flow Parameters and Out-of-the-Box Display Templates."
11.4 Applying a Page Template to a Page
This section includes the following topics:
-
Section 11.4.1, "How to Apply a Page Template During Page Creation"
-
Section 11.4.2, "How to Change the Page Template Applied to a Page"
-
Section 11.4.3, "How to Enable Dynamic Switching of Page Templates at Runtime"
11.4.1 How to Apply a Page Template During Page Creation
When you create a JSF page in a Portal Framework application, you can choose the page template to apply to the page in the Create JSF Page dialog, shown in Figure 11-4.
Figure 11-4 Page Template Option in the Create JSF Page Dialog
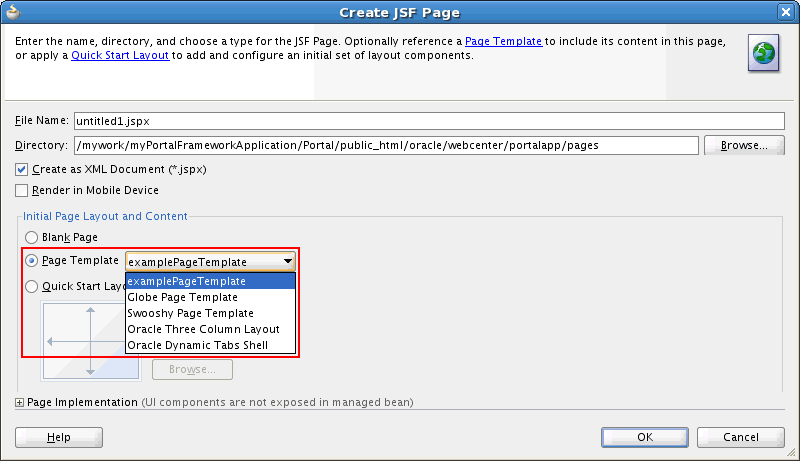
Description of "Figure 11-4 Page Template Option in the Create JSF Page Dialog"
For more information about creating pages in Portal Framework applications, see Section 15.2, "Creating Pages in a WebCenter Portal Framework Application."
11.4.2 How to Change the Page Template Applied to a Page
When you create a page, you select a specific page template to use for that page (see Section 11.4.1, "How to Apply a Page Template During Page Creation"). This adds a static reference to the page template to the JSPX file for the page. For example:
<af:pageTemplate
    viewId="/oracle/webcenter/portalapp/pagetemplates/pageTemplate_globe.jspx"
    value="#{bindings.pageTemplateBinding  }"
    id="pt1">
  <f:facet name="content"/>
</af:pageTemplate>
A binding of the page template is created in the page's page definition file. For example:
<executables>
  <variableIterator id="variables"/>
  <page path="oracle.webcenter.portalapp.pagetemplates.pageTemplate_globePageDef"
        id="pageTemplateBinding" Refresh="ifNeeded"/>
</executables>
To apply a different page template to a page, you must change both these references.
11.4.3 How to Enable Dynamic Switching of Page Templates at Runtime
You can change the references in a page's JSPX file and page definition file to use an EL expression that identifies the page template to use from the default page template setting. Users with the appropriate permissions can use the runtime administration console to switch to a different default page template.
Note:
You can switch between page templates at runtime only if the page template was created with an associated page definition.To enable dynamic switching of page templates at runtime:
-
In the Application Navigator, right-click the JSPX file for the page, and choose Open.
-
Click the Source tab.
-
Replace the following code:
<af:pageTemplate viewId="pathToPageTemplate"
                 value="#{bindings.pageTemplateBinding}"
                 id="ptId">
  <f:facet name="content"/>
</af:pageTemplate>
with:
<af:pageTemplate value="#{bindings.pageTemplateBinding.templateModel}"
                 id="ptId">
  <f:facet name="content"/>
</af:pageTemplate>
This indicates that the page template to be used by the page is defined in the page template's page definition.
-
Right-click the JSPX file and choose Go to Page Definition.
-
Click the Source tab.
-
Replace the following code:
<page path="pathToPageTemplatePageDef"
      id="pageTemplateBinding" Refresh="ifNeeded"/>
with:
<page viewId="${preferenceBean.defaultPageTemplate}"
      id="pageTemplateBinding" Refresh="ifNeeded"/>
The
${preferenceBean.defaultPageTemplate}EL expression retrieves the name of the page template from the default page template setting. -
You can set the default page template, as described in Section 11.5, "Selecting the Default Page Template."
At runtime, users with the appropriate permissions can switch to a different page template by selecting a new default page template in the runtime administration console. For more information, see the "Choosing a Default Page Template" section in Oracle Fusion Middleware Administering Oracle WebCenter Portal.
Note:
You can create your own backing bean to determine which page template to use, but you must also implement a persistence mechanism and a UI to enable users to set the backing bean.11.5 Selecting the Default Page Template
Every Portal Framework application defines a default page template that provides a convenient way to identify the page template that should be used by default in an application. You can then reference this default page template without having to specify its actual name. For example, you can use an EL expression to indicate that a page should use the application's default page template, rather than an explicitly selected page template, by including the following code in the page's page definition file:
<page viewId="${preferenceBean.defaultPageTemplate}"
      id="pageTemplateBinding" Refresh="ifNeeded"/>
When you first create a Portal Framework application, the pageTemplate_globe.jspx seeded page template is set as the application's default page template. If you subsequently create your own page template to use for the structure and layout of your application pages, you can set is as the default page template.
You can set the default page template for a Portal Framework application by editing the oracle.webcenter.portalapp.pagetemplate.pageTemplate preference in the adf-config.xml file.
To select the default page template:
-
In the Application Resources pane of the Application Navigator, right-click the adf-config.xml file, and choose Open.
Tip:
To locate theadf-config.xmlfile, expand the Descriptors node, and then the ADF META-INF node. -
Click the Source tab.
-
Locate the ADF preference with the following ID:
oracle.webcenter.portalapp.pagetemplate.pageTemplate
-
Set the value attribute to the path of the page template that you want to use as the default for the application, for example:
value="/oracle/webcenter/portalapp/pagetemplates/myPageTemplate.jspx
Example 11-6 shows an example of the complete preference element.
-
Save the
adf-config.xmlfile.
11.6 Deleting a Page Template
If a page template is no longer required within your portal, you can delete it. When you delete a page template, attempting to run any page that has a direct reference to the page template will result in a runtime error.
To delete a page template, right-click the page template in the Application Navigator and choose Delete from the context menu. For more information, see Section 9.4, "Deleting Portal Resources."