2 Setting Up Your Development Environment
This chapter provides guidance and tips to help you get started using JDeveloper for WebCenter Portal development activities.
This chapter includes the following topics:
-
Setup Tasks Specific to WebCenter Portal Framework Applications
-
Setup Tasks Specific to WebCenter Portlet Producer Applications
2.1 Introduction
This chapter distinguishes between tasks that are general and tasks that are application-specific. General tasks apply no matter what kind of application you are developing. For instance, installing JDeveloper and the WebCenter Portal Extension are general setup tasks. Other tasks described in this chapter apply only if you are developing specific kinds of applications, like WebCenter Portal Server Extension or WebCenter Portal Framework applications.
2.2 General Setup Tasks
This section describes setup tasks that do not depend on what kind of application you are developing.
-
Section 2.2.2, "Installing the WebCenter Portal Extension for JDeveloper"
-
Section 2.2.3, "Setting the User Home Directory Environment Variable"
-
Section 2.2.7, "Preparing for Team Development and Source Control"
2.2.1 Installing Oracle JDeveloper
Oracle JDeveloper provides an integrated development environment (IDE) for developing portals and custom portal components. For information on obtaining and installing Oracle JDeveloper, see the Oracle JDeveloper page on OTN at:
http://www.oracle.com/technetwork/developer-tools/jdev/overview/index.html
Once JDeveloper is installed, Oracle recommends that you increase the maximum PermGen size as follows:
-
Open the following file in a text editor:
JDEV_HOME/jdev/bin/jdev.confwhere
JDEV_HOMEis the location where JDeveloper is installed on your machine. -
Set
AddVMOption -XX:MaxPermSize=512. -
Restart JDeveloper.
2.2.2 Installing the WebCenter Portal Extension for JDeveloper
The WebCenter Portal extension is an add-in that provides JDeveloper with the complete set of WebCenter Portal capabilities and features. To install the WebCenter Portal extension:
-
Start Oracle JDeveloper.
-
If the Select Default Roles dialog displays, select Default Role to enable all technologies, and click OK.
-
If a dialog opens asking if you want to migrate settings from an earlier version, click No.
-
From the Help menu, select Check for Updates.
-
Click Next in the Welcome page of the Check for Updates wizard.
Note:
If you are behind a firewall, you may need to configure a proxy server to access the extensions. From the Updates wizard, a dialog will appear in which you can enter your HTTP Proxy Server settings. Click the Help button in any dialog for more information. For detailed information, see the "Proxy Settings and JDeveloper" topic in the Oracle JDeveloper online help. -
On the Source page, select Search Update Centers.
-
Check Oracle Fusion Middleware Products and Official Oracle Extensions and Updates and click Next.
-
From the generated list, search for the WebCenter Framework and Services Design Time extension, select it, and then click Finish.
-
When prompted, restart JDeveloper.
For more information on obtaining and installing WebCenter Portal, see the Oracle WebCenter Portal page on OTN at:
http://www.oracle.com/technetwork/middleware/webcenter/portal/overview/index.html
See also the Oracle Fusion Middleware Installation Guide for Oracle WebCenter Portal.
2.2.3 Setting the User Home Directory Environment Variable
Oracle strongly recommends that you set an environment variable for the user home directory that is referenced by JDeveloper. By setting this variable, you can avoid receiving long pathname errors that are known to occur in some circumstances.
For detailed instructions on setting this variable on Windows, Linux, UNIX, and Mac OS X operating systems, see the "Setting the User Home Directory" section in the Oracle Fusion Middleware Installation Guide for Oracle JDeveloper.
2.2.4 Managing the Integrated WebLogic Server
This section discusses the Integrated WebLogic Server used by JDeveloper.
-
Section 2.2.4.2, "Starting and Stopping Integrated WebLogic Server"
-
Section 2.2.4.3, "Configuring the JVM for the Integrated WebLogic Server"
-
Section 2.2.4.4, "The WebCenter Preconfigured Server Readme File"
2.2.4.1 What is the Integrated WebLogic Server?
The Integrated WebLogic Server is a runtime service that references an instance of Oracle WebLogic Server and is bundled with JDeveloper. The Integrated WebLogic Server allows developers to run, test, and debug WebCenter Portal Framework applications from within JDeveloper.
2.2.4.2 Starting and Stopping Integrated WebLogic Server
For detailed information managing the Integrated WebLogic Server, see the topic "Deploying to Integrated WebLogic Server" in the JDeveloper Online Help. Other options, such as running in debug mode and logging into the WebLogic Server Administration Console are also covered in that section.
2.2.4.3 Configuring the JVM for the Integrated WebLogic Server
Although it is not required, you have the option of changing the default Java Virtual Machine (JVM) settings the Integrated WLS in the setDomainEnv.sh. This file is located in JDEV_SYSTEM_DIRECTORY/DefaultDomain/bin.
The default memory values are:
-Xmx512m -XX:PermSize=128m -XX:MaxPermSize=512m
When creating or referring to the JDEV_SYSTEM_DIRECTORY, keep in mind that, on a Windows platform, a WebCenter domain name cannot contain spaces, and the domain cannot be created in a folder that has a space in its path. Also, pages in Portal Framework application are not rendered if there is a space in the path to the system directory in Oracle JDeveloper. Therefore, ensure that DOMAIN_HOME and JDEV_SYSTEM_DIRECTORY paths do not contain spaces.
2.2.4.4 The WebCenter Preconfigured Server Readme File
The WebCenter Preconfigured Server Read Me file contains valuable information about how to use Integrated WLS. In addition, the file contains links to preconfigured portlet producer test pages.
Note:
The links to the preconfigured portlet producers only work if the portlet producers are deployed to the server. The portlet producers are not deployed by default. You must deploy them before the links will resolve. For information on deploying the preconfigured producers, see Section 2.4.1.1, "Deploying the Preconfigured Portlet Producers."You can access the Preconfigured Server Read Me file by selecting WebCenter Portal Preconfigured Server Readme from the Oracle JDeveloper Help menu.
2.2.5 Configuring WebCenter Back-End Services
To use certain Oracle WebCenter Portal components, you must install schemas into a supported database. This section discusses the schema installation for Oracle, SQL Server, and DB2 databases.
For information on which databases that WebCenter supports, see the document "Oracle Fusion Middleware Supported System Configurations" on OTN.
Table 2-1 lists the schemas that are used with WebCenter Portal and the methods by which you can install them. The Repository Creation Utility (RCU) is the recommended approach for all the schemas. However, for WebCenter Portal schema, you have the option of installing with a SQL script, as explained below.
Table 2-1 Database Schema Summary
| Schema | Description | Installation Method |
|---|---|---|
|
WebCenter |
To use Tag, Links, Lists, Polls, and People Connections, you must have WebCenter Portal's schema installed in your database. |
|
|
Portlets |
For storing customizations in portlet producers. |
RCU only |
|
Activities |
For Activity Graph and Analytics products. |
RCU only |
|
Discussions/WebCenter Portal Discussions Crawler |
Used as the back end for Discussions and Announcements. |
RCU only |
2.2.5.1 Installing Schemas with RCU
Oracle recommends that you use RCU to install all WebCenter database schemas. For detailed information, see the "Creating Schemas" section in the Oracle Fusion Middleware Repository Creation Utility User's Guide.
2.2.5.2 Installing WebCenter Portal Schema with a SQL Script
To use Tag, Links, and People Connections, you must have the WebCenter Portal schema installed in your database.
To install the WebCenter Portal schema:
-
From the Tools menu, select DataBase, and then select SQL Worksheet.
-
In the Select Connection Dialog you can either select an existing connection or create a new connection. If you already have a database connection for an administrator user to your database you can select that connection. If you don't have a connection then follow the next steps to create a new connection:
-
In the Select Connection dialog, click the plus icon to create a connection.
-
Use the Create Database Connection dialog to create a connection to the database where you will create the schema. This connection is not associated to the WebCenter Portal Framework Application.
Table 2-2 Create Database Connection Dialog Settings
Setting Recommended Value Create Connection In
IDE Connections
Connection Name
Use any name of your choice, for example:
my_connection.Connection Type
Oracle JDBC
Username
SYS
Password
Enter the SYS user password.
Role
SYSDBA
Driver
thin
Host Name
Enter the server name where the database is running. For example:
myserver.example.com.SID
Enter the database SID, for example:
mydbl01.JDBC Port
Enter the database port, for example:
1521. -
Click Test Connection to verify that the connection works.
-
Click OK to close the Create Database Connection dialog.
-
2.2.5.3 Installing WebCenter Portal Schema with a SQL Script
To use Tag, Links, and People Connections, you must have the WebCenter Portal schema installed in your database.
To install the WebCenter Portal schema:
-
From the Tools menu, select DataBase, and then select SQL Worksheet.
-
In the Select Connection dialog, click the pencil icon to edit the connection.
Note:
For information on creating database connections, see Section 2.2.6, "Creating Application Resource Connections." -
Modify the connection to use an administrator username and password, such as
SYS(using theSYSDBArole) then click OK. -
Click OK to close the Select Connection dialog.
-
From the Tools menu, choose SQL Worksheet.
-
Enter the following SQL statement in the SQL Worksheet panel:
@@JDEV_HOME/jdeveloper/jdev/extensions/oracle.webcenter.install/sql/oracle/wc_schema.sqlwhere
JDEV_HOMEis the location where JDeveloper is installed on your machine. -
Click the Execute Statement icon, or press F9, to run the script.
-
At the prompt, enter
webcenteras the name for the schema and a password for the schema, such aswelcome1. The name of the schema must bewebcenter. -
If prompted for the Default Tablespace and Temporary Tablespaces, re-enter the default values
usersandtemp, then accept them.
2.2.6 Creating Application Resource Connections
Connections allow applications to access external data and services. For example, if you wish to use the Content Presenter task flow to display content from an Oracle WebCenter Content Server repository, you need to configure a connection to the repository. If you intend to consume portlets from a portlet producer, you need to configure the producer connection.
Tip:
A good practice is to create and test your connections once and check them into your source control system. Then, other developers on your team can check out the connections and use them. This technique also allows your team to keep in sync whenever a connection changes.This section discusses connections and describes the different ways to access the wizards for creating new connections. See also Section 2.2.6.3, "Where Can I Learn More About Connections?."
2.2.6.1 Where Are Connections Located?
Depending on how you invoke a wizard to create a connection, connections are placed in one of the following locations:
-
Under Application Resources in the Application Navigator
Connections created here can be used in the current application only. This is the most common way to create a repository connection.
For certain features, you can drag and drop a connection from Application Resources onto a page to create different types of task flow regions. To learn more, refer to the individual chapters on tools and services for WebCenter Portal. See
-
Under IDE Connections in the Resource Palette
Connections created here can be reused across applications. To use these connections in an application, you just have to drag and drop the connection from the Resource Palette onto the Connections node in that application.
2.2.6.2 How Do I Access the Connection Wizards?
To access a connection wizard from the New Gallery:
-
From the File menu, choose New.
-
In the New Gallery dialog, expand Connections, select the type of connection you want to create, and click OK.
Depending on your selection, the Create <Connection_Type> Connection dialog opens.
-
The Create Connection in option is set to Application Resources by default.
You can select IDE Connections to create a connection in the Resource Palette.
To access a connection wizard from the Application Navigator:
-
Right-click the Connections node under Application Resources and select New Connection, then select the connection type from the context menu.
-
Depending on your selection, the Create <Connection_Type> Connection dialog or wizard opens.
The Create Connection in option is set to Application Resources by default.
To access a connection wizard from the Resource Palette:
-
Click the New icon in the Resource Palette, select New Connection, then select the connection type from the context menu.
-
Depending on your selection, the Create <Connection_Type> Connection dialog or wizard opens.
The Create Connection in option is set to IDE Connections by default.
2.2.6.3 Where Can I Learn More About Connections?
For information about creating and consuming connections, see:
2.2.7 Preparing for Team Development and Source Control
It's important to consider the overall team development environment. To be useful, a team development environment must be configured to allow developers to share common resources, like databases, content repositories, and source code. A well-planned team environment allows you to quickly and consistently develop, build, and update your portals.
Tip:
Typically, one member of the development team creates a new portal application in JDeveloper and checks it in to the source control repository. A team member can create any required database or content repository connections and check those in as well.For more detailed information on team development topics like source control and file sharing, see Chapter 3, "Working Productively in Teams."
2.3 Setup Tasks Specific to WebCenter Portal Framework Applications
This section describes tasks that you only need to perform if you are creating WebCenter Portal Framework application.
2.3.1 Preparing for Iterative Development in a Portal Framework Application
This section discusses the iterative development feature for WebCenter Portal Framework applications.
Enabling iterative development lets you make changes to your portal application while it is running on the Integrated WebLogic Server and immediately see the effect of those changes by refreshing the browser. For more information on iterative development, see Section 8.7, "Understanding Iterative Development."
Note:
The iterative development option disables many performance optimization features, which can cause your application to run more slowly.2.3.1.1 Enabling Iterative Development
This section explains how to enable iterative development, if it has been disabled. When you enable this feature, you are turning off all caching, which can cause your application to run more slowly.
Note:
The iterative development feature is enabled by default when you create a new Portal Framework application.-
Select Application Properties from the Application menu.
-
Along the left side of the Application Properties dialog, expand the Run node.
-
Select WebCenter Portal.
-
Select Enable Iterative Development, as shown in Figure 2-1.
Figure 2-1 Enabling Iterative Development

Description of "Figure 2-1 Enabling Iterative Development"
-
Under the Run node in the left pane of the dialog, select MDS.
-
In the right pane, select Delete customizations before each run. Doing so clears the MDS of any runtime customizations every time the application is run.
-
Click OK.
2.3.1.2 Turning Off Iterative Development
This section explains how to turn off iterative development. Iterative development is enabled by default. It's a good practice to turn off iterative development for testing purposes before you deploy your application to a production server.
There are other several reasons why you might consider turning off iterative development, such as:
-
Because turning on iterative development disables all caching, you might turn off this feature if you have a very large portal and the lack of caching is causing performance problems.
-
When this feature is turned off, there is no difference between a portal instance that is running on the Integrated WebLogic Server and an instance that is deployed to a managed server.
To turn off iterative development:
-
Select Application Properties from the Application menu.
-
Along the left side of the Application Properties dialog, expand the Run node.
-
Select WebCenter Portal.
-
Unselect Enable Iterative Development.
-
Click OK.
2.3.2 Additional Configurations
Additional configurations that may be required for WebCenter Portal Framework applications are covered in Section 2.2.5, "Configuring WebCenter Back-End Services" and Section 2.2.6, "Creating Application Resource Connections."
2.4 Setup Tasks Specific to WebCenter Portlet Producer Applications
This section describes tasks that you only need to perform if you are creating WebCenter Portlet Producer application. For more information about WebCenter Portlet Producer applications, see Chapter 57, "Introduction to Portlets."
2.4.1 What You May Need to Know About Preconfigured Portlet Producers
WebCenter Portal provides a variety of ready-to-use portlets that you can add to your portal pages. This section provides a brief description of the preconfigured producers and the portlets they provide. It contains the following subsections:
-
Section 2.4.1.1, "Deploying the Preconfigured Portlet Producers"
-
Section 2.4.1.4, "The WSRP Sample Portlet Producers and Portlets"
-
Section 2.4.1.5, "The PDK-Java Sample Portlet Producer and Portlets"
2.4.1.1 Deploying the Preconfigured Portlet Producers
The preconfigured portlet producers are not deployed by default – you must deploy them manually, as explained in this section.
Note:
These producer applications consume memory and require CPU time during deployment. This contributes to the WebLogic Server startup time and base memory footprint. For these reasons, it makes sense to only deploy the applications you need. For more information tuning the deployment of internal applications, see the "On-demand Deployment of Internal Applications" section in Oracle Fusion Middleware Deploying Applications to Oracle WebLogic Server.-
If it is not running, start the Integrated WebLogic Server. The server must be running for this feature to be enabled.
-
From the Run menu, select WebCenter Portal Deployments.
-
In the WebCenter Portal Deployments dialog box, select the producer you wish to deploy and click OK. The dialog is shown in Figure 2-2. Each of the preconfigured producers is described in more detail in the following sections.
Figure 2-2 WebCenter Portal Deployments Dialog
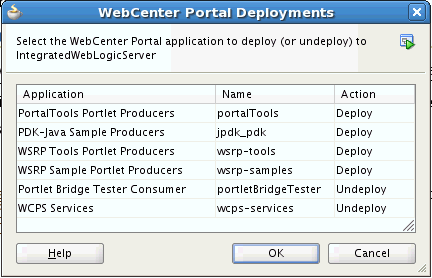
Description of "Figure 2-2 WebCenter Portal Deployments Dialog"
2.4.1.2 Registering Deployed Portlet Producers
After a portlet producer is deployed, you can register it. Portlets from registered producers can then be selected from Oracle JDeveloper's Application Resources panel.
For information about registering portlet producers, see Chapter 63, "Consuming Portlets." For information about adding portlets to pages, see Section 63.5, "Adding Portlets to a Page."
2.4.1.3 Accessing OmniPortlet and Web Clipping
The Integrated WLS contains PortalTools, which provides access to the design time at runtime OmniPortlet and Web Clipping portlet. Design time at runtime means that users define portlet content after the portlet is placed on an application page and the page is run.
To access the OmniPortlet and Web Clipping portlet producers:
-
Start the Integrated WebLogic Server.
-
From the Help menu, select WebCenter Preconfigured Server Readme.
-
In the Readme file, go to the heading Accessing the PortalTools Portlet Producers Test Pages, and click the PortalTools Welcome Page link.
This opens the PortalTools Welcome page.
Note:
The Portal Tools Portlet Producers component must be deployed before the PortalTools Welcome page can be accessed through the WebCenter Preconfigured Server Readme page. For details, see Section 2.4.1.1, "Deploying the Preconfigured Portlet Producers." -
On the PortalTools Welcome page, copy the URL of the Web Clipping Producer link, the OmniPortlet Producer link or the Sample Portlet Producer link, and use it as the producer URL in the Oracle PDK-Java Portlet Producer Registration Wizard.
Note:
For information about registering a portlet producer, see Chapter 63, "Consuming Portlets."
Once you have registered a producer, its portlets become available on Oracle JDeveloper's Application Resources panel. In the Application Resources panel, under the Connections node, select a producer name to list its portlets, then drag a portlet onto a portal page. (For information about adding portlets to pages, see Section 63.5, "Adding Portlets to a Page.".)
The PortalTools Welcome page contains producer URLs for three producers:
-
The Web Clipping producer provides the Web Clipping portlet, which is a browser-based declarative tool that enables dynamic reuse of content from another web source. When the source changes, the content in the Web Clipping portlet also changes. With the Web Clipping portlet, you use a web browser to navigate to the web page that contains the desired content. Using Web Clipping Studio, which is accessed through the portlet, drill down through a visual rendering of the target page to choose the desired content. For detailed information about the Web Clipping portlet, see Chapter 65, "Creating Content-Based Portlets with Web Clipping."
Note:
The Web Clipping portlet was deprecated in Release 11g (11.1.1.7.0). Consider using a clipper pagelet using Oracle WebCenter Portal's Pagelet Producer. For more information, see the "Managing the Pagelet Producer" chapter in the Oracle Fusion Middleware Administering Oracle WebCenter Portal. -
The OmniPortlet producer provides OmniPortlet, which is a declarative portlet-building tool that enables you to build portlets against a variety of data sources, including XML files, character-separated value files (for example, spreadsheets), web services, databases, and web page. OmniPortlet users can also choose a prebuilt layout for the data. Prebuilt layouts include tabular, news, bullet, form, chart, or HTML. For information about OmniPortlet, see Chapter 64, "Creating Portlets with OmniPortlet."
-
The Sample Portlet Producer includes portlets built with OmniPortlet that are for demonstration purposes only. The portlet samples include a scrolling RSS portlet and a simple RSS portlet. Note that the sample producer is for demonstration and should not be used to create real-use portlet instances.
2.4.1.4 The WSRP Sample Portlet Producers and Portlets
The Integrated WLS includes sample WSRP portlet producers and portlets you can use with your application.
Note:
You can find the source code for the sample portlets is in the following EAR file:JDEV_HOME/jdeveloper/webcenter/modules/oracle.portlet.server_11.1.1/wsrp-samples.ear
where JDEV_HOME is the location where JDeveloper is installed on your machine.
To access WSRP sample portlet producers:
-
Start the Integrated WebLogic Server.
-
From the Help menu, select WebCenter Portal Preconfigured Server Readme.
-
In the Readme file, go to the heading Accessing the WSRP Portlet Producers Test Pages, and click the link for the WSRP Tools Portlet Producers or Sample Portlet Producer.
Note:
The portlet producers are not deployed by default. You must deploy a producer application before it can be accessed through the WebCenter Preconfigured Server Readme page. For details, see Section 2.4.1.1, "Deploying the Preconfigured Portlet Producers."Both links open different WSRP Producer Test Pages—one that has Parameter Form and Parameter Display portlets, the other for different WSRP producer versions of sample portlets.
-
Copy the Web Services Description Language (WSDL) URL for a WSRP producer—either WSRP v1 WSDL or WSRP v2 WSDL.
Use the copied link as the producer URL in the WSRP Producer Registration Wizard.
Note:
For information about registering a portlet producer, see Chapter 63, "Consuming Portlets."
Depending on where the portlet producer connection was registered, its portlets appear either under Application Resources or in the Resource Palette. From here, you can drag and drop a variety of sample portlets onto your Portal Framework application pages.
2.4.1.5 The PDK-Java Sample Portlet Producer and Portlets
The Integrated WLS includes sample PDK-Java portlet producers and portlets you can use with your application. Use the PDK-Java sample portlets to familiarize yourself with the types of functionality that are available through PDK-Java portlets.
To access PDK-Java sample portlet producers:
-
Start the Integrated WebLogic Server.
-
From the Help menu, select WebCenter Preconfigured Server Readme.
-
In the Readme file, go to the heading Accessing the PDK-Java Portlet Producers Test Pages, and copy the link location for the PDK-Java Sample Producer or PDK-Java Struts Sample Producer link.
Note:
These producers must be deployed before they can be accessed through the WebCenter Preconfigured Server Readme page. For details, see Section 2.4.1.1, "Deploying the Preconfigured Portlet Producers."Use the copied link as the producer URL in the Oracle PDK-Java Portlet Producer Registration Wizard.
Note:
For information about registering a portlet producer, see Chapter 63, "Consuming Portlets.".
Depending on where the portlet producer connection was registered, its portlets appear either under Application Resources or in the Resource Palette. From here, you can drag and drop a variety of sample portlets onto your Portal Framework application pages.
2.4.1.6 The Portlet Bridge Tester Consumer
The tester is used to test portletized page or task flow in JDeveloper. The tester is deployed by default. For more information, see Section 58.4, "Testing a Portletized Page or Task Flow in JDeveloper."
2.4.1.7 WCPS Services
WebCenter Personalization Services is deployed by default, and is unrelated to portlet producers. For information about WebCenter Personalization, see Chapter 66, "Personalizing Oracle WebCenter Portal Applications."
2.5 Setting Up JDeveloper for Personalization
Personalization provides a dynamically derived user experience for your Portal Framework application. Personalization evaluates defined sources of input data, generates a decision based on that evaluation, and applies this information to a declaratively defined Personalization scenario. Personalization, for example, can return content or change application flow based on information about a user in a Human Resources database, targeting the application experience for that specific user. For more information, see Chapter 66, "Personalizing Oracle WebCenter Portal Applications."
Before you can develop and use personalization components you need to add certain components to your portal project. JDeveloper makes this process easy to do:
-
Be sure the WebCenter Portal Extension is installed into your JDeveloper environment. The WebCenter Portal Extension includes the required data integration component JAR files. See Section 2.2.2, "Installing the WebCenter Portal Extension for JDeveloper."
-
Create an application, such as a WebCenter Portal Framework application.
-
Add the WebCenter Personalization technology scope to your project. This technology scope adds the JDeveloper-specific tooling features, like the scenario editor, to the project.
-
Right-click your project and select Project Properties.
-
Select Technology Scope in the Project Properties dialog.
-
Select WebCenter Personalization in the list of available scopes and move it to the Selected column.
-
Click OK.
-
After you complete these steps, you are ready to develop and test personalization components in JDeveloper. For more information, see Chapter 66, "Personalizing Oracle WebCenter Portal Applications."