66 Personalizing Oracle WebCenter Portal Applications
This chapter describes how to integrate Personalization into a Portal Framework application to deliver targeted content based on both user and application context. This chapter also describes the Personalization run-time system and associated tools that allow the declarative definition of application flow.
This chapter includes the following topics:
For more information about Personalization, also see:
-
the "Managing Personalization" chapter in Oracle Fusion Middleware Administering Oracle WebCenter Portal
66.1 Introduction to Personalization
Personalization provides a dynamically derived user experience for your Portal Framework application. Personalization evaluates defined sources of input data, generates a decision based on that evaluation, and applies this information to a declaratively defined Personalization scenario. Personalization, for example, can return content or change application flow based on information about a user in a Human Resources database, targeting the application experience for that specific user.
This section provides an overview of the features and requirements of Personalization, and contains the following subsections:
66.1.1 Personalization Architecture
Figure 66-1 shows the architecture and out-of-the box services and components that comprise Personalization. These and other Personalization components are described in:
Figure 66-1 Personalization Services Architecture
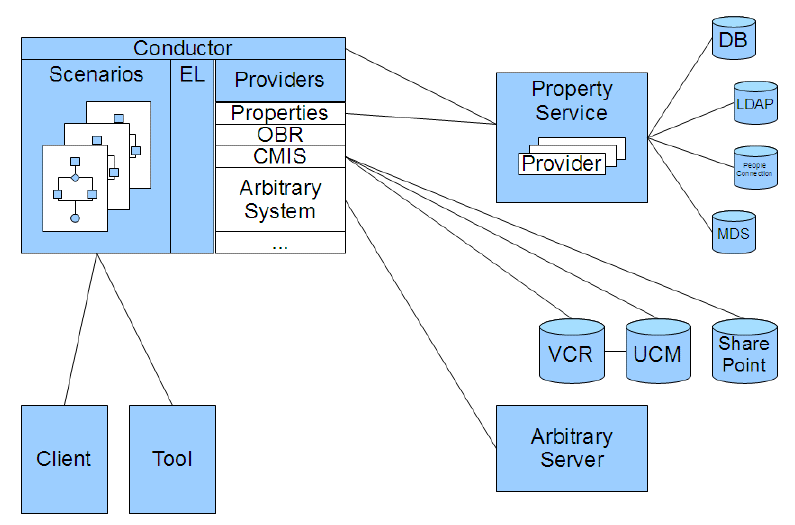
Description of "Figure 66-1 Personalization Services Architecture"
66.1.2 The Conductor
This section describes the role of the Conductor. The Conductor is the heart of the Personalization engine, and contains and runs the units of work called scenarios. The Conductor runs the prepared scenarios, and provides access to provider extensions that plug into the Conductor. These aspects of the Conductor are described in the following sections:
66.1.2.1 Scenarios
A scenario is defined by a script you create using the Scenario Editor in JDeveloper (or provide as an XML file). A scenario is based on a simple syntax that allows conditional statement evaluation, resulting in some form of content being returned to the client. Content can be filtered or manipulated prior to it being returned to the client.
A scenario, rather than returning targeted content, can also be used to make dynamic changes to application flow, resulting in a personalized user experience within the application.
In JDeveloper, you can use the Scenario Editor to graphically design your scenario. You can also create XML file-based scenarios. See Section 66.2.2.3, "Creating a New Scenario in the Scenario Editor" and Section 66.2.2.4, "Specifying Scenario Flow Using Node Types." See also Section 66.2.3, "Creating File-Based Scenarios."
66.1.2.2 Personalized Application Flow
As well as returning content targeted to a specific user, scenarios executing within the Conductor can also control application flow, render user interface components, and execute application-related events. Using the Conductor's public Java and Expression Language (EL) API, you can provide seamless integration with an existing Java or Web-based application. See Chapter 72, "Conductor API Reference" for more information about using Java and EL APIs.
66.1.2.3 Property Set Integration
The Property Service uses property sets to organize sets of user or application data, and property definitions to assign a data type to property data. You can extend the Property Service to access additional user profile data in an enterprise LDAP repository, or to access additional repositories such as Oracle MDS. For more information about the Property Service and property sets, see Section 66.2.2.2, "Creating Property Sets and Property Definitions"
66.1.2.4 Provider Integration
Providers provide a way to access external resources within your scenario. As well as three out-of-the-box providers for the Property Service, Content Server Provider (CMIS), and Activity Graph, the Conductor also supports an extensible architecture that lets you implement and access custom providers from within your Scenarios. For more information about providers, see Section 66.1.3, "Using Data Providers."
66.1.3 Using Data Providers
A data provider is an interface point for the Conductor that lets it communicate with external services. Personalization provides out-of-the-box providers for the Property Service, a CMIS provider enabling interaction with an Oracle WebCenter Content Server, and Activity Graph, and a locator used by the Property Service provider to allow integration with People Connections. There are also two types of custom providers you can implement: data providers and function providers.
This section describes the out-of-the-box providers and the two types of custom providers in the following subsections:
66.1.3.1 Out-of-the-Box Providers
This section describes the out-of-the-box providers you can access from within your scenarios, and a locator used by the Property Service provider to allow integration with People Connections.
This section contains the following subsections:
66.1.3.1.1 Property Service Provider
The Property Service Provider allows integration with the Property Service. This provider allows you to retrieve property sets for a particular property set definition, retrieve a property set by name, or return a specific property from a property set. For more information about the Property Service Provider, see Section 66.2.2.6.1, "Using the Property Service Provider."
66.1.3.1.2 CMIS Provider
The CMIS Provider provides services to retrieve and search for content from standards-based CMIS (Content Management Interoperability Services) content servers, specifically provided by the Oracle WebCenter Content Server. The CMIS Provider also has utility function providers to convert results to simplified form. For information about integrating the CMIS Provider, see Section 66.2.2.6.2, "Using the CMIS Provider." For information about creating and editing connection configuration for the Content Server provider, see "Configuring the REST Service Identity Asserter" in the Oracle Fusion Middleware Administering Oracle WebCenter Portal.
66.1.3.1.3 Activity Graph Provider
The Activity Graph Provider (ActivityGraphProvider) provides integration with the Activity Graph engine (the basis for the Activity Graph service), which provides recommendations about what a user may be interested in connecting with based on analytics within WebCenter. For example, the Activity Graph Provider method recommendedUsers, queries the Activity Graph engine for a list of users that a given user might want to connect with.
The Activity Graph engine provides a central repository for actions that are collected by enterprise applications. For more information about the Activity Graph service and the Activity Graph engine, see Section 46, "Integrating the Activity Graph."
The Activity Graph provider is built on two REST services for Activity Graph running on the WebCenter Portal server (WC_Spaces), and consequently requires that WebCenter Portal be installed in your environment. For more information about integrating the Activity Graph provider in your scenario, see Section 66.2.2.6.3, "Using the Activity Graph Provider." For information about creating and editing connection configuration for the Activity Graph provider, see "Configuring the Activity Graph Provider" in the Oracle Fusion Middleware Administering Oracle WebCenter Portal.
66.1.3.1.4 People Connections Locator
The People Connections locator is an IPropertyLocator used by the Property Provider to interface with People Connections. One of the benefits of People Connections is that it can access user profile information stored on WebCenter Portal. For more information about People Connections, see Section 36.3.4.2.16, "Working with People Connections." For more information about the People Connections locator, see Section 66.2.2.6.1, "Using the Property Service Provider." For information about creating and editing connection configuration for the People Connections locator, see "Configuring the Oracle People Connections Locator" in the Oracle Fusion Middleware Administering Oracle WebCenter Portal.
66.1.3.2 Writing Custom Data Providers
A data provider is a component that plugs into the Conductor architecture and acts as a delegate for some service. Data returned from a data provider can be used as-is (Java classes), or chained to be used as input to other data providers in the same scenario.
Data providers typically operate on the input context of a given user or an external application data set (or both). Personalization includes a Property Service that can provide typed data storage for user or application data, and is accessible as input to providers. For more information about creating your own data provider, see Chapter 67, "Implementing Custom Data Providers: Introduction."
66.1.3.3 Writing Custom Function Providers
Function providers also provide an extension point for the Conductor to create utility methods (for example, for data manipulation or transformation, or business rule calculation) that can be invoked using Expression Language (EL) expressions. A simple example might be: ${strings:concat('string1','string2')}). For information on writing your own function providers, see Chapter 68, "Implementing Custom Function Providers: Introduction."
The CMIS and Activity Graph providers each have their own function provider to facilitate data transformations, among other utilities. For more information about Personalization ELs, see Appendix F, "ELs Related to Personalization."
66.2 Integrating Personalization in Your Application
This section describes how to integrate Personalization in your Portal Framework application.
This section contains the following subsections:
66.2.1 Personalization Requirements
This section describes the design-time system requirements and dependencies for developing WebCenter Portal applications with JDeveloper that integrate Personalization services. For a complete list of requirements, dependencies, and options for Personalization, see "Personalization Prerequisites and Limitations" in the Oracle Fusion Middleware Administering Oracle WebCenter Portal.
-
WebCenter Portal must be installed if the CMIS provider, Activity Graph provider, or People Connections locator are being used in a scenario. Note that for basic iterative development WebCenter Portal is not required to be installed on your domain.
-
Before you can use REST APIs, you must take the steps outlined in "Before You Begin: Performing Required Configurations" in the Oracle Fusion Middleware Administering Oracle WebCenter Portal.
-
Personalization relies on WebCenter Trust Services to provide single sign-on (SSO) between different managed servers within the WebCenter domain, including the Oracle WebCenter Content: Content Server that is accessed through the CMIS provider. For JDeveloper's integrated domain, the Trust Services must be configured using a WLST script (
configureWCPS.py) located in theDefaultDomain/scrpts-wcpsdirectory. For more information about configuring the WebCenter Trust Services and single sign-on using this script see "Configuring Single Sign-On" in the Oracle Fusion Middleware Administering Oracle WebCenter Portal. -
The REST service must be configured. For information about how to configure the REST service, see the chapter "Managing REST Services" in the Oracle Fusion Middleware Administering Oracle WebCenter Portal.
Note:
Although you can optionally include the out-of-the-box providers for Activity Graph and People Connections in your application, you will not be able to test results in JDeveloper. Note also that these providers are only partially configured, and you must complete their configuration as described in the Oracle Fusion Middleware Administering Oracle WebCenter Portal in the sections on "Configuring the Oracle People Connections Service" and "Configuring the Activity Graph Service."66.2.2 Authoring Personalized Scenarios in JDeveloper
This section describes how to author personalized scenarios using the Personalization tools in JDeveloper, and includes the following subsections:
-
Section 66.2.2.2, "Creating Property Sets and Property Definitions"
-
Section 66.2.2.3, "Creating a New Scenario in the Scenario Editor"
-
Section 66.2.2.4, "Specifying Scenario Flow Using Node Types"
-
Section 66.2.2.5, "Defining Property Sets and Property Locators"
66.2.2.1 Creating a Properties Namespace File
The first step in setting up a scenario is to create a Properties Namespace file. This file will store the settings for the namespace(s) in which your scenario will run, and typically a set of default property definitions. This file will also contain the property definitions and property set definitions you define later on in Section 66.2.2.2, "Creating Property Sets and Property Definitions."
To create a Properties Namespace file in JDeveloper:
-
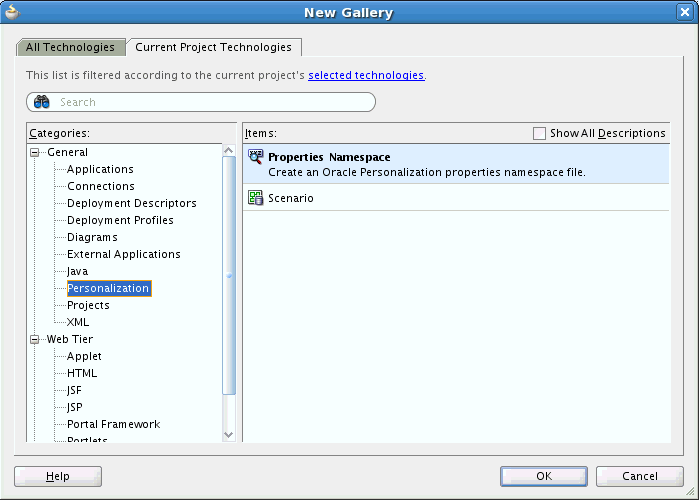
With the application open in the Application Navigator, select New from the File menu.
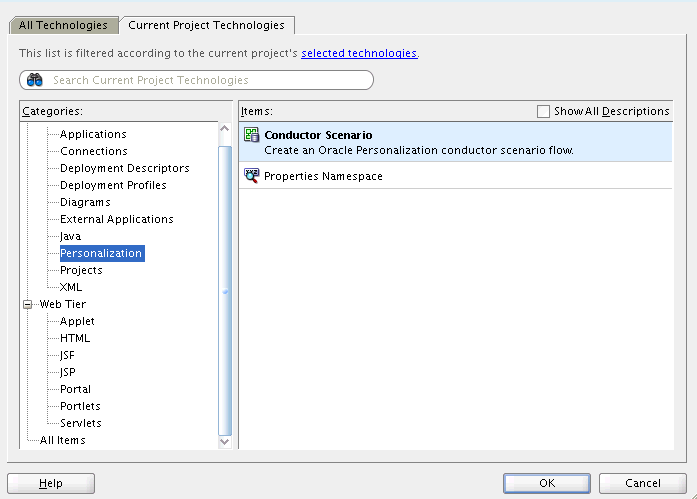
The New Gallery dialog displays (see Figure 66-2).
Note:
If the Personalization category doesn't display, open the All Technologies tab and select it, or click selected technologies and add WebCenter Personalization to the project. -
Choose Properties Namespace and click OK.
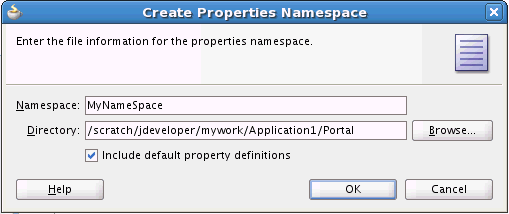
The Create Namespace dialog displays (see Figure 66-3).
-
Enter a name for the namespace, select the Include default property definitions check box to add initial default property definitions to the namespace, and click OK.
The Include default property definitions check box controls whether initial default property definitions are added to the namespace file. These are:
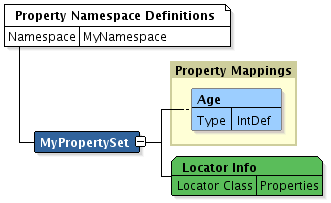
IntDef,NumberDef,StringDef,BooleanDef,DateTimeDef,ClobDef,IntArrayDef,NumberArrayDef,StringArrayDef,BooleanArrayDef,DateTimeArrayDef,ClobArrayDef.The property definitions can be removed afterwards if they're not required. Or, you can leave the check box unselected to start with no initial property definitions and create them as needed in the Properties Editor.A graphic representation of the namespace file displays in the Design pane (see Figure 66-4).
Figure 66-4 Design Pane - Namespace Definition
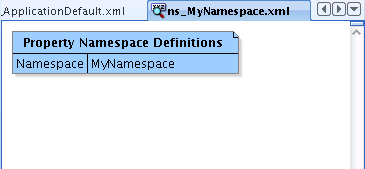
Description of "Figure 66-4 Design Pane - Namespace Definition"
-
Continue by defining the property sets and properties that you will need in your scenario as described in Section 66.2.2.2, "Creating Property Sets and Property Definitions."
66.2.2.2 Creating Property Sets and Property Definitions
Properties are the bits of data about someone or something on which, for example, you can base evaluations of conditionals in your scenario's flow. A property, for example, could contain a person's age or gender. A property set is simply a collection or container of related properties.
To define a property set and associated properties:
-
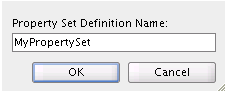
From within your application in JDeveloper, right-click the namespace in the Design pane, select Create New Property Set Definition, and click OK.
The Create New Property Set dialog displays (see Figure 66-5).
Figure 66-5 Create New Property Set Dialog
Description of "Figure 66-5 Create New Property Set Dialog"
-
Enter a name for the property set and click OK.
A node for the new property set displays in the Design pane (see Figure 66-6).
Figure 66-6 Design Pane - New Property Set Definition
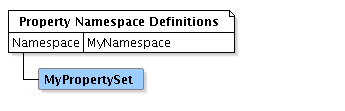
Description of "Figure 66-6 Design Pane - New Property Set Definition"
-
To add properties to the new property set, right-click the property set, and select Create New Property Definition Mapping.
The Create Property Mapping dialog displays (see Figure 66-7).
Figure 66-7 Create Property Mapping Dialog
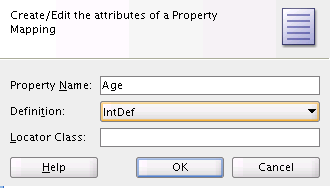
Description of "Figure 66-7 Create Property Mapping Dialog"
-
Enter a Property Name and select a Definition (the value type), and click OK.
To create a new property definition, select
New Definitionin the Definition drop down list.The new property appears as part of the property set's graphic representation (see Figure 66-8).
Figure 66-8 Design Pane - Property Definition
Description of "Figure 66-8 Design Pane - Property Definition"
-
Add any additional properties required to the property set definition (or create new property sets) and then continue by creating the scenario as described in Section 66.2.2.3, "Creating a New Scenario in the Scenario Editor."
66.2.2.3 Creating a New Scenario in the Scenario Editor
The Conductor's Scenario Editor provides a visual tool for viewing and editing scenario definitions managed by the Conductor. The Scenario Editor stores scenarios in both file and visual formats and is available from within JDeveloper. Before creating a scenario, you should have created a namespace and at least some of the property sets and properties you need for the scenario.
To create a new scenario using the Scenario Editor in JDeveloper:
-
From within your application in JDeveloper, right-click the application in the navigation bar and select New.
The New Gallery dialog displays (see Figure 66-9).
Note:
If the Personalization category doesn't display, open the All Technologies tab and select it, or click selected technologies and add the Personalization technology to the project. -
Select Scenario and click OK.
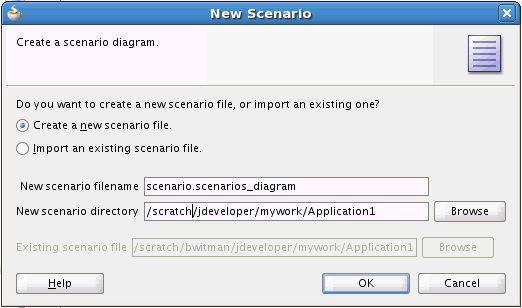
The New Scenario Wizard dialog displays (see Figure 66-10).
-
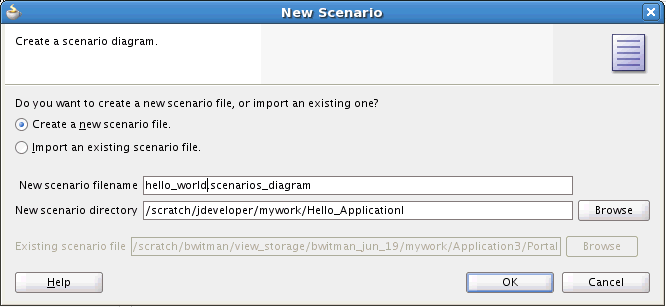
Select Create a new scenario file and modify the file name and where the file is stored if necessary. Note that the scenario name's extension (
.scenarios_diagram) cannot be changed.The Scenario Editor displays with a new Start node (see Figure 66-11).
Figure 66-11 Scenario Editor - Start Node
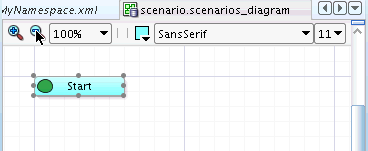
Description of "Figure 66-11 Scenario Editor - Start Node"
-
To add nodes to the scenario, right-click the node to which you want to add a new node, select Add Following Statement, and chose the node type from the list as shown in Figure 66-12.
Figure 66-12 Adding a Node in the Scenario Editor
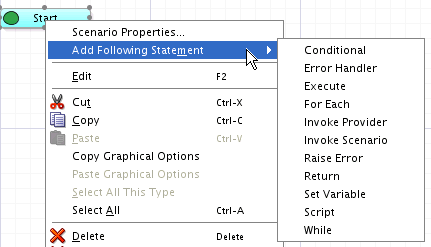
Description of "Figure 66-12 Adding a Node in the Scenario Editor"
Right-click the new node to expose options for setting node properties and extending the flow. For a description of available node types, see Section 66.2.2.4, "Specifying Scenario Flow Using Node Types."
66.2.2.4 Specifying Scenario Flow Using Node Types
The Scenario Editor uses a tree-structured fixed layout where the flow is represented by a combination of subtrees (for decisions) and internal label references to represent flow for loops and complex nested if/else decisions.
-
Start: The Start node is a root level node that defines where a scenario begins.
-
Return: The Return node halts execution of the scenario, and returns the specified results of evaluation of an EL expression to the caller.
-
Set Variable: The Set Variable node lets you define a variable that is scoped within the context of the currently running scenario and initialize it with an expression.
-
Script: Use the Script node to add a script, including ones that use embedded EL expressions, to your scenario. A script engine can be specified by either the mimetype or engine name.
-
Execute: The Execute node invokes a specified EL expression with no expected return value. Similar to Variable Assignment, only the results of the expression are not stored within the Scenario context.
-
Error Handler: The Error Handler node provides a Java-like Catch/Try construct where you can use the Try node to test a condition and execute a response depending on the results.
-
Conditional: The Conditional node evaluates an EL expression and executes the contained statements if the EL expression evaluate to true. Statements within the Otherwise block will only execute if all condition statements evaluate to false.
-
For Each: The For Each node provides looping/iterative functionality over a collection of things.
-
While: Provides looping/iterating functionality as long as a specified EL expression evaluates to true.
-
Raise Error: Raise and throw an error with the specified error message
-
Invoke Provider: Invokes a named implementation of IDataProvider. Results are stored within the context of the currently running Scenario.
-
Invoke Scenario: Invokes another named Scenario within the same namespace. Results are stored within the context of the currently running Scenario
66.2.2.5 Defining Property Sets and Property Locators
The Property Editor lets you view and edit the property set definitions and their associated property definitions managed by the Property Service. The Property Editor communicates and persists data through the Property Service.
Property sets and properties within a property set can be stored in many different locations and formats, so a locator facility is needed to retrieve them. A default property set locator is provided that retrieves and stores property set data to a pre-configured database. This default locator is used when no other is specified for the property set.
A custom locator for the People Connections service is also provided out-of-the-box (for more information, see Section 66.1.3.1.4, "People Connections Locator"), but you may want to define additional locators for other data sources. You can define multiple locators for properties and property sets, and they can also be defined in order of precedence. For step-by-step instructions for how to implement a locator see Chapter 70, "Implementing a Custom Locator." Note that although multiple locators can be associated with a property set definition, only a single property in that property set definition can be assigned to one of the locators.
66.2.2.6 Using the Out-of-the-Box Providers
Personalization provides three providers out-of-the-box providers for use within scenarios: the Property Service Provider, the Content Server Provider (CMIS), and Activity Graph. This section describes how you can integrate these providers in your application in the following subsections:
66.2.2.6.1 Using the Property Service Provider
The Property Service Provider (oracle.PropertiesServiceProvider) allows integration with the Personalization Server Property Service. This provider lets you to retrieve property sets for a particular property set definition, retrieve a property set by name, or return a specific property from a property set. If you are using the People Connections locator to integrate profile data into your scenario, then you must configure the Property Service before using it. For more information about the People Connections locator, see Section 66.1.3.1.4, "People Connections Locator." For information about configuring the Property Service provider, see "Configuring the Oracle People Connections Locator" in the Oracle Fusion Middleware Administering Oracle WebCenter Portal.
66.2.2.6.2 Using the CMIS Provider
The CMIS provider (CMISProvider) provides services to search for and retrieve content from standards-based CMIS (Content Management Interoperability Services) content servers. For WebCenter, this is specifically provided by the Oracle WebCenter Content: Content Server. The CMIS provider also has a utility function provider (CMISFunctionProvider) to convert results to simplified form. Before trying the examples below, be sure to configure your CMIS provider connection as shown in the section on "Configuring the CMIS Provider" in the Oracle Fusion Middleware Administering Oracle WebCenter Portal.
Example CMIS Provider Scenario
Create a scenario using the following (remember to set the content-type of application/xml):
Request URI:
POST http://localhost:8891/wcps/api/conductor/namespaces/myNameSpace/scenarios
Request Body:
<scenarioMetadata>
<scenario xmlns:common="http://xmlns.oracle.com/wcps/conductor/common/1.0.0" xmlns:scenario="http://xmlns.oracle.com/wcps/conductor/scenarios/1.0.0">
  <body>
    <call-provider>
      <provider-name>CMISProvider</provider-name>
      <connection-name>CmisConfigConnection</connection-name>
      <variable>exprString</variable>
      <input>
        <parameter>
            <common:name>search</common:name>
            <common:value>SELECT * FROM cmis:document WHERE cmis:name LIKE 'flowers'</common:value>
        </parameter>
      </input>
    </call-provider>
    <return>
      <expression>${exprString}</expression>
    </return>
  </body>
  <name>CMIS Scenario</name>
  <comments>CMIS Scenario comments</comments>
  <tags>
    <tag>CMIS Scenario tag</tag>
  </tags>
</scenario>
</scenarioMetadata>
Request URI:
POST http://localhost:8891/wcps/api/conductor/namespaces/myNameSpace/scenarios/CMIS%20Scenario
Request Body:
<parameters/>
Using the CMISFunctionProvider
A function provider is a utility class that can be invoked from within a scenario. The CMISFunctionProvider supports several methods (see the JavaDoc for the class for more information). Here are two example methods:
/**
     * Convert the array of input IDs to a CMIS query in the form of 'IN'
     * @param ids Array of document IDs, in the form of dDocName only
     * @return CMIS query String
     */
public static String getCMISQueryForDocIDs(
    @PublicParameter(parameterName="repository",descriptionBundleKey="getCMISQueryForDocIDs.parameter.description.inputList") String repository,
    @PublicParameter(parameterName="ids",descriptionBundleKey="getCMISQueryForDocIDs.parameter.description.inputList") List<String> ids))
...


/**
     * Convert the array of input IDs to a CMIS query in the form of 'IN'
     * @param ids, in the form of a WebCenter document ObjectURN.  For example: stanl18-ucm11g#dDocName:MOUNTAINS
     * @return CMIS query String
     */
 public static String
    getCMISQueryForDocIDsFromFullID(@PublicParameter(parameterName="ids",
            descriptionBundleKey="getCMISQueryForDocIDs.parameter.description.inputList") List<String> ids)
Using the CMISFunctionProvider in a Scenario
The following scenario snippet shows how data might be fed into the CMISFunctionProvider to create a CMIS query for multiple nodes, where the query is then sent to the CMIS provider. (In a more realistic case, rather than generate the data, we could have passed the results from an Activity Graph provider call, for example.)
<scenario:scenario xmlns:common="http://xmlns.oracle.com/wcps/conductor/common/1.0.0"
                   xmlns:scenario="http://xmlns.oracle.com/wcps/conductor/scenarios/1.0.0">
  <comments>testFunctionProviderScenario4 comments</comments>
  <body>
   <assign-variable>
      <variable>ids</variable>
      <expression>${collections:new()}</expression>
    </assign-variable>
    <execute>
      <expression>${collections:append(ids,'StellentRepository#dDocName:MOUNTAINS')}</expression>
    </execute>
    <execute>
      <expression>${collections:append(ids,'StellentRepository#dDocName:PARKS')}</expression>
    </execute>
    <execute>
      <expression>${collections:append(ids,'StellentRepository#dDocName:PATAGONIAPARKS')}</expression>
    </execute>

    <!-- Assign those as IDs to send to CMIS -->
    <assign-variable>
        <variable>cmisQuery</variable>
        <expression>${cmisfunction:getCMISQueryForDocIDsFromFullID(ids)}</expression>
    </assign-variable>

    <!-- Make the call to CMIS -->
    <call-provider>
      <provider-name>CMISProvider</provider-name>
      <connection-name>NonProxyConnection</connection-name>
      <variable>cmisResults</variable>
      <input>
        <parameter>
            <common:name>search</common:name>
            <common:value>${cmisQuery}</common:value>
        </parameter>
      </input>
    </call-provider>
    <return>
      <expression>${cmisResults}</expression>
    </return>
  </body>
  <name>testFunctionProviderScenario4</name>

</scenario:scenario>
66.2.2.6.3 Using the Activity Graph Provider
The Activity Graph Provider (ActivityGraphProvider) provides integration with the Activity Graph service, which provides recommendations based on analytics within WebCenter. Before attempting the examples below, be sure to configure the connection for the Activity Graph service as shown in the section on "Configuring the Activity Graph Provider" in the Oracle Fusion Middleware Administering Oracle WebCenter Portal.
Example Activity Graph Provider Scenario
Create a scenario using the following (remember to set the content-type of application/xml):
Request URI:
POST http://localhost:8891/wcps/api/conductor/namespaces/default/scenarios
Request Body:
<scenarioMetadata>
<scenario xmlns:common="http://xmlns.oracle.com/wcps/conductor/common/1.0.0">
    <body>
        <call-provider>
            <provider-name>ActivityGraphProvider</provider-name>
            <connection-name>ActivityGraphConfigConnection</connection-name>
            <resource-name>QueryCommonItems</resource-name>
            <method-name>queryCommonItems</method-name>
            <variable>providerResults</variable>
            <input>
                <parameter>
                    <common:name>sourceClassURN</common:name>
                    <common:value>WC.user</common:value>
                </parameter>
                <parameter>
                    <common:name>sourceObjectURN</common:name>
                    <common:value>carl</common:value>
                </parameter>
                <parameter>
                    <common:name>targetClassURN</common:name>
                    <common:value>WC.user</common:value>
                </parameter>
                <parameter>
                    <common:name>targetObjectURN</common:name>
                    <common:value>monty</common:value>
                </parameter>
                <parameter>
                    <common:name>similarityURN</common:name>
                    <common:value>user-edit</common:value>
                </parameter>
            </input>
        </call-provider>
        <return>
            <expression>${providerResults}</expression>
        </return>
    </body>
    <name>QueryCommonItemsScenario</name>
    <comments>QueryCommonItemsScenario comments</comments>
    <tags>
        <tag>invoke</tag>
        <tag>sample</tag>
        <tag>provider</tag>
        <tag>resource</tag>
        <tag>input</tag>
        <tag>parameters</tag>
        <tag>overloaded</tag>
    </tags>
</scenario>
</scenarioMetadata>
Before continuing, you must set the header values: Accept=application/xml and content-type=application/xml.
Request URI:
POST http://localhost:8891/wcps/api/conductor/namespaces/default/scenarios/QueryCommonItemsScenario
Request Body:
<parameters/>
A function provider is a utility class that can be invoked from within a scenario. An example using the AGFunctionProvider is shown below:
/**
     * Return the value of 'ObjectURN', only for WC.document, from the input Object.
     * @param agResults From call to 'QueryRecommendations' or QueryItems.  Can be one of the following Classes:
     *
     * From AG REST 'recommendations'
     * <ul>
     *   <li> Recommendations
     *   <li> RecommendedItems
     *   <li> List<Recommendation>
     * </ul>
     *
     * From AG REST 'items'   (common items)
     * <ul>
     *   <li> Results
     *   <li> Items
     *   <li> List<Item>
     * </ul>
     *
     * @param dDocNameOnly  If true, just the last part of the ObjectURN for
     * document will be returned; otherwise, the entire ObjectURN will be.
     * For example, if ObjectURN is example-ucm11g#dDocName:EXAMPLEACL000116,
     * if this value is 'true', then only EXAMPLEACL000116 will be returned.
     * Otherwise, all of stanl18-ucm11g#dDocName:EXAMPLEACL000116 is returned.
     *
     * @return a List of ObjectURN representing the document ID
     */
    @PublicFunction

    public static List<String> getDocumentIDs(
@PublicParameter(parameterName="agResults",descriptionBundleKey="getContentIDs.parameter.description.inputList")Object agResults,
 @PublicParameter(parameterName="dDocNameOnly",  descriptionBundleKey="getContentIDs.parameter.description.inputList")boolean dDocNameOnly)
    {
...

/**
     * Return the value of 'ObjectURN' for the 'ClassURN' from the input Object.
     * @param agResults From call to 'QueryRecommendations' or QueryItems.  Can be one of the following Classes:
     *
     * From AG REST 'recommendations'
     * <ul>
     *   <li> Recommendations
     *   <li> RecommendedItems
     *   <li> List<Recommendation>
     * </ul>
     *
     * From AG REST 'items'   (common items)
     * <ul>
     *   <li> Results
     *   <li> Items
     *   <li> List<Item>
     * </ul>
     *
     * param filterClassURN return content only of this type.  Examples are: WC.wiki-page, WC.group-space, WC.user, WC.blog,
     * WC.topic, WC.document.  If this is null, return all types.
     *
     * @return a List of ObjectURN representing the item identifier.
     */
    @PublicFunction
            (
                    functionName="getContentIDs",
                    descriptionBundleKey="getContentIDs.method.description"
            )
    public static List<String> getContentIDs(@PublicParameter(parameterName="agResults",
         descriptionBundleKey="getContentIDs.parameter.description.inputList")Object agResults,
                                             @PublicParameter(parameterName="filterClassURN",
                                                     descriptionBundleKey="getContentIDs.parameter.description.filterClassURN") String filterClassURN)
    ...

/**
     * Filter recommendations by score.  Only those recommendations with a score >= the cutoff will be preserved.
     */
    @PublicFunction
            (
                    functionName="filterRecsByScore",
                    descriptionBundleKey="filterRecsByScore.method.description"
            )
    public static Recommendations filterRecsByScore(
            @PublicParameter(parameterName="recommendations",
            descriptionBundleKey="filterRecsByScore.parameter.description.agRecs") Recommendations recs,
            @PublicParameter(parameterName="cutoffScore",
            descriptionBundleKey="filterRecsByScore.parameter.description.cutoffScore") float cutoffScore
            )
    {
Using the AGFunctionProvider in a Scenario
In the following scenario, a call is first made to the Activity Graph REST service. The results of that call are in the agRecommendations variable. The next call in the scenario is to the AGFunctionProvider.getContentIDs() method, passing in the results of the agRecommendations (an Activity Graph object), and returning a List<String> of document IDs, held in the evaluation of the expressions call.
<expression>${agfunction:getContentIDs(agRecommendations,'WC.user')}</expression>

 <scenario:scenario xmlns:common="http://xmlns.oracle.com/wcps/conductor/common/1.0.0"
                   xmlns:scenario="http://xmlns.oracle.com/wcps/conductor/scenarios/1.0.0">
    <comments>CallProviderScenario comments</comments>
    <body>
        <call-provider>
            <provider-name>ActivityGraphProvider</provider-name>
            <connection-name>AgTestServerConnection</connection-name>
            <resource-name>QueryRecommendations</resource-name>
            <method-name>getRecommendationsUsingDefaultRecipe</method-name>
            <variable>agRecommendations</variable>
            <input>
                <parameter>
                    <common:name>classURN</common:name>
                    <common:value>WC.user</common:value>
                </parameter>
                <parameter>
                    <common:name>objectURN</common:name>
                    <common:value>carl</common:value>
                </parameter>
            </input>
        </call-provider>

          <!-- Now call function provider to translate into user IDs.  A more specific call is available for WC.document; this just tests
         the ability of the function provider to handle different types of content  -->
        <return>
            <expression>${agfunction:getContentIDs(agRecommendations,'WC.user')}</expression>
        </return>
    </body>
    <name>CallProviderScenario</name>
</scenario:scenario>
66.2.3 Creating File-Based Scenarios
As well as using the Scenario Editor, you can also create file-based scenarios in XML format. Note that file-based scenarios are only supported through the Conductor's import/export function and JDeveloper MDS integration. To import a file-based scenario into the Scenario Editor, select the Import an existing scenario file option when you create the scenario.
Table 66-1 shows the statements that make up the contents of a scenario file. For more detailed information about the statements, refer to the node descriptions in Section 66.2.2.4, "Specifying Scenario Flow Using Node Types."
Table 66-1 Scenario Statements
| Statement | Description | Example |
|---|---|---|
|
Set Variable |
Creates a variable that is scoped within the context of the currently running scenario. |
<assign-variable>
     <variable>index</variable>
    <expression>3</expression>
</assign-variable>
|
|
Execute |
Invokes a specified EL Expression with no expected return value. Similar to Variable Assignment, only results of the expression are not stored within the Scenario Context. |
<execute>
   <comments>Adds to an existing
collection.</comments>

<expression>${collections:append(responses,
'The outlook is not so good.')}</expression>
</execute>
|
|
Conditional |
Evaluates an EL expression and executes the contained statements should the EL expression evaluate to true. Statements within the otherwise block will only execute if all condition statements evaluate to false. |
<conditions>
      <body>
        <condition>
          <body>
            <assign-variable>
              <variable>customerType</variable>
              <expression>Great Customer</expression>
            </assign-variable>
          </body>
          <expression>${customer.totalMoneySpent >= 100000}</expression>
        </condition>
        <otherwise>
          <body>
            <assign-variable>
              <variable>customerType</variable>
              <expression>Good Customer</expression>
            </assign-variable>
          </body>
        </otherwise>
      </body>
</conditions>
|
|
Error Handler |
Allows you to add a try/catch block to a scenario. |
<body>
        <error-handler id="_1">
            <try id="_2">
                <body/>
            </try>
            <catch id="_3">
                <body/>
                <variable>exception</variable>
            </catch>
        </error-handler>
    </body>
|
|
For Each |
Provides looping/iterating functionality over a collection of things. |
<for-each>
      <body>
         <execute>
           <comments>
               Let's send each great customer an email, thanking them for their loyalty.
           </comments>
           <expression>
               ${emailService:sendMail(customer,'Subject:Thanks for being a great customer')}
           </expression>
         </execute>
      </body>
      <variable>customer</variable>
      <max-iterations>10</max-iterations>
      <items>${greatCustomers}</items>
</for-each>
|
|
Script |
Allows you to run a script in the scenario. The script can be written in JavaScript, Groovy, JRuby, or Python. |
<body>
        <script type="text/javascript" resolveAsExpression="true" id="_5">
            <variable>hello</variable>
            <source>y=5;
                    z=2;
                    x=y+z;
                    hello=x;
            </source>
        </script>
        <return id="_6">
            <expression>${hello}</expression>
        </return>
    </body>
|
|
While |
Provides looping/iterating functionality as long as the specified EL expression evaluates to true. |
<while>
      <body>
        <assign-variable>
          <comments>Sum up customer invoices to arrive at customer total expenditure.</comments>
          <variable>customerTotalSpent</variable>
          <expression>${customerTotalSpent+order.invoiceTotal}</expression>
        </assign-variable>
      </body>
      <expression>${customer.id = currentCustomerId }</expression>
      <max-iterations>-1</max-iterations>
</while>
|
|
Invoke Scenario |
Invokes another named scenario within the same namespace. Results are stored within the context of the currently running scenario. |
<call-scenario >
    <variable>greeting</variable>
    <scenario>randomGreetingGenerator</scenario>
    <input>
        <parameter>
          <ns2:name>greetingsList</ns2:name>
          <ns2:value>hello, Bonjour, Buenos días</ns2:value>
        </parameter>
    </input>
</call-scenario>
|
|
Invoke Provider |
Invokes a named implementation of IDataProvider. Results are stored within the context of the currently running scenario |
<call-provider>
      <provider-name>CRM_Provider</provider-name>
      <connection-name>crm_db</connection-name>
      <resource-name>getGreatCustomers</resource-name>
      <variable>greatCustomers</variable>
      <input>
          <parameter>
              <ns2:name>minMoneySpent</ns2:name>
              <ns2:value>100000</ns2:value>
          </parameter>
      </input>
</call-provider>
|
|
Return |
Returns the specified results of evaluation of an EL Expression. |
<return>
    <comments>Return the sales rep who
 sold the most widgets this month.</comments>
    <expression>${bestSalesRep.id}</expression>
</return>
|
|
Raise Error |
Raise and throw an error with the specified error message |
<raise-error>
      <comments>User is unathorized,
 so let's return a 401.</comments>
      <statusCode>401</statusCode>
      <message>User ${ScenarioContext.scenarioRequest.user
Principal.name} is unauthorized to
 execute this scenario.</message>
</raise-error>
|
|
Script |
Add a script, including ones that use embedded EL expressions |
Example 66-1 Example File-based Scenario
<scenario:scenario xmlns:common="http://xmlns.oracle.com/wcps/conductor/common/1.0.0"
                   xmlns:scenario="http://xmlns.oracle.com/wcps/conductor/scenarios/1.0.0">
  <comments>sampleScenarioWithIf comments</comments>
  <body>
    <assign-variable>
      <variable>index</variable>
      <expression>3</expression>
    </assign-variable>
    <conditions>
      <body>
        <condition>
          <body>
            <assign-variable>
              <variable>ResultVar</variable>
              <expression>conditionSatisfied</expression>
            </assign-variable>
          </body>
          <expression>${index == 3}</expression>
        </condition>
        <otherwise>
          <body>
            <assign-variable>
              <variable>ResultVar</variable>
              <expression>otherwiseInvoked</expression>
            </assign-variable>
          </body>
        </otherwise>
      </body>
    </conditions>
    <return>
      <expression>${ResultVar}</expression>
    </return>
  </body>
  <name>sampleScenarioWithIf</name>
  <tags>
    <tag>if</tag>
    <tag>condition</tag>
    <tag>otherwise</tag>
  </tags>
</scenario:scenario>
66.2.4 Displaying Targeted Content at Runtime
Targeted content can be displayed to the user at runtime using Content Presenter. Content Presenter is tightly integrated with the Conductor's dynamic content query generation and enables simple surfacing of dynamic content. For more information about using Content Presenter in your application, see Chapter 27, "Creating Content Presenter Display Templates."
66.3 Deploying Personalization Files
This section explains how to build and deploy Oracle WebCenter Portal Personalization (WCPS) files.
Note:
For information on integrating and configuring Personalization, see "Personalization Prerequisites and Limitations" in the Oracle Fusion Middleware Administering Oracle WebCenter Portal.-
Section 66.3.1, "Deploying Personalization Files to a Server"
-
Section 66.3.2, "Deploying Personalization Files to an Archive File"
66.3.1 Deploying Personalization Files to a Server
To deploy Personalization files to a server:
Note:
The deployment feature described in this section requires the WebCenter Personalization technology scope. If this scope is not added, the related menu items will be disabled. See Section 66.2, "Integrating Personalization in Your Application."-
In JDeveloper, open your portal project. If you want to use WLST commands to perform this deployment, see Section 66.3.3, "Importing and Exporting MAR Files."
-
From the Application menu, select Deploy Personalization Files and then select To Server.
-
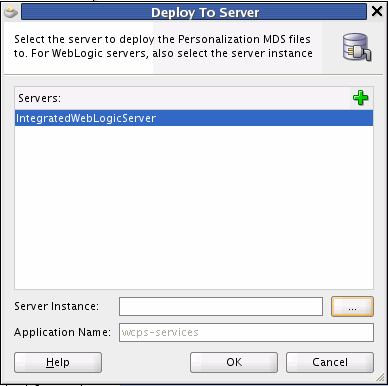
In the Deploy to Server dialog, select the server to which you want to deploy the service. See Figure 66-13.
Note:
Optionally, click the Add button to add a server to the list. -
Click the ellipsis ("...") button to select a specific server instance. For example, the running DefaultServer.
-
Click OK when you are finished.
-
Check the Message - Log window for details on the deployment. The log will indicate if the deployment of the metadata files was completed successfully.
66.3.2 Deploying Personalization Files to an Archive File
You can deploy your Personalization files to a metadata archive (MAR) file on the file system. To deploy to a MAR file:
-
In JDeveloper, open your portal project.
-
From the Application menu, select Deploy Personalization Files and then select To Filesystem.
-
In the Deploy to Filesystem dialog, select Create Metadata Archive and specify a location and name for the MAR file.
The MAR file can then be updated to the server using command line utilities described in Section 66.3.3, "Importing and Exporting MAR Files."
66.3.3 Importing and Exporting MAR Files
To update a Personalization server with new files from a Metadata Archive (MAR) file, use the following WLST commands to connect to the server and import the metadata.
wlst:> connect('<username>', '<password>', 't3://admin-server-hostname:7001')
wlst:> importMetadata(application='wcps-services', server='WC_Utilities', fromLocation='<mar file>', remote='true')
To export the Personalization files from the server into a MAR file on the filesystem, use these WLST commands to connect to the server and export the metadata:
wlst:> connect('<username>', '<password>', 't3://admin-server-hostname:7001')
wlst:> exportMetadata(application='wcps-services', server='WC_Utilities', toLocation='<mar file>', remote='true')
For more information on MDS WLST commands, refer to the Oracle Fusion Middleware WebLogic Scripting Tool Command Reference on the Oracle Technology Network.
If you're running on the IntegratedWebLogicServer in a development environment, the connect URL is t3://localhost:7101 and the server is DefaultServer.
66.3.4 Propagating Personalization Files
The WebCenter Portal Administration Console includes a propagation tool for moving portal metadata from a staging to a production server without incurring any downtime. The propagation tool supports moving Oracle WebCenter Portal Personalization files from staging to production. The propagation tool automatically exports metadata from the application's MDS repository on the source server, then imports the metadata to the application's MDS repository on the target server. For more information about the propagation tool, see Section 8.13, "Using the Propagation Tool to Propagate From Staging to Production."
The ability for the propagation tool to move Personalization files depends on the following conditions:
-
The Portal Framework application's MDS repository must point to the same database as the
mds-wcpsDSdata source. This is the default configuration. In general, propagation will work correctly if you do not change the default database configuration. -
On both the source and destination servers, the application's MDS store must use the same partition name as the MDS store for
wcps-services. In a standard portal configuration, this partition iswebcenter-portal.Note:
Typically, there is a one to two minute delay between when the propagation tool is initialized and when the Personalization REST services are notified of the MDS changes. This delay does not occur when you use the WLST commands to propagate Personalization files, as explained in Section 66.3.3, "Importing and Exporting MAR Files."
66.4 Tutorial: Creating, Testing and Deploying a Simple Application
This section describes how to create a simple application in JDeveloper containing a scenario that returns a simple string ("Hello World"). You'll then test the results of that scenario by adding it to a JSP page and running the application in the integrated WebLogic server to display the results in a browser.
This section also covers the steps to configure and start the integrated WebLogic server, define a connection to the Personalization Server Conductor, and how to deploy the scenario and JSP artifacts to the server domain for testing.
Note:
as a prerequisite to this tutorial, you should already have installed WebCenter Portal's extension for Oracle JDeveloper (oracle.webcenter.framework_bundle.zip). If you have not already added this extension, use the Update Wizard in JDeveloper to check for updates by clicking Check for Updates from the Help menu.-
Create a simple WebCenter Portal application (
Hello_Applicaton) using the default options and technologies.-
From the File menu select New...
The New Gallery appears.
-
Select the Applications category.
-
Select WebCenter Portal Framework Application from the Items list and click OK. The Create WebCenter Portal Framework Application wizard appears.
-
Enter the Application Name as
Hello_Application, as shown in Figure 66-14.Figure 66-14 Creating the Hello_Application - Step 1

Description of "Figure 66-14 Creating the Hello_Application - Step 1"
-
In the Project 1 Name page of the wizard (Step 2), select WebCenter Personalization in the Available list and move it to the Selected list.
-
Click Next until you reach Step 5 and click Finish.
-
-
Configure JDeveloper's integrated server's (integrated WLS) default domain.
The domain will automatically be extended to include necessary server artifacts required for running the Personalization components (i.e., the Personalization Conductor and the Property Service).
-
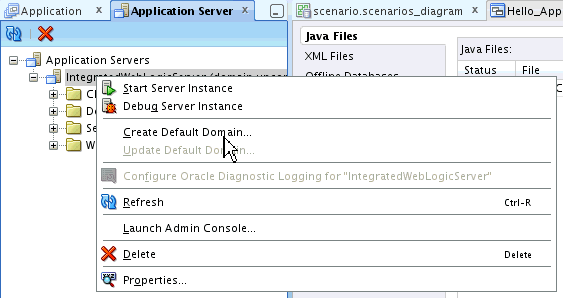
From the View menu, select
Application Server Navigatorand expand theApplication Serverstree node to display theIntegratedWeblogicServer.The current status should be
(domain unconfigured). -
Right-click
IntegratedWeblogicServerto display the context menu and selectCreate Default Domain...Figure 66-15 Application Server Navigator - Creating the Default Domain
Description of "Figure 66-15 Application Server Navigator - Creating the Default Domain"
-
When prompted, enter
welcome1as the Administrator password and click OK.The status displays
(domain building)and the Message Log window displays the output as the domain is being built. Wait for the domain to finish building. This may take some time to complete. When complete, the message log should display"Integrated Weblogic domain processing completed successfully." -
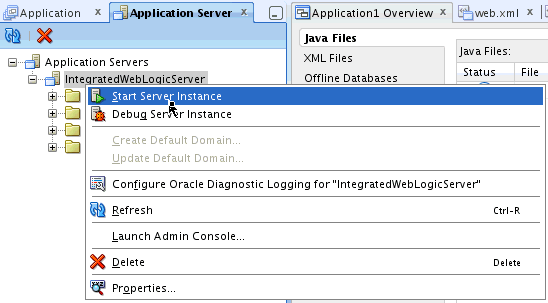
Start the server by right-clicking
IntegratedWeblogicServerto display the context menu, and selecting Start Server Instance. See Figure 66-16.The
Running: IntegratedWeblogicServer - Logview should appear and display output as the server is starting. Wait for the server to finish starting. This may take some time to complete. When complete, the IntegratedWeblogicServer Message Log should displayIntegratedWebLogicServer started.Figure 66-16 Application Server Navigator - Starting the Server
Description of "Figure 66-16 Application Server Navigator - Starting the Server"
-
-
Configure an application URL connection to the Personalization Conductor component of the application server.
-
From the Application menu select Application Properties. The Application Properties dialog displays.
-
Select the Personalization Server category, and from the URL Connection: drop-down list and select < New URL Connection... >.
The Create URL Connection dialog displays (see Figure 66-17).
Figure 66-17 Create URL Connection Dialog - Conductor URL Connection
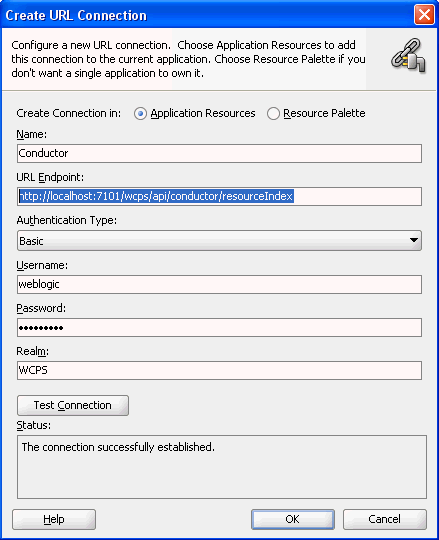
Description of "Figure 66-17 Create URL Connection Dialog - Conductor URL Connection"
-
Enter the (default) data entry fields as shown below to create the connection.
Field Name Value Name Conductor URL Endpoint http://localhost:7101/wcps/api/conductor/resourceIndex Authentication Type Basic Username weblogic Password welcome1 (the Administrator password you provided when you created the domain) Realm WCPS -
Click Test Connection.
The Status should display as
"The connection successfully established." -
Click OK to create the Conductor URL connection.
-
On the Personalization Server page, click OK.
-
-
Create a simple
hello_worldscenario that returns the string"Hello World"when invoked by the Personalization server.-
Right-click the
Portalproject in the Application Navigator and select New.The New Gallery appears.
-
From the Current Project Technologies tab, select the Personalization category.
-
Select Scenario and click OK.
The New Scenario dialog displays.
-
Leave the option
Create a new scenario fileselected, enter a New scenario filename calledhello_world.scenarios_diagram, and click OK to create the scenario. -
In the Scenario Editor's Diagram view, right-click the Start node and select
Add Following Statement->Return.A Return node is added and connected.
-
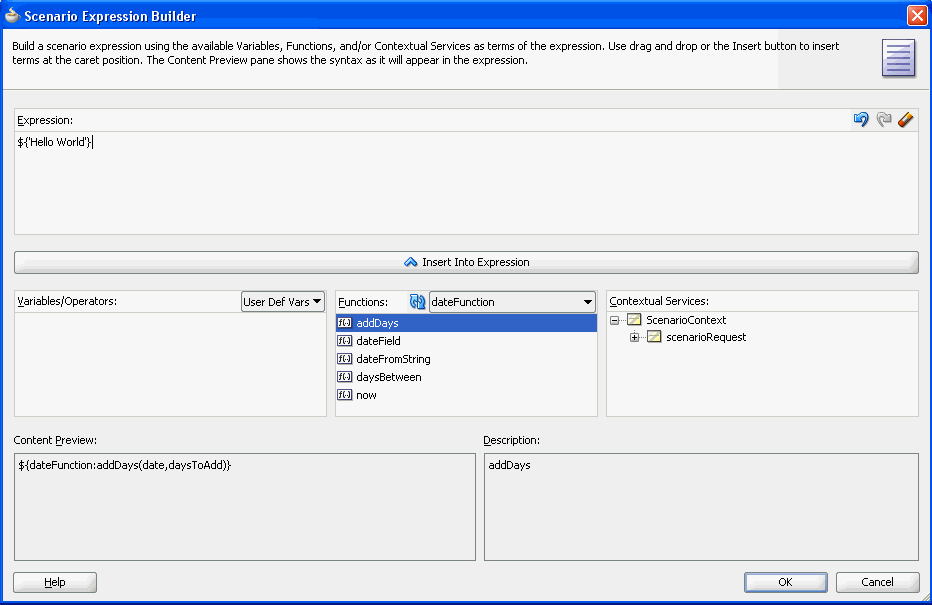
Right-click the Return node and select Set Expression.
The Scenario Expression builder displays (see Figure 66-19).
-
In the Expression text area, enter the following EL expression and click OK.
${'Hello World'}Your scenario diagram should look like the one shown in Figure 66-20.
Figure 66-20 Scenario Editor - hello_world Scenario
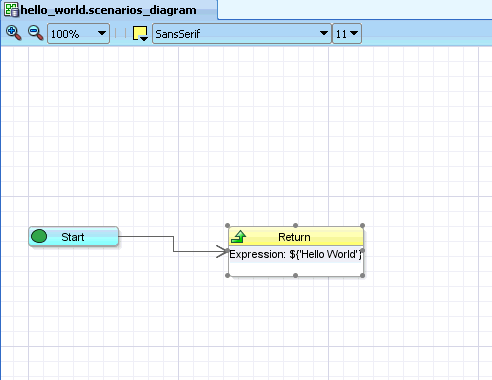
Description of "Figure 66-20 Scenario Editor - hello_world Scenario"
-
From the File menu, select
Saveto save thehello_world.scenarios_diagram.
-
-
Try running the Scenario directly. Right-click the Start node and select Run.
-
In the Scenario Input dialog, click OK. This dialog allows you to enter any required parameters for the scenario. In this case, there are none.
-
The result "Hello World" appears in a log window.
-
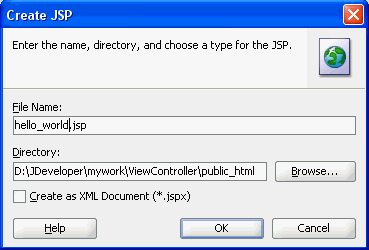
Next, create a JSP page that invokes the
hello_worldscenario and displays the results.-
Right-click the
Portalproject in the Application Navigator and select New...The New Gallery displays.
-
From the Current Project Technologies tab, select the JSP category.
-
From the item list select JSP and click OK.
The Create JSP dialog displays (see Figure 66-21).
-
Enter the File Name as
hello_world.jspand click OK to create the JSP page. -
When the JSP Editor launches, select the Source view and replace the template text with the following JSP code:
Notice in the
c:outcommand how the Personalization Context Beanp13nContextis being used to invoke the Conductor connection (Conductor) you created earlier using the scenario namespaceHello_Applicationspecified earlier in the Application Properties dialog, invoking the scenario calledhello_world, and finally displaying the results.<!DOCTYPE HTML PUBLIC "-//W3C//DTD HTML 4.01 Transitional//EN" "http://www.w3.org/TR/html4/loose.dtd"> <%@ page contentType="text/html;charset=UTF-8"%> <%@ taglib uri="http://java.sun.com/jsp/jstl/core" prefix="c"%> <html> <head> <meta http-equiv="Content-Type" content="text/html; charset=UTF-8"/> <title>hello_world</title> </head> <body> <jsp:useBean id="p13nContext" class="oracle.wcps.client.PersonalizationContext" scope="session"/> <%((oracle.wcps.client.PersonalizationContext)session.getAttribute("p13nContext")).reset(); %> <c:out value="${p13nContext.conductor['Conductor'].namespaces['Hello_ application'].scenario['hello_world'].results}"/> </body> </html>Note:
If you haven't configured single sign-on and the trust service as outlined in step 3, then theConductorURL connection specified here will generate a 401 "Unauthorized" return code when the page is run. As a shortcut (for testing purposes only) you can substitute an inline connection:http://weblogic:weblogic1@localhost:7101/wcps/api/conductor/resourceIndexin place of the
ConductorURL to get around the single sign-on constraint. For more information about configuring the WebCenter Trust Services and single sign-on using this script see "Configuring Single Sign-On" in the Oracle Fusion Middleware Administering Oracle WebCenter Portal. -
From the File menu, select Save to save the
hello_world.jsp.
-
-
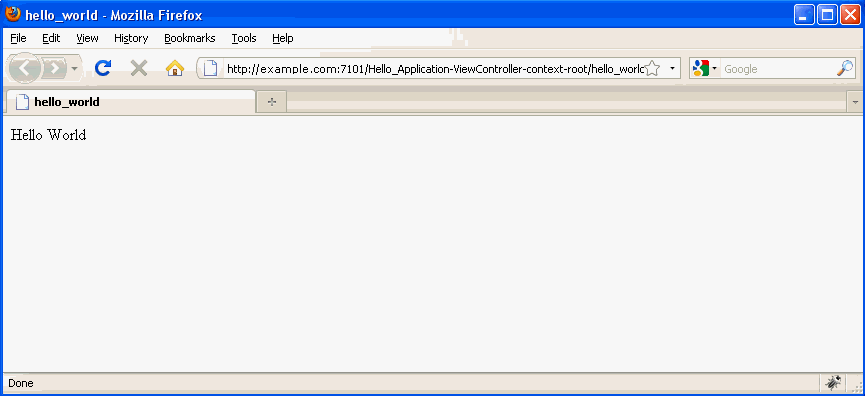
Finally, to build and deploy the
Hello_Application, right-click the runnable artifact (thehello_world.jsppage) in the Application Navigator and select Run.JDeveloper starts several background processes in sequence, including:
-
Building the application,
-
Starting the integrated server (if not already started),
-
Deploying the application artifacts (including any Personalization artifacts) to the default domain, and
-
Launching an external web browser to display the artifact
hello_world.jsp.
Figure 66-22 Application Navigator - Building and Deploying the Application

Description of "Figure 66-22 Application Navigator - Building and Deploying the Application"
The resulting
hello_world.jspJSP page appears in the browser.Figure 66-23 Hello_Application's hello_world.jsp Page Displayed in Browser
Description of "Figure 66-23 Hello_Application's hello_world.jsp Page Displayed in Browser"
-
66.5 Using Personalization in WebCenter Portal
Oracle WebCenter Portal Personalization provides a dynamically derived user experience that can be applied to any WebCenter Portal object that can be used in conjunction with Expression Language (EL) expressions. This section provides an overview of how the Personalization engine can be used to determine which WebCenter Portal objects are presented to the user, and how these objects are presented based on the outcome of a Personalization scenario.
This chapter includes the following sections:
-
Section 66.5.1, "Introduction to Personalization in WebCenter Portal"
-
Section 66.5.2, "Calling Personalization ELs in WebCenter Portal"
66.5.1 Introduction to Personalization in WebCenter Portal
WebCenter Portal's Personalization provides a mechanism with which to vary the user experience based on dynamically evaluated criteria defined in a Personalization scenario. The scenario evaluates defined sources of input data, and generates a decision. The results of that decision or outcome can be applied in WebCenter Portal using Expression Language (EL) expressions.
To use Personalization in WebCenter Portal, you first need to create a scenario in a Framework application. The scenario does all the work of supplying the logic and calling one or more data providers to retrieve data. You then use ELs to execute and return the results of the scenario, and modify the user experience accordingly in WebCenter Portal. For information about how to create Personalization scenarios, see Section 66.2.2, "Authoring Personalized Scenarios in JDeveloper." The Personalization ELs used to run a scenario are cataloged in Section F.11, "ELs Related to Personalization."
Once you've set up your scenario, you can use ELs in WebCenter Portal to present targeted content or shape the way content is presented based on information about the user. For example, you can use a Personalization scenario to determine a user's role within an enterprise, and based on that selectively show content for that role. You can also tailor the presentation (such as page templates, page styles, skins, resource catalogs, and so on) for the user.
66.5.2 Calling Personalization ELs in WebCenter Portal
Personalization can deliver targeted content or change application flow based on both user and application context. Personalization, for example, can return content based on information about a user in a Human Resources database, or targeting the WebCenter Portal experience for that specific user by selecting the page templates, page styles, skins, and navigation flow within which the content is presented.
You can define the content sources, or data providers, that are used to evaluate or provide data for a scenario. The default data provider for Personalization is the CMIS data provider, which can retrieve data from WebCenter Portal's default content repository (Oracle WebCenter Content Server), and a data provider for Activity Graph and a locator for People Connections are also available out of the box. You can also define your own data providers for other data sources. For more information about data providers, see Section 66.1.3, "Using Data Providers."
In general, you call a scenario from a portal using the following EL expression:
#{p13nContext.conductor['CONDUCTORCONNECTION'].namespaces['NAMESPACE'].scenario['SCENARIO'].results}
Where:
-
CONDUCTORCONNECTION- is the name of the ADF Connection configured against the WebCenter application -
NAMESPACE- is the name of the namespace within which the scenario will run -
SCENARIO- is the name of the scenario to be invoked
For example, you can create a simple example of using Personalization to drive content based on information about the user by creating a scenario that returns "true" if the employee hire date is within the last two months (see Section 66.2.2, "Authoring Personalized Scenarios in JDeveloper" to learn how to create a Personalization scenario). After creating the scenario:
-
Log in as an administrator in WebCenter Portal.
-
Create a page for new hires, naming it
New Hire. -
Edit the navigation model for the site, and add a new navigation link to the New Hire page. For more information about editing the navigation model in a portal, see Section 10.3, "Editing a Navigation Model."
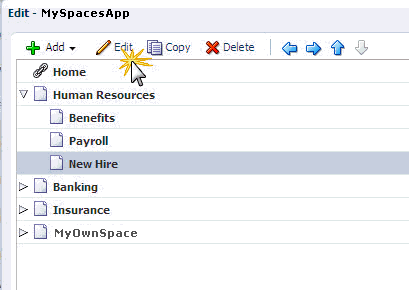
-
Select New Hire and click the Edit (Pencil) icon.
-
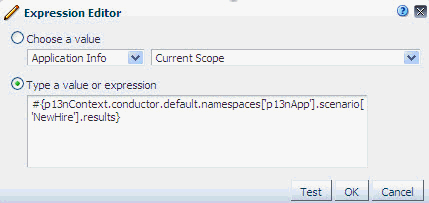
For the Visible attribute, open the Expression Editor, select Type a value or expression and enter:
#{p13nContext.conductor.default.namespaces['p13nApp'].scenario['NewHire'].results}Where
p13nAppis the name of the Framework application containing the scenario, andNewHireis the name of the scenario. This will execute the scenario and return the results (TrueorFalsein this case). If the user is a new hire (True) based on the results of the scenario, then the menu item will display when the user logs in.