68 Implementing Custom Function Providers: Introduction
This chapter introduces function providers, discusses their important role in data integration and the Data Integration architecture, and presents a basic example that you can build and run in JDeveloper. After reading this chapter, you will have a basic understanding of how to implement a function provider.
This chapter includes the following chapters:
68.1 What are Function Providers?
Where a data provider connects to and retrieves data from a data source, a function provider operates on data within the context of a scenario. WebCenter Portal provides a number of function providers out-of-the-box, like providers for working with List objects, Date objects, SQL data, and more. Or, you can implement custom function providers to address specific use cases.
68.2 Do I Need to Write a Function Provider?
WebCenter Portal includes a set of "out-of-the-box" function providers that perform certain commonly needed tasks. WebCenter Portal provides function providers that address general operations, like List and Date creation and manipulation. In addition, out-of-the-box function providers are included that address the data returned by specific data providers, like the SQL and REST data providers.
Note:
The out-of-the-box function providers are described in Chapter 69, "Function Provider Reference."For some use cases, the set of standard function providers may be insufficient, and you then have the option of writing and deploying your own custom function providers. For example, if you need to work with a specific data set returned from a custom data provider, you may need to write custom function providers to handle that data. See Section 68.4, "Implementing a Simple Custom Function Provider."
68.3 Discovering Function Providers
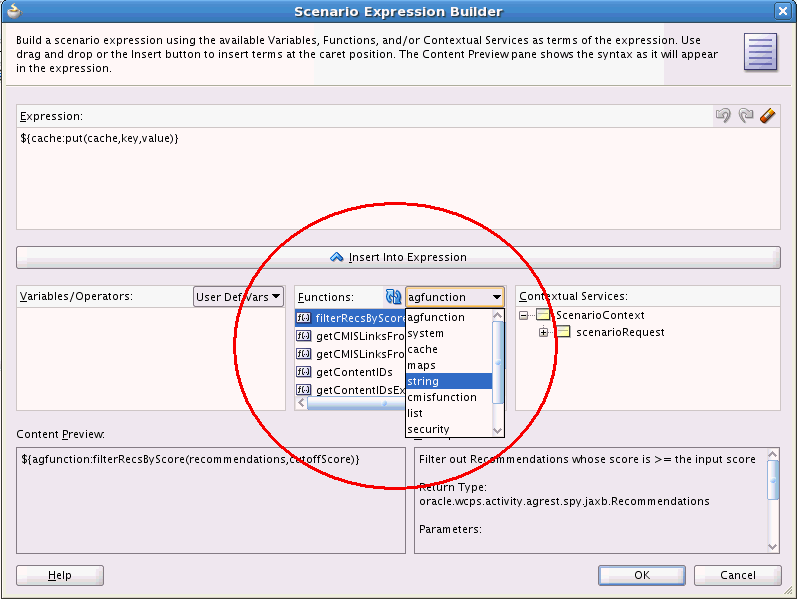
One way to discover the list of out-of-the-box and custom function providers is to bring up a the Scenario Expression Builder dialog, as shown in Figure 68-1.
-
Create an Execute scenario node.
-
Right-click the Execute node and select Set Expression.
For an example, see Section 68.6, "Calling a Function Provider in a Scenario."
The function providers allow you to perform operations on data. For example, Figure 68-1 shows the Scenario Expression Builder dialog. The "collections" function provider is selected. The drop-down list lets you select a function provider method for handling a collection of data. The collections function provider is one of several out-of-the-box function providers.
After you select a function provider, you need to fill in values for its parameters, if there are any. You supply parameter values to function providers by editing an Expression Language statement within the Expression Builder dialog. The dialog also provides a list of any variables that are available in the current scenario context as well as the Contextual Services, which are variables that exist within the scope of the current application.
Note:
Function providers appear in other statement contexts within the scenario editor that use the Expression Builder, such as Conditional and Return statements; however, the Expression Builder user interface associated with each statement is the same.Another way to "discover" the function providers available to you is to view REST responses in a tool that lets you make REST requests and view the responses.
-
In a browser, enter this URL, where host and port are the host and port name where the WCPS server is running. For example:
http://example.com:8891/wcps/api/conductor/resourceIndex
-
Locate the namespace URI and enter its URL in the browser. For example:
http://example.com:8891/wcps/api/conductor/namespaces
-
Locate the
functionProvidersURI for your application and enter its URL in the browser. Set the value ofprojectiontosummary. For example:http://mexample.com:8891/wcps/api/conductor/namespaces/MyApplication/functionProviders?projection=summary
This URL returns a REST response containing all of the function providers that are deployed to the server. This is also a handy test to run to test the configuration for a new function provider.
68.4 Implementing a Simple Custom Function Provider
This section describes how to implement a simple custom function provider, configure it, and invoke it inside a scenario. Even though this is a very basic example, it illustrates many important aspects of custom provider development and configuration.
68.4.1 Overview of the Example and Prerequisites
Before you begin developing a function provider in JDeveloper, be sure you have things set up properly. There are a few configurations that you need to make or verify for your environment. For details, see Section 2.5, "Setting Up JDeveloper for Personalization."
As general guidance, Figure 68-2 shows a sample project structure for a custom function provider implementation. You can develop function providers an any type of JDeveloper project that supports Java development. For details on creating Java classes in JDeveloper, refer to JDeveloper Online Help.
Note:
In this example, the provider is created in an Fusion Web Application in JDeveloper. You can also create function providers in WebCenter Portal applications or any other type of JDeveloper application that includes Java capabilities.Note:
Your project structure will not be identical to the sample shown in Figure 68-2; however, the basic organization of components (source files, resource properties, and META-INF/services configuration file) must follow this pattern for successful deployment. For example, it is required that your resources directory be in the same directory as your class files. Again, by following the general pattern shown in Figure 68-2, your deployment will succeed. The individual parts of the project structure are discussed in the following sections.Figure 68-2 Sample Function Provider Project Structure
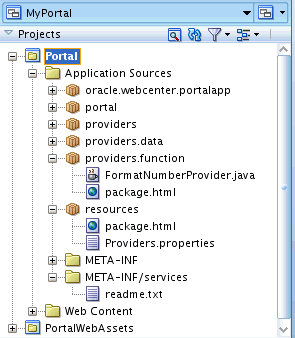
Description of "Figure 68-2 Sample Function Provider Project Structure "
68.4.2 Example Function Provider
All function providers are implementations of the IFunctionProvider interface. As with data providers, Java annotations allow function provider methods and parameters to appear in the scenario editor user interface.
Example 68-1 shows an example function provider. It provides a method for formatting numbers. In the following sections, we'll examine the parts of the class in detail, including the required Java annotations that appear at the top of the class and around methods and parameters.
Tip:
The general instructions for creating a class are to select New from the File menu and choose to create a new Java class. Copy the example code into the file and save it. If you explicitly enter the packagemodel (for this example) in the Create Java Class dialog, the package directory will be created for you and your class file will be placed in that package directory.Note:
Because function providers are simply Java components, you can follow best practices for exception handling as you would for any server-side Java components.Example 68-1 Example Function Provider
package model;

import oracle.wcps.conductor.annotation.FunctionProvider;
import oracle.wcps.conductor.provider.IFunctionProvider;
import oracle.wcps.conductor.annotation.PublicFunction;
import oracle.wcps.conductor.annotation.PublicParameter;
import java.text.DecimalFormat;
import java.lang.NumberFormatException;

import oracle.wcps.conductor.exception.ConductorRuntimeException;

@FunctionProvider
(
prefix="number",
resourceBundle="resources.Providers",
nameBundleKey="function.provider.name",
descriptionBundleKey="function.provider.description"
)
public class FormatNumberProvider implements IFunctionProvider {
   @PublicFunction
    (
        functionName="format",
        descriptionBundleKey="format.description"
    )
    public static String getNumber(@PublicParameter(parameterName="pattern",
        descriptionBundleKey="pattern.description") String pattern,
        @PublicParameter(parameterName="number", descriptionBundleKey="number.description") String number) {
        Double dd;
        dd = new Double("1.0");
        try {
            dd = new Double(number);
       } catch (NumberFormatException e){
           return ("You must enter a valid number.");
       }
       DecimalFormat df = new DecimalFormat(pattern);
       return number = df.format(dd);
    }
}
Figure 68-3 shows our example Java source file, FormatNumProvider.java, as it appears in the Application Navigator in JDeveloper. The file is in a package called model.
Tip:
Your source files may be organized differently, but Figure 68-3 at least shows a complete project structure for a function provider. This general pattern of project organization is the best practice.Figure 68-3 The Provider Class Source File
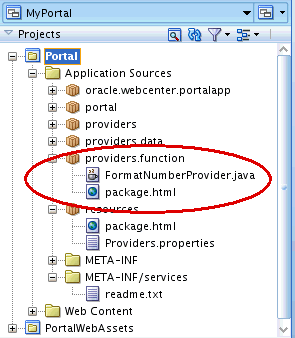
Description of "Figure 68-3 The Provider Class Source File"
Any object can be returned from a function provider. As a best practice, be sure that your return objects are marshalable, adhering to JAXB standards. Return objects that adhere to this criteria can be used anywhere within a scenario, like as input to a data provider.
68.4.3 Adding Java Class Annotations
Every function provider class requires the following Java annotation stanza immediately before the class definition:
@FunctionProvider
(
prefix="number",
resourceBundle="resources.Providers",
nameBundleKey="function.provider.name",
descriptionBundleKey="function.provider.description"
)
The prefix element specifies the name that will appear in the scenario editor user interface and lets you select the function provider. For example, when this function provider is referenced in a scenario, the method is called with an Expression Language expression like this: ${number:getNumber(format, number)"}.
Note:
Prefix names and variables must not contain hyphens or spaces. If hyphens or spaces appear in the prefix names or variables, they cannot be referenced by Expression Language expressions.The resourceBundle element refers to a resource file that exists in the class path of the function provider. The other annotations are resource bundle keys used to identify strings in the resource file, which primarily support localization.
Annotations are also required around your function provider's methods and method parameters, as explained in the next section. Note that to use annotations, you must import the following classes:
import oracle.wcps.conductor.annotation.PublicFunction;
import oracle.wcps.conductor.annotation.PublicParameter;
68.4.4 Writing Function Provider Methods
Methods and their parameters must be annotated, following the pattern shown in Example 68-0. The functionName value appears in the user interface, and the descriptionBundleKey value allows a description to be coded into the resource file specified at the top of the class. The same pattern applies to method parameter annotations.
Tip:
If you create methods with a Java Bean style "get" syntax, you can access object attributes in EL using convenient dot notation. For example, if your provider has a "foo" attribute and a "getFoo()" method, the attribute can be accessed through dot notation in EL in a scenario with a statement like this: ${myReturnObject.foo()}.Example 68-2 Java Annotations for Methods and Parameters
  @PublicFunction
    (
        functionName="format",
        descriptionBundleKey="format.description"
    )
    public static String getNumber(@PublicParameter(parameterName="pattern",
        descriptionBundleKey="pattern.description") String pattern,
        @PublicParameter(parameterName="number", descriptionBundleKey="number.description") String number) {

        Double dd;
        dd = new Double("1.0");
        try {
            dd = new Double(number);
       } catch (NumberFormatException e){
           return ("You must enter a valid number.");
       }
       DecimalFormat df = new DecimalFormat(pattern);
       return number = df.format(dd);
    }
}
68.5 Deploying a Custom Function Provider
After you create a new function provider class, you need to compile it and deploy it properly. After you accomplish these tasks successfully, the provider will show up in the scenario editor's Expression Builder user interface. This section explains the required steps.
Note:
Function provider deployment can be tricky, because it's largely a manual procedure. You must follow these instructions carefully–even a simple typo at any point will prevent the provider from being deployed.To summarize the steps, you must deploy a JAR file containing:
-
your compiled function provider class(es)
-
a resource properties file (which must be in the same directory as the classes)
-
a configuration file listing the classname(s) of your function provider(s)
The JAR file must then be manually copied to the server and the server must be restarted.
68.5.1 Compile Your Function Provider Class(es)
Function providers are written in Java, and must be compiled before they are deployed.
-
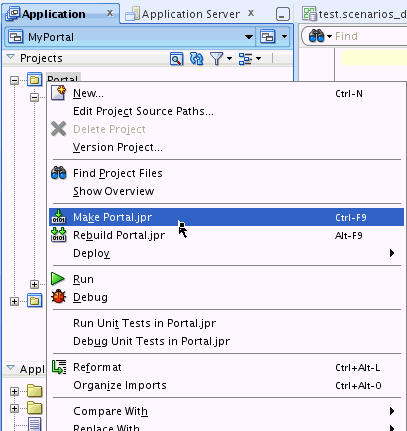
In Application Navigator, right-click the project containing your source code and select either the Make or Rebuild options, as shown in Figure 68-4.
68.5.2 Create a Resource Properties File
The Java annotations placed in the function provider class file point to a resource properties file. This file must exist and must include the required keys and values. The basic steps for creating the file are:
-
Right-click the project containing your Java files and select New.
-
In the New Gallery dialog, select General.
-
Create a Java package. In this example, the package is called resources.
-
Create a property file in the package. In this example, the file is called Providers.properties.
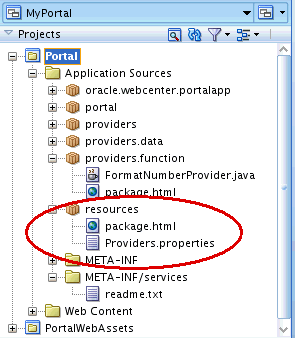
Figure 68-5 shows a properties file called Providers.properties in the resources package.
For example, the following resource keys were listed in the NumberFormatProvider class annotations (see the listing in Example 68-1). The first annotation, format.description, describes the provider's purpose. The others describe each of the input parameters.
format.description=Format a number.
pattern.description=A number format pattern like #.##.
number.description=The number to format.
68.5.3 Create a Configuration File in META-INF/services
The last step in preparing your function provider for deployment is to create a simple configuration file that lists the full class name(s) of your provider(s).
-
In the Application Navigator, create a new folder called
META-INFin the Application Sources folder. -
In the
META-INFfolder, create a folder calledservices. -
In the
servicesfolder, create a file calledoracle.wcps.conductor.provider.IFunctionProvider. You must use this exact name. See Figure 68-6.Figure 68-6 Function Provider Configuration File
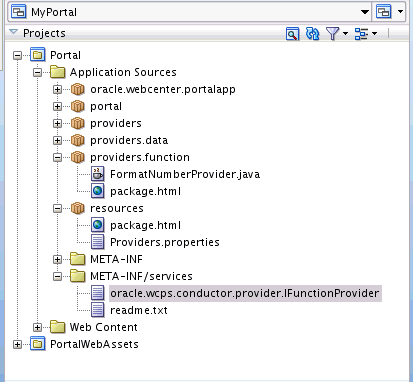
Description of "Figure 68-6 Function Provider Configuration File"
-
Open the
oracle.wcps.conductor.provider.IFunctionProviderfile and enter the full classname for each function provider you wish to deploy.For example:
model.FormatNumProvider
68.5.4 Set Up the JAR File Structure
If you are unfamiliar with JAR file creation in JDeveloper, this section explains how to set up your JAR file structure (a deployment profile) to ensure that all the required elements are included.
-
Right-click your project (in this example, the project called Portal) in the Application Navigator and select Project Properties.
-
In the Project Properties dialog, select Deployment.
-
Click New.
-
Select JAR File as the Archive Type and give the JAR a name.
-
Click OK.
-
In the JAR Options dialog, select Contributors.
-
Be sure that Project Output Directory, Project Source Path, and Project Dependencies are selected, as shown in Figure 68-7.
Figure 68-7 Selecting Project Output Contributors
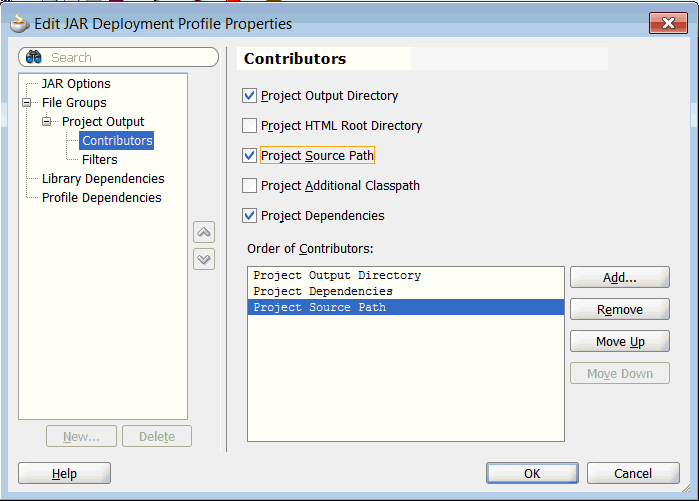
Description of "Figure 68-7 Selecting Project Output Contributors"
-
Select Filters.
-
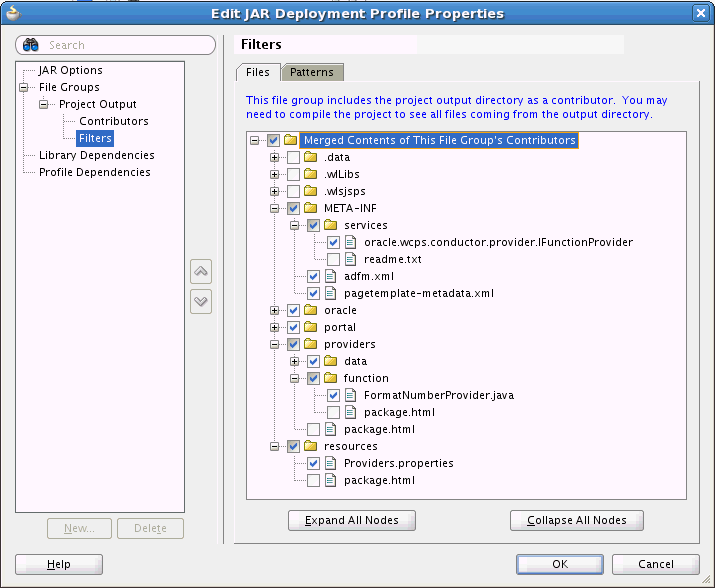
In the Files tab, select only the files you want to be added to the JAR. The JAR should include the
META-INF/servicesdirectory contents, Java classes, and resources folder, as shown in Figure 68-8. -
Click OK, and then OK in the Project Properties dialog.
-
Save your project.
68.5.5 Create a JAR File
After the JAR deployment profile is set, you are ready to generate a JAR file from your project.
-
Right-click the project (in this case, the Portal project) in the Application Navigator and select Deploy.
-
Select the JAR file you want to deploy. This is the name you gave the file in Section 68.5.4, "Set Up the JAR File Structure."
-
In the Deployment Action dialog, select Deploy to JAR file and click Finish.
The JAR file is placed in your project directory. You can view it on the file system in: <Workspace_Directory>/Portal/deploy. For example, if your Workspace is called MyProviders, you might find the JAR here: C:\JDeveloper\mywork\MyProviders\Portal\deploy.
68.5.6 Copy the JAR File to the Server
You must copy the JAR file to the server.
-
Copy the JAR file that you created in the previous step. As noted previously, the file is located in
<Workspace_Directory\Portal\deploy. -
Paste the JAR file into the following location on the server:
DOMAIN_HOME/conductor-extensions-library/WEB-INF/libFor example, for an Integrated WebLogic Server environment:
C:\JDeveloper\system11.1.7.40.63.82\DefaultDomain\conductor-extensions-library\WEB-INF\libOr, in a managed server environment:
ORACLE_HOME/oracle/user_projects/applications/wc_domain/conductor-extensions-library/WEB-INF/lib
-
Restart the server.
68.5.7 Test the Deployment
To test the deployment, simply verify that the custom data provider shows up in the UI or that you can discover it through the REST API. For details, see Section 68.3, "Discovering Function Providers."
If you're unable to discover the deployed function provider, then go back over your steps and carefully check that there are no obvious errors, like configuration or resource file misspellings. Be sure that you created your JAR file properly as described in Section 68.5.4, "Set Up the JAR File Structure." Also, be sure you copied the JAR file to the correct domain.
These are common mistakes to double-check for:
-
The META-INF/services contents must be included in the JAR file
-
The JAR file must be copied to your DOMAIN_HOME/conductor-extensions/WEB-INF/lib folder. You must restart the server after copying the file.
68.6 Calling a Function Provider in a Scenario
The scenario editor allows you to call function providers wherever you can perform an operation on a variable, like when you set a variable, create a return statement, create an input parameter to a data provider, or set up a conditional branch statement.
You always call a function provider from within the Expression Builder dialog. This dialog lets you select a function provider and select the specific method you wish to execute. If the provider takes input parameters, you must specify them in an Expression Language (EL) statement. An EL statement is automatically generated for you when you select your method, and all you need to do then is select or type in the appropriate variables.
For example, let's look at our example function provider, NumberFormatProvider (listed in Example 68-1).
The provider class had an annotation called "prefix." In our example, this annotation was set to the value "number." In the Expression Builder dialog, you can see that a provider called "number" appears in the drop down list of function providers. Figure 68-9 shows our example function provider called "number" is selected in the Functions drop down list. Under "number" is a list of methods in the provider. Our example contains just one method, called "format". Recall that "format" was provided in the method's functionName annotation.
Note:
Prefix names and variables must not contain hyphens or spaces. If hyphens or spaces appear in the prefix names or variables, they cannot be referenced by Expression Language expressions.Figure 68-9 Scenario Expression Builder Dialog
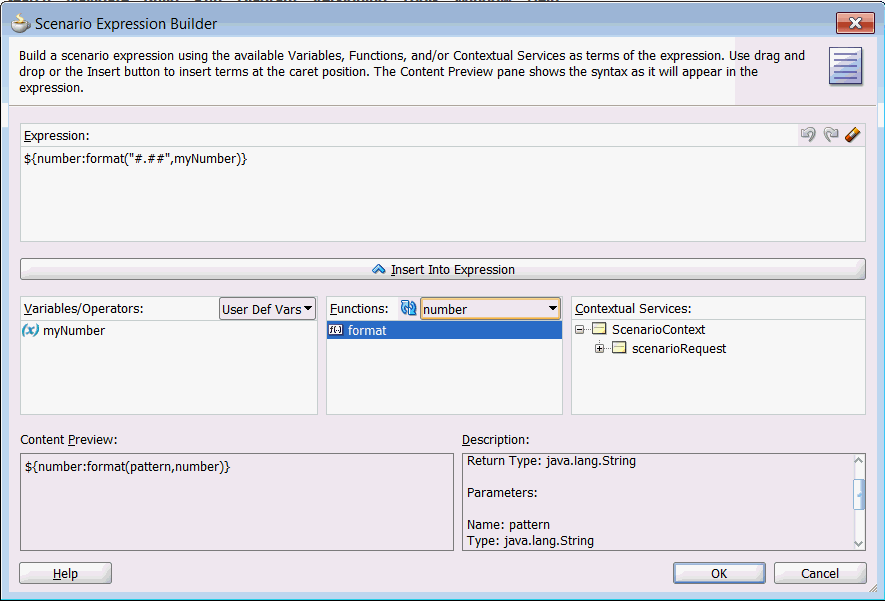
Description of "Figure 68-9 Scenario Expression Builder Dialog"
The Expression field in the dialog is automatically filled in with the EL statement that allows you to pass variables to the function provider. The expression is:
${number:format(format,myNumber)}
To parse the expression:
-
numbers – The name of the function provider as provided in the function provider class annotation.
-
format – The name of the method, as provided in the method's annotation.
-
pattern – The name of the first parameter, as provided in the method's annotation. In this case, the parameter is of type String, as indicated in the Description. As you can see in the function parameter's implementation, this string is a pattern that represents how you want the number to be formatted. This parameter comes from the Java class DecimalNumber. For more information, refer to the Javadoc for that class.
-
number – The name of the second parameter, as provided in the method's annotation. In this case, the parameter is also of type String. It's just a number represented as a string.
For more information on using the scenario editor and the Expression Builder, see Chapter 66, "Authoring Personalized Scenarios in JDeveloper."
