Changes to the physical layer of the Oracle BI repository include importing Essbase cubes, converting multiple hierarchies into one hierarchy, creating measures and flattening dimensions, creating LedgerId attribute in ledger dimension of each cube, and renaming dimensions and hierarchies.
After GL cubes are generated in Essbase, the BI Administrator must configure the connection (see Additional Links). The administrator must also import the cube and map the contents to the logical layer.
Follow these steps to import Essbase cubes into the physical layer of Oracle BI EE.
 To import Essbase cubes:
Select Connection Type Essbase, provide Essbase Server details, user name, and password, and then select Next.
Each cube is uniquely defined by the Chart of Accounts and Accounting Calendar. Select the cubes from Data source View, and move them to Repository View.

Leave the Import UDAs check box clear. If selected, Oracle BI EE creates measures of Account Dimension when converting from multiple Hierarchies to Single Hierarchy view. See Converting Multiple Hierarchies into One Hierarchy.
Selected cubes are imported into the physical layer of Oracle BI EE as highlighted in the figure below:
After the cubes are imported, you must make these changes in the physical layer:
Note: | The following sections illustrate the modeling of one cube. Follow the same steps for all imported cubes. |
By default, when imported, the cubes resemble the Essbase hierarchy. Figure 35, Dimension with Multiple Hierarchies displays the Company Dimension after import.

You must convert multiple hierarchies into one hierarchy.
Use the following steps to create measures by flattening the Balance Amount Dimension.
To create measures and flattening dimensions:
Double-click the db (Cube Table Object) and go to the Hierarchies tab.
Double-click the Balance Amount dimension and change the Dimension Type from other to Measure Dimension and select OK twice to close all open dialog boxes. The following figure is an example.
Right-click Database and select Convert measure Dimension to Flat Measures. All measures based on the Balance Amount Dimension are displayed in the physical layer.
Ledger ID is the primary key in the Business Model and Mapping layer and must be mapped from the physical layer. Ledger ID is not available as an attribute of Ledger dimension in the Essbase cubes after import. You must manually create Attributes.
To create the Ledger ID attribute:
Right-click the Ledger Dimension and select Create Columns For Alias Table.
Select LEDGER_ID_ALIAS from the list. Ledger_id is added to all the levels of Ledger Dimension.
Similarly, add the Default alias (Select Default) in step 2, which provides the Ledger Description.
Default Alias is added to all levels of the Ledger dimension.
Essbase dimension and hierarchy names in the physical layer of the Essbase cube do not match those in the Business Model and Mapping Layer Model; therefore, Essbase cube dimension and hierarchy names must be changed so that their names are based on the mapping between the segment labels to BI objects done in Fusion OLTP. This must be done in order for the Drag and Drop feature to work.
The renaming of Essbase qualified segment dimensions and hierarchies should follow the guidelines in Table 5, Qualified Segment Names.
Table 5. Qualified Segment Names
Essbase Segment Name | Segment Label Code (Defined in OLTP) | Modified Dimension Name | Modified Hierarchy Name |
|---|---|---|---|
Company | GL_BALANCING | Dim - Balancing Segment | Balancing Segment |
Account | GL_ACCOUNT | Dim - Natural Account Segment | Natural Account Segment |
Department | FA_COST_CTR | Dim - Cost Center | Cost Centers |
If a non-qualified segment dimension is present in an Essbase cube, then the dimension name should be renamed to Dim - GL Segmentx, and the hierarchy to GL Segmentx where x is a value from 1 to 10, depending upon which dimension it is mapped to in Fusion OLTP.
For example, if Product Dimension is mapped to GL Segment 1, then Product Dim is renamed to Dim-GL Segment1 and Hierarchy is renamed to GL Segment1 in the physical layer. In addition, for non-qualified segment dimensions, rename the code attributes inside the dimension to match attributes of GL SegmentX in the Business Model and Mapping layer. (See Figure 36, Renaming Non-qualified Segment Dimensions.)

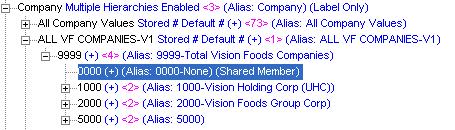
Note: | The attributes ending with Memnor, Ancestor Ref, and Member Key are not renamed, because they are deleted. See The Business Model and Mapping Layer Changes. For dimensions that share members across hierarchies, clear Use Unqualified Name for better performance . If you fail to do so, unknown member errors can occur. |
Figure 37, Company Dimension with Shared Members shows a company Dimension with shared members.
The renaming of dimensions other than Segment Dimensions should follow the guidelines in Table 6, Dimensions other than Segment Dimensions.
To rename hierarchies and dimensions:
For the company Dimension (Renamed Dim–Balancing Segment), in the physical layer of the Oracle BI repository, double-click the dimension and select the Hierarchies tab.
Select the hierarchy and clear Use unqualified name for better performance as shown in Figure 38, Physical Hierarchy - Dim - Balancing Segment.
Click OK in the Physical Dimension-Balancing Segment dialog box.
Note: | Do not rename the External name. |